1
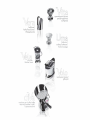
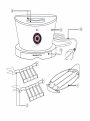
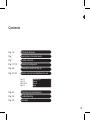
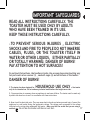
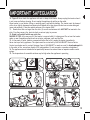
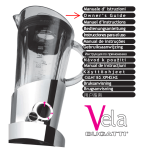
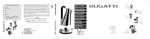
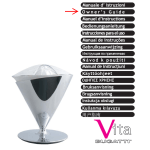
IMPORTANT NOTICES
Dear Customer, thank you for choosing Volo, the toaster from Casa Bugatti. Like any domestic
appliance, this toaster must be used with care and attention to prevent people getting burnt
and the toaster getting damaged.
BEFORE USING THE TOASTER FOR THE FIRST TIME,
READ ALL THE INSTRUCTIONS ON INSTALLATION,
USE AND MAINTENANCE AND THE SAFETY
INSTRUCTIONS
CAREFULLY.
DO NOT USE THE TOASTER UNLESS YOU ARE THOROUGHLY FAMILIAR WITH THE INSTRUCTIONS.
WARNING
No liability is accepted for damage due to:
-
incorrect use or use other than for its intended purpose
using the toaster continuously without any bread at browning setting.
repairs carried out by unauthorised persons
use of non-original spare parts or accessories
Use of instructions for use
For further information, or in the event of problems that have not been sufficiently addressed
in these instructions, contact Customer Care at CASA BUGATTI .
SAVE THESE INSTRUCTIONS CAREFULLY SO
and
remember to pass them on to those who will use the toaster after you.
If the instructions are lost before you use the toaster, request the instruction booklet from
Customer Care at CASA BUGATTI or send an e-mail to [email protected].
On the first page of the cover
you will find the illustrations
relating to the text. Keep the
first page open as you read
the instructions on use.
14
Contents
Pag. 16
Technical features
Pag. “
Description of toaster parts
Pag. “
Toaster controls
Pag. 17/19
Important safeguards
Pag. 20
Installation and starting up
Pag. 21/23
Advice and recommedations on use
Pag. 21
Pag. 22
Pag. 22/23
Pag. 23
Toasting (go)
Reheat
Defrost
Bagel
Pag. 24
Cleaning and maintenance
Pag. 24
Troubleshooting
Pag. 25
Warranty
15
Techinical features
Power supply
Power rating
Dimensions
Body
Weight
Lenght of power supply cable
Thermal overload protection
Crumb tray
Certifications
Warranty
See rating plate underneath machine
See rating plate underneath machine
320 x 200 x h. 300 mm approximately
Pressed Solid Steel
2,8 Kg approximately
1,0 metri approximately
Built in
Included
See rating plate underneath machine
As per attached certificate
Description of toaster parts
Bun warmer
Sandwich cage
Slots for bread slices or for sandwich cage
Toaster body
Crumb tray
Power supply cable with plug
1
2
3
4
5
6
Toaster controls
Control dial
Go / Stop button
Defrost button
Reheat button
Browning button
Bagel button
16
10
11
12
14
15
16
IMPORTANT SAFEGUARDS
READ ALL INSTRUCTIONS CAREFULLY. THE
TOASTER MUST BE USED ONLY BY ADULTS
WHO HAVE BEEN TRAINED IN ITS USE.
KEEP THESE INSTRUCTIONS CAREFULLY.
TO PREVENT SERIOUS INJURIES , ELECTRIC
SHOCKS AND FIRE TO PEOPLE DO NOT IMMERSE
CABLES, PLUGS, OR THE TOASTER ITSELF IN
WATER OR OTHER LIQUIDS, EITHER PARTIALLY
OR TOTALLY WARNING: DANGER OF BURNS!
PAY ATTENTION TO HOT SURFACES!
1.
Do not touch hot surfaces. Use handles or knobs. Use an oven glove when touching very
hot parts such as bun warmer (1) , sandwich cages (2) and all surfaces of the toaster:
DANGER OF BURNS!
HOUSEHOLD USE ONLY .
2. The toaster has been designed for
Use toaster
only for its intended use. Do not make any technical modifications that might cause risks.
3. Close supervision is necessary when any appliance is used near children. The toaster must be used only
by adults who know how to use it in accordance with these instructions.
4. Never touch live electrical parts. They may cause electric shocks and serious personal injury. Connect the
appliance to a wall socket having the appropriate voltage. The voltage must correspond to the voltage
indicated on the rating plate underneath the toaster. Make sure that the socket that you are using is
17
earthed
. Do not use the toaster with bare or wet feet.
IMPORTANT SAFEGUARDS
5. Figure A: power cable with plug. A short power cable with plug is supplied to reduce the risk that it could
become entangled in objects, people could trip over it and that it could wrap itself around a longer cable.
Long detachable power cables or extension cables are available but they may be used only if a QUALIFIED
ELECTRICIAN can confirm that they comply with wiring regulations. DO NOT USE plug/socket adapters.
If a long detachable power cable or extension cable is used:
a)The electrical rating of the detachable power cable or extension cable should be at least as great as the
electrical rating of the toaster indicated underneath the toaster itself.
b)The extension cable must be of the 3-wire/pole type and must be earthed .
A long cable or extension cable must never protrude from furniture or over counter tops or table tops where
it may be pulled on by children or tripped over.
c)Do not place toaster or cables on or near a hot gas ring or electric hotplate, or in or near the oven.
d) Do not use outdoors.
Do not let the cables hang over the edge of the table or counter, or touch hot surfaces.
Do not operate the toaster with a damaged cord or plug or after the appliance develops faults, or has been
damaged in any manner. Return appliance to the nearest authorized service facility for examination or repair.
The use of accessory attachments not recommended by the appliances manufacturer may result in fire,
electric shock or serious injuries to persons
6. Figure B: Make sure that children cannot play with the toaster. Children are not aware of the dangers of
electrical appliances.
7. Place the toaster on a flat surface, making sure that the feet adhere firmly to the support surface
so that the appliance cannot be overturned.
Do not place the toaster on or near hot surfaces or near naked flames.
8. Figure C: Pay attention to hot surfaces. Use handles or knobs or wear oven gloves. Be very careful when
touching very hot parts such as bun warmer(1) , sandwich cages (2) and all surfaces of the toaster.
Absolutely never put your fingers in the slots (3). Never try to remove bread slices from the slots (3) with
the toaster plugged into the electric power supply.
WARNING! DANGER OF BURNS! The areas surrounding the slots (3) become very hot during use.
9. Figure D: To ensure that the toaster works correctly, place it on a flat surface in an adequately
lighted and hygienic environment with an easily accessible electrical socket. Keep the toaster at least
10 cm away from the walls.
18
IMPORTANT SAFEGUARDS
10. Figure E: Never touch the appliance with wet or damp cloths/hands. Always unplug the toaster when it
is not in use and before cleaning. Do not unplug the appliance by pulling on the cable.
Allow toaster to cool before fitting or removing parts, and before cleaning. The toaster must be cleaned
with a dry or slightly dampened non-abrasive cloth soaked with a few drops of neutral non-corrosive detergent
(never use solvents). Clean the outside surfaces of the toaster ONLY.
11. Bread slices that are larger than the slots (3) as well as aluminium foil MUST NOT be inserted in the
slots (3) as they cause a fire, electric shock or serious injury to persons.
12. Bread is a foodstuff which may catch fire.
DANGER OF FIRE: A fire may occur if the toaster is covered whilst it is being used. Do not use the toaster
under or near flammable material such as curtains, wallpaper, walls and the like.
13. In the event of faults, defects or suspected faults after a fall, unplug the toaster immediately.
Never start up a faulty appliance. The repairs must be carried out by the CASA BUGATTI Service Centre.
Contact your dealer and/or contact Customer Care at CASA BUGATTI or send an e-mail to [email protected].
In the event of fire, use carbon-dioxide (CO2) extinguishers. Do not use water or powder extinguishers.
14. The appliances are not intended to be operated by means of an external timer or separate remote-control
system.
15. The temperature of accessible surfaces may be high when the appliance is operating
A
!
!
C
E
!
®
!
®
D
®
B
19
Installation and starting up
The original packaging has been designed for dispatch by post. Keep it in case you need to return the toaster
to the supplier. Before installing the toaster, comply with all the points of the safety instructions on the
previous pages.
After removing the toaster from its packaging, make sure that it is in perfect condition and make sure that
no kind of matter, packaging material, warranty sheets or the like have accidentally fallen inside the slots
(3) during transport or when opening the packaging.
The plastic bag in which the toaster is packaged should be kept out of reach of children as it poses a suffocation
hazard.
In order to remove dust that may have accumulated on the toaster, simply dust it off with a dry soft cloth.
After you have carried out the above steps and have strictly followed the safety standards, proceed to
connect to the power supply.
Connecting to power supply: electric current can kill! Follow safety instructions strictly. Plug the power
cable (6) of the Volo toaster into a power socket, the voltage of which corresponds to the voltage
indicated on the rating plate underneath the toaster.
To disconnect, make sure that the toaster is not running or press the Stop button (11) and wait for the
toaster to stop and for the Go/Stop button light to stop blinking . Remove the plug from the wall socket
when the red light stops blinking. Do not unplug the toaster from the power point by pulling on the
cable.
Make sure that the electric socket that you are using is suitably earthed
.
Never use faulty or damaged power cables. Use an extension cable only after making sure that it is in perfect
condition (adhere strictly to the safety instructions specified in point 5).
Never allow parts carrying live voltage to come into contact with water: you may cause a short circuit!!!
(adhere strictly to all points of the safety instructions specified above).
The toaster may emit a pungent odour or light smoke the first time you use it. This is a normal result of the
manufacturing process. The odour or smoke is harmless and will quickly disperse. Running the toaster
without bread may damage the toaster irreparably and thus automatically void the warranty.
20
Advice and recommendations on use
1) Adhere strictly to all safety, installation and commissioning instructions specified above.
2) When the plug (6) is inserted into the socket Volo emits a “beep” tone and the red light on the Go/Stop
button (11) will light up This is a very important feature which indicates that the toaster is connected to
the power supply .
3) If no buttons are pressed for 5 minutes, the toaster goes into “sleep” mode, but the red light on the
Go/Stop button (11) remains ON to warn that the toaster is plugged into the electric power supply. To resume
operations, press the browning button (15).
4) Do not toast very thin or broken bread slices.
5) Do not toast food which may drip during the toasting/cooking process. In addition to making cleaning
more difficult, dripping may cause fire and electric shocks.
6) It is also extremely important to remove all crumbs and drops from the crumb tray before using the
toaster.
7) Bread slices that are greater than the slots (3) MUST NOT be inserted into the slots (3). DO NOT insert
any types of aluminium foil or kitchen utensils into the slots (3) as they may cause fire, electric shock and
grave injury to persons.
8) Do NOT use the toaster unless the crumb tray (5) is correctly inserted into the toaster body (4). After
using the toaster, always unplug it and empty the crumb tray (5) in accordance with the CLEANING and
MAINTENANCE instructions.
9) When you use the sandwich cages (2), make sure that the bread slices or sandwiches touch the bottom
of the cages.
If the bun warmer (1) is used to heat bread, croissants or other types of buns, make sure that you place the
bun warmer (1) correctly and stably on the top of the toaster body (4). Put the food on the bun warmer (1)
and use the toasting function (see Toasting function below) or reheat function (see Reheat function below).
When you are using the bun warmer (1) do not use and do not insert the sandwich cages (2) into the slots
(3).
A) TOASTING FUNCTION
1) Insert the bread slices into the slots (3) of the toaster or put the bread slices/sandwiches into the sandwich
cages (2). Put the sandwich cages (2) into the slots (3). Also you can use this function to heat bread or
croissants and buns on the bun warmer (1). When you are using the bun warmer (1) do not use and do not
insert the sandwich cages (2) into the slots (3).
2) Select toast ”colour”: Volo gives you the choice of 6 different grades of browning, from 1 to 6. Each time
the browning button (15) on the control dial (10) is pressed, Volo emits a “beep” tone and the red lights on
the panel light up that correspond to the number indicating the browning level: the higher the number, the
higher the browning level.
3) When the Go/Stop button (11) is pressed, you hear a “beep” tone and the red light on this button starts
to blink (to indicate that the toaster is operating). The carriage holding the bread slices or the sandwich
cages (2) automatically descends into the toaster slots (3) and toasting starts.
When the toasting is finished Volo emits three “beep” tones and the carriage holding the bread slices or
the sandwich cages (2) automatically ascends slowly. The red light on the Go/Stop button (11) stops blinking
(toasting function concluded) but remains ON to warn that the toaster is plugged into the electric power
supply.
21
5) If you want to stop the toasting function before the set browning level is reached, press the Go/Stop
button (11) and the carriage holding the bread slices or the sandwich cages (2) will slowly ascend. The red
light on the Go/Stop button (11) stops blinking (function concluded) but remains ON to warn that the
toaster is plugged into the electric power supply.
6) Do not remove the bread slices or the sandwich cages from the slots (3) until they have completed their
ascent. If the bread is positioned on the bun warmer, three “beep”tones will warn that the operation has
terminated and that it is possible to remove the bread from the bun warmer. WARNING: use handles or
knobs or wear oven gloves when touching any of the surfaces of the toaster, including the bun warmer (1)
and the sandwich cages (2).
B) REHEAT FUNCTION
1) Insert the bread slices into the slots (3) of the toaster or put the bread slices/sandwiches into the
sandwich cages (2). Insert the sandwich cages (2) into the slots (3). You can also use this function to heat
bread and croissants on the bun warmer (1): when you are using the bun warmer(1) do not use and do not
insert the sandwich cages (2) into the slots (3).
2) Press the reheat button (14) to select the reheat function. A blue light on the reheat button (14) will
light up to indicate that the function has been selected.
3) Press the Go/Stop button(11). You will hear a “beep” tone and the red light on this button will start to
blink to warn that the toaster is operating. The carriage holding the bread slices or the sandwich cages (2)
descends slowly and automatically into the toaster slots (3). The reheat function starts and continues for
a time set by the electronic card.
4) When the reheat function has finished, Volo emits three “beep” tones and the carriage holding the bread
slices or the sandwich cages (2) slowly ascends automatically. The red light on the Go/Stop button (11)
stops blinking (reheat function concluded) but remains ON to warn that the toaster is plugged into the
electric power supply.
5) To stop the reheat function before the set time, just press the Go/Stop button (11): the carriage holding
the bread slices or the sandwich cages (2) slowly ascends automatically. The red light on the Go/Stop
button (11) stops blinking (reheat function concluded) but remains ON to warn that the toaster is plugged
into the electric power supply.
6) Do not remove the bread slices or the sandwich cages from the slots (3) until the bread slices or sandw
ch cages have completed their ascent. If bread is placed on the bun warmer three “beep” tones will be
heard to warn that the bread is ready and can be removed from the bun warmer(1).
WARNING: use handles or knobs or wear oven gloves to handle all hot surfaces of the toaster, including the
bun warmer (1) and the sandwich cages (2).
C) DEFROST FUNCTION
1) Insert the slices of frozen bread into the slots (3) of the toaster or put the frozen sandwiches into the
sandwich cages (2) and insert the sandwich cages (2) into the slots (3).
2) Press the defrost button (12) to select the defrost function. A blue light on the defrost button (12) will
light up to indicate that the function has been selected.
3) Select toast “colour” : Volo gives you the choice of 6 different levels of browning, from 1 to 6. Press the
browning button (15) on the control dial (10). Each time that the button (15) is pressed, Volo emits a “beep”
tone and the red lights on the control dial will light up that correspond to the numbers indicating the chosen
browning level. The higher the number selected, the higher the browning level.
21
22
Advice and recommendations on use
4) In defrost mode Volo will automatically lengthen the cooking cycle to enable the bread slices/ sandwiches
to be defrosted first and then toasted.
5) Press the Go/Stop button (11). Volo will emit a “beep” tone and the red light on this button will start to
blink to warn that the toaster is operating. The carriage holding the bread slices or the sandwich cages (2)
automatically descends slowly into the toaster slots (3) and the defrost function starts.
6) When the toasting function is finished Volo emits three “beep” tones and the carriage holding the bread
slices or the sandwich cages (2) slowly ascends automatically. The red light on the Go/Stop button (11) stops
blinking (function concluded) but remains ON to warn that the toaster is plugged into the electric power
supply.
7) If you want to stop the toasting function before the set browning level is reached, press the Go/Stop
button (11) and the carriage holding the bread slices or the sandwich cages (2) slowly ascends automatically.
The red light on the Go/Stop button (11) stops blinking (function concluded) but remains ON to warn that
the toaster is plugged into the electric power supply.
8) Do not remove the bread slices or the sandwich cages from the slots (3) until the bread slices or sandwich
cages have completed their ascent.
D) BAGEL FUNCTION for toasting just one external surface of the bread/bun
1) The Bagel function is for bagels and other kinds of buns. This function enables just one of the two surfaces
of the bun or bread slice to be toasted that is inserted into the slots(3). In this way you have one toasted
and crunchy side whilst the other side is soft.
2) Insert the buns / bread slices into the slots (3) of the toaster or put them into the sandwich cages (2)
and position the two sandwich cages (2) in the slots (3).
3) Press the bagel button (16) to select the bagel function. A blue light on the bagel button lights up to
indicate that the function has been selected.
4) Select toast “colour” : Volo gives you the choice of 6 different levels of browning, from 1 to 6. Press the
browning button (15) on the control dial (10). Volo will emit a “beep” tone each time that the button (15)
is pressed and the red lights will light up that correspond to the browning level. The higher the number
selected, the higher the browning level.
5) Press the Go/Stop button (11). You will hear a “beep” tone and the red light on this button will start to
blink to warn that the toaster is operating. The carriage holding the bread slices/buns or the sandwich cages
(2) automatically descends into the toaster slots (3) and the bagel toasting phase starts.
6) When the bagel toasting phase has finished Volo emits three “beep” tones and the carriage holding the
bread slices/buns or the sandwich cages (2) slowly ascends automatically. The red light on the Go/Stop
button (11) stops blinking (bagel function completed) but remains ON to warn that the toaster is plugged
into the electric power supply.
7) If you want to stop the bagel toasting function before the set browning level is reached, press the Go/Stop
button (11) and the carriage holding the bread slices/buns or the sandwich cages (2) slowly ascends
automatically. The red light on the Go/Stop button (11) stops blinking (bagel function completed) but remains
ON to warn that the toaster is plugged into the electric power supply.
8) Do not remove the bread slices/buns or the sandwich cages from the slots (3) until the bread slices/buns
or sandwich cages have completed their ascent.
23
Cleaning and maintenance
ALWAYS UNPLUG THE TOASTER WHEN IT IS NOT IN USE AND BEFORE CLEANING IT. DO NOT
UNPLUG THE TOASTER BY PULLING ON THE CABLE.
DO NOT IMMERSE CABLES, PLUGS OR THE TOASTER IN WATER OR OTHER LIQUIDS, EITHER
PARTIALLY OR TOTALLY.
1) Before cleaning the toaster, unplug it. Do not unplug it by pulling on the cable.
2) Wait for the toaster to cool before fitting or removing parts and before cleaning the toaster.
3) Clean only the outside surfaces of the toaster.
4) The toaster must be cleaned with a dry or slightly dampened non-abrasive cloth soaked with a few drops
of neutral non-corrosive detergent (never use solvents).
5) The control dial (10) containing the control and operating buttons must be cleaned only with a soft and
dry cloth.
6) After the bun warmer(1) has been removed from the body of the toaster (4) it can be washed by hand
with water and neutral detergents. Before it is positioned in the upper part of the toaster body (4) to be
used again make sure that it has been dried completely.
7) After the two sandwich cages (2) have been removed from the body of the toaster (4) they can be washed
by hand using neutral detergents. Before they are inserted into the slots (3) of the toaster to be used again
make sure that they have been dried completely.
8) To clean the crumb tray (5), just carry out the following steps:
a) Remove the crumb tray (5) from the toaster body (4) by pulling it out of its recess.
b) Wash all the surfaces by hand and with neutral detergents.
c) Make sure that it has been dried completely before fitting it into the toaster again. Be sure to
insert the crumb tray into its guides.
9) If bread gets stuck in the slots, follow these simple instructions for removing it:
a) Remove the plug from the socket. Do not unplug the toaster by pulling on the cord.
b) Turn the toaster body (4) upside down and shake it gently until any residue drops out of it
without any outside help.
c) Do NOT insert forks or other utensils into the slots (3) to remove the bread or food residue as
it could damage the heating elements and cause serious damage to persons and things. Such damage
may give the next person to use the toaster an electric shock or gravely injure that person.
Troubleshooting
If the Volo toaster develops faults or defects or if irregularities are suspected, unplug it immediately.
If you cannot eliminate the fault by following the instructions in this manual, contact Customer Care
at CASA BUGATTI. Repairs carried out incorrectly expose the user to grave danger. No liability is accepted
for damage or injury caused by repairs carried out incorrectly and in such cases warranty rights are
voided.
Operating the toaster without bread may damage it irreparably and automatically void warranty rights.
24
WARRANTY
1) A warranty is deemed to be the replacement or repair free of charge of the parts making up the toaster
that were faulty at the time of purchase due to manufacturing faults.
2) In the case of irreparable or repeated faults which are due to manufacturing faults as above, at the
manufacturer’s sole discretion, the machine will be replaced.
3) The warranty does not cover damage due to:
a) incorrect or faulty use
b) defects caused by accidental breakages or carelessness
c) failure to follow instructions and warnings, incorrect installation and maintenance
d) maintenance and/or modifications performed by unauthorised personnel
e) use of non-original spare parts
f) carriage
g) running any toaster function whilst the toaster is empty (without bread)
h) any other circumstance that cannot be ascribed to manufacturing faults. Any claims not envisaged
by law are excluded.
4) The warranty does not cover damage due to improper use and in particular due to non-domestic use.
5) The manufacturer accepts no liability for any direct or indirect harm or injury to persons, things and
domestic animals that may arise from failure to abide by all the safety instructions contained in this manual,
especially failure to abide by the instructions on installation, use and maintenance of the toaster.
6) Replacement or repair shall not extend the warranty period. The warranty does not cover the replacement
of consumables, such as the resistances, etc.
7) The warranty runs from the date of receipt of evidence of purchase and of receipt of the warranty card
by CASA BUGATTI.
SERVICE CENTRE
In the event of a toaster fault, contact an authorised BUGATTI dealer, who will return the toaster to the
manufacturer.
The purchaser is responsible for all carriage and/or dispatch costs for all repairs covered or not covered
by warranty. If possible, keep the toaster’s original packing for dispatch.
DISPOSAL OF THE PRODUCT IN CONFORMITY TO EUROPEAN DIRECTIVE 2002/96/EC.
At the end of its working life the product must not be disposed of alongside urban waste. It can be delivered
to local-authority separated waste collection centres or to dealers who provide this service. Separated
disposal of a household appliance enables possible negative consequences for the environment and health
arising from improper disposal to be eliminated and enables the materials of which it is made to be recovered
in order to make significant power and resource savings. The symbol of a moveable waste bin marked with
a cross displayed on the product indicates that as a household appliance it must be disposed of separately.
25
(DE) Alle Details des Textes wurden gewissenhaft geprüft. Das Unternehmen behält sich das Recht vor, Klarstellungen bereit zu stellen, falls im Text Druckfehler oder irreführender Informationen auftreten. Achtung: Das
Unternehmen aktualisiert die Produktdetails in diesem Handbuch fortlaufend, einschließlich der Überarbeitung
der technischen Daten, behält sich jedoch das Recht vor, Änderungen ohne vorherige Ankündigung vorzunehmen. Das Aussehen, die Form und Farbe des Produktes basieren auf dem realen Standardprodukt.
(ES) Todos los detalles del texto han sido revisados cuidadosamente. Nuestra compañía se reserva el derecho
de proveer aclaraciones en el caso de que el texto contenga errores tipográficos o informaciones erróneas.
Cuidado: Nuestra compañía se encarga de la actualización de todos los detalles del producto mostrados en el
manual, incluyendo las especificaciones técnicas. No obstante se reserva la facultad de revisar el manual sin
aviso previo. La perspectiva, la forma y el color del producto se inspiran al producto real estándar.
(PT) Todos os detalhes do texto foram devidamente verificados. A nossa empresa reserva-se o direito de
fornecer qualquer outro esclarecimento no caso em que o texto apresente gralhas ou informações pouco claras.
Atenção, A nossa Empresa mantém atualizados os detalhes do produto constantes no manual de instruções,
incluindo as revisões das caraterísticas técnicas; reserva-se a faculdade de efetuar modificações sem pré-aviso.
A prospetiva, a forma e a cor do produto foram inspiradas no produto real padrão.
(NL) Alle details van deze tekst zijn zorgvuldig gecontroleerd. Het bedrijf behoudt zich het recht voor om
toelichting te bieden m.b.t. de tekst in het geval van drukfouten of misleidende informatie.Opmerking: Het
bedrijf werkt de details van het product in deze handleiding bij, met inbegrip van de herziening van de technische specificities en behoudt zich het recht voor om wijzigingen aan te brengen zonder waarschuwing vooraf.
Het voorkomen, de vorm en de kleur van het product zijn gebaseerd op het huidige product.
(RU) Вся информация, изложенная в данном тексте, была тщательно проверена. Компания оставляет
за собой право на предоставление любых пояснений, если в тексте имеются опечатки или же вводящая
в заблуждение информация.Внимание: Компания обновляет информацию об изделии, содержащуюся в
инструкции, включая пересмотр технических характеристик. Тем не менее, она оставляет за собой право
на внесение изменений без предварительного уведомления. Вид, форма и цвет изделия похожи на его
реальный, стандартный вариант.
(CS) Všechny detaily obsažené v textu byly pečlivě zkontrolovány. Firma si vyhrazuje právo poskytnout veškerá
ujasnění v případě tiskových chyb nebo zavádějících informací.Pozor: Firma aktualizuje detaily týkající se
výrobku obsažené v tomto návodu k používání, včetně revizí technických specifikacích. Nicméně si vyhrazuje
právo na provedení změn bez předchozího upozornění. Perspektiva, tvar a barva výrobku jsou inspirovány
standardním skutečným výrobkem.
(RO) Toate detaliile textului au fost atent verificate. Fabrica isi rezerva dreptul de a furniza orice clarificari in
cazul in care exista in text erori de imprimare sau informatii care induc in eroare.Atentie: Fabrica actualizeaza
detaliile despre produs prezente in manualul de instructiuni, inclusiv revizuirea specificatiilor tehnice. Cu toate
acestea, isi rezerva dreptul de a aduce modificari fara aviz in prealabil.In perspectiva, forma si culoarea produsului se inspira din produsul standard real.