1
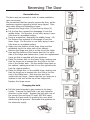
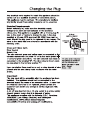
赵昌玉
2012.3.14
(CE-BCD 237-S)
黄 慧
8
413860
⑥
更换新LOGO,自2011.12.2开始执行
2011.12.2
杨静静
自2011.12.19日开始,冷媒由45更改为43g.
2011.12.19
杨静静
自订单412869开始,噪音更改为47dB
2012.3.14
赵昌玉
冷媒改为47g,即日采用。
2012.3.30
赵昌玉
7
自订单413721开始封面及内文第3页增加型号。
2012.5.6
赵昌玉
8
自2012.7.5起更改说明书内容,在第2页第4页
2012.7.5
何邦君
USER GUIDE
TF5517W/B/S
Contents
For your safety . . . . . . . . . . . . . . . . . . . . . . . . . . . . . . . . . . . . . . . . . . . . . . . . . . . . . 1
About your product . . . . . . . . . . . . . . . . . . . . . . . . . . . . . . . . . . . . . . . . . . . . . . . . . . 3
Installing your appliance. . . . . . . . . . . . . . . . . . . . . . . . . . . . . . . . . . . . . . . . . . . . . . . 4
Using your appliance . . . . . . . . . . . . . . . . . . . . . . . . . . . . . . . . . . . . . . . . . . . . . . . . . 5
Care & cleaning . . . . . . . . . . . . . . . . . . . . . . . . . . . . . . . . . . . . . . . . . . . . . . . . . . . . . 8
Troubleshooting. . . . . . . . . . . . . . . . . . . . . . . . . . . . . . . . . . . . . . . . . . . . . . . . . . . . . 9
Reversing the door. . . . . . . . . . . . . . . . . . . . . . . . . . . . . . . . . . . . . . . . . . . . . . . . . . 10
Changing the plug . . . . . . . . . . . . . . . . . . . . . . . . . . . . . . . . . . . . . . . . . . . . . . . . . . 11
Service record and Customer Care. . . . . . . . . . . . . . . . . . . . . . . . . . . . . . . . . Back cover
For Your Safety
Disposal of old appliances
Before disposing of an old appliance, make sure that you
have broken off, or disabled any locking mechanisms to
prevent children becoming accidentally locked inside.
Remove any plugs and power leads to ensure that the
appliance is inoperative.
Please note: This symbol means that products
bearing it may not be disposed of with household
waste.
The refrigeration system contains insulating gases and
refrigerant which will require specialist disposal. Most
components can be recycled. Always contact your local
council or authority for information regarding the correct
disposal/removal of old appliances, do not dispose of with
household waste.
Warning: When disposing of an old appliance make sure
that the pipe work does not become damaged.
Packaging
All of the packaging supplied with your appliance can be
recycled, or disposed of without any harm to the
environment.
Cardboard may be crushed, or cut into smaller pieces if
required for recycling or disposal. The polythene and
polystyrene included contain no CFC’s, and are
environmentally friendly.
For further information on recycling, contact your local
council or authority.
Before installing and using your new appliance
Read through the instructions supplied with your
appliance - failure to install or use this appliance in
accordance with the instruction book may invalidate
any warranty.
The manufacturer does not accept any liability for
damage caused through improper use, or incorrect
installation.
Do not install this appliance if it has been damaged
during transportation. This includes the plug and
power supply cord.
Always install this appliance in line with these
instructions.
Always read these instructions fully before using the
appliance for the first time.
1
Warning: Do not allow the refrigerant circuit to become damaged while using or
installing. Should it become damaged, do not use the appliance until you are instructed
to do so by a service engineer. Refrigerant can ignite or cause damage to the eye when
leaking.
● Warning: Always remember to unplug the appliance before cleaning.When disconnecting from the electricity supply, pull the plug, not the powe rcord.
● Warning: Do not use any electrical appliance inside the food storage area - unless they are recommended by the manufacturer.
● Warning: All electrical repairs must be carried out by a qualified electrician. Inadequate repairs may result in in a major source of danger for the user and invalidate any
warranty.
● Warning: Never store anything dangerous inside the appliance, such as combustibles,
explosives, strong acid and alkali etc. Alcoholic beverages must be stored upright in an
air tight container in the refrigerator. Never store alcohol in a freezer.
● Warning: When defrosting the appliance, never use sharp or pointed metal implements.Always use a plastic scraper. (see Defrosting for moreinformation).
● Warning: Always keep any ventilation openings clear of obstruction. Should they become blocked, clear them straight away.
● Warning: Do not allow children to play, sit or hang onto any part of the appliance.
● Warning: This appliance is intended for domestic use only, for food refrigeration, food freezing and frozen food storage.
● Warning: Make sure that the plug is in an accessible place wheninstallation is complete remove all packaging.Only use this appliance for domestic purposes in accordance
with these instructions.
● Warning: This appliance is not intended for use by persons (including children) with
reduced physical, sensory or mental capabilities, or lack of experience and knowledge,
unless they have been given supervision or instruction concerning use of the appliance
by a person responsible for their safety.
● Warning:Refrigerating appliances might not operate consistently when sited for an
extended period of time below the cold end of the the range of temperatures of the appliappliance.
● Warning:This appliance is not intended for use by persons (including children) with
reduced physical, sensory or mental capabilities, or lack of experience and knowledge,
unless they have been given supervision or instruction concerning use of the appliance
by a person responsible for their safety. Children should be supervised to ensure that
they do not play with the appliance.
● Warning:Keep ventilation openings, in the appliance enclosure or in the built-in structure, clear of obstruction.
● Warning: Do not use mechanical devices or other means to accelerate the defrosting
process, otherthan those recommended by the manufacturer.
● Warning:Do not damage the refrigerant circuit.
● Warning: Do not store explosive substances such as aerosol cans with a flammable
propellant in this appliance.
● Warning: When positioning the appliance ensure the supply cord is not trapped or
damaged.
● Warning:Do not locate extension sockets or charging transformers/power supplies
adjacen to the compressor as they could overheat.
●
About Your Product
3
Model Name: TF5517W/B/S
1
8
2
7
3
4
5
6
1
4
7
2
5
8
Control housing
Freezer drawer pan
Door pan low
Shelf
Power plug
3
6
Crisper
Leg leveler
Door pan up
Appliance dimensions
Technical Specification
Width (mm)
550
Depth ( mm)
595
Height (mm)
1725
Net volume (litres)
156 fresh food & 81 freezer
Energy Rating
A+
Freezing capacity
4kg / 24hrs
Climate Class
ST
Noise (dB (A) re 1 pW)
47 dBA
Refrigerant type
R600a (47g)
This appliance operates at a voltage of:
220 - 240V ~ 50Hz
Climate
Class
Ambient
Temp.
Range ˚C
SN
+10 to +32
N
+16 to +32
ST
+16 to +38
T
+16 to +43
Installing Your Appliance
4
Before you start
This appliance is intended to be used in households but is not intended to be used in
applications such as:
– Staff kitchen areas in shops, offices and other working environments;
– Farm houses and by clients in hotels,motels and other residential type environments
– Bed and breakfast type environments;
– Catering and similar non-retail applications
This appliance must stand vertically on a flat, even surface, to level the appliance
use the leveling feet by turning them until the appliance is as level as possible.
Do not install onto carpeted surfaces as this prevent adequate ventilation.
Install the appliance in a well ventilated room. The appliance should not be placed
near to any heat heat sources (cookers, heaters etc.) or in any unheated rooms
(garages, out houses etc.) as the ambient temperature affects the performance of
the appliance.
1a
Do not expose the appliance to damp conditions, open
air or rain.
Do not lift the appliance by the pipes or the door when
moving. Should the appliance become damaged, contact
Lec
Customer Care and do not use the appliance until you
are instructed to do so by a service engineer.
Getting started
Once you have installed your appliance in an appropriate
location, follow the start up procedure below:
Before you plug in the appliance, clean thoroughly the
inside, and any accessories with warm water and
bicarbonate of soda (0.5ml to 0.5 litres) and dry with a
soft cloth.
Leave the appliance to stand for 2 - 3 hours to allow
the refrigerant to settle following installation and
cleaning.
If the appliance has been transported horizontally, it
must be left to stand vertically for 12 hours before
installation.
Once dry, plug the appliance into the socket.
Turn the thermostat to the required setting - a medium setting is usually suitable.
Leave the appliance for at least 4 hours before storing
any food inside to allow a sufficient temperature to be
reached.
1b
Total space required in use
1175mm
Installation clearances
Allow 50mm clearance at the rear of the appliance and
adequate clearance on each side of the appliance and
over the top to ensure proper ventilation (see figures
1a and 1b) and use whichever dimensions suit your
installation requirements best.
955mm
Using Your Appliance
About the thermostat
The thermostat is located in the upper rear part of the
appliance.
To reduce the temperature inside the appliance, turn
the thermostat towards 6 maximum.
To increase the temperature inside the appliance turn
the thermostat towards 1 minimum.
Depending on the ambient temperature of the room
the appliance is in, you may need to adjust the
thermostat accordingly.
Making ice cubes
Fill the ice cube tray 3/4 full with water and place into
the freezer.
Place the tray onto a level suraface.
To remove ice cubes, twist the try or place under
running water for a few seconds to loosen.
Do not use sharp, pointed or metal implements to
remove the ice cube tray if it becomes frozen to the
fridge.
5
Using Your Appliance
Tips for using this appliance
Before storing cooked foods in the refrigerator, allow
them to cool to room temperature.
To maintain adequate air circulation, do not over fill
the appliance. If there is too much food inside, the
compressor does not work as effectively.
Do not open the door any more than necessary - this
will keep the temperature as cold as possible inside.
When storing frozen food in the freezer, make sure
that you follow the food manufacturers guidelines.
Ices and water ices should not be consumed straight
from the freezer - this can cause ice burns to the
tongue and hands.
Never touch the inside of the appliance, or any frozen
items with wet hands. This can cause injury to your
hands if they stick to cold surfaces.
Wrap or cover foods well before storing. Always make
sure that any packaging is air tight and suitable for
use inside a fridge or freezer.
Cooked meats and raw meats should be stored on
separate shelves, and raw meat should not be allowed
to drip onto other foods. Food which is to be frozen
should not be in direct contact with already frozen
food.
You may hear gurgling noises or a humming sound
while the appliance is in use and this is perfectly normal when the compressor is running and the coolant is
moving through the system.
A clicking sound may be heard, this is the thermostat
and is normal.
This appliance is designed to operate in an ambient
temperature between 16 and 38 ˚C.
Effervescent (fizzy) drinks should not be stored in the
freezer or low temperature compartments.
Do not exceed the storage times recommended by the
food manufacturer andd always check expiry dates.
Smaller portions of fresh food freeze quicker than
large portions. Divide large portions into smaller ones.
This helps to preserve the nutrients and quality of the
food.
Always allow warm food to cool down before freezing
it, preferably to room temperature.
Before you store large amounts of food in the freezer,
adjust the thermostat to the maximum (coldest) setting while the appliance freezes the food. After 24
hours, re-set the thermostat to the previous setting.
Only thaw the amount of food you need, once food
has been thawed cook it immediately.
6
Using Your Appliance
In the event of a power cut
If the power failure is 3 hours or less, food can remain
inside the appliance. Keep the door closed to maintain
the temperature inside.
If the power cut is longer than 3 hours, remove all food,
wrap well and store in a cool dry place.
Important: Be aware that the storage life of the food
will have been reduced. Use up this food as soon as possible or discard. Do not re-freeze food which has
thawed, either consume or cook and re-freeze if appropriate.
The drainage chanel
The drainage chanel collects water on the back wall of
the refrigerator and ensures that it is drained away into a
drip tray at the rear of the appliance.
7
Care & Cleaning
Before cleaning your appliance
You should always unplug this appliance before cleaning.
To clean your appliance
Once defrosted, remove the accessories inside and
clean the using warm water and a neutral detergent.
Do not place them in a dishwasher.
Clean the inside of the cabinet with warm water and a
neutral detergent, do not use harsh abrasives or
caustic cleaners.
Dry the inside of the cabinet with a soft, dry cloth.
Always make sure the inside of the appliance is dry
after cleaning.
Avoid getting water into the electric components of the
appliance (i.e. the thermostat), or spilling water on the
fridge.
When cleaning the door seals, use only warm soapy
water. Please use a mild soap and avoid damaging
the door seal as this will affect the performance of
your appliance.
Clean the outside of the appliance with warm, soapy
water and dry with a soft cloth. Any accumulation of
dirt and dust should be removed from the back and
bottom of the appliance to maintain adequate
ventilation.
If the appliance is not in use for a long period of time,
you should defrost and clean the appliance as detailed.
Make sure that it is dry, then unplug and leave the
door open to prevent unpleasant smells inside.
Clean the drainage channel regularly to prevent any
build up of impurities. Use a damp clean cloth and
wipe the cannel clean, then use a pipe cleaner or similar flexible object to clean the drainage hole to prevent
blockages.
Unhook and clean the drip tray occaisionally.
Please note: Regular turning off may shorten the life of
this appliance.
8
Troubleshooting
Before calling Lec Customer Care, please check the table
below to see if the problem can be solved without calling
for a Service engineer.
Problem
The fridge / freezer doesn’t work
Unusual noises
The temperature inside the
fridge / freezer is not cold
enough.
Solution
Check that the appliance is switched on
Check that the plug is not damaged
Check that the fuse has not blown
Check that the voltage is correct for the appliance
Turn the thermostat up higher
Check there has not been a power cut by checking the household
lights.
Check that the appliance is on a flat, level surface and is stable.
Check that nothing is coming into contact with the appliance.
Check that there is not too much stored in the appliance.
Check the frequency of door openings. If opened too often this can
cause the compressor to run for some time.
Check that the thermostat is set to a suitable temperature.
Check that the appliance is not in direct sunlight, or near a heating
source.
Check that the ventilation grille has not become blocked.
Check the ambient temperature is within the operation limits of the
appliance (16˚C - 38˚C)
Change the temperature setting to a more suitable setting.
The outer surfaces of the fridge
/ freezer are wet
Caused by condensation - dry the outer of the appliance carefully.
The inner surfaces of the fridge /
freezer are wet
The door is opened frequently, or kept open too long.
Caused by condensation - dry the inside of the appliance thoroughly.
Excess frost and ice has built up
inside the appliance.
Check that the door has not been left open.
Check that the door gasket is clean and undamaged.
The temperature inside the
appliance is too cold
Please note: Any damage caused by not following the
instructions within this handbook may lead to a charge
for a service engineer visit and any repairs carried out.
9
Reversing The Door
Reversible door
The door may be reversed in order to make installation
more convenient.
We recommend that two people reverse the door, as the
appliance requires supporting whilst being tipped. Take
care when fitting and tightening screws.
Remove the hinge cover (1) and the top hinge (2)
Lift the top door upwards to disengage it from the
middle hinge. Put the door to one side, laying it carefully down on a padded surface.
Using a screwdriver, dismantle the middle hinge. Lift
the freezer door upwards to disengage it from the
lower hinge. Put the door to one side, laying it carefully down on a padded surface.
Swap over the position of the lower hinge and the
adjustable leg to the other side of the cabinet.
Remove the hinge pins that is on the top of the fridge
door and the bottom of the freezer door.On the other
side of the fridge and freezer door, insert the replacement
hinge pin that is supplied with the appliance.
Place the freezer door on the lower hinge, making sure
that the hinge pin is inserted into the hole in the bottom of the freezer door. Put the middle hinge back on
the cabient, making sure that it is on the opposite side
from its original position.
Place the fridge door on the middle hinge, making sure
that the hinge pin is inserted into the hole in the bottom of the fridge door. Shut the door and then
replace the top hinge. Ensure that the top hinge pin is
inserted in the hole at the top of the fridge door.
Replace the hinge covers.
Changing the bulb
Pull the lamp forwards to gain access to the lamp
holder. Unscrew the light bulb in an anti clockwise
direction by the holder. Replace the bulb with one of
the correct size and type (15 watt, SES E14 base).
Replace the lamp cover by pushing the cover backwards along the grooves. Reconnect the appliance to
the electricity supply.
10
Service Record
12
Please record your model number and serial number in the space below.
Having these numbers to hand will help us to help you, quickly and more
efficiently.
When contacting us, please use the Customer Care number on the back
cover of this handbook
Model Number
Serial Number
Date of purchase
Installers stamp / Printed name
Date of installation
Place of purchase:
Date
Part(s) replaced
Engineers Stamp/
Printed Name