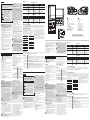
1
Prophet™ Sport Quattro 100Wx4 AC/DC Multi-Chemistry Battery Charger Instruction Manual | Bedienungsanleitung | Manuel d’utilisation | Manuale di Istruzioni English Ni-MH Charging NOTICE All instructions, warranties and other collateral documents are subject to change at the sole discretion of Horizon Hobby, Inc. For up-to-date product literature, visit horizonhobby.com and click on the support tab for this product. Meaning of Special Language The following terms are used throughout the product literature to indicate various levels of potential harm when operating this product: NOTICE: Procedures, which if not properly followed, create a possibility of physical property damage AND a little or no possibility of injury. CAUTION: Procedures, which if not properly followed, create the probability of physical property damage AND a possibility of serious injury. WARNING: Procedures, which if not properly followed, create the probability of property damage, collateral damage, and serious injury OR create a high probability of superficial injury. Safety Precautions and Warnings ARNING: Failure to exercise caution while using this product W and comply with the following warnings could result in product malfunction, electrical issues, excessive heat, FIRE, and ultimately injury and property damage. • Never leave the power supply, charger and battery unattended during use. • Never attempt to charge dead, damaged or wet battery packs. • Never attempt to charge a battery pack containing different types of batteries. • Never allow children under 14 years of age to charge battery packs. • Never charge batteries in extremely hot or cold places or place in direct sunlight. • Never charge a battery if the cable has been pinched or shorted. • Never connect the charger if the power cable has been pinched or shorted. • Never connect the charger to an automobile 12V battery while the vehicle is running. • Never attempt to dismantle the charger or use a damaged charger. • Never attach your charger to both an AC and a DC power source at the same time. • Never connect the input jack (DC input) to AC power. • Always use only rechargeable batteries designed for use with this type of charger. • Always inspect the battery before charging. 3 (DYN4110) WARNING: Read the ENTIRE instruction manual to become familiar with the features of the product before operating. Failure to operate the product correctly can result in damage to the product, personal property and cause serious injury. This is a sophisticated hobby product. It must be operated with caution and common sense and requires some basic mechanical ability. Failure to operate this Product in a safe and responsible manner could result in injury or damage to the product or other property. This product is not intended for use by children without direct adult supervision. Do not attempt disassembly, use with incompatible components or augment product in any way without the approval of Horizon Hobby, Inc. This manual contains instructions for safety, operation and maintenance. It is essential to read and follow all the instructions and warnings in the manual, prior to assembly, setup or use, in order to operate correctly and avoid damage or serious injury. Constant Current Charging Complete Alert Charging Complete LED COLOR • • • • • • • • Li-Po/Li-Fe battery cell count of 1 to 6 series cells. Ni-MH battery cell count of 1 to 8 cells. Output short-circuit, reverse polarity and over-current protection. DC input reverse polarity, high and low input voltage protection. Insulated, color coded, banana jack, power output terminals (Red = Positive (+), Black = Common or Negative (–)). • Internal cooling fans with grill covers. • Operating temperature range of 0°C to +50°C. • Meets IP43, IK07 environmental specs. • Rugged industrial plastic case. Specifications SOUND Blinking every 2 seconds Red LED Solid ON Yellow LED Solid ON Green LED Blinking once per second 5 times 1 beep per second 5 times All LEDs Solid ON K. Battery Capacity Indicator When charging begins, the 4-Digit LED Indicator (A) will cycle back and forth between the currently selected battery chemistry and the capacity data “0000”. After 30 seconds, the 4-Digit LED Indicator will only show the battery capacity. The battery capacity value (in mA) shown on the display will continue to increase as the charge cycle progresses. When charging is complete, it will display the final capacity added to the battery. EN The cell voltage will only be displayed for the actual number of cells in the battery. For example, if the battery is a 4S, then the charger will only display voltages for C-1 through C-4, at which point it would show the total battery voltage and charge capacity. If you push the Start/ Stop Button again during this sequence, the 4-Digit LED Indicator will show the present charge capacity data and resume normal operation. The cell voltages can also be displayed at any time following the completion of the charge cycle before the battery chemistry is changed, the battery is removed or another charge cycle is started. A. Charging Complete Yellow LED Solid ON Green LED Blinking once per second 5 times 1 beep per second 5 times All LEDs Solid ON DE A.4-Digit LED Indicator B.Green LED C. Yellow LED D.Red LED E. Battery Chemistry Switch F. Charge Current Dial G.Start/Stop Button H.Balance Circuit Adapter Board Connector I. Power Output Black (–) J. Power Output Red (+) K. Power Switch L. AC Power Input Port M.DC Power Input Port/APP Connectors B. C. D. E. F. G. H. I. J. Troubleshooting Guide When an error occurs, the Red LED (D) will blink and a beep will sound twice per second 10 times. Once the alert has sounded 10 times, the red LED will glow solid and the 4-Digit LED Indicator (A) will show the error condition that has been detected. Error Conditions A.4-Stellen LED Indikator B.Grüne LED C. Gelbe LED D.Rote LED E.Akkuwahlschalter F. Einstellrad Ladestrom G.Start/Stop Knopf H. Balanceboard Adapteranschluß I. Akku Anschluss Schwarz (–) J. Akku Anschluss Rote (+) K. Ein/Aus Schalter L. AC Spannung Eingang M.DC Spannung Eingang/APP Anschlüsse Channel 1 featured. Channel 2, 3 and 4 are the same as Channel 1. Kanal 2, 3, 4 sind identisch mit Kanal 1. Solution ‘-11-’ Dead cell or imbalance between cells is too high (over 0.3V) for safe charging ‘-22-’ Polarity (+ and -) connections of battery are incorrect for safe charging JST_XH Balance Adapter (4) ‘-33-’ Battery not connected correctly Ladeadapter Bananestecker zu EC3 Akkustecker (4) ‘-44-’ Charger has become too hot for safe charging ‘-55-’ Over-current or short-circuit condition on the battery 3 Im Lieferumfang mit enthalten AC Stromanschluß (eine Region US,EU, AU oder UK) optionales Zubehör JST_XH Balance adapter (4) DYN4012 - DC Anschlußkabel ‘-66-’ The Battery Chemistry Switch was moved to a different position during charging Banana plug to EC3™ battery connector (4) FEATURES ‘-77-’ The DC input voltage is too high or low for safe operation • Vier Ladeanschlüsse um gleichzeitig vier Akkus zu laden. Diese AC power cord (one region-US, EU, AU or UK) ‘-88-’ One cell of the battery pack is too high or too low for safe charging können aus verschiedenen Typen, Kapazitäten und Zellanzahlen Optional Accessories bestehen. DYN4012 - DC Power Cord • Li-Po, Li-Fe und Ni-Mh kompatibel, unabhängig von jedem Kanal FEATURES wählbar • Four charging ports to charge four batteries at once. Batteries can • Vier unabhäng einstellbare Ladestromkreise (0,1A bis 8,0 Ampere) be different chemistries, capacities and cell counts. • Vier unabhängige 4 Stellen LED Anzeigen zur Anzeige des Akkutyps, • Li-Po, Li-Fe and Ni-MH charging capability, independently selectable Ladekapazität, Zellspannung und Fehlercodes AC Input Voltage 100–240V AC (50-60Hz), 500W (Max) for each channel. • Drei LED Anzeigen pro Kanal (Rot, Gelb u. Grün) zur Anzeige des DC Input Voltage 11V–18V DC, 450W (Max) • Four independent, continuously adjustable charge rate dials (0.1A to Ladestatus und Fehlermeldungen Deutsch 8.0A). Output Max Voltage 25.2V, Max Charge Power • Akustikalarm WARNUNG: Lesen Sie die GESAMTE Bedienungsanleitung, HINWEIS • Four independent 4-digit LED indicators to display battery chemistry, 100W per channel (400W Total) • 100–240V AC (50–60Hz) or 11V–18V DC Eingangsspannung um sich vor dem Betrieb mit den Produktfunktionen vertraut zu charge capacity, cell voltages and error codes. Alle Anweisungen, Garantien und anderen zugehörigen Dokumente • Abnehmbare AC und DC Anschlußstecker Charge Current 0.1A to 8.0A per channel (in 0.1A machen. Wird das Produkt nicht korrekt betrieben, kann dies zu • Three LEDs per channel (red, yellow and green) to indicate charging können im eigenen Ermessen von Horizon Hobby, Inc. jederzeit • Ein/Aus Schalter increments/100W maximum per channel) Schäden am Produkt oder persönlichem Eigentum führen oder geändert werden. Die aktuelle Produktliteratur finden Sie auf status and error codes. • Vier eingebaute Balancer mit externen Adaptern. schwere Verletzungen verursachen. Operating Temperature 0º C to +50º C horizonhobby.com unter der Registerkarte „Support“ für das • Audible beep alerts. • Lädt 1 -6 S Li-Po/Li-Fe Akkus Dies ist ein hochentwickeltes Hobby-Produkt. Es muss mit Vorsicht betreffende Produkt. • 100–240V AC (50–60Hz) or 11V–18V DC input voltage. Balancing Current Drain 300mA per cell • Ladt 1-8 NiMh Zellen und gesundem Menschenverstand betrieben werden und benötigt • Removable AC and DC power cords. • Kurzschluß- , Polaritäts- und Überspannungsschutz Spezielle Bedeutungen Charging Mode Peak (Ni-MH), CC/CV (Li-Po/Li-Fe) gewisse mechanische Grundfähigkeiten. Wird dieses Produkt nicht • Power switch. auf eine sichere und verantwortungsvolle Weise betrieben, kann dies Die folgenden Begriffe werden in der gesamten Produktliteratur • Four built-in balance circuits with external balance lead adapters. zu Verletzungen oder Schäden am Produkt oder anderen Sachwerten verwendet, um auf unterschiedlich hohe Gefahrenrisiken beim Für den Start führen. Dieses Produkt eignet sich nicht für die Verwendung durch Betrieb dieses Produkts hinzuweisen: When Using an External AC Power Source: GETTING STARTED Kinder ohne direkte Überwachung eines Erwachsenen. Versuchen ACHTUNG: Schließen Sie niemals die AC und DC StromversHINWEIS: Wenn diese Verfahren nicht korrekt befolgt werden, CAUTION: Never connect the AC and DC input cords to an 1. Connect the AC power cord to the charger AC power input port. Sie nicht ohne Genehmigung durch Horizon Hobby, Inc., das Produkt orgung gleichzeitig an eine Stromquelle an. Dieses läßt die können sich möglicherweise Sachschäden UND geringe oder keine active power source at the same time. This will void the 2. Connect the AC power cord to the AC power source. zu zerlegen, es mit inkompatiblen Komponenten zu verwenden oder Garantie erlöschen, beschädigt das Produkt und verletzt Gefahr von Verletzungen ergeben. warranty, cause product damage and possibly injure the user. 3. Power ON the charger with the power switch. auf jegliche Weise zu erweitern. Diese Bedienungsanleitung enthält möglicherweise den Benutzer. ACHTUNG: Wenn diese Verfahren nicht korrekt befolgt werden, 4. When the charger is powered ON, all red, yellow and green LEDs When Using an External DC Power Source: Anweisungen für Sicherheit, Betrieb und Wartung. Es ist unbedingt ergeben sich wahrscheinlich Sachschäden UND die Gefahr von Bei Verwendung einer externen DC Stromversorgung: will blink 5 times with 5 beeps and all 4-Digit LED Indicators will 1. Connect the DC power cord to the charger DC power input port. notwendig, vor Zusammenbau, Einrichtung oder Verwendung alle Anschweren Verletzungen. 1. Schließen Sie den DC Stecker an den DC Stromeingang an. display 8888. After 5 seconds, all LEDs will glow solid and the 2. Connect the DC alligator clips to the DC power source. weisungen und Warnhinweise im Handbuch zu lesen und zu befolgen, 2. Schließen Sie die DC Krokokdilklemmen an die DC Stromquelle an. WARNUNG: Wenn diese Verfahren nicht korrekt befolgt werden, 4-Digit LED Indicator will display the current battery chemistry 3. Power ON the charger with the power switch. damit es bestimmungsgemäß betrieben werden kann und Schäden ergeben sich wahrscheinlich Sachschäden, Kollateralschäden 3. Schalten Sie das Ladegerät mit dem Ein/Aus Schalter ein. selected (nI, LIPO or LIFE) for 2 seconds, then display the current oder schwere Verletzungen vermieden werden. 4. When the charger is powered ON, all red, yellow and green LEDs und schwere Verletzungen ODER mit hoher Wahrscheinlichkeit 4. Bei dem Einschalten blinken die roten, gelben und grünen LEDs 5 capacity. oberflächliche Verletzungen. will blink 5 times with 5 beeps and all 4-Digit LED Indicators will Nicht geeignet für Kinder unter 14 Jahren. Dies ist kein mal mit 5 Pieptönen und die vierstelligen LED Indikatoren zeigen display 8888. After 5 seconds, all LEDs will glow solid and the CAUTION: Always power ON the charger before connecting a Spielzeug. 8888 an. Nach 5 Sekunden leuchten alle LED und der LED battery, or damage to the charger and the battery can result. 4-Digit LED Indicator will display the current battery chemistry Indikator zeigt den aktuellen Akkutyp (NI, LIPO oder LIFE) für 2 Sicherheitshinweise und Warnungen • Beobachten Sie immer den Ladevorgang und halten einen Feuerselected (nI, LIPO or LIFE) for 2 seconds, then display the current 1. Connect the charger to the power source. Sekunden an und dann die Ladestrom. löscher zu jeder Zeit bereit. capacity. WARNUNG: Unaufmerksamkeit oder falscher Gebrauch des 2. Power ON the charger. • Beenden Sie sofort den Ladevorgang wenn der Akku zu heiß zum HINWEIS: Schließen Sie die Kabel immer polrichtig an. Produktes in Zusammenhang mit den folgenden Warnungen NOTICE: Always connect cable polarities correctly. 3. Select charging settings. Anfassen werden sollte, oder seine Form (anschwellen) verändert. HINWEIS: Lesen Sie immer die Anleitung eines 12 Volt Akkus oder kann zu Fehlfunktionen, elektrischen Störungen, große NOTICE: Always consult 12V battery collateral materials or Horizon 4. Connect the battery to the charger. • Schließen Sie erst das Ladekabel am Ladegerät an und dann den Batterie oder kontaktieren Horizon Hobby wenn Sie etwas anderes Hitzeentwicklung, FEUER, und tötlichen Verletzungen und Hobby before using with sources other than a standard AC wall outlet. 5. Start battery charging. Akku, um ein verpolen der Anschlüsse zu vermeiden. Trennen Sie die nutzen wollen als ein Standard 12 Volt Netzgerät. Sachbeschädigungen führen. Verbindung nach dem Laden in umgekehrter Reihenfolge. OPERATING YOUR CHARGER • Lassen Sie das Netzgerät, Ladegerät und Akku niemals unbeaufsich- • Schließen Sie immer die die positiven (+) roten Anschlüsse und 1. Use the Battery Chemistry Switch (E) to select the battery 4. If charging a Li-Po or Li-Fe battery, connect the balance adapter tigt während des Betriebes. negativen schwarzen (–) Anschlüsse korrekt an. chemistry (Ni-MH/Li-Po/Li-Fe) of the battery you wish to charge. The board to the charger, then connect the balance connector of the • Versuchen Sie niemals tiefentladene, beschädigte oder nasse Akkus • Trennen Sie nach dem Laden den Akku vom Ladegerät und lassen Betrieb des Ladegerätes zu laden. 4-Digit LED Indicator will display the battery selection for 2 seconds, battery to the balance adapter board. A 1S battery will not have a das Ladegerät zwischen den Ladevorgängen abkühlen. 1. Mit dem Akkuwahlschalter (E) wählen Sie den Akkutyp (Ni-MH/ then show the current charge capacity. balance connector. A Li-Po/Li-Fe battery larger than 1S will NOT be • Laden Sie niemals Akkupacks, die aus verschiedenen Zellentypen • Laden Sie immer in gut belüfteten Bereichen. Li-Po/Li-Fe) aus den Sie laden möchten. Der vierstelligen LED bestehen. 2. Select the charge current (0.1A–8.0A) by rotating the Charge charged unless the balance leads are connected to the charger. • Beenden Sie bei Fehlfunktionen sofort alle Prozesse und kontaktieren Indikator zeigt ihnen den gewählten Akkutyp an und wechselt dann • Lassen Sie niemals Minderjährige Akkus laden. Horizon Hobby. Current Dial (F). 5. Connect the battery to the battery adapter cable. auf die Ladestromanzeige. 3. Connect the banana plugs of the battery adapter cable to the 6. Press and hold the Start/Stop Button (G) for 3 seconds to begin • Laden Sie niemals Akkus in extremer Hitze oder Kälte oder in direkter WARNUNG: Lassen Sie niemals das Ladegerät unbeaufsichtigt. 2. Wählen Sie mit dem Drehrad (F) den Ladestrom (01–8,0A) Sonneneinstrahlung. charger, making sure that the Red (+) and Black (–) connectors are charging. If there is no error, charging will begin. 3. Schließen Sie den Bananenstecker des Ladekabel an das Ladegerät Überschreiten Sie niemals den maximalen Ladestrom. Laden not reversed. 7. Press and hold the Start/Stop Button for 3 seconds at any time to • Laden Sie keine Akkus dessen Kabel beschädigt, punktiert oder an und achten bitte darauf die roten (+) und schwarzen (–) Sie niemals nicht geeignete Akkus oder Akkus im falschen gekürzt ist. stop charging. Mode. Falsche oder Fehlbedienung kann zu großer Hitze, Feuer CAUTION: Before charging, always ensure you have chosen Anschlüsse nicht zu vertauschen. • Schließen Sie niemals das Ladegerät an eine 12 Volt Autobatterie bei 8. When charging is complete, disconnect the battery from the oder tödlichen Verletzungen führen. the correct battery chemistry type for the battery you are laufenden Motor an. ACHTUNG: Stellen Sie vor dem Laden sicher, dass Sie den charger. charging. • Versuchen Sie niemals das Ladegerät auseinander zu bauen oder ein korrekten Akkutyp gewählt für den zu ladenden Akku gewählt ACHTUNG: Bitte stellen Sie sicher, dass die verwendeten Akkus beschädigtes Ladegerät in Betrieb zu nehmen. haben. mit den Spezifikationen des Ladegerätes übereinstimmen und LED INDICATORS • Schließen Sie nie an den DC Eingang (Gleichstrom) an eine AC (Wechdie Einstellungen des Ladegerät korrekt eingestellt sind. Ein selstromquelle an) Li-Po/Li-Fe Charging Nichtbefolgen kann zu großer Hitze und weiteren Fehlfunktionen • Schließen Sie nie den DC und AC Stromeingang gleichzeitig an. führen, die zu Personen- oder Sachschäden führen können. OPERATION LED COLOR LED STATUS SOUND • Benutzen Sie ausschließlich wiederaufladbare Akkus die für das Bitte kontaktieren Sie Horizonhobby oder einen autorisierten Constant Current Red LED Blinking every 2 seconds Laden mit diesem Ladegerät auch geeignet sind. Händler wenn Sie Fragen zur Akkukompatibilität haben. • Überprüfen Sie immer den Akku vor dem Laden. Red LED Solid ON • Halten Sie das Akku fern von Materialien die von Hitze beeinflußt Constant Voltage Yellow LED Blinking every 2 seconds werden können. Red LED Solid ON Charging Complete Alert M. L. Cell Voltage Indicator After 30 seconds of charging, you can push the Start/Stop Button (G) once to display the individual cell voltages in a 1–6S Li-Po/Li-Fe battery. The 4-Digit LED Indicator will cycle through the following Always keep the battery away from any material that could be sequence (actual values shown on the display will differ from this affected by heat. example): Always monitor the charging area and have a fire extinguisher 0000 (Present Charge Capacity) C-4 (Fourth Cell) available at all times. Always end the charging process if the battery becomes hot to the C6 (Total Cells Present/1 to 6) 3.70 (Fourth Cell Voltage) touch or starts to change form (swell) during the charge process. C-5 (Fifth Cell) Always connect the charge cable to the charger first, then connect the 22.2 (Total Pack Voltage/ 3.7 to 25.2) 3.70 (Fifth Cell Voltage) battery to avoid short circuit between the charge leads. Reverse the C-1 (First Cell) sequence when disconnecting. C-6 (Sixth Cell) Always connect the positive red leads (+) and negative black leads (–) 3.70 (First Cell Voltage) 3.70 (Sixth Cell Voltage) correctly. 22.2 (Total Pack Voltage/ Always disconnect the battery after charging, and let the charger cool C-2 (Second Cell) 3.70 (Second Cell Voltage) 3.7 to 25.2) between charges. Always charge in a well-ventilated area. 0000 (Present Charge Capacity) C-3 (Third Cell) Always terminate all processes and contact Horizon Hobby if the 3.70 (Third Cell Voltage) product malfunctions. ARNING: Never leave charger unattended, exceed maximum W charge rate, charge with non-approved batteries or charge batteries in the wrong mode. Failure to comply may result in excessive heat, fire and serious injury. CAUTION: Always ensure the battery you are charging meets the specifications of this charger and that the charger settings are correct. Not doing so can result in excessive heat and other related product malfunctions, which can lead to user injury or property damage. Please contact Horizon Hobby or an authorized retailer with compatibility questions. LED STATUS Red LED Age Recommendation: Not for children under 14 years. This is not a toy. • • • • • Included Items: OPERATION • Eingangspolaritätschutz mit Über- und Unterspannungsschutz • Farblich gekennzeichnete isolierte Ladeanschlüsse (Rot = Positiv+) Schwarz = Negativ –) • Interner Kühlüfter mit Abdeckung • Temperaturbereich für Betrieb 0° + 50° • Erfüllt IP43, IK07 Spezifikation • Stabiles Industriekunststoffgehäuse Spezifikationen Eingangsspannung 100–240 VAC (50/60Hz) 500W (Max) Eingangsspannung 11–18 V DC 450W (Max) Leistung Max Spannung 25,2V , max Leistung 100 Watte per Kanal (400 Watt gesamt) Ladestrom 0,10 bis 8,0A pro Kanal (in 0,1A Schritten/100W max. per Kanal) Arbeitstemperatur 0°C bis +50°C LED Indikator Li-Po/Li-Fe laden Betrieb LED Farbe Konstantstrom Konstantspannung Hinweis Ladevorgang beendet Ladevorgang beendet Blinkt alle zwei Sekunden Rot LED Leuchtet Gelbe LED Blinkt alle zwei Sekunden Rot LED Leuchtet Gelbe LED Leuchtet Grün LED blinkt einmal alle 5 Sekunden Alle Leuchtet Ton 1 Piepton per Sekunde 5 mal Ni-MH laden Betrieb LED Farbe Konstantstrom Balancerstrom 300mA per Zelle Lademodis Peak (Ni-MH); CC/CV (Li-Po/Li-Fe) LED STATUS Rot LED Hinweis Ladevorgang beendet Ladevorgang beendet LED STATUS Rot LED Blinkt alle zwei Sekunden Rot LED Leuchtet Gelbe LED Leuchtet Grün LED blinkt einmal alle 5 Sekunden Alle Leuchtet Ton 1 Piepton per Sekunde 5 mal Akku Kapazitätsanzeige Am Anfang des Ladevorganges wechselt die Information auf der LED Indikatoranzeige (A) zwischen dem gewählten Akkutyp und einer 0000 Kapazitätsanzeige. Nach dreißig Sekunden zeigt die dann Kapazitätsanzeige die Akkukapazität in mA an. Nach erfolgtem Ladevorgag zeigt das Display die gesamt eingeladenen Menge in mA an. Bei Verwendung einer externen AC Stromquelle: 1. Schließen Sie den AC Netzstecker an der AC Netzbuchse des Ladegerätes an. 2. Schließen Sie den Stecker am AC Netzstrom an. 3. Schalten Sie das Ladegerät mit dem Ein/Aus Schalter ein. 4. Bei dem Einschalten blinken die roten, gelben und grünen LEDs 5 mal mit 5 Pieptönen und die vierstelligen LED Indikatoren zeigen 8888 an. Nach 5 Sekunden leuchten alle LED und der LED Indikator zeigt den aktuellen Akkutyp (NI, LIPO oder LIFE) für 2 Sekunden an und dann die Ladestrom. ACHTUNG Schalten Sie immer erst das Ladegerät ein bevor Sie ein Akku anschließen, da sonst das Ladegerät oder Akku beschädigt werden kann. 1. Schließen Sie das Ladegerät an eine Stromquelle an. 2. Schalten Sie das Ladegerät ein. 3. Wählen Sie die Ladegeräteinstellungen. 4. Schließen Sie den Akku an das Ladegerät an. 5. Starten Sie den Ladevorgang. Anzeige Zellspannung Nach dreißig Sekunden laden können Sie den Start/Stop Button (G) drücken um die Einzelzellenspannung eines 1–6S Li-Po/Li-Fe Akkus anzuzeigen. Die Anzeige wechselt dabei wie folgt: (Aktuelle Werte können dabei vom Beispiel abweichen) 0000(aktuell eingeladene C-4 (Vierte Zelle) Kapazität) 3.70 (Zellspannung vierte Zelle) C6 (Zellanzahl 1 bis 6) C-5 (Fünfte Zelle) 22.2 (Gesamt Zellspannung/3.7 3.70 (Zellspannung fünfte Zelle) bis 25.2 V.) C-6 (Sechste Zelle) C-1 (Erste Zelle) 3.70 (Zellspannung sechste Zelle) 3.70 (Zellspannung erste Zelle) 22.2 (Gesamtspannung/3.7 bis C-2 (Zweite Zelle) 25.2) 3.70 (Zellspannung zweite Zelle) 0000(aktuell eingeladene C-3 (Dritte Zelle) Kapazität) 3.70 (Zellspannung dritte Zelle) Die Zellspannung wird nur für die tatsächlich angeschlossene Anzahl Zellen angezeigt. Ist zum Beispiel ein 4S Akku angeschlossen werden nur die Werte C-1 bis C4 angezeigt sowie die Gesamtakkuspannung und Ladekapazität. Drücken Sie während der Sequenz den Start/Stop Button zeigt die LED Anzeige die aktuelle Ladeinformation und kehrt dann zur normalen Anzeige zurück. Die Zellspannung kann zu jedem nach dem Ladezyklus angezeigt werden bevor der Akkutyp geändert wird, der Akku entfernt oder ein weiterer Zyklus gestartet wird. Problemlösung 4. Schließen Sie den Balancernanschluß an den Adapter des Ladegerät Tritt ein Fehler auf blinkt die rote LED (D) und es ertönt ein zweifaches Piepen alle 10 Sekunden. Ist der Alarm 10 mal akustisch mitgeteilt an und schließen dann den Balancerstecker des Akku an den worden leuchtet die rote LED und der LED Indikator (A) zeigt die Fehlermeldung an. Adapter an. Ein 1S hat keinen Balancernaschluß Ein Li-Po/Li-Fe dass größer als 1S ist wird NICHT geladen bis der Balancer am Fehlemeldung Lösung Gerät angeschlossen ist. ‘-11-’ Defekte Zelle oder Spannungsunterschied ist zu groß (über 0,3 Volt) sichere Ladung 5. Schließen Sie den Akku am Ladekabel am. 6. Drücken Sie den Start/Stop Button (G) für drei Sekunden um den ‘-22-’ Polarität (+ und –) ist nicht korrekt Ladevorgang zu starten. Wird kein Fehler festgestellt beginnt der ‘-33-’ Akku nicht korrekt angeschlossen Ladevorgang. ‘-44-’ Ladegerät ist zu heiß zum sicheren laden 7. Drücken und halten Sie zu jedem Zeitpunkt den Start/Stop Button für drei Sekunden um den Ladevorgang zu beenden. ‘-55-’ Überspannung oder Kurzschluß auf dem Akku 8. Trennen Sie den Akku vom Ladegerät wenn der ladevorgang erfolgt ist. ‘-66-’ Akkuwahlschalter wurde während des Ladevorganges bewegt ‘-77-’ DC Eingangsspannung ist zu hoch oder zu niedrig für einen sicheren Betrieb ‘-88-’ Die Spannung einer Zelle ist für eine sichere Ladung zu hoch oder zu niedrig Indications des DELs FRANÇAIS REMARQUE La totalité des instructions, garanties et autres documents est sujette à modification à la seule discrétion d’Horizon Hobby, Inc. Pour obtenir la documentation à jour, rendez-vous sur le site horizonhobby.com et cliquez sur l’onglet de support de ce produit. Signification de certains termes spécifiques Les termes suivants sont utilisés dans l’ensemble du manuel pour indiquer différents niveaux de danger lors de l’utilisation de ce produit: REMARQUE: Procédures qui, si elles ne sont pas suivies correctement, peuvent entraîner des dégâts matériels ET éventuellement un faible risque de blessures. ATTENTION: Procédures qui, si elles ne sont pas suivies correctement, peuvent entraîner des dégâts matériels ET des blessures graves. AVERTISSEMENT: Procédures qui, si elles ne sont pas suivies correctement, peuvent entraîner des dégâts matériels et des blessures graves OU engendrer une probabilité élevée de blessure superficielle. AVERTISSEMENT: Lisez la TOTALITÉ du manuel d’utilisation afin de vous familiariser avec les caractéristiques du produit avant de le faire fonctionner. Une utilisation incorrecte du produit peut entraîner sa détérioration, ainsi que des risques de dégâts matériels, voire de blessures graves. Ceci est un produit de loisirs sophistiqué. Il doit être manipulé avec prudence et bon sens et requiert des aptitudes de base en mécanique. Toute utilisation irresponsable de ce produit ne respectant pas les principes de sécurité peut provoquer des blessures, entraîner des dégâts matériels et endommager le produit. Ce produit n’est pas destiné à être utilisé par des enfants sans la surveillance directe d’un adulte. N’essayez pas de démonter le produit, de l’utiliser avec des composants incompatibles ou d’en améliorer les performances sans l’accord d’Horizon Hobby, Inc. Ce manuel comporte des instructions relatives à la sécurité, au fonctionnement et à l’entretien. Il est capital de lire et de respecter la totalité des instructions et avertissements du manuel avant l’assemblage, le réglage et l’utilisation, ceci afin de manipuler correctement l’appareil et d’éviter tout dégât matériel ou toute blessure grave. • • • • • • • • • • • • • Toujours garder la batterie à bonne distance de tout matériau thermosensible qui pourrait chauffer. AVERTISSEMENT: L’absence de précautions durant l’utilisation • Surveiller la zone de charge en permanence et toujours avoir un de ce produit et le non-respect des conditions et directives extincteur à portée de main. suivantes peuvent provoquer un dysfonctionnement du produit, • Toujours interrompre le processus de charge immédiatement si la des problèmes électriques, une chaleur excessive, un incendie, température de la batterie devient trop élevée au toucher ou qu’elle se des dégâts matériels ou des blessures. met à changer de forme (gonfler) en cours de charge. En cours d’utilisation, ne jamais laisser l’alimentation, le chargeur et la • Toujours commencer par connecter les câbles de charge au chargeur, batterie sans surveillance. puis à la batterie pour éviter tout court-circuit entre les câbles de Ne jamais essayer de charger de pack de batterie hors d’usage, charge. Lors du débranchement, procédez dans l’ordre inverse. endommagé ou humide. • Toujours veiller, lors de la connexion, à respecter la polarité des câbles Ne jamais essayer de charger un pack de batteries constitué de batpositif rouge (+) et négatif noir (–). teries de types différents. • Toujours déconnecter la batterie une fois la charge terminée et, entre Ne jamais permettre à des enfants de charger les packs de batteries. deux charges, laisser le temps au chargeur de refroidir. Ne jamais charger les batteries dans un endroit extrêmement chaud • Toujours charger les batteries dans un endroit bien aéré/ventilé. ou froid ni les exposer à la lumière directe du soleil. • En cas de mauvais fonctionnement du produit, toujours interrompre Ne jamais charger une batterie si le câble a été coincé ou mis en immédiatement tous les processus et contacter Horizon Hobby. court-circuit. AVERTISSEMENT: Ne jamais laisser le chargeur sans Ne jamais brancher le chargeur si le câble a été coincé ou mis en surveillance, dépasser le taux (courant) de charge maximum, court-circuit. mettre en charge des batteries non homologuées ou charger Ne jamais brancher le chargeur à une batterie de voiture de 12 V, des batteries dans un mode qui ne soit pas le bon. L’incapacité moteur de la voiture tournant. de respecter ces exigences peut se traduire par un échauffeNe jamais essayer de démonter le chargeur ni n’utiliser un chargeur ment excessif, un incendie et des blessures graves. endommagé. ATTENTION: Assurez-vous toujours que la batterie que vous Ne jamais connecter votre chargeur simultanément à une source chargez a des spécifications qui correspondent aux exigences d’alimentation CA et à une source d’alimentation CC. de ce chargeur et que les paramétrages du chargeur sont Ne jamais brancher le connecteur d’entrée (entrée CC) à une alimencorrects. Si vous ne le faites pas, ceci peut entraîner un tation alternative. échauffement excessif ou un autre dysfonctionnement du Ne toujours utiliser que des batteries (accus) rechargeables prévues produit, ce qui pourrait entraîner des blessures de l’utilisateur ou pour ce type de chargeur. des dégâts matériels. En cas de questions de compatibilité, Toujours inspecter la batterie avant de la charger. veuillez SVP contacter Horizon Hobby ou un distributeur autorisé. 3 Articles inclus Adaptateur/Equilibreur JST_XH (4) Fiche banane vers adaptateur de batterie EC3 (4) Cordon d’alimentation secteur (une zone-US, EU, AU ou UK) Accessoires optionnels DYN4012 - Cordon d’alimentation DC • Charge les batteries Li-Po/Li-Fe de 1 à 6S. • Charge les batteries Ni-MH de 1 à 8 éléments. • Sorties protégées contre les courts-circuits, les inversions de polarité et les surcharges. • Entrée DC protégée contre l’inversion de polarités, sécurité en cas de tension d’alimentation trop faible ou trop élevée. Prises de sorties de type banane, isolées et repérées par couleurs (Borne positive=Rouge, Borne négative=Noire). • Ventilateurs de refroidissement intégrés et protégés par grille. • Plage de températures d’utilisation: de 0°C à +50°C. • Conforme aux normes IP43 et IK07. • Boîtier en plastique très résistant. Caractéristiques • 4 ports de charge pour charger 4 batteries simultanément. Les batteries peuvent être de type, de capacité et avoir un nombre d’éléments différents. • Compatible avec les batteries Li-Po, Li-Fe et Ni-MH, sélection Caractéristiques indépendante par port. Tension d’alimentation CA • 4 potentiomètres indépendants pour régler les intensités de charge Tension d’alimentation CC (de 0.1 à 8A). • 4 afficheurs indépendants à 4 chiffres pour afficher le type de la Sortie batterie, l’intensité de charge, la tension des éléments et les codes erreur. • 3 DELs (Rouge, jaune et verte) par port pour indiquer le statut de la Courant de charge charge et les codes erreur. • Alertes par bips. Température de service • Alimentation AC de 100 à 240V (50–60Hz) ou DC de 11 à 18V. • Cordons d’alimentation amovibles. Courant de maintien de charge • Interrupteur d’alimentation. Mode de charge • 4 circuits d’équilibrage indépendants avec adaptateurs de prises. Pour démarrer ATTENTION: Ne jamais brancher les câbles d’alimentation CA et CC simultanément à une source d’alimentation active. Ceci aura pour conséquence d’invalider la garantie, peut endommager le produit et comporte des risques potentiels de blessures de l’utilisateur. En cas d’utilisation d’une source d’alimentation CC en entrée externe: 1. Connectez le cordon DC à l’entrée DC du chargeur. 2. Connectez les pinces crocodile du cordon DC à votre source DC. 3. Mettez le chargeur sous tension en utilisant l’interrupteur d’alimentation. 4. Quand le chargeur est mis sous tension, les DELS rouges, jaunes et vertes vont clignoter 5 fois accompagnées de 5 bips et les afficheurs à 4 chiffres affichent 8888. Après 5 secondes, toutes les DELs vont s’éclairer de manière fixe et les afficheurs à 4 chiffres vont afficher le type de batterie sélectionné (nI, LIPO ou LIFE) durant 2 secondes, puis vont afficher la capacité. REMARQUE: Toujours respecter les polarités en connectant le câble. REMARQUE: Toujours consulter les caractéristiques de la batterie 12V ou Horizon Hobby avant d’utiliser d’autres sources que l’alimentation AC standard. MODE D’EMPLOI DE VOTRE CHARGEUR 1. Utilisez l’interrupteur (E) de sélection du type de batterie pour sélectionner le type (Ni-Mh/Li-Po/Li-Fe) correspondant à la batterie que vous souhaitez charger, l’afficheur à 4 chiffres affichera la sélection durant 2 secondes, puis affichera l’intensité de charge. 2. Sélection de l’intensité de charge (0.1 à 8A) en faisant tourner le potentiomètre de réglage de l’intensité de charge (F). 3. Connectez le cordon adaptateur de charge de la batterie aux prises bananes du chargeur en prenant soin de respecter les polarités, Rouge (+) et noir (–). ATTENTION: Avant de commencer la charge, veuillez toujours contrôler que le type de batterie sélectionné correspond à la batterie que vous souhaitez charger. Couleur DEL Courant constant Tension constante Alerte de charge terminée Charge terminée Statut des DELs Rouge Clignote toutes les 2 secondes Rouge Allumée fixe Jaune Clignote toutes les 2 secondes Rouge Allumée fixe Jaune Allumée fixe Verte 5 fois un clignotement par seconde Toutes Alerte K. OPERATION Allumée fixe Couleur DEL Courant constant Alerte de charge terminée Charge terminée Statut des DELs Rouge Clignote toutes les 2 secondes Rouge Allumée fixe Jaune Allumée fixe Verte 5 fois un clignotement par seconde Toutes Allumée fixe Alerte FR A. INDICATEUR DE LA TENSION DES ELEMENTS Après 30 secondes de charge, vous pouvez appuyer une fois sur le bouton Start/Stop (G) pour afficher la tension individuelle des éléments des batteries Li-Po/Li-Fe de 1 à 6S. L’afficheur à 4 chiffres effectua une boucle en suivant la séquence ci-dessous (Vos valeurs actuellement affichées seront différentes de cet exemple): 0000 (Capacité actuelle) C-4 (Quatrième élément) C6 (Nombre total d’éléments/de 3.70 (Tension du quatrième 1 à 6) élément) 22.2 (Tension totale de la C-5 (Cinquième élément) batterie/de 3,7 à 25,2V) 3.70 (Tension du cinquième C-1 (1er élément) élément) 3.70 (Tension du premier C-6 (Sixième élément) élément) 3.70 (Tension du sixième C-2 (Deuxième élément) élément) 3.70 (Tension du deuxième 22.2 (Tension totale de la élément) batterie/de 3,7 à 25,2V) C-3 (Troisième élément) 0000 (Capacité actuelle) 3.70 (Tension du troisième élément) Guide de dépannage Quand une erreur survient, la DEL rouge (D) va se mettre à clignoter et 2 bips par seconde seront émis 10 fois. Une fois l’alerte effectuée, la DEL rouge devient fixe et l’afficheur à 4 chiffres (A) affiche le code de l’erreur détectée. Code erreur ‘-11-’ 11V–18V DC, 450W (Max) 0,1 à 8A (par incréments de 0,1A/100W max) Un élément est endommagé ou le déséquilibre entre les éléments est trop important (plus de 0.3V) pour assurer la charge en toute sécurité Quand vous utilisez une source AC externe: 1. Connectez le cordon AC à l’entrée AC du chargeur. 2. Connectez le cordon d’alimentation AC à la source AC. 3. Mettez le chargeur sous tension en utilisant l’interrupteur d’alimentation. 4. Quand le chargeur est mis sous tension, les DELS rouges, jaunes et vertes vont clignoter 5 fois accompagnées de 5 bips et les afficheurs à 4 chiffres affichent 8888. Après 5 secondes, toutes les DELs vont s’éclairer de manière fixe et les afficheurs à 4 chiffres vont afficher le type de batterie sélectionné (nI, LIPO ou LIFE) durant 2 secondes, puis vont afficher la capacité. ATTENTION: Toujours mettre le chargeur sous tension avant d’y connecter la batterie, sinon risque d’endommagement du chargeur et de la batterie. 1. Connectez le chargeur à son alimentation. 2. Mettez le chargeur sous tension. 3. Sélectionnez les paramètres de charge. 4. Connectez la batterie au chargeur. 5. Lancez la charge de la batterie. Carica terminata 3 Articoli inclusi Adattatore per bilanciatura JST_XH (4) ‘-33-’ Batterie incorrectement connectée Cavo alimentazione AC (una regione -US, EU, AU or UK) ‘-44-’ Le chargeur a atteint une température trop élevée pour effectuer la charge en toute sécurité ‘-55-’ Batterie en court-circuit ou en surcharge ‘-66-’ L’interrupteur de sélection du type de batterie a été placé dans une autre position durant la charge ‘-77-’ La tension d’alimentation DC est trop élevée ou trop faible pour un fonctionnement en toute sécurité ‘-88-’ Un élément de la batterie est trop élevé ou trop faible pour une charge en toute sécurité Convenzioni terminologiche Nella documentazione relativa al prodotto vengono utilizzati i seguenti termini per indicare i vari livelli di pericolo potenziale durante l’uso del prodotto: AVVISO: indica procedure che, se non debitamente seguite, possono determinare il rischio di danni alle cose E il rischio minimo o nullo di lesioni alle persone. ATTENZIONE: indica procedure che, se non debitamente seguite, determinano il rischio di danni alle cose E di gravi lesioni alle persone. AVVERTENZA: indica procedure che, se non debitamente seguite, determinano il rischio di danni alle cose, danni collaterali e gravi lesioni alle persone O il rischio elevato di lesioni superficiali alle persone. Precauzioni per la Sicurezza e Avvertenze • • 4. Si vous chargez une batterie Li-Po ou Li-Fe, connectez l’adaptateur • de prises d’équilibrage au chargeur, puis connectez la prise • d’équilibrage de la batterie à l’adaptateur. Les batteries 1S ne possèdent pas de prise d’équilibrage. Les batteries Li-Po/Li-Fe • supérieures à 1S ne DOIVENT PAS être chargées sans que la prise d’équilibrage ne soit pas branchée au chargeur. 5. Connectez la batterie au cordon adaptateur. 6. Pressez et maintenez le bouton Start/Stop (G) durant 3 secondes pour débuter la charge. La charge débutera s’il n’y a pas d’erreur. 7. Pressez et maintenez le bouton Start/Stop (G) durant 3 secondes pour stopper la charge à tout moment. 8. Déconnectez la batterie du chargeur quand la charge est terminée. Indicatori LED VVERTENZA: Non lasciare mai incustodito il caricabatterie, A non superare la corrente di carica massima, non effettuare la carica di batterie non approvate o caricare le batterie in modo Funzione sbagliato. Il mancato rispetto di queste disposizioni può comportare un calore eccessivo, incendi e lesioni gravi. Corrente costante ATTENZIONE: verificare sempre che la batteria sotto carica Tensione costante soddisfi le specifiche di questo caricabatterie e che le impostazioni del caricabatterie siano corrette. Non farlo potrebbe portare a un eccessivo calore e ad altre disfunzioni del prodotto, che potrebbero portare a lesioni per l’utente o a danni alla Avviso di carica terminata proprietà. Rivolgersi a Horizon Hobby o a un rivenditore autorizzato per domande sulla compatibilità. • Terminare sempre il processo di carica se le batterie scottano al tatto o iniziano a deformarsi (gonfiarsi) durante il procedimento di carica. • Collegare sempre prima il cavo al caricabatterie, poi connettere la batteria per evitare un cortocircuito fra i cavi. Invertire la sequenza delle operazioni per la disconnessione. • Collegare sempre correttamente il cavo positivo (+) al rosso e il negativo (–) al nero. • Disconnettere sempre la batteria e il caricabatterie dopo la carica e attendere che si raffreddino tra una carica e l’altra. • Caricare sempre in aree ventilate. • Interrompere sempre qualsiasi processo e rivolgersi a Horizon Hobby se il prodotto funziona male. Spinotto a banana con adattatore per batteria EC3 (4) AVVERTENZA: leggere TUTTO il manuale di istruzioni e familiarizzare con le caratteristiche del prodotto prima di farlo funzionare. Un uso improprio del prodotto può causare danni al prodotto stesso e alle altre cose e gravi lesioni alle persone. Questo aeromodello è un prodotto sofisticato per appassionati di modellismo. Deve essere azionato in maniera attenta e responsabile e richiede alcune conoscenze basilari di meccanica. L’uso improprio o irresponsabile di questo prodotto può causare lesioni alle persone e danni al prodotto stesso o alle altre cose. Questo prodotto non deve essere utilizzato dai bambini senza la diretta supervisione di un adulto. Non tentare di smontare, utilizzare componenti incompatibili o modificare il prodotto in nessun caso senza previa approvazione di Horizon Hobby, Inc. Questo manuale contiene le istruzioni per la sicurezza, l’uso e la manutenzione del prodotto. È fondamentale leggere e seguire tutte le istruzioni e le avvertenze del manuale prima di montare, impostare o utilizzare il prodotto, al fine di utilizzarlo correttamente e di evitare di causare danni alle cose o gravi lesioni alle persone. Almeno 14 anni. Non è un giocattolo. • Non collegare mai il caricabatterie se il cavo di alimentazione è schiacciato o in cortocircuito. AVVERTENZA: Se non si utilizza questo prodotto con attenzione • Non collegare mai il caricabatterie a una batteria di automobile da 12 e non si osservano le seguenti avvertenze potrebbero verificarsi V, mentre il veicolo è in movimento. malfunzionamenti del prodotto, problemi elettrici, eccessivo • Non tentare mai di smontare il caricabatterie o di utilizzare un caricasviluppo di calore, incendi e in definitiva lesioni e danni materiali. batterie danneggiato. Non lasciare mai l’alimentatore, il caricabatterie e la batteria incusto- • Non invertire i terminali negativi – e positivi +. • Non collegare mai la presa di ingresso (ingresso c.c.) alla corrente diti durante l’uso. alternata. Non tentare mai di caricare batterie fuori uso, danneggiate o bagnate. Non tentare di caricare un pacco batteria con batterie di tipo diverso. • Utilizzare sempre batterie ricaricabili progettate per l’utilizzo con questo tipo di caricabatterie. Non consentire ai minori di caricare i pacchi batteria. • Controllare sempre la batteria prima di caricarla. Non caricare mai le batterie in luoghi estremamente caldi o freddi o • Tenere sempre la batteria lontana da qualsiasi materiale che possa esposti alla luce diretta del sole. essere alterato dal calore. Non caricare mai una batteria se il cavo è schiacciato o messo in • Controllare sempre la zona di ricarica e tenere in ogni momento un corto estintore a disposizione. A.Indicatore LED a 4 cifre B.LED verde C. LED giallo D.LED rosso E. Interruttore per scelta batteria F. Regolatore corrente di carica G.Pulsante Start/Stop H.Connettore per adattatore bilanciamento I. Potenza di uscita nero (–) J. Potenza di uscita rosso (+) K. Interruttore alimentazione L. Presa alimentazione AC M.Presa alimentazione DC/APP Connettori Port 1 représenté. Les ports 2,3 et 4 sont identiques au port 1. Viene descritto il canale 1. Per i canali 2, 3 e 4 valgono le stesse cose. Les polarités (+ et –) sont incorrectes pour effectuer la charge en toute sécurité AVVISO Tutte le istruzioni, le garanzie e gli altri documenti pertinenti sono soggetti a cambiamenti a totale discrezione di Horizon Hobby, Inc. Per una documentazione aggiornata sul prodotto, visitare il sito horizonhobby.com e fare clic sulla sezione Support del prodotto. • I. J. ‘-22-’ ITALIANO 0°C à 50°C E. F. G. H. CARICA LI-PO/LI-FE Colore LED ACCESSORI OPZIONALI DYN4012 - Cavo alimentazione DC • • • • • Per le batterie Li-Po e Li-Fe accetta da 1 a 6 celle in serie Per le batterie Ni-MH accetta da 1 a 8 celle Protezione per cortocircuito, polarità invertita, e sovracorrente Protezione per polarità invertita DC, alta e bassa tensione in ingresso Terminali di uscita isolati con jack a banana a colori codificati (Rosso=positivo (+), Nero=comune o negativo (–)) Ventole di raffreddamento interne protette con griglie Temperatura operativa da 0°C a +50°C Rispetta le specifiche ambientali PI43 e IK07 Robusto contenitore in plastica industriale • • Caratteristiche • • Quattro prese di carica per caricare quattro batterie alla volta. Le batterie possono essere diverse per tipo, capacità e numero di celle • • Possibilità di caricare batterie Li-Po, Li-Fe e Ni-MH, selezionabili in SPECIFICHE modo indipendente per ciascun canale Tensione di ingresso a c.a. • Quattro regolatori della corrente di carica, agiscono in modo indipTensione di ingresso a c.c. endente e con continuità (da 0,1A a 8,0A) • Quattro indicatori indipendenti da 4 cifre a LED per mostrare il tipo Uscita di batteria, la capacità di carica, la tensione delle celle e i codici di errore Corrente di carica • Tre LED per canale (rosso, giallo e verde) per indicare lo stato di carica e i codici di errore Temperatura di esercizio • Segnali sonori di avvertimento • Tensione di alimentazione 100–240V AC (50–60Hz) o 11–18V DC Assorbimento corrente di • Cavi di alimentazione AC e DC staccabili bilanciatura • Interruttore di accensione Modalità di carica • Quattro circuiti di bilanciamento entrocontenuti, con cavi adattatori esterni per il bilanciamento Come iniziare ATTENZIONE: Non collegare mai nello stesso tempo l’alimentatore e i cavi di ingresso a c.c. a una sorgente di alimentazione attiva. Questo annulla la garanzia, danneggia il prodotto e potrebbe provocare lesioni all’utilizzatore. Quando si utilizza una sorgente esterna a c.c.: 1. Collegare il cavo di alimentazione DC all’apposita presa sul caricabatterie. 2. Collegare le pinze (coccodrillo) all’alimentatore DC. 3. Accendere il caricatore con il suo interruttore. 4. Quando si accende il caricatore, tutti i LED rossi, gialli e verdi lampeggiano per 5 volte con 5 beep, e tutte le 4 cifre dei LED indicatori mostrano 8888. Dopo 5 secondi tutti i LED restano accesi con luce fissa e l’indicatore a 4 cifre mostra il tipo di batteria selezionato (nl, LIPO o LIFE) per 2 secondi, poi mostra la capacità attuale. AVVISO: Collegare i cavi rispettando le polarità. AVVISO: Informarsi sempre prima di usare le batterie a 12V o altri alimentatori diversi dallo standard AC. FUNZIONAMENTO DEL caricabatterie 1. Usare l’interruttore (E) per scegliere il tipo di batteria (Ni-MH, LiPo, Li-Fe) che si vuole caricare. L’indicatore a 4 cifre mostrerà il tipo di batteria scelta per 2 secondi, poi mostrerà la corrente di carica. 2. Con la manopola di regolazione (F) scegliere la corrente di carica (0,1 - 8,0A). 3. Collegare gli spinotti a banana del cavo adattatore al caricabatterie, facendo attenzione a rispettare le polarità, Rosso (+), Nero (–). ATTENZIONE: prima di caricare, accertarsi di aver scelto il giusto tipo di batteria. 100–240V AC (50-60Hz), 500W (Max) 11V–18V DC, 450W (Max) Tensione max 25,2V, potenza max di carica 100W per canale (400W totali) 0.10 to 8.0A (incrementi di 0.1A/100W massimo) 0°C to +50°C 300mA per cella Picco (Ni-MH); CC/CV (Li-Po/Li-Fe) Quando si usa l’alimentatore AC esterno: 1. Collegare il cavo di alimentazione AC all’apposita presa sul caricabatterie. 2. Collegare l’altro capo del cavo alla presa AC. 3. Accendere il caricatore con il suo interruttore. 4. Quando si accende il caricatore, tutti i LED rossi, gialli e verdi lampeggiano per 5 volte con 5 beep, e tutte le 4 cifre dei LED indicatori mostrano 8888. Dopo 5 secondi tutti i LED restano accesi con luce fissa e l’indicatore a 4 cifre mostra il tipo di batteria selezionato (nl, LIPO o LIFE) per 2 secondi, poi mostra la capacità attuale. ATTENZIONE: accendere sempre il caricabatterie prima di collegare la batteria, altrimenti si potrebbero danneggiare entrambi. 1. Collegare il caricabatterie all’alimentatore. 2. Accendere il caricatore. 3. Scegliere le impostazioni per la carica. 4. Collegare la batteria al caricatore. 5. Iniziare la carica della batteria. 4. Se si caricano delle batterie Li-Po o Li-Fe, collegare al caricatore anche l’adattatore per il bilanciamento e poi collegarlo alla batteria. Le batterie 1S non hanno il connettore per il bilanciamento. Le batterie Li-Po o Li-Fe con elementi superiori a 1 non si possono caricare finché non si collega il cavetto per il bilanciamento. 5. Collegare la batteria al cavetto adattatore. 6. Per iniziare la carica, tenere premuto il tasto Start/Stop (G) per 3 secondi. Se non ci sono errori la carica avrà inizio. 7. Per fermare la carica basta tenere premuto il tasto Start/Stop per 3 secondi in qualsiasi momento. 8. Quando la carica è terminata, scollegare la batteria dal caricatore. Stato LED LED rosso Lampeggia ogni 2 secondi LED rosso Acceso fisso LED giallo Lampeggia ogni 2 secondi LED rosso Acceso fisso LED giallo Acceso fisso LED verde Lampeggia una volta al secondo per 5 volte Tutti accesi Acceso fisso Solution Tension maximale 25,2V et puissance de charge maximale de 100W par port (400W au total) Peak (Ni-MH); CC/CV (Li-Po/Li-Fe) B. C. D. La tension individuelle des éléments sera affichée que pour les éléments présents constituant la batterie. Par exemple, si la batterie est en 4S, le chargeur affichera uniquement les tension de C-1 à C-4, puis il affichera la tension totale de la batterie puis la capacité. Si vous appuyez de nouveau sur le bouton Start/Stop durant cette séquence, l’afficheur à 4 chiffres affichera la capacité actuelle de la batterie et retournera à un fonctionnement normal. La tension des éléments peut être affichée après l’achèvement du cycle de charge, avant que le type de batterie soit changé, que la batterie soit déconnectée ou qu’un nouveau cycle de charge soit lancé. IT A.Indicateur DEL à 4 chiffres B.DEL verte C. DEL jaune D.DEL rouge E. Interrupteur de sélection du type de batterie F. Potentiomètre de réglage de l’intensité de charge G.Bouton Mode/Stop H.Prise de platine d’équilibrage I. Sortie de charge de la batterie noire (–) J. Sortie de charge de la batterie rouge (+) K. Interrupteur de mise sous tension L. Entrée alimentation AC M.Connecteurs d’alimentation DC/APP 5 fois un bip par seconde INDICATEUR DE CAPACITE DE LA BATTERIE Quand la charge débute, l’afficheur à 4 chiffres (A) va alterner entre l’affichage du type de batterie sélectionné et la capacité “0000”. Après 30 secondes, l’afficheur à 4 chiffres affichera uniquement la capacité de la batterie. La valeur de la capacité de la batterie (en mA) affichée continuera à augmenter durant le cycle de charge. Quand la charge sera terminée, il sera affiché la capacité finale ajoutée à la batterie. 100–240V AC, 500W (Max) 300mA par élément M. L. 5 fois un bip par seconde Ni-MH Charging 14 ans et plus. Ceci n’est pas un jouet. Précautions et avertissements liés à la sécurité • Charge des batteries Li-Po/Li-Fe OPERATION Suono 1 beep al secondo per 5 volte Ni-MH Charging Funzione Corrente costante Avviso di carica terminata Carica terminata Colore LED Stato LED LED rosso Lampeggia ogni 2 secondi LED rosso Acceso fisso LED giallo Acceso fisso LED verde Lampeggia una volta al secondo per 5 volte Tutti accesi Acceso fisso Suono 1 beep al secondo per 5 volte Indicatore di capacità della batteria Quando inizia la carica, l’indicatore a 4 cifre (A) alterna l’indicazione tra il tipo di batteria scelto e i dati di capacità “0000”. Dopo 30 secondi mostrerà solo la capacità della batteria. Il valore di questa capacità (in mA) continuerà ad aumentare man mano che la procedura di carica prosegue. Quando la carica è terminata, mostrerà la capacità finale raggiunta dalla batteria. Indicatore della tensione delle celle Dopo 30 secondi di carica, si può premere una volta il tasto Start/ Stop (G) per vedere le tensioni delle singole celle in una batteria da 1 a 6 celle (1–6S) di tipo Li-Po o Li-Fe. L’indicatore a 4 cifre potrà far scorrere la seguente sequenza (i valori reali mostrati saranno diversi da questo esempio): 0000 (Capacità di carica attuale) C-4 (Quarta cella) C6 (Celle totali presenti da 1 a 6) 3.70 (Tensione quarta cella) 22.2 (Tensione totale del pacco, C-5 (Quinta cella) da 3,7 a 25,2V) 3.70 (Tensione quinta cella) C-1 (Prima cella) C-6 (Sesta cella) 3.70 (Tensione prima cella) 3.70 (Tensione sesta cella) C-2 (Seconda cella) 22.2 (Tensione totale del pacco, 3.70 (Tensione seconda cella) da 3,7 a 25,2V) 0000 (Capacità di carica attuale) C-3 (Terza cella) 3.70 (Tensione terza cella) La tensione delle celle si può vedere solo per il numero di celle presenti in quel certo momento. Per esempio, se la batteria è una 4S, allora il caricatore mostrerà solo le tensioni da C-1 a C-4, dopodiché dovrebbe mostrare la tensione totale della batteria e la capacità caricata. Se si preme di nuovo il tasto Start/Stop durante questa sequenza, l’indicatore a 4 cifre mostrerà la capacità di carica attuale e ritornerà alle normali operazioni. La tensione delle celle si potrà vedere anche in qualsiasi momento dopo che la carica è terminata prima di cambiare il tipo di batteria, di staccare la batteria o di avviare un altro ciclo di carica. Guida alla soluzione dei problem Quando si verifica un errore, il LED rosso (D) lampeggia e un cicalino suona due volte al secondo per 10 volte. Quando l’allarme termina di suonare, il LED rosso diventa fisso e l’indicatore a 4 cifre (A) mostra la condizione di errore che è stata rilevata. Condizione di errore Soluzione ‘-11-’ Cella inefficiente o sbilanciamento tra le celle troppo alto (> 0,3V) per procedere con una carica sicura ‘-22-’ Batteria collegata con la polarità (+ e -) sbagliata ‘-33-’ Batteria non collegata bene ‘-44-’ Il caricatore è troppo caldo per procedere nella carica ‘-55-’ Condizione di sovra corrente o cortocircuito nella batteria ‘-66-’ Il selettore del tipo di batteria è stato mosso durante la carica ‘-77-’ La tensione DC di ingresso è troppo alta o troppo bassa ‘-88-’ La tensione di una cella del pacco è troppo alta o troppo bassa 1 YEAR LIMITED WARRANTY What this Warranty Covers - Horizon Hobby, Inc., (Horizon) warrants to the original purchaser that the product purchased (the “Product”) will be free from defects in materials and workmanship for a period of 1 years from the date of purchase. What is Not Covered - This warranty is not transferable and does not cover (i) cosmetic damage, (ii) damage due to acts of God, accident, misuse, abuse, negligence, commercial use, or due to improper use, installation, operation or maintenance, (iii) modification of or to any part of the Product, (iv) attempted service by anyone other than a Horizon Hobby authorized service center, (v) Product not purchased from an authorized Horizon dealer, or (vi) Product not compliant with applicable technical regulations. OTHER THAN THE EXPRESS WARRANTY ABOVE, HORIZON MAKES NO OTHER WARRANTY OR REPRESENTATION, AND HEREBY DISCLAIMS ANY AND ALL IMPLIED WARRANTIES, INCLUDING, WITHOUT LIMITATION, THE IMPLIED WARRANTIES OF NON-INFRINGEMENT, MERCHANTABILITY AND FITNESS FOR A PARTICULAR PURPOSE. THE PURCHASER ACKNOWLEDGES THAT THEY ALONE HAVE DETERMINED THAT THE PRODUCT WILL SUITABLY MEET THE REQUIREMENTS OF THE PURCHASER’S INTENDED USE. Purchaser’s Remedy - Horizon’s sole obligation and purchaser’s sole and exclusive remedy shall be that Horizon will, at its option, either (i) service, or (ii) replace, any Product determined by Horizon to be defective. Horizon reserves the right to inspect any and all Product(s) involved in a warranty claim. Service or replacement decisions are at the sole discretion of Horizon. Proof of purchase is required for all warranty claims. SERVICE OR REPLACEMENT AS PROVIDED UNDER THIS WARRANTY IS THE PURCHASER’S SOLE AND EXCLUSIVE REMEDY. Limitation of Liability - HORIZON SHALL NOT BE LIABLE FOR SPECIAL, INDIRECT, INCIDENTAL OR CONSEQUENTIAL DAMAGES, LOSS OF PROFITS OR PRODUCTION OR COMMERCIAL LOSS IN ANY WAY, REGARDLESS OF WHETHER SUCH CLAIM IS BASED IN CONTRACT, WARRANTY, TORT, NEGLIGENCE, STRICT LIABILITY OR ANY OTHER THEORY OF LIABILITY, EVEN IF HORIZON HAS BEEN ADVISED OF THE POSSIBILITY OF SUCH DAMAGES. Further, in no event shall the liability of Horizon exceed the individual price of the Product on which liability is asserted. As Horizon has no control over use, setup, final assembly, modification or misuse, no liability shall be assumed nor accepted for any resulting damage or injury. By the act of use, setup or assembly, the user accepts all resulting liability. If you as the purchaser or user are not prepared to accept the liability associated with the use of the Product, purchaser is advised to return the Product immediately in new and unused condition to the place of purchase. Law - These terms are governed by Illinois law (without regard to conflict of law principals). This warranty gives you specific legal rights, and you may also have other rights which vary from state to state. Horizon reserves the right to change or modify this warranty at any time without notice. WARRANTY SERVICES Questions, Assistance, and Services - Your local hobby store and/ or place of purchase cannot provide warranty support or service. Once assembly, setup or use of the Product has been started, you must contact your local distributor or Horizon directly. This will enable Horizon to better answer your questions and service you in the event that you may need any assistance. For questions or assistance, please visit our website at www.horizonhobby.com, submit a Product Support Inquiry, or call 877.504.0233 toll free to speak to a Product Support representative. Inspection or Services - If this Product needs to be inspected or serviced and is compliant in the country you live and use the Product in, please use the Horizon Online Service Request submission process found on our website or call Horizon to obtain a Return Merchandise Authorization (RMA) number. Pack the Product securely using a shipping carton. Please note that original boxes may be included, but are not designed to withstand the rigors of shipping without additional protection. Ship via a carrier that provides tracking and insurance for lost or damaged parcels, as Horizon is not responsible for merchandise until it arrives and is accepted at our facility. An Online Service Request is available at http://www.horizonhobby.com/content/_service-center_renderservice-center. If you do not have internet access, please contact Horizon Product Support to obtain a RMA number along with instructions for submitting your product for service. When calling Horizon, you will be asked to provide your complete name, street address, email address and phone number where you can be reached during business hours. When sending product into Horizon, please include your RMA number, a list of the included items, and a brief summary of the problem. A copy of your original sales receipt must be included for warranty consideration. Be sure your name, address, and RMA number are clearly written on the outside of the shipping carton. NOTICE: Do not ship LiPo batteries to Horizon. If you have any issue with a LiPo battery, please contact the appropriate Horizon Product Support office. Warranty Requirements - For Warranty consideration, you must include your original sales receipt verifying the proof-of-purchase date. Provided warranty conditions have been met, your Product will be serviced or replaced free of charge. Service or replacement decisions are at the sole discretion of Horizon. Non-Warranty Service - Should your service not be covered by warranty, service will be completed and payment will be required without notification or estimate of the expense unless the expense exceeds 50% of the retail purchase cost. By submitting the item for service you are agreeing to payment of the service without notification. Service estimates are available upon request. You must include this request with your item submitted for service. Non-warranty service estimates will be billed a minimum of ½ hour of labor. In addition you will be billed for return freight. Horizon accepts money orders and cashier’s checks, as well as Visa, MasterCard, American Express, and Discover cards. By submitting any item to Horizon for service, you are agreeing to Horizon’s Terms and Conditions found on our website http://www.horizonhobby.com/content/_service-center_render-servicecenter. ATTENTION: Horizon service is limited to Product compliant in the country of use and ownership. If received, a non-compliant Product will not be serviced. Further, the sender will be responsible for arranging return shipment of the un-serviced Product, through a carrier of the sender’s choice and at the sender’s expense. Horizon will hold non-compliant Product for a period of 60 days from notification, after which it will be discarded. Garantie und Service Informationen Garantiezeitraum - Exklusive Garantie Horizon Hobby Inc (Horizon) garantiert, dass das gekaufte Produkt frei von Material- und Montagefehlern ist. Der Garantiezeitraum entspricht den gesetzlichen Bestimmung des Landes, in dem das Produkt erworben wurde. In Deutschland beträgt der Garantiezeitraum 6 Monate und der Gewährleistungszeitraum 18 Monate nach dem Garantiezeitraum. Einschränkungen der Garantie - (a) Die Garantie wird nur dem Erstkäufer (Käufer) gewährt und kann nicht übertragen werden. Der Anspruch des Käufers besteht in der Reparatur oder dem Tausch im Rahmen dieser Garantie. Die Garantie erstreckt sich ausschließlich auf Produkte, die bei einem autorisierten Horizon Händler erworben wurden. Verkäufe an dritte werden von dieser Garantie nicht gedeckt. Garantieansprüche werden nur angenommen, wenn ein gültiger Kaufnachweis erbracht wird. Horizon behält sich das Recht vor, diese Garantiebestimmungen ohne Ankündigung zu ändern oder modifizieren und widerruft dann bestehende Garantiebestimmungen. (b) Horizon übernimmt keine Garantie für die Verkaufbarkeit des Produktes, die Fähigkeiten und die Fitness des Verbrauchers für einen bestimmten Einsatzzweck des Produktes. Der Käufer allein ist dafür verantwortlich, zu prüfen, ob das Produkt seinen Fähigkeiten und dem vorgesehenen Einsatzzweck entspricht. (c) Ansprüche des Käufers Es liegt ausschließlich im Ermessen von Horizon, ob das Produkt, bei dem ein Garantiefall festgestellt wurde, repariert oder ausgetauscht wird. Dies sind die exklusiven Ansprüche des Käufers, wenn ein Defekt festgestellt wird. Horizon behält sich vor, alle eingesetzten Komponenten zu prüfen, die in den Garantiefall einbezogen werden können. Die Entscheidung zur Reparatur oder zum Austausch liegt nur bei Horizon. Die Garantie schließt kosmetische Defekte oder Defekte, hervorgerufen durch höhere Gewalt, falsche Behandlung des Produktes, falscher Einsatz des Produktes, kommerziellen Einsatz oder Modifikationen irgendwelcher Art aus. Die Garantie schließt Schäden, die durch falschen Einbau, falsche Handhabung, Unfälle, Betrieb, Service oder Reparaturversuche, die nicht von Horizon ausgeführt wurden aus. Rücksendungen durch den Käufer direkt an Horizon oder eine seiner Landesvertretung bedürfen der Schriftform. Schadensbeschränkung - Horizon ist nicht für direkte oder indirekte Folgeschäden, Einkommensausfälle oder kommerzielle Verluste, die in irgendeinem Zusammenhang mit dem Produkt stehen verantwortlich, unabhängig ab ein Anspruch im Zusammenhang mit einem Vertrag, der Garantie oder der Gewährleistung erhoben werden. Horizon wird darüber hinaus keine Ansprüche aus einem Garantiefall akzeptieren, die über den individuellen Wert des Produktes hinaus gehen. Horizon hat keinen Einfluss auf den Einbau, die Verwendung oder die Wartung des Produktes oder etwaiger Produktkombinationen, die vom Käufer gewählt werden. Horizon übernimmt keine Garantie und akzeptiert keine Ansprüche für in der folge auftretende Verletzungen oder Beschädigungen. Mit der Verwendung und dem Einbau des Produktes akzeptiert der Käufer alle aufgeführten Garantiebestimmungen ohne Einschränkungen und Vorbehalte. Wenn Sie als Käufer nicht bereit sind, diese Bestimmungen im Zusammenhang mit der Benutzung des Produktes zu akzeptieren, werden Sie gebeten, dass Produkt in unbenutztem Zustand in der Originalverpackung vollständig bei dem Verkäufer zurückzugeben. Sicherheitshinweise - Dieses ist ein hochwertiges Hobby Produkt und kein Spielzeug. Es muss mit Vorsicht und Umsicht eingesetzt werden und erfordert einige mechanische wie auch mentale Fähigkeiten. Ein Versagen, das Produkt sicher und umsichtig zu betreiben kann zu Verletzungen von Lebewesen und Sachbeschädigungen erheblichen Ausmaßes führen. Dieses Produkt ist nicht für den Gebrauch durch Kinder ohne die Aufsicht eines Erziehungsberechtigten vorgesehen. Die Anleitung enthält Sicherheitshinweise und Vorschriften sowie Hinweise für die Wartung und den Betrieb des Produktes. Es ist unabdingbar, diese Hinweise vor der ersten Inbetriebnahme zu lesen und zu verstehen. Nur so kann der falsche Umgang verhindert und Unfälle mit Verletzungen und Beschädigungen vermieden werden. Fragen, Hilfe und Reparaturen - Ihr lokaler Fachhändler und die Verkaufstelle können eine Garantiebeurteilung ohne Rücksprache mit Horizon nicht durchführen. Dies gilt auch für Garantiereparaturen. Deshalb kontaktieren Sie in einem solchen Fall den Händler, der sich mit Horizon kurz schließen wird, um eine sachgerechte Entscheidung zu fällen, die Ihnen schnellst möglich hilft. Wartung und Reparatur - Muss Ihr Produkt gewartet oder repariert werden, wenden Sie sich entweder an Ihren Fachhändler oder direkt an Horizon. Rücksendungen/Reparaturen werden nur mit einer von Horizon vergebenen RMA Nummer bearbeitet. Diese Nummer erhalten Sie oder ihr Fachhändler vom technischen Service. Mehr Informationen dazu erhalten Sie im Serviceportal unter www. Horizonhobby.de oder telefonisch bei dem technischen Service von Horizon. Packen Sie das Produkt sorgfältig ein. Beachten Sie, dass der Originalkarton in der Regel nicht ausreicht, um beim Versand nicht beschädigt zu werden. Verwenden Sie einen Paketdienstleister mit einer Tracking Funktion und Versicherung, da Horizon bis zur Annahme keine Verantwortung für den Versand des Produktes übernimmt. Bitte legen Sie dem Produkt einen Kaufbeleg bei, sowie eine ausführliche Fehlerbeschreibung und eine Liste aller eingesendeten Einzelkomponenten. Weiterhin benötigen wir die vollständige Adresse, eine Telefonnummer für Rückfragen, sowie eine Email Adresse. Garantie und Reparaturen - Garantieanfragen werden nur bearbeitet, wenn ein Originalkaufbeleg von einem autorisierten Fachhändler beiliegt, aus dem der Käufer und das Kaufdatum hervorgeht. Sollte sich ein Garantiefall bestätigen wird das Produkt repariert oder ersetzt. Diese Entscheidung obliegt einzig Horizon Hobby. Kostenpflichtige Reparaturen - Liegt eine kostenpflichtige Reparatur vor, erstellen wir einen Kostenvoranschlag, den wir Ihrem Händler übermitteln. Die Reparatur wird erst vorgenommen, wenn wir die Freigabe des Händlers erhalten. Der Preis für die Reparatur ist bei Ihrem Händler zu entrichten. Bei kostenpflichtigen Reparaturen werden mindestens 30 Minuten Werkstattzeit und die Rückversandkosten in Rechnung gestellt. Sollten wir nach 90 Tagen keine Einverständniserklärung zur Reparatur vorliegen haben, behalten wir uns vor, das Produkt zu vernichten oder anderweitig zu verwerten. Achtung: Kostenpflichtige Reparaturen nehmen wir nur für Elektronik und Motoren vor. Mechanische Reparaturen, besonders bei Hubschraubern und RC-Cars sind extrem aufwendig und müssen deshalb vom Käufer selbst vorgenommen werden. Garantie et réparations Durée de la garantie - Garantie exclusive - Horizon Hobby, Inc. (Horizon) garantit que le Produit acheté (le « Produit ») sera exempt de défauts matériels et de fabrication à sa date d’achat par l’Acheteur. La durée de garantie correspond aux dispositions légales du pays dans lequel le produit a été acquis. La durée de garantie est de 6 mois et la durée d’obligation de garantie de 18 mois à l’expiration de la période de garantie. Limitations de la garantie - (a) La garantie est donnée à l’acheteur initial (« Acheteur ») et n’est pas transférable. Le recours de l’acheteur consiste en la réparation ou en l‘échange dans le cadre de cette garantie. La garantie s’applique uniquement aux produits achetés chez un revendeur Horizon agréé. Les ventes faites à des tiers ne sont pas couvertes par cette garantie. Les revendications en garantie seront acceptées sur fourniture d’une preuve d’achat valide uniquement. Horizon se réserve le droit de modifier les dispositions de la présente garantie sans avis préalable et révoque alors les dispositions de garantie existantes. (b) Horizon n’endosse aucune garantie quant à la vendabilité du produit ou aux capacités et à la forme physique de l’utilisateur pour une utilisation donnée du produit. Il est de la seule responsabilité de l’acheteur de vérifier si le produit correspond à ses capacités et à l’utilisation prévue. (c) Recours de l’acheteur – Il est de la seule discrétion d‘Horizon de déterminer si un produit présentant un cas de garantie sera réparé ou échangé. Ce sont là les recours exclusifs de l’acheteur lorsqu’un défaut est constaté. Horizon se réserve la possibilité de vérifier tous les éléments utilisés et susceptibles d’être intégrés dans le cas de garantie. La décision de réparer ou de remplacer le produit est du seul ressort d’Horizon. La garantie exclut les défauts esthétiques ou les défauts provoqués par des cas de force majeure, une manipulation incorrecte du produit, une utilisation incorrecte ou commerciale de ce dernier ou encore des modifications de quelque nature qu’elles soient. La garantie ne couvre pas les dégâts résultant d’un montage ou d’une manipulation erronés, d’accidents ou encore du fonctionnement ainsi que des tentatives d’entretien ou de réparation non effectuées par Horizon. Les retours effectués par le fait de l’acheteur directement à Horizon ou à l’une de ses représentations nationales requièrent une confirmation écrite. Limitation des dégâts - Horizon ne saurait être tenu pour responsable de dommages conséquents directs ou indirects, de pertes de revenus ou de pertes commerciales, liés de quelque manière que ce soit au produit et ce, indépendamment du fait qu’un recours puisse être formulé en relation avec un contrat, la garantie ou l’obligation de garantie. Par ailleurs, Horizon n’acceptera pas de recours issus d’un cas de garantie lorsque ces recours dépassent la valeur unitaire du produit. Horizon n’exerce aucune influence sur le montage, l’utilisation ou la maintenance du produit ou sur d’éventuelles combinaisons de produits choisies par l’acheteur. Horizon ne prend en compte aucune garantie et n‘accepte aucun recours pour les blessures ou les dommages pouvant en résulter. En utilisant et en montant le produit, l’acheteur accepte sans restriction ni réserve toutes les dispositions relatives à la garantie figurant dans le présent document. Si vous n’êtes pas prêt, en tant qu’acheteur, à accepter ces dispositions en relation avec l’utilisation du produit, nous vous demandons de restituer au vendeur le produit complet, non utilisé et dans son emballage d’origine. Indications relatives à la sécurité - Ceci est un produit de loisirs perfectionné et non un jouet. Il doit être utilisé avec précaution et bon sens et nécessite quelques aptitudes mécaniques ainsi que mentales. L’incapacité à utiliser le produit de manière sûre et raisonnable peut provoquer des blessures et des dégâts matériels conséquents. Ce produit n’est pas destiné à être utilisé par des enfants sans la surveillance par un tuteur. La notice d’utilisation contient des indications relatives à la sécurité ainsi que des indications concernant la maintenance et le fonctionnement du produit. Il est absolument indispensable de lire et de comprendre ces indications avant la première mise en service. C’est uniquement ainsi qu’il sera possible d’éviter une manipulation erronée et des accidents entraînant des blessures et des dégâts. Questions, assistance et réparations - Votre revendeur spécialisé local et le point de vente ne peuvent effectuer une estimation d’éligibilité à l’application de la garantie sans avoir consulté Horizon. Cela vaut également pour les réparations sous garantie. Vous voudrez bien, dans un tel cas, contacter le revendeur qui conviendra avec Horizon d’une décision appropriée, destinée à vous aider le plus rapidement possible. Maintenance et réparation - Si votre produit doit faire l’objet d’une maintenance ou d‘une réparation, adressez-vous soit à votre revendeur spécialisé, soit directement à Horizon. Emballez le produit soigneusement. Veuillez noter que le carton d‘emballage d’origine ne suffit pas, en règle générale, à protéger le produit des dégâts pouvant survenir pendant le transport. Faites appel à un service de messagerie proposant une fonction de suivi et une assurance, puisque Horizon ne prend aucune responsabilité pour l’expédition du produit jusqu’à sa réception acceptée. Veuillez joindre une preuve d’achat, une description détaillée des défauts ainsi qu’une liste de tous les éléments distincts envoyés. Nous avons de plus besoin d’une adresse complète, d’un numéro de téléphone (pour demander des renseignements) et d’une adresse de courriel. Garantie et réparations - Les demandes en garantie seront uniquement traitées en présence d’une preuve d’achat originale émanant d’un revendeur spécialisé agréé, sur laquelle figurent le nom de l’acheteur ainsi que la date d’achat. Si le cas de garantie est confirmé, le produit sera réparé Cette décision relève uniquement de Horizon Hobby. Réparations payantes - En cas de réparation payante, nous établissons un devis que nous transmettons à votre revendeur. La réparation sera seulement effectuée après que nous ayons reçu la confirmation du revendeur. Le prix de la réparation devra être acquitté au revendeur. Pour les réparations payantes, nous facturons au minimum 30 minutes de travail en atelier ainsi que les frais de réexpédition. En l’absence d’un accord pour la réparation dans un délai de 90 jours, nous nous réservons la possibilité de détruire le produit ou de l’utiliser autrement. Attention: Nous n’effectuons de réparations payantes que pour les composants électroniques et les moteurs. Les réparations touchant à la mécanique, en particulier celles des hélicoptères et des voitures radiocommandées, sont extrêmement coûteuses et doivent par conséquent être effectuées par l’acheteur lui-même. Durata della Garanzia Periodo di garanzia - Garanzia esclusiva - Horizon Hobby, Inc., (Horizon) garantisce che i prodotti acquistati (il “Prodotto”) sono privi di difetti relativi ai materiali e di eventuali errori di montaggio. Il periodo di garanzia è conforme alle disposizioni legali del paese nel quale il prodotto è stato acquistato. Tale periodo di garanzia ammonta a 6 mesi e si estende ad altri 18 mesi dopo tale termine. Limiti della garanzia - (a) La garanzia è limitata all’acquirente originale (Acquirente) e non è cedibile a terzi. L’acquirente ha il diritto a far riparare o a far sostituire la merce durante il periodo di questa garanzia. La garanzia copre solo quei prodotti acquistati presso un rivenditore autorizzato Horizon. Altre transazioni di terze parti non sono coperte da questa garanzia. La prova di acquisto è necessaria per far valere il diritto di garanzia. Inoltre, Horizon si riserva il diritto di cambiare o modificare i termini di questa garanzia senza alcun preavviso e di escludere tutte le altre garanzie già esistenti. (b) Horizon non si assume alcuna garanzia per la disponibilità del prodotto, per l’adeguatezza o l’idoneità del prodotto a particolari previsti dall’utente. è sola responsabilità dell’acquirente il fatto di verificare se il prodotto è adatto agli scopi da lui previsti. (c) Richiesta dell’acquirente – spetta soltanto a Horizon, a propria discrezione riparare o sostituire qualsiasi prodotto considerato difettoso e che rientra nei termini di garanzia. queste sono le uniche rivalse a cui l’acquirente si può appellare, se un prodotto è difettoso. Horizon si riserva il diritto di controllare qualsiasi componente utilizzato che viene coinvolto nella rivalsa di garanzia. Le decisioni relative alla sostituzione o alla riparazione avvengono solo in base alla discrezione di Horizon. Questa garanzia non copre dei danni superficiali o danni per cause di forza maggiore, uso errato del prodotto, negligenza, uso ai fini commerciali, o una qualsiasi modifica a qualsiasi parte del prodotto. Questa garanzia non copre danni dovuti ad una installazione errata, ad un funzionamento errato, ad una manutenzione o un tentativo di riparazione non idonei a cura di soggetti diversi da Horizon. La restituzione del prodotto a cura dell’acquirente, o da un suo rappresentante, deve essere approvata per iscritto dalla Horizon. Limiti di danno - Horizon non si riterrà responsabile per danni speciali, diretti, indiretti o consequenziali; perdita di profitto o di produzione; perdita commerciale connessa al prodotto, indipendentemente dal fatto che la richiesta si basa su un contratto o sulla garanzia. Inoltre la responsabilità di Horizon non supera mai in nessun caso il prezzo di acquisto del prodotto per il quale si chiede la responsabilità. Horizon non ha alcun controllo sul montaggio, sull’utilizzo o sulla manutenzione del prodotto o di combinazioni di vari prodotti. Quindi Horizon non accetta nessuna responsabilità per danni o lesioni derivanti da tali circostanze. Con l’utilizzo e il montaggio del prodotto l’utente acconsente a tutte le condizioni, limitazioni e riserve di garanzia citate in questa sede. Qualora l’utente non fosse pronto ad assumersi tale responsabilità associata all’uso del prodotto, si suggerisce di di restituire il prodotto intatto, mai usato e immediatamente presso il venditore. Indicazioni di sicurezza - Questo è un prodotto sofisticato di hobbistica e non è un giocattolo. Esso deve essere manipolato con cautela, con giudizio e richiede delle conoscenze basilari di meccanica e delle facoltà mentali di base. Se il prodotto non verrà manipolato in maniera sicura e responsabile potrebbero risultare delle lesioni, dei gravi danni a persone, al prodotto o all’ambiente circostante. Questo prodotto non è concepito per essere usato dai bambini senza una diretta supervisione di un adulto. Il manuale del prodotto contiene le istruzioni di sicurezza, di funzionamento e di manutenzione del prodotto stesso. È fondamentale leggere e seguire tutte le istruzioni e le avvertenze nel manuale prima di mettere in funzione il prodotto. Solo così si eviterà un utilizzo errato e di preverranno incidenti, lesioni o danni. Domande, assistenza e riparazioni - Il vostro negozio locale e/o luogo di acquisto non possono fornire garanzie di assistenza o riparazione senza previo colloquio con Horizon. questo vale anche per le riparazioni in garanzia. Quindi in tale casi bisogna interpellare un rivenditore, che si metterà in contatto subito con Horizon per prendere una decisione che vi possa aiutare nel più breve tempo possibile. Manutenzione e riparazione - Se il prodotto deve essere ispezionato o riparato, si prega di rivolgersi ad un rivenditore specializzato o direttamente ad Horizon. il prodotto deve essere Imballato con cura. Bisogna far notare che i box originali solitamente non sono adatti per effettuare una spedizione senza subire alcun danno. Bisogna effettuare una spedizione via corriere che fornisce una tracciabilità e un’assicurazione, in quanto Horizon non si assume alcuna responsabilità in relazione alla spedizione del prodotto. Inserire il prodotto in una busta assieme ad una descrizione dettagliata degli errori e ad una lista di tutti i singoli componenti spediti. Inoltre abbiasmo bisogno di un indirizzo completo, di un numnero di telefono per chiedere ulteriori domande e di un indirizzo e-mail. Garanzia a riparazione - Le richieste in garanzia verranno elaborate solo se è presente una prova d’acquisto in originale proveniente da un rivenditore specializzato autorizzato, nella quale è ben visibile la data di acquisto. Se la garanzia viene confermata, allora il prodotto verrà riparato o sostituito. Questa decisione spetta esclusivamente a Horizon Hobby. Riparazioni a pagamento - Se bisogna effettuare una riparazione a pagamento, effettueremo un preventivo che verrà inoltrato al vostro rivenditore. La riparazione verrà effettuata dopo l’autorizzazione da parte del vostro rivenditore. La somma per la riparazione dovrà essere pagata al vostro rivenditore. Le riparazioni a pagamento avranno un costo minimo di 30 minuti di lavoro e in fattura includeranno le spese di restituzione. Qualsiasi riparazione non pagata e non richiesta entro 90 giorni verrà considerata abbandonata e verrà gestita di conseguenza. ATTENZIONE: Le riparazioni a pagamento sono disponibili solo sull’elettronica e sui motori. Le riparazioni a livello meccanico, soprattutto per gli elicotteri e le vetture RC sono molto costose e devono essere effettuate autonomamente dall’acquirente. Warranty and Service Contact Information Country of Purchase Horizon Hobby United States of America Horizon Service Center (Electronics and engines) Horizon Product Support (All other products) Address 4105 Fieldstone Rd Champaign, Illinois, 61822 USA Phone Number/Email Address 877-504-0233 Online Repair Request: www.horizonhobby.com/service 877-504-0233 [email protected] United Kingdom Horizon Hobby Limited Units 1–4 , Ployters Rd, Staple Tye Harlow, Essex, CM18 7NS, United Kingdom +44 (0) 1279 641 097 [email protected] Germany Horizon Technischer Service Christian-Junge-Straße 1 25337 Elmshorn, Germany +49 (0) 4121 2655 100 [email protected] France Horizon Hobby SAS 11 Rue Georges Charpak 77127 Lieusaint, France +33 (0) 1 60 18 34 90 [email protected] China Horizon Hobby – China Room 506, No. 97 Changshou Rd. Shanghai, China 200060 +86 (021) 5180 9868 [email protected] Parts Contact Information Horizon Hobby Adresse Telefon/Email Adresse Pays d’achat Horizon Hobby Adresse Numéro de téléphone/Courriel Stato di acquisto Horizon Hobby Indirizzo Telefono/Indirizzo e-mail Deutschland Horizon Technischer Service Christian-Junge-Straße 1 25337 Elmshorn, Germany +49 (0) 4121 2655 100 [email protected] France Horizon Hobby SAS 11 Rue Georges Charpak 77127 Lieusaint, France +33 (0) 1 60 18 34 90 [email protected] Germania Horizon Technischer Service Christian-Junge-Straße 1 25337 Elmshorn, Germany +49 (0) 4121 2655 100 [email protected] Kundendienstinformationen Adresse Telefon/Email Adresse Pays d’achat Horizon Hobby Adresse Numéro de téléphone/Courriel Stato di acquisto Horizon Hobby Indirizzo Telefono/Indirizzo e-mail Deutschland Horizon Hobby GmbH Christian-Junge-Straße 1 25337 Elmshorn, Germany +49 (0) 4121 2655 100 [email protected] France Horizon Hobby SAS 11 Rue Georges Charpak 77127 Lieusaint, France +33 (0) 1 60 18 34 90 [email protected] Germania Horizon Hobby GmbH Christian-Junge-Straße 1 25337 Elmshorn, Germany +49 (0) 4121 2655 100 [email protected] Rechtliche Informationen für die Europäische Union Konformitätserklärung laut Allgemeine Anforderungen (ISO/IEC 17050-1:2004, korrigierte Fassung 2007-06-15); Deutsche und Englische Fassung EN ISO/IEC 17050-1:2010 Declaration of conformity (in accordance with ISO/IEC 17050-1) Phone Number/Email Address United States of America Sales 800-338-4639 [email protected] United Kingdom Horizon Hobby Limited Units 1–4, Ployters Rd, Staple Tye Harlow, Essex, CM18 7NS, United Kingdom +44 (0) 1279 641 097 [email protected] Horizon Hobby GmbH Christian-Junge-Straße 1 D-25337 Elmshorn Germany Horizon Hobby GmbH Christian-Junge-Straße 1 25337 Elmshorn, Germany +49 (0) 4121 2655 100 [email protected] France Horizon Hobby SAS 11 Rue Georges Charpak 77127 Lieusaint, France +33 (0) 1 60 18 34 90 [email protected] Horizon Hobby – China Room 506, No. 97 Changshou Rd. Shanghai, China 200060 +86 (021) 5180 9868 [email protected] erklärt das Produkt: declares the product: Product(s): Item Number(s): Angewendete harmonisierte Normen: Harmonized standards applied: EN55022: 2010 + AC:2011 EN55024: 2010 EN61000-3-2: 2006 + A1:2009 + A2:2009 EN61000-3-3: 2008 EN60335-1: 2002 + A11:2004 + A1:2004 + A12:2006 + A2:2006 + A13:2008 + A14:2010 + A15:2011 EN60335-2-29: 2004 + A2:2010 Elmshorn 20.12.2012 DYN Prophet Sport Quattro 100Wx4 AC/DC Battery Charger DYN4110 The object of declaration described above is in conformity with the requirements of the specifications listed below, following the provisions of the EMC Directive 2004/108/EC and LVD Directive 2006/95/EC: EN55022: 2010 + AC:2011 EN55024: 2010 EN61000-3-2: 2006 + A1:2009 + A2:2009 EN61000-3-3: 2008 EN60335-1: 2002 + A11:2004 + A1:2004 + A12:2006 + A2:2006 + A13:2008 + A14:2010 + A15:2011 EN60335-2-29: 2004 + A2:2010 Signed for and on behalf of: Horizon Hobby, Inc. Steven A. Hall Champaign, IL USA Executive Vice President and Chief Operating Officer Dec 20, 2012 International Operations and Risk Management Horizon Hobby, Inc. Instructions for disposal of WEEE by users in the European Union This product must not be disposed of with other waste. Instead, it is the user’s responsibility to dispose of their waste equipment by handing it over to a designated collections point for the recycling of waste electrical and electronic equipment. The separate collection and recycling of your waste equipment at the time of disposal will help to conserve natural resources and ensure that it is recycled in a manner that protects human health and the environment. For more information about where you can drop off your waste equipment for recycling, please contact your local city office, your household waste disposal service or where you purchased the product. DYN Prophet Sport Quattro 100Wx4 AC/DC Battery Charger, DYN4110 DYN Prophet Sport Quattro 100Wx4 AC/DC Battery Charger, DYN4110 den übrigen einschlägigen Bestimmungen des EMV-Richtlinie 2004/108/EC und LVD-Richtlinie 2006/95/EC. complies with the essential requirements of the EMC Directive 2004/108/EC and LVD Directive 2006/95/EC. Declaration of Conformity (in accordance with ISO/IEC 17050-1) No. HH2012122001 Informations de conformité pour l’Union européenne Déclaration de conformité (conformément à la norme ISO/IEC 17050-1) 4105 Fieldstone Rd Champaign, Illinois, 61822 USA Note: This equipment has been tested and found to comply with the limits for a Class B digital device, pursuant to Part 15 of the FCC rules. These limits are designed to provide reasonable protection against harmful interference in a residential installation. This equipment generates, uses and can radiate radio frequency energy and, if not installed and used in accordance with the instructions, may cause harmful interference to radio communications. Compliance Information for the European Union Informazioni di Servizio clienti Horizon Hobby Address FCC Information Informations de contact pour les pièces Land des Kauf Horizon Hobby China Garanzia e Revisiona informazioni per i contatti Land des Kauf No. HH2012122001 Country of Purchase Coordonnées de Garantie et réparations Garantie und Service Kontaktinformationen Steven A. Hall Geschäftsführer Managing Director Birgit Schamuhn Geschäftsführerin Managing Director Dichiarazione di conformità (in conformità con ISO/IEC 17050-1) No. HH2012122001 No. HH2012122001 Produit(s): Numéro(s) d’article: Informazioni sulla conformità per l’Unione Europea DYN Prophet Sport Quattro 100Wx4 AC/DC Battery Charger DYN4110 Prodotto(i): Numero(i) articolo: DYN Prophet Sport Quattro 100Wx4 AC/DC Battery Charger DYN4110 L’objet de la déclaration décrit ci-dessus est en conformité avec les exigences des spécifications énumérées ci-après, suivant les conditions de la directive CEM 2004/108/EC et LVD 2006/95/EC: Gli oggetti presentati nella dichiarazione sopra citata sono conformi ai requisiti delle specifiche elencate qui di seguito, seguendo le disposizioni della direttiva europea EMC 2004/108/EC e LVD 2006/95/EC: EN55022: 2010 + AC:2011 EN55024: 2010 EN55022: 2010 + AC:2011 EN55024: 2010 EN61000-3-2: 2006 + A1:2009 + A2:2009 EN61000-3-3: 2008 EN60335-1: 2002 + A11:2004 + A1:2004 + A12:2006 + A2:2006 + A13:2008 + A14:2010 + A15:2011 EN60335-2-29: 2004 + A2:2010 Signé en nom et pour le compte de: Horizon Hobby, Inc. Steven A. Hall Champaign, IL USA Vice-Président, Directeur Général 20.12.2012 Gestion Internationale des Activités et des Risques Horizon Hobby, Inc. EN61000-3-2: 2006 + A1:2009 + A2:2009 EN61000-3-3: 2008 EN60335-1: 2002 + A11:2004 + A1:2004 + A12:2006 + A2:2006 + A13:2008 + A14:2010 + A15:2011 EN60335-2-29: 2004 + A2:2010 Firmato per conto di: Horizon Hobby, Inc. Steven A. Hall Champaign, IL USA Executive Vice President and Chief Operating Officer 20.12.2012 International Operations and Risk Management Horizon Hobby, Inc. Elimination dans l’Union Européenne Istruzioni del RAEE per lo smaltimento da parte di utenti dell’Unione Europea Ce produit ne doit pas être éliminé avec les ordures ménagères. Il est de la responsabilité de l‘utilisateur de remettre le produit à un Questo prodotto non deve essere smaltito assieme ai rifiuti domestici. Al contrario, l’utente è responsabile dello smaltimento di tali point de collecte officiel des déchets d’équipements électriques. Cette procédure permet de garantir le respect de l’environnement et rifiuti che devono essere portati in un centro di raccolta designato per il riciclaggio di rifiuti elettrici e apparecchiature elettroniche. l’absence de sollicitation excessive des ressources naturelles. Elle protège de plus le bien-être de la communauté humaine. Pour plus La raccolta differenziata e il riciclaggio di tali rifiuti provenienti da apparecchiature nel momento dello smaltimento aiuteranno a d’informations quant aux lieux d’éliminations des déchets d‘équipements électriques, vous pouvez contacter votre mairie ou le service local de preservare le risorse naturali e garantiranno un riciclaggio adatto a proteggere il benessere dell’uomo e dell’ambiente. Per maggiori informazioni traitement des ordures ménagères. sui centri di raccolta, contattare il proprio ufficio locale, il servizio di smaltimento rifiuti o il negozio presso il quale è stato acquistato il prodotto. Horizon Hobby GmbH; Christian-Junge-Straße 1; D-25337 Elmshorn HR Pi: HRB 1909; UStlDNr,:DE812678792; STR.NR.L 1829812324 Geschäftsführer: Birgit Schamuhn, Steven A. Hall -- Tel.: +49 (0) 4121 2655 100 • Fax: +49 (0) 4121 2655 111 eMail: [email protected]; Internet: www.horizonhobby.de Es gelten unsere allgemeinen Geschäftsbedingungen, die in unseren Geschäftsräumen eingesehen weden können. Eare bleibt bis zur vollstandigen Bezahlung Eigentum der Horizon Hobby GmbH Anweisungen zur Entsorgung von Elektro—und Elektronik-Altgeräten für Benutzer in der Europäischen Union Dieses Produkt darf nicht zusammen mit anderem Abfall entsorgt werden. Stattdessen ist der Benutzer dafür verantwortlich, unbrauchbare Geräte durch Abgabe bei einer speziellen Sammelstelle für das Recycling von unbrauchbaren elektrischen und elektronischen Geräten zu entsorgen. Die separate Sammlung und das Recycling von unbrauchbaren Geräten zum Zeitpunkt der Entsorgung hilft, natürliche Ressourcen zu bewahren und sicherzustellen, dass Geräte auf eine Weise wiederverwertet werden, bei der die menschliche Gesundheit und die Umwelt geschützt werden. Weitere Informationen dazu, wo Sie unbrauchbare Geräte zum Recycling abgeben können, erhalten Sie bei lokalen Ämtern, bei der Müllabfuhr für Haushaltsmüll sowie dort, wo Sie das Produkt gekauft haben. ©2013 Horizon Hobby Inc. Dynamite, Prophet, EC3 and the Horizon Hobby logo are tradmarks or registered trademarks of Horizon Hobby, Inc. Created 12/12 38681