1
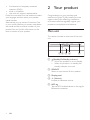
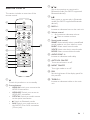
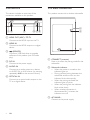
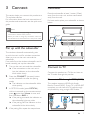
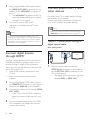
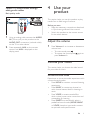
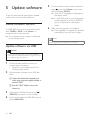
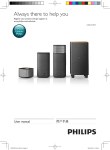
Always there to help you
Register your product and get support at
www.philips.com/support
Question?
Contact
Philips
User manual
HTL7140B
Contents
1Important
2
Safety2
Care for your product
3
Care of the environment
3
Compliance3
Help and support
3
2 Your product
4
Main unit
4
Remote control
5
Connectors6
Wireless subwoofer
6
3Connect
7
Pair up with the subwoofer
7
Placement7
Connect to TV
7
Connect digital devices through HDMI 8
Connect audio from TV and other devices8
4 Use your product
9
9
9
10
11
11
11
11
11
5 Update software
12
12
12
6 Wall mount
13
7 Product specifications
13
8Troubleshooting
14
Adjust the volume
Choose your sound
Play audio through Bluetooth
Connect Bluetooth via NFC
MP3 player
Auto standby
Set display brightness
Apply factory settings
Check software version
Update software via USB
EN
1
1Important
Read and understand all instructions before you
use your product. If damage is caused by failure
to follow instructions, the warranty does not
apply.
Safety
Risk of electric shock or fire!
• Before you make or change any
connections, make sure that all devices are
disconnected from the power outlet.
• Never expose the product and accessories
to rain or water. Never place liquid
containers, such as vases, near the product.
If liquids are spilt on or into the product,
disconnect it from the power outlet
immediately. Contact Consumer Care to
have the product checked before use.
• Never place the product and accessories
near naked flames or other heat sources,
including direct sunlight.
• Never insert objects into the ventilation
slots or other openings on the product.
• Where the mains plug or an appliance
coupler is used as the disconnect device,
the disconnect device shall remain readily
operable.
• Batteries (battery pack or batteries
installed) shall not be exposed to excessive
heat such as sunshine, fire or the like.
• Disconnect the product from the power
outlet before lightning storms.
• When you disconnect the power cord,
always pull the plug, never the cable.
Risk of short circuit or fire!
• For identification and supply ratings, see
the type plate at the back or bottom of
the product.
• Before you connect the product to the
power outlet, ensure that the power
voltage matches the value printed on the
2
EN
back or bottom of the product. Never
connect the product to the power outlet if
the voltage is different.
Risk of injury or damage to this product!
• For wall-mountable products, use only the
supplied wall mount bracket. Secure the
wall mount to a wall that can support the
combined weight of the product and the
wall mount. WOOX Innovations bears no
responsibility for improper wall mounting
that results in accident, injury or damage.
• Never place the product or any objects
on power cords or on other electrical
equipment.
• If the product is transported in
temperatures below 5°C, unpack the
product and wait until its temperature
matches room temperature before
connecting it to the power outlet.
• Parts of this product can be made of
glass. Handle with care to avoid injury and
damage.
Risk of overheating!
• Never install this product in a confined
space. Always leave a space of at least four
inches around the product for ventilation.
Ensure curtains or other objects never
cover the ventilation slots on the product.
Risk of contamination!
• Do not mix batteries (old and new or
carbon and alkaine, etc.).
• Danger of explosion if batteries are
incorrectly replaced. Replace only with the
same or equivalent type.
• Remove batteries if they are exhausted or
if the remote control is not to be used for
a long time.
• Batteries contain chemical substances, they
should be disposed of properly.
Risk of swallowing batteries!
• The product/remote control may contain
a coin/button type battery, which can be
swallowed. Keep the battery out of reach
of children at all times! If swallowed, the
battery can cause serious injury or death.
•
•
•
Severe internal burns can occur within two
hours of ingestion.
If you suspect that a battery has been
swallowed or placed inside any part of the
body, seek immediate medical attention.
When you change the batteries, always
keep all new and used batteries out of
reach of children. Ensure that the battery
compartment is completely secure after
you replace the battery.
If the battery compartment cannot be
completely secured, discontinue use of the
product. Keep out of reach of children and
contact the manufacturer.
This is CLASS II apparatus with double
insulation, and no protective earth provided.
This symbol means that the product contains
batteries covered by European Directive
2013/56/EU which cannot be disposed of with
normal household waste.
Inform yourself about the local separate
collection system for electrical and electronic
products and batteries. Follow local rules and
never dispose of the product and batteries
with normal household waste. Correct disposal
of old products and batteries helps prevent
negative consequences for the environment and
human health.
Removing the disposable batteries
To remove the disposable batteries, see battery
installation section.
Compliance
Care for your product
Use only microfiber cloth to clean the product.
Care of the environment
Disposal of your old product and battery
Your product is designed and manufactured
with high quality materials and components,
which can be recycled and reused.
This symbol on a product means that the
product is covered by European Directive
2012/19/EU.
This product complies with the radio
interference requirements of the European
Community.
Hereby, WOOX Innovations declares that
this product is in compliance with the
essential requirements and other relevant
provisions of Directive 1999/5/EC. You
can find the Declaration of Conformity on
www.p4c.philips.com.
Help and support
For extensive online support, visit
www.philips.com/support to:
• download the user manual and the quick
start guide
• watch video tutorials (available only for
selected models)
EN
3
•
find answers to frequently answered
questions (FAQs)
• email us a question
• chat with our support representative.
Follow the instructions on the website to select
your language, and then enter your product
model number.
Alternatively, you can contact Consumer Care
in your country. Before you contact, note down
the model number and serial number of your
product. You can find this information on the
back or bottom of your product.
2 Your product
Congratulations on your purchase, and
welcome to Philips! To fully benefit from the
support that Philips offers(e.g. notification
of product software upgrade), register your
product at www.philips.com/welcome.
Main unit
This section includes an overview of the main
unit.
ab c d
a
e
(Standby-On/Standby indicator)
• Switch this product on or to standby.
• When this product is in standby, the
standby indicator turns red.
b SOURCE
Select an input source for this product.
c Display panel
d +/- (Volume)
Increase or decrease volume.
e NFC tag
Tap the NFC-enabled device on the tag for
Bluetooth connection.
4
EN
c
Remote control
This section includes an overview of the
remote control.
d
a
/
Skip to the previous or next track in
Bluetooth mode (for AVRCP-supported
Bluetooth devices).
Start, pause or resume play in Bluetooth
mode (for AVRCP-supported Bluetooth
devices).
e BASS +/Increase or decrease bass on the main unit.
b
f Volume control
• +/-: Increase or decrease volume.
•
: Mute or restore volume.
c
d
e
l
f
g Sound mode control
SMART: Automatically select a predefined
sound mode to suit your video or music.
MUSIC: Select stereo sound mode.
VOICE: Select voice clarity sound mode.
MOVIE: Select surround sound mode.
h AUDIO SYNC +/Increase or decrease audio delay.
g
h
i AUTO VOL ON/OFF
Turn auto volume on or off.
i
j
j NIGHT ON/OFF
Turn night mode on or off.
k
k DIM
Set the brightness of the display panel for
this product.
a
Switch this product on or to standby.
b Source buttons
• HDMI IN: Switch your source to the
HDMI IN connection.
• HDMI ARC: Switch your source to
HDMI ARC connection.
• OPTICAL: Switch your audio source
to the optical connection.
•
: Switch to Bluetooth mode.
• AUX: Switch your audio source to
the AUDIO IN or AUX connection
(3.5mm jack).
l TREBLE +/Increase or decrease treble on the main
unit.
EN
5
Connectors
Wireless subwoofer
This section includes an overview of the
connectors available on this product.
This product comes with a wireless subwoofer.
a b
c
a
b
d ef
a HDMI OUT (ARC) - TO TV
Connect to the HDMI input on the TV.
b HDMI IN
Connect to the HDMI output on a digital
device.
c
(SERVICE)
Connect a USB flash drive to upgrade
software of this product (not for media
play).
d DC IN
Connect to the power supply.
e AUDIO IN
Connect to an audio output on a device
via AUDIO IN or AUX source (by pressing
repeatedly AUX on the remote control).
f OPTICAL IN
Connect to an optical audio output on the
TV or a digital device.
c
a CONNECT (connect)
Press to to enter the pairing mode for the
subwoofer.
b Subwoofer indicator
• When the power is turned on, the
indicator lights up.
• During wireless pairing between the
subwoofer and the main unit, the
indicator blinks white quickly.
• When the pairing succeeds, the
indicator lights up white.
• When the pairing fails, the indicator
blinks white slowly.
• When wireless connection is
disconnected for 2 minutes, the
indicator turns off.
c AC MAINS~
Connect to the power supply.
6
EN
3Connect
This section helps you connect this product to a
TV and other devices.
For information about the basic connections of
this product and accessories, see the quick start
guide.
Placement
Place the subwoofer at least 1 meter (3 feet)
away from the main unit, and ten centimeters
away from the wall.
For best results, place your subwoofer as shown
below.
Note
•• For identification and supply ratings, see the type plate
at the back or bottom of the product.
•• Before you make or change any connections, make sure
that all devices are disconnected from the power outlet.
Pair up with the subwoofer
The wireless subwoofer automatically pairs
up with the main unit for wireless connection
when you turn on the main unit and the
subwoofer.
If no audio from the wireless subwoofer can be
heard, manually pair up the subwoofer.
1
2
3
4
Turn on the main unit and the subwoofer.
»» If the connection to the main unit is
lost, the indicator on the subwoofer
blinks white slowly.
Press the CONNECT (connect) button
on the subwoofer to enter the pairing
mode.
»» The indicator on the subwoofer blinks
white quickly.
In OPTICAL mode (press OPTICAL) ,
within six seconds, on the remote control,
press twice then Volume + once, and
then hold down BASS +.
»» If the pairing succeeds, the indicator on
the subwoofer lights up white.
Connect to TV
Connect this product to a TV. You can listen to
the TV audio through this product.
Connect to TV through HDMI (ARC)
This product supports HDMI with Audio
Return Channel (ARC). If your TV is HDMI ARC
compliant, you can hear the TV audio through
this product by using a single HDMI cable.
TV
»» If the pairing fails, the indicator on the
subwoofer blinks white slowly.
If the pairing fails, repeat the steps above.
EN
7
1
2
Using a High Speed HDMI cable, connect
the HDMI OUT (ARC) connector on this
product to the HDMI ARC connector on
the TV.
• The HDMI ARC connector on the TV
might be labeled differently. For details,
see the TV user manual.
On your TV, turn on HDMI-CEC
operations. For details, see the TV user
manual.
Note
Connect audio from TV and
other devices
Play audio from TV or other devices through
the speakers of this product.
Use the best quality connection available on
your TV, this product, and other devices.
Note
•• When your product and TV are connected through
HDMI ARC, an audio connection is not required.
•• If your TV is not HDMI ARC compliant, connect an
audio cable to hear the TV audio through this product.
•• If your TV has a DVI connector, you can use an HDMI/
DVI adapter to connect to TV. However, some of the
features may not be available.
Option 1: Connect audio through a
digital optical cable
Best quality audio
Connect digital devices
through HDMI
Connect a digital device such as a set-top box,
DVD/Blu-ray player, or games console to this
product through a single HDMI connection.
When you connect the devices in this way and
play a file or game, the
• video is automatically displayed on your
TV, and
• audio is automatically played on this
product. 1
2
3
8
Using a High Speed HDMI cable, connect
the HDMI OUT connector on your digital
device to the HDMI IN on this product.
Connect this product to TV through HDMI
OUT (ARC).
• If the TV is not HDMI CEC compliant,
select the correct video input on your
TV.
On the connected device, turn on HDMICEC operations. For details, see the user
manual of the device.
EN
TV
1
Using an optical cable, connect the
OPTICAL IN connector on this product
to the OPTICAL OUT connector on the
TV or other device.
• The digital optical connector might be
labeled SPDIF or SPDIF OUT.
Option 2: Connect audio through
analog audio cables
Basic quality audio
AUDIO OUT
L
1
2
R
4 Use your
product
This section helps you use this product to play
media from a wide range of sources.
Before you start
• Make the necessary connections described
in Quick start guide and User manual.
• Switch this product to the correct source
for the other devices.
Using an analog cable, connect the AUDIO
IN (3.5mm jack) on this product to the
AUDIO OUT connectors (red and white)
on the TV or other device.
Press repeatedly AUX on the remote
control until AUX is displayed on the
display panel.
Adjust the volume
1
Press Volume +/- to increase or decrease a
volume level.
• To mute sound, press .
• To restore the sound, press again or
press Volume +/-.
Choose your sound
This section helps you choose the ideal sound
for your video or music.
Surround sound mode
Experience an immersive audio experience with
surround sound modes.
• Press MOVIE to create a surround listening
experience.
• Press MUSIC to create two-channel or
multi-channel stereo, ideal for listening to
music.
• Press VOICE to create sound effect
which makes human voice more clear and
outstanding for listening.
• Press SMART to automatically select a
predefined sound mode (MOVIE, MUSIC
or VOICE) based on input audio content
to optimize audio performance.
EN
9
Equalizer
Change the high frequency (treble) and low
frequency (bass) settings of this product.
1
Press TREBLE +/- or BASS +/- to change
the frequency.
Synchronize video and sound
What you need
• A Bluetooth device which supports
Bluetooth profile A2DP, AVRCP and with
Bluetooth version as 4.0.
• The maximum operational range between
this product and a Bluetooth device is
approximately 10 meters (30 feet).
1
If the audio and video are not synchronized,
delay the audio to match the video.
1
Press AUDIO SYNC +/- to synchronize
the audio with the video.
2
Auto volume
Turn the auto volume on to keep the volume
constant when you switch to a different source
or to a TV channel with a different content
volume level.
1
Press AUTO VOL ON/OFF to turn auto
volume on or off.
Night mode
For quiet listening, night mode decreases the
volume of loud sounds when audio is played.
Night mode is only available for Dolby Digital
soundtracks.
1
4
Press NIGHT ON/OFF to turn night
mode on or off.
Note
•• If auto volume is set to turned on, you cannot enable
the night mode.
Play audio through Bluetooth
Through Bluetooth, connect this product with
your Bluetooth device (such as an iPad, iPhone,
iPod touch, Android phone, or laptop), and then
you can listen to the audio files stored on the
device through the speakers of this product.
10
3
EN
5
Press on the remote control to switch
this product to Bluetooth mode.
»» BT is displayed on the display panel,
blinking.
On the Bluetooth device, switch on
Bluetooth, search for and select PHILIPS
HTL7140 to start connection (see the
user manual of the Bluetooth device on
how to enable Bluetooth).
»» During connection, BT on the display
panel blinks.
Wait until this product beeps.
»» When the Bluetooth connection succeeds,
BT is displayed on the display panel.
»» If the connection fails, BT on the
display panel blinks continuously.
Select and play audio files or music on
your Bluetooth device.
• During play, if a call is coming, music
play is paused.
• If your Bluetooth device supports
AVRCP profile, on the remote control
you can press
/ to skip to a track,
or press
to pause/resume play.
To exit Bluetooth, select other source.
• When your switch back to Bluetooth
mode, Bluetooth connection remains
active.
Note
•• The music streaming may be interrupted by obstacles
between the device and this product, such as wall,
metallic casing that covers the device, or other devices
nearby that operate in the same frequency.
•• If you want to connect this product with another
Bluetooth device, press and hold on the remote
control to disconnect the currently connected
Bluetooth device.
Connect Bluetooth via NFC
NFC (Near Field Communication) is a
technology that enables short-range wireless
communication between NFC-enabled devices,
such as mobile phones.
What you need
• A Bluetooth device with NFC function.
• For pairing, tap the NFC device on the
NFC tag of this product.
1
2
3
3
Press the buttons on the MP3 player to
select and play audio files or music.
Auto standby
When playing media from a connected device,
this product automatically switches to standby
after 15 minutes of button inactivity and no
audio/video play from a connected device.
Enable NFC on the Bluetooth device (see
the device' s user manual for details).
Set display brightness
Tap the NFC device onto the NFC tag of
this product until this product beeps.
• For first time connection, on some
mobile devices prompt for pair-up
appears, select "YES" for connection.
»» When the Bluetooth connection
succeeds, BT is displayed on the display
panel.
You can press DIM repeatedly to select a
different brightness level of the display panel on
this product.
If you select DIM 0, after 10 seconds LED
message is switched off.
»» If the connection fails, BT on the
display panel blinks continuously.
Select and play audio files or music on
your NFC device.
• To break the connection, tap again the
NFC device onto the NFC tag on this
product.
MP3 player
Apply factory settings
You can reset this product to the default
settings programmed at the factory.
1
In AUX mode, on the remote control
press Volume -, BASS -, and TREBLE - in
sequence within three seconds.
»» When the factory settings restore is
complete, the product automatically
switches off and restarts.
Connect your MP3 player to play your audio
files or music.
What you need
• An MP3 player.
• A 3.5mm stereo audio cable.
1
2
Using the 3.5mm stereo audio cable,
connect the MP3 player to the AUDIO IN
connector on this product.
Press repeatedly AUX on the remote
control until AUDIO IN is displayed on the
display panel.
EN
11
5 Update software
5
To get the best features and support, update
your product with the latest software.
Check software version
In HDMI ARC source, on the remote control
press TREBLE -, BASS -, and Volume - in
sequence within three seconds.
»» The software version number is displayed
on the display panel.
6
On the remote control, within 6 seconds
press twice then Volume + once, and
then hold down MOVIE.
»» Then "UPG" (upgrade) is displayed on
the display panel.
»» If a USB flash drive is not connected or
invalid upgrade file is found, "ERROR"
(error) is displayed on the display
panel.
Wait until the upgrade is completed.
»» If the upgrade is complete, this product
automatically turns off and on again.
Note
•• The upgrade time may take around 3 minutes.
Update software via USB
Caution
•• Do not turn off the power or remove the USB flash
drive when the software update is in progress because
you might damage this product.
1
2
Check the latest software version on
www.philips.com/support.
• Search for your model and click on
"Software and drivers".
Download the software into a USB flash
drive.
aUnzip the download if zipped, and
make sure that the unzipped folder is
named "UPG".
bPut the "UPG" folder in the root
directory.
3
4
12
Connect the USB flash drive to the
(SERVICE) connector on this product.
Switch this product to HDMI ARC source
(press HDMI ARC).
EN
6 Wall mount
Before you mount this product on the wall,
read all safety precautions.
7Product
specifications
Note
•• Specifications and design are subject to change without
Note
notice.
•• Improper wall mounting may result in accident, injury or
damage. If you have any query, contact Consumer Care
in your country.
•• Secure the wall mount to a wall that can support the
combined weight of the product and the wall mount.
Screw length/diameter
Depending on the type of wall mounting this
wall mount bracket, make sure that you use
screws of a suitable length and diameter.
Amplifier
•
•
•
•
3.5mm/0.14”
Audio
•
>25mm/0.98”
See the illustration in the quick start guide on
how to wall mount this product.
1) Secure the wall bracket on the wall with the
dowels and screws.
2) Hang this product on the wall bracket.
Total output power:
320W RMS (+/- 0.5 dB, 10% THD)
Frequency response: 20 Hz-20 kHz / ±3 dB
Signal-to-noise ratio: > 65 dB (CCIR) /
(A-weighted)
Input sensitivity:
• AUX: 1000 mV
• AUDIO IN: 500 mV
S/PDIF Digital audio input:
• Optical: TOSLINK
Bluetooth
••
••
Bluetooth profiles: A2DP, AVRCP
Bluetooth version: 4.0
Main unit
••
••
••
••
Power supply:
• Model (Philips branded AC power
adapter): DYS602-210309W;
AS650-210-AA309
• Input: 100-240 V~, 50/60 Hz 1.5 A
• Output: 21V , 3.09A
Standby power consumption: ≤ 0.5 W
Dimensions (W x H x D):
1060 x 38 x 62 mm
Weight: 1.4 kg
EN
13
••
Built-in speakers
• 2 x mylar tweeter (25mm/1", 8 ohm)
• 4 x racetrack full-range speaker
(90mm/3.5" x 27mm/1.1", 8 ohm) for
front/surround channel
• 2 x racetrack full-range speaker
(90mm/3.5" x 27mm/1.1", 16 ohm) for
center channel
Subwoofer
•
•
•
•
•
•
•
Power supply: 220-240 V~, 50-60 Hz
Power consumption: 60 W
Standby power consumption: ≤ 0.5 W
Impedance: 3 ohm
Speaker drivers: 1 x 203 mm (8") woofer
Dimensions (W x H x D):
208 x 301 x 403 mm
Weight: 6.1 kg
Remote control batteries
•
2 x AAA-R03-1.5 V
Standby power management
•
•
•
•
When the product remains inactive for
15 minutes, it automatically switches to
standby or networked standby.
The power consumption in standby or
networked standby is less than 0.5W.
To deactivate Bluetooth connection, press
and hold the Bluetooth button on the
remote control.
To activate Bluetooth connection, enable
Bluetooth connection on your Bluetooth
device, or enable Bluetooth connection via
the NFC tag (if available).
8Troubleshooting
Warning
•• Risk of electric shock. Never remove the casing of the
product.
To keep the warranty valid, never try to repair
the product yourself.
If you have problems using this product, check
the following points before you request service.
If you still have a problem, get support at
www.philips.com/support.
Main unit
The buttons on this proudct do not work.
• Disconnect this product from the power
supply for a few minutes, then reconnect.
Sound
No sound from the speakers of this product.
• Connect the audio cable from this product
to your TV or other devices. However, you
do not need a separate audio connection
when:
• the product and TV are connected
through HDMI ARC connection, or
• a device is connected to the HDMI IN
connector on this product.
• Reset this product to its factory settings.
• On the remote control, select the correct
audio input.
• Make sure that this product is not muted.
No sound from the wireless subwoofer.
• Wirelessly connect the subwoofer to the
main unit.
Distorted sound or echo.
• If you play audio from the TV through this
product, make sure that the TV is muted.
Audio and video are not synchronized.
• Press AUDIO SYNC +/- to synchronize
the audio with the video.
14
EN
Error message is displayed on the display
panel.
• When "ERROR" is displayed, it indicates
that an input audio format is not
supported.
• When "ARC" blinks, it indicates that the
connected TV is not HDMI ARC compliant
or an unsupported audio format is
detected.
Bluetooth
NFC
A device cannot connect with this product via
NFC.
• Make sure that the device is supported by
NFC.
• Make sure that NFC is enabled on the
device (see the device' s user manual for
details).
• For pairing, tap the NFC device on the
NFC tag of this product.
A device cannot connect with this product.
• The device does not support the
compatible profiles required for this
product.
• You have not enabled the Bluetooth
function of the device. See the user manual
of the device on how to enable the
function.
• The device is not correctly connected.
Connect the device correctly.
• This product is already connected with
another Bluetooth device. Disconnect the
connected device, then try again.
Quality of audio play from a connected
Bluetooth device is poor.
• The Bluetooth reception is poor. Move the
device closer to this product, or remove
any obstacle between the device and this
product.
The connected Bluetooth device connects and
disconnects constantly.
• The Bluetooth reception is poor. Move the
device closer to this product, or remove
any obstacle between the device and this
product.
• Turn off Wi-Fi function on the Bluetooth
device to avoid interference.
• For some Bluetooth, the Bluetooth
connection can be deactivated
automatically to save power. This does not
indicate any malfunction of this product.
EN
15
Manufactured under license from Dolby
Laboratories. Dolby, Pro Logic, and the
double-D symbol are trademarks of Dolby
Laboratories.
For DTS patents, see http://patents.dts.com.
Manufactured under license from DTS Licensing
Limited. DTS, the Symbol, & DTS and the
Symbol together are registered trademarks, and
DTS Digital Surround is a trademark of DTS,
Inc. © DTS, Inc. All Rights Reserved.
The terms HDMI and HDMI High-Definition
Multimedia Interface, and the HDMI Logo are
trademarks or registered trademarks of HDMI
Licensing LLC in the United States and other
countries.
The Bluetooth® word mark and logos are
registered trademarks owned by Bluetooth
SIG, Inc. and any use of such marks by WOOX
Innovations is under license. Other trademarks
and trade names are those of their respective
owners.
The N Mark is a trademark or registered
trademark of NFC Forum, Inc. in the United
States and in other countries.
16
© 2013 CSR plc and its group companies.
The aptX® mark and the aptX logo are
trade marks of CSR plc or one of its group
companies and may be registered in one or
more jurisdictions.
Specifications are subject to change without notice
2015 © WOOX Innovations Limited. All rights reserved.
Philips and the Philips’ Shield Emblem are registered trademarks o
f Koninklijke Philips N.V. and are used by
WOOX Innovations L imited under license from Koninklijke Philips N.V.
HTL7140B_12_UM_V1.0