1
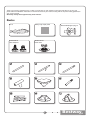
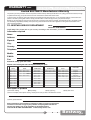
No Jumping Shallow Water SPLASH FRAME POOL OWNER’S MANUAL www.bestway-service.com Não pular Água rasa No saltar Agua poco profunda Nicht springen! Seichtes Wasser. Älä hyppää Matala vesi Niet Springen Ondiep Water Vietato saltare Acqua bassa Interdit de sauter Niveau d’eau bas SNTWN6IZL XN]ITLXI ÈÒÓÞÆÃÕß ÈÎÍÃÂÅÑÇÃ 1LHVNDNDþ 3ã\WNDZRGD No Diving Shallow Water Não mergulhar Água rasa No Diving Agua poco profunda Nicht tauchen! Seichtes Wasser. 7LORVXJUDQL 6HNpO\Yt] Älä sukella Matala vesi Hoppa inte i. Vattnet är grunt Niet Duiken Ondiep Water Vietato tuffarsi Acqua bassa Interdit de plonger Niveau d’eau bas SNTQITLZLJV[ZPLY XN]ITLXI ÈÐÞÓÂÕß ÈÎÍÃÂÅÑÇÃ 1LHQXUNRZDþ 3ã\WNDZRGD 7LORV)HMHVW8JUDQL 6HNpO\9t] Dyk inte. Vattnet är grunt S-S-000622 Thank you for buying a Bestway pool. In order to ensure that you gain maximum enjoyment and safe use of your pool please follow the installation instructions in the DVD enclosed in your retail box along with the important safety guidelines in your owner’s manual. Assembly usually takes approximately 20-30 minutes. Parts: Liner #F4D019N-03 Hose adaptors Heavy-duty repair patch #F4C018N Stopper plug x 2 #F4D019N-01 Drain valve F G H I J K L M N 2 Bestway® S-S-000622 Pool Size & Quantity Ref# Description A 229cm x 160cm x 43cm (90” x 63” x 17”) 239cm x 160cm x 61cm (94” x 63” x 24”) 259cm x 180cm x 66cm (102” x 71” x 26”) Top Rail A 2 2 4 B Top Rail B 2 2 2 C Top Rail C 2 2 4 D Top Rail D 2 2 0 E Top Rail E 0 0 0 F Vertical Pool Leg 8 6 6 G Y-Vertical Pool Leg 0 2 4 H Side Support Leg 0 2 4 I Connector 4 4 6 J Corner Seat 4 4 4 K Connection Pin 10 10 10 L Leg Band 2 2 3 M Footing 8 8 10 N Side Support Leg Footing 0 2 4 Ref# Description A Pool Size & Quantity 300cm x 201cm x 71cm (118” x 79” x 28”) 414cm x 216cm x 79cm (163” x 85” x 31”) Top Rail A 2 2 B Top Rail B 2 4 C Top Rail C 2 2 D Top Rail D 2 2 E Top Rail E 2 2 F Vertical Pool Leg 4 4 G Y-Vertical Pool Leg 6 8 H Side Support Leg 6 8 I Connector 6 8 J Corner Seat 4 4 K Connection Pin 10 10 L Leg Band 3 4 M Footing 10 12 N Side Support Leg Footing 6 8 Please see FAQ’S for additional information. Drawings not scaled to size. 3 Bestway® S-S-000622 Structure: Before assembling your pool, please take a few minutes to check all the parts and become familar with their position. Size: 229cm x 160cm x 43cm (90” x 63” x 17”) Size: 239cm x 160cm x 61cm (94” x 63” x 24”) D C C B A D A B Size: 259cm x 180cm x 66cm (102” x 71” x 26”) Size: 300cm x 201cm x 71cm (118” x 79” x 28”) A A C A C B D B A A Size: 414cm x 216cm x 79cm (163” x 85” x 31”) D A E C B I A F/G L H G F J K 4 Bestway® S-S-000622 WARNING The safety of your children depends entirely on you! Children under 5 years old are at greatest risk. Please take care to avoid accidents. Assign at least one person in charge of safety. Increase supervision if there are several people in the swimming pool. Teach your children to swim if possible. For safety, please do not set up your pool on a terrace/balcony. Remember to place our pool where it’s possible to drain it easily avoiding flooding. Never let children enter or remain in the pool or pool area without adult supervision or if they are not wearing life saving devices. Test the water temperature before entering the pool by splashing water on your neck, arms and legs. Under no circumstances should any user jump or dive into the pool, serious injury or death could result. Prohibit running and playing games near the swimming pool. Pool and accessories should only be assembled by competent adults. Your pool should be filled by low pressure water flow in order to prevent undue stress to the liner. Bestway will not be responsible for damage to the pool due to filling via water-truck. (See FAQ’s) Do not straddle, sit, lean over or put pressure onto the top rail, doing so could result in collapse of the pool and flooding, causing serious personal injury and/or damage to personal property. Do not leave toys near or in an unsupervised swimming pool. Do not swim alone. Do not use your pool under the use of alcohol, drugs or medicaments. Store chemicals and accessories out of the reach of children. Never add chemicals to pool while it is occupied. Consult a specialist pool supply retailer to ensure correct chemical usage. Always keep the pool water clean. Pool water should be tested regularly to ensure that the PH and chlorine concentration in the water is optimal for safe and enjoyable use throughout the season. Household pets should be kept clear of pool area to avoid structural damage to pool. Surround your pool with a fence and ensure the gate is kept closed at all times. Children will be in danger without Cover pool when not in use. Neither children nor adults can be seen inside the pool if the cover is in use. Remove cover completely when in use. adequate supervision. A working electronic detector should be installed to alert you if someone has entered the pool area. Under no circumstances should this equipment replace an adult’s nearby supervision. Do not leave ladder in pool when pool is unattended. Remember to empty and store the pool during the winter times and if the pool is not used. Only use Bestway accessories with Bestway pools. Properly maintain your pool in order to increase life span and safe use. (See Pool Maintenance Section) Do not operate pump while pool is in use. All equipment should be inspected frequently for signs of deterioration, corrosion, broken parts or other hazards which may cause injury. Remember to reapply sunscreen protection regularly and always after swimming. Failure to follow these instructions can result in property damage, injury or death. SAFETY Learn the necessary rescue operations, especially those relating to rescuing children. Rescue equipment should be located near the pool and the supervising adult should be fully trained to use it. Rescue equipment should include but not limited to items such as coastguard approved ring buoy with attached rope and strong, rigid Rescue Pole of at least 366cm(12’). Post emergency numbers including: • Fire • Police • Ambulance • Poison Control Hotline • Full home address Keep a cordless water-resistant phone nearby pool during use. No Jumping Shallow Water No Diving Shallow Water In case of an accident: • Take all the children out of the water immediately. • Call for emergency support and follow their instruction/advice. • Replace wet clothing with dry clothing. RETAIN THESE DIRECTIONS FOR REFERENCE 5 Bestway® S-S-000622 Preparation NOTE: The pool must be set up on a completely flat and level surface. Please do not install the pool if the surface is inclined or slope. • Check with your local city council for by-laws relating to fencing, barriers, lighting and safety requirements and ensure you comply with all laws. • Take the pool and accessories out of the carton with care. If the pool set comes with a ladder, the ladder requires a crosshead screwdriver or an adjustable wrench ( not included ) to assemble. • Locate your pool with a minimum of 122cm (4’ ) space on all sides so that a child can not use an object to climb into the pool. Do not set up directly under overhead power lines or trees and be sure the location does not contain underground utility pipes, lines or cables of any kind. • It is essential the pool is set up on solid, level ground. If the pool is set up on uneven ground it can result in collapse of the pool and flooding, causing serious personal injury and/or damage to personal property. Setting up on uneven ground will void the warranty and service claims. • Sand should not be used to create a level base, the ground should be dug out if necessary. • Do not set pool up on driveways, decks, platforms, gravel or asphalt. Ground should be firm enough to withstand the pressure of the water; mud, sand, soft / loose soil or tar are not suitable. • The ground must be cleared of all objects and debris including stones and twigs. NOTE: lawn or other vegetation under the pool will die and may cause odors and slime, therefore we recommend removing all grass from where the pool will be located. Avoid locating your pool over or beside areas prone to aggressive plant and weed species as they may grow through the ground cloth or liner. • We highly recommend that once the pool is unfolded on the ground cloth to let it sit exposed to direct sunlight for 1 hour or more so that the pool is more flexible during set up. • If purchased with a pump, the pump should be installed after pool is fully assembled. Remember to locate the intake and return outlets towards the outside power source. NOTE: If you bought a filter pump, this element has a separate manual instructions. Please open its relative box for details. • If you bought a separate ladder for your pool, make sure it matches the pool size. • Regularly check to make sure the ladder is properly assembled. NOTE: The ladder is only to be used for entering and exiting the pool. Installation Fig. 1 Fig. 2 Fig. 5 Fig. 6 J Fig. 3 F/G L Fig. 4 I Fig. 7 H K F G F L M N L M M Assembly of the Steel Pro Frame pool can be completed without tools. Assembly usually takes approximately 20-30 minutes. NOTE: It is important to assemble pool in the order shown below. Install your pools according to the above illustrations. 1. Lay out all parts and check that you have the correct quantities as listed in the parts guide. If you are missing any parts do not assemble the pool contact our Customer Service Department for assistance. 2. If pool was purchased with a ground cloth, spread it out at the desired location. Ensure the pool is located within distance of a 220-240volt AC outlet protected by a RCD (Residual Current Device). 3. Place the Leg Bands (L) on the ground (See Fig. 1). There are different lengths of Leg bands (L), please ensure you have used the correct sizes at the correct locations. 4. Spread out the pool and put it on the Leg Bands (L). Make sure it is right side up (See Fig. 2). Let it sit exposed to direct sunlight for 1 hour or more so the pool is more flexible during set up. 5. Ensure the drain valve is located near the area where your plan to drain the water and pump valves are facing the RCD outlet. ATTENTION: Do not drag the pool on the ground in order to avoid damaging the linear on sharp objects. Bestway Inflatables will not be responsible for damage caused to the pool due to mishandling or failure to follow these instructions. 6. Insert all of the top rails into the pole sleeves on the top of the pool (See Fig. 3). The combinations for top rails are different for different sizes pools, see the Structure Section for detail. 7. At the middle opening of each sleeve, insert the two ends of the top rails into the Connector (I). (See Fig. 4) NOTE: At each Connector ensure both top rails are properly inserted. 8. At the corners, insert the top rails into the Corner Seats (J). Insert the Connection Pins (M) into the pre-drilled holes locking the top rails into position. (See Fig. 5) 9. Insert the Vertical Pool Legs (F) into the bottom of the Corner Seats (J). (See Fig. 5) 10. On the sides of the rectangle, insert the Vertical Pool Legs (F) or the Y-Vertical Pool Legs (G) into the vertical holes of the Connectors (I). (See Fig. 6) 11. Connect the Side Support Legs (H) to the Y-Vertical Pool Legs (G). Ensure the spring-loaded pins lock into the pre-drilled holes. (See Fig. 6) 12. On each corresponding Pool Leg located on the sides of the rectangle, put the Pool Legs (F or G) through the loops of the Leg Bands (L). This will keep both corresponding pool legs locked in position. (See Fig. 6) 13. Attach all Footings (M&N) to the bottom of the Vertical Pool Legs (F) and the Side Support Legs (H). (See Fig. 7) 14. Test the Frame to ensure all connections are secure before filling with water. 15. Insert the blue stopper plug into the inlet and outlet on the inside wall of the pool. 16. Ensure drain valve is firmly closed. 17. Put 1’’ to 2’’ water in the pool to cover the floor. Once pool floor is slightly covered, gently smooth out all wrinkles. Start in the center of the pool and work your way clockwise to the outside. 6 Bestway® S-S-000622 FILLING POOL WITH WATER ATTENTION: Do not leave pool unattended while filling with water 1. Fill pool to drain valve. STOP 2. Turn water off. Check that the water is not collecting on any side to ensure the pool is level. If pool is not level, drain water and re-level ground by digging out (See Fig. 10). Never attempt to move the pool with water in it, serious personal injury or damage to the pool may result. NOTE: Your pool may contain up to xxxxx liters/xxxx gallons which equals xxxxx pounds of pressure. If your pool has any bulge or uneven side then the pool is not level, the sides may burst and the water may discharge suddenly causing serious personal injury and/or damage to property. 3. If level,fill pool to lowest pump valve. STOP 4. Turn water off. Check valves for secure fit. 5. Fill pool until water capacity is 90% (See Fig. 9), DO NOT OVERFILL as this could cause the pool to collapse. In times of heavy rainfall you may need to empty some of the water to ensure the level is correct. 6. Check pool for any leaks at valves or seams, check ground cloth for any evident water loss. Do not add chemicals until this has been done. 7. In the event of a leak, patch your pool using the patch kit provided. Refer to the FAQ’s for further information. Fig. 8 Fig. 9 Fig. 10 Flat, Level Ground - CORRECT Bumpy, Sloping Ground - INCORRECT Proper Water Level Pool Maintenance If you do not adhere to the maintenance guidelines below, your health might be at risk, especially that of your children. NOTE: The filter pump is used to circulate the water and to filter small particles to keep your water free of suspended dirt particles. In order to keep your pool water clean and hygienic you must add chemicals. To keep your pool clean: 1. Contact your local pool supply shop for advice and purchase of chemicals and PH kits.One of the most important factors to increase the life of the liner is to keep continuosly clean and healthy water. Please follow strictly the instructions from professional technicians for the water treatment through the use of chemicals. 2. Locate a bucket of water next to pool to clean users’ feet before entering pool. 3. Cover the pool when not in use. 4. Skim pool regularly to avoid settled dirt. 5. Change filter cartridge in filter pump every 2 weeks. 6. Gently clean any scum from below the side with a clean cloth. 7. To improve the water quality we suggest to use Bestway accessories like skimmer, maintenance kits. Please visit our website www.bestwayservice.com or contact your pool supplier. Please be careful in case of rain water, kindly check that the water level is not higher than the expected one. If so, please act consequently. Proper maintenance can maximize the life of your pool. ATTENTION: Do not use pump when pool is in use. Repair If your pool is damaged, use a repair patch. -see FAQ’s for instructions. Dismantling 1. Unscrew the drain valve cap on the outside of the pool counter clockwise and remove. 2. There are 2 garden hose adaptors, choose the appropriate size to fit your hose. 3. Connect the adaptor to the hose and put the other end of the hose in the area where you are going to drain your pool. (Check local regulations for drainage by-laws). 4. Screw control ring of the hose adaptor onto the drain valve clockwise. The drain valve will be open and water will start to drain automatically. ATTENTION: Water flow can be controlled with the control ring. 5. When draining is finished, unscrew the control ring to close the valve. 6. Disconnect the hose. 7. Screw the cap back onto the drain valve. 8. Air dry pool ATTENTION: Do not leave the drained pool outside. Storage 1. Please remove all the accessories and spare parts of the pool and store them clean and dry. 2. Once pool is completely dry, sprinkle with talcum powder to prevent pool from sticking together, fold pool carefully. If pool is not completely dry, mould may result and will damage the pool liner. 3. Store liner and accessories in a dry place with a moderate temperature between 5 º C / 41 º F and 38 º C / 100 º F. 7 Bestway® S-S-000622 Frequently Asked Questions (FAQ) 1. What is a suitable base for the Frame Set pool? Almost any completely flat, solid, level surface can be used. Do not use sand as a leveling material as it is prone to shifting under the pool. The ground should be dug out until it is perfectly level. Do not set up on driveways, decks, platforms, gravel or asphalt. The ground should be firm enough to withstand the weight and pressure of the water: mud, sand, soft / loose solid or tar are not suitable. A concrete base can be used but care should be taken not to drag the pool across the surface as abrasions could tear the liner. If the pool is to be set up on a lawn, it is recommended that the grass is removed from where the pool will sit as it will die and may cause odors / slime. Certain types of hardy grass can grow through the liner as can aggressive bushes / plants by the side of the pool. Ensure adjacent vegetation is cut back where necessary. Use of a ground cloth assists in protecting the base of the pool. 2. How will I know if my pool is set up on unleveled ground? If your pool appears to be bulging on one side it is not set up on level ground. It is important that you empty your pool and move the pool to a level site. If the pool is not on level ground it will place undue stress on the seams and could result in the seams bursting which will cause flooding, property damage and potentially personal injury or death. Fill your pool following the instructions in the owner’s manual carefully. This will ensure that you do not waste water and the pool can be moved easily so that the ground can be leveled at an appropriate time and not after you have completely filled it with water. 3. Can I have my pool filled by a water service? We recommend using a garden hose under low pressure for filling your pool. If it is necessary to use a water delivery service, it is best to fill the pool with one inch of water by hose and smooth wrinkles first. Use a water service that is able to regulate the flow of water to prevent damage. Ensure you stop at each step as noted in the instruction manual to ensure your pool is level. Bestway will not be held responsible for pools damaged or weakened by water delivery services. 4. What is the maximum fill height of the pool? Fill pool until water capacity is 90% up to the bottom of the top rail of the pool. Never attempt to fill your pool beyond the base of the top rail. We recommend leaving extra room to account for water displacement when occupants are inside the pool. You may have to top up the water during the season which has been lost through evaporation or normal use. 5. My pool is leaking, what do I do to fix it? The pool does not need to be emptied to fix any holes. Self-adhesive underwater repair patches can be purchased at your local pool / hardware store. For external use, use the repair patch provided. For internal holes, clean the hole on the inside of the pool to wipe off any oils and algae. Cut a circle large enough to cover the hole and apply the patch securely onto the side in the water. Cut a second patch and apply to the outside of the pool for extra strength. If the hole is in the base of the pool use one patch only and weigh it down with a heavy object while it bonds. If you have patched the pool when it is empty we recommend you leave it at least 12 hours before filling. 6. Where can I buy filter cartridges and how often should I change them? Filter cartridges to fit your filter pump should be available from the store where you purchased your pool. If not, most mass retailers sell filter cartridges as an accessory. If you are unable to obtain replacements please call our toll-free number and we will assist you in finding a source local to you. The cartridges should be changed every 2 weeks dependent upon use of the pool. Check the filter on a weekly basis and clean by hosing down any debris and particles. Note: Ensure your pump is disconnected from the electrical supply before checking the filter cartridge.You can also visit our website www.bestway-service.com for cartridge purchase. 7. How many times a year should I change the water? This is dependant on the amount of use the pool receives, and the attention paid to covering the pool and keeping chemicals properly balanced. If maintained correctly the water should last a full summer season. Please contact your local pool chemical supplier for detailed information regarding chemicals, they will be able to advise you how to best maintain the cleanliness of your water. 8. Do I need to take my pool down for the winter? Yes, Above-ground pools may collapse under the weight of ice and snow and the PVC walls will be damaged. We recommend taking the pool down when temperatures fall below 8 º C / 45 º F. The pool should be stored indoors in a moderate temperature between 5 º C / 41 º F and 38 º C / 100 º F. Please store away from chemicals and rodents and out of the reach of children. 9. My pool is fading – why is that? Excessive use of chemicals can cause the color of the inside of the liner to fade; this is similar to a swimsuit fading over time from repeated contact with chlorinated water. 10. How many years will the pool last? There is no set time limit for the pool to last; following the instructions in the owner’s manual and with proper care, maintenance and storage you can considerably increase the life of your pool. Improper set-up, use or care can result in failure of the pool. 11. Do you recommend the use of a filter pump with a Bestway pool? Absolutely! We strongly recommend you the use of a filter pump which could maintain the water of the pool clean. 12. Which are the most important functions of my filter pump? The most important function of a filter pump is the elimination of every sort of impurity from the water by the aid of a filter cartridge and chemical products for its sterilization. 8 Bestway® S-S-000622 WARRANTY Bestway R Bestway R Bestway R 2009 Limited BESTWAY® Manufacturers Warranty The product you have purchased comes accompanied a limited warranty. Bestway stands behind our quality guarantee and assures, through a replacement warranty, your product will be free from manufacturer’s defects that result in leaks. To enact a claim, this warranty card must be filled out completely and returned along with: (1) Your purchase receipt (2) Cut the drain valve placed on the wall of pool together with the nearby production batch number and copy them to your purchase receipt. Bestway is not responsible for economic loss due to water or chemical costs. With the exception of replacement product, the results of leak are not Bestway responsibility. Bestway will not place any products deemed to have been neglected or having been used outside of the owner’s manual guidelines. TO: BESTWAY SERVICE DEPARTMENT DATE Customer Code Number FAX/E-MAIL/TEL: please refer to your country according to the information you find on the back cover Information required Name: Address: Zipcode: City: Country: Telephone: Mobile: E-MAIL: Fax: Please fill clearly your item code: Please cross clearly the size correspond with your pool. FAST SET™ OVAL FAST SET™ STEEL PRO™ RECTANGULAR SPLASH FRAME POOLS POOLS FRAME POOLS FRAME POOLS POOLS 244cm x 66cm. 549cm x 366cm x 122cm. 244cm x 61cm. 549cm x 274cm x 122cm. 229cm x 160cm x 43cm. 330 gallons 305cm x 76cm. 610cm x 366cm x 122cm. 305cm x 76cm. 671cm x 396cm x 132cm. 239cm x 160cm x 61cm. 530 gallons 366cm x 76cm. 732cm x 366cm x 122cm. 366cm x 81cm. 259cm x 180cm x 66cm. 800 gallons 366cm x 91cm. 853cm x 366cm x 122cm. 366cm x 122cm. 300cm x 201cm x 71cm. 1500 gallons 457cm x 91cm. 457cm x 91cm. 414cm x 216cm x 79cm. 457cm x 107cm. 457cm x 122cm. 457cm x 122cm. 549cm x 107cm. 549cm x 107cm. 549cm x 122cm. 549cm x 122cm. 549cm x 132cm. FILTER PUMP 800 gallons sand filter 1500 gallons sand filter 549cm x 132cm. Description of problem Item tears / leaking faulty welding faulty upper ring faulty drain valve Item is incomplete, Which part is missing - Please put the code you find on the instruction manual Others, please describe All the information given need to be complete in order to receive our assistance. You have to send also a copy of your purchase receipt together with this fax. The free-toll number can not be reachable by the mobile phones. YOU CAN ALSO VISIT OUR WEB SITE: www.bestway-service.com 9 Bestway® S-S-000622