1
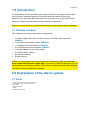
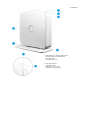
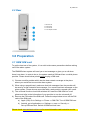
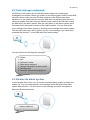
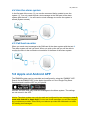
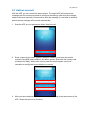
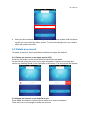
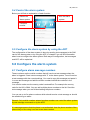
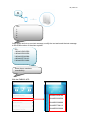
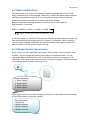
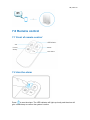
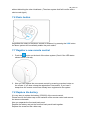
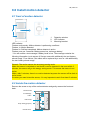
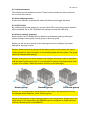
EM8605
Basic Wireless GSM Alarm System Starter Kit
2 | ENGLISH
EM8605 - Basic Wireless GSM Alarm System
Starter Kit
Table of contents
1.0 Introduction ........................................................................................................... 4
1.1 Packing contents ............................................................................................... 4
2.0 Explanation of the Alarm system ........................................................................... 4
2.1 Front .................................................................................................................. 4
2.2 Rear .................................................................................................................. 6
3.0 Preparation............................................................................................................ 6
3.1 GSM SIM card ................................................................................................... 6
3.2 Download APP .................................................................................................. 7
3.3 Plan for sensor placement ................................................................................. 7
3.4 Configure the sensors in a group ....................................................................... 8
3.5 Registered sensors............................................................................................ 9
3.6 Register accessories/sensors ............................................................................ 9
3.7 Register wireless siren..................................................................................... 10
4.0 Operating the Alarm System ................................................................................ 10
4.1 Change language ............................................................................................ 10
4.2 Text message commands ................................................................................ 12
4.3 Disarm the alarm system ................................................................................. 12
4.4 Arm the alarm system ...................................................................................... 13
4.5 Call-back monitor............................................................................................. 13
5.0 Apple and Android APP ....................................................................................... 13
5.1 Add an account ............................................................................................... 14
5.2 Delete an account............................................................................................ 15
5.2.1 Delete an account on an Apple phone (iOS) ..............................................15
5.2.2 Delete an account on an Android phone ....................................................15
5.3 Secure the APP with a PIN/Passcode.............................................................. 16
5.4 Control the alarm system ................................................................................. 18
5.5 Configure the alarm system by using the APP ................................................. 18
6.0 Configure the alarm system ................................................................................. 18
6.1 Configure alarm message numbers ................................................................. 18
6.2 Alarm notifications ........................................................................................... 20
6.3 Change Sensor (zone) name ........................................................................... 20
6.4 Low battery warning of a sensor by text message............................................ 21
6.5 Sabotage warning of a sensor by text message ............................................... 21
6.6 Configure the delay time .................................................................................. 21
6.7 Adjust siren volume and time of alarm ............................................................. 23
6.8 Restore factory defaults. .................................................................................. 24
6.9 Removing the registered Accessories .............................................................. 24
6.10 Arm or disarm the alarm system for free ........................................................ 24
6.11 Turn off the operation indicator LED .............................................................. 25
6.12 Turn on the operation indicator LED .............................................................. 25
3 | ENGLISH
7.0 Remote control .................................................................................................... 26
7.1 Front of remote control .................................................................................... 26
7.2 Arm the alarm .................................................................................................. 26
7.3 Disarm the alarm ............................................................................................. 27
7.4 In-home mode ................................................................................................. 27
7.5 Silent mode ..................................................................................................... 27
7.6 Panic button .................................................................................................... 28
7.7 Register a new remote control ......................................................................... 28
7.8 Replace the battery ......................................................................................... 28
8.0 Install motion detector.......................................................................................... 29
8.1 front of motion detector .................................................................................... 29
8.2 Inside the motion detector................................................................................ 29
8.2.1 Infrared sensors.........................................................................................30
8.2.2 Anti sabotage button ..................................................................................30
8.2.3 LED On/Off ................................................................................................30
8.2.4 Group settings (jumpers) ...........................................................................30
8.3 Rear motion detector ....................................................................................... 31
8.3.1 Test mode .................................................................................................31
8.3.2 Activated ...................................................................................................31
8.3.3 Pair the motion detector.............................................................................31
8.4 Installation tips ................................................................................................. 32
8.5 Test the motion detector .................................................................................. 34
9.0 Install the Window/Door sensor ........................................................................... 35
9.1 Front window/door sensor................................................................................ 35
9.2 Inside the window/door sensor ........................................................................ 35
9.2.1 Anti sabotage button ..................................................................................36
9.2.2 Group settings (jumpers) ...........................................................................36
9.3 Installation tips ................................................................................................. 36
9.3.1 Register the window/door sensor ...............................................................37
10.0 Technical specifications ..................................................................................... 38
10.1 Alarm system ................................................................................................. 38
10.2 Motion detector .............................................................................................. 38
10.3 Window/door contact ..................................................................................... 38
11.0 Frequently Asked Questions and other related information ................................ 39
12.0 Service and support ........................................................................................... 39
13.0 Warning and points of attention ......................................................................... 39
14.0 Warranty conditions ........................................................................................... 40
4 | ENGLISH
1.0 Introduction
Congratulations with the purchase of this high-quality Eminent product! This product
has undergone extensive testing by Eminent’s technical experts. Should you
experience any problems with this product; you are covered by a five-year Eminent
warranty. Please keep this manual and the receipt in a safe place.
Register your product now on www.eminent-online.com and receive product updates!
1.1 Packing contents
The following parts need to be present in the packing:
•
•
•
•
•
•
•
•
1 x Alarm system with built-in mobile module, siren and 1 back-up battery.
(EM8605)
1 x wireless door/window contact. (EM8660)
1 x wireless PIR motion detector. (EM8650)
2 x multifunctional remote controls. (EM8621)
1 x power adapter for the Alarm system.
2 x window alarm stickers
All required batteries.
English manual.
Notice: The alarm system can only be used and configured by SMS text messages,
even if used with Android or Apple App! For the use of SMS text messages you will
be charged by your telecom provider. Inform with your telecom provider the estimated
cost rates for sending SMS text messages.
2.0 Explanation of the Alarm system
2.1 Front
1. Power LED / Alarm status / Low battery indicator
2. GSM Signal / Pairing / Alarm LED indicator
3. SOS button
4. Operation indicator
5. Stand
6. Microphone (monitoring)
5 | ENGLISH
1. Quick flashing green: Searching GSM network
Slow flashing green: Normal GSM signal
Red: Pairing mode
Quick flashing red: Alarm
2. Green: Alarm disarmed
Yellow: Alarm armed
Yellow/Green: In-Home mode
Flashes green: Low battery level
6 | ENGLISH
2.2 Rear
1. SIM Card slot
2. Pairing button
3. Power On/Off
4. Power adapter interface
3.0 Preparation
3.1 GSM SIM card
To get the best out of the system, it is crucial to take some precautions before making
use of the alarm system.
The EM8605 alarm system will send you a text message or gives you a call when
there is an alarm. In order to do so, the system needs a SIM card from a mobile phone
provider. Please check below points before buying a SIM card:
1) Choose a mobile provider which has the best network coverage at the place
where you would like to mount the alarm system.
2) When using a prepaid card, make sure that info messages from the provider will
be send by e-mail instead of text message. You cannot read text messages on the
alarm system. Please choose a provider with a web portal to upgrade your credit.
3) The voicemail function should be switched off. Insert the SIM card into a cell
phone and refer to the information of your provider to turn the voicemail off.
4) Remove the PIN code of the SIM card. Follow the steps below to turn off the PIN
code of the SIM card.
a) Apple (iOS) Go to Settings => Phone => SIM PIN. Turn off SIM PIN here
b) Android, go to Applications => Settings => more => Security =>
Set up SIM card lock. Switch off SIM card lock here.
Please check www.eminent-online.com for more information and instruction movies
7 | ENGLISH
3.2 Download APP
The EM8605 system can be set and operated with an APP, but it can also be fully
used with SMS commands.
The APP is only available for Android and Apple (iOS) phones.
Search for the "EM8605" APP in the Google Play store or the Apple Store.
See chapter "Apple and Android APP" for more information on the operation of the
APP
3.3 Plan for sensor placement
Before starting to install the alarm system it is important to make a plan. Determine the
locations you want to secure and what type of sensor is needed. Also you need to
determine what group type or configuration the sensor needs to be installed in. Every
type of sensor needs to be placed in a group; Home-group, normal group or 24-hours
group.
Illustration below is an example of a plan that determines what sensor should be
placed for the preferred security.
A.
B.
C.
Alarm system
Remote control
Siren
8 | ENGLISH
1.
2.
3.
4.
5.
6.
7.
8.
Front door : Window/door contact
Living room : Motion detector PIR
Window - Living room : Window/door contact
Window - Living room : Window/door contact
Door-terrace : Window/door contact
Window – Bedroom : window/door contact
Bedroom : Motion detector PIR
Kitchen : Gas detector
Check www.eminent-online.com for an overview of all available sensors and
accessories.
3.4 Configure the sensors in a group
Every sensor can be configured to be added to a single group by setting the jumper
settings; home-group, normal group or 24-hours group.
Bellow you will see an overview of the meaning and how to configure the jumper
settings for that type of group.
Remark: Determine before pairing with the alarm system in which group the sensor
will be operational. Once the sensor is successfully paired with the system, the group
cannot be changed after pairing!
Remark: If the group of a sensor needs to be changed all sensors need to be paired
with the alarm system once again. It is not possible to remove one single sensor from
a group! (See chapter “Delete all wireless sensors by text message”)
Home-group
Normal-group
24-hours-group
Remark: It’s recommended to install detectors that need to be operational 24-hours,
for example smoke detectors, in the 24-hours-group.
Notice: In the manuals of the accessories there is also mentioned a “Single-group” the
single group is not supported by the EM8605 sensors configured as Single zone will
work as a Normal group on the EM8605.
9 | ENGLISH
The default jumper settings for a window/door contact are D0, D1 and D2 (Normalgroup), for the motion detector the default settings are D1 and D2 (Home-group).This
means that the window/door contact will be enabled when the alarm system is in full
security mode or in-home security. The motion detector will only be enabled when the
alarm system is in full security mode. You can enable the full or in-home security by
using the Alarm system, remote control, the EM8605 APP or your mobile phone.
When the jumper settings are set to D1 and D2 the sensor is configured in the Homegroup. In full security mode the sensor will be enabled. If In-home security is activated
this sensor will be disabled.
Sensors with a jumper setting of D0, D1 and D3 are configured as 24hours-group.
These sensors are always enabled regardless the status of the security system.
3.5 Registered sensors
The motion detector and window/door sensor included with the alarm system are
already paired to the system. The motion detector is set by default as Home-group
and the window/door contact is configured as Normal-group.
The window/door contact is paired with Zone 1. The motion detector is paired with
Zone 2.
The supplied remote controls are already paired to the system.
3.6 Register accessories/sensors
1. Push the
button on the back of the alarm system (Check if the LED status
shown below is lid red).
2. Now add the accessory/sensor by activating the accessory/sensor (For example
push a button on the remote or remove the magnet from the door/windows
sensor).
3. If you hear a beep the sensor is registered to the system. If you hear 2 beeps this
indicates this sensor is already registered (repeat these steps for every
accessory/sensor you wish to pair with the alarm system).
10 | ENGLISH
3.7 Register wireless siren
The wireless siren is an extra accessory. To register the siren to the system press
shortly the connect button of the siren. The LED will turn on. Press the “SOS” of the
control panel. You will hear a beep to notify you the registration is successful.
4.0 Operating the Alarm System
4.1 Change language
Send a text message with the text 0001 to the alarm system.
The language will be set to English.
0001
Operate successfully.
Send a text message with the text 0031 to the alarm system.
The language will be set to Dutch.
0031
Instellen geslaagd.
Send a text message with the text 0033 to the alarm system.
The language will be set to French.
11 | ENGLISH
0033
Opération réussi avec succès.
Send a text message with the text 0039 to the alarm system.
The language will be set to Italian.
0039
Avvenuto Correttamente.
The language can also be modified by using the “EM8605” APP. This App is explained
in chapter 5.
With the EM8605 APP:
12 | ENGLISH
4.2 Text message commands
All settings of the system can be controlled and configured by sending text
messages to the system. Before you power up the alarm system install a mobile SIM
card first. Notice: make sure the PIN and voicemail of the SIM card are both
disabled. You can disable this by using the SIM card in a regular mobile phone. In
case of a prepaid card make sure you have enough credit on the SIM card. Install
the SIM card in the alarm system. Now you can power up the alarm system wait a
few seconds for the system connect to the mobile network. You can view all the
menu settings of the alarm system by sending a text message to the alarm system.
The first part of the menu will be send to you by a text message if you send a text
message with the text”?” to the SIM card of the alarm system.
?
You will receive the following text message:
‘0’ Disarm
‘1’ Arm
‘2' Call-back monitor
‘3’ Store phone numbers
‘4’ Change information of alarm zones
‘5’ Set delay time
‘6’ Set siren volume and ringing time.
4.3 Disarm the alarm system
In the first part of the menu (?) you see the command that’s needed to disarm the
system (0). You only need to send a text message to the SIM card of the alarm
system with the text 0. You will receive a text message to confirm the system is
disarmed (System disarmed).
0
System disarmed.
13 | ENGLISH
4.4 Arm the alarm system
In the first part of the menu (?) you see the command that’s needed to arm the
system (1). You only need to send a text message to the SIM card of the alarm
system with the text 1. You will receive a text message to confirm the system is
armed (System armed).
1
System armed.
4.5 Call-back monitor
When you send a text message to the SIM card of the alarm system with the text 2.
The alarm system will call you back. When you pick-up the call you will be able to
monitor the site via the monitoring microphone in the base of the alarm system.
2
5.0 Apple and Android APP
The EM8605 system can be controlled and configured by using the “EM8605” APP.
Search for the EM8605 APP in the Apple App-store or in the Google Play Store.
Download and install the APP on your phone.
Remark: the APP does only send text messages to the Alarm system. The settings
are not stored in the APP.
Notice: The alarm system can only be used and configured by text messages, even if
used with Android or Apple App! For the use of text messages you will be charged
by your telecom provider. Inform with your telecom provider the estimated cost rates
for sending text messages.
14 | ENGLISH
5.1 Add an account
With the APP you can control the alarm system. The Apple APP will create a text
message with the command needed to configure the settings. After this the message
needs to be send manually. Press send to send the message. If used with an Android
device the text message will be send automatically.
1. Start the APP on your phone and select ‘Add Account’
2. Enter a name for the alarm system (example: EM8605) and enter the mobile
number of the SIM card installed in the alarm system. Start with the country code
(example UK 0044). Without the country code the alarm system cannot be
controlled or configured from outside your country.
3. After you have added an account the account will appear in the start screen of the
APP. Select the account to continue.
15 | ENGLISH
4. After you have selected the account you will see the Alarm system. With the Alarm
system you can control the alarm system. To enter the settings menu you need to
swipe the screen to the left.
5.2 Delete an account
To delete an account, there are different methods for Apple and Android.
5.2.1 Delete an account on an Apple phone (iOS)
Press the edit button on the screen where the accounts are added.
On the left side of the account a minus sign will appear. Press the minus sign and
confirm by pressing Delete on the right side of the screen. The account will be deleted.
5.2.2 Delete an account on an Android phone
Press “Edit” and keep the account which needs to be removed pressed.
There will now be a message to delete the account.
16 | ENGLISH
5.3 Secure the APP with a PIN/Passcode
The APP has the possibility to secure the access to the APP and settings with a
Passcode. Follow the instructions below to set this security feature.
•
At the main screen tap the “Passcode” button
•
Select “ON”
17 | ENGLISH
•
Enter a 4 digit PIN/Passcode you wish to use to access the APP
•
Repeat the PIN/Passcode for verification
•
Restart the APP and you will be prompted to enter the PIN/Passcode. Once you
entered the PIN/Passcode you will get access to the APP
18 | ENGLISH
5.4 Control the alarm system
Below you will find an explanation of each function.
Disarm the
alarm system
Arm the alarm
system
Call-back
monitor
5.5 Configure the alarm system by using the APP
The configuration of the alarm system is done by sending text messages to the SIM
card of the alarm system or by using the APP. In chapter 6 you will find information
about how to configure the alarm system. Both ways of configuration, text messages
and APP, will be explained.
6.0 Configure the alarm system
6.1 Configure alarm message numbers
These numbers are the mobile numbers that will receive a text message when the
alarm is triggered. Send a text message with “3” to the alarm system. You will receive
a text message with the current settings. You need to copy this message and paste it
in a new text message and add the mobile numbers behind the numbers in the
message.
You need to make sure the country code is entered first. For example the country
code for the UK is 0044. You can add multiple phone numbers to the list. Send the
text message when you are finished adding the phone numbers.
You can set up to five phone numbers which should receive a text message or should
be called during an alarm.
Remark: Only mobile numbers entered as alarm number can control the alarm system
by text message commands or by the APP!
If a message appears that the phone is not authorized, then the phone number of the
phone that you are using is not set as an alarm number.
19 | ENGLISH
3
TEL:
1.
2.
3.
4.
5.
Copy above text into a new text message, modify the text and send the text message
to the GSM-number of the alarm system:
TEL:
1.00446123654789
2.00446333222558
3.00446223366998
4.00446557788112
5.00446552233668
Store phone numbers
successfully.
With the EM8605 APP:
00446123654789
00446333222558
00446223366998
00446557788112
00446552233668
20 | ENGLISH
6.2 Alarm notifications
The alarm system will check the programmed phone numbers one by one. Firstly
every number will get a text message. When this is fulfilled the alarm system will start
calling the programmed numbers. If one of the phone number has the voicemail
enabled the system will continue to call the next phone number.
Between every text message and phone call there will be a time span of
approximately 15 seconds.
SMS 1 => SMS 2 => SMS 3 => SMS 4 => SMS 5
TEL 1 => TEL 2 => TEL 3 => TEL 4 => TEL 5
If the alarm system is switched off during the notification process the alarm system will
stop sending/calling the remaining phone numbers. For example: Phone number 2
receives a text message notification and switches off the alarm system via the APP
phone number 3 will not receive a text message.
6.3 Change Sensor (zone) name
Every sensor can get a specified name (zone). Every sensor is provided with a zone
number. You can change the sensor (zone) name to a preferred name. You can
change the name of the sensors 1 to 4. Every sensor name can be used up to 30
characters. The names of the sensors above 4 cannot be changed. The text message
to change the name of sensor zone name is 4.
4
Zone Information:
1. Zone 1 alarm
2. Zone 2 alarm
3. Zone 3 alarm
4. Zone 4 alarm
Copy above text into a new text message, modify the text and send the text message
to the GSM-number of the alarm system:
Zone Information:
1.Front door
2.Motion detector
3.Smoke detector
4.Kitchen window
21 | ENGLISH
Change zone information
successfully.
With the EM8605 APP:
6.4 Low battery warning of a sensor by text message
Notice: This function is only available for sensors with a 2-way communication
(example: EM8650). You will receive a text message when the battery level is low.
The message will have the following information in the text message: The sensor
name (Up to sensor 4) and the text ‘Battery low’. Sensors above sensor 4 will be
displayed with the sensor number followed with the text ‘battery low’.
6.5 Sabotage warning of a sensor by text message
Notice: This function is only available for sensors with a 2-way communication
(example: EM8650). You will receive a text message when the sensor has been
sabotaged. The message will have the following information in the text message: The
sensor name (Up to sensor 4) and the text ‘Sabotage alarm’. Sensors above sensor 4
will be displayed with the sensor number followed with the text ‘Sabotage alarm’.
6.6 Configure the delay time
When a delay time is set, the alarm system will beep every second as warning of the
delay. The last 15 seconds the speed of the beeps will increase.
The delay you can set here is the entry delay and exit delay time.
22 | ENGLISH
5
Alarm delay time (0-300sec): 0
Copy above text into a new text message, modify the text and send the text message
to the GSM-number of the alarm system:
Alarm delay time (0-300sec): 30
Set alarm delay time successfully.
With the EM8605 APP:
23 | ENGLISH
6.7 Adjust siren volume and time of alarm
Both settings can be adjusted by this menu.
6
Siren volume (0 Mute, 1 Low, 2 Medium, 3 High):
2
Siren ringing time (1-9 min):5
Copy above text into a new text message, modify the text and send the text message
to the GSM-number of the alarm system:
Siren volume (0 Mute, 1 Low, 2 Medium, 3 High): 1
Siren ringing time (1-9 min): 4
Set siren volume and ringing
time successfully.
With the EM8605 APP:
24 | ENGLISH
6.8 Restore factory defaults.
Also called hard reset. This needs to be done when, for example, a new SIM card is
installed.
Push the
button on the back of the alarm system and press the SOS button on the
alarm system simultaneously. Wait for 3 beeps to confirm the Alarm system has been
restored to factory defaults.
6.9 Removing the registered Accessories
To remove all registered accessories from the EM8605 please follow these
instructions:
Push and hold the
button on the back of the alarm system until 2 beeps are heard
(all registered accessories will be removed from the EM8605).
6.10 Arm or disarm the alarm system for free
To arm the alarm system, call the number of the alarm system. Disconnect when it’s
ringing. The alarm is armed.
To disarm the alarm system, call the number of the alarm system and wait for the
system to terminate the connection. The alarm is deactivated.
Remark: This function will only work when the voicemail of the SIM card is disabled!
25 | ENGLISH
6.11 Turn off the operation indicator LED
The operation indication LED on the side panel of the alarm system can be switched
off by sending a text message to the alarm system.
30
6.12 Turn on the operation indicator LED
The operation indication LED on the side panel of the alarm system can be switched
on by sending a text message to the alarm system.
26 | ENGLISH
31
7.0 Remote control
7.1 Front of remote control
LED Indicator
Arm
In-home
security
Disarm
Panic button
7.2 Arm the alarm
Press
to arm the alarm. The LED indicator will light up shortly and the siren will
give a short beep to confirm the system is active.
27 | ENGLISH
7.3 Disarm the alarm
Press
to disarm the alarm. The LED indicator will light up shortly and the siren will
beep 2 times to confirm the system is disarmed.
7.4 In-home mode
Press . All sensors configured in the normal-group will be enabled; the sensors in
the Home-group will stay disabled.
7.5 Silent mode
Press , followed by
or . The alarm system will arm or disarm silently. The
external siren will not give an alarm signal. The alarm system can be armed/disarmed
28 | ENGLISH
without disturbing the other inhabitants. (The alarm system itself will confirm with a
short sound signal)
7.6 Panic button
Regardless the status of het alarm; armed or disarmed, by pressing the SOS button
the alarm system will immediately enable the panic status.
7.7 Register a new remote control
1. Push the
button on the back of the alarm system (Check if the LED status
shown below is lid red).
2. Now you can register the new remote control by pressing a random button on
the remote. If you hear a beep the registration is successful. If you hear 2
beeps then the remote control has already been registered to the system.
7.8 Replace the battery
It is very easy to replace the battery (CR2025) of the remote control.
Please remove the rubber cap on the backside of the remote control and remove
the screw underneath.
Now you separate the front and back panel.
Replace the battery and put the front and back panel back together.
Replace the screw and the rubber cap.
29 | ENGLISH
8.0 Install motion detector
8.1 front of motion detector
1.
2.
3.
Detection window
LED indicator
Mounting bracket
LED indicator:
Flashes continuously: Motion detector is performing a self-test
Flashes 1x: Motion detected
Flashes 2x: Self-test completed. Motion detector is active
Flashes once per 3 seconds: Battery power low, exchange battery*
* You will receive a text message if battery level is low. The message contains the
following information (up to sensor 4) Sensor name with additionally the text ‘battery
almost empty’. From sensor 5 the name will be replaced by a zone nr. with additionally
the text ‘battery almost empty’.
Remark: The motion sensor has an energy saving mode.
When the sensor is switched on and there is motion detected in the room within 3
minutes, the sensor will go into energy saving mode. This means the sensor is not
active.
When, after 3 minutes, there is no motion detected anymore the sensor will be back in
active mode.
So when you need to test the sensor, it is very important to wait for at least 3 minutes.
8.2 Inside the motion detector
Remove the screw on top of the motion detector and gently remove the front and
back.
Infrared sensor
Anti sabotage
button
LED On/Off
Group setting (jumpers)
Infrared sensor
30 | ENGLISH
8.2.1 Infrared sensors
The infrared sensors detect the motion. These sensors need to be clean at all time.
Do no touch the sensors!
8.2.2 Anti sabotage button
If the motion detector is opened this switch will detect it and trigger the alarm.
8.2.3 LED On/Off
By switching this jumper setting you can set if the LED in front of the motion detector
will be switched “On or Off”. By default this setting is turned ON (LED ON).
8.2.4 Group settings (jumpers)
Every sensor can be configured to be added to a dedicated group by setting the
jumper settings; home-group, normal group or 24-hours group.
Bellow you will see an overview of the meaning and how to configure the jumper
settings for that type of zone.
Remark: Determine before pairing with the alarm system in which group the sensor
will be operational. Once the sensor is successfully paired with the system. The group
cannot be changed after pairing!
Remark: If the group of a sensor needs to be changed, all sensors need to be paired
with the alarm system once more. It is not possible to remove one single sensor from
a group! (See chapter “Delete all wireless sensors by text message”)
Home-group
Normal-group
24-hours-group
Remark: It’s recommended to install detectors that need to be operational 24-hours,
for example smoke detectors, in the 24-hours-group.
Notice: In the manuals of the accessories there is also mentioned a “Single-group” the
single group is not supported by the EM8605 sensors configured as Single zone will
work as a Normal group on the EM8605.
31 | ENGLISH
8.3 Rear motion detector
Test button
8.3.1 Test mode
After the self-test has finished press the test button once. The motion detector will
send a trigger signal (flashes 1x).
8.3.2 Activated
If the motion sensor is triggered more than 2 times within 3 minutes the device
switches automatically to power saving mode. The motion detector will activate again
if it does not register motion for a time period of 3 minutes.
8.3.3 Pair the motion detector
1. Push the
button on the back of the alarm system (Check if the LED status
shown below is lid red).
Press 2x the test button of the motion detector you wish to register. If you hear a
beep the sensor is registered to the system. If you hear 2 beeps this indicates this
sensor is already registered.
32 | ENGLISH
Notice: During the registration process be sure no other sensor is triggered. If a
motion detector is in the same room make sure you cover the motion detector or place
the motion detector temporarily in a different room.
8.4 Installation tips
Avoid installation of the motion detector in range of a window, air-conditioning,
radiator, refrigerator, oven, direct sunlight or other places with high temperature
fluctuation.
Do not place 2 motion detectors facing each other or within each other’s range.
33 | ENGLISH
Motion detectors are usually placed at 2 meters from the floor on the wall.
First install the mounting bracket before placing the motion detector in the bracket.
Point the detector in the direction you wish to secure. Test if the motion detector is
working properly in test mode (see chapter 8.5).
34 | ENGLISH
Side view
Top view
8.5 Test the motion detector
1. After you fully installed the motion detector and the self-test is completed you can
test the motion detector by walking within the range of the motion detector from
one side to the other side.
2. The LED indicator of the motion detector will flash if motion is detected.
3. Adjust the motion sensor to get the best results. And repeat the test.
Notice: Please make sure the motion detector is active (no motion detected within 3
minutes) before you test the motion detector!
35 | ENGLISH
9.0 Install the Window/Door sensor
9.1 Front window/door sensor
LED Indicator
Magnet
Sensor
LED indicator:
Flashes 1x: Window/Door is detected as open.
Flashes quickly: Battery power low, exchange battery*
* You will receive a text message if battery level is low. The message contains the
following information (up to sensor 9) sensor name with additionally the text ‘battery
almost empty’. From sensor 10 the name will be replaced for a zone nr. with
additionally the text ‘battery almost empty’.
9.2 Inside the window/door sensor
Anti sabotage button
Group settings (jumpers)
36 | ENGLISH
9.2.1 Anti sabotage button
If the sensor is opened this switch will detect it and trigger the alarm.
9.2.2 Group settings (jumpers)
Every sensor can be configured to be added to a single group by setting the jumper
settings; home-group, normal group or 24-hours group.
Bellow you will see an overview of the meaning and how to configure the jumper
settings for that type of zone.
Remark: Determine before pairing with the alarm system in which group the sensor
will be operational. Once the sensor is successfully paired with the system. The group
cannot be changed after pairing!
Home-group
Normal-group
24-hours-group
Remark: It’s recommended to install detectors that need to be operational 24-hours for
example: smoke detectors in the 24-hours-group.
Notice: In the manuals of the accessories there is also mentioned a “Single-group” the
single group is not supported by the EM8605 sensors configured as Single zone will
work as a Normal group on the EM8605.
9.3 Installation tips
It’s recommended to install the sensor on the frame (no movement) and to
install the magnet on the door/window itself.
Notice: The magnet needs to be placed on the right side of the sensor. The red LED
will light up every time the door/window is opened!
37 | ENGLISH
The distance between the sensor and the magnet must not exceed 1cm.
Mount both parts with the supplied double-sided tape. You can also choose to mount
the sensor by using screws.
It’s not recommended to install the sensor in a room with a lot of metal. Neither mount
the sensor on constructions. Always check if the red LED will turn on when the door
/window is opened.
9.3.1 Register the window/door sensor
1. Make sure the sensor and the magnet are located next to each other.
button on the back of the alarm system (Check if the LED status
2. Push the
shown below is lid red).
3. Now separate the magnet from the sensor. The sensor will be triggered. If you
hear a beep the sensor is registered to the system. If you hear 2 beeps this
indicates this sensor is already registered.
38 | ENGLISH
10.0 Technical specifications
10.1 Alarm system
Power supply
Output
Mobile GSM frequency
Stand-by current
Alarm current
Back-up battery
Internal siren
Maximum amount of sensors
Sensor frequency
Temperature
Humidity
Dimensions Alarm system
Dimensions Stand
110 – 240V AC 50-60Hz
12V DC 500mAh
850 / 900 / 1800 / 1900Mhz
80mA
170mA
Lithium-Ion battery 7,4V 500mA rechargeable
110dB
10 x Remote controls
50 x Sensors
433MHz
-10 to 55 degrees Celsius
< 80% (no condensing)
126 x 36 x 130 mm
150 x 70 x 10
10.2 Motion detector
Power supply
Stand-by current
Alarm current
Detection reach
Wireless reach
Frequency sensors
Temperature
Humidity
Dimensions motion detector
Dimensions mounting bracket
3V DC (2 x AA 1,5V LR6)
<50uA
<9,5mA
8 meter / 110 degrees
Max. 80 meter (open field)
433MHz
-10 to 55 degrees Celsius
< 80% (no condensing)
108 x 52 x 36,8 mm
52 x 30 x 26,5 mm
10.3 Window/door contact
Power supply
Stand-by current
Alarm current
Wireless reach
Frequency sensors
Temperature
Humidity
Dimensions sensor
Dimensions magnet
1,5V DC (1 x AA 1,5V LR6)
<30uA
<40mA
Max. 80 meter (open field)
433MHz
-10 to 55 degrees Celsius
< 80% (no condensing)
71 x 34 x 17,5 mm
51 x 12 x 13,5 mm
39 | ENGLISH
11.0 Frequently Asked Questions and other
related information
The latest frequently asked questions for your product can be found on the support
page of your product. Eminent will update these pages frequently to assure you have
the most recent information. Visit www.eminent-online.com for more information about
your product.
12.0 Service and support
This user’s manual has been carefully written by Eminent’s technical experts. If you
have problems installing or using the product, please fill out the support form at the
website www.eminent-online.com/support.
You can also contact us by phone. Please check www.eminent-online.com/support for
the helpdesk phone number and opening hours.
13.0 Warning and points of attention
Due to laws, directives and regulations set out by the European parliament, some
(wireless) devices could be subject to limitations concerning its use in certain
European member states. In certain European member states the use of such devices
could be prohibited. Contact your (local) government for more information about these
limitations.
Always follow up the instructions in the manual*, especially where it concerns devices
which need to be assembled.
Warning: In most cases this concerns an electronic device. Wrong/improper use may
lead to (severe) injuries!
Repairing of the device should be done by qualified Eminent staff. The warranty
immediately voids when products have undergone self-repair and/or by misuse. For
extended warranty conditions, please visit our website at www.eminentonline.com/warranty.
*Tip: Eminent manuals are written with great care. However, due to new technological
developments it can happen that a printed manual does not longer contain the most
recent information.
If you are experiencing any problems with the printed manual or you cannot find what
you are looking for, please always check our website www.eminent-online.com first for
the newest updated manual.
40 | ENGLISH
Also, you will find frequently asked questions in the FAQ section. It is highly
recommended to consult the FAQ section. Very often the answer to your questions will
be found here.
14.0 Warranty conditions
The five-year Eminent warranty applies to all Eminent products, unless mentioned
otherwise before or during the moment of purchase. After buying a second-hand
Eminent product the remaining period of warranty is measured from the moment of
purchase by the product’s initial owner. Eminent warranty applies to all Eminent
products and parts, indissolubly connected or mounted to the product it concerns.
Power supply adapters, batteries, antennas and all other products not directly
integrated in or connected to the main product or products of which, without
reasonable doubt, can be assumed that wear and tear during use will show a different
pattern than the main product, are not covered by the Eminent warranty. Products are
not covered by the Eminent warranty when exposed to incorrect/improper use,
external influences or when opening the service parts of the product by parties other
than Eminent. Eminent may use refurbished materials for repair or replacement of
your defective product. Eminent cannot be held responsible for changes in network
settings by internet providers. We cannot guarantee that the Eminent networking
product will keep working when settings are changed by the internet providers.
Eminent cannot guarantee the working of web services, apps and other third party
content that is available through Eminent products. Eminent products with an internal
hard disk have a limited warranty period of two years on the hard disk. Eminent could
not be held responsible for any data lost. Please make sure that if the product stores
data on a hard drive or other memory source, you will make a copy before you return
the product for repair.
When my product gets defective
Should you encounter a product rendered defective for reasons other than described
above: Please contact your point of purchase for taking care of your defective product.
EM8605-UK | 02-2015