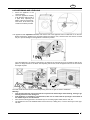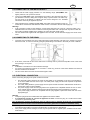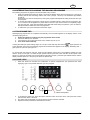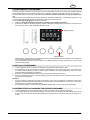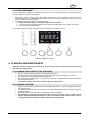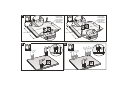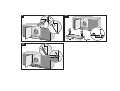
1
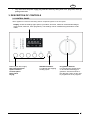
WASHER-DRYER INSTRUCTION MANUAL EN Contents 1. Precautions for safety and use 2 2. Installation instructions 5 3. Description of controls 8 4. Using the appliance for washing 9 5. Using the appliance for drying 15 6. Cleaning and maintenance 17 7. Troubleshooting 20 This appliance is tagged in accordance with European Directive 2002/96/EC on Waste Electrical and Electronic Equipment - WEEE. This directive contains the regulations governing the collection and recycling of decommissioned appliances throughout the European Union. The symbol of the rubbish bin with a line through it on the appliance or its packaging indicates that the product must be disposed of separately from other waste at the end of its life cycle. The user is thus obliged to consign scrapped appliances to the special electronic and electrotechnical waste disposal centres, or return them to the dealer on purchase of a similar new appliance, on a one-to-one basis. Consignment to the appropriate facility for environmentally responsible recycling, treatment and disposal helps to prevent any negative effects on the environment and health, and encourages the reuse and/or recycling of the appliance’s component materials. Illegal dumping of the appliance by the user will be subject to prosecution under the relevant law. 1 EN READ THE INSTRUCTIONS Attention! You are advised to read all the instructions in this manual carefully; it will inform you about the right conditions for the proper, safe use of your washer-dryer It is very important to keep this instruction manual with the appliance for future reference. In the event of sale or transfer, ensure that the manual always accompanies the appliance, to provide the necessary information about its use. 1. PRECAUTIONS FOR SAFETY AND USE Attention! These precautions are detailed for reasons of safety. This section must be read carefully before installation and use. Disposing of packaging • Never leave packaging residues unattended in the home. Separate waste packaging materials by type and consign them to the nearest recycling centre. • Packaging materials (plastic bags, polystyrene, etc.) must not be left within reach of children. Disposing of old appliances • Once no longer in use, appliances must be rendered unusable: permanently disarm the lock on the door (this will prevent children risking their lives by locking themselves inside during play) and cut the power supply lead after removing the plug from the socket. The appliance must be delivered to a recycling facility. Environmental protection • Use the whole of the maximum recommended capacity. Never exceed the maximum permitted load. • Do not use the prewash function for lightly or normally soiled items. • Follow the manufacturer's recommendations on detergent usage. • Use the highest spin speed permitted for the fabric type. Fast spins reduce the drying time and thus energy consumption. Safety instructions • This appliance is intended for domestic use and is compliant with Directives 72/23/EEC and 89/336/EEC (including Directives 92/31/EEC and 93/68/EEC) currently in force. • Read all the instructions in this manual carefully before installation and use. • Check that the drum assembly has been released before use (see instructions). Failure to release the drum assembly may cause damage to the washer-dryer and the surrounding furniture or appliances during the spin cycle. • This Instruction Manual is an integral part of the appliance: it must always be kept intact with the appliance. Installation must be carried out by qualified staff in compliance with the relevant regulations. The appliance is built to provide the following functions: washing and drying of clothes or fabrics stated to be suitable for machine washing by the producer on the relevant label. All other uses are to be considered improper. The manufacturer declines all liability for uses other than those stated above. • The nameplate with the technical data, serial number and mark is in a visible position in the part in view after the door has been opened. The nameplate must never be removed. • The electrical and plumbing works required to install the appliance must only be carried out by skilled staff. • The appliance must be connected to earth in compliance with electrical system safety regulations. The manufacturer declines all liability for direct or indirect injury or damage deriving from a non-existent or defective earth connection. • In the event that the appliance is not connected by means of a plug, an omnipolar circuit-breaker device with contact gap of at least 3 mm must be provided. • The plug to be connected to the power supply lead and the relative socket must be of the same type and comply with the relevant regulations. Check that the mains voltage and frequency are the 2 EN • • • • • • • • • • • • • • • • • • • • • • • • • • • • • • • • same as the values marked on the nameplate. The use of adapters or junctions is not recommended. Never disconnect the plug by pulling on the power supply lead. The appliance is only disconnected from the electricity supply if the plug has been removed from the socket or the electrical system master switch has been turned off. The power plug must be accessible after the appliance has been installed. The appliance must be installed using new sets of hoses (supplied with the appliance). Old hose sets should not be reused. Take care that the appliance is not standing on the power supply cable. The washer-dryer must never be used on vehicles, on board ships or planes, or in environments with hazards, such as explosive or corrosive environments (powders, vapours and gases) or explosive and/or corrosive liquids, Do not install the washer-dryer in places with a risk of frost. Frozen pipes may burst under the pressure. Make sure that the drain hose connected to the sink is securely fastened and cannot move. If it is not fixed in place, the repulsive force of the water might thrust it away from the sink, causing the risk of flooding. When connecting the hose to a sink also check that the water drains from it quickly, as otherwise the sink may overflow. Do not overload the appliance. Never use detergents which contain solvents or chemicals for washing in the washer-dryer. They might damage the appliance and form poisonous vapours. These fumes might also catch fire and explode. Garments soaked in petroleum products must not be washed in the washing machine. Before washing, check that garments do not contain inflammable devices (e.g. cigarette-lighters, matches, etc.) If volatile cleaning fluids are used, ensure that these substances have been removed from the garments before they are placed in the appliance. Before loading garments for washing, check that the pockets are empty, buttons secure and zips fastened. Do not wash frayed or torn garments. During washing at high temperatures, the glass in the door will become very hot. Check that all water has been drained from the appliance before opening the door. If there is water inside, pump it out before opening the door. If in doubt, read the instruction manual. The water in the appliance is not suitable for drinking! Swallowing washing machine detergents may injure the mouth and throat. Before removing the garments from the washer-dryer check that the drum is at a standstill. Switch the appliance off after each use to avoid wasting electricity. Leave the door ajar between washes to keep the gasket in good condition. In the event of a malfunction never attempt to repair the appliance yourself. Disconnect the appliance from the electricity supply and turn off the water tap. Then contact a qualified engineer. Repairs must only be carried out by qualified staff. The appliance is intended for use by adults. Do not allow children to tamper with the washerdryer's controls or play with it and do not keep children in the vicinity while the programme is in progress. Young animals or small children might climb into the washer-dryer . Always check the inside of the drum before use and do not allow children to play with the appliance. Keep children away from the appliance when the door or the detergent drawer is open; the appliance might contain detergent residues which may cause permanent injury to the eyes, mouth and throat, or even cause death by suffocation. The appliance is not intended for use by persons (including children) with reduced physical, sensory or mental capabilities, or lack of experience and knowledge, unless they have been given supervision or instruction concerning use of the appliance by a person responsible for their safety. That the tumble dryer is not to be used if industrial chemicals have been used for cleaning That lint must not be allowed to accumulate around the tumble dryer Do not dry unwashed items in the tumble dryer Items that have been soiled with substances such as cooking oil, acetone, petrol, kerosene, spot removers, turpentine, waxes and wax removers should be washed in hot water with an extra amount of detergent before being dried in the tumble dryer 3 EN • • • • • Items such as foam rubber (latex foam), shower caps, waterproof textiles, rubber backed articles and clothes or pillows fitted with foam rubber pads should not be dried in the tumble dryer Fabric softeners, or similar products, should be used as specified by the fabric softener instructions. The final part of a tumble dryer cycle occurs without heat (cool down cycle) to ensure that the items are left at a temperature that ensures that the items will not be changed Never stop a tumble drier before the end of the drying cycle unless all items are quickly removed and spread out so that the heat is dissipated Do not store flammable fluids near the appliance. Lengthy periods out of use. • If the appliance is not to be used for a lengthy period it should be disconnected from the electricity and water supplies and the door should be left ajar to prevent unpleasant smells from building up inside. Important! This appliance is easy to use. However, for the best results it is important to read this manual carefully and follow all the instructions before putting it into operation. The manual provides the correct instructions for installation, use and maintenance, as well as giving useful advice. For Great Britain only Warning: this appliance must be earthed. Fuse replacement If the mains lead of this appliance is fitted with a BS 1363A 13amp fused plug, to change a fuse in this type of plug use an A.S.T.A. approved fuse to BS 1362 type and proceed as follows: 1. Remove the fuse cover (A) and fuse (B) 2. Fit replacement 13A fuse into fuse cover 3. Refit both into plug Important: The fuse cover must be refitted when changing a fuse and if the fuse cover is lost the plug must not be used until a correct replacement is fitted. Correct replacement are identified by the colour insert or the colour embossed in words on the base of the plug. Replacement fuse covers are available from your local electrical store. If the appliance is provided with a plugless supply cord: • It is necessary to install in the fixed wiring an all-pole disconnection device having a gap between contacts of at least 3,5mm. After installation the disconnection device has to be easy to reach. • The connection to the mains must be carried out by a qualified technician in accordance to the scheme shown below and the regulations in force L = brown N = blue = yellow-green • In the event of damage to the supply cord, it has to be replaced by the manufacturer or an authorized technical service center in order to avoid any risk. 4 EN The manufacturer declines all responsibility for injury or damage caused by failure to comply with the above regulations or deriving from tampering with even just one part of the appliance and the use of non-original spare parts. 2. INSTALLATION INSTRUCTIONS Important! The appliance must be installed by a qualified engineer in compliance with the relevant regulations. The washer-dryer is heavy. Take care when lifting it. 2.1 UNPACKING The unit on flexible mounts is fixed in place for transport using the screws (A) on the rear of the washer-dryer, with the relative plastic spacers (B). Once the screws have been removed, the power supply lead can be used. A+B 1. Undo all the screws with a 10 mm spanner 2. Remove all the screws (A) from the rear 3. Remove all the plastic spacers (B) B A 4. Fit all the plastic plugs (C) provided, to prevent water splashes from getting into the appliance, and contact with live parts. C Warning! • Do not turn the appliance upside-down or place it on its sides. • All the transport retainer fittings should be kept in a safe place; they must be fitted again if the appliance has to be moved around in the future. 5 EN 2.2 POSITIONING AND LEVELLING 1. 2. Place the appliance in the chosen position. Level the appliance carefully in all directions with the aid of a spirit level, adjusting the height of the feet if necessary. Once done, fix the feet in place with the locknuts provided. 3. On appliances with adjustable rear feet, note that the rear of the appliance rests on skids and not on the feet. Before inserting the appliance into its place between the kitchen units, check that the rear feet are screwed fully in to prevent damage as the appliance is shifted into position. Once the appliance is in position in the kitchen, the height of the rear feet has to be increased so that the appliance no longer stands on the skids. After adjusting the rear feet, level the appliance and fix the front feet at the height required. The water intake and drain hoses can be fitted pointing to the left or right for effective installation. Warning! • This operation must be carried out with care to prevent the washer-dryer from vibrating, moving or generating excessive noise during use. • If the appliance is installed on a carpeted floor, take care to ensure that the openings in the bottom of the washer-dryer are not obstructed. • Also check that during operation the washer-dryer is not resting against walls, kitchen units, etc. • The appliance must not be installed behind a door with lock, a sliding door, or a door with hinge on the opposite side. 6 EN 2.3 CONNECTING TO THE WATER SUPPLY 1. Check that the water supply pressure is in the following range: 0,05-0,9MPa. With higher pressures, use a pressure reducer. 2. Connect the cold water supply hose (blue screw collar) to the cold water tap with ¾ gas threaded connector, taking care to tighten firmly to prevent leaks. The water supply hose must not be kinked or crushed and must not be changed or cut. Threaded connections must only be tightened by hand. 3. When appliances are supplied with hot water, the intake water temperature must not exceed 60°C and the hose with red screw collar must be connected to the hot water supply tap. Warning! • If the connection is made to new pipelines, or lines which have been out of use for a long time, allow a considerable amount of water to flow out before connecting the intake hose. This prevents any sand or other dirt from fouling the filters installed in the appliance to protect the water intake valves. • The new intake hose supplied with the appliance must be used, and the old water supply hose must not be used. 2.4 CONNECTING TO THE DRAIN 1. Insert the end of the drain hose into a drain pipe having inside diameter of at least 4 cm, at least 50 to 90 cm above floor level, or connect it securely (using the plastic fitting on the elbow in the hose) to a sink or bathtub. 2. In all cases, check that the end of the drain hose is securely fixed to prevent the repulsive force of the water from pushing it out of place. Warning! • Avoid kinks or restrictions to ensure effective drainage. • Any drain hose extensions must be no more than 1 metre long, must be of the same diameter and must be free from restrictions of all kinds. • The end of the drain hose must never be submerged in water. 2.5 ELECTRICAL CONNECTION Before connecting the plug to the power socket ensure that: 1. 2. 3. The electrical system voltage is the same as that stated on the nameplate on the front of the appliance, in the zone visible when the door is open. The rated power supply and the fuses required are specified on the nameplate. The meter, safety breakers, power supply line and power socket are rated to withstand the maximum load required, stated on the nameplate. The power supply socket and the plug fitted to the appliance are compatible without the use of reductions, multiple sockets, adapters and extension leads which might cause overheating or scorching. If the power supply socket is not compatible with the plug supplied, replace the socket with one of the appropriate type. Warning • The power plug must be accessible after the appliance has been installed. • It is absolutely essential to connect the appliance to earth. Connect the plug to a socket with an earth connection in good working order. The manufacturer declines all liability for direct or indirect injury or damage deriving from a non-existent or defective earth connection. Correct electrical connection guarantees conditions of maximum safety. • • This appliance is compliant with the requirements of EEC directive 89/336 of 3.5.89 (including the amendment directive 92/31/EEC) concerning the elimination of radio-frequency disturbance. If the power supply lead is damaged, it must only be replaced with an original spare, available from the AfterSales Service. 7 EN • • Do not connection/disconnect the power supply plug from the socket with wet hands Only disconnect the power supply plug from the socket by taking hold of the plug itself, never by pulling on the lead. 3. DESCRIPTION OF CONTROLS 3.1 CONTROL PANEL All the appliance's control and monitoring devices are placed together on the front panel. Display: shows the settings (spin speed, cycle status, flexi time, maximum recommended weight, drying levels, child lock, clean programme). The settings can be modified using the buttons underneath. Buttons (from left to right): Spin speed selection Option selection Confirm option Delay Timer Drying Start/Pause button: For starting and stopping working cycles. Programme Selector For switching the washer-dryer on and off and selecting programmes. Can be turned in either direction. Does not turn while programmes are in progress. 8 EN 4. USING THE APPLIANCE FOR WASHING 4.1 PREPARING THE ITEMS FOR WASHING 1. 2. Subdivide the items for washing by fabric type and colour fastness. Wash white and coloured items separately. New coloured items should be washed separately the first time. Normally, items carry labels with washing instructions. The following is a short description of the symbols used on these labels. WASHING BLEACHING Machine wash at max. 90°C Machine wash at max. 60°C Do not bleach Bleaching allowed IRONING Machine wash at max. 40°C Machine wash at max. 30°C Hot iron Warm iron Cool iron Do not iron DRY CLEANING Machine wash, delicate cycle at max. 60°C Machine wash, delicate cycle at max. 40°C Machine wash, delicate cycle at max. 30°C Any solvent Any solvent except trichloroethylene Petroleum solvent and R113 Do not dry clean DRYING Hand wash Do not wash High temperature Less than 60°C Do not tumble dry Warning! • Do not wash unhemmed or torn items as they may fray. • Unrelated items in the wash may damage the garments or parts of the washer-dryer. So: empty pockets and turn them inside-out, and remove wheels from curtains or wrap them in a mesh bag. • Wash very small items (belts, handkerchiefs, socks, padded bras, etc.) in a white canvas bag. Fasten pressstuds and zips and sew on loose buttons. • The use of modern detergents and the correct washing temperature is generally sufficient to remove stains from fabrics. However, some difficult stains such as grass, fruit, egg, blood, rust, ballpoint pen, etc. should be dealt with before washing. Depending on the type of fabric, there are a large number of commercial stain removers on the market. In all cases, stains should be cleaned or diluted at once, since the older they are, the harder they are to remove. • Failure to comply with washing guidance symbols may result in damage to the items washed. Wool – Only wool marked as pure new wool, with the mark, or labelled "shrink-proof, machine-washable" can be washed in a washing machine on the specific programme; other types of wool should be hand-washed or dry-cleaned. 4.2 OPENING THE DOOR The appliance is fitted with a safety device which prevents the door from being opened while the programme is in progress. 1. Check that all the water has been drained from the tank and the drum is at a standstill. Warning! • If the washing programme is interrupted, it will be from 3 to 15 minutes before the door can be opened, depending on the temperature reached inside the appliance. Warning! The water may still be boiling hot if the wash was at high temperature. Do not open the door if there is still water in the drum! 4.3 LOADS OF WASHING As far as possible, to save electricity, it is more economical to wash complete loads of the various types of fabric. Shake out the laundry before loading, and alternate large and small items. It is best to weight the load the first few times, after which you will be able to rely on your experience. 9 EN 4.4 LOADING THE ITEMS FOR WASHING 1. 2. 3. 4. Open the door and load the laundry, distributing it evenly over the drum, with items opened out and not bundled together; if possible, large and small items should be well mixed. The washing machine covered by this manual can be loaded with up to 7kg of laundry for each wash. If this weight is exceeded, the washing results will be poor and the appliance may malfunction. To save energy it is more economical to wash full loads of the various types of fabric, following the guidance on quantities provided in the "Programmes Table" supplied in this manual. Close the door by pressing against the frame until you hear it click shut. Take care not to trap items of laundry between the door and the rubber gasket. Warning! • If the door is not properly closed, a safety device prevents the washer-dryer from starting. • Do not exceed the maximum load: overloading adversely affects washing results. 4.5 ADDING DETERGENT AND ADDITIVE The internal tray comprises three compartments, marked with the symbols prewash detergent main wash detergent for fabric conditioner, starch, additives, etc. (e.g. treatment products). The additives are added to the washing tank automatically during the final rinse. The main wash detergent compartment has a tang allowing the use of liquid detergent. To insert it, pull it towards the front and then lower it. Following the recommendations in the "Programmes Table" supplied with this manual, place the detergent and any additives in the drawer before the start of the programme. Never fill with liquids above the maximum level marked; otherwise the trays will empty too quickly. Before pouring dense additives into the container, dilute with a little water to ensure they do not clog the outlet. Use only low-foam detergents suitable for use in a washer-dryer. The amount of detergent must be decided in relation of the hardness of the water, the type and quantity of items loaded, and their degree of dirt. This will provide the desired effect with optimal detergent consumption. On detergent packs the recommended dose is indicated for 4 levels of water hardness and for loads of 4-5 kg of laundry with average dirt levels. Request information about the water's hardness from your water supply company. Water hardness Level of hardness Soft Medium Hard Very hard French degrees fH Up to 15° 15° - 25° 25° - 40° More than 40° German degrees dH Up to 8° 8° - 14° 14° - 22° More than 22° 10 EN 4.6 POWDER DETERGENT DOSES Laundry with normal dirt 1. Choose a programme without prewash. 2. Pour the total amount of detergent shown on the pack into the main wash compartment of the detergent drawer. Very dirty laundry 1. Choose a programme with prewash. 2. Place ¼ of the recommended amount of detergent in the prewash compartment of the detergent drawer and ¾ of the detergent in the wash compartment. Warning! • If no recommended doses are provided, for delicate items in synthetic fibre use from ½ to 2/3 of the recommended dose for washing tough cotton fabrics. • Only neutral detergents recommended for wool should be used on the wool programme. • Use the doses recommended by the detergent producer. 4.7 LIQUID DETERGENT DOSES 1. 2. Pour the dose required into the measuring cap supplied with the bottle of liquid detergent and place it in the drum, or use the main wash compartment of the detergent drawer, fitting the insert provided. The scale on the red insert is intended as an aid when deciding the dose of liquid detergent. Warning! • Liquid detergents can be used, at the doses recommended by the producer, only for the main wash, i.e. in all programmes without prewash. 4.8 DESCALERS Descalers can be added to the prewash and main wash compartments as recommended by their producers. Place the detergent in the compartments first, followed by the descaler. 4.9 PROGRAMMES AND FUNCTIONS For advice on selecting programmes in relation to the type of fabric, refer to the "Programmes Table", supplied with this manual (Inside the bag of accessories). 4.10 SWITCHING ON THE APPLIANCE AND SELECTING THE WASHING PROGRAMME To switch on the appliance and select the programme, proceed as follows: 1. 2. 3. 4. Turn the programmes knob in either direction. This switches on the washer-dryer. Select the washing programme. The time left to the end of the programme and the maximum recommended weight for the selected programme alternate on the display. The symbols on the display light up to identify the information shown. The default spin speed values are shown. The initial settings can be modified using the button underneath the sequence of spin speeds. If spin speed is set, there will be no spin cycle and the appliance will stop with the tank full. If this value is set the appliance does not perform the final spin and the washing programme ends with water in the tank. Delay Timer Max recommended weight Spin Speed selection 11 EN 4.11 SELECTING AND CONFIRMING OPTIONS Options Option selection 1. 2. 3. 4. Confirm option Start Pause The Option Selection button can be used to select the following options in sequence (from the top down): Prewash: adds a stage before the main wash, lasting about 20 minutes at a temperature of 35°C. Suitable for loads of particularly dirty items. Intensive: the max. temperature is changed to 60°C and the washing stage is extended to increase the effectiveness of the enzymes in the detergents. Suitable for delicate but dirty items. Easy iron: produces items which are less creased and easy to iron. Water plus: Increases the amount of water used for washing and rinses. In alternative Extra rinse: this option adds a rinse to the selected washing programme. Flexi Time: reduces the duration of the cycle. The symbol is completely illuminated with the initial duration of the selected programme. Once the option has been selected the cycle duration can be further reduced to an intermediate setting and a minimum setting and then returned to the initial duration by repeated pressing of the Set button In alternative Rapid: reduces the duration of the washing cycle. Suitable for small amounts of laundry with only light dirt. Buzzer: sets whether or not the buzzer will sound at the end of the cycle. The appliance comes with the buzzer function "on". To confirm the selected option, simply press the Confirm options button and the LED of the option remains on. To delete an option selection, simply return to the option with the Selection button and press the Confirm options button. To annul all the options previously selected in a single operation, simply hold down the Confirm options button for 4 seconds. The Buzzer option retains its "on" or "off" status for subsequent cycles. It is only automatically switched to "off" if the Night Wash programme is chosen. 12 EN 4.12 TIME REMAINING Delay Timer symbol Start pause symbol Start Pause Delay Timer button 1. 2. 3. 4. The Delay Timer can be pressed repeatedly to select the time after which the washing programme will end. The time left before the end of the cycle calculates the initial duration of the washing/drying cycle, the settings made (temperature, spin speed and options) which may shorten or lengthen the cycle's initial duration, and the delay time the user wishes to add before the cycle starts. After the Delay Timer function has been set, the symbol on the display remains on. To annul the Delay Timer function, keep pressing the button repeatedly until the display shows 0. The Start Pause symbol flashes on and off until the cycle starts. After the cycle starts, the symbol remains constantly lit. 4.13 STARTING THE WASHING PROGRAMME 1. 2. 3. To start the washing programme after making your personal settings, press the Start Pause button. Once the cycle has started, the display shows the time remaining before the end of the cycle and the Start Pause symbol on the display is constantly on. During performance of the washing/drying programme, the symbols which identify the various phases light up: Cycle phase symbols: Prewash, wash, rinses, final spin and dry. 13 EN 4.14 INTERRUPTING OR CHANGING THE WASHING PROGRAMME The washing programme in progress can be interrupted at any moment: 1. press the “Start/Pause” button for about 3 seconds: the display shows the word PAUS (for 1 second) alternating with the time remaining until the end of the cycle (for 1 second). The Start/Pause light flashes on and off. Programmes can also be interrupted by turning the programme/temperature setting knob while the cycle is in progress. 2. To change the washing programme, simply turn the programme knob to select the new programme; there is no need to set the appliance in pause status. The new cycle will be carried out completely, beginning from the start. If the tank had already been filled with water during the previous cycle, the water intake phase will be omitted from the new programme. 3. To restart the cycle, press the Start-Pause button again. 4.15 PROGRAMME END Washing/drying programmes are completed automatically. The word END appears on the display and the "Time remaining" light goes out. 1. 2. 3. 4. Switch the appliance off by turning the programmes knob to OFF Unload the laundry from the drum. Leave the door ajar to allow the interior of the washer-dryer to dry out. Turn off the water intake tap. If during the initial spin speed setting stage, the "no spin" mode with stop with tank full (spin speed set as 0) was selected, at the end of the washing programme the word STOP appears on the display, alternating with ---(spin speed of 0) and the spin light is on. To proceed with the pump-out and spin, press the spin selection button twice. The appliance restarts the cycle with the pump-out and spin. To select the spin speed required, press the button until the chosen speed is displayed. To pump out the water from the tank without performing the spin, press the spin selection button until the display indicates speed of 0: the pump-out will be run without spin. 4.16 CHILD LOCK 1. When this function is activated, the modification of options, temperatures, spin speed and the washing/drying cycle is not possible while the cycle is in progress. 1 2. 3. 4. 2 Child Lock Symbol To activate the Child Lock, press the Option selection button and hold it down. Also press the Confirm options button within 3 seconds. The Child Lock symbol lights up to show that the function has been activated. Repeat the same procedure to deactivate the function. 14 EN 4.17 OPENING THE APPLIANCE IN AN EMERGENCY In the event of a power failure, the door is opened using the mechanical release device activated by means of the lever in the bottom of the appliance: • Turn the knob to Off and disconnect the power supply plug from the socket. • Drain off the water (see point 6.4) • Pull the lever down and open the door. Warning, scolding hazard: before opening the door, check that the appliance does not contain boiling hot water and detergent which may pour out and cause injury when the door is opened. Warning: do not open the door using the emergency release lever while the drum is turning. 5. USING THE APPLIANCE FOR DRYING 5.1 GENERAL During drying cycles, the water tap must be turned on and the drain hose correctly positioned. This appliance can be set to perform wash only, dry only and wash-and-dry programmes. In the wash-and-dry programme, the appliance switches from washing to drying automatically, with no need to use the controls (at the end of the wash) to obtain the complete cycle. Attention • Only dry laundry or garments washed in an aqueous solution and suitable for tumble drying. • Do not dry fabrics which have been dry cleaned or had stains removed with chemical solvents, wool or wool blend fabrics which will be shrunk by the heat, very delicate fabrics such as silk and synthetic curtains, fabrics which may easily lose threads such as woollen yarn, padding and loose-pile mats, or articles which contain foam rubber or similar elastomers. • Loads of laundry placed in the washer-dryer for drying must not exceed 4 Kg in weight. The washer-dryer is constructed to give the best results with loads which do not exceed 4 kg of dry weight of laundry. • When washing programmes for resistant fabrics are set, drying automatically takes place at 90°C (normal drying). • In washing programmes for delicate fabrics, drying automatically takes place at 60°C (gentle drying). Therefore, in automatic wash-and-dry programmes, the drying programme will depend on the washing programme selected. • In drying only programmes, the laundry must first have been washed and spun-dried. • After drying particularly fluffy items such as new terry towels, the "Rinse" program should be carried out to ensure that any deposits left by the fabric are removed, and are not deposited on the clothes in the next wash. Important – Do not dry delicate fabrics that will not withstand a temperature of 60°C or any fabrics which will not withstand the selected temperature. 5.1.1 EXTRA DRYING If the laundry is still too damp at the end of the programme, set a short timed drying programme. Warning!: do not over-dry as this may cause creases or shrinkage of garments. 15 EN 5.2 WASH-AND-DRY PROGRAMME Automatic washing and drying can be carried out in the tough fabrics (cotton and colours) and synthetic/delicate fabrics programmes. If the wool wash programmes are selected, automatic drying after the wash cannot be set. For automatic washing and drying, the load of laundry must not exceed 4 kg of cotton or 2 kg of synthetic fabrics. Therefore, if the load for washing and drying exceeds the quantities stated above, a wash+dry programme is not recommended; the load will have to be halved after washing and dried in two lots. To set a wash-and-dry programme proceed as follows: 1. Select the washing programme and make any changes to the default parameters; 2. Press the dry button to set the drying time required. The display initially shows the maximum time which can be set (2h:40’), which is then gradually reduced to 0h:00’ Drying symbol Drying button Whether drying will be at the normal temperature (90°C) or the delicate fabrics temperature (60°C) depends on the washing programme set previously. Once a drying time has been set, the symbol on the display flashes; it remains constantly on once the cycle enters the drying stage. 5.3 DRY ONLY PROGRAMME 1. 2. 3. 4. Turn the appliance off by turning the washing/drying programmes selector knob to OFF. Turn the knob to the drying programme required: Intensive drying: for normal drying (90°C), or Gentle drying: for delicate fabrics (60°C). To find out which symbol identifies each drying programme, refer to the programmes table supplied with the appliance. Press the Dry button repeatedly to set the drying time required (see previous point). Press the "Start-Pause” button to start the drying programme. The display shows the time remaining and the drying symbol LED lights up. Attention • Since no washing programme has been set previously, there are no constraints on selection of the drying programme (normal or gentle). Remember that normal drying is recommended for cotton and coloureds, and gentle drying for synthetic and delicate items. • For good drying results, the load of laundry must not exceed 4kg of cotton or 2kg of synthetic fabrics. 5.4 INTERRUPTING OR CHANGING THE DRYING PROGRAMME 1. 2. The drying programme can be interrupted by the same procedures as the washing programme. To end the programme and remove the laundry, it is best first to cool the load. Use the selector button to set a drying time of 20 minutes. Restart the appliance as described above and the laundry will be ready for removal. 16 EN 5.5 CLEAN PROGRAMME To keep the appliance operating at peak efficiency over time, it has a CLEAN programme for regular cleaning of the drying circuit to remove any fluff deposits. 1. 2. After a given number of drying cycles, the CLEAN symbol lights up on the display to warn that this programme needs to be run. The warning light remains on until the CLEAN programme is carried out. The light goes out at the end of the programme. To perform the CLEAN programme, proceed as follows: a. Make sure that the drum is completely empty and close the door. b. Turn the knob to the CLEAN programme (see programmes table for the exact position on the knob) c. Press the START/PAUSE button The CLEAN programme can also be carried out even if the light on the display is not on. CLEAN programme symbol 6. CLEANING AND MAINTENANCE Important – Before carrying out any cleaning or maintenance procedure, the plug must be disconnected from the power supply socket. 6.1 CLEANING THE OUTSIDE OF THE APPLIANCE • • • • • Regular, thorough cleaning will keep your appliance looking good. Clean the exterior of the appliance with soap and water only, then dry thoroughly with a soft cloth. The plastic parts should just be wiped with a damp cloth. Do not scrape with pointed objects, or use solvents or products containing abrasive substances because they damage the surfaces. For reasons of safety, never spray the washer-dryer with jets of water. 6.2 CLEANING THE DRUM • • • • Remove any rust marks from the drum using a stainless steel cleaner, or very fine sandpaper for particularly stubborn cases. For descaling the washer-dryer use only brand-name descalers which contain an anti-corrosion agent for washing machines. Always follow the producer's instructions with regard to use and dosages. After descaling or removing rust from the drum, carry out a few rinse cycles to remove all acid residues which might damage the appliance. Never use cleaners which contain solvents. There is the risk of the formation of vapours which might catch fire and explode. 17 EN 6.3 CLEANING THE DOOR GASKET Check regularly that there are no brooches, buttons, nails or pins in the folds of the door gasket. 6.4 CLEANING THE DRAIN PUMP The drain pump only needs cleaning if it has been blocked by buttons, brooches or similar objects and the water is not being pumped out. In this case, proceed as described below. 1. Remove the mains plug to disconnect the appliance from the electricity supply. 2. Depending on the model, proceed as follows: Built-in/totally concealed model – use a small screwdriver as a lever to remove the plugs shown here, turn the plinth downwards and access the pump. Free-Standing Model – Insert a small screwdriver through the slits in the front of the plinth, then apply upward leverage with the screwdriver to release the top of the plinth from the cabinet. Tilt the plinth forward slightly and pull it upward to remove it completely. 3. Extract the drain hose ”A”. Warning: if the hose is hot, the water is hot or boiling hot. Place a shallow container on the floor and remove the plug “B” to drain off the water. Depending on the amount of water in the appliance, the container may have to be emptied several times. When no more water is coming out, close the hose again by pushing the plug “B” firmly back into place. 4. Unscrew the cover of the pump “D” by turning it to the left. Clean the pump and remove any foreign bodies. Also check the inside “E”, making sure that the impeller turns freely; any foreign bodies stuck in it must be removed. 5. Screw the cover back on the pump. Secure the drain house by snapping the plug back into place "C". Depending on the model, replace the plinth as follows: Built-in/completely concealed model – Fit the bottom of the plinth first. Push it towards the cabinet and put the plugs back into place. Free-standing model – Fit the bottom of the plinth first and then push it towards the cabinet until it snaps into place. 18 EN 6.5 CLEANING THE DETERGENT DRAWER The detergent drawer should be kept clean, removing all solid deposits. To simplify this operation, completely remove the detergent drawer (pull the drawer fully out, press in the zone marked PUSH and then remove completely). Remove the siphon "A" and clean all parts with hot water. Fully re-insert the siphon and remove any detergent deposits before putting the drawer back in position. . 6.6 CLEANING THE WATER INTAKE FILTERS The machine is fitted with a filter which protects the water intake valves. The filter is in the fitting on the intake hose which is connected to the tap The filter must be cleaned if the washer-dryer is not taking in water or the amount of water is insufficient. To clean, proceed as follows: • Remove the mains plug to disconnect the appliance from the electricity supply. • Turn off the water tap. • Unscrew the intake hose fitting from the tap. • Remove the intake hose fitting filter. • Clean the filter with water, with the aid of a small brush. • When screwing the intake hose fitting back into place, check that the filter is positioned correctly. 19 EN 7. TROUBLESHOOTING This produce complies with the relevant regulations governing the safety of electrical equipment. For safety reasons, any technical inspections or repairs must be performed by qualified staff, to prevent all hazards for the user. If the appliance does not work, before calling the After-Sales Service, to avoid unnecessary expense, check yourself that the operations listed in this troubleshooting table have been carried out.. 1 Appliance does not start Check that: - plug is properly connected to socket - door is securely closed - “Start/Pause” button has been pressed. 2 3 4 5 No water filling Check that: - plug is properly connected to socket - door is securely closed - water tap is turned on - water intake hose filters not fouled. - water intake hose not trapped or kinked. No water visible in washing drum No malfunction. Water not pumped out Check that: The water level is below the level of the glass in the door because new appliances use very little water to achieve the same washing and rinsing results. - drain hose is not kinked - drain pump not fouled. Water not pumped out after last rinse in delicate fabrics and wool wash programmes It is not a malfunction: pause programmed into washing programme to prevent creasing of fabrics. 6 Water takes in and pumps out water continually Check that end of drain hose is not too low down. 7 Strong spins Check that: 8 9 10 vibrations during Too much foam formed in tank and flowing out of drawer Water on floor Not all fabric conditioner used or too much water left in compartment To pump out water, proceed as described in "Programme End" point. - Appliance is properly levelled - washer-dryer not too close to walls or kitchen units - internal unit on flexible mounts locked in position. Check that: - detergent used is recommended for automatic washing machines and not for hand washing - quantity used is as stated in manual and no more. Check that: - water intake hose fittings not loose - end of drain hose still correctly positioned. Check that detergent drawer siphons are correctly fitted and not fouled. 20 EN 11 Appliance does not spin Anti-imbalance safety device tripped because laundry not evenly distributed in drum. If laundry is still wet at end of cycle, rearrange it in the drum by hand and repeat spin programme only. 12 Emptying water from drum In the event of a power blackout or appliance failure, the water can be removed from the drum using the emergency procedure. 13 Laundry not properly spun Large items screwed up and not evenly distributed within drum. Always wash a mix of large and small items. 14 Traces of laundry Many phosphate-free detergents contain substances with low water solubility. detergent on Select Rinse programme or brush the laundry. 15 Laundry not dried Check that: - water tap is turned on - load of laundry is not excessive - drying time is long enough - appropriate drying time selected. If the appliance still does not dry the laundry, call the Service Centre to have the fan and drying ducts cleaned to remove any fluff deposits. 16 Washing results unsatisfactory - Probably too little detergent or unsuitable detergent used - Difficult stains not dealt with before washing - Correct temperature not set - Basket overloaded. ERROR DISPLAY In case of a malfunction, the appliance will identify the problem by showing an error code on the display. Error code Key to problem Door not properly closed. Try reclosing. Aqua stop device tripped. Cut off power supply, turn off water tap and contact nearest service centre. Water not taken in for washing. See point 2 in troubleshooting table. Water not pumped out. See point 4 in troubleshooting table. For all the other error codes displayed, cut off the electricity supply, turn off the water tap and contact your nearest Service Centre. 21 PROGRAM GUIDE Detergent drawer compartments Programs Max. Spin (rpm) Max. washing load (kg) Max. drying load (kg) Delicate coloureds with light dirt Cold Max 7 Delicate coloureds with normal dirt 40° Max Tough coloureds with normal dirt 60° Tough coloureds with heavy dirt Options Prewash Wash Conditioner Prewash Intensive Easy Iron Extra rinse Rapid 4 Normal Cold wash, rinses and final spin at the selected speed 7 4 Normal Wash at 40°C, rinses and final spin at the selected speed Max 7 4 Normal Wash at 60℃, rinses and final spin at the selected speed (Standard cycle with only "intensive" option selected) 90° Max 7 4 Normal Wash at 90℃, rinses and final spin at the selected speed Cold 800 2 - - - - - - - - Cold wash, rinses and final spin at the selected speed 30° 800 2 - - - - - - - - Wash at 30℃, rinses and final spin at the selected speed Rinse & Spin - Max 7 - - - - - - - Rinse and pump-out only, or pump-out and final spin at the selected speed Drain & Spin - Max 7 - - - - - - - - Pump-out only, or pump-out and final spin at the selected speed Items with light dirt 30° 1000 3,5 3,5 - Delicate Wash at 30℃, rinses and final spin at the selected speed Items with normal dirt 40° 1000 3,5 3,5 - Delicate Wash at 40℃, rinses and final spin at the selected speed Super Fast Light cotton or delicate fabrics for refreshing 30° 800 2 - - - - - - - - Wash at 30℃, rinses and final spin at the selected speed Mix Cotton and synthetics with light dirt 30° 1200 3 3 Delicate Wash at 30℃, rinses and final spin at the selected speed 60° Max - 3 - - - - - - - - - Delicate drying for synthetic and delicate items 90° Max - 4 - - - - - - - - - Normal drying for cotton items - - - - - - - - - - - - - Drying circuit cleaning cycle Cotton and Coloureds Temp. (°C) Wool and Delicates Hand wash Wool and silk Synthetics Drying Programmes Gentle Intensive Clean Drying after wash if selected Wash program description : Option available : Options which cannot be selected simultaneously Code 19392012900 ISTRUZIONI DI MONTAGGIO DELLE LAVATRICI INTEGRABILI IT ASSEMBLY INSTRUCTIONS FOR BUILT-IN WASHING MACHINES EN MONTAGEANLEITUNG FÜR EINBAUBAREWASCHMASCHINEN DE INSTRUCTIONS DE MONTAGE DES LAVE-LINGE INTÉGRABLES FR INSTRUCCIONES DE INSTALACIÓN DE LAS LAVADORAS INTEGRABLES ES INSTRUÇÕES DE MONTAGEM DAS MÁQUINAS DE LAVAR ROUPA INTEGRÁVEIS PT MONTAGEINSTRUCTIES VAN INTEGREERBARE WASMACHINES NL MONTERINGSANVISNING FOR INTEGRERBARE VASKEMASKINER DK MONTERINGSANVISNINGAR FÖR INBYGGNADSBARA TVÄTTMASKINER SE ANKASTRE ÇAMAŞIR MAKĐNELERĐ ĐÇĐN MONTAJ TALĐMATLARI TR ИНСТРУКЦИИ ПО МОНТАЖУ ВСТРОЕННЫХ СТИРАЛЬНЫХ МАШИН RU ASSEMBLY INSTRUCTIONS FOR BUILT-IN WASHING MACHINES IMPORTANT - This machine complies with current safety regulations governing electrical appliances and, to ensure user safety, it must be installed by a qualified technician as required by current legislation Size of cabinet The minimum dimensions of the cabinet are: height 820 mm, width 600 mm, depth 584 mm (fig. 1). Applying the panel The panel may be attached to the left- or right-hand side of the washing machine (fig. 2) The machine is supplied fitted for a left-hand side panel attachment as the right-hand side is fitted with the push-pull lock (upper part) and the rubber pad (lower part). Should you wish to use the magnetic lock instead of the pushpull lock, remove the push-pull lock support and fit the supplied magnetic lock support. Important! Before fitting the panel (removing all the hinge and locking elements from the front) make sure the washing machine is totally disconnected from the mains power supply. Warning - To fix the panel on the right-hand side (direction of opening opposite to that of the door) dismount the push-pull lock (or the magnet lock) from the front of the machine and the rubber pad (fig. 3-A) and fit them on the opposite side (fig. 3B). All the elements applied to the front of the washing machine must be remounted correctly (no holes must remain open) in order to make it impossible to touch live components inside the machine. Our company declines all liability for failure to observe the above safety requirement. Using the template 1) Measure the height of the kitchen baseboard: the height of the wooden panel is obtained by first establishing the height of the kitchen baseboard. E.g.: for a 100 mm high baseboard, the maximum height of the panel is 720 mm. If the height of the baseboard must be increased, the height of the wooden panel must be reduced. 4 Place the template of the inner side of the panel and match the height of the baseboard with the lower edge of the panel (fig. 4) using the graduated scale. Make sure the template is horizontally centred with reference to the vertical lines marked at the ends. After placing the template in the correct position, trace the positions of the following holes, pushing in with the tip of your pencil: • holes for the hinges and hinge screws (fig. 4) • holes for fixing the metal plate (if the magnetic lock is used), or the hook for the push-pull lock (fig. 4, A - B) Applying the panel elements and fixing the panel 1) Drill the holes for the hinges (fig. 5), the hook for the pushpull lock (fig. 5), or the metal plate if you decide to use the magnetic lock (fig. 6), and the holes for fixing the hinges (fig. 6). 2) The 13 mm depth of the 2 mm holes, for fixing the hinges and a metal plate for the magnet lock, only applies to the solid wood panel. For the chipboard panel, simply drill the upper coating – fig. 6. 3) Screw the two hinges to the panel (fig. 7) 4) Mount the hook for the push-pull lock or the metal plate for the magnet lock on the side opposite the hinges (fig. 7). 5) Fix the panel to the washing machine following the instructions shown in fig. 8. Adjusting the hinges If, after applying the panel to the washing machine, it is slightly inclined or off-centre with respect to the front of the machine, correct its position by adjusting the mobile part of the hinges (fig. 9). Positioning the washing machine in the cabinet Position the washing machine in the cabinet and, if necessary, adjust the feet to level it and lock them with the relative locknut. On appliances with adjustable rear feet, refer to the operator’s manual. To prevent the vibrations generated by the washing machine from being transmitted to the cabinet, make sure the sides and top do not touch the cabinet. There must be a gap of at least 2 mm. The back of the machine must also remain detached from the rear panel. If the cabinet is 870 mm high, the washing machine heightening kit on sale from the Spare Parts Service, must be used. To comply with safety legislation, any gaps between the floor and the bottom of the baseplate and between the floor and the sides of the machine when it is positioned at the end of a line of furniture must be completely closed. The cover must be installed in such a way as to make it 5 impossible to touch live components and a tool must be required to remove it. Our company declines all liability for failure to observe the above safety requirement. Applying the baseboard It must be possible to remove the continuous kitchen baseboard to allow the drain pump to be cleaned if necessary. In some cases, the baseboard is not continuous but limited to the width of the washing machine. In this case, the kitchen baseboard can be fixed to the washing machine baseboard with 4 screws, respecting the 4 reference marks (see fig. 9-10-11). When applying the kitchen baseboard, the washing machine baseboard may not be removed or adapted as, for reasons of safety, it must remain as it is, in one piece and fixed to the washing machine. 6 1 ! 596mm 820mm ! 560mm 820mm 58mm ca. 82kg 150mm 16mm 2 A B 9 3 3-A 2 2 1 C 3 7 8 3 9 5 10 4 A-B 11 12 6 C 9 C A B D 5 6 1 1 2 3 7 A-B 8 3 4 2 D C 3-B 4 5 4 Unterkante Lower edge Côté inférieur Lato inferiore Lado inferior Onderkant Нижний край e 16...21mm 9 Unterkante Lower edge Côté inférieur Lato inferiore Lado inferior Onderkant Нижний край e 16...21mm 592...595mm 592...595mm e e 13mm 13mm 6 5 Ø 35mm Ø 2mm 7 8 2 2 1 1 3 3 4 5 6 9 ? 1 2 2 1 3 9 11 10