1
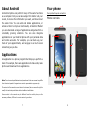
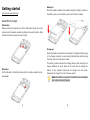
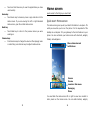
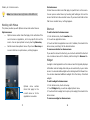
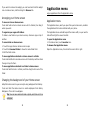
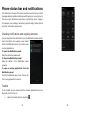
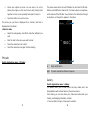
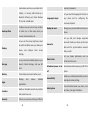
Contents Contents .................................................................. 1 About Android.......................................................... 7 Applications ............................................................. 7 Your phone .............................................................. 8 Getting started ...................................................... 11 Touch screen & keys .............................................. 13 Touch tips .......................................................... 13 Zooming tips ...................................................... 14 Rotate the screen ................................................ 14 Key tips ............................................................. 14 Home screen .......................................................... 16 Quick start: Home screen ..................................... 16 Working with Menus ............................................ 17 Shortcut ............................................................ 18 Widget .............................................................. 18 Arranging your Home screen ................................. 19 Changing the background of your Home screen ........ 19 1 2 Application menu ................................................... 20 People ............................................................... 29 Application menu ................................................ 20 Phone................................................................ 32 Phone status bar and notifications......................... 21 Checking notifications and ongoing activates............ 21 Toolkits ............................................................. 21 Dial pad ................................................................. 23 Make a call......................................................... 23 Options available during a call ............................... 23 Text entry .............................................................. 24 On-screen keyboard ............................................ 24 Enter text .......................................................... 24 Enter Various Characters ...................................... 25 Edit Text............................................................ 25 Email ................................................................ 33 Multimedia ............................................................. 36 Camera ............................................................. 36 FM radio ............................................................ 37 Gallery .............................................................. 38 Sound Recorder .................................................. 39 Tools ...................................................................... 41 Calendar ............................................................ 41 Clock................................................................. 41 Calculator .......................................................... 42 Chrome .................................................................. 43 Select Text......................................................... 25 Connect to networks and devices........................... 44 Cut /Copy/Paste Text ........................................... 26 Determine the network you are using ..................... 44 Communication ...................................................... 27 Edit or create new access points ............................ 44 Messaging.......................................................... 27 Wi-Fi networks.................................................... 44 3 4 Bluetooth ........................................................... 45 Requirements for Mobile Phone.............................. 64 Connect to a computer via USB ............................. 46 Requirements for the Battery ................................ 65 Working with secure certificates............................. 46 Requirements for the Charger and AC Adapter ......... 65 Install secure certificate from phone storage ............ 47 Cleaning and Maintenance .................................... 65 Settings ................................................................. 48 Accessing Password............................................... 51 PIN Code ........................................................... 51 PIN2 Code.......................................................... 51 PUK Code........................................................... 51 PUK2 Code ......................................................... 52 Notices................................................................... 53 Precautions............................................................ 55 Frequently Asked Questions and Troubleshooting . 58 Safety Information and Notices ............................. 61 Using the Mobile Phone and Charger....................... 61 Using the Mobile Phone ........................................ 61 Using the Battery ................................................ 63 Using the Charger ............................................... 64 5 6 About Android An Android phone can perform many of the same functions as a computer. But you can also adjust it to better suit your needs, to receive the information you want, and have fun at the same time. You can add and delete applications, or enhance them to improve functionality. At Android Market you can download a range of applications and games from a constantly growing collection. You can also integrate applications on your Android phone with your personal data and online accounts. For example, you can back up your track of your appointments, and engage in as much social networking as you like. Your phone the important keys & connectors Phone overview 1 9 2 8 3 Applications An application is a phone program that helps you perform a task. For example, there are applications to make calls, take photos and download more applications. Note: The colors and specifications shown/mentioned in the user manual may differ from the actual product. Images shown are for representation purpose only. The content of the manual is correct when it is released, but we reserve the right to 4 5 6 10 7 modify the technical specification without additional notification. Some content in the manual may be different from the mobile phone, as the accessory software, SIM card or service varies by providers. 7 8 1 Earphone Jack 2 Receiver To connect an earphone so you can listen to music/radio. 7 To connect charger or USB Charge/USB Port data cable for data exchange. To hear the voice of the other Switch the phone on and off; 8 side when calling. Power/Lock Key Press and hold to open phone options menu. To adjust the ringer volume, 3 Volume Keys adjust the voice volume during a call, and adjust media volume. 9 Back Camera Lens 10 Speaker For taking photos. To listen to music, and other sounds offered by your phone. Open a list of options available in 4 Menu Key the current screen or application. Touch and hold to open a window showing your most recently used applications. 5 Home Key Go to Home screen. Go back to the previous screen; 6 Back Key Close the on-screen keypad, a Icons Description Signal strength indicator for SIM1 Icons Area Signal strength indicator for SIM2 Icons Area Alert Type is Ring and Vibration Icons Area Alert Type is Silent Icons Area Alert Type is Vibration Icons Area Alert Type is Loudest Ring and Vibration Icons Area Unread SMS Icons Area Missed calls Icons Area Unread mail Icons Area Alarm Enabled Icons Area dialog box, an options menu, or the Notification panel. 9 Location 10 Getting started Battery in let's get you up and running the battery slot, press the battery down until it locks into place. With the metallic contacts of the battery facing the metallic contacts in Assemble & charge SIM card in Make sure that the clipped corner of the SIM card is facing the correct direction and the metallic contacts are facing the correct direction. Slide the SIM card into the card slot until it stops. Charge up Ensure the battery is inserted in the handset. To charge the battery, plug in the charger connector at your phone (USB interface) and then plug the other end into an AC power socket. The battery symbol indicates the charging status. While charging, the charge indicators will scroll. When all the scroll bars are steady, the SD card in Put the SD card into the SD card slot with the metallic contacts facing downwards. battery is fully charged. Disconnect the charger from the phone. Disconnect the charger from the AC power socket. Note: If the battery is powerless, the battery icon will reappear after a few minutes of charging. 11 12 Touch screen & keys a few essentials Zooming tips When looking at maps, webpages or photos, place two fingers on the touch screen at once and pinch them together to zoom out or spread them apart to zoom in. Touch tips Note: Use the zoom function when you view photos, maps or Here are some tips on how to navigate around your phone. when you browsing the web. Touch To choose an icon or option, touch it. Rotate the screen On some screens, the orientation of the screen rotates with the phone as Touch & hold Open special functions or additional options. Try it: From Application menu, touch Messaging icon to enter Messaging library, then touch and hold an Messaging, some options will be available to you. For example: Copy, Forward, delete, etc. you turn it from upright to its slide and back again. You can turn this feature on and off. Key tips Power/Lock key Drag To scroll through a list or move slowly, drag across the touch screen. Try it: on the Home screen, touch People icon to enter contacts list, you can drag contacts list up or down to scroll list. When powering off status, press and hold to turn on the phone; When powering on status, press and hold to enter phone options (Power off, Reboot, Airplane mode, and so on); To save your battery, prevent accidental touches or when you want to wipe smudges off your touch screen, put the touch Slide To slide by moving your finger up or down on the touch screen quickly. Scroll through a list or move quickly, slide across the touch screen (drag screen to sleep by pressing Power/Lock key; To wake up the touch screen, just press Power/Lock key again, and then drag the lock icon to the right on the screen to unlock quickly and release). according to the clue on the screen. Menu key Double-touch Touch quickly twice to zoom in/out. For example, double-touch a picture in Gallery to zoom in/out. 13 Opens a menu with items screen/application. 14 related to the current Touch and hold menu key to view the applications you have used recently. quick access to the things you need most Home key Touch Home key to close any menu or app and return to the Home screen. If you are viewing the left or right Extended Home screen, open the central Home screen. Back key Touch Back key to return to the previous screen you were working on. Quick start: Home screen The Home screen gives you all your latest information in one place. It's what you see when you turn on the phone. It is the equivalent of the desktop on a computer. It’s your gateway to the main features in your phone. You can customize your Home screen with shortcuts, widgets, Volume keys Home screen Press Volume keys to change the volume. When playing music or video files, press Volume keys to adjust media volume. folders, and wallpapers. Phone status bar and notifications Camera Chrome Launcher: Main menu Messaging Phone You need slide the Home screen left or right to view more content in other panels on the Home screen. You can add shortcuts, widgets, 15 16 Context menus folders, etc. to Home screen. Context menus contain tools that apply to specific item on the screen. Note: Your Home screen might look a little different. You can open a context menu by touching and holding an item on the screen. Not all items have context menus. If you touch and hold an item that has no context menu, nothing happens. Working with Menus The phone provides you with Options menus and context menus. Shortcut Options menus To add a shortcut to Home screen Options menus contain tools that apply to the activities of the 1. From Home screen, touch Launcher icon. current screen or application, not to any specific item on the 2. You will see application menu. screen. You can open options menu by touching Menu key. 3. Touch and hold an application icon until it vibrates, then back to the Not all screens have options menus. If you touch Menu key on Home screen, and drag it to the desired location. a screen that has no options menu, nothing happens. To remove a shortcut on Home screen If you want to remove the shortcut, you can touch and hold the shortcut icon on Home screen until it vibrates, and then drag it to Remove tab. Widget A widget is small application on the Home screen that typically displays information such as Analog clock and you can use directly on your Home screen. You can also add a widget such as Analog clock that shows time. You can also download additional widgets from the library of Android widgets. To add a widget to Home screen Options menu contain items that apply to the current screen or to the application as a whole. 17 1. From Home screen, touch menu key. 2. Touch Widgets tab, you will see widget options menu. 3. Touch and hold a widget icon to pick up the widget, then back to the Home screen. To remove a widget on Home screen 18 If you want to remove the widget, you can touch and hold the widget icon on Home screen, and then drag it to Remove tab. Arranging your Home screen Application menu enjoy applications from the Application menu To move an item on Home screen Application menu Touch and hold an item on Home screen until it vibrates, then drag it The Application menu, which you open from your Home screen, contains where you want. the applications that come installed with your phone. To organize your apps with folders The Application menu extends beyond the screen width, so you need to To make a new folder on your Home screen, stack one app on top of slide left and right to view all content. another. To open the Application menu To name folder on Home screen 1. On Home screen, touch Launcher icon. 1. Touch the apps stack on Home screen to open To browse the Application menu 2. Touch the Unnamed Folder to show the name folder field. Open the Application menu, then slide the screen left or right. 3. Edit the folder name. To move application shortcuts on Home screen to a folder Touch and hold the item on Home screen until it vibrates, and then stack the app on top of others. To move application shortcuts in a folder to Home screen Touch and hold the item in a folder, and then drag the item out of the folder. Changing the background of your Home screen Adapt the Home screen to your own style using wallpapers from Gallery. Touch and hold the Home screen to select wallpapers from Gallery Wallpapers. Then set it as wallpaper. Tip: You can use camera to take a photo, and then set it as wallpaper. 19 20 Phone status bar and notifications The status bar at the top of the screen contains icons that tell you about messages and phone status and shows what’s going on in your phone. At the top you get notifications when there is something new or ongoing. For example, new message, missed call, signal strength, battery status and other information appear here. Checking notifications and ongoing activates You can drag down the status bar to open the Notification panel and get more information. For example, view missed calls from Notification panel. You can also open running applications. To open the Notification panel Drag the status bar downwards. To close the Notification panel Drag the bottom of the Notification panel upwards. To open a running application from the Notification panel From the Notification panel, touch the icon for the running application to open it. Toolkits In the toolkits you can quickly start the common applications such as Bluetooth, Wi-Fi and so on. Open the toolkits panel by touching 21 . 22 Dial pad Text entry Make a call On-screen keyboard Touch Phone icon on the Home screen. Touch the keys of the on-screen QWERTY keyboard to enter text In dialing screen, input number and touch dial icon to dial the inputted conveniently. You can open this keyboard by touching a text field. number. Android keyboard input method Options available during a call Touch this icon to select desired contact from phonebook. During a call, there are some call options available to you. These call options can be seen only during a call. When a call is in progress, you can put it on hold, initiate a phone conference, mute your microphone etc. Text field To Send message Key pad: Go to the key pad. Speaker: To turn on/off Touch the Touch speaker. Touch to capitalize the next letter you type. Mute: Mute your voice so that the Touch other party cannot hear you. Hold: To place a call on hold. Touch Add call: Open dial pad to dial the Touch second call. End: To end a call. Touch Enter text Touch the keys on the keyboard to type. Use the Delete key to erase characters to the left of the cursor. When you finished typing, Touch Back key to close the keyboard. Press Volume keys to adjust the call volume. 23 24 Enter Various Characters Touch the Symbols key Select all to switch to the numbers and Copy Cut symbols keyboard. Touch on the symbols keyboard to view additional symbols. Edit Text You can edit the text you enter in text fields and use menu commands to cut, copy, and paste text, within or across applications. Some applications do not support editing some or all of the text they display. Others may offer their own way to select text you want to work with. Touch and hold the text field that contains the text to select the word. Cut or copy the text. Cut /Copy/Paste Text 1. Touch Cut icon or Copy icon in the menu that opens. Select Text 2. Touch and hold the text field where you want to paste the text. You can select text for cutting or copying. The selected text is 3. Touch PASTE in the menu that opens. The text is inserted at the highlighted in blue. cursor. Touch and hold the portion that contains text. Some options open with icons. You can paste the text that you copied from one application into a text field in any application. Move the cursor to select the text. 25 26 Communication do actions. it’s good to talk, text or email. . . Messaging Find it: Application menu > Messaging You can compose, send and receive text messages from your phone, and also can compose, send and receive multimedia messages, which contain media files such as pictures, videos and audios. When you view your messages, they appear as conversations, which means that all messages to and from a particular person are grouped together. • Compose new message 1. From your Home screen, touch Messaging icon or find it: Application menu > Messaging. 2. Touch 1. From your Home screen, touch Messaging icon or find it: . 3. To add recipient(s), touch , then find and mark the contact name. To add more than one contact, mark the contact name for the desired recipients. You can also enter the recipient’s phone number manually. 4. After you finish marking contact(s), touch OK. 5. Touch Type text message to enter your message text. 6. If you want to insert a media file, touch • Delete message threads , and select an attachment. Application menu > Messaging. 2. Touch and hold the message thread. 3. Select the conversations you want to delete. 4. Touch , then touch Delete in the menu that pops up. You can also touch Menu key and touch Delete all threads to delete all message threads from the window. • Forward a message 1. From your Home screen, touch Messaging icon or find it: 7. To send the message. When editing message, touch Menu key, some additional options will be available to you. For example, add subject. You can touch the options to 27 Application menu > Messaging. 2. Touch the conversation containing the message you want to forward. 28 3. Touch and hold the message you want to forward. 4. Touch Forward in the menu that opens. 5. Add recipient(s), touch • Contact screen overview Groups tab Favorites tab , then find and mark the contact name. To Contact tab add more than one contact, mark the contact name for the desired recipients. You can also enter the recipient’s phone number manually. 6. To send the message. • Lock a message You can lock a message. Touch a contact thumbnail to access the quick contact menu Touch a contact to view its details 1. From your Home screen, touch Messaging icon or find it: Application menu > Messaging. 2. Touch the conversation containing the message you want to lock. 3. Touch and hold the message you want to lock. 4. Touch Lock in the menu that opens. A lock icon appears. Unlock a message by touching and holding the message and then touch Unlock. Touch to add new contact Touch to search • Add a contact 1. From your Home screen, touch People icon or find it: Application menu > People. • Messaging settings 1. From your Home screen, touch Messaging icon or find it: Application menu > Messaging. 2. Touch Menu key, select Settings in the menu that opens. 2. Touch . 3. Select storage path to which you want to add this new contact. 3. You can change messages settings, such as delete old messages as 4. Enter the information for the contact. multimedia message limits, request a delivery report for each message 5. After you finish, touch DONE. you send. • Search a contact 1. From your Home screen, touch People icon or find it: Application People menu > People. Find it: Application menu > People The People application offers you to store and manage all your contacts. 29 2. Touch . 3. Input the first character of the name you are searching for in the 30 cursor, and then all records meeting the conditions will be displayed. Search results will be different due to different input content. • Additional options From contacts list screen, touch Menu key, some additional options will be available to you. For example, import/export, and share visible contacts. Delete contact: You can mark much more than one contact, 4.Select the account you want to save. 5. Input the information of group, then touch DONE. To assign a contact to a group 1. From your Home screen, touch People icon or find it: Application menu > People. 2. Touch Groups tab. and then delete these marked contacts. 3. Touch a group to which you want to assign contacts. Contacts to display: To select what sort of contacts to display 4. Touch Menu Key select edit. in the contacts list. 5. Touch Type person’s name to input the Search contacts name, then Import/Export: Copy contacts to which you want to import. the corresponding contact entry will pop up, select the desired contact Accounts: You can synchronize your phone contacts with a entry. synchronization account. Settings: Set up the contact. Share visible contacts: You can share contacts via Bluetooth, Email, and so on. 6. After you finish editing, touch DONE. • Favorites You can set contacts as favorites so that you can get access to them from the Contacts application. • Contact groups To set a contact as favorite You can assign contacts to groups to get quicker access to them from the 1. From your Home screen, touch People icon or find it: Application Contacts application. It allows you to create a new group such as VIP, schoolmate, friends, family or co-worker. To create a new group 1. From your Home screen, touch People icon or find it: Application menu > People. 2. From contacts list, touch a contact which you want to set as favorite. 3. Touch . If you want to cancel the favorite, touch Phone 2. Touch Groups tab. 3. Touch menu > People. Find it: Application menu > Phone . 31 32 . • Call log 4. Compose email. Touch Menu key, you can attach a file, select the Find it: Application menu > Phone > Call log tab type of attachment, and select the file which you want to attach from the Touch different tabs such as All, Received, Dialed, and Missed calls on list that appears. upside screen of Call log interface, and then you can view different call 5. If you want to add Cc/Bcc, touch Menu key, then touch Add Cc/Bcc. logs. 6. When you finish, touch to send the email. • Receive emails 1. From your Home screen, touch Launcher icon, then find it: Email Find it: Application menu > Email The Email application in your phone offers you to compose, send and receive emails through your regular email account. You need create account first, and then create email to send. You can configure Email for most accounts in just a few steps. • Set up an email account in your phone 1. From your Home screen, touch Launcher icon, then find it: Application menu > Email. 2. Enter your email address and password, then touch Next. 3. If the settings for the email account cannot be downloaded automatically, complete the setup manually. If necessary, contact your email service provider for detailed settings. 4. When you are prompted, enter a name for your email account, so that it is easily identifiable. The same name shows in the emails you send from this account. 2. Touch more to refresh, you can download new emails. • Read your emails 1. From your Home screen, touch Launcher icon, then find it: Application menu > Email. 2. In the email inbox, scroll up or down, and touch the email you want to read. • Reply to an email 1. From your Home screen, touch Launcher icon, then find it: Application menu > Email. 2. In the email inbox, scroll up or down, and touch the email to which you want to reply. 3. Touch to reply, touch More to select Reply all. 4. Enter your reply, touch to send the email. • Forward an email 1. From your Home screen, touch Launcher icon, then find it: 5. After you finish, touch Next. Application menu > Email. • Create and send an email 1. From your Home screen, touch Launcher icon, then find it: Application menu > Email. 2. Touch Application menu > Email. 2. In the email inbox, scroll up or down, and touch the email you want to forward. 3. Touch More, to select Forward. . 3. Enter recipients’ addresses, and subject. 33 4. Enter recipients’ addresses. 34 5. Touch Multimedia to send the email. • View all folders 1. From your Home screen, touch Launcher icon, then find it: listen it, watch it, capture it, enjoy it! Application menu > Email. Camera 2. Touch inbox. Find it: Application menu > Camera Take a photo or record a video with the camera in your phone. You can hold the camera horizontally or vertically. Share a photo or a video with your friends, or upload your photos and videos to a web service. • Camera control overview 1 2 3 1 Take a photo 2 Shooting mode 3 Settings camera • Take a photo Adjust your picture size, color effect, and other settings if you wish. 35 36 Frame your subject on screen. You can zoom in or out by The phone comes with an in-built FM Radio. You can listen to FM radio placing two fingers on the touch screen and pinching them stations, and add them to channel list. You have to plug in an earphone, together to zoom out or spreading them apart to zoom in. as the antenna of the FM radio. You can listen to the radio either through Touch the shutter icon on the screen. an earphone, or through the speaker in the phone. The picture you just took is displayed for a moment, and then is 1 displayed as a thumbnail. • Shoot a video Adjust the video quality, color effect, and other settings if you wish. Point the lens to the scene you want to shoot Touch the camcorder icon to start. Touch the camcorder icon again to stop shooting. FM radio 3 2 Find it: Application menu > FM radio 1 Radio on/off button 2/3 To search around the effective frequency Gallery Find it: Application menu > Gallery The Gallery offers you to view photos and play videos which are downloaded as well as those taken by the phone camera. From Gallery, you can also share your photos and videos with your friends, via Messaging, Bluetooth, or Email. 1. Touch an album to open it and view its contents. 37 38 2. Touch a picture or a video in an album to view it. Record sound and play sound file. To Share via various ways Touch Delete Touch When viewing a picture, touch Menu key, some additional options will be available to you, such as delete, slideshow, edit, rotate left, rotate right, crop, set picture as, and details. • Share an Album 1. From your Home screen, touch Launcher icon, then find it: Application menu > Gallery. 2. Touch Menu key, touch Select album in the menu that opens. 3. Select the albums you want to share. 4. Touch . 1 5. In the menu that opens, touch the application to use to share the 2 3 selected albums. You can share via Email, Bluetooth, Messaging and so on. Sound Recorder Find it: Application menu > Sound recorder 39 1 To start recording 2 Recording files list 3 To play recording 4 To stop recording 40 4 Tools • Add an alarm stay on top of things Application menu > Clock. 1. From your Home screen, touch Launcher icon, then find it: Calendar Find it: Application menu > Calendar Your phone has a calendar for managing your time schedule. You can use the calendar to keep track of important events. After entering the calendar function menu, you can select year, month and date. • To set the calendar view 1. From your Home screen, touch Launcher icon, then find it: Application menu > Calendar. 2. Touch 2. Touch . 3. Touch . 4. You need set time, ringtone, repeat, and vibrate. Then, turn it on. Then the alarm can ring at a specific time you set. Calculator Find it: Application menu > Calculator Keep your calculations on your finger tips with the calculator. Using this application allows you to make calculations. The calculator provides the . 3. Select day, week, or month in the menu that opens. • To add a calendar event 1. From your Home screen, touch Launcher icon, then find it: Application menu > Calendar. basic arithmetic functions; addition, subtraction, multiplication, and division. You can also use an advanced panel. • How to use the calculator 1. From your Home screen, touch Launcher icon or find it: Application menu > Calculator. 2. Touch Menu key, then touch New event in the menu that opens. 2. Enter the first number using the numeric keys. 3. Enter the name, location, time, and description for the event. 3. Enter the operation for your calculation by touching the Plus, Minus, 4. Select a reminder for the event. Multiplication, or Division key. 5. After you finish, touch DONE. 4. Enter the next number. 5. To view the result, touch the “=” (equals) key. Clock Touch Menu key, you can open advanced panel to do calculation. Find it: Application menu > Clock The clock allows you to view time and date. You can also add an alarm, Touch , you can only erase one numeric before the cursor. Touch and hold , you can erase all numeric before the cursor. set the alarm and turn it on. Then, the alarm can ring at a specific time you set. 41 42 Chrome Connect to networks and devices Use your web browser to view and navigate web pages, add pages as Your phone can connect to a variety of networks and devices, including bookmarks, and save pages for offline reading. You can open several Wi-Fi, Bluetooth, and devices such as headsets. You can also transfer windows at the same time and switch among them easily. files to/from your PC through the data cable. • Open the web browser From your Home screen, touch Chrome icon or find it: Application menu > Chrome. 1. Touch Launcher icon, and from Application menu, touch Settings. • Search and address bar Enter a search word to search for a web page, or enter a web page address to load a web page Determine the network you are using 2. Touch More... > Mobile networks > Access point names. The name of the wireless service provider you are currently registered with is selected in the list. Edit or create new access points View the download progress of the current web page If you and your wireless service provider determine that you need to change the settings of your current access point name (APN) or to create a new one, you must obtain the APN and detailed settings from your provider. • Manage bookmarks Bookmarks let you access your favorite and frequently visited web pages quickly. You can add bookmarks directly from your phone browser. 1. Touch Launcher icon, and from Application menu, touch Settings. 2. Touch More... > Mobile networks > Access point names. 3. Touch an existing APN to edit it, or touch Menu key select New APN. Enter the APN settings that you obtained from your wireless service provider. 4. When you finished, touch Menu key and then Save. 5. If you created a new APN, touch it in the APNs screen to start using it. Wi-Fi networks Wi-Fi is a wireless networking technology that can provide internet access at distance of up to 20 meters. To use Wi-Fi on your phone, you 43 44 access a wireless access point, or “hotspot”. Some hotspots are open 1. Touch Launcher icon, and from Application menu, touch Settings. and you can simply connect to them. Others are hidden or implement 2. Touch Bluetooth. other security features, so you must configure your phone so it can 3. Check or uncheck Bluetooth to turn it on or off. connect to them. • Pair with Bluetooth devices TIP: Turn off Wi-Fi when you are not using it, to extend the life of your You must pair your phone with a device before you can connect to it. battery. Once you pair your phone with a device, they stay paired unless you • Connect to Wi-Fi network unpair them. 1. Touch Launcher icon, and from Application menu, touch Settings. 1. Touch Launcher icon, and from Application menu, touch Settings. 2. Touch Wi-Fi. 2. Touch Bluetooth. 3. Check Wi-Fi to turn it on. The phone scans for available Wi-Fi 3. If Bluetooth is not turned on, check Bluetooth to turn it on. Your phone networks and displays the names of those it finds. Secured networks are scans for and displays the IDs of all available Bluetooth devices in range. indicated with a Lock icon. 4. If the device you want to pair with is not in the list, touch SEARCH 4. Touch a network to connect to it FOR DEVICES. If the network is secured, you are prompted to enter a password or other 5. Touch the ID of the desired device in the list to pair it. credentials (Ask your network administrator for details) • Receive notifications By default, when Wi-Fi is on, you receive notifications in the status bar when your phone detects an open Wi-Fi network. 1. Turn on Wi-Fi, if it’s not already on. 2. In the Wi-Fi list screen, touch Menu key to open Advanced options, check Network notification. You can uncheck this option to stop receiving notifications. Connect to a computer via USB You can connect your phone to a computer with a USB cable to transfer music, pictures, and other files between your phone’s SD card and the computer. You cannot share your phone’s data connection and SD card via USB cable at the same time. If you are using USB tethering, you must turn that off first. The connection to USB interfaces has to be limited to USB 2.0 version or Bluetooth higher. The connection to so called power USB is prohibited. Bluetooth is a short-range wireless communications technology that devices can use to exchange information over a distance of about 10 meters. Working with secure certificates If your organization’s VPN or Wi-Fi Network relies on secure certificates, • Turn Bluetooth on/off 45 46 you must obtain the certificates and store them in your phone’s secure credential storage, before you can configure access to those VPN or Wi-Fi networks on your phone. Settings the settings for various features of the phone If your network administrate instructs you to download the certificates from a website, you are prompted to set a password for the credential Get to know the settings in your phone so that you can personalize them storage when you download the certificates. to your own requirements. Go to Settings to configure how your phone looks, sounds, communication, privacy, and operations in a variety of Install secure certificate from phone storage 1. Copy the certificate from your computer to the root of the SD card. 2. Touch Launcher icon, and from Application menu, touch Settings. ways: SIM management 3. Touch Security. 4. Touch Install from phone storage. 5. Touch the file name of the certificate to install. Only the names of Wi-Fi certificates that you have not already installed on your phone are 7. From Wi-Fi list, search and select the certificate. inserted in your phone. Turn Wi-Fi on or off, scan available Wi-Fi networks, or add the Wi-Fi network. Turn Bluetooth on or off, search for displayed. 6. If prompted, enter the certificate’s password. Set preferences on how you use SIMs Bluetooth available Bluetooth devices, and make your phone visible or invisible to other Bluetooth devices. Turn the mobile data traffic on or off, and Data usage keep track of your data usage details over a specified period of time. Turn Airplane mode on or off, and More... configure settings for VPN and mobile networks, enable your phone to share its 47 48 mobile data connection as a portable Wi-Fi locks and passwords. hotspot, or through USB tethering or Bluetooth tethering, and share Windows Let you select the language for the text on Language & input PC internet via USB cable. Backup & reset or Silent you in other ways when you to switch orientation when you rotate your and configure other Accounts screen Let you check out available space on your phone’s internal storage, and your SD card. Battery Apps Location Security Data & time and remove Manage your personal data and reset your installed Enable or disenable Access to my location accounts. Enable your phone synchronize data with the synchronization accounts Let you choose preferences such as format and time zone. Schedule automatic powering on/off of the off phone. Accessibility applications. About phone Enable your installed accessibility services and adjust related settings. View information about your phone, such as status, and legal information. and Location sources. Protect your phone by setting up different 49 the Scheduled power on & Check battery status and battery level. Manage configuring that you add. settings. Storage for Let you add, and manage supported Let you set the screen brightness, select phone, and phone. receive communications, etc. Display phone onscreen keyboard. Configure how your phone rings, vibrates, Audio profiles your 50 Accessing Password The cell phone and SIM card use several accessing passwords. These your local service provider for PUK code. cannot be used any more. Please contact your service provider for a passwords help to prevent the cell phone from being embezzled. You can use the function options in the security settings of settings menu to change accessing password (except for PUK and PUK2). PIN Code PIN code (Personal Identification Number) can prevent the SIM card from being embezzled. The PIN code is provided along with the SIM card. If the PIN code checking is activated, it is necessary to input the PIN code when the cell phone powers on every time. new SIM card. confirmation. PUK code cannot be changed. If the PUK code is lost, please contact your service provider. PUK2 Code PUK2 code is provided along with some SIM cards for changing locked PIN2 code. If wrong PUK2 code has been input for 10 times straight, the SIM card cannot be used any more. Please contact your service provider If a wrong PIN code has been input for 3 times straight, it is needed to input the PUK code, then input a new PIN code and input it again for If wrong PUK code has been input for 10 times straight, the SIM card for a new SIM card. The PUK2 code cannot be changed. If it is lost, please contact your service provider. PIN2 Code Some SIM cards may provide PIN2 code, while PIN2 code needs to be used in some functions like Call Cost. These functions can be used only if the SIM card supports them. If a wrong PIN2 code has been input for 3 times straight, it is needed to input the PUK2 code, then input a new PIN2 code and input it again for confirmation. PUK Code PUK code (Personal Unlock Key) is used to change locked PIN code. PUK code is provided along with the SIM card. If not provided, please contact 51 52 Notices Location: Adapter shall be installed near the equipment and shall be easily accessible. Warnings on Battery: (a) Please use appointed battery in case of explosion risk. (b) Please dispose of lifeless battery under guidance. Requirements for the Battery When not in use, store the battery in a cool, well-ventilated place with sunshine. If you will not be using the mobile phone for an extended period of time, charge the battery on a regular basis to avoid battery breakdown. The phone battery wears out fast. If charging the battery does not improve its performance, it is time to replace the battery. Properly dispose of the battery according to local regulations. Do not throw it into a fire. Caution:Risk of explosion if battery is replaced by an incorrect type. Dispose of used batteries according to the instructions. Requirements for the Charger and AC Adapter Please confirm if the environment temperature is within the range of 0ºC ~40ºC while charging. 1.Health (Article 3.1(a) of the R&TTE Directive) EN 50360:2001+ A1 :2012 /EN 62209-1:2006 EN62311 :2008/EN62209-2:2010 EN 62479 :2010 2.Safety (Article 3.1(a) of the R&TTE Directive) Applied Standard(s): EN 60950-1:2006+A11:2009+A1:2010+A12:2011 EN50332-1:2000 EN50332-2:2003 3.Electromagnetic compatibility (Article 3.1 (b) of the R&TTE Directive) Applied Standard(s): EN 301 489-1 V1.9.2/-3 V1.4.1/-7 V1.3.1/-17 V2.2.1/-24 V1.5.1 4.Radio frequency spectrum usage (Article 3.2 of the R&TTE Directive) Applied Standard(s): EN 301 511 V9.0.2 EN 301 908-1 /-2 V5.2.1 EN 300 328 V1.7.1 EN 300440-1 V1.6.1 EN 300440-2 V1.4.1 All the reports of the applied standards have the Positive Opinion of Notified Body: PHOENIX TESTLAB, Königswinkel 10 D-32825 Blomberg, Germany Identification mark: 0700 (Notified Body) CE Please make sure the temperature for device will not be higher than 40˚C The device could be used with a separation distance of 1.5cm to the humanbody. Complies with the essential requirements of Article 3 of the R&TTE 1999/5/EC Directive, if used for its intended use and that the following standards have been applied: 53 54 Precautions Turn off around exposure Area Please carefully read and observe the terms below: Please observe related limitations and do not use your Safe power on mobile phone near an area where explosions can occur. Do not use your mobile phone where it is forbidden to use or Proper use you might cause a disturbance or danger. Safe transportation first Please observe all related local laws and regulations. Do not use your mobile phone while driving. Safe transportation should be considered first when driving. As described in this manual, your mobile phone can be used only in the correct location. If possible, please do not touch the antenna area of your phone. Use qualified after sales service Only a qualified technician can install or repair your mobile Disturbance All mobile phone performances might be disturbed. Turn off when in the hospital Please follow related limitations. Please switch your mobile phone off when near a medical instrument. phone. Please contact the authorized service center in case of phone failure. Accessories and batteries Only use the authorized accessories and batteries and do not connect to incompatible manufacturers or products. Waterproof Turn off on an airplane Your mobile phone is not waterproof. Please keep it away Please follow related limitations. from water. Do not use your mobile phone on an airplane. Backup Turn off when at a gasoline station Remember to make a backup or keep a written record of all Do not use your mobile phone at a filling station or around important information saved in your mobile phone. fuels or chemicals. 55 56 Connect to other devices Please read the user manual of the device to get more detailed security instructions before connecting to other devices and do not connect to an incompatible product. SOS emergency calls Make sure your mobile phone is switched on and in a service area. In idle mode, input the SOS number, then touch the Dial Key. Advise where you are and do not hang up without permission. Frequently Asked Questions and Troubleshooting Frequently Asked Cause and Solution Questions Press the power on key for over 1 second. Fail to turn on Check if the battery is properly connected. Please remove and install it again, retry to turn it on; Check if battery is appropriately charged. Weak signal. Please try and move to a location with Fail to connect network strong signal and try connecting to the network again; Please ensure that you are not beyond the network coverage of service providers; Please ensure you have a valid SIM card. Please contact your network provider for further information; Check if the SIM card is installed correctly Handset lock password. If the handset lock is activated, Display you have to input handset password. information Input PIN: Inputting PIN while turning on each time is while turning activated, you have to input the PIN code. on Input PUK code: When you’ve input wrong PIN code for 3 times will lock the SIM card. You need to input the PUK code provided by your network provider. Please check if the sound volume is tuned improperly Poor quality of calling In an area with poor receiving condition, example: basement, the signal might be weak. Try searching a location with stronger signal reception and call again. 57 58 While using the mobile phone in the peak period of Please confirm if the environment temperature is within communication, like commute time, you may be unable the range of 0ºC ~40ºC while charging. to call because of line congestion. The battery or charger is damaged. You need to replace The standby duration is relative to the system setting of it. network. While the mobile phone is in an area with poor Fail signal strength and cannot receive the signal, the some The network provider does not support the function, or Standby handset will continuously search for a base station. This functions you have not applied for it. duration will Note: If the instruction above cannot help you solve problems, please shortened recommended that you turn off your mobile in area with record, no signal reception to save battery. Mobile phone model and serial number, Need replacing the battery. Please change a new Specific content of warranty, battery. Clear statement of problems, Dirt on the metal surface of an SIM card. Use clean cloth Then contact your local dealer or the authorized service center in your to wipe the metal touch point on an SIM card. area. SIM Card Error significantly reduce battery charge. It is to set Wrong operation. The SIM card is not installed. The SIM card is damaged. Please contact your network service provider. Please check if you touch the dial key after dialing. Please Fail to dial out check if calling is forbidden because of defaulting. Please check if the SIM is valid. Please check if the call barring is set. Please check if the fixed dial function is set. Callers cannot contact you Fail to charge Please check if the mobile phone is on and connected with the network. Please check if the Call barring or call divert is activated. Please check if the SIM card is valid. Poor contact. Please check if the plug is connected well. 59 60 Safety Information and Notices Using the Mobile Phone and Charger Warning: Please confirm if the environment temperature is within the range of 0ºC ~40ºC while charging. Danger: Do not use the phone while you are driving. Pull over and stop your Only use authorized battery and charger. Using other brands may cause automobile to dial or listen to a phone call. battery leakage, overheating, explosion or even fire. Usage of mobile phones in aircrafts or hospitals is prohibited. Switch the Caution: phone off to prevent interference with electronic medical devices. Follow Keep the phone away from dust, water and damp areas. Dust, water or any rules or regulations in such places. other liquids may cause overheating, electrical leakage, and/or phone Do not use the phone at a gas station, near fuel or near chemicals. failure. Do not use the phone near electronic medical devices such as hearing The phone, battery, charger and AC adapter are not waterproof. Keep aids, pacemakers and auto-control devices such as fire detectors and them away from rain and liquid. automatic doors. Warning: If you have to use your mobile phone near an electronic medical device Do not bump, shake or tamper with the phone or charger. This may such as a pacemaker, please contact your manufacturer or dealer for cause battery leakage, overheating, explosion or even fire. information about preventing interference. Do not place the battery, phone or charger near a microwave or Caution: high-voltage device. This may cause battery leakage, overheating, Electronic systems in automobiles such as anti-lock brakes, speed explosion or even fire; also prevent the phone and AC adapter from control, or fuel spraying systems, are usually not influenced by wireless overheating, smoking or short circuiting. devices. Manufacturers of these systems will tell you whether they are Do not use the phone around volatile oil. This may cause fire, breakdown provided with good screening functions. If you suspect that an or damage. automobile failure is caused by a wireless wave, please contact your To avoid any damage or breakdown, do not disassemble the phone, automobile dealer. battery, charger or internal components by yourself. Avoid using your phone in crowded places. Location: Do not store your mobile phone near or with a credit card, disk or other The socket-outlet shall be installed near the equipment and shall be magnetic materials. This may effect information stored on your phone. easily accessible. Keep your phone away from pins. Pins can be absorbed by the phone’s receiver magnet, which may cause harm. Using the Mobile Phone If you intend not to use your mobile phone for a long period of time, 61 62 please remove the battery from the phone. Leaving the battery inside Do not leave the product or its battery inside a vehicle. This may damage the mobile phone for a long period of time may cause moisture to the the product, overheat the battery, or pose a risk to the vehicle. battery, and it can damage the mobile phone or the battery. Warnings on Battery: Using the Battery Danger: (c) Please use appointed battery in case of explosion risk. (d) Please dispose of lifeless battery under guidance. Do not dispose of the battery into a fire. Doing so may cause battery Using the Charger explosion or even fire. Danger: If you have difficulties installing the battery, do not force the installation. Only use the charger that came with the phone. Using a different charger This may cause battery leakage, overheating, explosion or even fire. may cause the phone to breakdown or explode. Keep metal objects away so they do not come in contact with the battery If the charger short circuits, a fire may occur. or its connectors as it may cause the battery to short circuit, overheat or Do not use a damaged, worn or broken charger. This may cause a fire. explode. Clean dust away from the power socket to avoid the possibility of a fire. Do not weld the polarities of the battery directly together. This may Do not store the charger near any liquids. If liquids spill onto the charger cause battery leakage, overheating, explosion or even fire. it may cause it to overheat or breakdown. Battery liquid is severely harmful for your eyes. If battery liquid gets in If liquid does spill onto the charger, immediately unplug the power cable your eyes, do not rub them. Instead, wash your eyes with water first to prevent overheating, fire or another type of breakdown. and then go directly to a doctor for help. Do not use the charger in places with high humidity like a bathroom. This Do not use or store your phone in high temperature areas. This may may cause a fire or other breakdown. cause battery leakage, overheating, explosion or even fire. Do not touch the charger, power cable or socket with wet hands. This Warning: may cause an electric shock. Replace the battery when the normal usage time begins to decrease or if you notice the battery is overheated or has changed shape or color. If battery liquid leaks onto your skin or clothes, immediately wash the affected parts with water. If the battery begins to leak or emits a strange odor, properly dispose of the battery according to local regulations. Do not throw it into a fire. Requirements for Mobile Phone Avoid using your mobile phone in extremely high or low temperatures. It is recommended that you do not use your mobile phone near a telephone, TV set, radio or other radio frequency sensitive devices. Caution: 63 64 Requirements for the Battery When not in use, store the battery in a cool, well-ventilated place with sunshine. If you will not be using the mobile phone for an extended period of time, charge the battery on a regular basis to avoid battery breakdown. The phone battery wears out fast. If charging the battery does not improve its performance, it is time to replace the battery. Properly dispose of the battery according to local regulations. Do not throw it into a fire. Caution: Risk of explosion if battery is replaced by an incorrect type. Dispose of used batteries according to the instructions. Requirements for the Charger and AC Adapter Please confirm if the environment temperature is within the range of 0ºC ~40ºC while charging. Cleaning and Maintenance The mobile phone, the battery and the charger are not waterproof. Do not use them in places with high humidity like a bathroom and also avoid spilling any liquids on them. Use a soft cloth to clean the mobile phone, the battery and the charger. Do not use alcohol, diluted liquid or benzene to clean the mobile phone. If dust gets in the sockets the phone can be damaged, short-circuit or even the lose the ability to be re-charged. Be sure to clean the socket regularly. 65