1
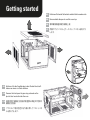
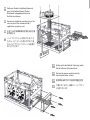
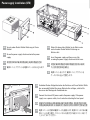
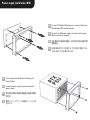
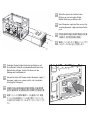
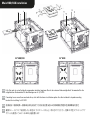
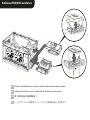
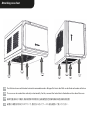
Getting started
DE Entfernen Sie die Frontblende, indem Sie die Kunststoff-
haken von innen zur Seite drücken.
EN Remove the front panel by pressing outward on the
plastic tabs located inside the case.
CN 按壓固定於機殼前方面板內側塑膠卡
機殼前方面板
組,即可移除
JP プラスチック製の固定爪を外側に押してフロントパネ
ルを取り外します.
DE
Entfernen Sie beide Seitenteile und die Gehäuseoberseite.
EN
Remove both side panels and the case top.
CN
移除機殼兩邊側板及機殼上板
JP
両側のサイドパネルとケースのトップパネルを取り外
します.
DE Entfernen Sie den Festplatten-Einbaurah-
men. Anschließend können Sie das
Mainboard und gegebenenfalls eine
Grafikkarte einbauen.
EN Remove the hard drive mounting frame. You
can now install the mainboard and, if
applicable, a graphics card.
CN 先取下5.25吋硬
板及顯示卡
轉接架並開始安裝主機
JP ハードドライブトレイを取り外します。
そ
れから、
メインボードを取り付けます。場
合によってグラフィックスカードを設置す
ることができます.
ield
IO sh
DE Entfernen Sie die Netzteil-Halterung, indem
Sie die äußeren Schrauben lösen.
EN Remove the power supply bracket by
loosening the outer screws.
CN 鬆開螺絲後即可卸下電源供應器固定框
電源ユニットブラケッ
JP 外側のネジを外し、
トを取り外します.
SF
PS X
U
S
PS FX
U
Power supply installation (SFX)
DE Verschrauben Sie die Netzteil-Halterung mit Ihrem
DE Setzen Sie danach das Netzteil in das Gehäuse ein
Netzteil.
EN Screw the power supply attachment onto the power
supply.
CN 使用隨附螺絲將電源供應器鎖在電源供應器固定框
JP 電源ユニットブラケットを電源ユニットにねじ込みます.
und schrauben Sie die Netzteil-Halterung am
Gehäuse fest.
EN Insert the power supply and then secure it by
screwing the power supply attachment to the case.
CN 將整組電源供應器含電源供應器固定框推入機殼
內,並將固定框鎖在機殼上
JP 電源ユニットを入れて、
電源ユニットブラケットを
ケースにねじ込んで固定します.
DE Verbinden Sie den Kaltgerätestecker des Gehäuses mit Ihrem Netzteil. Sollte
das verwendete Netzteil über einen Netzschalter verfügen, schalten Sie
diesen vor der Montage der Frontblende ein.
EN Connect the internal IEC power cord to the power supply. If the power
supply uses a power switch, turn it on before attaching the front panel.
CN 將機殼內部標準IEC規格電源線連接至電源供應器,
假如使用者的電源
供應器具備電源開關,安裝機殼前方面板前記得先將開關切至開啟位置
JP 電源ユニットに内蔵IEC電源コードを接続します。
電源スイッチのある電
源ユニットを使う場合、
フロントパネルを取り付ける前にスイッチを「オ
ン」にしておいてください.
Power supply installation (ATX)
DE Für eine ATX Netzteil Montage muss zunächst die innere
Metallblende (SFX) entfernt werden.
EN To install an ATX power supply, the internal metal panel
(SFX) must first be removed.
CN 安裝標準ATX電源供應器前,
先移除內部SFX電源供應
器轉接板
JP ATX電源を取り付ける場合、
まずは内部の金属パネル
DE Verschrauben Sie die Netzteil-Halterung mit
Ihrem Netzteil.
EN Screw the power supply attachment onto the
power supply.
CN 使用隨附螺絲將電源供應器鎖在電源供應器
固定框
JP 電源ユニットブラケットを電源ユニットにねじ
込みます.
AT
PS X
U
(SFX)を取り外す必要があります.
DE Setzen Sie danach das Netzteil in das
Gehäuse ein und schrauben Sie die
Netzteil-Halterung am Gehäuse fest.
EN Insert the power supply and then secure it by
AT
PS X
U
screwing the power supply attachment to the
case.
CN 將整組電源供應器含電源供應器固定框推
入機殼內,並將固定框鎖在機殼上
JP 電源ユニットを入れて、
電源ユニットブラケ
ットをケースにねじ込んで固定します.
DE Verbinden Sie den Kaltgerätestecker des Gehäuses mit
Ihrem Netzteil. Sollte das verwendete Netzteil über einen
Netzschalter verfügen, schalten Sie diesen vor der
Montage der Frontblende ein.
EN Connect the internal IEC power cord to the power supply. If
the power supply uses a power switch, turn it on before
attaching the front panel.
CN 將機殼內部IEC電源線連接至電源供應器,
若電源供應
器含有電源開關,安裝面板前請先將開關切至開啟位置
JP 電源ユニットに内蔵IEC電源コードを接続します。
電源
スイッチのある電源ユニットを使う場合、
フロントパネ
ルを取り付ける前にスイッチを「オン」にしておいてくだ
さい.
Main HDD/SSD installation
3.5"DD
H
3.5" D
HD
2.5" D
HDD/SS
2.5" HDD/SSD
3.5" HDD
DE Falls Sie mehr als eine Festplatte verwenden möchten, beginnen Sie mit der unteren Einbaumöglichkeit. Verwenden Sie die
mitgelieferten Einbauwinkel für die Montage von 1x 3,5" HDD.
EN If wanting to use more than one hard drive, start with the lower installation option. Use the included L-shaped mounting
bracket for installing 1x 3.5" HDD.
CN 若需安裝二個硬
,第一個硬
必須先安裝於下方的安裝位置.安裝3.5吋硬
需使用隨附L型硬
轉接片固定
下のスペースから上へ取り付けてください。付属のL字型マウンティングブ
JP 複数のハードドライブを使用したい場合は、
ラケットを使用して 3.5インチHDDを1基設置します.
Additional HDD/SSD installation
2.
HD 5"
SSDD
3.5"
HDD
3.5H"DD
DE Weitere Festplatten können mit dem Festplatten-Einbaurahmen montiert werden.
EN Additional hard drives can be mounted with the hard drive mounting frame.
CN 第二個硬
安裝於硬
轉接架上
ハードドライブを増設することが可能です.
JP ハードドライブトレイを使用して、
2.5"
HDSDSD
Optional 2.5" HDD/SSD or 80mm fan
installation
2.5"
HDD/SSD
DE Montagemöglichkeit für 1x 2,5" HDD/SSD
oder 1x 80-mm-Lüfter.
EN Installation option for 1x 2.5" HDD/SSD or 1x
80mm fan.
CN 可安裝一個2.5吋硬
風扇(選配)
/SSD或是一個80mm
JP 2.5インチHDD/SSD x 1基または80mmファ
ン x 1基を搭載することができます.
Attaching case feet
DE Das Gehäuse kann vertikal oder horizontal verwendet werden. Bringen Sie hierzu die Füße an der Unterseite oder seitlich an.
EN The case can be used either vertically or horizontally. For this, connect the feet either to the bottom or the side of the case.
CN 機殼可垂直或水平擺放,
請依使用需求將隨附之自黏
固定於機殼側板或是底板角落位置
JP 縦置き・横置き両対応のデザインで、
置き方に応じてケースの足を設置して使ってください.