1
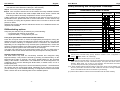
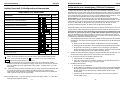
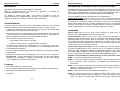
KVM Switch Pro USB 2.0 Audio 4 Port is also available with
DisplayPort Interface (LINDY No.39328).
Der KVM Switch Pro USB 2.0 Audio 4 Port ist auch mit DisplyPort
Interface (LINDY Art.-Nr. 39328) verfügbar.
KVM Switch Pro USB 2.0 Audio
User Manual
Benutzerhandbuch
Manuel Utilisateur
Manuale d’uso
English
Deutsch
Français
Italiano
Le commutateur KVM Switch Pro USB 2.0 Audio 4 port est
disponible également en DisplayPort (N° Art. 39328).
Lo switch KVM Pro USB 2.0 audio 4 porte è disponibile anche con
interfaccia DisplayPort (art. 39328).
User Manual............................. English ............................... page 3
Benutzerhandbuch ................. Deutsch .............................. Seite 8
Manuel d’utilisateur ................ Français ........................... page 13
Manuale d’uso ......................... Italiano ........................... pagina 18
No. 39330 – 2 Port DVI-I
No. 39331 – 4 Port DVI-I
No. 39332 – 2 Port DVI-I Dual Link
No. 39333 – 4 Port DVI-I Dual Link
No. 39334 – 2 Port DVI-I Dual Link Dual Head
No. 39335 – 4 Port DVI-I Dual Link Dual Head
For Home and Office Use
Tested to Comply with
FCC Standards
Certifications & Statements ... ................................................... 24
www.LINDY.com
© LINDY ELECTRONICS LIMITED & LINDY-ELEKTRONIK GMBH
-
SECOND EDITION (APR 2013)
-2-
User Manual
English
User Manual
English
Introduction
USB 2.0 Device Sharing
Thank you for purchasing the LINDY KVM Switch Pro USB 2.0 Audio. This
product is covered by a limited 2 Year warranty.
This KVM Switch provides USB Keyboard & Mouse ports as well as two USB 2.0
hub ports to connect different USB 2.0 devices.
Pease read this manual carefully to fully understand all the functions and features
of this advanced USB KVM Switch. It allows several USB enabled computers to
be connected and controlled from a single keyboard, monitor and mouse thereby
reducing hardware costs and maximising desk space.
The built in USB hub supports USB data rates of up to 480Mbps. The internal
USB 2.0 hub ports also support the connection of an additional USB hub allowing
more that two devices to be connected to the KVM switch. USB devices can either
be switched together with the KVM function or configured to be excluded from
switching.
Product Features
The LINDY KVM Switch Pro USB 2.0 Audio supports advanced features that allow
modern USB enabled computers such as PCs and Macs to connect and share
USB peripherals, such as printers, scanners, storage devices etc.
•
Supports USB mice and keyboards as well as USB 2.0 device sharing among
the connected computers
•
True Transparent USB versions support specific model identification for
Keyboards & Mice, allowing individual drivers and special functions to be used.
This also provides enhanced support for combined use with KVM extenders.
•
Computer port selection by any of the following:
o Front panel push buttons on the switch
o Keyboard Hotkey – configurable by the user
•
Audio support for microphone and speakers. Includes selectable switching
function which can be configured to exclude audio switching for uninterrupted
listening.
•
Built in 2 port USB 2.0 hub allows peripherals to be shared between the
connected computers. USB hub ports can be configured to be excluded from
switching when changing computers.
•
DVI-I & DisplayPort versions are available, supplied with KVM cables for
computer connections.
•
The DVI-I version uses advanced DVI-I technology for digital video as well as
analogue video signals via the DVI-I connector. Supports all digital DVI-D
Single Link resolutions up to 1920 x 1200, and analogue VGA resolutions up to
2048 x 1536.
Package contents
Important Note: If you share USB Pen Drives, Card Readers or other memory
devices, and switch them between your computers, you must make sure that any
current data transfer is completed before you change channels. If you do not do
this the active data transfer may be interrupted and files may become corrupted or
lost. To prevent such problems make sure that any data transfer has completed or
use the Windows or Mac function to remove the USB hardware safely.
Installation
VGA operation: This KVM Switch only switches analogue and digital signals;
it does not convert the video signal. If you only want to connect analogue VGA
signals then you should attach a LINDY DVI to VGA Adapters (No. 41223) to
both your graphics cards and monitor. Also ensure your monitor supports VGA
signals.
Mixed DVI-D and VGA operation: You can connect VGA and DVI-D signals
from separate computers. Your monitor must support both VGA as well as DVID signals and should automatically switch to the active signal. If your monitor
has two separate inputs for analogue (VGA) and digital (DVI-D) signals then
you will need to use a LINDY Video Splitter Cable (No. 41008) to connect your
monitor.
Dual Head operation mixed DVI-D and VGA: You can connect and switch
between both digital DVI-D and analogue VGA signals (dual head operation)
using the supplied KVM cable. Use the LINDY Video Splitter Cable (No. 41008)
to connect to your DVI-D monitor and a short VGA extension cable (i.e.
No.37390, 37452 or 37391) to extend the splitter cable to your VGA monitor.
You may need an additional Video Splitter Cable (No. 41008) if your graphics
cards output the VGA and DVI-D signals via individual ports.
Please install your KVM Switch Pro USB 2.0 Audio as described below:
LINDY KVM Switch Pro USB 2.0 Audio
2 or 4 sets of KVM cables (depending on model) to connect the computers
Step 1. Connect the power supply to the KVM switch before you connect any
other cables.
Step 2. Connect your Keyboard & Mouse to the USB ports and your monitor to
the DVI port labelled CONSOLE on the KVM switch. Connect your speakers
and microphone if required.
Power supply
This manual
Step 3. Connect your computers using the cables provided. Should you wish to
extend the operating distance purchase suitable cables from LINDY. The
-3-
-4-
User Manual
English
maximum distance for USB is 5m. If you require a longer distance then please
use USB 2.0 Active Extension Cable (No. 42817/42915).
User Manual
Hotkey Switching and Configuration Commands
Step 4. Turn on the power to all devices and computers.
Step 5. Your computer should now boot and detect the newly installed hardware.
Windows OS will detect and install multiple USB device drivers. Please wait
until this procedure has finally completed to ensure correct operation.
A Mac system may not identify PC keyboards at the first boot and may show an
identification menu; please follow the on screen information. In some cases it may
be necessary to unplug the Keyboard & Mouse and re-connect to allow the USB
ports to re-detect.
Windows OS includes all relevant USB device drivers so no additional drivers are
required to be installed.
KVM switching options
Computer port selection may be made by any of the following:
o Front panel push buttons on the switch
o Keyboard Hotkey – configurable by the user
Front panel push buttons with white/red LED indicators
Press the front push button to select the appropriate port/computer. During the
switching process a white LED behind the switch button will flash. The LED will
remain on when switching is completed and the connections are established.
Depending on the configuration only the KVM ports (USB keyboard, mouse and
monitor) or KVM and USB 2.0 hub and/or Audio ports are switched. To learn more
about these options, please refer to the table on the next page.
The white port LEDs refer to the KVM section status, the red port LEDs refer to
the USB 2.0 hub section status and shows the port/computer currently selected.
Keyboard Hotkey Switching
The KVM switch may also be conveniently switched and configured using
keyboard hotkeys. This process is invoked by pressing a universal hotkey on the
keyboard twice within 2 seconds. The factory default setting for this universal
hotkey is the SCROLL LOCK button. The KVM switch can be reconfigured to use
a different hotkey from the following list: NUM LOCK, or CAPS LOCK, or F12 or
Escape (ESC) key.
Press the universal hotkey twice to invoke the switching function – the KVM switch
will confirm this with a short beep signal. Depending on the next key you press
you can select any of the available switching or configuration functions of the KVM
switch. Please refer to the following table for the available options.
-5-
English
KVM Switch Pro USB 2.0 Audio
Command
Hotkey Input
Binds KVM & Hub switching (Default, Z for QWERTY kb!)
* + * + Z (or Y)
Unbinds KVM & Hub switching
* + * +X
Binds KVM & Audio switching
(Default)
Front
* + * +Q
Unbinds KVM & Audio switching
* + * +W
Switches directly to port 1, 2, 3 or 4
* + * + 1-4
Switches USB Hub to port 1, 2, 3 or 4
* + * + Fn1-Fn4
(Yes)
Switches Audio devices to port 1, 2, 3 or 4
* + * + Fn5-Fn8
(Yes)
Switches one port up
* + * +↓
Switches one port down
* + * +↑
Switches to the previous port
* + * +←
Switches the Beep confirmation tone ON / OFF
* + * +B
Switches the universal Hotkey to **
* + * + H + **
Switches to Autoscan
* + * +S
Switches to Autoscan with port time 10s (1) to 100s (0)
* + * + S + 0-9
Stops Autoscan
Any key
*
Yes
Yes (#)
Yes
stands for the universal hotkey (factory default is SCROLL LOCK, configurable to new
hotkey ** NUM, CAPS, F12, or ESC key)
Fn1-Fn4 stands for the function keys F1, F2, F3, and F4
(#)
To change the universal hotkey from the front push buttons please press the highest port
button until you hear two short confirmation beeps. Then press the chosen new hotkey
SCROLL, NUM, CAPS, F12, or ESC on your keyboard. The KVM switch will confirm this
by a short beep and the hotkey is permanently changed.
(Yes) When binding between KVM and USB 2.0 Hub and/or Audio ports is enabled, pressing
the front push button will switch all: KVM & USB hub & Audio. If binding is disabled for
Audio or the USB hub this will not be included for port switching.
[To print the above table the manual can be downloaded from the LINDY website.]
-6-
User Manual
English
Benutzerhandbuch
Deutsch
Troubleshooting
Einführung
Note when using older USB computers: When connecting older USB
computers with only USB 1.1 interfaces, ensure that Legacy Support in the BIOS
is enabled. Also ensure your operating system is up to date with the latest USB
HID drivers.
Herzlichen Glückwunsch zum Erwerb des KVM Switch Pro USB Audio.
Note for power supply: It is possible to use the KVM switch without the DC
adapter for use with low power devices. However, it is advisable to use the DC
adapter for use with the built in USB 2.0 hub when using bus powered devices.
Bitte lesen Sie dieses Handbuch sorgfältig um die ausgefeilten Möglichkeiten
kennen zu lernen, die Ihnen dieser technisch herausragende KVM-Switch bietet.
Durch den Einsatz dieses LINDY KVM Switches können Sie Kosten für
zusätzliche Monitore, Tastaturen und Mäuse einsparen. Ferner sparen Sie
erheblich an Platz und Sie beseitigen die Problematik, hin und wieder Mäuse und
Tastaturen der einzelnen Rechner zu verwechseln.
Eigenschaften
Fault finding: Please check that all monitor and USB cable connections are
firmly connected to ensure correct operation of the KVM switch.
1. If the KVM Switch reacts to the universal hotkey with a beep signal, but no
monitor picture is displayed, please check if the currently selected computer is
in sleep mode or powered down.
2. If the monitor picture is not sharp or shows shadows, make sure you have used
high quality video cables with co-axial cores.
KVM Switch Pro USB Audio ist ein KVM-Umschalter mit einigen herausragenden
technischen Features zum Einsatz mit modernen USB Computern wie mit PCs als
auch mit Macs mit aktuellen Betriebssystemen:
•
Er unterstützt sowohl USB Tastatur & Maus wie auch USB 2.0 Device Sharing
zwischen den Rechnern
•
Die neue True Transparent USB Version ab Baujahr 2013 unterstützt die
Modellerkennung für Maus und Tastatur und die Einbindung der individuell
zugehörigen Treiber mit Sonderfunktionen. Ferner wird die Kaskadierung mit
KVM Extendern besser unterstützt!
•
Er unterstützt zwei Arten des Umschaltens:
a. For CRT monitors (not flat screens) & analogue VGA signals consider
setting the video frame rate to 72Hz.
b. For flat screen monitors or digital DVI-D signals please make sure the
video frame rate is set to 60Hz.
c. When using mixed analogue and digital video setups please refer to
the notes in the Installation chapter. Your monitor should automatically
switch between the active analogue or digital signal.
o Umschalttaste am Switch
o Tastatur-Hotkey – durch Anwender konfigurierbar
•
Der KVM-Switch schaltet bei Bedarf auch die Audio-Lautsprecher und ein
Mikrofon mit um. Er kann auch so konfiguriert werden, dass diese vom
Umschalten ausgenommen werden und immer an einen Port / Rechner
gebunden bleiben
•
Auch die USB 2.0 Ports des USB Hub können je nach individuellem Bedarf
vom Umschalten ausgenommen oder mit umgeschaltet werden
•
Er ist als DVI-I sowie als DisplayPort Version verfügbar, mit 2 oder mit 4
Rechneranschlüssen und beiliegenden Kabelsätzen.
DVI-I Version: der KVM Switch setzt die DVI-I Technologie für digitale &
analoge Monitorsignale ein, digital bis zu 1920 x 1200 (DVI-D Single Link),
analog bis zu 2048 x 1536 (VGA).
3. A computer boots but the keyboard or mouse don’t work:
a. Use only USB keyboards and mice
b. DO NOT SWITCH PORTS until the Keyboard & Mouse driver
installations are complete! Equally do not press any keys on the
keyboard or mouse whilst a selected computer is booting up.
c. Check if the keyboard (or mouse) works when directly connected to
the computer
d. Reboot the computer with the keyboard and mouse directly connected
and check the status of the installed drivers
Lieferumfang
Should you require any help with this product then please contact LINDY
Technical Support Team. Contact information can easily be found on the LINDY
website www.lindy.com.
LINDY KVM Switch Pro USB 2.0 Audio
2 bzw. 4 Kabelsätze (je nach Modell) zum Anschluss der Rechner
Eco-Weitbereichsnetzteil mit verschiedenen Steckervorsätzen
Dies Handbuch
-7-
-8-
Benutzerhandbuch
Deutsch
USB 2.0 Devices gemeinsam verwenden
Der KVM-Switch verfügt sowohl über USB Anschlüsse für Maus und Tastatur als
auch über zwei weitere USB 2.0 Ports für alle anderen Arten von USB-Geräten.
An diese USB 2.0 Ports können auch USB Hubs angeschlossen werden, über die
weitere USB Devices gemeinsam genutzt und umgeschaltet werden können. Die
Ports arbeiten mit USB 2.0 High Speed bis zu 480MBit/sec.
Der Switch kann je nach Bedarf so konfiguriert werden, dass die Hub-Ports
entweder zwischen den Rechnern mit umgeschaltet werden oder dass sie fest an
einen Rechner / Port gebunden bleiben.
WICHTIGER HINWEIS: Wenn Sie USB Pen Drives, Card Reader und andere
Speichermedien gemeinsam nutzen wird beim Umschalten die Verbindung zum
Rechner getrennt. Aktive Datenübertragungen werden dadurch unterbrochen,
offene Files werden möglicherweise beschädigt und können verloren gehen!
Stellen Sie sicher, dass Datentransfers abgeschlossen sind oder verwenden Sie
vor dem Umschalten die Windows “Hardware sicher entfernen Funktion” bzw. am
Mac die „Datenträger auswerfen“ Funktion.
Installation
Benutzerhandbuch
Deutsch
Beachten Sie aber die Gesamtlänge von 5m bei USB-Kabeln, verwenden Sie ggf.
aktive USB-Verlängerungskabel (Nr. 42817/42915).
Schritt 4. Schalten Sie dann alle Geräte und die Rechner wieder ein.
Schritt 5. Windows wird nun den KVM Switch als neu installierte Hardware
erkennen und die entsprechenden Treiber einbinden. Bis zum endgültigen
Abschluss der Installation werden Maus und Tastatur möglicherweise noch
nicht funktionieren. Warten Sie bis Windows alle neu erkannten Komponenten
komplett installiert hat.
Ein Mac wird möglicherweise eine PC Tastatur nicht auf Anhieb identifizieren,
folgen Sie den Bildschirmanweisungen des MAC OS.
Sollte es zu Problemen mit Maus und Tastatur kommen, so ziehen Sie diese für
20 Sekunden vom KVM Switch ab und stecken sie wieder an. Führt dies nicht
zum Erfolg, so schließen Sie Maus und Tastatur kurz direkt am Rechner an und
den KVM Switch an einen andren USB Port.
Ein aktuelles Windows hat die notwendigen KVM-Treiber im System dabei.
Aktualisieren Sie gegebenenfalls Ihr Windows Betriebssystem.
KVM Umschaltoptionen
VGA-Anschluss: Falls Sie Rechner und Monitor mit VGA-Anschlüssen
verwenden wollen, verwenden Sie unsere DVI-VGA-Adapterkabel 41223.
Gemischter VGA- und DVI-Betrieb: Falls Sie einen Rechner mit digitalem und
einen mit analogem Grafiksignal anschließen wollen benötigen Sie am Computer
für den analogen VGA Anschluss unser DVI-VGA-Adapterkabel 41223. In diesem
Fall muss Ihr Monitor sowohl digitale wie auch analoge Grafiksignale unterstützen,
der KVM Switch führt keine Signalwandlung durch! Hat der Monitor getrennte
VGA und DVI-D Eingangsbuchsen so benötigen Sie hierfür das DVI-I Splitterkabel
DVI-I an HD-15&DVI-D (LINDY 41008) am Monitor.
Dual Head-Betrieb, VGA und DVI gemischt: Sie können beide Signale über
DVI-I gleichzeitig übertragen und umschalten. Falls ein Rechner das digitale und
analoge Grafiksignal über getrennte Buchsen ausgibt benötigen Sie unser DVI-I
Splitterkabel 41008. Schließen Sie den DVI-D Monitor ebenfalls mit unserem DVISplitterkabel 41008 an. Mit einem kurzen VGA-Verlängerungskabel (z.B. 37390,
37452 oder 37391) können Sie den VGA-Monitor am Adapterkabel 41008
anschließen.
Nehmen Sie den KVM Switch und die Kabel aus der Verpackung und folgen
Sie der Installationsreihenfolge:
Schritt 1. Schließen Sie zuerst das Netzteil an den KVM Switch an.
Schritt 2. Schließen Sie dann Ihre Tastatur, Maus und Monitor an die mit
Console, Tastatur und Maus gelabelten Konsolenports an. Schließen Sie bei
Bedarf ebenfalls Ihre Lautsprecher und das Mikrofon an.
Schritt 3. Schließen Sie die Rechner unter Verwendung der beiliegenden KVM
Kabel an. Diese können mit Verlängerungskabeln verlängert werden –
-9-
KVM Switch Pro USB Audio unterstützt 2 Arten des Umschaltens:
o Umschalttaste am Switch
o Tastatur-Hotkey – durch Anwender konfigurierbar
Umschalttaste am Switch mit LED Anzeige
Drücken Sie die entsprechende Port-Taste um umzuschalten. Während des Umschaltvorganges blinkt die LED. Sie leuchtet für den aktiv ausgewählten Port
dauerhaft weiß nachdem der Umschaltvorgang abgeschlossen ist und die
Verbindung steht. Je nach Konfiguration werden ausschließlich die KVM- oder die
KVM- zusammen mit den USB-Hub- und Audio-Ports umgeschaltet – siehe unten.
Die weißen Port-LEDs zeigen den geschalteten KVM Port (Monitor, Maus,
Tastatur) an, die roten LEDs zeigen an, welcher Port/Rechner mit den USB 2.0
Hub Ports verbunden ist.
Tastatur Hotkey Umschaltung
Der KVM Switch wird über Tastatur-Hotkeys komfortabel umgeschaltet und
konfiguriert. Dies wird eingeleitet durch zweimaliges Drücken einer universellen
Hotkey-Taste. Die Werkseinstellung hierfür ist die Rollen-Taste (SCROLL LOCK).
Dieser universelle Hotkey kann bei Bedarf auf die ESCAPE-, Num-, Feststell(Großschreibung), oder F12-Taste umgestellt werden. (Siehe auch Bemerkung #
auf der Folgeseite.)
Drücken Sie die universelle Hotkey-Taste 2x kurz hintereinander um die Umschaltfunktion zu aktivieren. Der KVM Switch gibt zur Bestätigung einen Piepton
aus. Je nach weiterem eingegebenen Tastenkommando können Sie dann
umschalten und der KVM Switch gibt erneut einen Piepton aus. Folgende
Optionen stehen zur Verfügung:
- 10 -
Benutzerhandbuch
Deutsch
KVM Switch Pro USB Audio
Hotkey-Eingabe
Deutsch
Fehlersuche und -beseitigung, Hilfe bei Problemen
Hotkey Umschalt- & Konfigurations-Kommandos
Kommando
Benutzerhandbuch
Taste
Bindet KVM- & Hub-Umschaltung (Default)
* + * +Y
Entkoppelt KVM- & Hub-Umschaltung
* + * +X
Bindet KVM- & Audio-Umschaltung (Default)
* + * +Q
Entkoppelt KVM- & Audio-Umschaltung
* + * +W
Schaltet direkt zu Port 1, 2, 3 oder 4
* + * + 1-4
Schaltet USB Hub zu Port 1, 2, 3 oder 4
* + * + Fn1-Fn4
(Ja)
Schaltet Audiogeräte zu Port 1, 2, 3 oder 4
* + * + Fn5-Fn8
(Ja)
Schaltet einen Port hoch
* + * +↓
Schaltet einen Port hinunter
* + * +↑
Schaltet zum vorherigen Port
* + * +←
Schaltet den Piepton An / Aus
* + * +B
Schaltet den Hotkey um auf **
* + * + H + **
Schaltet auf Autoscan
* + * +S
Schaltet auf Autoscan mit Kanalzeit 10s (1) bis 100s (0)
* + * + S + 0-9
Stoppt den Autoscan
Jede Taste
USB Hinweis: Beim Anschluss von alten Rechnern die lediglich über USB 1.1 Schnittstellen
verfügen ist zumindest der USB Legacy Support im Rechner-BIOS zu aktivieren und das
Betriebssystem muss den KVM Switch als HID USB Device korrekt in das System einbinden.
Sollte dies nicht möglich sein, so ist der Rechner möglicherweise nicht für den Anschluss an
einen USB KVM Switch geeignet und es kann zu Kompatibilitätsproblemen kommen – wenn
dies geschieht ist ein PS/2 KVM Switch möglicherweise die bessere Wahl.
Netzteil Hinweis: Falls an den USB 2.0 Hub Ports am KVM Switch keine USB Devices
angeschlossen werden, kann der KVM Switch auch ohne Netzteil betrieben werden. In diesem
Falle erhält er seine Spannungsversorgung über die USB Kabel von den angeschlossenen
Rechnern. USB Geräte an den USB Hub Ports funktionieren dann NICHT! Für einen
problemlosen Betrieb empfehlen wir daher immer das Netzteil anzuschließen!
Ja
Sollten Sie Probleme mit diesem KVM Switch haben so wenden Sie sich gerne an den Techniksupport in einer LINDY Niederlassung. Kontaktinformationen finden Sie auf www.lindy.com.
Kontrollieren Sie bitte als erstes die Kabelverbindungen zwischen KVM Switch und den
Rechnern. Es geschieht leicht, dass ein USB-Kabel unbeabsichtigt herausgezogen wird.
Wenn der KVM Switch auf Hotkey-Eingaben mit einem Piepton reagiert und Sie aber kein
Bildsignal vom ausgewählten Rechner erhalten, prüfen Sie bitte ob sich dieser möglicherweise
im Standby oder Soft Power OFF Zustand befindet.
1.
Falls das Bildsignal unscharf ist oder starke Schatten aufweist prüfen Sie bitte die Kabelverbindungen. Sie sollten hochwertige Kabel mit Koaxialleitungen für die Monitorsignale
verwenden.
a. Setzen Sie bei alten Röhrenmonitoren die Bildfrequenz auf 72Hz oder ähnlich
*
Ja (#)
b. Stellen Sei bei DVI-D Signalen oder Flachbildschirmen die Bildfrequenz auf 60Hz.
c. Bei gemischter Verwendung von digitalen DVI-D und analogen VGA Signalen
beachten Sie bitte die Hinweise im Kapitel Installation. Ihr Monitor sollte automatisch
auf das aktive Signal (analog oder digital) umschalten können
Ja
steht in der obigen Tabelle für die universelle Hotkey-Taste (Werkseinstellung RollenTaste, durch Anwender änderbar auf ** Num-, Feststell-, F12-, oder Escape-Taste)
2.
Drücken Sie während der Bootvorgänge der angeschlossenen Rechner bitte keine Tasten
an Maus und Tastatur. Warten Sie bis Windows alle Treiber eingebunden hat!
3.
Ein Computer bootet aber die Tastatur funktioniert nicht:
a. Verwenden Sie nur USB-Tastaturen.
b. Prüfen Sie ob die Tastatur bei direktem Anschluss an den betreffenden Rechner
funktioniert. Verwenden Sie ggf. eine andere Tastatur.
Fn1-Fn4 steht für die Funktionstasten F1, F2, F3, F4
(#)
(Ja)
Halten Sie zum Ändern des universellen Hotkeys über die Fronttasten die höchste
Porttaste gedrückt bis zwei Piepstöne erklingen, lassen sie los und drücken als nächstes
auf Ihrer Tastatur den neuen gewünschten Hotkey (Rollen-, Feststell-, Num-, F12- oder
ESC-Taste).
Sofern die Bindung zwischen USB Hub Ports bzw. Audio-Ports mit den KVM-Ports aktiv
ist, werden durch Drücken der Fronttaste die USB und Audio-Port zusammen mit
umgeschaltet. Wenn die Bindung nicht besteht, werden bei Drücken der Fronttasten die
USB- und Audio-Ports nicht mit umgeschaltet.
[Dieses Handbuch kann – auch zum separaten Ausdruck der obigen Tabelle – von der LINDY
Webseite heruntergeladen werden.]
- 11 -
4.
Die Maus funktioniert nicht:
a. Verwenden Sie nur USB-Mäuse.
b. Sonderfunktionen zum Beispiel von Funkmäusen und durch spezielle Maustreiber
hinzugefügte Funktionen müssen auf allen angeschlossenen Rechnern installiert
werden. Warten Sie den Abschluss der Treiberinstallation abohne vorher
umzuschalten!
c. Vermeiden Sie das Umschalten auf einen anderen Port während ein Rechner
heruntergefahren wird.
- 12 -
Manuel d’utilisateur
Français
Manuel d’utilisateur
Français
Introduction
Utilisation de la fonction « USB 2.0 Device Sharing »
Félicitations d’avoir choisi le switch KVM Pro USB audio.
Le switch KVM dispose aussi bien de prises USB pour le clavier et la souris que 2
ports USB 2.0 supplémentaires pour d’autres périphériques USB. Des hubs USB
peuvent y être connectés pour étendre encore le nombre d’appareils USB. Les 2
ports USB 2.0 High Speed ont une vitesse maximum de 480MBit/sec.
Merci de soigneusement lire ce manuel pour apprendre à connaître les
possibilités qu’offrent ce switch KVM.
En utilisant ce switch KVM LINDY, vous pouvez économiser le coût de
claviers/écrans/souris supplémentaires. De plus, vous gagnez de la place et
évitez de confondre les claviers et souris de chaque ordinateur.
Caractéristiques
Le switch KVM Pro USB Audio est un commutateur KVM avec des fonctions
avancées à utiliser avec les ordinateurs USB actuels (PC), ou avec les Macs:
Ces ports USB peuvent être commutés de façon indépendante.
NOTE IMPORTANTE: quand vous utilisez en commun des clés USB, lecteur de cartes,
etc: la connexion à l’ordinateur sera coupée lors de la commutation. Les transferts
de données en cours seront coupés, les fichiers ouverts seront endommagés et
peuvent être perdus! Assurez vous bien préalablement que tous les transferts de
données sont terminés ou utilisez la fonction Windows “retirez mon périphérique
USB en toute sécurité“ ou sous Mac “Ejectez le support de données“.
•
Il supporte le clavier/souris en USB, tout comme la fonction de partage USB
(USB 2.0 Device Sharing) entre les ordinateurs
Installation
•
La nouvelle version True Transparent USB disponible depuis 2013 prend en
charge la détection du modèle exacte pour la souris/clavier et l’intégration des
pilotes individuels associés pour les fonctionnalités spécifiques.
Version VGA: dans le cas où vous voulez connecter un écran VGA, merci
d’utiliser notre câble adaptateur DVI-VGA N° Art.41223.
•
La commutation s’effectue de 2 manières:
o Commutation via le bouton sur le switch
o Séquence hotkey clavier – configurables par l’utilisateur
•
Le switch KVM commute les haut-parleurs et le microphone. Il peut être
configuré de telle sorte que la commutation du son soit indépendante de la
commutation des ordinateurs
•
Les ports USB 2.0 du hub USB peuvent être également commutés de manière
indépendante
•
Disponible en version DVI-I ou DisplayPort, et en version 2 ou 4 ordinateurs.
Version DVI-I: le switch KVM utilise la technologie DVI-I pour des signaux
numériques & analogiques, numérique jusqu’à 1920 x 1200 (DVI-D Single
Link), analogique jusqu’à 2048 x 1536 (VGA).
Livraison
Version DVI/VGA: dans le cas où vous voulez connecter un ordinateur avec
signal graphique analogique et un autre en numérique, merci d’utiliser l’adaptateur
VGA/DVI (LINDY N° Art. 41223). Dans ce cas précis, votre écran doit supporter
les signaux graphiques analogiques et numériques, le switch KVM ne convertit
aucun signal! Si l’écran possède 1 prise VGA et 1 prise DVI-D, il vous faut l’article
41008 sur l’écran: DVI-I vers DVI-I & HD-15.
Version Dual Head DVI et VGA: les deux signaux peuvent être transmis et
commuter simultanément en DVI-I. Dans le cas où un ordinateur possède des
sorties de carte graphique numérique et analogique séparées, merci d’utiliser
notre câble splitter 41008.Avec une rallonge VGA courte (par ex. 37390, 37452 ou
37391), vous pourrez connecter l’écran VGA au câble adaptateur 41008
Déballez le switch KVM et les câbles combo et suivez la procédure suivante:
Etape 1. Connectez l’alimentation au switch KVM.
Etape 2. Connectez ensuite le clavier/souris/écran des PCs directement sur les
ports console du switch. Connectez, si nécessaire, les haut-parleurs et le
microphone.
De 2 à 4 câbles combo (suivant le modèle) pour la connexion des ordinateurs
Etape 3. Connectez les ordinateurs via les câbles combo. Ceux-ci peuvent être
rallongés – Respectez que les longueurs maximales USB sont de 5m, sinon
utilisez les rallonges USB actives.
Alimentation avec différents types de prises
Etape 4. Allumez ensuite tous les ordinateurs et appareils.
Ce manuel
Etape 5. Windows reconnaîtra à présent le switch KVM comme nouveau
périphérique et installera les pilotes appropriés. A la fin de cette procédure, la
souris et le clavier ne fonctionneront peut être pas de suite. Attendez jusqu’à
Switch KVM LINDY Pro USB 2.0 Audio
- 13 -
- 14 -
Manuel d’utilisateur
Français
ce que Windows installe complètement les nouveaux composants reconnus et
qu’il vous informe qu’ils sont utilisables.
Manuel d’utilisateur
Français
Configuration des commandes de commutation
Un Mac n’identifiera peut être pas de suite le clavier, suivez les instructions
données par MAC OS.
Switch KVM Pro USB audio
Commande
Si vous rencontrez des problèmes avec la souris ou le clavier, retirez puis
rebranchez les rapidement du switch KVM. Cela suffit pour que Windows les
reconnaisse et les installe.
Sinon, connectez directement l’écran, la souris et le clavier sur l’ordinateur et ne
laissez que le port USB 1 du switch KVM sur le port USB 2.0 de votre ordinateur.
Redémarrez les appareils et suivez les instructions Windows pour l’installation
des pilotes. Un Windows actuel a les pilotes nécessaires au KVM. Sinon
actualisez votre système d’exploitation Windows et les pilotes via une connexion
internet.
Option de commutation KVM
Switch KVM Pro USB audio supporte 2 manières de commutation:
o Commutation sur le switch
o Séquence clavier hotkey – configurable via l’utilisateur
Touche de commutation sur le switch avec LED de statut
Appuyez sur le bouton du switch pour commuter. Lors de la commutation, la LED
clignote. Elle s’allume en blanc pour indiquer que la connexion est active sur le
port choisi. Suivant chaque configuration, le KVM ou le hub USB ou les ports
audio sont commutés ensemble ou pas. Lisez le tableau suivant pour les
paramétrages.
Les LED blanches affichent le port commuté (écran, souris, clavier), les LED
rouges indiquent quel port/ordinateur est connecté avec les hubs USB 2.0.
Touche
Lie la commutation KVM & USB (défaut)
* + * +Y
Sépare la commutation KVM & USB
* + * +X
Lie la commutation KVM & audio (défaut)
* + * +Q
Sépare la commutation KVM & audio
* + * +W
Se commute sur le port 1, 2, 3 ou 4
* + * + 1-4
Oui
Commute l’USB sur les ports 1, 2, 3 ou 4
* + * + Fn1-Fn4
(oui)
Commute l’audio sur le port 1, 2, 3 ou 4
* + * + Fn5-Fn8
(oui)
Commute sur le port supérieur
* + * +↓
Commute sur le port inférieur
* + * +↑
Commute sur le port précédent
* + * +←
Active/désactive le bip sonore
* + * +B
Transforme la touche Hotkey en **
* + * + H + **
Lancer un autoscan
* + * +S
Lance un autoscan avec 10s (1) jusqu’à 100s (0)
* + * + S + 0-9
Stoppe l’autoscan
Chaque touche
*
Commutation par séquence clavier hotkey
Le switch KVM se commute et se configure facilement via des séquences clavier
hotkey. Elles sont introduites au travers de 2 touches clavier: Arrêt défil
(SCROLL LOCK). Ces hotkey universelles peuvent être utilisées avec les touches
ECHAP, Num, Maj, ou F12. (voir page suivante)
Pressez rapidement 2 fois les touches universelles hotkey pour activer la fonction
de commutation. Le switch KVM émet alors un bip sonore de confirmation. Les
options suivantes sont à disposition:
Entrée hotkey
Oui (#)
Oui
correspond à la touche Arrêt Défil, modifiables en ** par l’utilisateur : touche Num, Maj,
F12, ou Echap)
Fn1-Fn4 correspond aux touches de fonctions F1, F2, F3, F4
(#)
Pour changer la touche hotkey depuis la façade du switch KVM, restez appuyé sur la
touche la plus haute jusqu’à ce que vous entendiez deux bips sonores, appuyez ensuite
sur la nouvelle touche hotkey désirée (Arrêt Défil, Maj, Num, F12 ou Echap).
(Oui) Si la connexion entre le hub USB/ports audio et les ports KVM est active, les ports audio
et USB seront commutés ensemble, via une pression sur le bouton en façade.
Si cette même connexion n’est pas active, les ports audio et USB ne seront pas
commutés, via une pression sur la touche en façade.
[Le tableau ci-dessus est imprimable à partir du manuel téléchargeable depuis le site Web LINDY.]
- 15 -
- 16 -
Manuel d’utilisateur
Français
Manuale d’uso
Italiano
Problèmes rencontrés, aide
Note sur l’USB: lors de la connexion d’anciens ordinateurs avec interface USB 1.1, l’option
“ USB Legacy Support“ est à activer dans le BIOS et le système d’exploitation doit reconnaître
correctement le switch KVM en tant que HID USB Device. Si cela n’est pas possible,
l’ordinateur n’est peut être pas adapté à un switch KVM USB et il peut rencontrer des
problèmes de compatibilité – si ce cas se produit, un switch KVM PS/2 est certainement la
solution.
Note sur l’alimentation: dans le cas où le hub USB 2.0 du switch KVM n’est connecté à aucun
appareil USB, le switch KVM peut être utilisé sans alimentation. Il utilise alors l’alimentation
procurée par les câbles USB des ordinateurs connectés. Les appareils USB du hub USB ne
fonctionneront ensuite PAS! Pour éviter tous problèmes, nous recommandons toujours
l’utilisation d’une alimentation!
Si vous rencontrez des problèmes avec ce switch KVM, tournez vous vers le support technique
LINDY. Vous trouverez les informations pour nous contacter sur www.lindy.com.
Contrôlez avant tout la connexion des câbles entre le switch KVM et les ordinateurs. Cela
peut arriver qu’un câble USB soit déconnecté involontairement. Quand le switch KVM
réagit à l’entrée des séquences Hotkey avec un bip sonore et que vous n’obtenez aucune
image à l’écran, vérifiez si celui-ci n’est pas en mode veille ou en mode d’économie d’énergie.
1.
Dans le cas où l’image est sombre ou avec des ombres, vérifiez les connexions des câbles.
Vous devez utiliser des câbles (avec structure coaxiale) de haute qualité.
a.
Vi ringraziamo per aver scelto il LINDY KVM Switch Pro USB 2.0 Audio.
Leggete attentamente questo manuale per apprendere tutte le funzioni e le
caratteristiche di questo KVM Switch USB.
Questo KVM Switch consente di controllare più computer con porte USB da un
monitor, mouse e tastiera.
Caratteristiche
Questo Switch Pro USB 2.0 Audio consente di condividere periferiche USB come
stampanti, scanner, pen drive, ecc. tra PC e Mac con supporto USB.
•
Supporta mouse, tastiere e periferiche USB 2.0
•
La nuova versione 2013 include l’identificazione dell’esatto modello di mouse e
tastiera consentendo l’utilizzo di driver specifici per abilitare tasti e funzioni
speciali. Questa funzione migliora anche l’utilizzo con gli extender KVM
•
La commutazione può avvenire:
o Tasti sul pannello frontale dello switch
Paramétrez, dans le cas d’anciens moniteurs à tube cathodique, la fréquence de
rafraîchissement des signaux VGA à 72Hz ou semblable
b.
Paramétrez la fréquence de rafraîchissement sur des écrans plats ou des signaux
DVI-D à 60Hz.
c.
Lors d’utilisation de signaux numériques DVI-D et analogiques VGA, respectez
l’information dans le chapitre Installation. Votre écran doit pouvoir commuter
automatiquement sur le signal actif (analogique ou numérique)
2.
Ne pressez aucunes touches (sur la souris et sur le clavier) pendant le démarrage des
ordinateurs connectés. Attendez jusqu’à ce que Windows a installé tous les pilotes!
3.
Un ordinateur démarre mais le clavier ne fonctionne pas:
a. N’utilisez que des claviers USB.
b. Vérifiez si le clavier fonctionne en le connectant directement sur l’ordinateur.
Sinon utilisez un autre clavier.
4.
Introduzione
o Hotkey tastiera – configurabile dall’utente
•
Supporto audio per microfono e casse, escludibile dalla commutazione dei
computer
•
Hub USB 2.0 a 2 porte integrato per la condivisione di periferiche USB tra i
computer collegati. E’ possibile escludere l’hub USB dalla commutazione tra i
computer.
•
Versioni DVI-I e DisplayPort disponibili, entrambi con 2 o 4 porte e con cavi
KVM inclusi.
•
Le versioni DVI-I supportano segnali video sia digitali che analogici grazie al
connettore DVI-I. Supportano tutte le risoluzioni digitali DVI-D Single Link fino a
1920 x 1200, ed analogiche VGA fino a 2048 x 1536.
La souris ne fonctionne pas:
Contenuto della Confezione
a. N’utilisez que des souris USB.
b. Les fonctions supplémentaires des souris sans fil et autres pilotes de souris
doivent être installés sur les ordinateurs connectés. Attendez la fin de l’installation
des pilotes avant de commuter le KVM !
LINDY KVM Switch Pro USB 2.0 Audio
c. Evitez la commutation sur un autre port pendant qu’un ordinateur est en cours
d’arrêt.
Alimentatore
- 17 -
2 o 4 cavi KVM (a seconda del modello) per il collegamento ai computer
Questo manuale
- 18 -
Manuale d’uso
Italiano
USB 2.0 Device Sharing
E’ possibile collegare a questo KVM Switch sia mouse e tastiera USB che due periferiche USB
2.0. L’hub supporta velocità di trasferimento dati fino a 480Mbps. Le porte USB 2.0 dell’hub
supportano anche la connessione addizionale di hub USB per poter collegare più di due
dispositivi al KVM switch. Le periferiche USB collegate possono sempre essere configurate in
modo da essere escluse dalla commutazione.
Nota Bene: se si intende condividere Pen Drive USB, Card Reader o altri dispositivi con
memorie, e commutarli tra i computer, occorre attendere prima che il trasferimento dati sia
completato prima di procedere con la commutazione. Se si dovesse interrompere il processo di
trasferimento dati, è possibile che i dati vadano persi o risultino corrotti. Per disattivare
correttamente periferiche Hardware, utilizzare le funzioni di Windows o Mac.
Installazione
Utilizzo in sola modalità VGA: se si desidera collegare solo computer con
segnali video analogici VGA, occorre utilizzare un adattatore VGA a DVI LINDY
(Art. 41223) sia dal lato della scheda che da quello del monitor. Assicurarsi che
il monitor sia compatibile con segnali analogici. Questo KVM Switch non
converte segnali video, è in grado soltanto di commutare segnali analogici e
digitali.
Utilizzo in modalità mista DVI-D e VGA: Potete connettere PC con segnali
video sia VGA che DVI-D ma in questo caso il vostro monitor drovrà supportare
entrambi i tipi di segnali e commutare automaticamente su quello attivo. Se il
vostro monitor ha due ingressi separati per segnali analogici (VGA) e digitali
(DVI-D) dovrete utilizzare anche un cavo splitter come l’art.41008 LINDY
Utilizzo in modalità Dual Head mista DVI-D e VGA: potete connettere e
commutare simultaneamente sia i segnali analogici (VGA) che digitali (DVI-D)
tramite i cavi KVM forniti con lo switch utilizzando anche un cavo LINDY Video
Splitter (Art. 41008) per connettere il vostro monitor DVI-D. Utilizzate poi anche
dei cavi prolunga VGA corti (es. Art.37390, 37452 o 37391) per estendere il
segnale dal cavo video splitter al monitor VGA. Il cavo splitter può essere
necessario anche se le prese sulla scheda graficadel PC sono differenti (VGA
e DVI)
Per installare il Vostro LINDY KVM Switch Pro USB 2.0 Audio basta seguire
questi semplici passaggi:
Step 1. Collegare l’alimentatore al KVM switch prima di effettuare i collegamenti.
Step 2. Collegare mouse, tastiera e monitor alle porte USB e DVI sul KVM switch
(porte CONSOLE). Collegare casse e microfono se necessarie.
Step 3. Collegare i computer tramite i cavi inclusi nella fornitura. All’occorrenza è
possibile sostituire i cavi a corredo con altri cavi LINDY di dimensioni differenti,
considerando che la distanza massima supportata dallo standard USB è 5m.
Per distanze superiori utilizzare una prolunga attiva USB 2.0 LINDY (Art.
42817/42915).
Step 4. Accendere i computer e i dispositivi.
- 19 -
Manuale d’uso
Italiano
Step 5. I computer dovrebbero riconoscere ed installare automaticamente
l’hardware. Su Windows vengono installati i driver per i dispositivi USB.
Attendere che questa procedura sia terminata prima di utilizzare lo switch.
Su sistemi Mac è possibile che non venga riconosciuta la tastiera al primo avvio,
potrebbe apparire un menu di identificazione; seguire le indicazioni per completare
l’installazione. In alcuni casi potrebbe essere necessario scollegare e ricollegare
mouse e tastiera per consentire il riconoscimento.
Potrebbe essere necessario anche riavviare il computer con mouse e
tastiera collegati. Una volta che i driver sono installati correttamente, scollegare
mouse e tastiera e collegarli direttamente nelle porte console sul KVM switch. Su
sistemi Windows sono inclusi tutti i driver USB principali, quindi non è necessario
installare ulteriori driver.
Opzioni di Commutazione
La selezione dei Computer collegati può avvenire nei seguenti modi:
o Tasti sul pannello frontale dello switch
o Hotkey tastiera – configurabili dall’utente
Tasti sul pannello frontale con indicatori LED bianco/rosso
Premere i tasti sul pannello frontale a seconda della porta che si desidera attivare.
Durante la commutazione il LED bianco dietro il tasto sullo switch lampeggerà,
rimarrà invece fisso a commutazione completata.
In base alla configurazione impostata verranno commutate solo le porte KVM
(mouse, tastiera e monitor) oppure sia le porte KVM che le porte dell’hub USB 2.0
e/o le porte Audio. Per approfondire il funzionamento di queste opzioni, consultare
la tabella nella pagina successiva.
I LED bianchi sono riferiti allo stato della selezione delle porte KVM, i LED rossi
sono riferiti allo stato delle porte dell’hub USB 2.0 e mostrano la porta in cui è
attivo l’hub.
Commutazione tramite Hotkey
La commutazione può essere effettuata anche tramite delle combinazioni di tasti
(hotkey) configurabili. Questo avviene quando l’hotkey principale viene premuta
due volte di seguito entro 2 secondi. L’hotkey di default principale è il tasto BLOC
SCORR. Il KVM switch può essere riconfigurato impostando una tra le seguenti
hotkey: BLOC NUM, CAPS LOCK, F12 o Escape (ESC).
Premendo due volte di seguito l’hotkey principale viene attivata la commutazione
– il KVM switch emetterà un breve segnale acustico per confermare il comando
ricevuto. A questo punto basta premere il tasto riferito alla porta che si intende
selezionare oppure è possibile accedere alle funzioni di configurazione del KVM
switch. Consultare la tabella nella pagina successiva per conoscere tutte le
opzioni selezionabili.
- 20 -
Manuale d’uso
Italiano
Comandi Hotkey e Opzioni di Configurazione
Hotkey Input
Commutazione congiunta di KVM & Hub (Default Z per
tastiere QWERTY)
* + * + Z (o Y)
Sbloccare la commutazione congiunta di KVM & Hub
* + * +X
Commutazione congiunta di KVM & Audio
* + * +Q
(Default)
Italiano
Risoluzione dei Problemi
Se si utilizzano vecchi computer USB: se si collegano vecchi computer con
interfacce USB 1.1, assicurarsi che sia abilitato dal BIOS il supporto Legacy.
Assicurarsi anche che il sistema operativo abbia i driver USB HID aggiornati.
KVM Switch Pro USB 2.0 Audio
Comandi
Manuale d’uso
Front
Alimentatore: è possibile anche utilizzare il KVM switch senza alimentatore
esterno se utilizzato con dispositivi a basso consumo di energia. E’ comunque
consigliato l’uso dell’alimentatore, soprattutto se si collegano dispositivi
autoalimentati all’hub USB 2.0.
Risoluzione problemi: controllare prima che tutti i cavi siano collegati
correttamente al KVM switch ed ai dispositivi.
Sbloccare la commutazione congiunta di KVM & Audio
* + * +W
Commutazione diretta alla porta 1, 2, 3 o 4
* + * + 1-4
Commutazione dell’Hub USB alla porta 1, 2, 3 o 4
* + * + Fn1-Fn4
(Si)
Commutazione di dispositivi Audio alla porta 1, 2, 3 o 4
* + * + Fn5-Fn8
(Si)
Commutazione alla porta precedente
* + * +↓
Commutazione alla porta successiva
* + * +↑
Commutazione alla porta precedente
* + * +←
Segnale acustico commutazione ON / OFF
* + * +B
Modificare l’Hotkey pincipale
* + * + H + **
Commutazione tramite Autoscan
* + * +S
Commutazione via Autoscan con intervallo di scan da 10s
(1) a 100s (0)
* + * + S + 0-9
Stop Autoscan
Tasto qualsiasi
SI
1. Se il KVM Switch emette un segnale acustico quando viene premuta la hotkey
principale ma non compare nessuna immagine sul monitor, controllare che il
computer selezionato non sia in standby oppure spento.
2. Se l’immagine visualizzata presenta difetti od ombre, assicurarsi che i cavi
video utilizzati siano coassiali e di alta qualità.
a. Per vecchi monitor CRT (non flat screen) e con segnali VGA analogici può
risultare utile impostare la frequenza del video a 72Hz.
b. Per monitor flat screen o per segnali DVI-D digitali assicurarsi che il frame
rate video sia di 60Hz.
Si (#)
c. Per segnali video misti analogici e digitali consultare le note nel capitolo
Installazione. Il monitor dovrebbe selezionare in automatico tra il segnale
analogico o digitale attivo.
3. Non premere nessun tasto sulla tastiera o sul mouse durante il processo di
commutazione. Attendere che l’installazione dei driver sia completata.
Si
4. A commutazione avvenuta tastiera o mouse non rispondono:
a. Utilizzare solo tastiere e mouse USB
*
Rappresenta l’hotkey principale (di default è BLOC SCORR, configurabile con le hotkey
** NUM, CAPS, F12, o ESC)
Fn1-Fn4 sono i tasti funzione F1, F2, F3 e F4
(#)
Per modificare l’hotkey principale dai tasti sul pannello frontale dello switch, premere il
tasto corrispondente all’ultima porta fino a quando non si sentono due brevi segnali
acustici. Quindi premere la nuova hotkey (SCROLL, NUM, CAPS, F12, o ESC) sulla
tastiera. Il KVM switch emetterà un segnale acustico a conferma della variazione della
hotkey.
(Si) Quando è abilitata la commutazione congiunta tra KVM e hub USB 2.0 e/o l’Audio,
premendo i tasti sullo switch verrà commutato tutto. Se la commutazione congiunta è
disabilitata, l’Audio o l’hub USB sarà escluso dalla commutazione.
[Per stampare la tabella riportata sopra potete scaricare il manuale dal sito web LINDY.]
- 21 -
b. Per favore attendete e NON commutate su un'altra porta fino a quando
l’installazione dei driver di mouse e tastiera non sarà completata! Non
premete alcun pulsante di tastiera e mouse mentre il computer selezionato
sta effettuando il boot.
c. Controllare se tastiera o mouse funzionano correttamente se connessi
direttamente ad un computer
d. Riavviare il computer con tastiera e mouse collegati direttamente e
controllare se i driver sono installati correttamente
Se necessitate assistenza potete contattare direttamente lo staff LINDY, potete
trovare i contatti sul sito www.lindy.com.
- 22 -
Certifications and Statements
Certifications and Statements
FCC Warning
This device complies with part 15 of the FCC Rules.
Operation is subject to the following two conditions:
1. This device may not cause harmful interference, and
2. This device must accept any interference received, including interference that may cause undesired
operation.
CE Statement, EMC and RoHS Compatibilty
This equipment complies with the requirements relating to Electromagnetic Compatibility Standards
EN55022/EN55024 and the further standards cited therein. It must be used with shielded cables only.
It has been manufactured under the scope of RoHS compliance.
Dieses Produkt entspricht den einschlägigen EMV Richtlinien der EU und darf nur zusammen mit
abgeschirmten Kabeln verwendet werden. Es wurde unter Berücksichtigung der RoHS Vorgaben
hergestellt.
LINDY Herstellergarantie
LINDY gewährt für dieses Produkt über die gesetzliche Regelung hinaus eine zweijährige
Herstellergarantie ab Kaufdatum. Die detaillierten Bedingungen dieser Garantie finden Sie auf der
LINDY Website aufgelistet bei den AGB.
Die Garantie gewährt LINDY gegenüber dem Endkunden, sie schränkt die Rechte des Käufers
gegenüber dem Verkäufer aus der gesetzlichen Sachmängelhaftung nicht ein.
WEEE (Waste of Electrical and Electronic Equipment),
Recycling of Electronic Products
Europe, United Kingdom
In 2006 the European Union introduced regulations (WEEE) for the collection and recycling of all waste
electrical and electronic equipment. It is no longer allowable to simply throw away electrical and
electronic equipment. Instead, these products must enter the recycling process.
Each individual EU member state has implemented the WEEE regulations into national law in slightly
different ways. Please follow your national law when you want to dispose of any electrical or electronic
products. More details can be obtained from your national WEEE recycling agency.
Germany / Deutschland
Die Europäische Union hat mit der WEEE Direktive Regelungen für die Verschrottung und das Recycling
von Elektro- und Elektronikprodukten geschaffen. Diese wurden im Elektro- und Elektronikgerätegesetz
– ElektroG in deutsches Recht umgesetzt. Dieses Gesetz verbietet das Entsorgen von entsprechenden,
auch alten, Elektro- und Elektronikgeräten über die Hausmülltonne! Diese Geräte müssen den lokalen
Sammelsystemen bzw. örtlichen Sammelstellen zugeführt werden! Dort werden sie kostenlos entgegen
genommen. Die Kosten für den weiteren Recyclingprozess übernimmt die Gesamtheit der
Gerätehersteller.
France
En 2006, l'union Européenne a introduit la nouvelle réglementation (DEEE) pour le recyclage de tout
équipement électrique et électronique.
Chaque Etat membre de l’ Union Européenne a mis en application la nouvelle réglementation DEEE de
manières légèrement différentes. Veuillez suivre le décret d’application correspondant à l’élimination des
déchets électriques ou électroniques de votre pays.
Italy
Nel 2006 l’unione europea ha introdotto regolamentazioni (WEEE) per la raccolta e il riciclo di
apparecchi elettrici ed elettronici. Non è più consentito semplicemente gettare queste apparecchiature,
devono essere riciclate. Ogni stato membro dell’ EU ha tramutato le direttive WEEE in leggi statali in
varie misure. Fare riferimento alle leggi del proprio Stato quando si dispone di un apparecchio elettrico o
elettronico.
Per ulteriori dettagli fare riferimento alla direttiva WEEE sul riciclaggio del proprio Stato.
LINDY No. 39330, 39331, 39332, 39333, 39334, 39335
2nd Edition, April 2013
www.lindy.com
- 23 -
- 24 -