1
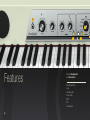
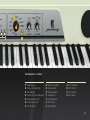
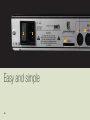
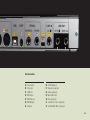
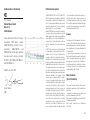
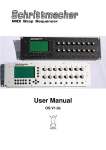
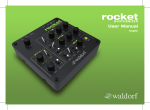
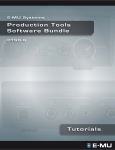
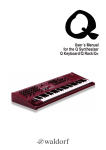
Manual An instrument only made for your passion to play music. Content 04 06 10 11 13 18 20 21 Preface Features Start Sounds Effects Store + Plug Facts CE Declaration of Conformity 25 Preface We are happy if you don’t read this manual … 04 … because as with all Waldorf instruments, our goal during development of Zarenbourg was to design the user interface to be as intuitive and selfexplanatory as possible. In case you do decide to read it, you may very likely skip over this preface and jump straight to the hard facts. However, if you decide – against all odds – to continue reading here, you will be rewarded in the end! During conception of Zarenbourg piano, we wanted to create an instrument where playing is the primary focus. Usually electronic keyboards require a lot of accessories and addons like keyboard stands, amplifiers, etc. that you have to assemble and connect before you can even hear the first note. We have tried to minimize these often frustrating obstacles with Zarenbourg so that you can approach it as a true musical instrument. One element that often adorns most electronic keyboards nowadays is the digital display or LCD. But with Zarenbourg, we deliberately decided to omit it. An LCD demands so much attention that it often steals the show. We think you should instead stay focused on playing music. Moreover, we also consider the LCD to be a aesthetic catastrophe. So instead, we made the sophisticated Zarenbourg architecture easily accessible by extracting some concepts not only from musical instru- ments, but also from analog electric devices like car radios and tape recorders that are surprisingly easy to navigate without a display. And of course with its sounds, Zarenbourg recreates archetypal keyboards with an emphasis on classic, vintage electro-mechanical instruments of the last century. The fact that the underlying technology is anything but vintage should not concern you while playing your Zarenbourg piano. You play the music, we’ll handle the rest. Since you made it through this preface, you can now receive our promised reward: To get a full version of the Waldorf Edition software suite for free, please send us the serial number of your Zarenbourg to: [email protected] And now it is time to throw this manual away and play your Zarenbourg. We wish you lots of fun with it! Your Waldorf Team 2011 05 03 07 01 02 04 05 06 11 08 Features 06 09 Included Components and Accessories Zarenbourg Piano Legs Sustain pedal Power cable DVD Box This manual 10 14 18 13 12 16 17 15 Front Connections and Controls 01 02 03 04 05 06 07 Headphone jack Volume control with switch Power indicator Volume control for external signal Tremolo Intensity control Tremolo Speed control Tremolo indicator 08 09 10 11 12 13 14 Tremolo stereo button Transpose button Preset bank button Sound Selector User Bank buttons Effect Selector Effect indicators 15 16 17 18 Effect Hold button Effect Control 1 Effect Control 2 Effect button 07 22 19 20 21 Easy and simple 08 23 24 25 26 27 28 29 30 31 32 Rear Connections 19 20 21 22 23 24 25 Power switch Power jack SDHC Slot MIDI In jack MIDI Thru jack MIDI Out jack USB jack 26 27 28 29 30 31 32 S/PDIF digital out Expression pedal jack Sustain pedal jack Ground lift switch Stereo input jack Line Out Left | Stereo output jack Line Out Right | Mono output jack 09 Start Setting up and Startup Adjustment of the Internal Zarenbourg Volume Adjustment of Volume for External Signal Initial setup works best with the assistance of a second person. Take your Zarenbourg [33] out of the box [38], and place it carefully on a table so that the screw threads for the legs [34] are free. Screw in all four legs [34], and place your Zarenbourg where you want to play it. Now plug the power cable [36] into the power jack [20] to power the piano. Zarenbourg works with an input voltage from 110 V to 230 V AC. Connect the sustain pedal [35] to the Sustain Pedal jack [28], turn on first the power switch [36], then turn up the volume control [2]. Guess what? You can adjust the volume using the Volume knob [2]. There is a small range at the bottom of the pot where no sound is output, and you will hear only silence from Zarenbourg. We did this intentionally so that you have the option of listening to only an external signal, for instance, if you use Zarenbourg as a MIDI controller keyboard. You can plug a stereo signal into the Stereo Input jack [30] to hear it through the internal speakers. Adjust the level using the Volume control for external signal [4]. For weaker signals such as a microphone, you can increase the input sensitivity in four steps. When you increase the input sensitivity, please start with a moderate level first, then press and hold the Transpose button [9]. The sensitivity can now be set using the Volume control for external signal [4]. Your Zarenbourg piano is now ready to play! Attention! ONLY use the Volume knob on the frontpanel to switch your Zarenbourg on and off! 10 Sounds Selecting Sounds Tremolo Detuning After switching Zarenbourg on, the Preset Bank is active, and you can select sounds using the Sound Selector [11]. Here seven presets are offered: Two classic electric pianos (Tines/ Bars), another electric piano (Reeds), grand piano (Grand), electric grand piano (Electric Grand), an FM piano (FM) and a clavinet. Banks A, B and C contain similar sounds, but these locations can also be used to store user sounds. Use the User Bank buttons [12] and Preset Bank button [10] to select the different banks. The button of the active bank is illuminated to indicate which bank you have selected. For details on how to store sounds including effect settings for locations A1 – C7, please refer to page 18. Tremolo is a periodic amplitude modulation, and although this is quite a simple effect, it can really enrich your sound when used with care. Adjust the Tremolo using the Tremolo Intensity control [5] and the Tremolo Speed control [6]. Use the Tremolo Stereo button [8] for a phase-shifted modulation between the left and right channels, this significantly smooths the resulting stereo image. The button is lit when Stereo Tremolo is active. The Tremolo indicator [7] flashes in sync with the speed of the modulation effect to give you a visual cue. If you want to turn the Tremolo effect off, simply turn the Tremolo intensity control [5] to zero. If playing together with other inst ruments, it may be helpful to detune Zarenbourg slightly in order to sound in tune with instruments that are hardly or not at all tunable. The process is comparable to Transposition: press and hold the Transpose switch [9] and turn the Tremolo speed control [6], until Zarenbourg is in tune with the other instrument. The Tremolo indicator [7] will light up to indicate the neutral / mid position. Active detuning is also indicated by an illuminated Transpose switch [9]. 11 Transposition Tuning Cancel Transpose and Tune When you play music with singers or other instrumentalists, you are often asked to play a song in a different key without having the time to practice. Consider yourself lucky if you are one of the few who can do this easily. For the rest of us, it might be easier to quickly change the tuning of the instrument instead. To transpose the keyboard, press and hold the Transpose button [9], then play any key from C2 to C4, and then release the button. If you have pressed a key other than middle C (no transposition), the Tranpose button illuminates to indicate that transposition is active. When playing with other instruments, it is sometimes necessary to re-tune your instrument slightly in order to be in tune with other instruments that are not able to be tuned or played by musicians that do not want to change their tuning. The process is similar to Transpose: press and hold the Transpose button [9], then move the neighboring Tremolo Speed knob [6] until your Zarenbourg is in tune with the other instruments. The center position (no tuning change) is shown when the Tremolo indicator is lit [7]. When retuning is active, this is indicated by the Transpose button [9] being lit. To cancel any transpose and tune settings, tap the Transpose button [9] once again. To return to your previous Transpose and Tune settings, just tap Transpose again without touching any keys or the Tremolo Speed knob [6]. Transposition is possible in a range of + / - one octave from the middle C, the C note close to the Transpose button [9]. If you pressed D for your trans position, now when you play a song in the key of C major, it sounds like it is in D major. 12 Effects The Effects Here you can select and adjust the individual effects. You can also enable any combination of effects. The effects are selected using the Effect Selector [13], and the active effects are noted by the Effects Indicators [14]. You can enable an effect simply by using the Effect Selector [13]. Then if you want to add more effects, press the Effect Hold button [15] to keep the current effect active when another effect is selected. This way you can combine any or all of the available effects. The Effect Hold button [15] will light when the effect is selected to indicate that Effect Hold is active for the current effect. When the effect is not selected but still in its hold state, its effect indicator LED is lit. You can deactivate Effect Hold for each individual effect by pressing the Effect Hold button [15] again when each effect is selected. To deactivate Effect Hold for ALL effects, turn the knob to the “Off” position, and press the Effect Hold button [15].1 The Effect Hold button [15] has another useful function: If you keep it held when you select a new sound, the current active effects and their settings are maintained for the new sound. This way you can conveniently preserve your carefully created effect settings while switching between different sounds. 1 (Note: After selecting a sound, the Effect Selector [13] may point to an inactive effect.) 13 Off Adjust Off – no effect. This does not adjust any “effects” but rather the makeup of the sound itself. Each sound will change in its own way depending on its architecture. There are three different architectures in Zarenbourg: The electric pianos are created using a virtual model ( Presets Tines, Bars, Reeds ). Effect Control 1 [16] adjusts the height of the virtual pickup which changes the overtone content in the sound. Grand, Electric Grand and Clavinet are based on samples. With these instruments, use Effect Control 1 [16] to select any of the multisample sets in Zarenbourg. This is especially important if you want to add your own sample sets or third party samples. 14 Here a list of the factory content: 1 2 3 4 5 6 Grand Piano Electric Grand Piano Clavinet Pickup #1 Clavinet Pickup #2 Strings Strings with spiccato articulations added at high velocities 7 Orchestra 8 Orchestra with additional staccato articulations at high velocities 9 Synth Pad The third Zarenbourg architecture is a full-featured FM synthesizer that is used for the FM-Piano. Effect Control 1 [16] changes the frequency of one of the six operators which drastically changes the sound. Effect Control 2 [17] mixes a resonance model with the signal for each architecture. In mechanical and electromechanical keyboards, the undamped strings get excited by other strings and oscillate. This is especially evident when the sustain pedal is down as all strings are undamped. These sympathetic vibrations provide additional warmth and expression in the resulting sound. This is what the resonance model in Zarenbourg does. Handle with care, especially in combination with reverb, as the resulting sound can get muddy if overused. Layer Chorus Flanger Phaser With Adjust selected, tap the Effect button [18] to layer sounds: The well-known chorus effect uses a periodically detuned signal mixed with the original. Set the detune amount using Effect Control 1 [16] and the rate using Effect Control 2 [17]. The Effect button LED [18] flashes to indicate the speed of the modulation. You can also manually set the tempo by tapping the Effect button [18] four times at the desired rate. This function is called “Tap Tempo.” A slightly delayed signal is mixed with the original signal to create a radically different timbre. The delay time is modulated periodically to provide animation. Use Effect Control 1 [16] to set the modulation depth and Effect Control 2 [17] to set the speed of the modulation. The signal is passed through a chain of filters with frequency-dependent delays and then mixed with the original signal. The filter is modulated periodically. This causes an interesting coloration of the sound with spectral bumps and notches that change in frequency. Use Effect Control 1 [16] to set the modulation depth. Feedback is added at high values. Effect Control 2 sets modulation rate. The Effect button LED [18] flashes at the speed of the modulation. You can also use “Tap Tempo” here to set the modulation rate (see Chorus for details). With Effect Control 1 [16], you can add any of the 28 internal sounds Preset /A / B / B 1–7 as a layer with the current sound. Adjust the balance of the two sounds with Effect Control 2 [17]. When set to zero, the layer is inactive. Since a layer uses two voices per note, polyphony is reduced. Note that for the effects and layer settings only apply to the primary sound and not the layered sound: there is just one set of effects, and you cannot add a layer to a layer. The LED in the Effect button [18] flashes at the speed of the modulation. You can also use “Tap Tempo” here to set the modulation rate (see Chorus for details). 15 Echo | Reverb Select the Echo or Reverb effect using the Effect button [18]. When the Effect button is lit, Reverb is selected. When the button is not lit, Echo – also called Delay – is selected. For the Echo effect, the signal is delayed and mixed with the original. The mix level can be adjusted using Effect Control 1 [16]. With high mix levels, feedback is grad ually added so that multiple echoes with decreasing volume are geneated. You can set the delay time either with Effect Control 2 [17] or with four consecutive taps – the well-known “Tap Tempo” function – on the Effect button [18]. 16 Auto Wah Reverb simulates the sound of a room with diffuse reflections. Effect Control 1 [16] controls the Reverb level, and Effect Control 2 [17] adjusts the room size. The Auto Wah is a time-varying filter with a narrow frequency band known as “bandpass filter.” The frequency of the filter can be controlled in different ways and set with the Effect button [18]. When the Effect button is lit, the filter is controlled by an envelope that starts at the current level of each note. The filter peak is tied to velocity. The harder you play, the higher the filter frequency. The sensitivity of the envelope is adjusted with Effect Control [1], and the release speed of the envelope is set with Effect Control 2 [17]. When the sensitivity is set to zero, the filter frequency can be controlled by an expression pedal connected plugged into the Expression Pedal jack [27]. In this case, it is no longer an “Auto Wah” but rather the more traditional “Wah-Wah” effect that you control manually with your pedal. When the Effect button [18] is NOT lit, the frequency of the bandpass filter gets modulated by an LFO, a low frequency oscillator. Effect Control 1 [16] sets the modulation depth, and the LFO rate is set by Effect Control 2 [17] or with Tap Tempo by tapping the Effect button four times at the desired rate. Equalizer Zarenbourg Equalizer has four frequency bands that can be boosted or cut. Effect button 1 [18] selects the frequency bands. When the Effect button is not lit, you can adjust these frequency bands: Effect control 1 [16] controls Bass (120 Hz and below ) from -18 to +8 dB Effect control 2 [17] controls Treble ( 6 kHz and above ) from -18 to +8 dB Overdrive When Effect is lit, you can adjust these frequency bands: Effect control 1 [16] controls Mid ( around 750 Hz ) from -18 to +18 dB Effect control 2 [17] controls Presence ( 3000 Hz ) from -18 to +10 dB In the middle position, there is no boost or cut. This is subtly indicated by a dim Effect indicator [14]. The Equalizer can also be used to simulate an guitar amplifier. For example, you can cut Bass and Treble while boosting Mid and Presence. You can deliberately overdrive the sound to create a harsh and aggressive tone similar to a rock guitar. Set the amount of overdrive (Drive) using Effect Control 1 [16], and adjust the “color” of the sound with Effect Control 2 [17]. You can change between two different types of overdrive using the Effect button [18]: When the Effect button is lit, a soft tube overdrive is simulated. When the Effect button is not lit, you get the sound of transistor distortion. 17 Store + Plug 18 Saving Sounds Connecting to Mixer, Amplifier or Recording Device Connecting to a Computer You can store your own sounds in 21 locations A1 – C7. To save the current sound, press and hold the User Bank button [12] of the bank ( A, B or C ) where you want to store the sound and wait until it flashes. Select the your desired location using the Sound Selector [11]. Then when you release the button, the active sound is permanently stored in your newly selected location. As long as the button is held, you can still chose another bank by pressing another User Bank button [12] and releasing the first one. You can also cancel the store operation by pressing the Preset Bank button [10] in case you change your mind while the button is already flashing. Use the Line Out jacks for left and right signal [31| 32] or a single stereo cable with just the left Line Out jack [31]. When the left Line Out [31] is not connected, you can take a Mono signal from the right Line Out right jack [32]. Connect Zarenbourg to your computer using an the USB jack [25]. Zarenbourg is recognized as a class comp liant USB MIDI Device, so no drivers are necessary. With the appropriate software, you can now play, record or backup the sound programs of your Zarenbourg. You cannot transfer sample content or firmware through USB. Instead, this is done using the SDHC slot [21]. Connection of Digital Output Use the S/PDIF digital out [26]. Connection to an iPad MIDI Connecting Pedals Data transfer via SDHC Card With the camera connection kit, you can connect USB to your iPad and use Zarenbourg to communicate with music apps. Note that we cannot guarantee this functionality as it is not officially supported. Zarenbourg is equipped with three MIDI jacks: Zarenbourg supports two pedals simultaneously: MIDI In jack [22]: connect a MIDI cable here to control Zarenbourg from another source. The Expression pedal jack [27] hosts a standard expression pedal. Currently this can be used to control the Auto Wah filter frequency. To load firmware and sample content, you need a standard SDHC card. The card data must be present in the root directory for Zarenbourg to read it. First insert the card into the SDHC card slot [14], and then switch on Zarenbourg. While the data is being read, the Effect indicators [14] will display a binary code that gives you an estimate of the time remaining. When all LEDs are off, the transfer is done. Depending on the type of data, it may be necessary to restart Zarenbourg once the transfer has completed. MIDI Thru jack [23]: Here the data received on Zarenbourg’s MIDI In port is repeated so that you can connect an additional MIDI device. Connect MIDI Thru to the MIDI In port of the additional device. MIDI Out jack [24]: Zarenbourg sends all control data like notes, pedal info and program changes to control external equipment or make MIDI recordings in a DAW or sequencer. The Sustain pedal jack [28] accepts a standard sustain pedal. The data from some pedals can be read continuously – even if they were not designed for this purpose – to make it possible play with the pedal only half depressed (“half pedaling”). Please consult our website for the latest firmware and samples for your Zarenbourg piano: zzz.waldorfmusic.de 19 Facts Specifications Connections Sound Engine Width Depth Height Weight Keyboard Stereo Headphone Stereo Line out Stereo Line in Sustain Pedal Input Expression Pedal Input S / PDIF Digital output USB MIDI In / Through / Out SDHC Card slot Power jack Sample Memory 4GB Direct Streaming Memory 120 cm 62 cm 83 cm 38 kg 76 weighted hammer action keys Input Voltage 100V ... 230V ~AC Power consumption Max. 75 Watt, Standby 0.0 Watt Soundsystem 2 × 20 Watt wide-band loudspeakers 1 × 20 Watt subwoofer Digital crossover network 20 Polyphony up to 100 Voices Sound generation Physical Modeling, Sampling, FM Synthesis Effects Tremolo, Chorus, Flanger, Phaser, Reverb, Echo, Auto-Wah, Equalizer, Overdrive Sound Programs 7 Presets, 21 User Locations CE Declaration of Conformity The company Waldorf Music GmbH Neustr. 12 53498 Waldorf Hereby declares that the electric piano Zarenbourg, EAN device number 426012638020, conforms to the requirements 2004/108/EG and 2006/95/EG. The following standards have been used to declare conformity: EN 55013, EN 55020, EN 61000-3-2 and EN 61000-3-3. Waldorf, July 21st 2011 Stefan Stenzel CEO FCC Information (U.S.A.) 1. IMPORTANT NOTICE: DO NOT MODIFY THIS UNIT! This product, when installed as indicated in the instructions contained in this Manual, meets the FCC requirements. Modifications not expressly approved by Waldorf may void your authority, granted by the FCC, to use this product. 2. IMPORTANT: When connecting this product to accessories and/or another product use only high quality shielded cables. Cable/s supplied with this product MUST be used. Follow all installation instructions. Failure to follow instructions could void your FCC authorization to use this product in the USA. 3. NOTE: This product has been tested and found to comply with the requirements listed in FCC Regulations, Part 15 for “Class B” digital devices. Compliance with these requirements provides a reasonable level of assurance that your use of this product in residential environment will not result in harmful interference with other electronic devices. This equipment generates or uses radio frequencies and, if not installed and used according to the instructions found in the users manual, may cause interference harmful to the operation of other electronic devices. Compliance with FCC regulations does not guarantee that interference will not occur in all installations. If this product is found to be the source of interference, which can be determinated by turning the unit off and on, please try to eliminate the problem by using one of the following measures: Relocate either this product or the device that is being affected by the interference. Utilize power outlets that are on branch (Circuit breaker or fuse) circuits or install AC line filters. In the case of radio or TV interference, relocate or reorient the antenna. If the antenna lead-in is 300 ohm ribbon lead, change the lead-in to coaxial type cable. If these corrective measures do not produce satisfactory results, please contact the local retailer authorized to distributed this type of product. The statements above apply ONLY to products distributed in the USA. Canada The digital section of this apparatus does not exceed the “Class B” limits for radio noise emissions from digital apparatus set out in the radio interference regulation of the Canadian Department of Communications. Le présent appareil numérique n’émet pas de bruits radioélectriques dépassant les limites applicables aux appareils numériques de “Classe B” prescrites dans le règlement sur le brouillage radioélectrique publié par le ministère des Communications du Canada. Ceci ne s’applique qu’aux produits distribués dans Canada. Other Standards (Rest of the World) This product complies with the radio frequency interference requirements of the Council Directive 89/336/EC. Cet appareil est conforme aux prescriptions de la directive communautaire 89/336/EC. Dette apparat overholder det gaeldenda EF-direktiv vedrørendareadiostøj. Diese Geräte entsprechen der EG-Richtlinie 89/336/EC. 21