1
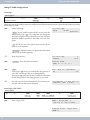
elmeg CS290
elmeg CS290-U
elmeg IP-S290plus
Operating instructions
English
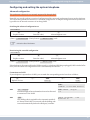
Please note!
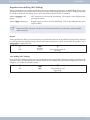
The system telephones and corresponding systems in this user guide use the following abbreviations:
System / PABX:
Abbreviation:
elmeg PABX
elmeg PABX
elmeg Hybird 300
elmeg Hybird 600
elmeg hybird. Alternative configuration of the system telephones (see also page 67)
Bintec TR200aw
as PABX
Bintec TR200bw
as PABX
Declaration of Conformity and CE Mark
This device meets the requirements of R&TTE Directive 1999/5/EC:
»Directive 1999/5/EC of the European Parliament and of the Council of 9 March 1999 on radio equipment and telecommunications terminal equipment and the mutual recognition of their conformity«.
meg.com.
The Declaration of Conformity can be viewed at the following web address: http://www.bintec-el-
The crossed-out waste bin icon on the device indicates that the device must be disposed of separately from normal
household waste at the disposal sites provided at the end of its service life. You can find additional information on the individual return of used devices at www.bintec-elmeg.com.
© bintec elmeg GmbH - All rights reserved.
This document may not be reproduced, in full or in part, except with the approval of the publisher and with a detailed
reference to the source publication, irrespective of the nature and method or media (mechanical or electronic) by
which this is produced.
Functional descriptions of this documentation that relate to software products of other manufacturers are based on
the software used at the time of creation or printing. The product or company names used in this documentation may
in some cases be registered trademarks.
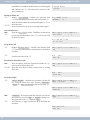
Table of contents
Table of contents
Telephone user interface. . . . . . . . . . . . . . . . . . . . . . . . . . . . . . . . . . . . . . . . . . . . . . . . 1
Description and installation
elmeg CS410 . . . . . . . . . .
elmeg CS410-U. . . . . . . . .
elmeg IP-S400 . . . . . . . . .
....................................
. . . . . . . . . . . . . . . . . . . . . . . . . . . . . . . . . . . . .
. . . . . . . . . . . . . . . . . . . . . . . . . . . . . . . . . . . . .
. . . . . . . . . . . . . . . . . . . . . . . . . . . . . . . . . . . . .
.
.
.
.
.
.
.
.
.
.
.
.
.
.
.
.
.
.
.
.
.
.
.
.
.
.
.
.
.
.
.
.
.
.
.
.
3
3
3
3
Safety notices . . . . . . . . . . . . . . . . . . . . . . . . . . . . . . . . . . . . . . . . . . . . . . . . . . . . . . 4
Unpacking and positioning the system telephone . . . . . . . . . . . . . . . . . . . . . . . .
Connecting the system telephone (connector and receiver cord) . . . . . . . . . . . . . . . . .
Changing the label field . . . . . . . . . . . . . . . . . . . . . . . . . . . . . . . . . . . . . . . . .
Pictograms . . . . . . . . . . . . . . . . . . . . . . . . . . . . . . . . . . . . . . . . . . . . . . . .
.
.
.
.
.
.
.
.
.
.
.
.
.
.
.
.
.
.
.
.
.
.
.
.
.
.
.
.
.
.
.
.
.
.
.
.
5
5
8
8
System telephone settings . . . . . . . . . . . . . . . . . . . . . . . . . . . . . . . . . . . . . . . . . . . . . . 10
Setting the display language. . . . . . . . . . . . . . . . . . . . . . . . . . . . . . . . . . . . . . . . . . . . . . . 10
Telephoning . . . . . . . . . . . . . . . . . . . . . . . . . . . . . . . . . . . . . . . . . . . . . . .
Initiate a call . . . . . . . . . . . . . . . . . . . . . . . . . . . . . . . . . . . . . . . . . . . . . . . .
Accepting/rejecting a call . . . . . . . . . . . . . . . . . . . . . . . . . . . . . . . . . . . . . . . . .
Forwarding a call (Call Deflection) . . . . . . . . . . . . . . . . . . . . . . . . . . . . . . . . . . . .
Suppressing the call number (anonymous call) . . . . . . . . . . . . . . . . . . . . . . . . . . . . .
Initiating a call with a fixed call number (MSN) . . . . . . . . . . . . . . . . . . . . . . . . . . . .
Redialling . . . . . . . . . . . . . . . . . . . . . . . . . . . . . . . . . . . . . . . . . . . . . . . . . .
Switching the microphone on/off, loudspeaker . . . . . . . . . . . . . . . . . . . . . . . . . . . . .
Using the headset. . . . . . . . . . . . . . . . . . . . . . . . . . . . . . . . . . . . . . . . . . . . . .
Announcement . . . . . . . . . . . . . . . . . . . . . . . . . . . . . . . . . . . . . . . . . . . . . . .
Automatic callback . . . . . . . . . . . . . . . . . . . . . . . . . . . . . . . . . . . . . . . . . . . . .
Intercept (MCID). . . . . . . . . . . . . . . . . . . . . . . . . . . . . . . . . . . . . . . . . . . . . .
Keypad and tone dialling (MFC dialling) . . . . . . . . . . . . . . . . . . . . . . . . . . . . . . . .
.
.
.
.
.
.
.
.
.
.
.
.
.
.
.
.
.
.
.
.
.
.
.
.
.
.
.
.
.
.
.
.
.
.
.
.
.
.
.
.
.
.
.
.
.
.
.
.
.
.
.
.
.
.
.
.
.
.
.
.
.
.
.
.
.
.
.
.
.
.
.
.
.
.
.
.
.
.
.
.
.
.
.
.
.
.
.
.
.
.
.
13
13
14
15
15
15
15
17
17
18
18
19
20
Telephoning with several people
Call Waiting. . . . . . . . . . . . .
Hold for enquiry . . . . . . . . . .
Call forwarding (call transfer) . .
Brokering . . . . . . . . . . . . . .
Conference . . . . . . . . . . . . .
...................................
. . . . . . . . . . . . . . . . . . . . . . . . . . . . . . . . . . . .
. . . . . . . . . . . . . . . . . . . . . . . . . . . . . . . . . . . .
. . . . . . . . . . . . . . . . . . . . . . . . . . . . . . . . . . . .
. . . . . . . . . . . . . . . . . . . . . . . . . . . . . . . . . . . .
. . . . . . . . . . . . . . . . . . . . . . . . . . . . . . . . . . . .
.
.
.
.
.
.
.
.
.
.
.
.
.
.
.
.
.
.
.
.
.
.
.
.
.
.
.
.
.
.
.
.
.
.
.
.
.
.
.
.
.
.
21
21
21
21
21
22
Operate system telephone . . . . . . . . . . . . . . . . . . . . . . . . . . . . . . . . . . . . . . .
VIP memory . . . . . . . . . . . . . . . . . . . . . . . . . . . . . . . . . . . . . . . . . . . . . . . .
Caller history . . . . . . . . . . . . . . . . . . . . . . . . . . . . . . . . . . . . . . . . . . . . . . . .
SMS and UUS1 text messages. . . . . . . . . . . . . . . . . . . . . . . . . . . . . . . . . . . . . . .
.
.
.
.
.
.
.
.
.
.
.
.
.
.
.
.
.
.
.
.
.
.
.
.
.
.
.
.
23
23
23
25
Checking costs . . . . . . . . . . . . . . . . . . . . . . . . . . . . . . . . . . . . . . . . . . . . . . . . . . . . . 30
I
Table of contents
Viewing and deleting costs . . . . . . . . . . . . . . . . . . . . . . . . . . . . . . . . . . . . . . . . . . . . . . . 30
Set up tariff factor and denomination . . . . . . . . . . . . . . . . . . . . . . . . . . . . . . . . . . . . . . . . . 31
System telephony . . . . . . . . . . . . . . . . . . . . . . . . . . . . . . . . . . . . . . . . . . . . . . . . . . . 32
Function keys . . . . . . . . . . . . . . . . . . . . . . . . . . . . . . . . . . . . . . . . . . . . . . . . . . . . . . . 32
Function keys when connecting to a elmeg hybird or PABX . . . . . . . . . . . . . . . . . . . . . . . . . . . . 33
System menu on elmeg PABX with system telephony . . . . . . . . . . . . . . . . . . . . . . . . . . . . . . 40
Configuring and setting the system telephone . . . . . . . . . . . . . . . . . . . . . . . . . . .
Advanced configuration . . . . . . . . . . . . . . . . . . . . . . . . . . . . . . . . . . . . . . . . . .
Acoustic . . . . . . . . . . . . . . . . . . . . . . . . . . . . . . . . . . . . . . . . . . . . . . . . . . .
Display contrast . . . . . . . . . . . . . . . . . . . . . . . . . . . . . . . . . . . . . . . . . . . . . .
.
.
.
.
.
.
.
.
.
.
.
.
.
.
.
.
.
.
.
.
.
.
.
.
.
.
.
.
46
46
47
50
Configuration . . . . . . . . . . . . . . . . . . . . . . . . . . . . . . . . . . . . . . . . . . . . . . . . . . . . . 51
elmeg IP-S400 configuration . . . . . . . . . . . . . . . . . . . . . . . . . . . . . . . . . . . . . . . . . . . . . . 55
Service. . . . . . . . . . . . . . . . . . . . . . . . . . . . . . . . . . . . . . . . . . . . . . . . . . . . . . . . . . 57
Index. . . . . . . . . . . . . . . . . . . . . . . . . . . . . . . . . . . . . . . . . . . . . . . . . . . . . . . . . . . . 63
Options . . . . . . . . . . . . . . . . . . . . . . . . . . . . . . . . . . . . . . . . . . . . . . . . . . . . . . . . . . 67
Quick Install Guide . . . . . . . . . . . . . . . . . . . . . . . . . . . . . . . . . . . . . . . . . . . . . . . . . . 71
II
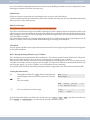
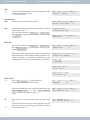
Telephone user interface
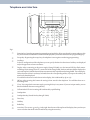
Telephone user interface
8
12 3
F E <
1
T 4
W 7
R *
L
90 ß ° $
4
O
2
5
8
0
56 7
> C
3
6
9
#
$ §
z
z
z
z
z
%&
/
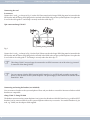
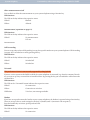
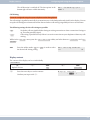
Fig: 1
1
Function key: Open the programming menu by pressing this key. If you are already in a menu and press this
key, the functions available in this menu will be displayed or you will be taken back one programming step.
2
3
Escape key: By pressing the escape key, the telephone is once again at rest during programming.
4
Display: After connecting to the power supply (elmeg IP-S400) or to the internal ISDN or flush-mounted(elmeg CS410 ,elmeg CS410-U ) connection of the elmeg PABK, the date and time shall be displayed to
you on the top line. Both the date and time are automatically copied from the elmeg PABK. The text displayed for a function in line 2 can always be found above the corresponding softkey. If you press the softkey, the
next level is then displayed.
If not all of the characters can be shown in the display, this is indicated by »»« or »»«.
5
OK key: After pressing this button the setting is then stored in the telephone. You will then hear an acknowledge tone.
6
C-key: You can go back one menu step by pressing this key in any menu. If you are in input mode, you can
delete individual characters using this key.
7
8
9
0
ß
°
§
Call reminder LED: An incoming call is indicated by rapid flashing.
3 softkeys
In the PC configuration of the telephone you can specify whether the functions of softkeys are displayed
only with uppercase or lowercase letters.
Loudspeaker
Loudspeaker key (hands free key elmeg IP-S400)
Divert key
Hold key
Redial key
Arrow key: The arrows »{« and »}« in the right-hand corner of the top line of the display show you that you
can access other functions in the second line by using the arrow key.
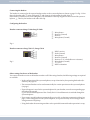
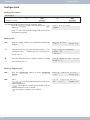
1
Telephone user interface
$
%
&
Star key / hash key
Option keys / VIP keys
elmeg CS410-U: 5 programmable function keys with LEDs: Each key has a two-colour LED (Level 1 - Red /
Level 2 - Yellow). These LEDs can be used to indicate specific functions.
elmeg CS410: Each key has a (red) LED available. The LEDs for both of the lower function keys have two colours (Level 1 - Red / Level 2 - Yellow). These LEDs can be used to indicate specific functions.
/
2
Labels for programmable function keys
elmeg CS410
Description and installation
Description and installation
The system telephone can be operated by an internal connector of a elmeg PABX that supports system functions.
Together with the elmeg PABX, the system telephone provides various performance features that are typical of this
system.
The internal connector on the elmeg PABX is simultaneous and automatically the system interface for the system telephone. Please consult the user’s guide for your elmeg PABX to see whether or not this offers the typical system performance features combined with various system telephones.
U
A complete configuration of the elmeg PABX and directly via the system telephone is possible on
all elmeg PABX (excluding elmeg hybird) using the Professional Configurator.
U
A complete configuration of the telephone using the elmeg hybird is not possible. Some of the
performance features can only be set up using the telephone’s own interfaces. However, this is
only possible if the system telephone has a USB or Ethernet interface.
Functions that cannot be fully configured via the elmeg hybird are marked at appropriate points
in the text.
b
Differences in configuration between the elmeg PABX and the elmeg hybird
Press a softkey or an arrow key. On the elmeg hybird this key does not have to be pressed again if the display
is different, as the function is already displayed or is not available.
c
The following message indicates if differences exist.
Cannot be configured using the system telephone on the elmeg hybird!
A summary of these functions can be found on page 67under »Restricted system telephone configuration«.
elmeg CS410
This system telephone is designed for connection to an internal S-connector (4-wire cable) on a elmeg PABX.
elmeg CS410-U
This system telephone is designed for connection to an internal Up0-connector (2-wire cable) on a elmeg PABX. The
system telephone has an ISDN connection to which further ISDN terminals can be connected.
elmeg IP-S400
This system telephone is connected to the corresponding LAN connection (or network) of the elmeg PABX by a Cat. 5
cable.The system telephone has an PC connection to which further IP terminals can be connected.
Setting / configuring the system telephone
On the system telephone itself, you can only perform a restricted configuration of the supported performance features. A complete configuration of the system is only possible via the corresponding connectors of theelmeg PABX.
3
Safety notices
elmeg IP-S400
Safety notices
· Note the ambient temperature for the storage and operation of the device in the specifications.
The device must only be connected once the permissible ambient operating temperature is
reached.
· Please note that when switching from cold to warm temperatures, condensation may form on or
in the device. Only remove the device from the packaging when the permissible ambient operating temperature has been reached.
· During a storm, you should not connect or disconnect any cables and do not make any calls.
· Only connect the cords to the connectors provided.
· Lay the cords so that they are protected in the event of an accident.
· Avoid the following influencing factors:
Direct sunlight
Source of heat (e.g. radiator)
Electronic devices (e.g. sound systems, office equipment or microwave devices)
Penetrating moisture or liquids
Aggressive liquids or vapours
High levels of dust
· Do not use the device in humid rooms or in explosive atmospheres.
· Only open the areas of the device indicated in the assembly/operating instructions.
· Do not touch the plug contacts with sharp, metal or damp objects.
· If the device is not permanently mounted, position the device or the accessory on a non-slip
surface.
· Please ensure that you only clean the system with a slightly damp cloth.
· Please ensure you only use approved accessories.
· Only terminals that offer SELV (safety extra low voltage) and/or meet ETS 300047 may be connected to the device. Correct use of the permitted terminals meets these requirements.
Plug power supply unit
· Only use the plug power supply unit supplied or available as an accessory (DSA-0101F-05 UP or
L15 D52 AB DDLAWO).
· Do not use any plug power supply units that show signs of damage (breaks or cracks in the casing).
Electrostatic charges (ESD protection)
The system telephone is supplied with ESD protection above the permissible values against the effects of electrostatic
charges. In spite of this, be sure to avoid excessive static charges. Various causes can result in the electrostatic charge
achieving values that far exceed the permissible values required and that exceed interference immunity of the system
telephone. The causes or circumstances such as low humidity or carpets must be eliminated. The manufacturer of
the system telephone accepts no liability for damages resulting from these causes.
4
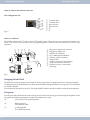
Connecting the system telephone (connector and receiver cord)
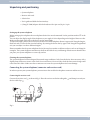
Unpacking and positioning
Unpacking and positioning
· System telephone.
· Receiver with cord.
· 2 device feet.
· User’s guide and labels for function keys.
· ( elmeg IP-S400)Adapter cable for headsets with 4-pin cord, 8-pin / 4-pin.
Setting up the system telephone
Before setting up the telephone the rear telephone device feet must be mounted 2 in the positions marked 6 in the
picture.
You can adjust the display angle of the telephone to your angle of vision depending on the height of these two feet.
Make sure that both of the feet on the device are the same height.
To adjust the height, pull the device foot away from the base of the telephone. Rotate it approx. 60° along the longitudinal axis and re-insert the foot into the housing. By rotating the device foot by approx. 60° along the longitudinal
axis you can adjust it to three different heights.
Please remember that the system telephone device feet may leave marks on delicate surfaces, such as on fittings for
examples. The system telephone manufacturer shall not be liable for any such damage. Please ensure therefore that
you place your system telephone on a non-slip surface.
Cleaning the system telephone
The system telephone has been designed for normal usage conditions. Only clean the device when necessary with a
slightly damp cloth or use an anti-static cloth. Never use solvents. Never use a dry cloth; the electrostatic charge could
cause electronic faults. Make sure that no moisture can enter the system telephone and cause damage.
Connecting the system telephone (connector and receiver cord)
In order to operate your system telephone, you must insert the cords for the telephone connector and the receiver.
Connecting the receiver cord
Connect the receiver cord 1 as shown in Fig. 2. Place the receiver cord in the cable guide 4 and clamp it securely under the cable clips 5.
4
2
6 3
5
7 1
6
4
Fig: 2
5
Unpacking and positioning
Connecting the system telephone (connector and receiver cord)
Connecting the cord
S-connector
Connect the S-cord 2 as shown in Fig. 2 (socket S0). Please note that the longer ISDN plug must be inserted in the
ISDN socket and the shorter ISDN plug must be inserted in the ISDN socket on the system telephone. Next place the
S-cord in the cable guide 4 and clamp it securely under the cable clips 5.
Up0-connectorelmeg CS410-U:
1
2
5
3
4
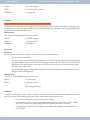
Fig: 3
Connect the S-cord 1 as shown in Fig. 3 (socket Up0). Please note that the longer ISDN plug must be inserted in the
ISDN socket and the shorter ISDN plug must be inserted in the ISDN socket on the system telephone. Next place the
S-cord cable in the cable guide 2 and clamp it securely under the cable clips 3.
,
,
This elmeg CS410-U may no longer be connected to an ISDN connector via an S0 socket (e.g. internal
S-connector of the elmeg PABX).
You can connect a further ISDN terminal with S-interface (e.g. an ISDN card or another system telephone) to the S0 socket on the system telephone. The power supply at this connector for another ISDN
terminal is 1 Watt.
Connecting and setting the headset (not included)
You can connect a headset to the system telephone. Please ask your dealer or consult the Internet to find out which
headsets are compatible.
elmeg CS410-U. elmeg IP-S400
The headset connector on the system telephone is an 8-pin socket. Headsets with DSHG interface (e.g. cordless DECT
headsets) can be connected directly to the system telephone without any accessories. For standard headsets (4-pin
cord, e.g. U10PS) use the adapter cable supplied.
6
Connecting the system telephone (connector and receiver cord)
Unpacking and positioning
Connecting the headset
The headset is connected to the separate headset socket on the system telephone as shown on page 5 in Fig. 2. Next
place the headset cable 3 in the cable guide 4 and clamp it securely under the cable clips 5.
If the headset cord does not fit in the cable guide, stick the adhesive cable clip supplied on to the base of the system telephone 7. Then lay the headset cord under this clip.
Configuring the headset
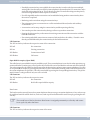
Headset connectorelmeg CS410 elmeg IP-S400
4
23
1
1
2
3
4
Microphone +
Receiver (Ground)
Receiver
Microphone (Ground)
1
2
3
4
5
6
7
8
DSHG receiver
Earth (Ground)
Microphone +
Receiver (Ground)
Receiver (3.3V switchable over resistance)
Microphone (Ground)
V+ (3.3V)
DSHG transmitter
Fig: 4
Headset connector elmeg CS410-U, elmeg CS410
8
7
65
4
23
1
Fig: 5
Other settings for the use of the headset
You can use either the receiver or the headset to make a call. When using a headset, the following settings are required
or available:
· In the configuration of the system telephone, set up a function key for operating the headset (headset key, see page 36).
· The connected headset can be used automatically for certain operations on the system telephone
(see page ).
· If special support is saved in the system telephone for your headset, enter the corresponding type
of headset (see page 48).
e.g. the LED in the microphone of the »Firefly F142 N« from Plantronics is switched through the
system telephone.
· If you want to use the headset to automatically receive calls, set the time to automatic pickup (see
page ). In the configuration of the system telephone, set up a function key for activating or deactivating automatic call pickup.
· Using the headset the answering machine can be queried if automatic headset operation is set up.
7
Unpacking and positioning
Changing the label field
elmeg IP-S400 on the Ethernet connector
PIN configuration PoE
8
7
65
4
23
1
Fig.: 6
1 Transmit Data +
2 Transmit Data 3 Receive Data +
6 Receive Data 4/5
7/8
Audio in / Audio out
The telephone has an input 7 and an output 8 for audio signals. These connectors are intended as a headset connector. The sockets are connected to the corresponding socket connectors for the headset on the base of the
telephone.
1 3 57 8
2
4
9
6
1
2
3
4
5
6
7
8
9
Plug power supply unit connector
Plug power supply unit
Ethernet PC connector
PC or additional IP telephone
Ethernet / PABX connector
elmeg PABX
Audio-in connector (microphone)
Audio-out connector (receiver)
Headset with two 2.5mm stereo
jack plugs.
Fig: 7
Changing the label field
The labels for the function keys can be found on the last page of this user guide. Remove the selected nameplate.
To change the plate, pull the flexible cover between thumb and forefinger and lift the cover upwards. The nameplate
can then be changed.
You can label the nameplate via your PC. The elmeg PABX CD-ROM contains an Adobe Acrobat file with templates.
Pictograms
In order to be able to demonstrate some of the processes involved for setting up and operating the telephone in this
user guide, the following pictograms (symbols) listed below were used.
8
b
a
Lift receiver or start preparing to dial.
l
A call is signalled.
The call melody sounds.
Replace receiver.
The telephone is idle.
Pictograms
g
d
q
t
0...9
*#
,
F
S
O
Z
z
E
C
R
W
T
L
#
Unpacking and positioning
You are in a call.
A conference call is initiated.
You will hear the positive or negative acknowledgement tone.
Choose call number, code, character or text.
Press a specific key on the dialling pad.
You can switch back and forth between the text displayed by pressing the arrow keys
The configuration and settings are initiated by pressing the function key.
This key is a softkey; the function corresponds to the function listed in the display.
You can confirm an entry by pressing the OK key.
You will be prompted to press one of the function or speed dial keys.
You will be prompted to press a specific function or speed dial key.
The Escape key ends a current configuration without saving it. Following this the telephone is once
again in idle state. In elmeg IP-S400 entries for IP functions are completed and then transferred by
pressing Escape.
Entries such as telephone numbers or names can be deleted by pressing the Clear key. Only one character is deleted each time the key is pressed.
This key is necessary for manually holding an enquiry.
The redialling key starts the redialling; pressing it a number of times starts the advanced redialling or
the automatic redialling.
Any current connections can be terminated by pressing the disconnect key.
The system telephone loudspeaker is switched on or off by pressing the loudspeaker key.
If you enter a call number to dial via a SIP provider, the number dialled is output approx. 5 seconds after entering the last digit. If you end the call number with the hash key, the system dials automatically.
The terminal must be able to dial the hash key in to the PABX.
9
System telephone settings
Setting the display language
System telephone settings
Connection and operation of the elmeg IP-S400 to the elmeg PABX /elmeg hybird (Basic operation with
DHCP)
Please ensure your read the elmeg PABX assembly instructions in order to see which connectors are intended for the
connector to the elmeg IP-S400. Connect the connector to the Ethernet PABX connector on the system telephone.
· Configure the elmeg PABX for use with IPS system telephones.
· Set the MSN of the IPS system telephones in the elmeg PABX.
· Connect the power supply (plug power supply unit) to the IP system telephone and wait until the
system telephone has initialised.
If the IP system telephone is initialised, you will be prompted to choose a language in the display.
S
Select the language for the display.Press the arrow keys to select the languages that are available
and confirm with O.
Welche Sprache? }
deutsch english polski
Enter one of the elmeg MSN entered in the PABX
(example 12) .Confirm the entry with O.
Program dial number
MSN-1>12
If no PIN is entered in the system configuration,
press O and O again when prompted.
Please enter login PIN
TNM-1->
Switch on »Use
Use DHCP?
off
DHCP?«.Select »on«.
on
System telephone and elmeg PABX are synchronised.
,
If there is no connection to the elmeg PABX (no LAN connection or the system telephone is not registered), the time in the display is replaced by »©---/ /--‰ «.
You can now use the IP system telephone like a system telephone on ISDN or UP0.
A complete description of the configuration can be found on page .
Possible error:
IP address, IP gateway, IP subnet mask, IP SYS server.
MSN is not entered in the elmeg PABX or is used multiple times.
A PIN / login name is entered in the elmeg PABX but not in the telephone.
No extension is set up in the elmeg PABX.
You can now use the IP system telephone like a system telephone on S or UP0 connectors.
Setting the display language
You can choose in which language the display is to appear.
10
Setting the display language
Start as follows:
System telephone settings
F
a
Replace receiver
S
S
S
config.
display
language
Press the arrow keys to see the languages that are available.
Which language? }
deutsch english polski
Press the arrow keys to see the languages that are available.
Which language? }
deutsch english polski
Example:
F-3-1-2-
S
Press the softkey under the chosen language. The display is
immediately switched to the chosen language.
Entering letters and numbers
If you press a key several times, you will see characters (letters or numbers) displayed in sequence.
For the entry of letters and digits, the keys are assigned as follows:
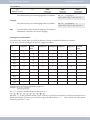
Key
First press
Second
press
Third press Fourth press Fifth press
Sixth press Seventh
press
1
1
2
A
B
C
2
Ä
3
D
E
F
3
€
4
G
H
I
4
5
J
K
L
5
6
M
N
O
6
Ö
Ø
7
P
Q
R
S
7
ß
8
T
U
V
8
Ü
9
W
X
Y
Z
9
*
*
#
#
Å
Æ
$
¥
All of the letters entered are displayed in uppercase.
Example: »bintec elmeg«.
The »0« key has a number of special characters on it.
E.g.: »!«, »&«, »?«, »+«, »-«, »=«, »(«, »)«, »@«, »$«, …
When the 0 is first pressed it inserts a space. If the key is pressed a second time, several special characters are
shown in the display. To select a special character, press the allocated keys 1 ... . If you want to view other special
characters, press the 0 key.
11
System telephone settings
Setting the display language
Display of the performance features set up
>
S
>
When the telephone is at rest, the date and time are displayed in the top line of the display; the phonebook (tbuch)
and VIP information are displayed in the bottom line of the
display.
22.11.09 08:30
tbook
In order to view further information about the various
functions that are set up, press the right arrow key and then
the softkey under the desired function.
22.11.05 08:30 i S U {
mail
charge
info
}
vip
Additional display information
When the telephone is at rest, additional information on the functions that are set up is displayed in the top line of the
display.
22.11.09 08:30
tbook
Display
S U }
vip
Function set up
»S«
Dial control or call filter activated,
Access to system telephone menus protected
»U«
Call diversion (call forwarding) set up.
»i«
Status info text is available (e.g. router key).
Displays
Softkey »mail«
Select between »uus« und »sms«.
Messages
uus
sms
UUS
Select between »list« und »sms«.
<
S
S
12
Messages / UUS
list
You can choose between 5 messages by using the arrow
keys. Select the desired entry to edit by pressing the O key.
Select text
1: HELLO
If you wish to send or delete the message, press the corresponding »send« or »delete?« softkey (example: »send«).
1/HELLO
send
Press the »UUSHello« softkey.
Send mail (Abc)
UUS> HELLO
}
new
{}
delete?
Setting the display language
S
You can select the desired call number to which the UUS is
due to be sent between »speed dialling«, »vip«, »repeat«
and »new«. Press the corresponding softkey.
System telephone settings
Send mail / UUS
direct
vip
}
new
13
Telephoning
Initiate a call
Telephoning
Initiate a call
Dial call number - without option to make a correction
b
t
g
Lift the receiver
Dial call number
Call
Dial call number - with option to make a correction
a
t
b
g
Replace receiver
Dial call number
Lift the receiver
Call
To amend the call number or to correct an incorrect entry, select the incorrect digit with the arrow keys and press the
C key to delete it. Then enter the correct digit.
If you want to carry out the call using the receiver, life the receiver after entering the call number. At any time during a
call, you can switch back and forth between hands free (only elmeg IP-S400), receiver and loudspeaker.
After you have entered a call number, you can also press the loudspeaker key in order to be able to select the call number and use the hands free system (only elmeg IP-S400).
After you have entered a call number, you can also press the loudspeaker key in order to be able to select the call
number.
If it is not possible to connect a call (e.g. call number blocked by dial control), a message to this effect will appear in the
telephone display; e.g.: »Blocked: Call no.«, if the dial control is activated.
If you have lifted the receiver and you are not connected, you can accept a call waiting via the »accept« softkey without having to replace the receiver. You will be notified of the call by a brief message. If you set up a connection key,
you can accept the call straight away by pressing the key.
Other options for dialling when the receiver is replaced
It is also possible to dial a number when the receiver is replaced and to correct or supplement a call number before dialling when calling:
•
•
•
•
•
•
from the redial memory (see page 16).
from the caller history(see page 24).
from the phone book on the PABX (see page ).
from the VIP memory (see page 24).
using the function keys (see page 15).
via the PABX CTI (TAPI) function (elmeg CS410 / elmeg CS410-U).
If you want to use one of these options, you can make further entries before initiating the call. You can determine, for
example, whether or not a call number (MSN) is to be transmitted to the called party.
14
Accepting/rejecting a call
Telephoning
Select from the phone book on the PABX
If you are using the system telephone on a PABX with system telephony, you can dial from the phone book on the
PABX.
S
a
Replace receiver
tbuch
O
t
<>
Enter the initial
letters
O
Entry
select
b
g
Lift the receiver
Call
Dialling from the VIP memory
You can programme a VIP entry for each of the 10 dialling keys consisting of a name (max. 20 characters) and a call
number (max. 26 digits).
a
Replace receiver
S
<>
VIP
VIP destination
or
t
b
g
VIP destination Lift the receiver
select
Call
select
The procedure for programming VIP entries is described on page 24of this user guide.
Speed dial with function keys
Speed dialling is initiated using the function keys. You can programme two functions or speed dials under each of the
five keys.
a
Z
b
g
Replace receiver
Pressing the function keys
Lift the receiver
Call
Dial the required call number using the function keys.
If you want to dial a number in the second layer, press the desired key twice. This must be done quickly.
,
Programming of the speed dial/function keys is done via the PC configuration or the advanced configuration page 47.
Select from the caller history
The telephone has a caller history. A maximum of 10 entries (calls, SMS or UUS1 text messages) shall be possible in
this list. Entries in the caller history are shown on the display by pressing the »list« softkey.
a
S
<>
b
g
Replace receiver
list
Select entry
Lift the receiver
Call
You will find further information on the caller history on page 24of this user guide.
Accepting/rejecting a call
With respect to the telephone’s basic settings, each call shall be signalled irrespective of the dialled call number
(MSN). If two calls are signalled simultaneously, the first call is accepted when the receiver is lifted. The second call
may continue to be signalled by means of the call waiting signal.
The number of the caller and the number dialled by the caller (MSN-1 … MSN-3, or assigned name) are shown on the
telephone display. If only MSN-1 is entered, only the entered name is displayed and not the number.
a
Replace receiver
l
b
g
Lift the receiver
Call
15
Telephoning
Forwarding a call (Call Deflection)
If you are unable to or do not wish to accept a call, you can reject the call. Press the »reject« softkey and the call will
no longer be signalled to your telephone. If you are a member of a team, the call is signalled to other telephones in the
team. If the call was only signalled to your telephone, Busy is signalled to the caller after it has been rejected.
a
S
l
Replace receiver
reject
Forwarding a call (Call Deflection)
If you are unable to or do not wish to accept a call, you can forward the call. Press the »transfer« softkey in order to
forward the call directly to another extension. The call number to which the call is due to be forwarded can be preset
in the telephone configuration for each call number (MSN).
After pressing the »transfer« softkey you can either forward the call to the preset call number by pressing the OK
key or enter a new call number.
a
S
l
Replace receiver
O
t
Dial call number (if no call number has been preset)
transfer
Suppressing the call number (anonymous call)
If you do not want your call number to be sent to the called party, you can suppress the transmission of your call number. You can set this function specifically for the next call or permanently (see page 32). The performance feature »ad
hoc suppression of call number« must be requested from the network provider.
Suppressing transmission of the call number for the next call
You can perform internal or external dialling so that the call number (MSN) is not transmitted from your system telephone to the called party.
a
t
Replace receiver
Dial call number
O
F
S
secret
b
g
Lift the receiver
Call
If a call is signalled, you can decide before accepting the call whether or not your call number should be transmitted to
the caller. If your system telephone is the destination of a call diversion, you can use this procedure to prevent the call
seeing the call number of the diversion destination (your number).
a
>
l
Replace receiver
S
b
g
secret
Lift the receiver
Call
Initiating a call with a fixed call number (MSN)
You can perform internal or external dialling so that a specific number (MSN) is transmitted from your system telephone to the called party. This call number must first be entered in your system telephone. During selection you will
see the call number transmitted (»MSN-1«...»MSN-3«) or the name you have assigned to this call number (MSN).
You can initiate dialling with a fixed number as described below or use a programmed function key (MSN
assignment or user key).
a
t
O
F
Replace receiver Dial call number
Redialling
The last number dialled is stored in the redial memory.
16
S
S
msn
msn...
1 msn-3
b
g
Lift the receiver
Call
Redialling
Telephoning
W
a
g
Replace receiver
Call
Advanced redialling
The call numbers of the last 10 calls, connections (calls), connection attempts or text message destinations are stored
in the extended redialling option. You can view and automatically dial these entries by pressing the redial key or the
arrow key.
W
a
<>
Replace receiver
O
Select entry
b
g
Lift the receiver
Call
The first entry displayed is the entry that was added most recently. A letter is displayed at the end of the second row to
indicate the status of the entry.
»v«
Connection (Call)
»A«
Call
»M«
Mail (call numbers to which an SMS or UUS1 text message has been sent)
»|«
Calls for which automatic redialling has been set up.
No entry
You have called an extension, but not been able to reach it or the extension was busy.
Delete call number from the extended redialling option
W
a
<>
Replace receiver
F
S
Select entry
delete?
Press the »delete?« softkey to delete the displayed entry straight away. You will now see the next entry.
Automatic redialling
If you have selected an extension who is busy or who does not answer the call, you can initiate an automatic dial
function in which the desired extension is selected again after approx. 10 seconds.
b
t
g
Lift the receiver Dial call num- Extension busy
ber
W
or
S
Auto dial
O
a
Replace receiver
After approx. 10 seconds, the telephone is switched on and the call number is automatically dialled. The system attempts to reach the extension for approx. 2 minutes.
If the extension is not reached, up to 20 call attempts are made. After 20 unsuccessful attempts, automatic redialling
is terminated with a negative acknowledgment tone.
,
If automatic dialling is switched on, this is indicated in the display by the »autodial« softkey. Press
the right arrow key to show the normal display when the telephone is idle.
Interrupt automatic redialling
You can interrupt automatic redialling at any time by making another call. Should this be the case, press the loudspeaker key during the automatic redialling.
At the end of the call, automatic redial is continued.
17
Telephoning
Switching the microphone on/off, loudspeaker
Deactivate automatic redialling
You can deactivate automatic redialling at any time. No other call attempts will then be made.
To deactivate automatic redialling during an automatic call, press the ESC key.
If you wish to deactivate the automatic redialling function when the telephone is idle, please proceed as follows:
a
S
S
Replace receiver
Auto dial
Yes
Switching the microphone on/off, loudspeaker
Switching the microphone on/off
You can disable the receiver microphone during a call. This prevents the called party from hearing any discussions in
the room. You continue to hear the called party however.
,
g
S
Call
mute
Room query
S
g
speak
Call
The call duration or cost meter will continue to run whilst the microphone is switched off.
Loudspeaker
If other persons in the room wish to hear the call, switch on the loudspeaker. You continue to use the receiver during
the call. You can change the volume during the call.
Inform the other party that you are switching on the loudspeaker. The activated loudspeaker is shown in the display
by »|«.
g
L
L
g
Call
Activate loudspeaker
Deactivate loudspeaker
Call
If you replace the receiver whilst the loudspeaker is activated, the receiver and loudspeaker are deactivated.
Hands free (elmeg IP-S400)
When using hands free, the receiver is not used. The built-in microphone and the loudspeaker are activated. This can
only be operated by using the loudspeaker / hands free button. You can switch to normal »receiver mode« whilst in
hands free mode by lifting the receiver. If you want to switch to hands free mode when in normal »receiver mode«, replace the receiver whilst pressing the loudspeaker / hands free button. In hands free mode, acoustic signals such as
the call waiting signal are not transmitted.
Inform the other party that you are switching to hands-free. The activated hands-free function is shown in the
display by »|«.
a
L
t
g
L
Receiver replaced
Initiate hands free
Dial participant
Call
End call
Using the headset
You can connect a headset to the telephone. You can use either the receiver or the headset to make a call.
18
Announcement
Telephoning
Switching the headset on/off
In order to operate the headset, a telephone function key shall be set up in the form of a headset key. The LED assigned to this button indicates whether the headset is switched on or off (LED on/off).
a
z
t
g
z
Replace receiver
Switch on the headset
Dial call number
Call using headset
Switch off headset
Switch volume on or off whilst using the headset
L
g
g
L
g
z
Call using head- Switch on loud- Call using headset and Switch off loud- Call using head- Switch off headset
speaker
loudspeaker
speaker
set
set
Announcement
The announcement function allows the internal connection to other telephones without them having to actively accept this connection (i.e. lift receiver, switch volume on). This is a one-sided connection in which only the extension
initiating the announcement is heard.
The start of the announcement is signalled by an attention tone.
Initiate announcement
The announcement is initiated by means of a code procedure (see elmeg PABX user guide).
If your telephone is the destination for an announcement, the call number of the announcer appears on the display.
The announcement is notified by means of an attention tone on the loudspeaker. The announcement can be terminated with the ESC key.
The announcement is accepted automatically by activating the loudspeaker function, if:
· the telephone is idle.
· the announcement is permitted in the PABX (can be controlled by the »announcement
on/off« function key).
You can initiate an announcement via a programmed function key. An announcement can also be initiated during an
existing connection (in hold for enquiry) using the function keys.
,
You can only use this function if the announcement is released for your internal number (MSN) in the
PABX.
Automatic callback
You can reach an extension who is currently busy by using the automatic callback function. You then receive a message stating that the extension for which a callback has been set up can now be called. This message is displayed for
external callbacks from the exchange and for internal callbacks from the PABX.
The telephone display then indicates »recall.«. This display alternates every 2 seconds between the number or
name of the desired party. As soon as you accept this notice (by lifting the receiver, for example), the selected
subscriber is called automatically.
Automatic callback when busy (CCBS)
When you call the desired connection, you hear the engaged tone. With »Callback on Busy« you can reach the engaged person once they have replaced the receiver at the end of the call.
19
Telephoning
Intercept (MCID)
Setting up callback
b
t
g
S
a
Lift the receiver
Dial call number
Extension busy
callback
Replace receiver
The »callback« softkey is only displayed if it is possible to set up an automatic callback in the exchange or in the
PABX. For external calls the performance feature »Callback on busy« must be requested from your network
provider.
You can define up to 3 callbacks. If you use an LCR procedure, an automatic callback is always performed via the standard network operator.
,
If automatic callback is switched on, this is indicated in the display by the »Callback« softkey.
Viewing and deleting initiated callbacks
When the telephone is at rest, initiated callbacks are indicated in the display by the »callback« softkey. To view
callbacks, press this softkey. You can now view the individual callbacks using the arrow keys. If you wish to delete a
callback, you can select this by using the arrow keys, then press the F key and finally the »delete?« softkey.
Initiated callbacks are deleted automatically after a specified time. This time is defined for external callbacks by the
network operator and for internal callbacks by the PABX.
,
If the telephone is disconnected from the ISDN network (e.g. telephone ISDN plugs unplugged, PABX
switched off or reset), then any requested callbacks are deleted.
Intercept (MCID)
If you receive a malicious call, you can save the caller’s number in the exchange.
The Trace (MCID) performance feature must be requested from the network provider for your ISDN connection.
,
Identification is carried out in the exchange and is recorded under the caller’s number, date and time.
You can use this performance feature in two situations.
During a call
You want to identify the
extension.
g
Call with extension
>S
The call number can now be determined in the exchange.
a
Replace receiver
intercept
After the caller has replaced the receiver
g
Call with extension
20
You want to identify the extension, but the caller has already replaced the receiver.
S
intercept
The call number can now
be determined in the exchange.
a
Replace receiver
Keypad and tone dialling (MFC dialling)
Telephoning
Keypad and tone dialling (MFC dialling)
When connected you can use other performance features by using keypad sequences or MFC dialling. When configuring the telephone you can determine in the basic settings whether keypad sequences or MFC dialling are possible
or not when connected. The display shows which functions (keypad or MFC) are available.
Softkey »Keypad« is displayed.
MFC sequences can be entered immediately. The keypad is only displayed after
pressing the softkey.
Softkey »MFC« is displayed.
Keypad sequences can be entered immediately. MFC is only displayed after pressing the softkey.
,
Keypad and MFC sequences can also be stored on the function keys so that they remain available
when connected.
Keypad
The keypad function allows you to control service or performance features in the PABX or in the operator’s network
by entering character and digit strings. Consult your network operator or check out the PABX user guide to see if
»Keypad« is supported or not.
g
S
Call
Keypad
t
Enter character and digit string
Tone dialling (MFC dialling)
By using the MFC dialling function you can send multifrequency signals (MFC) during an existing connection (call)
in order to request an answerphone for example. If there is a call waiting whilst there is an existing connection on the
telephone, you cannot use the MFC option.
g
S
Call
MFC
t
Enter character and
digit string
21
Telephoning with several people
Call Waiting
Telephoning with several people
Call Waiting
If you have enabled call waiting for your telephone, you are available to other callers during an existing connection.
S
call waiting
(Extension 2)
g
Call with extension 1
g
Call with extension 2;
Extension 1 is on hold
accept
Hold for enquiry
During an existing call, you can put up to two further connections on hold. To initiate a hold for enquiry connection
you can use the MSN key or a line key.
g
R
t
g
Call with extension
Extension 1 is on hold
Dial call number
Call with extension 2
If you want to establish other connections, proceed as described.
Pressing the Disconnect button ends the active connection and returns you to the last held connection. As soon as
there is no held connection, a new connection is established.
Call transfer in hold for enquiry to an engaged extension
This performance feature is only possible with an extension on hold. You want to forward a call in hold for enquiry to
another engaged extension.
g
R
g
S
a
Extension 2 is busy
transfer
Replace receiver
t
Call with extensi- Extension 1 is on Dial call number
on 1
hold
Extension1 who is on hold shall hear music on hold. If Extension 2 hangs up, the call with Extension 1 then takes
place.
Call forwarding (call transfer)
When transferring a call, the active extension and the extension of the last held connection are always connected.
You can carry out a hold for enquiry (e.g. to announce the call) or transfer the call directly without announcement.
R
g
Call with exten- Extension 1 is on
sion 1
hold
t
g
Dial call number
Call with extension 2
S
transfer
This performance feature is not currently supported by elmeg hybird!
,
Please note that when transferring two external parties, this performance feature (ECT - Explicit Call
Transfer) must be supported by the PABX or, if you use the system telephone directly on the NTBA,
by the network operator.
Brokering
If you have more than one active connection on your telephone as a result of call waiting or holding (max. 3 connections), you can speak alternatively with these extensions (brokering). Depending on the number of connections on
hold, there are up to 3 softkeys (»conn1",... «conn3«) available to you.
22
Conference
Telephoning with several people
>
g
Call with extension
S
conn1
...
conn3
g
>
S
Call with desired extension
conn1
...
conn3
g
Call with desired extension
If you have set up line keys, transferring between the various extensions is also possible using these keys.
To terminate an active connection, press the disconnect key. You then return to the last held connection.
Conference
If you have an active connection and a connection on hold on your telephone, you can initiate a conference call with
both extensions. All three extensions can speak to one another.
Conference calls are not possible with more than two (2) connections at your phone.
g
S
g
S
Call with extension 1
accept
Call with extension 2
conf
d
Conference with extension 1 and extension 2
In order to end the conference, press the »back« softkey. You are then reconnected to the extension with the last active connection. The other extension is now back on hold.
23
Operate system telephone
VIP memory
Operate system telephone
VIP memory
You can programme a VIP entry for each of the 10 dialling keys consisting of a name (max. 20 characters) and a call
number (max. 26 digits).
This performance feature is not stored in the elmeg hybird.
Programme VIP entry
Start as follows:
a
F
Replace receiver
S
S
S
<>
set
vip
New
Select VIP destination
O
t
Enter the name for the selected VIP destination. Example:
»bintec elmeg«.
O
Confirm your input with O.
F-2-2-3—ok-T-ok
Program VIP nam (Abcd)
V0> bintec elmeg
t
Program VIP number.
V0> 012345
Enter the call number.
Example: »012345«.
O
Confirm your input with O.
F-2-2-3—ok-T-ok-T-ok
Edit VIP entry
Start as follows:
a
Replace receiver
F
S
S
S
<>
set
vip
List
Select VIP destination
O
t
Change the name.
Example: »bintec elmeg, PE«.
O
Confirm your input with O.
F-2-2-2—ok-T-ok
Program VIP nam (Abcd)
V0> bintec elmeg,PE
t
VIP-telefonnr. prog.
V0> 01122334455
Change the call number.
Example: »01122334455«.
O
Confirm your input with O.
F-2-2-2—ok-T-ok-T-ok
Caller history
The telephone has a caller history. A maximum of 10 entries (calls, SMS short messages or UUS1 text messages) shall
be possible in this list. Entries in the caller history are shown on the display by pressing the »list« softkey. The last
10 entries made are always in the list. The last entry added is displayed first.
When you press this softkey the number of new entries is shown on the display (for example: »New calls: 4!«)
and together with the number of new SMS or UUS1 messages (for example: »Messages: 2«).
You will also see the number of the entry and the number of all entries in the list before each entry.
E.g.: »3/10: 1122334455...... *«.
If the call number of an entry in this list is the same as the call number of a VIP, the person’s name whose number it is
shall be displayed instead of the call number. You can view further information (provided it is available) for each entry. If you lift the receiver whilst viewing an entry, the corresponding number is dialled automatically. Individual en-
24
Caller history
Operate system telephone
tries can be deleted individually from the list. Entries from the PABX phone book can also be displayed by name.
Resetting the telephone will delete the name entry.
Caller history
Calls that you do not accept that you intentionally reject are saved in the caller history.
If a call is completed with a subscriber in the caller list (you call him or he calls you), the entry is deleted automatically
and carried over to the redial memory.
SMS/UUS1 messages
This performance feature is not currently supported by elmeg hybird!
If you have received new messages, the number of messages received is displayed when the telephone is idle. In the
caller history you can see the number or the name of the sender and an indication of the message type (SMS or UUS1).
After pressing the F key you can read the message received either straight away or you can save it in the list of SMS or
UUS1 messages to read later.
If you have already viewed a new message in the list of saved UUS1 or SMS messages, the corresponding entry in the
caller list is deleted. These entries shall be deleted following the resetting of the telephone.
UUS1 block
You can approve and block the receipt of internal and external UUS1 messages using the Professional Configurator
or the system telephone.
MWI - Message Waiting Indication (e.g.T-NetBox).
The T-NetBox is an answering machine that is available in T-Com, the network of Deutsche Telekom AG. The performance feature MWI displays a notice as soon as a new message is received in your T-NetBox.
The notice is saved as an entry in the caller list. By selecting the entry and lifting the receiver, you can connect to your
T-NetBox, for example, in order to listen to new messages. The entry in the caller list is automatically deleted, if no
new messages appear, e.g. on the T-NetBox. You can also delete the entry manually.
You can only use this function if the MWI performance feature is supported by your ISDN connection and the PBX.
Viewing the caller history
a
s
3-
The telephone is idle. The »list« softkey in the bottom line of the display indicates if an entry exists in the caller history.
Press this softkey.
New call!
Messages: 1
UUS today 14:33
1/4: 05171717171
F
You can read and save this message.
1/20
read
*
{}
}
save
3—1
In the first line of the display you will see the selected entry type (»Call«, »UUS«, »SMS« ), the date (for the first two
days »Today« or »Yesterday«), the time and the selected call number (MSN).
25
Operate system telephone
»*«
»a«
»I«
SMS and UUS1 text messages
new call, UUS1 or SMS text message
Call
Information about messages e.g. on your T-Netbox (MWI)
,
When you view the caller history again, call entries that you have already seen but not deleted will be
marked with »a« instead of with »*«.
You can view other entries by using the arrow keys.
F
Call today
1/02:12
08:50
If you wish to view information about an entry or delete the
entry, press F.
1-
»delete?«
The entry is deleted immediately.
»Info«
Viewing other information on the received call.
E.g.: The number for which the message was sent and the number of the sender.
1—1
C
{}
a
For further information press the »info« softkey . You
will now see information on the call. If not all information
can be displayed, press the arrow keys to display further information.
Press the C to exit the menu.
1/121
delete
a
info
Deleting the caller history
Deleting an entry
a
S
<>
Replace receiver
list
Select entry
F>
S
delete?
SMS and UUS1 text messages
You can use the telephone to send or receive SMS or UUS1 text messages (SMS - Short Message Service, UUS1 - User
to User Signalling). A text message is entered using the telephone keypad. For the text entry of letters, digits or special
characters, the keys are assigned as described on page 11.
You can only send and receive text messages if the sender transmits his number and if this is displayed to the recipient. Text messages without a transmitted call number are not transmitted.
The receipt of a text message is signalled with two short attention tones on the telephone. When the telephone is idle,
the number of messages received is displayed and a reference to these is displayed in the caller history.
Any SMS/UUS1 messages that are received and sent are saved in a list in the telephone. 10 received SMS/UUS1 messages and 2 sent SMS/UUS1 messages can be saved. Please note that there must be free memory available in order to
be able to save SMS/UUS1 messages. If you have already saved 5 received SMS/UUS messages then you cannot receive any more SMS/UUS1 messages (information on display).
An SMS message shall be temporarily saved after it is sent. You shall be able to access these saved SMS/UUS messages
until they are overwritten by a newly sent SMS/UUS1 message.
These entries shall be deleted following the resetting of the telephone.
The sending of SMS/UUS1 text messages shall be possible to both internal and external telephones. You can only make use of this performance feature to external telephones if »SMS/UUS1 (User to User Signalling)« is activated for
your ISDN connection.
26
SMS and UUS1 text messages
Operate system telephone
SMS text messages (available depending on the network operator)
SMS enables you to send text messages to other telephones in the fixed network or to mobile telephones, and to receive these messages from them. You can only send and receive SMS text messages:
• If you are using the system telephone on a PABX with system telephony that supports the SMS performance
feature.
• If you have registered for this performance feature with the network operator or the provider of the SMS centre
for your ISDN connection.
• If the call number of the SMS centre is saved in the telephone.
• The PABX dialling code (AKZ) must be entered.
Please consult the provider of the SMS centre to find out in which networks (mobile, fixed) SMS messages can be sent
and the cost of sending and receiving SMS messages. The telephone does not support the transmission of SMS messages with special content (e.g. pictures, ring tones).
UUS1 text messages
You can send text messages from one telephone to another without having to call this extension. The length of an
UUS1 text message is limited to 31 characters.
Please note that all terminals involved (telephones and PABX) must support the performance feature »UUS1 (User
to User Signalling)«.
Creating and sending a text message
You can send a text message to a call number saved in the telephone (VIP memory, function key or automatic dialling
list) or enter a new call number to send it to. Whilst in the »Send mail / UUS« menu, press the corresponding
»speed dialling«, »VIP«, »new« or »repeat« softkey.
To select a number assigned to a function key (»destination«) or stored under the redial button, you can also
press that corresponding key.
,
>-1-1-3-T-ok->
When sending a text message, the first (»MSN-1") entered in the telephone or the call number defined via the user key is transmitted.
Start as follows:
a
>
Replace receiver
S
S
S
mail
uus or sms
new
Example: Create UUS1 text message
t
Enter the text.
Example: »Meeting 9. 30 a.m.
O
Confirm your input with O.
>-1- 1 oder 2-3-T-ok
S
O
to 11.00 a.m.«.
Press the corresponding softkey to dial a call number saved
in the telephone or the »new« softkey to enter a new call
number. E.g.: »new«.
Enter the call number.
E.g.: »2200«. Confirm with O.
The text message is sent to the recipient.
Send mail (Abc)
Meeting 9. 00 to 1
Define targt. numb.
> 2200
27
Operate system telephone
SMS and UUS1 text messages
Important notes on entering the call number for sending SMS messages
If the performance feature »Automatic Outside Line« for your telephone is switched off in the PABX, you will not be
able to enter the dialling code before entering the destination number. In addition the dialling code must be saved in
the telephone.
When the telephone is connected to a PABX with automatic outside line, you can enter the destination number
directly.
View new text messages received
You can view a new message from the caller history (see page 24) or from the list of received text messages. If you have
already viewed a new message in the list of received text messages, the corresponding entry in the caller history is
deleted.
Viewing received or sent text messages
When viewing received or sent text messages, you can access the following functions:
• Resend a text message.
Before sending, the text message can be modified.
• Delete a text message.
• Transfer text message to the list of saved text messages (only UUS1).
Start as follows:
>
a
Replace receiver
S
S
S
mail
uus or sms
read
Example: Read received UUS1 text message
The text message added last is displayed first. A new text message that has not been read is marked with »*«. The following information can be displayed for a text message:
• Number of the text message in the list (Example: »1/3«).
• Call number to which the text message was transmitted (Example: »MSN-1«).
• Call number of the sender / Recipient of the text message (Example: »2200«).
O
Press the arrow keys to see the full text message.
Press O to access a menu with further options.
UUS 1/2 { 2200
TxT
In the top line of the display you will see the date and time
at which you received the message. To select an action,
confirm with the corresponding softkey.
UUS 1 today 14:21
send delete? more
>-1- 1-1
>-1- 1-1-ok
}
»send«
Modify and then send text message.
To send the text message, proceed as described under »Creating and sending text messages« (see page
27).
»del?«
Delete the text message.
»continue « View next temporary saved text message.
>
S
28
Press the arrow key and select »list.
UUS 1 today
list
14:21
{
SMS and UUS1 text messages
Operate system telephone
Use the arrow keys and select the desired message and confirm your selection with O.
O
Save text
1: TxT
{}
Permanently saved text messages (only UUS1)
Up to five UUS1 text messages can already be saved in the telephone. You can edit, delete or send these text messages.
Text messages that are already saved can only be entered directly on the telephone.
Start as follows:
>
a
Replace receiver
S
S
S
mail
uus
list
Press the arrow keys to select a text message.
Select text
1: TxT
O
Press O in order to enter or amend the selected text message. Press O to confirm your final entries.
F
Press F in order to send or delete a message.
1/ TXT
send
{}
delete?
>-1- 1-2—ok-1
»send«
Modify and then send text message.
To send the text message, proceed as described under »Creating and sending text messages« (see page
27).
»del?«
Delete the text message.
Send text messages automatically (only UUS1)
When on a call, you can automatically send a UUS1 text message to the caller. To do this, the text 1 from the list of permanently saved text messages is always used.
Start as follows:
a
>
Replace receiver
S
S
S
mail
uus
Press the »incoming« softkey to switch automatic sending on or off.
>
S
incoming
Send Text 1 with call?
no
ok
>-1- 1->-3
Set receipt for text messages (only UUS1)
You can configure whether external or internal UUS1 text messages are received by the telephone or not. Receipt can
be blocked separately for external and internal text messages.
Start as follows:
a
Replace receiver
>
S
S
mail
uus
>
S
uus_receipt
29
Operate system telephone
S
>-1- 1->-1
Press the »external« or »internal« softkey to switch
the receipt of UUS1 text messages on or off. E.g.:
»external«: Receipt of external messages inhibited.
»internal«: Receipt of internal messages is possible.
SMS and UUS1 text messages
Inhibit reception
internal
external
Error receiving an SMS message
If you are unable to receive an SMS message or only as voice output, there may be several reasons:
• If you are unable to transmit an SMS message, a corresponding error code is displayed. Consult the SMS service
of your network operator / provider to find out which error codes are displayed.
• The SMS performance feature has not been registered with the network operator and/or the provider of the
SMS centre for your ISDN connection.
• The SMS message was transmitted by a third-party service provider, which failed to transmit this message as
an SMS message.
• Permanent number suppression is activated for your ISDN connection.
• 5 SMS messages are already saved in the telephone, meaning therefore that no more SMS messages can be
received.
• Check the system telephone and PABX setttings
30
Viewing and deleting costs
Checking costs
Checking costs
You can obtain details on accumulated call costs on your telephone. You can only use this function if the AOCD / AOCE performance feature is activated for your ISDN connection by the network operator.
Consult your network operator to find out what options are available for transmitting cost information. Please note
that the transfer of all cost information from the exchange to your telephone is no longer possible for technical reasons. Any price reductions received, special tariffs used and special features may lead to deviations between the data
saved in the telephone and the data stated on the telephone bill.
Procedure for transmitting cost information
There are various procedures for transmitting cost information. The same procedure is normally always applied to a
connector. This procedure is automatically recognised by the telephone and is saved for future use.
If the transmission of cost information during a procedure occurs that is not saved in the telephone, then »Incorrect cost type« is shown in the display.
In this case delete all of the cost information stored in the telephone (see also: Viewing/deleting total costs). Recognition and saving of the procedure used to transmit cost information is then re-activated.
,
You can set up the tariff factor and denomination via the PC or Advanced configuration page 47.
Viewing and deleting costs
Cannot be configured using the system telephone on the elmeg hybird!
You can view the costs for individual calls as well as for all accumulated calls and delete the entries. You can also view
and delete the call costs via the Professional Configurator.
View/delete costs of last call
Start as follows:
>
a
S
Replace receiver
S
charge
The cost of the last call is displayed. If you want to delete
these costs, press the »delete?« softkey.
Last conn.: 0,18EUR
}
single
delete?
sum
>-2
View/delete total costs
Start as follows:
a
Replace receiver
>-2-3
,
>
S
S
charge
sum
You can view the total cost for all call numbers (MSN). If
you want to delete these costs, press the »delete?« softkey.
Total:
single
0,31 EUR
delete?
}
sum
If the total cost is deleted, all MSN cost accounts are deleted at the same time. The recognition and saving of the procedure for transmitting cost information is re-activated.
31
Checking costs
Set up tariff factor and denomination
View/delete costs of individual call numbers (MSN)
Start as follows:
>
a
S
Replace receiver
>
charge
S
MSN-1
You can view the total cost for a single call number. Example for »MSN-2«.
MSN-2:
msn-1
If you wish to delete the total costs for the selected number
(example MSN-2), press the left arrow key and then the
»delete?« softkey.
MSN-2:
single
0,06 EUR
msn-2 msn-3
{
>-2->-
<
S
>-2->-1-<
0,18 EUR
delete?
}
sum
Set up tariff factor and denomination
Start as follows:
F-3-2
F
a
Replace receiver
»tariff«
S
S
config.
charge
Enter the tariff factor and confirm your entry with O. The length of the tariff factor is limited to 4
characters. Press the asterisk key to enter a comma.
»currency« Enter the denomination and confirm your entry with O. The length of the name is limited to 6 characters. For the text entry of letters, digits or special characters, the keys are assigned as described on
page 11.
»del?«
All cost information saved in the telephone will be deleted. Recognition and saving of the procedure
used to transmit cost information (see page 31) is re-activated.
Transmission of the call number correctly set up (CLIP/CLIR/COLP/COLR)
Start as follows:
F-3-1-1-
F
a
Replace receiver
S
S
32
S
S
S
config.
display
call no.
By pressing the »incoming« , »yes - no« softkey, the display of the caller’s number is switched on
or off.
By pressing the »outgoing« , »yes - no« softkey, the display of the called party’s number is switched on or off.
Function keys
System telephony
System telephony
The system telephone is ready for connection to the corresponding internal connector of the PABX / elmeg hybird .
On the PABX / elmeg hybirdthe system telephone provides various performance features that are typical of this system. For example:
· Select from the phone book on the PABX (see page 15).
· Announcement (see page 19).
· Special function keys (see page 33).
· Access to the system menu on the PABX (see page 41).
,
Please consult the user’s guide for your elmeg PABX to see whether this system telephone is supported
in conjunction with this telephone.
Operating the function keys
Press the corresponding function key. The function programmed on the key is executed. If an LED function is also associated with this function, the LED is switched on or off according to the function executed.
You can reach the second layer of function keys by pressing the keys twice. This must be done quickly.
Important notes on LED functions
The states of the LEDs are not permanently refreshed in the system telephone. If these functions are modified or switched by a code or PC configuration on the PABX, the state of the LED does not change. If the system telephone is disconnected from the ISDN network (e.g. parking a call), the LEDs are off when reconnecting the system telephone.
Pressing a function key updates the display of the assigned LEDs and the performance feature in the PABX is
activated or deactivated.
Example: You can switch the announcement function on your system telephone on and off using the function key
through the PC configuration of the PABX. Pressing the function key switches off the announcement and the assigned LED is updated.
Function keys
The system telephone has five function keys that can be assigned with various functions in two layers.
Each key has a two-colour LED that can be used to display the functions of the keys. Each colour is assigned to a layer
of the function key.
Examples for operating function keys
· Speed dial keys (see page 15).
· MFC/ Keypad sequences (see page 21).
· Announcement (operation see page 19).
· Simplex operation (operation see page ).
33
System telephony
Function keys when connecting to a elmeg hybird or PABX
Function keys when connecting to a elmeg hybird or PABX
Line keys (Extension line key)
You can set up dialling to an internal extension using a line key. After pressing the corresponding key, the loudspeaker or hands free (only elmeg IP-S400) is switched on and the internal extension entered is selected.
If already on a call, the call is held and the destination extension call after pressing the line key.
If a call is signalled on the internal extension you have entered, you can pick this up by pressing the line key.
If the automatic headset option is enabled, the headset is activated instead of the loudspeaker.
Calls waiting with the number of the line key are indicated by a flashing LED on this line key. By pressing this line key
you can pick up the call from any extension within the group.
Held calls are not indicated by the LED.
Line key (Team line key)
A team key is a normal line key to which the internal number of a team is assigned. After pressing the corresponding
key, hands free is switched on and the team entered is selected. If a call is signalled for the entered team, you can pick
this up by pressing the team key.
LED functions
The LED on the key indicates the respective status:
LED off:
No connection.
LED on:
Existing connection.
LED flashes:
Connection on hold.
LED flickers:
Incoming call / call waiting.
Line key
This performance feature is not currently supported by elmeg hybird!
A B-channel of an external ISDN connection is set up using a line key. If this key is pressed, hands free is switched on
automatically and the corresponding B-channel of the ISDN connection is assigned. You then hear the external dialling tone.
If an external call is signalled on another internal system telephone, you can pick this up by pressing the line key.
LED functions
The LED on the key indicates the respective status:
LED off:
No connection.
LED on:
All B-channels are assigned.
LED flashes:
Connection on hold.
LED flickers:
Incoming call / call waiting.
Line key
If this key is pressed, hands free is switched on automatically and the corresponding external connection (ISDN, SIP
or FXO) is assigned. You then hear the external dialling tone.
If an external call is signalled on the LED of the line key, you can pick this up by pressing the key. Here you can pick up
up to 4 calls by pressing the line key. If you pick up 4 calls, this is displayed by the lights on the LED.
LED functions
The LED on the key indicates the respective status:
LED off:
34
No connection.
Function keys when connecting to a elmeg hybird or PABX
LED on:
System telephony
On ISDN connections, the LED only lights up when all B-channels are assigned.
If a connection limit is set up in the elmeg hybird with the SIP provider, the LED
lights up when the maximum number of connections is reached.
LED flickers:
MSN assignment (Set call number for next call)
This performance feature is not currently supported by elmeg hybird!
You can perform internal or external dialling so that a specific number is transmitted from your system telephone to
the called party. This number must first be entered in your system telephone.
LED functions
The LED on the key indicates the respective status:
LED off:
No connection.
LED on:
Connection set up using keys.
Day/Night all
You can set up a key so that when pressing this key, the call assignments on the PABX are switched (day/night call assignment). You have various options for this switching: Day/Night all: All performance features that differentiate
between day call assignment and night call assignment (AVA, Teams, TFE) are switched together.
LED functions
The LED on the key indicates the respective status:
LED off:
Day active.
LED on:
Night active.
Day/Night Team
When entering a team number, the call variant is only switched for this team. If you do not enter a team number, the
call assignment is switched for all team.
LED functions
The LED on the key indicates the respective status:
LED off:
Day active.
LED on:
Night active.
Team on/off
If you are entered as an extension in the call assignments for one or more teams, you can set up a key so that you can
control the call signalling of your system telephone. If you are logged in, team calls will be signalled to your system telephone. If you are logged out, no team calls will be signalled.
The call numbers entered in the telephone can be logged in/logged out from a team using a set function key
(»MSN-1«...»MSN-9«). Before entering a team number, you must select the telephone call number index (MSN) that
is entered in the corresponding team call assignments.
LED functions
The LED on the key indicates the respective status:
LED off:
Logged out.
LED on:
Logged in.
35
System telephony
Function keys when connecting to a elmeg hybird or PABX
Allow announcement on/off
You can block or allow the announcement on your system telephone using a function key.
LED functions
The LED on the key indicates the respective status:
LED off:
Blocked.
LED on:
Allowed.
Announcement (operation see page 19).
LED functions
The LED on the key indicates the respective status:
LED off:
No announcement.
LED on:
Announcement.
Call Forwarding
You can set up a key so that call forwarding is set up for a specific number on your system telephone. Call forwarding
(see page 49) is switched on or off by pressing the key.
LED functions
The LED on the key indicates the respective status:
LED off:
Switched off.
LED on:
Switched on.
Voicemail
This performance feature is not currently supported by elmeg hybird!
If you use a voice system on the PABX to which the system telephone is connected (e.g. from the company Discofone), you can set up a key to control the voicemail function. By pressing the key you can establish a connection to the
voicemail box.
LED functions
The LED on the »Voicemail« button indicates the respective status:
LED off:
No connection.
LED on:
Connection to voice box.
LED flashes:
Voice box, new message available.
Headset
If you have set up and connected a headset to your system telephone, the headset is operated using a function key.
These are set up in the ex works settings for the keys 4 (Headset) and 5 (Automatic call acceptance).
Press the headset key to initiate, pick up and end calls.
LED functions
The LED on the key indicates the respective status:
LED off:
36
No connection.
Function keys when connecting to a elmeg hybird or PABX
LED on:
System telephony
Connection or connection setup.
Automatic call acceptance
Your system telephone can accept calls automatically without you having to lift the receiver or press the loudspeaker
key. The time after which calls are accepted automatically is set up in the configuration of the system telephone. Automatic call acceptance is switched on or off using the function key assigned.
LED functions
The LED on the key indicates the respective status:
LED off:
Switched off.
LED on:
Switched on.
Line AB
This performance feature is not currently supported by elmeg hybird!
This key is a special line key to which the internal number of an answering machine is assigned. An MFC sequence
can also be assigned to this key.
After pressing the key, the number of the answering machine is dialled and then the saved MFC sequence is transmitted. The MFC sequence allows you to activate remote operation of the answering machine and to listen new messages. The loudspeaker is switched on when calling the answering machine, but the microphone remains off. By pressing this key, you can also pick up a call that is signalled to the allocated answering machine.
LED functions
The LED on the »Line AB« button indicates the respective status:
LED off:
No connection.
LED on:
Connection to AB.
LED flashes:
AB has an active connection to the caller.
LED flickers:
Incoming call AB.
User on/off
Normally the first number entered in the system telephone (MSN-1) is used as the default number for all settings and
operations. You can set the default number of the system telephone with the user key. By pressing this key, the default
number of the system telephone is modified on the corresponding call number. When initiating a call and when sending SMS or UUS1 text messages, the modified default number is used.
LED functions
The LED on the key indicates the respective status:
LED off:
Default number.
LED on:
Modified number.
Bundle key
elmeg hybird
If one or more external connections (ISDN, FXS or SIP provider) are grouped into bundles, they can be assigned to a
bundle key. If this key is pressed, hands free is switched on automatically and a free external connection is assigned in
the bundle in the order of entry. You then hear the external dialling tone. If a call is made in this bundle (the LED on
the bundle key flashes), this connection cannot be transferred by pressing the bundle key.
A busy status is signalled as described under »Line key«.
LED functions
The LED on the key indicates the respective status:
37
System telephony
Function keys when connecting to a elmeg hybird or PABX
LED off:
No bundle assigned.
LED on:
No external connection free.
LED flickers:
Incoming call.
Bundle key
This performance feature is not currently supported by elmeg hybird!
If one or more external connections are grouped into bundles, they can be assigned to a bundle key. If this key is pressed, hands free is switched on automatically and a free external connection is assigned on the corresponding bundle.
You then hear the external dialling tone.
LED functions
The LED on the key indicates the respective status:
LED off:
No bundle assigned.
LED on:
No B-channel free.
LED flickers:
Incoming call.
Status info
Recording
You can set up the »router key« (code 01) or »record key«(code 02) under this key.
Router key (01),(only PABX)
If you have set up a status info key in the configuration, you can press the key to disconnect existing Internet
connection and to set up new connections over the registered provider. The LEDs on the function button
indicate the status of the Internet connection (LED off: No connection, LED on: Connection over WAN).
Record key (02), (only PABX)
(Only if the PABX supports this function) If you press the Record key during an existing connection, recording is started (the LED lights up).
LED functions
The LED on the key indicates the respective status:
LED off:
No connection.
LED on:
Connection active
or
Recording switched on.
Connection
In addition to the softkeys »Connection 1...«, you can also set up function keys on the system telephone or the extension for operation when brokering. Here two to four of these keys must always be set up.
· No other keys must be set up between the connection keys.
· The number of possible connections depends on the number of connection keys set up. If more
than 4 keys are set up, the call waiting and hold for enquiry functions are restricted.
· If multiple connections have the »Calling« status, the first call signalled is accepted when the receiver is lifted.
38
Function keys when connecting to a elmeg hybird or PABX
System telephony
· If multiple connection keys are available, the connection key is used to select between multiple
waiting calls. Note that only one ISDN system telephone is operated on the S/U connection, only a
single call waiting signal is set up. This is the only way that a second call waiting can take priority
over an existing call (both callers require a B-channel).
· If a call is signalled, another connection can be established using another connection key when
the receiver is replaced.
· Brokering can be carried out using the connection keys.
· The assignment given to a connection or a call is retained until the end, unless with softkeys
»Connection 1...«.
· A connection can be set up using the connection key and then pressing a line key.
· You can also press the connection key during a call to set up another connection.
· Pressing the disconnect key to disconnect the existing connection and the connection with the
last held connection.
· If an existing and a held connection are connected with each other, the softkey »Transfer« must
then be pressed followed by the connection key for the held connection.
LED functions
The LED on the key indicates the respective status of the connection:
LED off:
No connection.
LED on:
Existing connection.
LED flashes:
Connection on hold.
LED flickers:
Call status.
Open hold for enquiry (Open.Hold)
The called party is put on hold for enquiry and dials a code. The system telephone is now free for other operations, e.g.
an announcement. Another party can accept the call, if he lifts the receiver and dials the relevant code of the held call.
The codes assigned by the PABX can also be entered in the function keys of one or more system telephones. If a call is
set to open hold for enquiry by pressing the function key, this is indicated by flashing LEDs on the function keys for
the system telephones set up for this. The call is transferred by pressing the corresponding function key. This performance feature is only possible if only one call is on hold.
LED functions
The LED on the key indicates the respective status:
LED off:
No connection.
LED flashes:
Held call in open hold for enquiry.
Hotel room
The hotel room key can only be used on system telephones that are set up as reception telephones. A key can be set up
for each hotel room for which check-in, check-out, wake-up call and call functions can be set up by pressing the relevant key.
,
The second layer of the key function »Hotel room« is assigned permanently as a line key and cannot
be set up for any other functions.
LED functions
The LED on the key indicates the respective status of the room:
39
System telephony
Function keys when connecting to a elmeg hybird or PABX
LED off:
Room is free.
LED on:
Room is occupied.
LED flashes:
Room is being cleaned.
Key functions
The LED is switched off:
Pressing the hotel room key opens the »Check-out« and »Wake-up call« menu.
LED on:
Pressing the hotel room key opens the »Check-in« menu.
The LED flashes:
No function when pressing the hotel room key.
For all LED displays:
The room telephone is called by pressing the key twice.
Post-processing time of the agent (post-processing time)
This key can only be used by the agents of the mini call centre.
LED functions
The LED on the key indicates the respective status of the agent:
LED off:
The agent is free and can be called.
LED on:
The agent is post-processing and cannot be called.
Key functions
The LED is switched off:
Pressing the key starts the post-processing time.
LED on:
Pressing the key ends the post-processing time.
LED on:
The post-processing time is restarted by pressing the button twice.
The LED is switched off:
Pressing the key twice has no function.
,
The second layer of the key function is assigned permanently and cannot be set up for any other
functions.
Night operation
This key centrally switches all of the extensions configured for this. All existing external call assignments, the team
call assignments and the door assignments are switched together.
LED functions
The LED on the key indicates that night operation is activated:
LED off:
Night operation deactivated, the call assignments previously set up apply.
LED on:
Night operation activated (by key or calendar on elmeg hybird).
The LED on the »Night operation« key lights up when night operation is activated using the calendar on elmeg
hybird. Pressing the »Night operation« key deactivates night operation. The current »calendar function« set is applied again the next time operation is switched using the calendar.
40
Function keys when connecting to a elmeg hybird or PABX
System menu on elmeg PABX
System menu on elmeg PABX
Cannot be configured using the system telephone on the elmeg hybird.
The system telephone is ready for connection to the internal S/U / IP connector of the PABXs. These PABX provide a
special menu with properties that are typical of the system. This menu and the performance features it contains are
managed entirely in the PABX.
,
The description of the menu and the performance feature that is available in this menu can be found
in the user guide for your PABX.
Connection to a PABX
This performance feature is normally set in the PABX. If this is not possible, the setting can also be made on the telephone. An AKZ must be entered first in order to do this.
Start as follows:
F-3->-3
a
F
Replace receiver
S
S
>
PABX Numb. length
>4
Dialling code (Softkey »akz«):
Dialling code of the PABX
For external calls the dialling code is entered automatically
before the called party’s number.
Input external line
Extern> 9
a
S
F
Replace receiver
tbuch
Then press the F key.
S
S
tkanl
Call number length (Softkey »no. length«):
Maximum length of internal numbers that are allocated to
other extensions in the PABX.
Start as follows:
1-F
S
config.
Select the required menu using the arrow keys. In this menu you can also select the menu using the keys 1 to 7 on the
keypad (3 = direct call). If you are in a menu, you can go
back to the menu selection by pressing the F key.
1 = Phone book of the PABX
2 = Follow me
3 = Direct call
4 = Day / Night
5 = Cost registration
6 = LCR
7 = Hotel functions
Confirm your selection with the OK key.
OK/figure confirmed {}
Directory
/1
Select from the phone book on the PABX
S
Please note the simplified version on page 15. Display:
O
»tbuch« . Confirm your selection with O. Enter 1... 8
“
41
System menu on elmeg PABX
1-F—ok
Function keys when connecting to a elmeg hybird or PABX
initial letters or numbers for the name you are looking for
and confirm with O. The name that is nearest to this
entry is displayed.
Setting up follow-me
O
Display: »Follow-me«. Confirm your selection with
O. Enter the desired call number and confirm with O.
1-F—ok-T-ok Press the softkey under the entered call number or O to
delete the entry.
<> Press the arrow keys to set up an existing redirect again.
Activate follow-me
S
Press the »Activate« softkey. The follow-me function is
O
now set up and switched on. Press O, you are now back
in the device menu.
1-F—ok-T-ok-ok
Please enter
letter:
Followme from
Number: 11
OK/figure confirmed {}
activate
/ 1
Follow me from
n° 11 act.
Set up direct call
O
Display: »Direct call« . Confirm your selection with
O. Enter the call number to which the direct call shall be
switched.
1-F—ok-T-ok
O
Confirm your entry with O.
OK/figure confirmed {}
20_
Dir. call
set up
Switch off or delete direct call:
1-F—ok-T-ok
S
<>
1-F->->-ok
Press the softkey under the entered call number or O
you can switch off the direct call.
Press the arrow keys to delete or deactivate an existing
direct call.
OK/figure confirmed {}
20
Dir. call
Turn On
Set up Day/Night
1-F->->-ok-1
O
1-F->->->
»Day / Night« . Confirm your selection with the OK
key. Using the arrow keys, select between »Central«,
»Teams« or »door intercom«, and confirm with O.
OK/figure confirmed {}
Day / Night
/ 4
OK/figure confirmed {}
Central
1-F->->->-ok
S
»Central«: If you have made this selection, you can use
the arrow keys to select» Day« or »Night« setting. Confirm your entry with O (Example »Day«).
1-F->->->-ok—ok
O
All of the day or night switches set up in the PABX are
switched.
OK/figure confirmed {}
Day
/1
Day Service
set up
1-F->->->-ok—ok-1
42
Function keys when connecting to a elmeg hybird or PABX
S
»Teams« : If you have made this selection, confirm your
entry with O.
System menu on elmeg PABX
OK/figure confirmed {}
Teams
1-F->->->-ok—ok-
O
Costing
Enter the team number or »*« if the selection should apply
for all PABX teams.
Confirm your input with O.
Enter ream no.
(*=all):_
O
»Costing« . Confirm your selection with O.
S
Enter the 6-digit PIN (PABX factory setting 000000).
Pls Enter
PIN: 000000
If you enter an incorrect PIN, you can return to the menu
selection by pressing O .
You are not
authorized
O
Cost meter
S
Using the arrow keys, select between »Cost meter« and
»Cost printout«. Please note that the cost printout
function is not available for all elmeg PABXs. Confirm
your selection with O.
O
O
O
Confirm »Read
out« with O.
Enter the desired extension number (example 11).
Confirm your selection with O.
OK/figure confirmed {}
Call metering /5
OK/figure confirmed {}
Call meter
/1
OK/figure confirmed {}
Read out
Meter value for
Tln.-Nr.: 11
1-F->->->->-ok-PIN-ok-1-1
The costs incurred for the selected extension are displayed.
N° 11
0,24EUR
1-F->->->->-ok-PIN-ok-1-1-ok
Cost display
S
Confirm your selection with O.
OK/figure confirmed {}
Charges record
/2
1-F->->->->-ok-PIN-ok->
S
Confirm your selection with the softkey.
OK/figure confirmed {}
Turn On
/1
1-F->->->->-ok-PIN-ok->-1
S
You can switch the call printout function on and off via the
softkey.
Charges record
on
43
System menu on elmeg PABX
Function keys when connecting to a elmeg hybird or PABX
1-F->->->->-ok-PIN-ok->-1-ok
LCR
O
You can receive information on the LCR download via the
»Status request« softkey.
OK/figure confirmed {}
Status inquiry
/1
1-F->->->->->-1
Hotel functions
S
Confirm your selection with the softkey
S
1-F->->->->->->-ok
Enter the desired room call number (example 20). Confirm
your selection with O.
You can choose between »Check-in«, »Check-out«
and »Wakeup« by pressing the arrow keys (in this example
1-F->->->->->->-ok-T»Check-in«).
OK/figure confirmed {}
Hotel functions /7
Please enter
room nunber:20
OK/figure confirmed {}
Check-In
/1
1-F->->->->->->-ok-T-ok
Check-out
You can choose between »Check-in«, »Check-out«
and »Wake-up call« by pressing the arrow keys (Example »Check-out«).
OK/figure confirmed {}
Check-Out
/2
If you wish to check a guest out, the next steps required are
displayed after the corresponding softkey is pressed, such
as the cost display or a printout of information via the
PABX printer. The ability to print depends on the PABX.
1-F->->->->->->-ok-T-ok->->ok
Check-In: 22.11. 11:11
Check-out guest?
1-F->->->->->->-ok-T-ok->->-ok-ok
Charging data
Print out?
1-F->->->->->->-ok-T-ok->-ok-ok-ok
Check-out compl.
successfully
1-F->->->->->->-ok-T-ok->->
Wake-up call
O
Select »Wake-up call« via the arrow keys.
Confirm your selection with the OK key.
t
O
44
Room: 20
0,000EUR
OK/figure confirmed {}
Wakeup
/2
Please select whether the wake-up call shall take place once
»Sgl.wakeup call« or daily »Dly. wakeup
call«. Confirm your selection with O.
OK/figure confirmed {}
Sgl.wakeup call
/1
Enter the time to wake up and confirm your entry with
O.
You may then want to select the wake-up melody you wish
the guest to hear when picking up the handset. Confirm
your selection with O.
Sgl.wakeup call
at: 06:00 on 22.11.
Function keys when connecting to a elmeg hybird or PABX
System menu on elmeg PABX
Enter or amend call number (MSN)
Start as follows:
a
F
Replace receiver
S
S
S
S
config.
msn
msn1...msn3
tel no.
Enter the telephone MSN (call numbers) or amend the
MSN (Example 22).
Program dial number
MSN-1>22
elmeg IP-S400: If you have entered an MSN that has not
been approved for your PABX or has been used twice, please use the closest entry when making an MSN request.
Currently inactive MSNs
MSN-1
F-3-3-1-1
Set up large or small letters for the display
You can select whether the display is shown in large or small letters.
Start as follows:
F-2->-2-2
F
a
S
Replace receiver
S
>
S
set
operate
Press the softkey via »softkey«. Select (»yes« or »no«. Depending on the existing configuration in place, you can make changes by pressing the »yes« softkey. The configuration remains the same if »no« is
pressed.
Keypad settings
Start as follows:
F-2->-1-1-ok
F
a
S
Replace receiver
S
>
S
set
operate
Connector / use headset (»headset« softkey)
Setting up a headset; To operate the headset, you will need the »headset« function key and optionally
also the »auto-answer«.
S
Basic settings when connected (»keypad« softkey)
Select whether in the initial settings »DTMF« or »keypad« is possible during an ongoing call.
LED caller history
Start as follows:
a
Replace receiver
S
F
S
set
>
S
operate
>
S
list
Confirm your selection with the softkey.
»off«: No message will be signalled.
»on«: All calls, UUS1 and SMS messages and MWI information will be signalled.
45
System menu on elmeg PABX
F-2->-2->-3
Function keys when connecting to a elmeg hybird or PABX
»messages«: Only UUS1/SMS messages and MWI information will be signalled.
An incoming call is signalled by a flashing LED.
Caller list LED?
off messages on
Programming of keys
Programming of a call number to a speed dial key (MFC or keypad sequence).
Start as follows:
a
F
Replace receiver
t
S
>
set
S
S
<>
speed
dial.
new
Select entry
Enter the desired call number and confirm your entry with
O.
O
prog. new direct dial
1_>
F-2->-1-3 -ok
Keypad / MFC switching on
R
Select the MFC-(T), keypad-(K) or speed dial key and enter
the corresponding sequence.
O
Confirm your input with O.
F-2->-1-3 -ok-R-
prog. new DTMF-key
1_>T123699#####9#####9
prog. new keypad-key
2_>K#*123
F-2->-1-3
Pro
gram
-ok-Rming of function keys
Start as follows:
a
Replace receiver
F
S
set
>
S
S
<>
destination
function
Select entry
S
Using the arrow keys, select the function keys that you wish
to assign a new function to.
Press the softkey under the selection (in the example »LiF-2->-1-1 -ok—ok
ne key«)
Function for key 5a?{}
extension key
t
1_ / Extension key
Number> 234
Enter the call number.
Confirm your selection with O (a line key in this examO
ple).
F-2->-1-1 -ok—ok-T
46
O
Advanced configuration
Configuring and setting the system telephone
Configuring and setting the system telephone
Advanced configuration
This performance feature is not currently supported by elmeg hybird!
Normally you can only perform a restricted configuration of the supported performance features on the telephone.
You can set more performance features via »Advanced configuration«. A complete configuration of the system is only possible via the internal connector of an elmeg PABX.
Switching the advanced configuration on
Start as follows:
a
t
q
Replace receiver
Enter the code*)
Acknowledgment tone
*)Enter »**46782551##« (Vanity format »**INSTALL1##«) code.
,
Activation lasts 30 minutes.
Deactivating the extended configuration
Start as follows:
a
t
qQ
Replace receiver
Enter the code*)
Acknowledgment tone
*)Enter »**46782550##« (Vanity format »**INSTALL0##) code.
If the telephone is disconnected from the ISDN network (e.g. telephone ISDN plugs unplugged, PABX switched off or
reset), then the advanced configuration mode is automatically switched off.
Connection to a PABX
If your telephone is operated on a PABX, you can make the corresponding entries here.Start as follows:
a
Replace receiver
S
F-3->-3
F-3->-3-1
S
F-3->-3-3
F
S
config.
>
S
tkanl
PABX
number ln.access extern
»no. length«:
Maximum length of internal numbers that can be allocated
to extensions in the PABX.
PABX Numb. length
>4
»AKZ« :
This dialling code is required for the «Automatic outside line" feature in the PABX. For external calls the dialling code
is entered automatically before the called party’s number.
Input external line
Extern> 9
47
Configuring and setting the system telephone
Acoustic
Acoustic
Headset
If special support is saved in the system telephone for your headset elmeg CS410 or elmeg CS410-U, enter the corresponding type of headset; e.g. the LED located on the microphone of the »Firefly F142 N« made by the company Plantronics is connected via the telephone.
Start as follows:
a
F
S
Replace receiver
S
>
acoust
S
headset
Press the corresponding softkey to set the type of headset
that is connected.
Headset / Audib?
standard
silicomp
}
Or select the desired headset by using the arrow keys The
entry depends on the respective telephone type.
Headset / Audib?
gn netcom 2100/2200
{
F-1->-1
F-1->-1-
Loudspeaker
Fix volume
Start as follows:
a
F
Replace receiver
O
Press the arrow keys to set the volume.
Confirm your entries with O.
S
S
audib
loudspeaker
Loudspeaker loudness.{}
- ©©-- +
F-1-1
Set receiver volume
Start as follows:
a
F
Replace receiver
O
Press the arrow keys to set the volume.
Confirm your entries with O.
S
S
audib
receiver
Handset loudness
- ©©-- +
F-1-2
Set volume temporarily
During a call you can adjust the volume of the receiver or the volume of the loudspeaker (if activated).
Start as follows:
g
Call
48
F
{}
Acoustic
E
F-1-2
Configuring and setting the system telephone
Press the arrow keys to set the volume.
Confirm your entries with ESC. If you confirm O button
instead of the E button, you will overwrite the current
value.
Handset loudness
- ©©-- +
{}
Set acknowledgement tone
You can set on your telephone whether the acknowledgement tones are switched on permanently (»yes«), never
(»no«) or in the event of an incorrect entry (»error«). The acknowledgment tones are always active in the basic
settings.
Start as follows:
F
g
Call
S
S
S
audib
beep
Press the softkey under the desired function.
Acknowledge signal activ?
no
error
ok
Setting call waiting
If you have enabled call waiting for your telephone (see page 51), you can set the call waiting tone volume. You can also choose whether a call waiting is signalled once or several times.
Start as follows:
g
F
Call
S
>
audib
S
call waiting
Press the »repeat« softkey.
S
F-1->-3
If a call waiting is only to be signalled once, press the softkey under »no«. In order to signal a call waiting more than
once, press the softkey under »yes«.
Repeat call wt. tone.?
no
ok
Press the »vol.« softkey.
O
Press the arrow keys to set the call waiting tone volume.
Confirm your input with O.
Call wait.tone vol {}
- ©©©-- +
Attention tone
F-1->-3-3
You can set the attention tone volume.
Start as follows:
a
Replace receiver
O
F
S
audib
Press the arrow keys to set the volume. The bar in the display shows the current status.
Confirm your input with O.
>
S
attention
Beep tone volume {}
- ©©©-- +
F-1->-2
49
Configuring and setting the system telephone
Acoustic
Call diversion (call forwarding)
The system telephone enables you to be reached even if you are not in the vicinity of your telephone. You achieve this
by automatically forwarding your calls to another call number.
Call forwarding can be set up separately for each of the numbers entered. In order to be able to use call forwarding,
you can have set up at least one number.
The following settings are possible for each number:
»delayed«
Call diversion delayed:
Calls are only signalled to the extension after the time specified in the PABX and are then forwarded.
»busy«
Call diversion on busy:
Calls to a number are only forwarded if the telephone is busy.
(E.g.: Two connections already exist or a connection exists and call waiting is not permitted.)
»fixed«
Call diversion fixed:
All calls are forwarded. Your telephone no longer rings when calls are received for this number.
,
The following example describes how to set up a delayed call diversion for call number MSN1.
Switch on call diversion
Start as follows:
F
a
S
S
set
calldiv
Replace receiver
When in the »Call
diversion delayed« menu press the »msn-1« softkey.
t
Enter the number to which calls are to be diverted.
Example: »0123456789«.
Call forwarding delay
MSN-1>0123456789_
O
Confirm your input with O.
The call forwarding is registered. The three points in the
bottom right will start to blink alternately.
Delayed call forwarding
MSN1>0123456789
...
F-2-1—1
View current call diversion
When the telephone is at rest, »U« is displayed in the top line of the display which indicates that a call diversion is set
up. To view a call diversion that is set up, proceed as described on page 12.
Switch off call diversion
When in the »Call
S
S
diversion« menu press the »off« softkey.
Select the call diversion type that you wish to switch off.
Call forwarding quit
all
fixed
Select the call number for which the call diversion is to be
switched off.
Call forwarding quit?
msn-1
F-2-1->-1—ok
F-2-1—1->-ok-1
50
}
Display contrast
Configuring and setting the system telephone
The call diversion is switched off. The three points in the
bottom right will start to blink alternately.
Call forwarding quit
MSN-1
...
Call Waiting
Cannot be configured using the system telephone on the elmeg hybird.
The call waiting is signalled acoustically by an attention tone via the loudspeaker and visually in the display. You can
set up the call waiting tone volume and can also choose whether a call waiting is signalled just once or several times.
The following settings for the call waiting are possible:
»no«
No further calls are signalled either during an existing connection or when a connection is being set
up. The caller gets a Busy signal.
»yes«
Call waiting is possible but only if there is an active connection on your telephone without any calls
waiting.
Whilst in the »set
ternal« .
S
up« menu press the »call waiting« softkey and select between »internal« and »ex-
Press the softkey under »no« or »yes« in order to select
the desired call waiting setting.
Call waiting enable?
no
ok
Display contrast
The contrast of the display can be set individually.
Start as follows:
a
F
Replace receiver
O
Press the arrow keys to set the contrast.
Confirm your input with O.
S
set
>
S
contrast
Display contrast
- ©©©©- +
{}
F-2->-3
51
Configuration
Display contrast
Configuration
Blocking (dial control)
Start as follows:
a
Replace receiver
F
S
>
S
config.
*
blocked
* For elmeg IP-S400 you must press the arrow key twice.
Press the »inhibit« softkey and enter the PIN for »inh«
(0000) or
press O. This PIN cannot be changed and serves only for
F-3->->-2-T
confirmation purposes.
Input PIN please
>0000
Blocking »list«
S
Press the »list« softkey to set up blacklist and whitelist
numbers.
Set up block
list
outgoing
F-3->->-2-PIN-ok
O
Using the arrow keys, select the memory location (1...7 enabled spaces and 1... 7 inhibited spaces). Confirm your selection with O.
Lock/free telephone
number.{}
inhib-1:
F-3->->-2-PIN-ok-2
t
O
Enter the desired blacklist or whitelist number. Confirm
your selection with O.
Inhib./Enable tel. no.{}
Enable-1:
F-3->->-2-PIN-ok-2-ok-T-ok
Blocking »Outgoing calls«
S
Press the »outgoing« softkey to block »outgoing
calls«.
Config. inhibit filter
list
outgoing
F-3->->-2-PIN-ok
S
Select :
»All calls«: Only the uninhibited numbers that are entered can be dialled.
F-3->->-2-T-ok-3
»list«: All telephone numbers not included in the restricted numbers list can be dialled.
»no« All telephone numbers can be dialled.
52
Inhib. outgoing calls?
no
list
complete
Display contrast
Configuration
Setting the display language
You can choose in which language the display is to appear.
Start as follows:
F
a
Replace receiver
<>
S
S
S
S
config.
display
language
Press the arrow keys to see the languages that are available.
Which language?
deutsch english
}
polski
Press the softkey under the chosen language. The display is
immediately switched to the chosen language.
F-3-1-2
Call numbers (MSN)
You can enter up to 3 call numbers (MSN) via the PC configuration that the telephone can use on the internal connector on the PABX. Please see the information on the user guide of your PABX.
By entering a number in your telephone you indicate that your telephone is reachable when dialling with this number
(MSN). If you enter more than one call number in your telephone, your telephone will ring when dialling with any of
the entered numbers.
elmeg CS410 , elmeg CS410-U
If you do not enter a MSN here, then the telephone linked to the internal connector to which it is connected shall ring
for each call.
elmeg IP-S400
If no MSN is entered in this telephone then no calls are signalled. The telephone is then only logged on with guest access. Outgoing calls can only be telephoned internally (except if »exchange access rights« have been configured for
guest access. The setting of a call number is described below using the example of the call number »msn-1".
Enter, view or amend call number (MSN)
,
The entry or amendment of a call number is only possible via the PC configuration or the advanced
configuration page 47.
Start as follows:
a
F
Replace receiver
t
O
Enter the desired MSN.
Confirm your input with O.
S
S
S
S
config.
msn
msn-1...msn-3
tel no.
Program dial number
MSN-1>10
Set up call melodies and volume
For each call number you can choose its own call melody and volume separately. You can set up a different ring tone
and volume for internal calls on the internal ISDN / UP0 /Ethernet connector.
,
10 different melodies are saved in the telephone as ringtones. These 10 melodies cannot be changed.
53
Configuration
Display contrast
Set call melodies
Start as follows:
F
a
Replace receiver
S
O
<>
O
S
S
S
S
config.
msn
msn-1...msn-3
tone
Select »internal« or »external«.
Confirm your input with O.
Select melody {}
internal
external
Press the arrow keys to set the desired melody.
Confirm your entries with O.
MSN_1
- ©©©-- +
F-3-3-1-3
Set call melody volume
Start as follows:
a
F
Replace receiver
S
O
O
S
S
S
S
config.
msn
msn-1...msn-3
vol.
Select »internal« or »external«.
Confirm your input with O.
Select call signal
internal
external
Press the arrow keys to set the desired volume.
Confirm your input with O.
Select call signal {
MSN-1 - ©©©-- +
Assign name to call number (MSN)
You can assign each number a name of max. 5 characters.
Start as follows:
a
Replace receiver
t
O
F
S
S
S
config.
msn
msn-1...msn-3
Enter the desired name.
In the example: »STORE«.
Confirm your input with O.
>
S
msn-name
Own MSN designati (Abc)
MSN-1>LAGER
After you have assigned a name to a call number, the softkey names »msn-1«, »msn-2« or »msn-3« are replaced
with the corresponding names in the menus. As an example, »msn-1« is replaced by the assigned name »LAGER«.
Presetting a number for forwarding calls
If you do not wish to accept a call, you can forward this call directly to another call number.
If you frequently forward calls to the same number, you can preset this number in the telephone. If you then want to
forward a call, you will first be offered the preset number.
This preset is separate for each of the numbers entered in the telephone.
54
Display contrast
Configuration
When in the »Programme
Start as follows:
a
MSN-1« menu press the arrow key and then the »transfer« softkey.
F
Replace receiver
S
S
S
config.
msn
msn-1...msn-3
t
Enter the desired call number. Example 12345.
O
C
Confirm your input with O
Press the C key to delete an existing number.
>
S
transfer
Call forward. number
MSN-> 12345
Own MSN designati (Abc)
MSN-1>STORE
Setting of »Info at end of call«
Start as follows:
F
a
Replace receiver
S
S
S
S
config.
display
end
After a call is terminated, information about this connection (e.g. call length or costs incurred) can be seen in the
display.
F-3-1-3
Info at end of call?
no
ok
Setting of »UUS Dummy Message«
This performance feature shall only be required if specified by your provider. If you encounter problems with the
transmission of UUS1 messages, please ask your provider. If necessary you can then switch this function off.
Start as follows:
a
Replace receiver
S
F
S
config.
Select setting with the softkeys.
>
S
>
Service
UUS Dummy-Message?
off
S
uus
on
F-3->-1->->-1
55
Configuration
elmeg IP-S400 configuration
elmeg IP-S400 configuration
IP settings
Start as follows:
a
F
S
Replace receiver
>
S
config.
O
ip
Please take note of the PABX or network configuration and specifications that are required for the following settings
of the elmeg IP-S400.
S
F-3->-2
Softkey meanings:
IP-settings
dhcp
ip-adr
gateway
»dhcp«: If your PABX is used as DHCP server, press this
softkey followed by »on«. This completes the settings for
the system telephone. You will now have to enter the MSN
extension number specified in the PABX into your telephone
»ip«: If DHCP is not active, please enter here the IP address for your telephone.
»gateway«: If DHCP is not active, please enter here the IP
address for the PABX (gateway).
>
Press the arrow key.
S
IP settings
subnet
»subnet«: Enter the subnet mask here.
Subnet mask
INA> 0. 0. 0. 0.!
»sys«:
If you press »ok« then you confirm that the gateway in
your LAN is an elmeg PABX or an elmeg gateway.
If you press »no« then you will have to enter the IP address
for the elmeg PABX or the elmeg gateway in your LAN.
Act. Sys srv Gateway?
no
ok
F-3->-2->
{
sys
F-3->-2->-1
S
E
Once the entry has been amended and E has been pressed, this will reset the system telephone.
IP Address of Sys server
INA>192.168. 1.250!
F-3->-2->-3-1
Enter Login_PIN (MSN)
Start as follows:
a
Sk
F
S
S
S
config.
MSN
MSN-1...MSN10
Enter »Login_PIN«
>
S
Login_pin
MSN-1 Programm {
login-pin login-name
Please enter login PIN
MSN-1>
56
elmeg IP-S400 configuration
t
F-3-3-1->->-1
If you press the 0 key several times, you are shown the
special characters available and their current position on
the keypad. Each time you press the 0 key, you are
shown up to 4 layers. Then press one of the keys 0 to
9 to enter the character displayed. Wait until the cursor
has moved on to the next field before entering the next character. Only the current character can be seen and the characters already entered are covered with an asterisk.
Example: Press the 0 key once followed by the 6 key,
the @ character is applied.
Configuration
1=! 2=% 3=? 7=, 8=. 9=0
4=5=:6=@ 0=more
F-3-3-1->->-1-T0
O
E
Confirm your input with O.
press the E key.
Telephone and PABX are synchronised.
,
Note that registration and synchronisation make tame some time!
If there is no connection to the PABX (no LAN connection or the telephone is not registered), the time in the display is
replaced by »©---/ /--‰ « .
57
Service
elmeg IP-S400 configuration
Service
Name
Telephone name
In order to be able to clearly identify a telephone to a PABX, you can give the telephone a name (max. 20 characters).
The telephone name is required for example when configuring the telephone via the internal connector of a PABX.
The telephone serial number is typically entered as the name in the basic settings.
Start as follows:
a
F
Replace receiver
t
OO
S
>
config.
S
>
service
Enter the telephone name with max. 20 characters and
confirm your entry with O.
S
Name
Device name (Abc)
Name> 0000000923
SMS
F-3->-1->-3
Call number of the SMS centre
,
The call numbers may only be edited via the »Advanced configuration« page 47, the call number display and TX server modification (control room) are possible.
Your system telephone allows you to send SMS messages (text messages) to other telephones in the fixed network or
to mobile telephones (mobiles) and to receive these messages from them (see page 26).
,
The receipt and sending of SMS messages is only possible if the telephone is connected to the PABX.
Please consult the user’s guide for your PABX to see whether these SMS messages are supported in
conjunction with this telephone.
In order for you to be able to send and receive SMS messages with your telephone, the SMS service provider number
must be saved in the telephone (max. three service providers). Messages can be received from any of the three SMS
servers entered, but the sending of such messages can only be done via the server that you have approved for this purpose. The call number »0193010" is entered as the Deutsch Telekom SMS centre in the telephone basic settings and
can be amended as described below.
Start as follows:
a
Replace receiver
O
F-3->-1->-2
F
S
config.
>
S
service
Select the SMS server and enter the call number of your
SMS service provider. For example: »0193010«.
Confirm your input with O.
>
S
sms
Number for SMS exchg.{}
1:0193010
TX
2:
3:
Version
F-3->-1->-2Select telephone firmware version
You can select the telephone version and type in order to determine, for example, which firmware version is available
in the phone.
58
elmeg IP-S400 configuration
Start as follows:
a
F
Replace receiver
<<
C
Service
S
>
config.
You can view information about the telephone.
E.g.: Firmware version, name, ...
Press the arrow keys to see further information.
To exit the menu, press C.
S
S
service
version
Software-Identification{}
Type: CS290 V4.xx
Software-Identification{}
Time 11/11/05 11:11
Software-Identification{}
:V4.xx 14 00 01 01
Software-Identification{}
Name: 003002272
The following keys are only displayed for the elmeg
IP-S400 .
Software-Identification{}
SNr.: 007074
Software-Identification{}
MAC:11:22:33:44:55:10
Software-Identification{}
IP: 192.168.1.57
Software-Identificatio{}
GW: 192.168.1.250
Data
Reset - Restore basic settings
You can restore the telephone’s basic settings by following the procedure described below. All data entered by you
will therefore be deleted. Or you can just delete user-specific data such as: VIP destinations, SMS /UUS1 messages,
caller history and automatic dialling list. Any function keys that have been set up will not be deleted as well.
Start as follows:
a
Replace receiver
S
S
S
F-3->-1-3-3
F
S
>
config.
Press the »yes« softkey to restore the basic settings. If you
do not want to delete the data, press the »no« softkey.
Press the »user« softkey to delete only user-specific data
S
S
service
data
Sure to delete all?
no
user
ok
After pressing the »"ok« softkey the telephone’s basic settings are restored. All data is deleted and the telephone is
reset. This process may take a few seconds.
59
Service
elmeg IP-S400 configuration
Firmware
Download new firmware
The company provides a Server PC which you can use to load new firmware in the system telephone elmeg CS410and
elmeg CS410-U . In this case the firmware is loaded over the ISDN connection and takes approx. 12 minutes depending on the size of the firmware file. Note that connection fees may apply when downloading the firmware over an
external ISDN connection.
For the elmeg IP-S400 you can download the firmware using the Professional Configurator (WIN-Tools on the
PABX) under »System telephone«, »Indirect software download«. Whilst in the configurator you can specify the internet address where the firmware can be found. No operations must be carried out on the system telephone.
,
Other information on downloading firmware can be found in the description »Firmware download
IP« on your CD-ROM.
For the elmeg CS410-U you can also download the firmware using the Professional Configurator (WIN-Tools on the
PABX) under »System telephone«, »Indirect software download«. No operations must be carried out on the system
telephone.
• During data transmission, you must not press any keys and plug or unplug any connectors unless requested to
do so. Should there be an interruption whilst downloading, restart the download program and proceed as
described below.
• After the new firmware is loaded the telephone automatically carries out a RESET and is then available for use
again.
• In some cases, all data in the telephone is selected when carrying out a firmware download. If this is the case
then you will receive information in the telephone display before downloading commences. If you do not have
any backup files for the telephone configuration settings, please ensure you only begin the download once you
have backed up this data (via the PC configurator).
,
Important information for export assignments:
Please ask your dealer/distributor for the access number of the download server in your country!
Download-Server (elmeg CS410/ elmeg CS410-U)
Server-PC bintec elmeg GmbH
Call number
++49-(0)5171-901190
Start download of new firmware to telephone (elmeg CS410/ elmeg CS410-U):
Start as follows:
a
F
Replace receiver
S
>
config.
S
S
service
software
The telephone is now reset in BIOS mode.
S
Press the »Update« softkey.
Load new software?
no
F-3->-1-3-3
t
60
Enter the call number of the download server including the
dialling code for the external assignment of the PABX.
Example: »005171901190«.
If you have set up an automatic outside line for your telephone in the PABX, enter the number of the download server without automatic outside line.
Please dial
ABORT
Firmware Updaste
005171901190
ABORT
ok
elmeg IP-S400 configuration
,
Service
In order to interrupt a download that has been started, press the »Abort« softkey or the
ESC key.
In some cases, all data in the telephone is selected when carrying out a firmware download. If this is the case, the following message will be displayed before the download starts: »All data will be deleted Continue?«. The
firmware download will only commence once you have confirmed acceptance of this message by pressing the «yes«
softkey. If the telephone data is not deleted when downloading, the download will begin without any flashing
message.
Telephone BIOS mode (elmeg CS410/ elmeg CS410-U):
The telephone has a BIOS mode (basic functions) in English. The various BIOS functions shall remain available to
you even if the telephone firmware is not functioning correctly or if new firmware has not been fully downloaded.
The following functions are available in the telephone BIOS mode
•
•
•
All telephone calls are signalled. No call numbers (MSN) need to be entered in the telephone.
It is possible to make outgoing calls once the receiver is lifted (no dial preparation, no loudspeaker).
Loading of new telephone firmware via external ISDN connector.
Download of new firmware via external ISDN connector (elmeg CS410/ elmeg CS410-U)
S
You will see the telephone BIOS menu.
If you would like to load new firmware via the ISDN connection, press the »Update« softkey.
CS290-bios 1.04 by ps
INFO
SET
UPDATE
Now proceed as described on page 60of this user guide.
Country
Country-specific settings
If the telephone is to be used in a country that deviates from the basic settings, country-specific settings shall therefore be necessary.
This sets the language, the currency and country-specific features in the ISDN network to the basic settings of your
chosen country.
As described below, please check whether country-specific settings are possible for the country in which the telephone is to be used.
Start as follows:
a
Replace receiver
S
F-3->-1->-1-
F
S
config.
>
S
service
Press the arrow keys to see the countries for which special
settings are available.
Press the softkey for the desired country, e.g. »germany«.
>
S
Country
Which Country (Prot.)?}
germany
uk
poland
61
Service
,
elmeg IP-S400 configuration
The system telephone is then rebooted!
The specific settings of the chosen country are established
immediately.
The telephone data is not deleted, but the cost settings are
reset.
62
11.11.05 07:00
tbook
}
vip
Index
Index
A
Accepting/rejecting a cal . . . . . . . . . . . . . 16
Check-out . . . . . . . . . . . . . . . . . . . . . 46
Cleaning the system telephone . . . . . . . . . . 5
Acknowledgement tone . . . . . . . . . . . . . 51
CLIP/CLIR/COLP/COLR . . . . . . . . . . . . . 33
Acoustic . . . . . . . . . . . . . . . . . . . . 50 - 52
Conference. . . . . . . . . . . . . . . . . . . . . 24
Activate follow-me . . . . . . . . . . . . . . . . 44
Configuring and setting the system telephone 49 - 53
Advanced configuration . . . . . . . . . . . . . 49
Connecting the system telephone . . . . . . . 5 - 8
Advanced redialling. . . . . . . . . . . . . . . . 18
Connection. . . . . . . . . . . . . . . . . . . . . 40
Allow announcement on/off . . . . . . . . . . . 38
Connection to a PABX . . . . . . . . . . . . . . 49
Announcement . . . . . . . . . . . . . . . . . . 20
Cost registration. . . . . . . . . . . . . . . . . . 45
Anonymous call . . . . . . . . . . . . . . . . . . 17
Country-specific settings . . . . . . . . . . . . . 63
Assign name to call number (MSN). . . . . . . 56
Creating and sending a text message . . . . . . 28
Attention tone . . . . . . . . . . . . . . . . . . . 51
D
Data. . . . . . . . . . . . . . . . . . . . . . . . . 61
Audio in / Audio out . . . . . . . . . . . . . . . . 8
Automatic call acceptance . . . . . . . . . . . . 39
Automatic callback . . . . . . . . . . . . . . . . 20
Automatic callback when busy (CCBS) . . . . . 21
Automatic callback when busy (CCBS) . . . . . 21
Automatic callback . . . . . . . . . . . . . . . . 20
Automatic redialling . . . . . . . . . . . . . . . 18
B
BIOS mode. . . . . . . . . . . . . . . . . . . . . 63
Blocking (dial control) . . . . . . . . . . . . . . 54
Brokering . . . . . . . . . . . . . . . . . . . . . 23
Bundle key . . . . . . . . . . . . . . . . . . . . . 39
C
Call forwarding . . . . . . . . . . . . . . . . . . 52
Day/Night all . . . . . . . . . . . . . . . . . . . 37
Deactivate automatic redialling . . . . . . . . . 19
DHCP. . . . . . . . . . . . . . . . . . . . . . . . 58
Dialling from the VIP memory . . . . . . . . . 16
Display contrast . . . . . . . . . . . . . . . 53 - 57
Display contrast . . . . . . . . . . . . . . . 53 - 57
E
Edit VIP entry . . . . . . . . . . . . . . . . . . . 25
elect from the phone book on the PABX . . . . 16
Electrostatic charges (ESD protection) . . . . . . 4
Enter or amend call number (MSN) . . . . . . 46
Enter, view or amend call number (MSN) . . . 55
Entering letters and numbers . . . . . . . . . . 12
Call forwarding (call transfer) . . . . . . . . . . 23
Error receiving an SMS message . . . . . . . . 31
Call Forwarding . . . . . . . . . . . . . . . . . . 38
et up call melodies and volume . . . . . . . . . 55
Call number of the SMS centre . . . . . . . . . 60
Ethernet connector . . . . . . . . . . . . . . . . . 8
Call number of the SMS centre . . . . . . . . . 60
F
Firmware. . . . . . . . . . . . . . . . . . . . . . 62
Call waiting settings. . . . . . . . . . . . . . . . 53
Call Waiting . . . . . . . . . . . . . . . . . . . . 23
Caller list . . . . . . . . . . . . . . . . . . . 25 - 26
Changing the label field . . . . . . . . . . . . . . 9
Checking costs . . . . . . . . . . . . . . . . 32 - 34
Forwarding a call . . . . . . . . . . . . . . . . . 17
Forwarding a call (Call Deflection) . . . . . . . 17
Function keys . . . . . . . . . . . . . . . . . . . 35
G
Gateway . . . . . . . . . . . . . . . . . . . . . . 58
63
Index
H
Hands free . . . . . . . . . . . . . . . . . . . . . 19
Headset . . . . . . . . . . . . . . . . . . . . . . . 7
Hotel functions . . . . . . . . . . . . . . . . . . 45
I
Initiate a call . . . . . . . . . . . . . . . . . . . . 15
Programming of a call number to a speed dial key48
R
Redialling . . . . . . . . . . . . . . . . . . . . . 18
Rejecting a call. . . . . . . . . . . . . . . . . . . 16
Reset . . . . . . . . . . . . . . . . . . . . . . . . 61
Initiating a call with a fixed call number . . . . 17
Reset - Restore basic settings . . . . . . . . . . 61
Initiating a call with a fixed call number (MSN) 17
Router key . . . . . . . . . . . . . . . . . . . . . 40
Initiating a call with a fixed call number (MSN) 17
S
Select from the caller list . . . . . . . . . . . . . 16
Intercept
During a call . . . . . . . . . . . . . . . . . . 21
Intercept (MCID) . . . . . . . . . . . . . . . . . 21
Intercept (MCID) . . . . . . . . . . . . . . . . . 21
Interrupt automatic redialling . . . . . . . . . . 19
IP settings . . . . . . . . . . . . . . . . . . . . . 58
K
Keypad . . . . . . . . . . . . . . . . . . . . . . . 22
L
LCR . . . . . . . . . . . . . . . . . . . . . . . . . 45
Select from the caller list . . . . . . . . . . . . . 16
Select from the phone book on the PABX . . . 44
Select telephone firmware version . . . . . . . 61
Service. . . . . . . . . . . . . . . . . . . . . 60 - 64
Set receiver volume . . . . . . . . . . . . . . . . 50
Set up call melodies and volume. . . . . . . . . 55
Set up call melodies and volume. . . . . . . . . 55
Set up Day/Night . . . . . . . . . . . . . . . . . 44
Set up direct call. . . . . . . . . . . . . . . . . . 44
LED caller list . . . . . . . . . . . . . . . . . . . 47
Set volume temporarily. . . . . . . . . . . . . . 50
Line AB. . . . . . . . . . . . . . . . . . . . . . . 39
Setting call waiting . . . . . . . . . . . . . . . . 51
Line AB. . . . . . . . . . . . . . . . . . . . . . . 39
Setting of «Info at end of call« . . . . . . . . . . 57
Line key . . . . . . . . . . . . . . . . . . . . . . 36
Setting of «UUS Dummy Message« . . . . . . . 57
Line keys . . . . . . . . . . . . . . . . . . . . . . 36
Setting the display language . . . . . . . . . . . 54
Loudspeaker . . . . . . . . . . . . . . . . . . . . 19
Setting up callback . . . . . . . . . . . . . . . . 21
M
M42IP am Ethernet-Anschluss . . . . . . . . . 9,8
Setting up the system telephone . . . . . . . . . 5
SMS and UUS1 text message . . . . . . . . 27 - 31
MSN assignment (Set call number for next call)37
SMS/UUS1 messages . . . . . . . . . . . . . . . 26
MWI . . . . . . . . . . . . . . . . . . . . . . . . 26
Speed dial with function keys . . . . . . . . . . 16
MWI - Message Waiting Indication. . . . . . . 26
Status info . . . . . . . . . . . . . . . . . . . . . 40
N
Name . . . . . . . . . . . . . . . . . . . . . . . . 60
64
Programme VIP entry . . . . . . . . . . . . . . 25
Subnet . . . . . . . . . . . . . . . . . . . . . . . 58
Switching the microphone on/off . . . . . . . . 19
NTBA. . . . . . . . . . . . . . . . . . . . . . . . 23
sys. . . . . . . . . . . . . . . . . . . . . . . . . . 58
O
Open hold for enquiry (Open.Hold) . . . . . . 41
System menu . . . . . . . . . . . . . . . . . 43 - 48
P
Pictograms . . . . . . . . . . . . . . . . . . . 9 - 11
System telephone settings. . . . . . . . . . 11 - 14
System telephone on the Ethernet connector . . 8
System telephony . . . . . . . . . . . . . . 35 - 42
Index
T
Team on/off . . . . . . . . . . . . . . . . . . . . 37
Telephone BIOS mode . . . . . . . . . . . . . . 63
Telephone name. . . . . . . . . . . . . . . . . . 60
Telephone user interface . . . . . . . . . . . . 1 - 2
Tone dialling (MFC dialling). . . . . . . . . . . 22
Transmission of the call number correctly set up 33
UUS1 block . . . . . . . . . . . . . . . . . . . . 26
V
Version . . . . . . . . . . . . . . . . . . . . . . . 61
View/delete costs of individual call numbers (MSN)
33
View/delete total costs . . . . . . . . . . . . . . 32
View/delete total costs . . . . . . . . . . . . . . 32
Viewing and deleting costs. . . . . . . . . . . . 32
U
Unpacking and positioning the system telephone5 10
Viewing the caller list. . . . . . . . . . . . . . . 26
Up0-connector . . . . . . . . . . . . . . . . . . . 6
W
Wake-up call. . . . . . . . . . . . . . . . . . . . 46
User on/off . . . . . . . . . . . . . . . . . . . . . 39
Voicemail . . . . . . . . . . . . . . . . . . . . . 38
65
Options
Advanced configuration . . . . . . . . . . . . . 46
AM line. . . . . . . . . . . . . . . . . . . . . . . 36
Bundle key . . . . . . . . . . . . . . . . . . . . . 37
Call forwarding (call transfer) . . . . . . . . . . 21
Call waiting . . . . . . . . . . . . . . . . . . . . 49
Line key . . . . . . . . . . . . . . . . . . . . . . 33
MSN assignment . . . . . . . . . . . . . . . . . 34
Programme VIP entry . . . . . . . . . . . . . . 23
SMS/UUS1 messages . . . . . . . . . . . . . . . 24
System menu . . . . . . . . . . . . . . . . . 40 - 45
View and delete costs . . . . . . . . . . . . . . . 30
VIP-memory. . . . . . . . . . . . . . . . . . . . 23
Voicemail . . . . . . . . . . . . . . . . . . . . . 35
67
68
(
(
69
70
Quick Install Guide
Quick Install Guide
Inquiry
b
g
Lift the receiver
Call
R
t
g
Enter call number
Brokering
b
g
Lift the receiver
Call
R
g >
t
S
Enter call number
Conn1...
conn2
Conference
b
g
Lift the receiver
Call
R
t
R
g
Lift the receiver Enter call number
Replace receiver
a
W
Replace receiver
S
g
Enter call number
l
Extended redialling
Conf
t
Call
Forward calls
a
S
g
Enter call number
Transfer with call notice
b
t
W
switch
S
t
transfer
O
Enter call number
O
or
Search for desired
call number
Search for desired call number
Callback on Busy
b
g
Lift the receiver
Call
b
t
g
S
a
Lift the receiver
Enter call number
Extension busy
callback
Replace receiver
Dialling the outgoing call number (MSN assignment)
O
a
t
Replace receiver
Enter call number
F
Replace receiver
Switch off call diversion
a
Replace receiver
S
msn
S
msn-1...
msn-3
Switch on call diversion
a
F
F
S
S
S
set
forward
delayed
busy fixed
S
b
g
Lift the receiver
Call
t
O
Enter call
number
msn-1...
msn-3
S
S
S
S
set
forward
off
msn-1...msn-3
O
Dial from the caller history, PABX phone book or VIP memory
a
S
<>
b
g
Replace receiver
list
Select entry
Lift the receiver
Call
71
Quick Install Guide
72
bintec elmeg GmbH
Südwestpark 94
D-90449 Nürnberg
For information on support and service offerings please visit our Website at
www.bintec-elmeg.com where, you will find a Service / Support area
Subject to modifications
Ausgabe 7 / 20131213