1
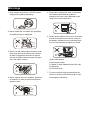
Warnings
1. Only connect this unit to a 12V DC power
supply with negative grounding.
5. Please don't change the fuse in the power
cord without professional guidance,
improper fuse may cause damage to this
using unit or even cause fire.
1
2. Never install this unit where the operation
for safety driving is restrained.
5
6. Please power off this unit at once and send
it back to the after-sales service center or
the dealer / distributor you purchased from
if one of the following symptoms is found:
2
3. Never use the video display function in the
front when driving to prevent the violation
of laws & regulations and also to reduce
the risk of traffic accident except using the
rear view video camera.
3
4. Never expose this unit, amplifier, speakers
to moisture or water to prevent electronic
sparks or fires.
4
6
(a) No audio output;
(b) No image output;
(c) Water or other obstacle enters the unit;
(d) Smoking;
(e) Peculiar smell.
7. To ensure safe driving, please adjust the
volume to a safe and comfort level in case
of emergency situations.
Precautions
1. Never disassemble or adjust the unit
without any professional guide. For
details, please consult any professional car
shop / dealer for inquiry.
2. If the front panel or TFT monitor is squalid,
please use a clean silicone cloth and
neutral detergent to wipe off the spot.
Using a rough cloth and non-neutral
detergent such as alcohol for cleaning may
result in scratching or decoloration to the
applicant.
3. If any abnormal behavior of the unit is
found, please refer to trouble shooting
guide of this manual. If no relevant
information is found,please press the
[RESET] key on the front panel to resume
factory default.
4. If you have parked the car in hot or cold
weather for a long time, please wait until
the temperature in the car becomes normal
before operating the unit.
5. Using in-car heater in low temperature
environment may result in beads coagulate
inside the unit, DO NOT use the unit in
this situation, eject the disc and wipe off
the bead on the disc. If the unit still doesn't
work after a few hours, please contact with
after-sales service center.
6. No fierce impact to the LCD monitor when
it is in open position for preventing the
damage to any mechanisms inside.
7. To prevent the damage to the screen,
avoid touching it with sharp objects.
8. The monitor employs auto motorizing
mechanism, please don't push, pull, or
swivel the monitor manually to prevent
damage to the core mechanism.
9. To provide a clear demonstration and an
alternative for easy understanding to the
operation of this unit, graphic illustrations
areused.However, these illustrations are
some different from the actual images
displayed on the screen.
10.During operating the unit, “
” will
display if the current operation is not
available or illegal.
11.Operate the unit correctly according to this
manual to prevent unnecessary problem.
The guarantee won't be valid if the problem
is caused by inappropriate operation.
Declaration
This product incorporates copyright
protection technology that is protected
by U.S patents and other intellectual
property rights. Use of this copyright
protection technology must be authorized
by Macrovision, and is intended for home
and other limited viewing uses only unless
otherwise authorized by Macrovision.
Reverse engineering or disassembly is
prohibited.
Contents
Before using
Front panel.............................................. 1
Remote control........................................ 2
Basic operations
Power on / off.......................................... 4
Audible beep confirmation....................... 4
Mute........................................................ 4
Open SOURCE MENU........................... 4
Playing source selection......................... 4
Volume adjustment.................................. 4
Audio control menu................................. 4
System reset........................................... 4
Change aspect ratio................................ 4
Image settings......................................... 4
RDS operations
AF function.............................................. 5
PS(Program service ) . ........................... 5
CT (Clock time)....................................... 5
RT (Radio text)........................................ 5
Radio mode
Select radio as playing source................ 6
Select one radio band............................. 6
Tune........................................................ 6
Preset station.......................................... 6
EQ Selection........................................... 6
Playback
Insert a disc............................................. 7
Eject the disc........................................... 7
Touch screen controls............................. 7
Using USB device................................... 7
Using SD/MMC card............................... 7
Play......................................................... 7
Pause...................................................... 7
Stop......................................................... 7
Fast rewind/Fast forward......................... 7
Play the next or previous file................... 8
Repeat playback..................................... 8
Repeat A-B.............................................. 8
Random playback................................... 8
DVD menu/title........................................ 8
Select audio channel............................... 8
Select subtitle language.......................... 8
PBC function........................................... 8
Zoom in /out............................................ 8
Playback information display................... 8
Rotate picture.......................................... 9
Select a particular file.............................. 9
Playback information............................... 9
On-screen control icons........................ 10
iPod mode
Accessing iPod mode.............................11
Pausing play...........................................11
Selecting a track.....................................11
Fast forward/Fast reverse......................11
Repeat play............................................11
Random play..........................................11
Search function......................................11
Bluetooth mode
Select bluetooth as playing source....... 12
Disconnect Bluetooth Device................ 12
Work modes of bluetooth module......... 12
Phone mode.......................................... 12
Other modes
AUX....................................................... 13
Camera................................................. 13
SWC...................................................... 13
Setup
Setup procedures.................................. 14
General................................................. 14
Language.............................................. 14
Misc....................................................... 14
Audio..................................................... 15
Hardware............................................... 15
RDS....................................................... 15
Adjust sound
Adjust volume........................................ 16
Mute...................................................... 16
Select preset equalizer.......................... 16
Adjust rader/balance............................. 16
Troubleshooting........................................ 17
Device connections
Notes of connection ............................ 19
Control cables....................................... 19
Parking brake cable connections ........ 20
Reverse driving cable connections....... 20
Installation and uninstall
ISO-DIN Installation.............................. 21
Installation using half-sleeve................. 22
Using the cosmetic trim ring.................. 22
Specifications............................................ 23
Appendix
Wiring diagram...................................... 24
Before using
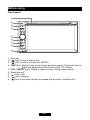
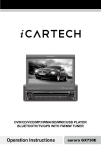
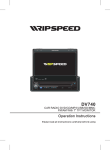
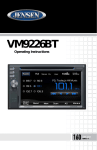
Front panel
ཱ
ི
ཱི
ུ
ཱུ
ྲྀ
ཷ
ླྀ
1.
2.
3.
4.
5.
6.
7.
8.
9.
Disc slot.
[ ] Key: Press to eject a disc.
[ ] Key: Press to turn the unit ON/OFF.
[SRC] Key: Switch to the current mode and main menu / Press and hold to
adjust the brightness and contrast of the TFT monitor.
[VOL / MUTE] Knob: Rotate to adjust volume / Mute audio outputs .
Reset the unit.
[
] Key: Call.
[
] Key: Hangup.
[ ] Key: Push down the key to release the key block, and take off it.
EN - 1
Before using
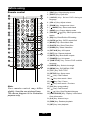
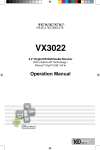
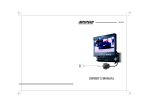
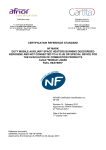
Remote control
1. [SRC] Key: Select playing source
2. [EJECT] Key: Eject disc
1
16
2
17
3. [AUDIO] Key: Select DVD dialogue
18
4. [VOL+/-] Key: Adjust volume
3
4
5
19
5. [ZOOM] Key: Image zoom in/out
6. [
21
7. [WIDE] Key: Change display mode
22
8. [PRESET
23
station
24
25
26
27
28
9. [EQ] Key: Enter/Exit the EQ setting
MUSIC
29
iPod
30
13.[VIDEO] Key: Show Video files
8
9
10
12
PHOTO
13
VIDEO
10.[GOTO/
/
] Key: Select preset radio
] Key: GOTO search/Call
11.[MUSIC] Key: Show Music files
12.[PHOTO] Key: Show Photo files
14.[RPT A-B] Key: A-B repeat
15.[RPT] Key: Repeat playback
31
16.[MUTE] Key: Mute audio outputs
17.[POWER] Key: Unit power
14
15
/BAND] Key: Select radio band
20
6
7
11
language
18.[SUBTITLE] Key: Select DVD subtitle
language
32
19.[ANGLE] Key: Select view angle
33
20.[MENU] Key: DVD MENU / PBC
21.[TILT ] Key: DVD TITLE
22.[SETUP] Key: Setup menu
23.[
] Key: Fast Forward
24.[
] Key: Auto search / Next
25.[
] Key: Play / Pause
26.[
] Key: Auto search / Previous
Note:
Your remote control may differ
slightly from the one pictured here.
The above diagram is for illustrative
purpose only.
27.[PIC] Key: Image setting
28.[
29.[ /
] Key: Fast Reverse
] Key: Stop Playback/Hangup
30.[DISP/CLEAR] Key: Display information/
Clear information
31.[0~9] Key: Numeric keys
32.[RDM] Key: Random playback
33.[INT] Key: Intro playback
EN - 2
Before using
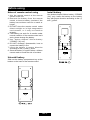
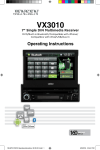
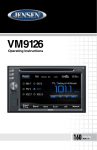
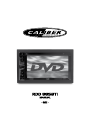
Install battery
Notes of remote control using
1. Aim the remote control at the remote
sensor on the unit.
2. Remove the battery from the remote
control or insert a battery insulator if the
battery has not been used for a month or
longer.
3. DO NOT store the remote control under
direct sunlight or in high temperature
environment, or it may not function
properly.
4. The battery can work for 6 months under
normal condition. If the remote control can't
work, please change the battery.
5. Use "button shaped" lithium battery
"CR2025" (3V) only.
6. DO NOT recharge, disassemble, heat or
expose the battery in fire.
7. Insert the battery in proper direction
according to the (+) and (-) poles.
8. Store the battery in a place where children
cannot reach to avoid the risk of accident.
Uninstall battery
Slide out the battery compartment tray at the
bottom on the back of the remote control.
EN - 3
Use button-shaped lithium battery "CR2025
(3V)" only. Insert the battery to the battery
tray with proper direction according to the (+)
and (-) poles.
Basic operations
Power on / off
turn the rotary encoder on the front panel.
When the volume level reaches "0" or "40", a
beep sounds, indicating that the adjustment
limit has been reached. The TFT screen
displays the volume level for 3 seconds.
Audible beep confirmation
Programmable turn-on volume
This feature allows the user to select a turnon volume setting regardless of the volume
setting prior to turning the unit off. To program
a specific turn-on volume level, turn the rotary
encoder to adjust the volume to the desired
turn-on volume. Push and hold the rotary
encoder while the blue speaker icon and level
indication is displayed on the screen. The
unit will beep to confirm your turn-on volume
setting.
Press the [
] key to turn the unit on. The
buttons on the front of the unit light up and
the current mode status appears on the LCD.
Press the [
] key to power off the unit.
An audible beep tone confirms each function
selection. The Beep tone can be disabled
through the Setup menu.
Mute
Press momentarily to activate the MUTE
function. Press again to resume normal
listening. If the MUTE wire is connected,
audio output mutes when a phone call is
received by the mobile phone.
Audio control menu
The Audio Control feature allows you to
easily adjust your audio system to meet the
acoustical characteristics of your vehicle,
which vary depending on the type of vehicle
and its measurements. Proper setting of the
Fader and Balance boosts the effects of the
cabin equalizer.
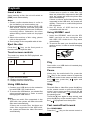
Open SOURCE MENU
Press the [SRC] key on the front panel or
remote control or touch the top left corner of
the screen to open the SOURCE MENU.
Do the above operation again to return to the
original source.
System reset
To correct a system halt or other illegal
operation, use the tip of a pen to press the
[RESET] key located on the panel. After a
system reset, the unit restores all factory
default settings.
Note:
If the unit is reset while a DVD is playing,
the DVD resumes play once the reset is
complete.
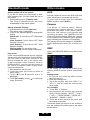
Playing source selection
You can use the touch screen to change
the source through the SOURCE MENU. To
access the SOURCE MENU, touch the top
left corner of the screen or press the [SRC]
key. Touch the DISC, RADIO, USB, SD,
CAMERA, BLUETOOTH (BT), AUXIN or
SWC to select the corresponding source.
Note:
If an iPod® is attached to the USB port, “iPod”
appears instead of the text “USB.”
Volume adjustment
Volume Increase/Decrease
To increase or decrease the volume level,
EN - 4
Change aspect ratio
Press the [WIDE] key on the remote control
to adjust the aspect ratio.
Image settings
1. Enter image setting mode
Press the [PIC] key on the remote control.
2. Select one item to adjust
Rotate to adjust volume knob or press the
[
]/[
] keys on the remote control.
3. Adjust the value
Rotate to adjust volume knob or press the
[ ]/[ ] keys on the remote control.
4. Exit image setting mode
To exit image setting mode, repeat the first
step or stop operation for some seconds.
RDS operations
The unit provides basic functions of RDS, including
PI (Program Identification), radio station name ,
RT (Radio Text), CT (Clock Time), AF (Alternative
Frequency), TA (Traffic Announcement) and PTY
(Program Type) Selection.
AF function
Alternative Frequencies Lists are used
for the same program service and used
in conjunction with the PI code (Program
Identification code) to assist automatic tuning.
Using this information, a radio can automatically
search out another station that is playing the
same material. This is useful when the station
you are listening to is fading out.
To activate AF function, touch the [AF] button on
the user interface.
To cancel this function, do the operation above
again.
Note:
During auto switching radio frequency, some
interference could be heard. Turning off AF
function can settle this problem.
TA function
The TA (Traffic Announcement flag) function
lets the unit receive traffic announcements
automatically no matter what media source
is playing back. The TA function can be
activated by a TP (Traffic Program) station
broadcasting traffic information.
W h e n TA i s a c t i v a t e d a n d a t r a f f i c
announcement is received, the current
playing source will be overridden by the traffic
announcement if the current radio band is FM
and the 'TA' indicator lights up, indicating that
the unit is waiting for traffic announcements.
The unit returns to the original source after
the traffic announcement has been received.
To activate TA function, touch the [TA] button
on the user interface.
To cancel this function, do the operation
above again.
PTY function
PTY is the abbreviation for Program Type
which is a code defining the type of program
being broadcast (e.g. News or Rock).
Six PTY options will display on the screen. To
view more PTY options, touch the scroll bar
and arrows on the screen.
EN - 5
When one PTY option is touched (e.g.
News), auto search for next available PTY
by increasing tuning frequency until the PTY
of the next station matches the current. If no
matched PTY has been found, the unit will
return to the original radio frequency.
PS(Program service )
Used for receiver displays of an 8 character
alpha numeric Program Service name which
may use Upper or Lower case characters, e.g.
{BBC_4_FM}, {Classic_}.
CT (Clock time)
Some stations broadcast the time and date
within the encoded RDS signal. The clock
time is automatically adjusted when "CT" is
set to "On".
RT (Radio text)
When this function is activated, the unit will
display short message data transmitted from
the provider, such as station information, the
name of the current broadcasting song and
the artist name.
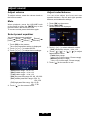
Radio mode
Select radio as playing source
Manual store
1. Tune to a station.
2. Touch [
].
3. Touch one of the channels P1 to P6 to save
the selected band.
Open the SOURCE MENU and then touch
[RADIO].
Auto store (AS)
To select six strong stations and store them in
the current band:
1. Select a band (if needed).
2. Touch [AS] on the on-screen controls to
activate the Auto Store function.
The new stations replace stations already
stored in that band. If you have already
set the preset memories to your favorite
stations, activating the Auto-Store feature
will erase those stations and enter the new
strong stations. This feature is most useful
when travelling in an area where you are
not familiar with the local stations.
Select one radio band
Press the [BAND] key on the remote control
] icon on the user interface
or touch the [
to select one radio band among FM1, FM2,
FM3, AM1 and AM2.
Preview scan (SCAN)
Tune
Auto tuning
Press the [
] / [
] key on the remote
control or touch the [
]/[
] icon on the
user interface to seek a higher / lower station.
To stop searching, repeat the operation above
or press other keys having radio functions.
To scan the AM or FM band for a preview
of available stations in your particular area,
] icon. The scan function will play
touch [
the first 5 seconds of each station.
When a desired station is reached, touch
] icon again. Play of the selected station
[
will continue and the preview scan will stop.
Note:
When a station is received, searching stops
and the station is played.
Manual tuning
During manual tuning, the frequency will be
changed in steps.
]/[
] key on remote control
Press the [
or touch the [
] / [
] icon on the user
interface to tune in a higher / lower station.
Touch the numeric keypad icon(
) and then
touch the numeric buttons to input the radio
station frequency numbers.
Preset station
The unit has 5 bands, such as FM1, FM2,
FM3, AM1, AM2, and each band can store 6
stations; hence the unit can store 30 stations
in total.
EN - 6
Recalling a station
1. Select a band (if needed).
2. Touch an on-screen preset button to select
the corresponding stored station.
Local radio station seeking (LOC)
When the Local function is on, only radio
stations with a strong local radio signal are
played. To activate the Local function in the
AM/FM tuner mode, touch [MORE] on the
screen. The Options tab is revealed. Touch
] icon and choose the Radio Local or
[
Distance. When the Local function is active,
the LOC indicator at the top of the screen
is illuminated. When the Distant function
is active, the DX indicator at the top of the
screen is illuminated.
EQ Selection
Touch the [
setup.
] icon and enter the EQ
Playback
Insert a disc
If there are no audio or video files, but
there are picture files supported in the USB
stick, the system will enter the picture files
menu automatically.
If there no above audio/video/picture files
supported in the USB stick, the screen will
display: There are no audio/video/picture
files supported.
2. N o t a l l k i n d s o f U S B d e v i c e s a r e
compatible with the unit.
Upon inserting a disc, the unit will switch to
[DISP] mode automatically.
Notes:
1. Please confirm whether there is a disc in
the unit before you insert another one.
2. Some recorded discs, such as CD-R, CDRW, DVD-R, DVD+R, DVD-RW, DVD+RW
cannot be played back because of different
recording status. Otherwise, the discs
without being closed could not be played
back.
3. About the cautions of disc using, please
refer to the appendix.
4. Don’t pledge to be compatible with all disc.
Using SD/MMC card
1. Insert the SD/MMC card into the SD/
MMC card slot on the extension box
with USB / SD / Audio Aux-in. Play starts
automatically.
2. To remove the card, you should first select
another source, in order to avoid damaging
the card.
Eject the disc
Press the [
] key on the front panel or
remote control to eject the disc.
Touch screen controls
USB
SD
The touch key areas for DVD playback are
outlined below:
Aux in
Play
Once a disc, or a USB device is inserted, play
starts automatically.
Pause
A - Open SOURCE MENU
B - Display playback information
C - Display onscreen control menu
When play the audio/vedio file, press the
[
] key on the remote control or open the
on-screen control icons menu and then touch
the [
] icon, press the [
] again and
continue to play.
Using USB device
Stop
1. Connect your USB device to the extension
box with USB / SD / Audio Aux-in.
2. To remove the USB device, you should first
select another source, in order to avoid
damaging the USB device.
For audio files or video files, press the [■] key
on the remote control or open the on-screen
control icons menu and then touch the [■]
icon to stop. Press the [
] to resume from
the pausing point.
Touch the [■] icon again to stop entirely, and
press the [■] key on the remote control. Press
] to playback from the top file.
the [
Notes:
1. If there are audio files supported in the
USB stick, the system will enter the audio
files menu automatically.
If there are no audio files, but there are
video files supported in the USB stick,
the system will enter the video files menu
automatically.
EN - 7
Fast rewind/Fast forward
For CD/MP3/WMA
Press the [
] key on the remote control or
Playback
DVD menu/title
] icon on the screen to
press and hold [
fast forward;
Press the [
] key on the remote control or
press and hold [
] icon on the screen to
fast rewind;
This function is only available for the DVD
discs having “MENU / TITLE”.
In full screen playing of DVD disc,touch
anywhere except for the upper right corner
to display menu on the screen, touch the
[MENU] icon and enter the DVD control menu
interface, touch the [TITLE] icon and enter
the TITLE control menu interface.
For DVD/VCD/MPEG
Press the [
] icon to fast forward.
] icon to fast rewind.
Press the [
Play the next or previous file
Press [
press [
Select audio channel
] to select the previous file, and
] to select the next file.
For DVD containing multi-language audio
files, press the [AUDIO] key on the remote
control repeatedly or open the on-screen
control icons menu and then touch the
[AUDIO] icon repeatedly to change dialogue
language.
Repeat playback
Press the [RPT] key on the remote control or
open the on-screen control icons menu and
then touch the [
] icon to switch the repeat
modes as below:
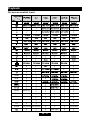
Disctype
DVD
VCD(PBC off)
Select subtitle language
Press the [SUBTITLE] key on the remote
control repeatedly or open the on-screen
control icons menu and then touch the
[SUBTITLE] icon repeatedly to choose a
subtitle language.
Repeatmode
Repeat chapter ė Repeat title ė Repeat off
Repeat single ė Repeat all ėRepeat off
CD
Repeat single ė Repeat folder ėRepeat allėRepeat off
MP3/WMA
Repeat single ė Repeat folder ėRepeat allėRepeat off
MPEG
Repeat single ė Repeat folder ėRepeat allėRepeat off
Picture
Repeat single ė Repeat folder ėRepeat allėRepeat off
PBC function
Note:
When play the VCD disc,open the [PBC]
function and the [repeat] function is abated.
This function is available for the VCD discs
with PBC function (Ver 2.0 or higher).
Press the [MENU] key on the remote control
or open the on-screen control icons menu
and then touch the [PBC] icon repeatedly to
activate this function.
Press again to cancel.
Repeat A-B
When a DVD, VCD is played back, you can
play back the contents between the time
points from A to B repeatedly:
Rep A-
ė
Rep A-B
ė
Notes:
1. When PBC is on, playback goes back to
the track list and starts from the first track.
2. When PBC is on, fast motion playback,
slow motion playback or skip search
is available but repeat playback and
searching for a particular chapter or track
is prohibited.
3. If you do the operation of random playback,
scan playback or searching playback when
PBC is on, PBC will be off automatically.
RepAB Off
Random playback
You can play audio tracks/files in random
order.
] repeatedly to turn
During play CD,touch [
random play on or off.
RANDOM [ON]: start random play
RANDOM [OFF]: cancel random play
Zoom in /out
Note:
when the [random] turn off,the unit resume
natural play from the current sequence.
During picture playing back, press the
[ZOOM] key on the remote control or open
the on-screen control icons menu and then
touch the [ ] icon to zoom the picture.
EN - 8
Playback
step
4. Display the information of searching: Title/
track
5. Exit the setup interface
Playback information display
Touch the top center area of TFT LCD when
playing back DVD and VCD discs and the
playback information will be displayed on the
top area of the TFT.
Playback information
Rotate picture
When one picture file is playback, you can
rotate the picture to get proper view angle by
press the [ANGLE] key on the remote control
repeatedly or open the on-screen control
icons menu and then touch the [
] icon
repeatedly.
Select a particular file
Touch the top center area of TFT LCD when
playing back DVD and VCD discs and the
playback information will be displayed on the
top area of the TFT.
For DVD
During playing the DVD disc / USB, touch
anywhere except for the down right corner to
display menu on the screen.
For DVD, touch the [
] icon to display
information and shown as below:
Title:
B 1. Input area
2. Choose area of the track and number
3. Delete the input track and number step by
step
4. Display the information of searching: Title/
track
5. Exit the setup interface
6. Choose item of the chapter or title.
] icon to display
For VCD / CD, touch the [
information and shown as below:
Track:
B 1. Disc type.
2. Elapsed time of the current title.
3. DVD Title information. "5/8" indicates that
this DVD has 8 titles and the title playing
back now is the fifth title.
4. DVD Chapter information. "2/16" indicates
that current title has 16 chapters and the
chapter playing back now is the second
chapter.
5. Indicates that the subtitle of this DVD has
been recorded in 6 languages and the
language displayed now is the second, that
is English.
6. Touch the [SUB TITLE] button repeatedly
to choose a subtitle language.
7. Multi angle.
8. Bitrate.
For VCD
1. Disc type.
2. Elapsed time of the current track.
3. PBC function indicator. "PBC On" indicates
that PBC function has been activated.
1. Input area
2. Choose area of the track and number
3. Delete the input track and number step by
EN - 9
Playback
On-screen control icons
More
Audio
Sub
Music
Music file
Photo
Photo file
Video
Video file
List
Playlist
1/2
SCAN
Slow playback Slow playback Slow playback
Scan playback Scan playback
Scan playback
DVD angle
EN - 10
iPod mode
Connect an iPod or iPhone to the USB
connector via an iPod cable.
Pausing play
1. Touch the [
] button on the bottom of the
screen to pause play.
2. Touch [
] button again to resume play.
Selecting a track
Track-up
Touch the [
] button to move to the beginning
of the next track.
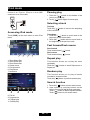
Accessing iPod mode
Touch [IPOD] on the main menu to enter iPod
menu.
1
2
3
Track-down
] button to move back to the
1. Touch the [
beginning of the current track.
2. Touch the [
] button twice to move back to
the beginning of the previous track.
Fast forward/Fast reverse
Fast forward
Touch and hold the [
Fast reverse
Touch and hold the [
4
5
6
7
1. Show Music files
2. Show Video files
3. Show Photo files
4. Search menu
5. Previous track
6. Play/Pause
7. Next track
] button.
] button.
Repeat play
This function allows you to play the track
repeatedly.
Touch the [
] button to select Repeat one or
Repeat all.
Random play
This function allows you to play all tracks
recorded in a random order.
Touch the [
] button to perform random play.
iPod
Search function
8
9
10
11
1. Touch the [ ] button to enter search menu.
2. Input number by touching buttons on the
screen, then touch [ ] to begin searching.
Touch [
] button to delete inputted number.
Touch [ ] button to exit search menu.
8. File list
9. Progress bar
10. Repeat play
11. Shuffle play
EN - 11
Bluetooth mode
Bluetooth is a wireless transmission way
for short distance. The built-in bluetooth
can connect with the mobile phones having
bluetooth function.
After connecting, you can control your mobile
phone through the unit.
You can make or receive phone calls with
Bluetooth-enabled phones through the unit.
You can also listen to music from a Bluetoothenabled device.
Select bluetooth as playing
source
Open the SOURCE MENU and then touch
[BT].
Phone mode
Pairing
Use this function to establish a connection
between the Bluetooth module and your
mobile phone.
1. Switch the work mode of the Bluetooth
module to phone mode, select the
Bluetooth sub-menu and then set the
"Bluetooth" options to "ON".
2. Turn on the Bluetooth function of your
mobile phone and start to search Bluetooth
devices.
3. After the name of the Bluetooth module
appears on the pairing list on your mobile
phone, you should select it. At this time,
a pairing code is required. The Bluetooth
module will exit pairing mode if there is no
pairing instruction from your mobile phone
during the pairing time (90s) and 'Phone
Pairing Fail' is displayed on the screen.
4. Enter the pairing code (1234 by default)
to initiate the pairing process. The paired
mobile phone name will display on the
screen.
Make a call
Disconnect Bluetooth Device
To disconnect one device,touch [
].
[
] is displayed.
Notes:
1. The device will also be disconnected
when the device is moved beyond the
operational range.
2. If you want to reconnect the device to the
unit, place it within the operational range.
Wo r k m o d e s o f b l u e t o o t h
module
The bluetooth module has two work modes,
which are phone mode and music mode.
Touch the mode switch icon to switch to its
corresponding mode. Under phone mode,
hand-free, call and other phone functions are
available. Under music mode, you can enjoy
the music played back by your mobile phone
through the speakers in your car and you can
control the playback.
The Bluetooth module will download phone
book and call records from your mobile phone
after pairing.
Touch [Call Histony] to search for phone
number from the following list:
∙ [Missed calls]
∙ [Received calls]
∙ [Dialed calls]
Touch [Phone Book] to select phone number
to dial, or touch [Direct Entry] to dial number
directly, then touch [ ] to dial.
Receive a call
By default,all incoming calls are received
automaticaly.
1. If there is incoming call, the incoming call
and "Incoming Call" appear on the screen.
Speak into the Bluetooth microphone.
2. When conversation ends, touch [Hangup]
to terminate the call.
Note:
You can select to receive calls manually by
set [Auto Answer] to [OFF] status.
EN - 12
Bluetooth mode
Other modes
Switch phone call to the mobile
If you do not want your passenger to hear
your incoming call, you can switch the call to
the mobile.
1. During talking, touch [Transfer Call].
The voice is transferred from the unit’s
loudspeaker to the mobile phone.
AUX
Adjust bluetooth settings
1. In Bluetooth menu,touch [Options].
The option menu is displayed.
2. Touch on the selected option to change the
setting.
∙ [Bluetooth]: To turn ON or OFF "Bluetooth"
function.
∙ [Auto Connect]: To turn ON or OFF "Auto
Connect" function.
∙ [Auto Answer]: To turn ON or OFF "Auto
Answer" function.
∙ [Pairing Code]: To set paring code.
∙ [DeviceName]: Device name is displayed.
This player is "camera ready". Before
accessing any camera features, you must
purchase and install a rear video camera.
Once the rear camera is connected and
operating properly, the CAMERA source
mode will become active. While the camera
is not installed, the CAMERA option appears
gray, indicating the function is not available.
The playing source will change to "CAMERA"
mode automatically when you reverse your
car.
Play music
If the connected Bluetooth device supports
Advanced Audio Distribution Profile(A2DP),
you can listen to the music stored on the
device through the unit. If the device also
supports Audio Video Remote Control
Profile(AVRCP), you can use the control on
the unit or its remote control to play music
stored on the device.
1. Pair the device with the unit.
2. Touch the upper left corner to return to
home menu.
3. To u c h [ B T ] , t h e B l u e t o o t h m e n u i s
displayed.
4. Touch [BT Audio], touch [ ] to start play
music via device.
External peripheral devices with RCA audio and
video outputs can be connected with the unit.
To enter AUX IN mode, open the SOURCE
MENU and then touch [Auxin].
Camera
SWC
Open the SOURCE MENU and then touch
[SWC].
By the setting, you can use the button of the
steering wheel to control volume, select track
etc.
Setting below:
1.To connect your steering wheel control
device to the unit.
2. Enter the setting menu.
3. Touch the anyone key from "KEY 1" to
"KEY 7", and the opposite function key
turns bright.
For example:
1. Touch "KEY 1" function ;
2. And long-touch the function key from the
car,the screen display: "MUTE" / "VOL+"
/ "VOL-" / "SEEK DOWN" / "SEEK UP" /
"SOURCE" / "BAND" / "NULL"
3. Touch the anyone key that you want, and
the setting is success.
Touch the nether left corner of the screen to
exit, the setting of the other keys as the same
as the above.
EN - 13
Setup
● Clock mode
12Hr: Clock displays 12 hour time using
AM and PM.
24Hr: Clock displays 24 hour time up to
23:59.
● Clock
Clock appears in the top right corner of the
screen during certain operations.
Note:
The AM/PM indication will change as you
continue to adjust the hour past 12.
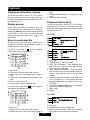
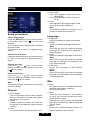
Setup procedures
1.Enter setup mode
Press the [SETUP] key on the remote control
or touch the setup icon [
] on the user
interface.
The following menu appears after entering
the setup mode.
The General sub-menu is highlighted by
default.
2.Select one sub-menu
Press the direction keys on the remote control
or Touch on the option to display/select an
option.
3.Select one item
Press the [
] / [
] key on the remote
control to select one item and then press the
[
] key to confirm.
4.Select one value
] / [
] key on the remote
Press the [
control to select one suitable value and then
press the [
] key to confirm.
Note:
All following settings can be done by touching
the option directly.
General
● Tuner Region
The unit provides several radio systems
and you can select a correct radio system
according to your country.
● Source
Choose a source for which you would like
to increase or decrease the relative volume
(LEVEL).
● Level
You can set relative volume level from 0 to 6.
Language
● Language
Select one language of system menu display.
● Subtitle
Select one subtitle language of DVD disc.
Note:
If the DVD disc does not contain the selected
language, the subtitle will be displayed in
default language.
● Audio
Select one dialogue language of DVD disc.
Note:
If the DVD disc does not contain the selected
language, the dialogues you listening to will
be in default language.
● DVD menu
Select one language of DVD MENU
display.
Note:
If the DVD disc does not contain the selected
language, the DVD MENU will be displayed
in default language.
Misc
● Beep
On: When turned on, an audible beep tone
confirms each function selection.
Off: No beep sounds.
● TsCal
When the touch function is not sensitive
or valid, you should calibrate the touch
screen by this function.
Calibrate the touch screen just following
the screen introductions after entering the
TS CAL mode.
● DRC
Employ the Dynamic Range Control for
better playback for low volumes.
EN - 14
Setup
● Load Factory
Select “Reset” to restore the factory default
settings for the Rating system only.
Audio
● Loudness
Select low frequency boost only or high
and low frequency boost.
● Subwoofer
Turns the subwoofer output on or off.
● Sub Filter
Select a crossover frequency to set a cutoff frequency for the subwoofer’s LPF (lowpass filter).
● Bass Q
Adjust the Q / Bandwidth of the Bass
response of the selected BCF (Bass
Center Frequency).
● Mid Q
Adjust the Q / Bandwidth of the Midrange
response of the selected MCF (Midrange
Center Frequency).
RDS
● RDS
Turn On/Off the RDS feature.
● CT
System time is synchronized with current
broadcast station time (Clock Time).
Setting this feature to On will automatically
set your system clock.
● TA VOL
You can adjust TA volume from 0 to 7.
Hardware
● Key Color
Choose the key backlight color Red or Blue.
● Camera In
Normal: Actual scenes shot by the camera
display on the TFT monitor while reverse
driving (just like what you are looking).
Mirror: The mirror images of actual scenes
display on the TFT monitor while
reverse driving (just like looking from the
rearview mirror).
● Video input
NTSC: Set the color system of the TFT
screen to NTSC.
PAL: Set the color system of the TFT
screen to PAL.
AUTO: Set the color system of the TFT
screen automatically by the unit according
to the input video formats.
EN - 15
Adjust sound
Adjust volume
Adjust rader/balance
To adjust volume, rotate the volume knob on
the host car audio.
You can also adjust the front and rear
speaker balance, the left and right speaker
balance,and subwoofer settings.
Mute
When playback, press the VOLUME knob
on the panel or press the [MUTE] key on the
remote control, the sound is cut off.
To resume sound, press the button again.
1. Touch [EQ] on the screen.
2. Touch [BAL-FAD].
Below options are displayed:
Select preset equalizer
You can select preset equalizer:
[Rock]
[Hip Hop]
[User]
[Dance]
[Latin]
[Rave]
[Urban]
[Acoustic]
1. Touch [EQ] on the screen.
The current equalizer setting is displayed.
2. Touch [ + ] or [ - ] to select an EQ.
3. Touch [ + ] or [ - ] to adjust below settings:
3. Touch [ + ] or [ - ] to select subwoofer volume.
∙ [Sub] subwoofer volume: -14 to +14.
4. Touch [
], [
] or [
], [
] to adjust
fader/balance value.
∙ [Fade] fader range:
-16 to +16 (F=front range, R=rear range)
∙ [Balance] balance range:
-16 to +16 (L=left range, R=rear range)
5. Touch [ ] on the screen to exit.
∙ [Bass] bass range: -14 to +14
∙ [Mid] middle range: -14 to +14
∙ [Treb] treble range: -14 to +14
∙ [Mcf] low pass filter range: 60, 80, 100, 200
∙ [Bcf] middle pass filter range: 0.5k, 1k,
1.5k, 2.5k
∙ [Tcf] high pass filter rang: 10k, 12.5k,
15k, 17.5k
4. Touch [ ] on the screen to exit.
EN - 16
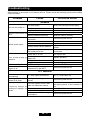
Troubleshooting
What appears to be trouble is not always serious. Please check the following points before calling
a service center.
Problem
Cause
Corrective action
General
Unit fuse blown.
Install new fuse with correct rating.
Unit can not power on
Car battery fuse blown.
Illegal operation
Remote control does not Battery depleted.
work
Battery installed incorrectly.
Improper audio output
connection.
Volume set too low.
Speakers damaged.
No/low audio output
Heavily biased volume balance.
Install new fuse with correct rating.
Reset the unit.
Change the battery.
Install the battery correctly.
Check wiring and correct.
Speaker wiring is in contact
with metal part of car.
Increase volume level.
Replace speakers.
Adjust the channel balance to center
position.
Insulate all speaker wiring
connections.
Piratic disc is in use.
Use original disc.
Speaker power rating does not
Poor sound quality or
Replace speakers.
match unit.
distortion
Wrong connections.
Check wiring and correct.
Speaker is shorted.
Check wiring and correct.
Tel-Mute malfunction
MUTE wire is grounded.
Check the ‘MUTE’ wiring and correct.
Unit resets itself when
Incorrect connection
Check wiring and correct.
engine is off
between ACC and BATT.
TFT monitor
Monitor does not open
TFT Auto Open is turned off.
automatically
Warning information is Parking break wiring is not
shown at all times
correct.
The color system of DVD disc
does not match the monitor.
Turn TFT Auto Open on.
Check wiring and correct.
Adjust the color system of the DVD
disc playing back or the monitor in
use.
Use original disc.
Replace cables.
Flashing image or
interference appears on Piratic disc is in use.
screen
Video cable damaged.
Improper video signal
Check wiring and correct.
connections.
EN - 17
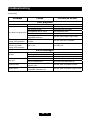
Troubleshooting
(Continued)
Problem
Cause
Corrective action
Disc playback
Cannot insert disc
A disc inside the unit already.
Disc is warped or scratched.
Disc is dirty or wet.
Incompatible disc is used.
Disc does not play back
Disc is inserted upside down.
Disc region code is not
compatible with unit.
PBC cannot be used
PBC is not available on
during VCD playback
the disc.
Repeat or search
function is invalid
PBC is on.
during VCD playback
Eject current disc and insert new one.
Use disc in good condition.
Clean disc with soft cloth.
Use compatible disc.
Insert disc with label side up.
Use disc with proper region code.
Use disc with PBC available.
Turn PBC off.
Error messages
No disc
Bad disc
Unknown disc
Region Error
Disc is dirty.
Disc is upside down.
No disc inside.
Disc is dirty.
Disc is upside down.
Disc format is not compatible
with this unit.
DVD region code is not
compatible with this unit.
EN - 18
Clean disc with soft cloth.
Insert disc with label side up.
Insert disc.
Clean disc with soft cloth.
Insert disc with label side up.
Use disc with compatible format.
Use disc with compatible region code.
Device connections
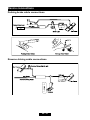
Notes of connection
● This unit is designed to be used in a vehicle with a 12-volt battery and negative grounding.
Before installing this unit to a recreational vehicle, a bus, or a truck, make sure the battery
voltage is appropriate for this unit to be used, otherwise, install a transformer by professional to
convert the output voltage to 12V.
● To avoid short circuit in the electrical system, ensure that the negative battery cable is
disconnected before installation.
● To prevent short circuit in the wiring and damaging to this unit, secure all wirings with cable
clamp or adhesive tape. Route the wirings in a secured, out of heating place without touching
any moving parts such as gear shift, handbrake, and seat rails to prevent the wiring insulation
being melted / wore off.
● Never pass the yellow power cord through the installation hole into the engine compartment
and connect to the car battery. Otherwise, a high possibility of serious short circuit to the
electrical system may be occurred.
● Replacing a new fuse with 15A rating when the old one is broken, using no fuse or fuse with
improper rating may cause damage to this unit or even fires. If a proper fuse is installed and
electrical problems still occur, please contact with any professional car shops for inquiry.
● DO NOT connect other equipments with the car battery to avoid battery overheating.
● Please make sure all the wiring connections & the cables of the speakers are well-insulated.
Otherwise, this unit may be damaged by short circuit.
● If there is no ACC available, Please connect ACC lead to the power supply with a switch.
● If an external power amplifier is connected, please don’t connect P.CONT lead to the power
lead of the external power amplifier, otherwise, electric spark or other damage may be resulted.
● Never ground the speaker output to prevent the damage to the built-in power amplifier.
● The minimum rating of the speakers connected to this unit is 50W with 4 to 8Ω impedance.
Control cables
Auto brightness control
To avoid the display being too bright at night time, if the headlight cable is connected to ILLUMI,
turning on the headlight will dim the backlight of the TFT LCD and vice versa.
Telephone mute
If the MUTE cable is connected to a car phone, other audio outputs mute when one call is
received by the car phone.
Reverse driving
If a rear view camera is connected with the unit, the playing source switches to CAMERA
automatically when you start reverse driving.
As the reverse driving is done, the playing source switches to the previous.
Parking brake
1. If "PRK SW" cable is connected to hand brake switch, video display on the TFT monitor will be
controlled by this function.
Parking cable function ceases when the playing source is CAMERA.
2. The monitor displays the blue screen with warning information to prevent the driver watching
video contents during driving, but the passengers at the rear seat can watch video contents
normally.
EN - 19
Device connections
Parking brake cable connections
Reverse driving cable connections
EN - 20
Installation and uninstall
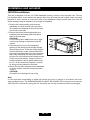
ISO-DIN Installation
This unit is designed to fit into a 2.0 DIN dashboard opening, found in many imported cars. The unit
has threaded holes in the chassis side panels which may be used with the original factory mounting
brackets of some vehicles to mount the radio to the dashboard. Please consult with your local car
stereo specialty shop for assistance on this type of installation.
1. Remove the existing factory radio from the
dashboard or center console mounting. Save
all hardware and brackets as they will be used
to mount the new radio.
2. Remove the factory mounting brackets and
hardware from the existing radio and attach
them to the new radio.
CAUTION!
Do not exceed M5 X 6MM screw size. Longer
screws may damage components inside the
chassis.
3. Place the radio in front of the dashboard
opening so the wiring can be brought through
the mounting sleeve. Follow the wiring diagram
carefully and make certain all connections are
secure and insulated with wire nuts or electrical
tape. After completing the wiring connections,
plug the ISO connectors into the mating sockets
on the rear of the chassis. Turn the unit on to
confirm operation (vehicle ignition switch must
be “on”). If the unit does not operate, re-check
all wiring until the problem is corrected.
4. Mount the new radio assembly to the dashboard
or center console using the reverse procedure
in step 1.
CAUTION!
Be careful not to damage the car wiring.
Note:
It is the end-users responsibility to install and operate this unit in a manner in accordance with local,
state and federal laws. The PARKING BRAKE wire MUST BE CONNECTED as directed in the manual.
CAUTION! Do not block the cooling fan exit. If blocked, the unit may overheat and become damaged.
EN - 21
Installation and uninstall
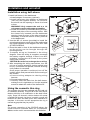
Installation using half-sleeve
1. Install half-sleeve in the dashboard.
a.Install adapter if necessary (optional).
b.Install half-sleeve into adapter or dashboard
(use only the supplied screws). Do not force
the sleeve into the opening or cause it to bend
or bow.
WARNING! Only connect the unit to a 12volt power supply with proper grounding.
c.Locate the series of bend-tabs along the top,
bottom and sides of the mounting sleeve. With
the sleeve fully inserted into the dashboard
opening, bend as many of the tabs outward as
necessary so that the sleeve is firmly secured
to the dashboard.
2. Use the M5 x 6 screws (provided) to install the
mounting brackets to each side of the radio using
the holes indicated in the diagram. DO NOT USE
OTHER SCREWS.
3. Place the radio in front of the dashboard opening
so the wiring can be brought through the
mounting sleeve.
4. Complete wiring as illustrated in the wiring
diagram. Once the wiring is complete, reconnect
the battery negative terminal. If there is no ACC
available, connect the ACC lead to the power
supply with a switch.
CAUTION! Be careful not to damage the car wiring.
5. After completing the wiring connections, turn the
unit on to confirm operation (ignition switch must
be on). If unit does not operate, recheck all wiring
until problem is corrected.
Once proper operation is achieved, turn off the
ignition switch and proceed with final mounting of
the chassis.
a.C onnect wiring adapter to existing wiring
harness.
b.Connect antenna lead.
c.Carefully slide the radio into the half-sleeve,
making sure it is right-side-up. Use the supplied
screws to attach the radio to the half sleeve.
Using the cosmetic trim ring
Two cosmetic trim rings are packaged with the head unit
for installation flexibility. This unit will fit into most import
dashes with little or no modification to the dash board/
cavity. Some US domestic vehicle dashes will accept
a Double-DIN chassis, but there is usually a small gap
between the radio and dash piece after installation is
complete. In this case, use the appropriate trim ring to
conceal any gaps that may be present.
Note:
For proper operation of the CD/DVD player, the
chassis must be mounted within 30° of horizontal.
Make sure the unit is mounted within this limitation.
EN - 22
Specifications
DVD/CD Player
Compatible Disc Media: DVD + R / RW (Single and Dual Layer) and CD-R / RW
Compatible Media Formats: CD-DA, MP3, WMA, VCD, Xvid, AVI, MPEG 1/2
Signal to Noise Ratio: >95dBA
Dynamic Range: >95dB
Frequency Response: 20Hz to 20 kHz, -3dB
Channel Separation: > 60dB @ 1 kHz
D/A Converter: High performance 24-bit / 192 kHz sample rate, Multi-Bit Sigma- Delta Modulator
Video
Format: NTSC, PAL (auto-detection)
Output: 1Vp-p (75-ohm)
Input: 1Vp-p (75-ohm)
FM Tuner
Tuning Range: 87.5MHz - 108.0MHz
Mono Sensitivity (-30dB): 9dBf
Quieting Sensitivity (-50dB): 15dBf
Alternate Channel Selectivity: 70dB
Signal to Noise Ratio @ 1 kHz: 58dB
Image Rejection: 80dB
Stereo Separation @ 1 kHz: >30dB
Frequency Response: 30Hz - 15 kHz, -3d
AM Tuner
Tuning Range: 522 kHz - 1620 kHz
Sensitivity (-20dB): 15uV
Signal to Noise Ratio @ 1 kHz: 50dB
Image Rejection: 60dB
Frequency Response: 50Hz - 2 kHz, -3dB
Monitor
Screen Size: 6.2" (Measured diagonally), 16:9 Widescreen
Screen Type: TFT Liquid Crystal Display (LCD) active matrix
Resolution: 1,152,000 sub pixels, 800x3 (W) X 480 (H)
General
Auxiliary Input impedance: 10k
Power Supply: 11 to 16VDC, negative ground
Power Antenna (Blue): 500mA max, current limited protection
Amplifier Remote (Blue/White): 500mA max, current limited protection
Operating Temperature: -20C ~ 65C
Fuse: 15-amp, mini ATO type
DIN chassis dimensions: 7" X 7" X 4" (178mm x 178mm x 100mm)
Weight of the Main Unit: 2.0Kg
Note:
Specifications are subject to possible modifciations for improvement without further notice.
EN - 23
Appendix
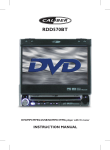
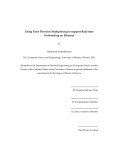
Wiring diagram
CAUTION!IMPORTANT: Incorrect wiring connections can damage the unit. Follow the
wiring instructions carefully, or have the installation handled by an experienced technician.
extension box with
USB/SD/Audio Aux-in
EN - 24