1
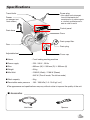
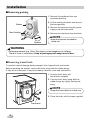
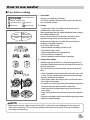
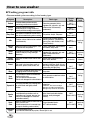
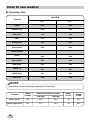
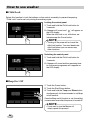
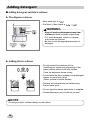
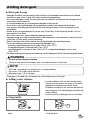
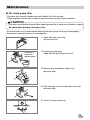
OWNER’S MANUAL WASHING MACHINE Before beginning installation, read these instructions carefully. This will simplify installation and ensure that the washer is installed correctly and safely. Leave these instructions near the washer after installation for future reference. F14U1TBS(0~9) F12U1TBS(0~9) MFL68128005 www.lg.com Contents Contents....................................2 Product Features......................3 Important safety instructions Important safety instructions....................4 Basic safety precautions..........................5 Save these instructions............................6 Specifications ...........................7 Installation Removing packing ...................................8 Removing transit bolts .............................8 Installation place requirements ................9 Connecting water supply hose...............11 Installation of drain hose........................13 Leveling .................................................14 How to use washer Operating washing machine ..................16 Care before washing..............................17 Washing program table..........................18 Extra options..........................................19 Operating data .......................................20 Control panel .........................................21 Options ..................................................22 - Pre Wash.............................................22 - Medic Rinse.........................................22 - Favorite................................................22 - Steam (Wash and Softener) ................22 - Delay ...................................................23 - Wash ...................................................23 - Temp. ..................................................23 - Rinse ...................................................23 - Spin .....................................................23 Child Lock ..............................................24 Beep On/Off...........................................24 Tub Clean ..............................................25 Door Lock & Detecting...........................25 Before using the Tag On function Turning on the NFC function of the smart phone...........................................26 The Tag On guide..................................27 2 Thank you for buying a LG Fully Automatic Washing Machine. Please read your owner’s manual carefully, it provides instruction on safe installation, use and maintenance. Retain it for future reference. Record the model and serial number of your washing machine. Model No. Serial No. Date of Purchase Regulation...............................27 Adding detergent Adding detergent and fabric softener.....28 Maintenance The water inlet filter ...............................30 The drain pump filter..............................31 Dispenser drawer...................................32 The washing drum .................................33 Cleaning your washer ............................33 Cold conditions ......................................33 Troubleshooting guide Diagnosing problem...............................34 Error message .......................................36 Using SmartDiagnosis™........................37 Terms of warranty ..................38 Operating Data........................39 Product Features Inverter Direct Drive system The advanced Brushless DC motor directly drives the drum without belt and pulley. 6 Motion Washer is able to perform various drum actions or a combination of different actions depending on the wash program selected. Combined with a controlled spin speed and the ability of the drum to rotate both left and right, the wash performance of the machine is greatly improved, giving you perfect results every time. Turbo Wash Wash cycle in under 1 hour with energy and water saving. Tag on This is a function that may use Diagnosis, Download Cycle, Washing Coach, One Touch Washing, etc. when you touch the Tag On logo of the washing machine by using your smartphone with NFC. More economical with Intelligent Wash system Intelligent Wash System detects the size of load and water temperature, and then determines the optimum water level and washing time to minimize energy and water consumption. 추가선택 예약 Child Lock The Child Lock prevents children from pressing any button to change the settings during operation. Low noise speed control system By sensing the amount of load and balance, it evenly distributes load to minimize the spinning noise level. Auto Restart Auto Restart allows the program to restart all by itself in case of power failure. It does from the stage where it stopped. SmartDiagnosis™ Should you experience any technical difficulty with your washing machine, it has the capability of transmitting data by phone to the Customer Information Center. The call center agent records the data transmitted from your machine and uses it to analyze the issue, providing a fast and effective diagnosis. 3 Important safety instructions READ ALL INSTRUCTIONS AND EXPLANATION OF THE INSTALLATION BEFORE USE. WARNING For your safety, the information in this manual must be followed to minimize the risk of fire or explosion, electric shock, or to prevent property damage, injury to persons, or death. Your Safety and the safety of others are very important. We have provided many important safety messages in this manual and on your appliance. Always read and obey all safety messages. This is the safety alert symbol. This symbol alerts you to potential hazards that can kill or hurt you and others. All safety messages will follow the safety alert symbol and either the word DANGER, WARNING or CAUTION. These words mean: DANGER You will be killed or seriously injured if you don’t immediately follow instructions. WARNING You can be killed or seriously injured if you don’t follow instructions. CAUTION You may be slightly injured or cause damage to the product if you do not follow instructions. All safety messages will tell you what the potential hazard is, tell you how to reduce the chance of injury, and tell you what can happen if the instructions are not followed. 4 Important safety instructions ■ Basic safety precautions WARNING To reduce the risk of fire, electric shock, or injury to persons when using the washer, follow basic precautions, including the following: • To reduce the risk of personal injury, adhere to all industry recommended safety procedures including the use of long sleeved gloves and safety glasses. Failure to follow all of the safety warnings in this manual could result in property, personal injury or death. • When the machine runs high temperature, the front door may be very hot. Don’t touch it. • Never reach into washer while it is moving. Wait until the drum has completely stopped. • To minimize the possibility of electric shock, unplug this appliance from the power supply or disconnect the washer at the household distribution panel by removing the fuse or switching off the circuit breaker before attempting any maintenance or cleaning. • When a product was under water, Please call service center. There is a risk of electric shock and fire. • Do not wash or dry articles that have been cleaned in, washed in, soaked in, or spotted with combustible or explosive substances (such as wax, oil, paint, gasoline, degreasers, drycleaning solvents, kerosene, etc.) which may ignite or explode. Oil may remain in the tub after a whole cycle resulting in fire during drying. So, do not load oiled clothes. • Keep the area underneath and around your appliances free of combustible materials such as lint, paper, rags, chemicals, etc. • The appliance is not intended for use by young children or infirm persons without supervision. Do not allow children to play on, with, or inside this or any other appliance. • Keep small animals away from the appliance. • Do not leave the washer door open. An open door could entice children to hang on the door or crawl inside the washer. • Before installation, check exterior damages. If it has, do not install. • Do not install or store the washer where it will be exposed to the weather. • Do not tamper with controls. • Do not repair or replace any part of the washer or attempt any servicing unless specifically recommended in the user-maintenance instructions or published user-repair instructions that you understand and have the skills to carry out. • The laundry process can reduce the flame retardant of fabrics. To avoid such a result, carefully follow the garment manufacturer’s wash and care instructions. • Do not slam the washer door closed or try to force the door open when locked. This could result in damage to the washer. 5 Important safety instructions ■ Basic safety precautions WARNING To reduce the risk of fire, electric shock, or injury to persons when using the washer, follow basic precautions, including the following: • When unplugging power cord, do not pull out by grasping the cord. Otherwise, the power cord may be damaged. • Never attempt to operate this appliance if it is damaged, malfunctioning, partially disassembled, or has missing or broken parts, including a damaged cord or plug. • Before discarding an old machine unplug it. Render the plug useless. Cut off the cable directly behind the appliance to prevent misuse. • Appliance connected to the water mains using new hose-sets. Old hosesets should not be reused. • Do not push down the door excessively, when washer door open. This could topple over the washer. ■ Save these instructions GROUNDING INSTRUCTIONS This appliance must be grounded. In the event of malfunction or breakdown, grounding will reduce the risk of electric shock by providing a path of least resistance for electric current. This appliance is equipped with a cord having an equipment-grounding conductor and grounding plug. The plug must be plugged into an appropriate outlet that is properly installed and grounded in accordance with all local codes and ordinance. • Do not use an adapter this will defeat the grounding plug. • If you don’t have the proper outlet, consult an electrician. WARNING Improper connection of the equipment-grounding conductor can result in electric shock. Check with a qualified electrician or serviceman if you are in doubt as to whether the appliance is properly grounded. Do not modify the plug provided with the appliance - if it does not fit the outlet, have a proper outlet installed by a qualified electrician. 6 Specifications Power plug Transit bolts • If the supply cord is damaged, it must be replaced by the manufacturer or its service agents or a similarly qualified person in order to avoid a hazard. Drawer (For detergent and fabric softener) Control panel Drain hose Drum Drain pump filter Door Drain plug Adjustable feet Cover cap ■ Name : Front loading washing machine ■ Power supply : 220 - 240 V~, 50 Hz ■ Size : 600 mm (W) 560 mm (D) 850 mm (H) ■ Weight : 63 kg ■ Max.Watt : 2100 W (Wash) / 1100 W (Steam) 0.45 W (The off-mode, The left-on mode) ■ Wash capacity : 8 kg ■ Permissible water pressure : 100 - 1000 kPa (1.0 - 10.0 kgf / cm2) The appearance and specifications may vary without notice to improve the quality of the unit. ■ Accessories Inlet hose Spanner 7 Installation ■ Removing packing 1. Remove the cardboard box and styrofoam packing. 2. Lift the washing machine and remove the base packing. Washer 3. Remove the tape securing the power supply cord and drain hose. Base Packing 4. Remove the inlet hose from the drum. NOTE Spanner • Keep the spanner provided for future use. WARNING • Packaging material (e.g. Films, Styrofoam) can be dangerous for children. There is a risk of suffocation ! Keep all packaging well away from children. ■ Removing transit bolts To prevent internal damage during transport, the 4 special bolts are locked. Before operating the washer, remove the bolts along with the rubber bungs. If they are not removed, it may cause heavy vibration, noise and malfunction. 1. Unscrew the 4 bolts with the spanner supplied. 2. Take out the 4 bolts along with the rubber bungs by slightly twisting the bung. NOTE • Keep the transit bolts for future use. 3. Close the holes with the caps supplied. Transit bolt 8 Installation ■ Installation place requirements Location Washer approx. 2cm • Level floor : Allowable slope under entire washer is 1˚ • Power outlet : Must be within 1.5 meters of either side of location of washer. Do not overload the outlet with more than one appliance. • Additional Clearance : For Wall, 10cm:rear / 2cm : right & left side Do not place or store laundry products on top of washer at any time. They can damage the finish or controls. Positioning • Install the washer on a flat hard floor. • Make sure that air circulation around the washer is not impeded by carpets, rugs, etc. • Never try to correct any unevenness in the floor with pieces of wood, cardboard or similar materials under the washer. • If it is impossible to avoid positioning the washer next to a gas cooker or coal burning stove,an insulating(85x60cm) covered with aluminum foil on the side facing the cooker or stove,must be inserted between the two appliance. • The washer must not be installed in rooms where the temperature can drop below 0°C. • Please ensure that when the washer is installed, it is easily accessible for the engineer in the event of a breakdown. • With the washer installed, adjust all four feet using the transit bolt spanner provided ensuring the appliance is stable, and a clearance of approximately 20mm is left between the top of the washer and the underside of any work-top. • This equipment is not designed for maritime use or for use in a mobile installations such as caravans, aircraft etc. Electrical connection • Do not use an extension cord or double adapter. • If the supply cord is damaged, it must be replaced by the manufacturer or its service agents or similarly qualified person in order to avoid a hazard. • Always unplug the machine and turn off the water supply after use. • Connect the machine to an earthed socket in accordance with current wiring regulations. • The appliance must be positioned so that the plug is easily accessible. • Repairs to the washing machine must only be carried out by qualified personnel. Repairs carried out by inexperienced persons may cause injury or serious malfunctioning. Contact your local service center • Do not install your washing machine in rooms where temperature below freezing may occur. Frozen hoses may burst under pressure. The reliability of the electronic control unit may be impaired at temperatures below freezing point. • If the appliance is delivered in the winter months and temperatures are below freezing : Place the washing machine at room temperature for a few hours before putting it into operation. 9 Installation CAUTION CAUTION concerning the Power cord • Most appliances recommend they be placed upon a dedicated circuit; that is, a single outlet circuit which powers only that appliance and has no additional outlets or branch circuits. Check the specification page of this owner's manual to be certain. • Do not overload wall outlets. Overloaded wall outlets, loose or damaged wall outlets, extension cords, frayed power cords, or damaged or cracked wire insulation are dangerous. Any of these conditions could result in an electric shock or fire. • Periodically examine the cord of your appliance, and if its appearance indicates damage or deterioration, unplug it, discontinue use of the appliance, and have the cord replaced with an exact replacement part by an authorized servicer. • Protect the power cord from physical or mechanical abuse, such as being twisted, kinked, pinched, closed in a door, or walked upon. Pay particular attention to plugs, wall outlets, and the point where the cord exits the appliance. If the appliance is supplied from a cord extension set or an electrical portable outlet device, The cord extension set on electrical portable outlet device must be positioned so that it is not subject to splashing or ingress of moisture. CAUTION • The appliance is not intended for use by young children or infirm persons without supervision. • Young children should be supervised to ensure that they do not play with appliance. BS plug safety details (for U.K. user) Green and Yellow(Earth) Brown(Live) Blue(Neutral) E L Fuse N Cord grip Important The wires in this mains lead are coloured in accordance with the following code: Green and yellow: Earth Blue: Neutral Brown: Live This appliance must be earthed. As the colours of the wires in the mains lead of this apparatus may not correspond with the coloured markings identifying the terminals in your plug, proceed as follows: The wire which is coloured Green and Yellow must be connected to the terminal in the plug which is marked with the letter E or by the earth symbol or coloured Green or Green and Yellow. The wire which is coloured Blue must be connected to the terminal which is marked with the letter N or coloured Black. The wire which is coloured Brown must be connected to the terminal which is marked with the letter L or coloured Red. If a 13 amp (BS 1363) plug is used, fit a 13 amp BS 1362 fuse. 10 Installation ■ Connecting water supply hose • Water supply pressure must be between 100 kPa and 1000 kPa (1.0 - 10.0 kgf / cm2). • Do not strip or crossthread when connecting inlet hose to the valve. • If the water supply pressure is more than 1000 kPa, a decompression device should be installed. • Periodically check the condition of the hose and replace the hose if necessary. Step1 : Check rubber seal inlet hose • Two rubber seals are supplied with the water inlet hoses. They are used for preventing water leaks. Make sure the connection to taps is sufficiently tight. Hose connector Rubber seal Step2 : Connect hose to water tap Type-A : Connecting Screw-type hose to tap with thread • Screw the hose connector onto water supply tap. Type-B : Connecting Screw-type hose to tap without thread Upper connector Rubber packing Fixing screw Plate Water supply hose 1. Unscrew the adapter ring plate and the 4 adapter retaining screws. 2. Push the adapter onto the end of the tap so that the rubber seal forms a watertight connection. Tighten the adapter ring plate and the 4 screws. 3. Push the water supply hose vertically upwards so that the rubber packing within the hose can adhere completely to the tap and then tighten it by screwing it to the right. 11 Installation Type-C : Connecting one touch type hose to tap without thread 1. Unscrew the adapter ring plate and the 4 adapter retaining screws. 2. Remove the guide plate if the tap is too large to fit the adapter. Ring plate Guide plate 3. Push the adapter onto the end of the tap so that the rubber seal forms a watertight connection. Tighten the adapter ring plate and the 4 screws. 4. Pull the connector latch plate down, push the inlet hose onto the adapter, and release the connector latch plate. Make sure the adapter locks into place. NOTE • After connecting inlet hose to water tap, turn on the water tap to flush out foreign substances (dirt, sand or sawdust) in the water lines. Let water drain into a bucket, and check the water temperature. Latch plate Step3: Connect hose to washer • Make sure that there are no kinks in the hose and that they are not crushed. When your washer has two valves. • The Inlet hose which has red connector is for the hot water tap. • If the washer has two valves, the energy is saved by using hot valve. NOTE • After completing connection, if water leaks from the hose, repeat the same steps. Use the most conventional type of faucet for water supply. In case the faucet is square or too big, remove the spacing ring before inserting the faucet into the adaptor. Please use the horizontal tap Horizontal tap 12 Extension tap Square tap Installation Installation of drain hose • The drain hose should not be placed higher than 100 cm above the floor. Water in the washer does not drain or drains slowly. about 100 cm • Securing the drain hose correctly will protect the floor from damage due to water leakage. max. 100 cm about 145 cm • If the drain hose is too long, do not force back into the washer. This will cause abnormal noise. about 105 cm • When installing the drain hose to a sink, secure it tightly with string. • Securing the drain hose correctly will protect the floor from damage due to water leakage. Laundry tub Hose Retainer max. 100 cm max. 100 cm Tie strap 13 Installation ■ Leveling 1. Leveling the washing machine properly prevents excessive noise and vibration. Install the appliance on a solid and level floor surface, preferably in a corner of the room. NOTE • Timber or suspended type flooring may contribute to excessive vibration and unbalance. Raise Lower 2. If the floor is uneven, turn the adjustable feet as required. (do not insert pieces of wood etc. under the feet) Make sure that all four feet are stable and resting on the floor and then check that the appliance is perfectly level. (use a spirit level) • Once the washer is level, tighten the lock nuts up towards the base of the washer. All lock nuts must be tightened. Lock Nut Tighten all 4 locknuts securely • Diagonal Check When pushing down the edges of the washing machine top plate diagonally, the machine should not move up and down at all (Please, check both directions). If machine rocks when pushing the machine top plate diagonally, adjust the feet again. NOTE • If the washing machine is installed on a raised platform, it must be securely fastened in order to eliminate the risk of falling off. 14 Installation Concrete floors • The installation surface must be clean, dry and level. • Install washer on a flat hard floor. Tile floors (Slippery floors) • Position each foot on the Tread Mate and level the machine to suit. (Cut Tread Mate into 70x70 mm sections and stick the pieces on to the dry tile where machine is to be placed.) • Tread Mate is a self adhesive material used on ladders & steps that prevents slipping. Wooden floors (Suspended floors) • Wooden floors are particularly susceptible to vibration. Rubber Cup • To prevent vibration we recommend you place rubber cups under each foot under washer at least 15mm thick, secured to at least 2 floor beams with screws. • If possible install the washer in one of the corners of the room, where the floor is more stable. • Fit the rubber cups to reduce vibration. • You can obtain the rubber cups (p/no.4620ER4002B) from the LG spares dept. NOTE • Proper placement and leveling of the washer will ensure long, regular and reliable operation. • The washer must be 100% horizontal and stand firmly in position. • It must not “Seesaw” across corners under load. • The installation surface must be clean, free from floor wax and other lubricant coatings. • Do not let the feet of the washer get wet. If feet of the washer get wet, slipping may occur. 15 How to use washer Operating washing machine 1. Sort Laundry. (Refer to 17 page) 2. Open the door and load laundry. 3. Touch the Power button. 4. Select a Program. (Refer to 18 ~ 20 page) Select options at this time (Refer to 22 ~ 25 page) ■ Options ■ Temperature ■ Spin Speed 5. Add detergent. (Refer to 28 ~ 29 page) 6. Touch the Start/Pause button. 16 How to use washer ■ Care before washing Wash temperature Normal machine wash Permanent press Delicate Hand wash Do not wash Sort laundry by... Soiling Wash temperature Colour Fabric type 1. Care Labels Look for a care label on your clothes. This will tell you about the fabric content of your garment and how it should be washed. 2. Sorting To get the best results, sort clothes into loads that can be washed with the same wash cycle. Water temperature and spin speed and different fabrics need to be washed in different ways. Always sort dark colors from pale colors and whites. Wash separately as dye and lint transfer can occur causing discolouration of white etc. If possible, do not wash heavily soiled items with lightly soiled one. • Soil (Heavy, Normal, Light) Separate clothes according to amount of soil. • Color (White, Lights, Darks) Separate white fabrics from colored fabrics. • Lint (Lint producers, Collectors) Wash lint producers and lint collectors separately. 3. Caring before loading Combine large and small items in a load. Load large items first. Large items should not be more than half the total wash load. Do not wash single items. This may cause an out-of-balance load. Add one or two similar items. • Check all pockets to make sure that they are empty. Items such as nails, hair clip, matches, pens, coins and keys can damage both your washer and your clothes. • Close zippers, hooks and strings to make sure that these items don’t snag on other clothes. • Pre treat dirt and stains by brushing a little detergent dissolved in water onto stains like collars and cuffs to help lift dirt. • Check the folds of the flexible gasket (gray) and remove any small articles. • Check inside of the drum and remove any item from a previous wash. • Remove any clothing or items from the flexible gasket to prevent clothing and gasket damage. NOTE • Before the first wash, select a cycle (Cotton 60°C, add a half load of detergent) allow the unit to wash without clothing. This will remove residues and water from the drum that may have been left during manufacturing. 17 How to use washer Washing program table • Recommended cycles according to the laundry type. Program Description Cotton Provides better performance by combining various drum motions. Cotton Large Provides optimised washing performance for a large amount of laundry with less energy consumption. Easy Care Fabric type Color fast garments (shirts, nightdresses, pajamas, etc) and soiled cotton load normally (underwear). This cycle is suitable for casual shirts that do not need ironing after washing. Polyamide, Acrylic, Polyester. Mix Enables various fabrics to be washed simultaneously. Various kind of fabrics except special garments. (Silk/delicate, sports wear, dark clothes, wool, Duvet/Curtains). Allergy Care Removes pet hair and allergens such as house mite and pollen. Cotton, underwear, pillow covers, bed sheets, baby wear. Silent Wash Provides less noise and vibration and saves money by using overnight electricity. Steam Refresh Removes wrinkles within 20mins with steam Color fast garments (shirts, nightdresses, pajamas, etc) and lightly soiled white cotton (underwear). Cotton mixed, Polyester mixed Dress shirts, blouses. Duvet Sports Wear Dark Wash 40°C (Cold to 95°C) 60°C (Cold to 60°C) Rating 40°C (Cold to 60°C) 40°C Less than (Cold to 40°C) 4.0 kg 60°C 40°C Less than (Cold to 60°C) 4.5 kg No choice 3 items Cotton bedding except special garments (delicates, wool, silk, etc.) 1 single with filling: duvets, pillows, blankets, size 40°C sofa covers with light filling. (Cold to 40°C) This cycle is suitable for sports wear such Coolmax, Gore-tex, fleece and Sympatex. as jogging clothes and running wear. Less than If it's possible for clothes to decolourate, 2.0 kg Dark garments made from cotton please use this cycle. 20°C or mixed fabrics. The cycle prevent decolorization. (Cold to 40°C) (Please use detergent for colored fabrics.) Speed 14 Gentle Care This cycle is for hand and machine washable delicate clothes such as washable wool, lingerie, dresses etc. (Please use detergent for machine washable woolens). Coloured laundry which is lightly soiled fast. 20°C CAUTION : Use less than 20g of (20°C to 40°C) detergent (for 2.0kg load) otherwise detergent may remain on the clothes. Wool, hand washable clothes. Delicate, easily damaged laundry. Wash off several kinds of stain such as wine, juice, dirt, etc. Cotton blended fabrics. (Water temperature is increased step NOT delicate clothes. by step for washing various stains.) Download For downloadable cycles. Cycle If you did not download any cycles, ‘Rinse+Spin’ is set. 18 Maximum Load This cycle is for large items such as bed cover, pillows, sofa covers, etc. This cycle provides fast washing time for small loads and lightly soiled clothes. Stain Care Proper Temp. Less than 2.0 kg 20°C Less than (Cold to 20°C) 1.5 kg 40°C Less than (30°C to 60°C) 3.0 kg How to use washer • Water Temperature: Select water temperature to suit wash cycles. Always follow garment manufacture’s care label or instructions when washing. • Set program at "Cotton Large 40°C (Half Load)", "Cotton Large 60°C (Half Load)", "Cotton Large 60°C (Full Load)" option for test in accordance in conformity with EN60456 and Regulation 1015/2010. - Standard 60°C cotton program : Cotton Large - Standard 60°C cotton program : Cotton Large - Standard 40°C cotton program : Cotton Large + 60°C (Full Load) + 60°C (Half Load) + 40°C (Half Load) (They are suitable to clean normally soiled cotton laundry.) (They are the most efficient programmes in terms of combined energy and water consumptions for washing that type of cotton laundry.) * Actual water temperature may differ from the declared cycle temperature. • The test results depend on water pressure, water hardness, water inlet temperature, room temperature, type and amount of load, degree of soiling utilized detergent, fluctuations in the main electricity supply and chosen additional options. NOTE • Neutral detergent is recommended. Extra options Program Turbo Wash Pre Rinse Intensive Rinse+ Wash Hold Medic Steam Rinse Wash Steam Favorite Delay Softer Cotton Cotton Large Easy Care Mix * Allergy Care Silent Wash * Steam Refresh Duvet Sports Wear Dark Wash Speed 14 * Gentle Care Stain Care * * : This option is automatically included in the cycle and can not be deleted. 19 How to use washer Operating data Max RPM Program F14** F12** Cotton 1400 1200 Cotton Large 1400 1200 Easy Care 1200 1200 Mix 1400 1200 Allergy Care 1400 1200 Silent Wash 1000 1000 Steam Refresh - - Duvet 1000 1000 Sports Wear 800 800 Dark Wash 1400 1400 Speed 14 800 800 Gentle Care 800 800 Stain Care 1200 1200 NOTE • Information of main washing programmes at half load. Program Time in minutes Remaining moisture content 1400 rpm 1200 rpm Water in Liter Energy in kWh Cotton (40°C) 96 40 % 53 % 55 0.72 Cotton Large (60°C) 221 51 % 53 % 35 0.43 20 How to use washer ■ Control panel Power Button Start/Pause Button SmartDiagnosis™ function is available only for the products with a SmartDiagnosis™ mark. LED display Program Button Power Options Program button • Touch and release your fingers to turn it on. • Programs are available according to the laundry type. • Touch and release your fingers after 1 second to turn it off. • Lamp will light up to indicate selected program. Start/Pause • This Start/Pause button is used to start wash cycle or pause the wash cycle. • If temporary stop of wash cycle is needed, touch the Start/Pause button. LED display • The display shows the settings, estimated time remaining, options, and status messages for your washer. The display will remain on through the cycle. • When in Pause, the power is turned off automatically after 4 minutes. Options • This allows you to select an additional cycle and will light when selected. • Use these buttons to select the desired cycle options for the selected cycle. 21 How to use washer ■ Options Pre Wash ( ) Steam (Wash and Softener) If the laundry is heavily soiled, “Pre Wash” cycle is effective. 1. Touch the Power button. 2. Select a cycle. 3. Touch the Pre Wash button. 4. Touch the Start/Pause button. Medic Rinse ( ) Steam Wash features enhanced washing performance with low energy consumption. Steam Softener sprays steam after spinning cycle to reduce creases and makes the laundry fluffy. 1. Touch the Power button. 2. For Steam Wash option, select steam cycles. For Steam Softener option, select Cotton or Cotton Large, Mix, Easy Care. 1. Touch the Power button. 3. Touch the Steam button once for Steam Wash. Touch the Steam button one more time (twice) for Steam Softener. Touch the Steam button one more time (three time) for Steam Wash and Steam Softener together. 2. Select a cycle. 4. Touch the Start/Pause button. For best results or for cleaner rinsing. This allows the final rinse to be heated to 40 degrees. 3. Touch the Medic Rinse button and set time required. 4. Touch the Start/Pause button. Favorite ( ) Favorite program allows you to store a customized wash cycle for future use. 1. Touch the Power button. Steam Wash ( ) • For heavily stained clothes, underwear or baby clothes. • Available with the Cotton, Cotton Large, Mix, Easy Care, Duvet, Allergy Care, Steam Refresh cycles. • Do not use Steam Wash for easily discoloured clothes and delicates such as wool, silk. 2. Select a cycle. 3. Select the cycle. (Washing method, number of rinses, spin speed, water temperature etc.) 4. Touch and hold Favorite program button for 3 seconds. The Favorite program is now stored for future use. To reuse the program, select Favorite program and touch the Start/Pause. 22 Steam Softener ( ) • Good to make Softens and fluffs fabrics after air drying. • Available with the Cotton, Cotton Large, Mix, Easy Care cycles. • Do not use Steam Softener for easily discoloured clothes and delicates such as wool, silk. • Depending on the kind of fabrics, softening performance may be different. How to use washer Delay ( ) You can set a time delay so that the washing machine will start automatically and finish after a specified time interval. NOTE Rinse ( • Rinse plus ( ) ) :Add rinse once. • Rinse Hold ( ): The cycle is paused until start button is touched again when rinse is finished. • The delay time is the time to the end of the programme, not the start. The actual running time may vary due to water temperature, wash load and other factors. 1. Touch the Power button. 2. Select a cycle. 3. Touch the Time Delay button and set time required. 4. Touch the Start/Pause button. Wash ( ) Spin • Turbo Wash ( ): Wash cycle in under 1 hour with energy and water saving. • Spin Speed level can be selected by touching 'Spin' button repeatedly. • Intensive ( ): If the laundry is normal and heavily soiled, “Intensive” option is effective. 1. Touch the Power button. • Spin Only 2. Touch the Spin button to select RPM. 3. Touch the Start/Pause. Temp. • By touching the Temp. button the water temperature can be selected. NOTE When you select "No Spin", it will still rotate for a short time with low speed to drain quickly. - Cold (0) - 20°C, 30°C, 40°C, 60°C, 95°C • Water temperature can be selected according to the program. 23 How to use washer ■ Child Lock Select this function to lock the buttons on the control assembly to prevent tampering. "Child Lock" can be set only during the washing cycle. Locking the control panel 1. Touch and hold the Child Lock button for 3 seconds. 2. A beeper will sound, and ' ' will appear on the LED display. When the child lock is set, all buttons are locked except the Power button. NOTE • Turning off the power will not reset the child lock function. You must deactivate child lock before you can access any other functions. Unlocking the control panel 1. Touch and hold the Child Lock button for 3 seconds. 2. A beeper will sound and the remaining time for the current programme will reappear on the LED display. ■ Beep On / Off 1. Touch the Power button. 2. Touch the Start/Pause button. 3. Touch and hold the Temp. and Rinse button simultaneously for three seconds to set Beep on/off function. Once the Beep on/off function is set, the setting is memorized even after the power is turned off. NOTE • If you want to turn the Beeper off, simply repeat this process. 24 How to use washer ■ Tub Clean ( ) Tub Clean is a special cycle to clean the inside of the washing machine. A higher water level is used in this cycle at higher spin speed. Perform this cycle regularly. 1. Remove any clothing or items from the washer and close the door. 2. Open the dispenser drawer and add Anti limescale(e.g. Calgon) to the main wash compartment. 3. Close the dispenser drawer slowly. 4. Power On and then touch and hold Tub Clean button for 3 seconds. Then ' ' and tub clean pictogram will be displayed on the LED display. 5. Touch the Start/Pause button to start. 6. After the cycle is complete, leave the door open to allow the washer door opening, flexible gasket and door glass to dry. NOTE • Do not add any detergent to the detergent compartments. • Excessive suds may generate and leak from the washer. CAUTION • If there is a child, be careful not to leave the door open for too long. ■ Door Lock & Detecting “Door Lock” - For safety reasons, the door will lock while machine is in use and the “Door Lock” icon will light up. You can safely open the door after the “Door Lock” icon turns off. • While "Detecting" is shown on the display the washing machine rotates slowly and detects how much laundry is loaded in the drum. It will take a short time. • 25 Before using the Tag On function • The Tag On function allows you to conveniently use the LG SmartDiagnosis™ and Cycle Download features to communicate with your appliance right from your own smart phone. • To use the Tag On function: 1. Download the LG Smart Laundry & DW App to your smart phone. 2. Turn on the NFC (Near Field Communication) function in your smart phone. • The Tag On function can only be used with most smart phones equipped with the NFC function and based on the Android operating system (OS). ■ Turning on the NFC function of the smart phone 1. Enter the "Settings" menu of the smart phone and select "Share & Connect" under "WIRELESS & NETWORKS". 2. Set "NFC" and "Direct Android Beam" to ON and select "NFC". 3. Check "Use Read and Write/P2P receive". NOTE • Depending on the smart phone manufacturer and Android OS version, the NFC activation process may differ. • Refer to the manual of your smart phone for details. 26 Before using the Tag On function ■ The Tag On guide Tag On position • Tag On: Look for the Tag On icon next to the LCD screen on the control panel. This is where you position your smart phone when using the Tag On function with the LG SmartDiagnosis™ and Cycle Download features of the LG Smart Laundry & DW App. • When you use the Tag On function, position your smart phone so that the NFC antenna on the back of your smart phone matches the position of the Tag On icon on the appliance. If you do not know the position of your NFC antenna, move your smart phone very slightly in a circular motion until the application verifies the connection. • Because of the characteristics of NFC, if the transmission distance is too far, or if there is a metal sticker or a thick case on the phone, transmission will not be good. In some cases, NFC-equipped phones may be unable to transmit successfully. • Press in the LG Smart Laundry & DW app for a more detailed guide on how to use the Tag On function. Regulation ■ EU Conformity Notice: LG Electronics hereby declares that this product is in compliance with the following Directives. R&TTE Directive 1995/5/EC 27 Adding detergent ■ Adding detergent and fabric softener The dispenser drawer • Main wash only ➔ • Pre Wash + Main Wash ➔ WARNING • Keep all washing detergents away from children as there is danger of poisoning. • Too much detergent, bleach or softener may cause an overflow. • Be sure to use the appropriate amount of detergent. Adding fabric softener • Do not exceed the maximum fill line. Overfilling can cause early dispensing of the fabric softener which could stain clothes. Close the dispenser drawer slowly. • Do not leave the fabric softener in the detergent drawer for more than 2 days. (Fabric softener could be harden) • Softener will automatically be added during the last rinse cycle. • Do not open the drawer when water is supplied. • Solvents(benzene, etc) should not be used. NOTE • Do not pour fabric softener directly on the clothes. 28 Adding detergent Detergent dosage • Detergent should be used according to the instruction of the detergent manufacturer and selected according to type, colour, soiling of the fabric and washing temperature. • If too much detergent is used, too many suds can occur and this will decrease the washing result or cause heavy load to the motor. • It is recommended that you use powdered detergent for best results. • If you wish to use liquid detergent follow guidelines provided by the detergent manufacturer. • You can pour liquid detergent directly into the main detergent drawer if you are starting the cycle immediately. • Please do not use liquid detergent if you are using ‘Time Delay’ as the liquid may harden, or if you have selected ‘Pre Wash’. • If too many suds occur, please reduce the detergent amount. • Detergent usage may need to be adjusted for water temperature, water hardness, size and soil level of the load. For best results, avoid oversudsing. • Refer to the label of the clothes, before choose the detergent and water temperature. • To use the washing machine, put the designated detergent only. - General powdered detergents for all types of fabric (Cold - 95°C) - Powdered detergents for delicate fabric (Cold - 40°C) - Liquid detergents for all types of fabric (Cold - 95°C) or designated detergents only for wool (Cold - 40°C) • For better washing performance and whitening, use the detergent with the General powdered bleach. WARNING • Do not let the detergent harden. Doing so may lead to blockages, poor rinse performance or bad odor. NOTE • Full load : according to manufacturer’s recommendation. • Part load : 3/4 of the normal amount. • Minimum load : 1/2 of full load. • Detergent is flushed from the dispenser at the beginning of the cycle. Adding water softener • A water softener, such as Anti-limescale (e.g. Calgon) can be used to cut down on the use of detergent in extremely hard water areas. Dispense according to the amount specified on the packaging. First add detergent and then the water softener. • Use the quantity of detergent as for soft water. Using tablet 1. Open the door and put tablets into the drum. 2. Load the laundry into the drum and close the door. 29 Maintenance • Before cleaning the washer interior, unplug the electrical power cord to avoid electrical shock hazards. • Turn off the stopcock if the machine is to be left for any length of time (e.g. holiday), especially if there is no floor drain(gully) in the immediate vicinity. The water inlet filter •" " icon will be displayed on the control panel when water does not enter the detergent drawer. • If water is very hard or contains traces of lime deposit, the water inlet filter may become clogged. It is therefore a good idea to clean it from time to time. 1. Turn off the water tap. 2. Unscrew the water inlet hose. 3. Clean the filter using a hard bristle brush. 4. Tighten up the inlet hose. 30 Maintenance The drain pump filter • The drain filter collects threads and small objects left in the laundry. Check regularly that the filter is clean to ensure smooth running of your machine. CAUTION • First drain using the drain hose and then open the pump filter to remove any threads or objects. Be careful when draining if the water is hot. • Allow the water to cool down before cleaning the drain pump, carrying out emergency emptying or opening the door in an emergency. 1. Open the lower cover cap. pull out the hose. 2 Container to collect the drained water. 2. Unplug the drain plug. Open the filter by turning to the left. 1 3. Remove any extraneous matter from the pump filter. 4. After cleaning, turn the pump filter and insert the drain plug. 5. Close the lower cover cap. 31 Maintenance Dispenser drawer • After a while, detergents and fabric softeners leave a deposit in the drawer. • It should be cleaned from time to time with a jet of running water. • If necessary it can be removed completely from the machine by pressing the catch downwards and by pulling it out. • To facilitate cleaning, the upper part of the fabric softener compartment can be removed. 1. Pull out the dispenser drawer. 2. Clean the dispenser drawer under water. 3. Clean inside the recess with a brush. 4. Insert the dispenser drawer. 32 Maintenance The washing drum • If you live in a hard water area, limescale may build up continuously in places where it cannot be seen and thus not easily removed. Over time the build up of scale clogs appliances, and if it is not kept in check these may have to be replaced. • Although the washing drum is made of Stainless steel, specks of rust can be caused by small metal articles (paper clips, safety pins) which have been left in the drum. • The washing drum should be cleaned from time to time. • If you use descaling agents, dyes or bleaches, make sure they are suitable for washing machine use. • Descaler may contain chemicals that may damage part of your washing machine. • Remove any spots with a stainless steel cleaning agent. • Never use steel wool. ■ Cleaning your washer Exterior • Proper care of your washer can extend its life. • The outside of the machine can be cleaned with warm water and a neutral non abrasive household detergent. • Immediately wipe off any spills. Wipe with damp cloth. • Try not to hit surface with sharp objects. • Do not use methylated spirits, diluents or similar products. Interior • Dry around the washer door opening, flexible gasket and door glass. • Run washer through a complete cycle using hot water. • Repeat process if necessary. • Dilute 5g of bleach with 5l of warm water. (1000 times dilution) • Wipe the gasket by using diluted bleach. (MUST wear the rubber gloves) • Dry up the gasket by using a dry cloth. • Open the door until it is completely dry. • Clean the gasket more than once a month. * use of undiluted bleach may damage parts of the washing machine. NOTE • To remove hard water deposits, use only cleaners labelled washer safe. ■ Cold conditions If the washer is stored in an area where freezing may occur or moved in freezing temperatures, follow these instructions to prevent damage to the washer: • Turn off water supply tap. • Disconnect hoses from water supply and drain water from hoses. • Plug electrical cord into a properly grounded electrical outlet. • Add 1gallon (3.8L) of nontoxic recreational vehicle(RV) antifreeze into an empty wash drum. Close the door. • Set spin cycle and let washer spin for 1minute to drain out all water. Not all of the RV antifreeze will be expelled. • Unplug electrical power cord, dry the drum interior, and close the door. • Remove dispenser drawer, drain and dry excess water from the compartments. • Store washer in an upright position. • To remove antifreeze from washer after storage, run empty washer through a complete cycle using detergent. Do not add wash load. 33 Troubleshooting guide • This washing machine is equipped with automatic safety functions which detect and diagnose faults at an early stage and react appropriately. When the machine does not function properly or does not function at all, check the following points before you contact your service provider. Diagnosing Problem Symptom Possible Cause Solution Rattling and clanking noise • Foreign objects such as coins or safety pins maybe in drum or pump. Stop washer, check drum and drain filter. If noise continues after washer is restarted, call your authorised service centre. Thumping sound • Heavy wash loads may produce a thumping sound. This is usually normal. If sound continues, washer is probably out of balance. Stop and redistribute wash load. Vibrating noise • Have all the transit bolts and packing been removed? • Are all the feet resting firmly on the ground? If not removed during installation, refer to Installation guide for removing transit bolts. Wash load may be unevenly distributed in drum. Stop washer and rearrange wash load. Water leaks. • Fill hoses or drain hose are loose at tap or washer. Check and tighten hose connections. • House drain pipes are clogged. Unclog drain pipe. Contact plumber if necessary. Too much detergent or unsuitable detergent may cause excessive foaming which may result in water leaks. Oversudsing Water does not enter washer or it enters slowly Water in the washer does not drain or drains slowly. 34 • Water supply is not adequate in area. Check another tap in the house. • Water supply tap is not completely open. Fully open tap. • Water inlet hose(s) are kinked. Straighten hose. • The filter of the inlet hose(s) clogged. Check the filter of the inlet hose. • Drain hose is kinked or clogged. Clean and straighten the drain hose. • The drain filter is clogged. Clean the drain filter Troubleshooting guide Symptom Possible Cause Washer does not start • Electrical power cord may not be plugged in or connection may be loose. Make sure plug fits tightly in wall outlet. • House fuse blown, circuit breaker tripped,or a power outage has occurred. Reset circuit breaker or replace fuse. Do not increase fuse capacity. If problem is a circuit overload, have it corrected by a qualified electrician. • Water supply tap is not turned on. Turn on water supply tap. • Check that the door is firmly shut. Close the door and touch the Start/Pause button. After touching the Start/Pause button, it may take a few moments before the washer begins to spin. The door must be locked before spin can be achieved. Add 1 or 2 similar items to help balance the load. Rearrange load to allow proper spinning. Washer will not spin Solution Door does not open Once machine has started, the door cannot be opened for safety reasons. Check if the "Door Lock" icon is illuminated. You can safely open the door after the "Door Lock" icon turns off. Wash cycle time delayed The washing time may vary by the amount of laundry, water pressure, water temperature and other usage conditions. If an imbalance is detected or if the suds removing programme is on, the wash time shall be increased. Fabric softener overflow Softeners dispensed too early Too much softener may cause an overflow. Follow softener guidelines to ensure appropriate amount is used. Do not exceed the maximum fill line Close the dispenser drawer slowly. Do not open the drawer during the wash cycle. 35 Troubleshooting guide Error Messages Symptom Possible Cause Solution • Water supply is not adequate in area. • Water supply taps are not completely open. • Water inlet hose(s) are kinked. • The filter of the inlet hose(s) are clogged. Check another tap in the house. Fully open tap. • Drain hose is kinked or clogged. • The drain filter is clogged. Clean and straighten the drain hose. Clean the drain filter. • Load is too small. • Load is out of balance. • The appliance has an imbalance detection and correction system. If individual heavy articles are loaded (e.g. bath mat, bath robe, etc.) this system may stop spinning or even interrupt the spin cycle altogether. • If the laundry is still too wet at the end of the cycle, add smaller articles of laundry to balance the load and repeat the spin cycle. Add 1 or 2 similar items to help balance the load. Rearrange load to allow proper spinning. • Ensure door is not open. Close the door completely. If “ , ” is not released, call for service. Straighten hose(s). Check the filter of the inlet hose. Unplug the power plug and call for service. • Water overfills due to the faulty water valve. Close the water tap. Unplug the power plug. Call for service. • Water level sensor has malfunctioned. 36 • Over load in motor. Allow the washer to stand for 30 minutes to allow the motor to cool; then restart the cycle. • Water leaks. Call for service. Troubleshooting guide NOTE • SmartDiagnosis™ function is available only for the products with a SmartDiagnosis™ mark. In case of a mobile phone with static option, the SmartDiagnosis™ function might not operate. Using SmartDiagnosis™ • Only use this feature when instructed to do so by the call center. The transmission sounds similar to a fax machine, and so has no meaning except to the call center. • SmartDiagnosis™ cannot be activated if the washer does not power up. If this happens, then troubleshooting must be done without SmartDiagnosis™. If you experience problems with your washer, call to Customer Information Center. Follow the call center agent's instructions, and do the following steps when requested: 1. Press the Power button to turn on the washer. Do not press any other buttons or turn the cycle selector knob. 2. When instructed to do so by the call center, place the mouthpiece of your phone very close to the Power button. Max. 10 mm 3. Touch and hold the “Temp.” button for three seconds, while holding the phone mouthpiece to the icon or Power button. 4. Keep the phone in place until the tone transmission has finished. This takes about 6 seconds, and the display will count down the time. • For best results, do not move the phone while the tones are being transmitted. • If the call center agent is not able to get an accurate recording of the data, you may be asked to try again. 5. Once the countdown is over and the tones have stopped, resume your conversation with the call center agent, who will then be able to assist you using the information transmitted for analysis at the call to Customer information center. • Smart Diagnosis is a troubleshooting feature designed to assist, not replace, the traditional method of troubleshooting through service calls. The effectiveness of this feature depends upon various factors, including, but not limited to, the reception of the cellular phone being used for transmission, any external noise that may be present during the transmission, and the acoustics of the room where the machine is located. Accordingly, LG does not guarantee that Smart Diagnosis would accurately troubleshoot any given issue. 37 Terms of Warranty Disposal of your old appliance 1. When this crossed-out wheeled bin symbol is attached to a product it means the product is covered by the European Directive 2002/96/EC. 2. All electrical and electronic products should be disposed of separately from the municipal waste stream via designated collection facilities appointed by the government or the local authorities. 3. The correct disposal of your old appliance will help prevent potential negative consequences for the environment and human health. 4. For more detailed information about disposal of your old appliance, please contact your city office, waste disposal service or the shop where you purchased the product. NOTE • When disposing of the appliance, cut off the mains cable, destroy the plug and disable the door lock to prevent children being trapped inside. What Is Not Covered: • Service trips to your home to teach you how to use the product. • If the product is connected to any voltage other than that shown on the rating plate. • If the fault is caused by accident, neglect, misuse or Act of God. • If the fault is caused by factors other than normal domestic use or use in accordance with the owner's manual. • Provide instruction on use of product or change the set-up of the product. • If the fault is caused by pests for example, rats or cockroaches, etc. • Noise or vibration that is considered normal, for example water drain sound, spin sound, or warning beeps. • Correcting the installation. For example, levelling the product, adjustment of drain. • Normal maintenance which is recommended by the owner's manual. • Removal of foreign objects / substances from the machine, including the pump and inlet hose filter, For example, grit, nails, bra wires, buttons etc. • Replace fuses in or correct house wiring or correct house plumbing. • Correction of unauthorized repairs. • Incidental or consequential damage to personal property caused by possible defects with this appliance. • If this product is used for commercial purpose, it is not warranted. (Example : Public places such as public bathroom, lodging house, training center, dormitory) If the product is installed outside the normal service area, any cost of transportation involved in the repair of the product, or the replacement of a defective part, shall be borne by the owner. 38 Operating Data Product fiche_Commission Delegated Regulation(EU) No 1061/2010 Supplier’s name or trade mark Supplier’s model Rated capacity Energy efficiency class LG F14U1TBS(0~9) F12U1TBS(0~9) 8 8 kg A+++ A+++ Awarded an “EU Ecolabel award” under Regulation (EC) No 66/2010 No No Weighted annual energy consumption (AEC) in kWh per year based on 220 standard washing cycles for cotton programmes at 60°C and 40°C at full and partial load, and the consumption of the low-power modes. Actual energy consumption will depend on how the appliance is used. 117 117 kWh / year - The standard 60°C cotton programme at full load 0.37 0.37 kWh - The standard 60°C cotton programme at partial load 0.43 0.43 kWh - The standard 40°C cotton programme at partial load 0.65 0.65 kWh Weighted power consumption of the off-mode and of the left-on mode. 0.45 0.45 W Weighted annual water consumption (AWC) in litres per year based on 220 standard washing cycles for cotton programmes at 60°C and 40°C at full and partial load. Actual water consumption will depend on how the appliance is used. 9000 9000 litres / year Spin-drying efficiency class on a scale from G (least efficient) to A (most efficient). B B 1400 1200 rpm 51 53 % The energy consumption Maximum spin speed attained for the standard 60°C cotton programme at full load or the standard 40°C cotton programme at partial load, whichever is the lower, and remaining moisture content attained for the standard 60°C cotton programme at full load or the standard 40°C cotton programme at partial load, whichever is the greater. The “Cotton Large 60°C / 40°C + Intensive” are the standard washing programmes to which the information in the label and the fiche relates, that these programmes are suitable to clean normally soiled cotton laundry and that they are the most efficient programmes in terms of combined energy and water consumption; The programme time - The standard 60°C cotton programme at full load 275 275 min. - The standard 60°C cotton programme at partial load 221 221 min. - The standard 40°C cotton programme at partial load 216 216 min. The duration of the left-on mode (Tl) 10 10 min. 52 (Wash) 52 (Wash) dB(A) 73 (Spin) 72 (Spin) dB(A) Airborne acoustical noise emissions expressed in dB(A) re 1 pW and rounded to the nearest integer during the washing and spinning phases for the standard 60°C cotton programme at full load; Free Standing 39 For U.K. Customer CUSTOMER SERVICES Tel. Fax. LGEUK SERVICE WEB-SITE : +44-(0) 844 847 LGLG(5454) : +44-(0) 844 847 1413 : http://www.lg.com