1
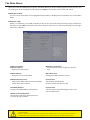
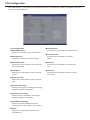
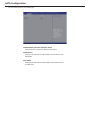
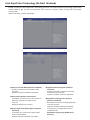
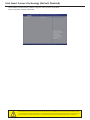
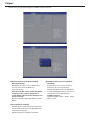
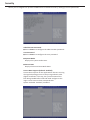
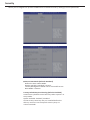
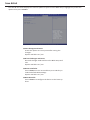
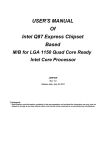
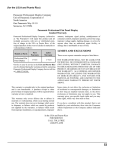
BIOS Setting Guide
Schnellstartanleitung / Guide de démarrage rapide / Руководство по быстрой сборке
Przewodnik użytkownika / Hızlı Başlangıç Kılavuzu
BIOS Setup
BIOS (Basic Input and Output System) is a UEFI interface that allows you to setup and configure your
system for optimum use. Using your mouse and keyboard, users can change BIOS settings, monitor CPU
temperature, select the boot device priority and view system information such as the CPU name, DRAM
capacity, and the BIOS version.
To access the BIOS setup program, press the <F2> key during the POST (Power-On Self-Test) when the
power is turned on.
BIOS Setup Program Function Keys
<↑><↓>
Move the selection bar to select an item
<←><→>
Move the selection bar to select the screen
<Enter> or <Double Click>
Execute command or enter the submenu
<Esc> or <Right Click>
Main Menu: Exit the BIOS Setup program
Submenus: Exit current submenu
■
■
■
■
■
■
<+>
Increase the numeric value or make changes
<->
Decrease the numeric value or make changes
<F1>
General Help
<F2>
Restore the previous BIOS settings for the current submenus
<F3>
Load the Optimized BIOS default settings for the current submenu
<F4>
Save all the changes and exit the BIOS Setup program
Main
This setup page includes all the items in standard compatible BIOS
Advanced
This setup page includes all the items of BRIX enhanced features.
Chipset
Platform Controller Hub additional features configuration.
Boot
This setup page provides items for configuration of boot sequence.
Security
Change, set or disable supervisor and user password. Configuration supervisor
password allows you to restrict access to the system and BIOS Setup.
A supervisor password allows you to make changes in BIOS Setup.
A user password only allows you to view the BIOS settings but not to make
changes.
Save & Exit
Save all the changes made in the BIOS Setup program to and exit. (Pressing <F10>
can also carry out this task.)
Abandon all changes and the previous settings remain in effect. Pressing <Y> to
the confirmation message will exit BIOS Setup. (Pressing <Esc> can also carry out
this task.)
BIOS flashing is potentially risky, if you do not encounter problems of using the current BIOS version, it is
recommended that you don’t flash the BIOS. To flash the BIOS, do it with caution. Inadequate BIOS flashing may
result in system malfunction.
● It is recommended that you not alter the default settings (unless you need to) to prevent system instability or
other unexpected results. Inadequately altering the settings may result in system’s failure to boot. If this occurs,
try to clear the CMOS values and reset the board to default values.
●
The Main Menu
Once you enter the BIOS Setup program, the Main Menu (as shown below) appears on the screen. Use
arrow keys to move among the items and press <Enter> to accept or enter other sub-menu.
■
■
Main Menu Help
The on-screen description of a highlighted setup option is displayed on the bottom line of the Main
Menu.
Submenu Help
While in a submenu, press <F1> to display a help screen (General Help) of function keys available for
the menu. Press <ESC> to exit the help screen. Help for each item is in the Item Help block on the right
side of the submenu.
BIOS Information
■ Product Name
Displays product name.
■
■
■
Memory Frequency
Displays the memory frequency information.
BIOS Version
Displays version of the BIOS.
ME FW Version
Displays the ME firmware version.
Build Data and Time
Displays the date and time when the BIOS
setup utility was created.
System Date
Set the date following the
weekly-month-day-year format.
LAN MAC Address
Displays the MAC address information.
Memory Information Size
Determines how much total memory is
present during the POST.
System Time
Set the system time following the hour-minute-second format.
If you do not find the settings you want in the Main Menu or a submenu, press <Ctrl> + <F1> to access more
advanced options.
● When the system is not stable as usual, select the Restore Defaults item to set your system to its defaults.
● The BIOS Setup menus described in this chapter are for reference only and may differ by BIOS version.
●
Advanced Menu
The Advanced menu display submenu options for configuring the function of various hardware components. Select a submenu item, then press <Enter> to access the related submenu screen.
■
■
■
■
■
■
CPU Configuration
Configures the CPU features in this entry.
SATA Configuration
Configures the SATA settings in this entry.
H/W Monitor
Displays a real-time record of the CPU / system
temperature and fan speed.
Intel Rapid Start Technology
Enables BRIX to get up and running faster from the
deepest sleep, saving time and power consumption.
Intel Smart Connect Technology
Allows BRIX to automatically update programs while
system suspended.
Intel Anti-Theft Technology Configuration
Makes BRIX useless to thieves with immediate
shutdown.
CPU Configuration
Your CPU features / instructions are displayed and can be individually enabled / disabled in the CPU
features list showed below.
CPU Configuration
■ CPU Model Name
Displays the processor type information.
■
■
■
■
■
■
■
■
■
■
CPU Signature
Displays the processor ID information.
Microcode Patch
Displays the information of the processor
microcode patch.
CPU Speed
Displays the information of the processor
speed.
Processor Cores
Displays the information of the processor
core.
Intel HT Technology
Displays Intel Hyper Threading Technology
function support information.
Intel VT-x Technology
Displays Intel Virtualization Technology
function support information.
Intel SMX Technology
Displays Intel Safer Mode Extensions
Technology function support information.
64-bit
Displays the supported information of
installed CPU.
■
■
L1 Data Cache
Displays the information of L1 Data Cache.
L1 Code Cache
Displays the information of L1 Code
Cache.
L2 Cache
Displays the information of L2 Cache per
Core.
L3 Cache
Displays the information of total L3 Cache
per socket.
CPU Configuration
■
■
■
■
■
■
■
Intel Virtualization Technology (Default: Enabled)
Select whether to enable the Intel Virtualization
Technology function. Intel VT allows a single platform
to run multiple systems in independent partitions.
Option available: Enabled / Disabled.
EIST (Default: Enabled)
EIST (Enhanced Intel SpeedStep Technology) allows the
system to dynamically adjust processor voltage and
core frequency, which can result in decreased average
power consumption and decreased average heat
production.
Option available: Enabled / Disabled.
Turbo Mode (Default: Enabled)
Turbo Mode (Intel Turbo Boost Technology) automatically allows processor cores to run faster than the
rated operating frequency if they’re operating below
power, current, and temperature specification limits.
Option available: Enabled / Disabled.
CPU C3 Report (Default: Enabled)
Allows CPU enter C3 state.
Option available: Enabled / Disabled.
CPU C6 Report (Default: Enabled)
Allows CPU enter C6 state.
Option available: Enabled / Disabled.
CPU C7 Report (Default: CPU C7s)
Allows CPU enter C7 state.
Option available: CPU C7s / CPU C7 / Disabled.
CFG lock (Default: Enabled)
Locks cuurent c state until the next reset occurred.
Option available: Enabled / Disabled.
SATA Configuration
Let you select the on chip SATA type.
■
■
■
SATA Mode Selection (Default: AHCI)
SATA controller enable its AHCI functionality.
SATA Port
Displays the hard drive information connected to your
SATA port.
m-SATA
Displays the hard drive information connected to your
m-SATA slot.
H/W Monitor
Enter to view the Hardware Monitor screen which displays a real-time record of the CPU / system
temperature and fan speed.
■
■
■
■
■
FAN 1 / 2 Fail Detect (Default: Enabled)
Enable FAN 1 / 2 stop warming function.
Option available: Enabled / Disabled.
FAN 1 / 2 SMART FAN Control (Default: Enabled)
Enable FAN 1 / 2 SMART FAN function.
Option available: Enabled / Disabled.
GPU Temperature
Displays current GPU temperature.
CPU Temperature
Displays current CPU temperature.
FAN 1 / 2 Speed
Displays current FAN 1 / 2 speed.
SMART FAN control is the unique function by GIGABYTE whether providing intelligent and dynamic FAN speed control function.
Intel Rapid Start Technology (Default: Disabled)
Enable / Disable the Intel Rapid Start Technology function. The Intel Rapid Start Technology (Intel RSTe)
enables BRIX to get up and running faster from even the deepest sleep, saving time and power
consumption.
Option available: Enabled / Disabled.
■
■
■
Entry on S3 RTC Wake (Default: Enabled)
Enable / Disable entry on S3 RTC wake
function.
Option available: Enabled / Disabled.
Entry After (Default: 10 minutes)
If enabled, will allow you to set a timer to
wake the computer at a particular
interval.
Option available: 10 minutes.
Active Page Threshold Support (Default:
Disabled)
If enabled, the system will support RST
with small partition.
Option available: Enabled / Disabled.
■
■
Hybrid Hard Disk Support (Default:
Disabled)
Enables Intel RST to support the latest
solid state hybrid drives.
Option available: Enabled / Disabled.
RapidStart Display Save / Restore
(Default: Disabled)
BIOS POST screen will be displayed after
Intel RST resume.
Option available: Enabled / Disabled.
If enabled, the configuration will be
showed below.
RapidStart Display Type (BIOS Save /
Restore).
Intel Smart Connect Technology (Default: Disabled)
Allows BRIX to automatically update programs while system suspended.
Option available: Enabled / Disabled.
Intel Smart Connect Technology is for S3 mode only. During the updating process, the monitor will not light up and
no sound will be output from the speaker. This feature works best with programs designed to work automatically
with the internet to obtain their data such as Microsoft Outlook, Microsoft Windows Live Mail, and Seesmic.
Intel Anti-Theft Technology Configuration (Default: Enabled)
Intel Anti-Theft Technology makes your BRIX useless to thieves with immediate shutdown.
Option available: Enabled / Disabled.
■
Enter Intel AT Suspend Mode (Default: Disabled)
Suspends Intel AT support.
Option available: Enabled / Disabled.
Chipset
Allows users to view and configure the BRIX chipset features.
■
■
■
Onboard LAN Device (Default: Enabled)
Enabled / Disabled onboard LAN
controller.
Option available: Enabled / Disabled.
■
Onboard Audio Device (Default: Enabled)
Enabled / Disabled onboard audio
controller.
Option available: Enabled / Disabled.
ERP Support (Default: Disabled)
Enabled / Disabled ERP support function.
Option available: Enabled / Disabled.
■
Restore AC Power Loss (Default: Enabled)
This option provides user to set the mode
if an AC power loss occurs.
Power On: System power state when AC
cord is re-plugged.
Power Off: Do not power on system when
AC power is back.
Last State: Set system to the last state
when AC power is removed.
Option available: Power On / Power Off /
Last State.
XHCI Mode (Default: Auto)
Set USB port behavior.
Option available: Samrt Auto / Auto.
Chipset
Allows users to view and configure the BRIX chipset features.
■
■
System Performance Mode (Default:
Operation Mode)
GIGABYTE provides several methods to
users to overclock the BRIX in a
convenient way.
Operation Mode: Lower power limitation
to decrease the system temperature.
Turbo Mode: Lift CPU power limition. CPU
works normally.
Option available: Operation Mode / Turbo
Mode.
VT-d (Default: Enabled)
Enables guest virtual machines to directly
use peripheral devices through DMA and
interrupt remapping.
Option available: Enabled / Disabled.
■
DRAM Frequency Control (Default:
Disabled)
Allows users to overclock memory
frequency in a convenient way.
Option available: Enabled / Disabled.
If enabled DRAM Frequency Control, a
submenu will be showed below
DRAM Frequency
Option available: 1067 / 1333 / 1600 /
1867 / 2133.
Boot
Allows you to set the device priority during system boot-up.
Boot Option Priorities
Boot Option (Default: #1)
Press <Enter> to configure the boot priority.
Option may vary depends on your connected HDD
numbers: #1 / (#2).
■
Boot
Allows you to set the device priority during system boot-up. BIOS setup will display an error message if
the drive specified is not bootable.
CSM parameters
■ Launch CSM (Default: Disabled)
Enabled / Disabled UEFI CSM (Compatibility Support Module) to support a legacy PC
boot process.
Option available: Enabled / Disabled.
The configurations will be showed below
after enabled Launch CSM.
■
■
Boot option filter
Allows users to select the OS type to boot.
Option available: UEFI and legacy / Legacy
only / UEFI only.
Launch PXE OpROM policy
Allows users to enable legacy option ROM
for the LAN controller.
Option available: Do not launch / Legacy
only.
■
Launch Storage OpROM policy
Allows users to select the UEFI or legacy
option ROM for the storage device
controller.
Option available: Do not launch / UEFI only
/ Legacy only.
Other PCI device ROM priority
Allows users to select the UEFI or Legacy
option ROM for the PCI device controller.
Option available: UEFI OpROM / Legacy
OpROM
Network stack
Allows users to enable UEFI option ROM for
the LAN controller.
Option available: Disabled / Enabled.
Security
Allows you to safeguard an protect the BRIX from unauthorized use by setting up access passwords.
Administrator Password
■ Press <Enter> to configure the administrator password.
User Password
■ Press <Enter> to configure the user password.
■
■
System Mode
Display the system mode state.
Secure Boot
Display the Secure Boot Mode State.
Secure Boot Support (Default: Enabled)
Secure Boot requires all the applications that are running
during the booting process to be pre-signed with valid
digital certificates. This way, the system knows all the
files being loaded before UEFI OS loads and gets to the
login screen have not been tampered with.
Option available: Enabled / Disabled.
Security
Allows you to safeguard an protect the BRIX from unauthorized use by setting up access passwords.
■
Secure Boot Mode (Default: Standard)
Define the Secure Boot Mode.
Option available: Standard / Custom.
The Key Management below can be selected if Secure
Boot Mode is Custom.
Factory Default Key Provisioning (Default: Disabled)
Install factory default secure boot keys when system is in
setup mode.
Option available: Enabled / Disabled.
All the security boot keys are pre-installed before the
delivery and users can setup each security keys via
various methods.
Save & Exit
The Save & Exit menu displays the various options to quit from the BIOS setup. Highlight any of the exit
options then press <Enter>.
■
■
■
■
Save Changes and Reset
Active this option to reset system after saving the
changes.
Option available: Yes / No.
Discard Changes and Reset
Discards changes made and close the BIOS setup and
exit.
Option available: Yes / No.
Restore Defaults
Press <Enter> on this item and then press <Y> key to
load the default BIOS settings.
Option available: Yes / No.
Boot Override
Press <Enter> to configure the device as the boot-up
drive.