1
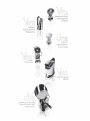
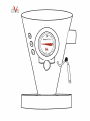
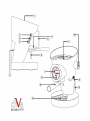
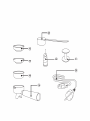
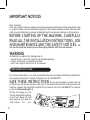
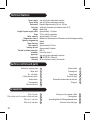
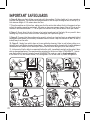
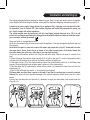
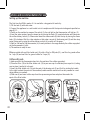
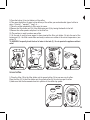
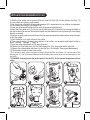
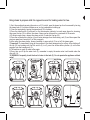
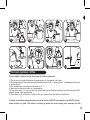
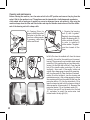
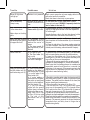
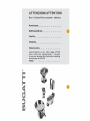
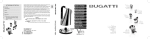
IMPORTANT NOTICES
Dear Customer,
Diva, the coffee machine, enables you to make espresso and normal coffee using either pods
or ground coffee. Like all domestic appliances, this coffee-making machine must be used
with care and attention to prevent accidental burns and prevent damage to the machine.
BEFORE STARTING UP THE MACHINE, CAREFULLY
READ ALL THE INSTALLATION INSTRUCTIONS, USE
AND
MAINTENANCE AND THE SAFETY NOTICES. Do
not use the machine unless you are thoroughly familiar with the instructions.
WARNING
No liability is accepted for damage due to:
- incorrect use or use other than for its intended purpose
- repairs carried out by unauthorized staff
- use of non-original spare parts or accessories
Instructions for use
For further information, or in case of problems that have not been sufficiently addressed in
the present instructions, contact Customer Care at CASA BUGATTI .
SAVE THESE INSTRUCTIONS
for use and remember to pass them on
to those who will use the machine after you. If the instructions are lost before you use the
machine, request the instruction booklet from Customer Care at CASA BUGATTI or send an
e-mail to [email protected].
On the first page you will
find the illustrations relating
to the text. Keep the first
page open as you read the
instructions
for
use.
1
4
5
3
®
6
2
9
2
Indice
2
1
8
2
2
1
6
1
1
7
1
8
2
1
1
®
5
4
3
1
6
9
20
2
23
®
22
1
8
21
6
11
18
7
15
8
19
2
®
16
24
12
17
Pag. 15
Contents
Page 19
Technical features
Page “
Machine controls and parts
Page “
Accessories
Page 20/21
Important safeguards
Page 22
Installation and starting up
Page 23/29
Advice and recommendations on use
Page 23
Page “
Page 24/25
Page 26
Page 27/28
Page 29
Page 30
Page 30/31
Setting up the machine
Coffee with pods
Ground coffee
Using steam
Preparing cappuccino
Cleaning and maintenance
Descaling
Troubleshooting
Page 28
The best espresso coffee
Page 32
Warranty
18
Technical features
Power supply
Power rating
Dimensions
Solid cast
Weight
Length of power supply cable
Pump
Boiler capacity
Temperature control
Quantity programming
Steam delivery
Tank capacity
Heating up time
Thermal overload protection
Insulation
Approvals
Conformity
Warranty
See rating plate underneath machine
See rating plate underneath machine
Diameter approximately 240 x h. 365 mm
Solid cast aluminium and stainless steel 18/10
About 6,5 Kg
Approximately 1.2 metres
15 bar, electrico-vibrating
Approximately 0,25 litres
Mechanical thermometer with Bourdon coil with analogue reading
Manual
Manual
Approximately 0,8 litres
Approximately 3 minutes
Built in
Protection class I
See rating plate underneath machine
- 89/336 CEE - cCSAus-cUL
As per attached warranty information
Machine controls and parts
Surface for warming cups
Water tank
On – off switch
Coffee delivery switch
Steam switch
Thermometer
Filter-holder unit
1
2
3
4
5
6
Steam nozzle
Brewing unit
Steam knob
Power-ON light
Removable steam nozzle protection
Drip grid
12
14
Pressing tool for powder coffee
Dosing spoon
Ion exchange filter for filtering calcareous water
Electrical wire with plugs
21
23
24
25
8
9
10
11
16
Accessories
Filter for pods
Filter-holder unit for powder coffee and pods
Filter for 1-cup dose
Filter for 2-cup dose
19
15
16
18
19
IMPORTANT SAFEGUARDS
CAREFULLY READ ALL INSTRUCTIONS. THE
APPLIANCE MUST BE USED ONLY BY ADULTS WHO
HAVE BEEN TRAINED IN ITS USE.
1. To protect against fire, electric shock and injury to person DO NOT IMMERSE PARTIALLY
OR TOTALLY ANY PART OF THE CORD, PLUGS, OR
THE MACHINE ITSELF IN WATER OR IN OTHER LIQUID.
CAUTION:
HOT SURFACES, DANGER OF BURNS. Do not touch
hot surfaces. Use handles or knobs. Be very careful when touching very hot parts such as the hot water/steam pipe (use a
protective glove): DANGER OF BURNS! Steam and hot water can cause burns. Never direct the jet of steam or hot water
towards parts of the body.
HOUSEHOLD USE ONLY.
2.
Do not use appliance for other than intended use.
Do not make any technical modifications as these may cause risks and will void the warranty.
3. Close supervision is necessary when any appliance is used near children.
The appliance is not to be used by children or persons with reduced physical, sensory or mental capabilities,
or lack of experience and knowledge, unless they have been given supervision or instruction. The kettle must
be used only by adults who know how to use it in accordance with these instructions.
4. Never touch live electrical parts. They may cause electric shocks and serious injuries. Connect the machine
to a wall socket having the appropriate voltage. The voltage must correspond to that indicated on the rating
plate underneath the machine. Make sure that the socket you are using is earthed (grounded).ooooo
5. Figure A: electrical wire. A short detachable power-supply cord is provided to reduces risks resulting from
becoming entangled in or tripping over a longer cord.We do not suggest using an extension cord.
c)Do not place on or near a hot gas or electric burner or in a heated oven.
d) Do not use outdoors. Do not let cord hang over edge of table or counter, or touch hot surfaces. Do not operate any
appliance with a damaged cord or plug or after the appliance malfunctions, or has been damaged in any manner. Return
appliance to the nearest authorized service facility for examination, repair or adjustment.The use of accessory attachments
is not recommended by the appliance manufacturer as they may result in fire, electric shock or injury to the user.
20
IMPORTANT SAFEGUARDS
6. Figure B: Make sure that children cannot play with the machine. Children should not to use, operate or
play near the appliance. The machine must be positioned so that the cups warming surface on the top (1) is
at a minimum height of 1.20 meters above the floor.
7. Place the machine on a flat surface, making sure that the suction feet adhere firmly to the support surface
so that the machine cannot be overturned. Hot water or steam may escape: danger of burns! Do not use the
machine in environments below 5 °C. Do not place the machine on very hot surfaces or near open flames.
8. Figure C: Do not direct the jet of steam or hot water towards parts of the body. Be very careful when
touching very hot parts such as the hot water/steam pipe (use a protective glove).
9. Figure D: To ensure that the machine works correctly, place it on a level surface in an adequately lighted
and hygienic environment with an easily accessible electrical socket. Keep the machine at least 100 mm (4
inches) away from the walls.
10. Figure E: Unplug from outlet when not in use and before cleaning. Allow to cool before putting on or
taking off parts, and before cleaning the appliance. The appliance must be cleaned with a freshly dampened
non-abrasive cloth soaked with a few drops of neutral non-corrosive detergent (never use solvents).
11. In the event of faults, defects or suspected faults after a fall, immediately unplug from the socket. Never
start up damaged appliances. The repairs must be carried out by the Service Centre of CASA BUGATTI . Contact
your dealer and/or contact Customer Care at CASA BUGATTI or send an e-mail to [email protected].
In the event of fire, use carbon-dioxide (CO2) extinguishers. Do not use water or powder extinguishers.
A
®
it
al
de
ia n
sig
n-
st ar
s
sso
e s p r ez
/an dre a s se e g at
®
1,2m
it
al
de
!
B
si g
ia n
n-s
t ar s
es
e s p rz
so
/a n dr e as s e e g a t
!
C
!
21
D
E
!
Installation and starting up
The original packaging has been designed for dispatch by post. Keep it in case you need to return the machine
to the supplier. Before installing the machine, comply with the important safeguards indicated on page 20, 21.
Connecting to power supply. Always attach plug to appliance first, then plug cord into the wall outlet.
To disconnect, turn all controls OFF, then remove plug from wall outlet. Be aware electric power can
kill. Strictly comply with safety regulations.
The coffee machine must be connected, with the Casa Bugatti original electrical wire (25) to a wall
socket with a voltage as specified on the rating plate underneath the machine. Make sure that the socket
you are using is earthed (grounded).
Never use faulty or damaged power cords.
We do not recommend using an extesion cord with the appliance. This may damage the appliance and void
the warranty.
Never allow live parts to come into contact with water: may cause short circuit!!! Steam and hot water
can cause burns. Never direct the jet of steam or hot water towards parts of the body. Handle the
steam/hot water pipe with care: risk of burns (use a protective glove)!
Do not start up the machine without first filling the tank with water. Take care to insert it carefully in its
seat.
1) When starting up the machine, push the switch (3) to light up the light (11) on the thermometer, which
will show that the machine is on and that the heater resistance is heating up.
2) Then open the tap (10) of the steam nozzle and press the coffee delivery switch (4) to facilitate pump
priming. Pump priming has occurred when water comes out of the steam nozzle.
3) Shut the steam tap (10) and keep the coffee-delivery switch (4) pressed until water flows out from the
brewing unit (9).
4) Turn off the coffee delivery switch 4 : the operation has finished.
5) Always make sure that there is water in the tank (2) and that the suction pipe is correctly inserted.
Warning: the pump will be irreparably damaged if the machine operates without water even for a short
period.
6) Every time you add water into the tank (2), remember to empty the waste water tank located under the
drip grid (14).
®
al
de
ian
sig
n-s
t ars
o
e ss
e s p r tz
/a n dr e as see ga
it
al
de
1
®
®
it
2
ian
si g
n-s
ta r
e s pr
e zs s
s / a n d r e a s s e eg a
it
o
al
de
t
3
ian
si g
n-s
ta r
e s pr
e zs s
s / a n d r e a s s e eg a
o
t
5
22
Advice and recommendations for use
Setting up the machine.
The first time that DIVA is used or if it is used after a long period of inactivity:
1) Fill the tank (2) with cold water.
2) Connect the appliance to a wall socket in strict compliance with the important safeguards specified on
page 20, 21.
3) Switch on the machine by means of the switch (3); the red light on the thermometer will light up (11)
4) Load the water system: open the steam tap by turning the knob (10) counterclockwise and then press
the coffee-delivery switch (4). When water leaves the steam nozzle (8) shut the tap by turning the steam
knob (10) clockwise. Wait for a few minutes so that water runs out of the brewing unit (9) and then stop
water flowing out by using the coffee-delivery switch (4) to switch off the pump.
5) Wait for the hand of the thermometer (6) to reach position in the range shown by the coffee cup symbol
on the thermometer (6) dial.
6) The machine is ready for use.
DiVa is provided with one filter-holder unit (16) with a filter for ESE pods (15), one filter for ground coffee
for 1 cup (18) and one filter for ground coffee for 2 cups (19)
Coffee with pods.
1) Make sure that the thermometer hand is in the position of the coffee cup symbol.
2) Place the filter (18) in the filter-holder unit (16) to pour one cup of coffee and place a pod in it, taking
care to place it perfectly in its seat.
3) Insert the filter-holder unit (16) into the seat of the brewing unit (9) and fix it by rotating the handle
to the right to about the centre of the machine (handle must be rotated until correct pressure for a seal
during delivery is reached).
4) Take one dry and warm coffee cups from the cup-warming surface and place them under the
spout of the filter holder.
®
®
it
al
de
it
al
de
1
23
ian
sig
n-s
tars
ess
e s p r tz
/an dreas s eega
o
2
3
4
ia n
si g
n -s
ta r
e s pr
e zs s
s / a n d r e a s s e eg a
t
o
5) Press the button (4) to start delivery of the coffee.
6) Then press the button (4) again to stop delivery of the coffee: you can decide what type of coffee to
enjoy: “ristretto”, “espresso”, “lungo” or ...
7) Serve the coffee immediately to fully enjoy its aroma.
8) Remove the filter-holder unit (16) from the brewing unit (9) by turning the handle to the left.
9) Remove the coffee powder and place it in the litter bin.
10) The machine is ready to make a new coffee.
11) At the end of each cycle we suggest to leave inserted the filter unit-holder (16) into the seat of the
brewing unit (9) : the filter remain warm and ready to make a new coffee at the correct temperature. (see
picture 3)
12) WARNING: frequently check the level of water in the tank (2). Do not operate the appliance without
water!
®
it
al
de
ian
si g
n -s
ta r
es pr
e zs s
s / a n d r e a s s e eg a
o
t
5 6
7
8
9
4
Ground coffee.
1) Place the filter (18) in the filter-holder unit for ground coffee (16) to pour one cup of coffee.
Place the filter (19) in the filter-holder unit for ground coffee (16) to pour two cups of coffee.
2) Make sure that the thermometer hand is in position of the coffee cup symbol.
®
it
al
de
1
2
ian
sig
n-s
tars
ess
e s p r tz
o
/an dreas s eega
24
Advice and recommendations for use
3) Take the filter-holder unit for ground coffee (16) insert the filter (18) for one coffee or the filter (19)
for two coffees, according to requirements.
3) Pour the ground coffee with the appropriate measure (23): one measure for one coffee or two measures
for two coffees, according to the chosen filter.
4) Level the coffee powder inside the filter with the appropriate pressing tool.
5) Insert the filter-holder unit (16) into the seat of the brewing unit (9) and fix it by rotating the handle to
the right to about the centre of the machine (handle must be rotated until correct pressure for a seal during
delivery is reached).
6) Take one or two dry and warm coffee cups from the cup-warming surface and place them under the spout
of the filter holder.
7) Press the button (4) to start delivery of the coffee.
8) Then press the button (4) again to stop delivery of the coffee: you can decide what type of coffee to
enjoy: “ristretto”, “espresso”, “lungo” or ...
9) Serve the coffee immediately to fully enjoy its aroma.
10) Remove the filter-holder unit (16) from the brewing unit (9) by turning the handle to the left.
11) Remove the coffee powder and place it in the litter bin. ( See chapter: Cleaning and Maintenance)
12) The machine is ready to make a new coffee.
13) At the end of each cycle we suggest to leave inserted the filter unit-holder (16) into the seat of the
brewing unit (9) : the filter remain warm and ready to make a new coffee at the correct temperature. (see
picture 5)
14) WARNING: frequently check the level of water in the tank (2). Do not operate the appliance without
water!
®
it
al
de
3
5
6
9
1
11
®
4
it
al
de
25
7 8
ian
si g
n-s
ta r
e s pr
e zs s
s / a n d r e a s s e eg a
o
t
ian
si g
n-s
ta r
e s pr
e zs s
s / a n dre as se ega
t
o
Using steam to prepare milk for cappuccino and for heating water for tea.
1) Start the machine by pressing the main on- off (3) switch, open the steam tap for a few seconds by turning
the steam knob (10) counterclockwise so as to stop condensation building up.
2) Close the tap again by turning the steam knob (10) clockwise.
3) Press the steam switch (5) and wait for the thermometer indicator to reach range shown for steaming,
then open the tap (10) to deliver the steam. Steam can be delivered for a maximum of 90 seconds.
4) To obtain more steam, release the steam switch (5) and shut the tap (10).
5) Press the coffee-delivery button (4) until water emerges from the brewing unit (9) and then repeat the
previous operations from point 3) of this paragraph.
6) After using the steam nozzle, always remember to press switch (5) to cut off the steam again.
7) Important: To immediately bring up the machine to the ideal temperature for coffee, after shutting off
the tap (10) and making sure that the switch (5) is off, press the coffee-delivery button (4) until water
emerges from the brewing unit (9).
8) The machine is ready to make coffee again.
9) Every time you fill up the water tank (2), remember to empty the waste water tank located under the
drip grid (14).
10) WARNING: frequently check the level of water in the tank (2). Do not operate the appliance without
water!
max 90 sec.
ia n
si g
n-s
ta r
e s pr
e zs s
s / a n d r e a s s e eg a
it
o
1
al
de
t
2
ian
si g
n-s
ta r
e s pr
e zs s
s / a n d r e a s s e eg a
®
al
de
®
®
it
it
o
al
de
t
3
ia n
si g
n-s
ta r
e s pr
e zs s
s / a n dre as se ega
o
t
4
®
®
®
it
it
al
de
5
ia n
si g
n -s
ta r
e s pr
e zs s
s / a n d r e a s s e eg a
it
o
6
al
de
al
de
t
ian
si g
n-s
ta r
e s pr
e zs s
s / a n d r e a s s e eg a
o
t
7
ian
s ig
n -s
tars
sso
e s p r et z
/ an dr e as seeg a
9
26
Advice and recommendations for use
Preparing cappuccino.
To make a delicious Italian-style cappuccino, carefully follow this procedure:
1) Prepare espresso coffee in one or more Bugatti cappuccino cups (depending on how many cups you want
to make). Follow instructions on making espresso coffee on page 25.
2) Half fill a jug with cold milk.
3) After pressing the steam switch (5), wait for the indicator on the thermometer ( 6) to reach the range
shown for steaming.
4) Move the steam nozzle (8) to a comfortable position, place the jug under the nozzle and immerse the
nozzle in the milk.
5) Open the steam tap by gradually turning the steam knob (10) counterclockwise.
6) The steam from the nozzle will blow into the milk to produce the typical froth of a true Italian cappuccino.
7) When enough froth has been created, shut the steam tap by turning the steam knob (10) clockwise.
8) Remember to press the steam switch (5) to shut off the steam.
9) Remove the jug from the steam nozzle.
10) Add the frothy milk to the espresso coffee that was previously prepared in the special cups (point 1).
Sprinkle powdered cocoa on the froth and enjoy your cappuccino.
11) Important: To immediately bring up the machine to the ideal temperature for coffee, after shutting off
the tap (10) and making sure that the switch (5) is off, press the coffee-delivery button (4) until water
emerges from the brewing unit (9).
12)The machine is ready to make coffee again.
13) To clean the residual milk from the steam nozzle (8), first wait for the nozzle to cool to prevent burning.
Then remove the extractable steam nozzle protection (12) by gently pulling on it and alternately turning it to
the right and to the left. Clean the side hole of the steam nozzle protection (12) with a toothpick, then wash
it thoroughly inside and outside. Use a damp sponge to remove the remaining milk from the nozzle (8).
Clean the hole of the steam nozzle (8) with a toothpick (see the cleaning and maintenance sector). Use a
damp sponge to remove the remaining milk from the nozzle (8) and from the protection device (12). Use the
steam knob (10) to open the steam tap and to let the steam or drops of water escape for a few seconds (2-3).
Reconnect the protection device (12) on the steam nozzle (10).
14) Every time you fill up the water into the tank (2), remember to empty the waste water tank located
under the drip grid (14).
15) WARNING: frequently check the level of water in the tank (2).
®
it
al
de
®
it
al
de
ian
si g
n-s
ta r
e s pr
e zs s
s / a n d r e a s s e eg a
al
de
®
it
ian
sig
n-s
tar s
ss o
e s p r eat z
/ a n d r ea s s e e g
o
t
max
27
1
2
3
4
ian
sig
n-s
tars
es
e s p r tz
/ a n d re a s s e eg a
so
®
it
al
de
ian
sig
n-s
tars
e
e s p r tz
o
ss
/ a n d re a s s e eg a
®
®
®
it
al
de
i an
sig
n-s
tars
it
sso
e s p r eat z
it
al
de
max 90 sec.
5
!
6
n-s
tars
al
de
al
de
11
ian
sig
n-s
tars
ss
espre
/ an dr eas see ga
t ars
sso
e s p r eat z
/ a n dr ea s se e g
8
®
it
n-s
/ a n dr ea s se e g
7
it
i an
si g
sso
e s p r eat z
i an
sig
®
10
al
de
/a n dr ea s se e g
ian
sig
n-s
tars
es
e s p r tz
so
/ a n d rea s s e eg a
o
tz
13
!
14
The best espresso coffee
To be excellent, espresso coffee must have the following features:
1) The serving of ground coffee must be seven grams (to the nearest half gram).
2) The temperature of the water leaving the machine must be 88 °C (give or take 2 °Cdepending on the type
of coffee blend).
3) The temperature of espresso coffee must be 67 °C.
4) Water-delivery pressure must be 9 atmospheres.
5) Percolation time, i.e. the time that the coffee takes to pass through the nozzle into the cup must be 25
seconds (give or take two seconds).
6) There must be 25 millilitres of coffee in the cup. (give or take two and a half millilitres)
To obtain an excellent Italian espresso as served at the bar, BUGATTI recommends using BUGATTI coffee,
either powder or in pods. This coffee is exclusively roasted in a wood-burning oven, especially for diVa.
28
Cleaning and maintenance
Before cleaning the machine, turn the main switch to the OFF position and remove the plug from the
socket. Wait for the machine to cool. The appliance must be cleaned with a freshly dampened non-abrasive
cloth soaked with a few drops of neutral non-corrosive detergent (never use solvents). After using the
machine always clean the filter and filter holders and wipe the stainless-steel surface of the filter holder
and of the brewing unit with a damp cloth.
H
L
®
it
al
de
ian
sig
n-s
tars
es
e s p r tz
®
it
so
al
de
/ a n dr e a s s e eg a
Ia
ian
sig
n-s
tars
Ib
Ic
29
®
H: Cleaning filters for
ground coffee: Ensure that
the holes in the filter are
free from coffee grounds.
If necessary, clean them
with a small brush
es
e s p r tz
/ a n dr e a s s e eg a
so
L. Cleaning the brewing
unit (9) and its gasket.
Regularly clean the gasket
under the brewing unit (9)
with a wet brush (Figure L)
in order to remove all
coffee residues. The gasket
must be cleaned all the
time
Ia/Ib/Ic)To clean the residual milk from the steam
nozzle (8), first wait for the nozzle to cool to prevent
burning. Then remove the extractable steam nozzle
protection (12) by gently pulling on it and alternately
turning it to the right and to the left. Clean the side
hole of the steam nozzle protection (12) with a
toothpick, then wash it thoroughly inside and
outside. Use a damp sponge to remove the remaining
milk from the nozzle (8). Clean the hole of the steam
nozzle (8) with a toothpick (see the cleaning and
maintenance sector). Use a damp sponge to remove
the remaining milk from the nozzle (8) and from the
protection device (12). Use the steam knob (10) to
open the steam tap and to let the steam or drops of
water escape for a few seconds (2-3). Reconnect the
protection device (12) on the steam nozzle (10).
14) Every time you fill up the water into the tank
(2), remember to empty the waste water tank
located under the drip grid (14).
Advice and recommendations for use
Descaling
DiVa has been built with the best materials available on the market today. Careful and accurate processing
and the use of the innovative ion exchange filter enable the hardest water to be filtered.
The ion exchange filter should be changed about every 3 to 4 months if the hardness of water is around 20
to 25 F°. We suggest to use distilled water. You can get a new filter from your retailer or from Customer
Care at CASA BUGATTI. The ion exchange filter (24) is housed inside the tank and is connected to the pump
suction pipe. To replace this filter (24), follow these simple instructions:
1) Remove the water tank (2).
2) With one hand take the filter (24) and with the other hand pull and rotate alternately clockwise and
counterclockwise the suction pipe near the fitting fixed to the filter in such a way that the pipe becomes
detached.
3) Take the original new CASA BUGATTI filter (24) and fit the suction pipe onto the pipe fitting by exerting
pressure and alternately turning clockwise and counterclockwise so that the pipe slides down over the
entire length of the pipe fitting.
4) Again insert the pipe with the filter into the tank and carefully refit the tank filled with fresh water onto
the machine.
5) In order to prolong the working life of the Diva, we recommend using water that is low in sodium wherever
this is possible.
N.B.: do not use descaling products with the Diva .
0,0...%
1
2
3
4
30
Tr o u b l e
Possible cause
Power-ON light does
not light up.
Machine is not powered.
Check correct connection of power supply cable to the
wall socket and to the machine.
Check that there is electricity in your system.
No coffee delivery.
Pump is noisy.
No water in the tank (2).
Tank is not correct in its
seat.
Coffee tastes burnt.
Steam switch (5) is ON.
Fill the water tank (2) with fresh water. Position
it correctly in its seat. WARNING : frequently check the
level of water in the tank (2)
Follow procedure at point 6) in section “Using steam”,
page 26, to bring up the machine to the ideal temperature
for coffee again.
Normal discharge, due to the fact that drops of coffee
should finish out of the shower filter holder (15)
Water drops on the drip
grille.
31
Solution
During the milk frothing
we cannot get the typical
of cappuccino froth.
a. The pointer of the
thermometer has not yet
reached the sector of
steam
b. The steam nozzle (8)
and its protection (12) are
blocked
a. Make sure the steam button (5) is turned on and wait
that the pointer of the thermometer (6) is in the sector
of steam.
b. Clean the side hole of the steam nozzle protection
(12) with a toothpick, then wash it thoroughly inside and
outside (see the cleaning and maintenance chapter).
Coffee is not hot
a. The cups are cold
b. The filter-holder (16)
unit is cold
c. The heating element of
the boiler is damaged
Leaking of water between
the filter-holder unit (16)
and the brewing-unit (9)
a. There is coffee powder
residue on the gasket of
the brewing-unit (9) and
/ or on the edge of the
filter-holder (16)
b. If you're making a
coffee with the ESE pods:
the pod is not positioned
correctly in the middle of
the filter basket (15)
c. If you are making
coffee with the ground
coffee: there is too much
coffee in the filter you are
using: filter (18) to 1 cup
or filter (19) for two cups.
d. The seal of the
distribution unit (9) is
worn-out
a. Leave the cups on the warmer plate (1) or rinse them
with hot water before use with the coffee machine
b. Leave the filter-holder unit (16) in the seat of the
brewing unit (9) so that it is always hot and ready for a
new coffee at the correct temperature
c. Please call the courtesy service office or send an e-mail
to Bugatti at [email protected] to book the assistance.
Please note that the heating element is considered as
expendable material and therefore is outside the
protection of the warranty (The warranty protects the
original defective components that are faulty from its
origin due to manufacturing faults).
a. Regularly clean the gasket under the brewing unit (9)
with a wet brush (Figure L) in order to remove all coffee
residues. The gasket must be cleaned all the time (See
section cleaning and maintenance).
b. Place the pod in the center of the filter (15)
c. Put into the filter "1cup" (18) no more than 7 grams
or one cup of the measuring cup (23) of ground coffee.
Put 2 cups into the filter (19) no more than 14 grams or
two cups of measuring cup (23) of ground coffee.
d. Please call the courtesy service office or send an e-mail
to Bugatti at [email protected] to book the assistance.
Please note that the gaskets are considered as expendable
material and therefore is outside the protection of the
warranty (The warranty protects the original defective
components that are faulty from its origin due to
manufacturing faults).
WARRANTY
1) A warranty is deemed to be the replacement or repair free of charge of the parts making up the appliance
that are faulty from its origin due to manufacturing faults.
2) In the event or irreparable or repeated faults having the same origins, at the manufacturer’s sole discretion,
the machine will be replaced.
3) The warranty does not cover damage due to: incorrect or faulty use, defects caused by accidental breakages
or carelessness, failure to observe instructions and warnings, incorrect installation and maintenance,
maintenance and/or modifications operated by unauthorised personnel. Use of non-original spare parts,
carriage and any other circumstance that cannot be ascribed to manufacturing faults, and any all claims not
envisaged by law are excluded.
4) The warranty does not cover damage due to improper use and in particular to non-domestic use.
5) The manufacturer accepts no liability for any direct or indirect harm or injury to persons, things and
domestic animals that may arise from failure to abide by all the safety regulations contained in this manual,
especially failure to abide by the instructions on installation, use and maintenance of the machine.
6) Any replacement or repair shall not interrupt the warranty period.
The replacement of expendable materials such as filters, seals, resistance, etc, is not covered by the warranty.
7) To exercise the above rights, the customer must have returned the attached card duly filled in: Warranties
that miss even one of the following parts shall not be taken into consideration: sender’s address, retailer’s
stamp, number and/or date of receipt of payment.
SERVICE CENTRE
In the event of a machine fault, contact an authorised BUGATTI dealer, who will return the machine to the
manufacturer.
The purchaser is responsible for all carriage and/or dispatch cost for all repairs not covered by warranty.
Where possible, keep the appliance’s original packing.
IMPORTANT INFORMATION FOR CORRECT DISPOSAL OF THE PRODUCT IN ACCORDANCE WITH EC
DIRECTIVE 2002/96/EC.
At the end of its working life, the product must not be disposed of as urban waste.
It must be taken to a special local authority differentiated waste collection centre or to a
dealer providing this service. Disposing of a household appliance separately avoids possible
negative consequences for the environment and health deriving from inappropriate disposal and
enables the constituent materials to be recovered to obtain significant savings in energy and
resources. As a reminder of the need to dispose of household appliances separately, the product
is marked with a crossed-out wheeled dustbin.
32