1
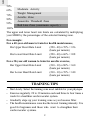
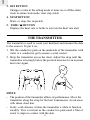
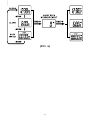
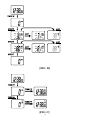
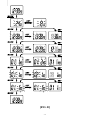
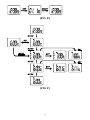
GB
BASIC HEART RATE MONITOR
MODEL NO.: HR102
USER’S MANUAL
SECTION 1
INTRODUCTION
Congratulations on your purchasing the HR102 Basic Heart Rate
Monitor.
The HR102 is a very useful healthcare product to help you achieve and
maintain your optimum exercise zone by monitoring your heart rate in
working out.
The HR102 comes with a heart rate transmitter and a receiver watch complete
with the functions of a real-time clock, stopwatch and back light.
KNOW YOUR DATA
It is important you know your maximum heart rate (MHR), training
zone, upper heart rate limit and lower heart rate limit before you begin.
They help you achieve the maximum health benefits out of your workout.
MHR is expressed in beats per minute. You can get your MHR from a
MHR test. Or you can estimate it using the following formulae:
Men
220 - age = MHR
Women
230 - age = MHR
There are several training zones that bear specific results in your fitness
program. The most popular zones range between 50% to 80% of your
maximum great rate. This is where you achieve cardiovascular benefits,
burn fat, and become fitter. When programming your watch, the lowest
% of the zone you choose becomes your lower heart rate limit and the
highest % becomes the upper heart rate limit.
1
GB
50%
60%
70%
80%
90%
100%
Moderate Activity
Weight Management
Aerobic Zone
Anaerobic Threshold Zone
Red Line Zone ( maximum capacity )
The upper and lower heart rate limits are calculated by multiplying
your MHR by the percentages of the selected training zone.
For example:
For a 40-year-old man to train for health maintenance,
His Upper Heart Rate Limit
(220 - 40) x 70% = 126
(beats per minute)
His Lower Heart Rate Limit
(220 - 40) x 60% = 108
(beats per minute)
For a 30-year-old woman to train for aerobic exercise,
Her Upper Heart Rate Limit
(230 - 30) x 80% = 160
(beats per minute)
Her Lower Heart Rate Limit
(230 - 30) x 70% = 140
(beats per minute)
TRAINING TIPS
- Start slowly. Select the training zone most suitable for your physique.
- Exercise regularly. 20 to 30 minutes each and three to four times a
week for a healthier cardiovascular system.
- Gradually steps up your training zone as you become fitter.
- The health maintenance zone has the lowest training intensity. It is
good for beginners and those who want to strengthen their
cardiovascular systems.
2
GB
- The aerobic exercise zone increases strength and endurance. It
works within the body’s oxygen intake capability, burns more
calories and can last longer.
- The anaerobic exercise zone generates speed and power. It works at
or above the body’s oxygen intake capability, builds more muscle
and cannot be maintained for a long time.
WARNING: Determining your individual training zone is a critical
step in the process towards efficient and safe training. Please consult
your doctor or health professional to help you determine your maximum
heart rate, upper and lower limits, exercise frequency and duration
appropriate for your age, condition and specific goals.
RECEIVER CONTROL BUTTONS
1. LIGHT BUTTON
Turns on the EL back light for five seconds
2. MODE BUTTON
Changes the operating mode or holds to enter the setting mode
3
GB
3. SET BUTTON
Changes a value in the setting mode or turns on or off the alarm
clock in alarm clock mode, reset stop watch
4. ST/SP BUTTON
Starts or stops the stopwatch
5. TIME / BUTTON
Displays the heart rate or holds to activate the heart rate alert
THE TRANSMITTER
The transmitter is used to count your heartbeat and transmit the data
to the receiver. To put it on,
1. Wet the conductive pads on the underside of the transmitter with
water or a conductive gel to ensure a solid contact.
2. Strap the transmitter across the chest. Adjust the strap until the
transmitter sits snugly below the pectoral muscles for an accurate
heart rate signal.
HINTS:
- The position of the transmitter affects its performance. Move the
transmitter along the strap for the best transmission. Avoid areas
with dense chest hair.
- In dry, cold climates, it takes the transmitter a while to function
steadily. This is normal as the conductive pads need a film of
sweat to improve contact with the skin.
4
GB
THE RECEIVER
The receiver comes in the format of a wrist watch. You can wear it on
your wrist or strap it to your bike or exercise machine. You can also
obtain a mounting bracket from your authorized dealer.
EFFECTIVE RANGE
The transmitter and receiver will start transmitting and receiving
signals once batteries are in place. Both units should be worn or
mounted within an effective distance of 50 centimeters (20 inches). If
the signals have become unsteady,
- Shorten the distance between the transmitter and receiver.
- Re-adjust the position of the transmitter.
- Check the batteries. Replace them when necessary.
USE IN THE WATER
The HR102 is water-resistant up to 30 meter.
Note: Set the unit before exposing it to excessive water. Activating
the keys while in the water or during heavy rainstorms may cause
water to enter the unit.
5
GB
SECTION 2 OPERATION
THE BACK LIGHT
Press LIGHT to turn on the back light for five seconds.
OPERATING MODES
There are four operating modes, see FIG. A
NOTE : When no signals are received or the measurement is out of
range for five minutes, the receiver will disable the function and return
to the previous operating mode automatically.
HOW TO SET HEART RATE LIMITS
The heart rate limits help you determine if you are exercising within
your training zone. Whenever you go above or below your limits, an
indicator will flash to attract your attention. To set the heart rate limits,
see FIG. B
NOTE: The upper limit must exceed the lower limit. The transmitter
will adjust the ranges automatically according to the data entered.
You can also activate the heart rate limit alert function, so the transmitter
will emit beeping sound when the limits are exceeded. [see FIG. C]
REAL TIME CLOCK
To set the clock, see FIG. D
NOTE: The date format for 12-hour display is MONTH-DAY while
that for 24-hour display is DAY-MONTH.
6
GB
To display the date, see FIG. E
To set the alarm, see FIG. F
NOTE : When the alarm clock is activated, it will go off at the set time
every day. Press any button to stop the alarm for the day. The alarm
clock is still active and will set off again the following day.
STOP WATCH
To use the stop watch, see FIG. G
SECTION 3 ADDITIONAL INFORMATION
BATTERY INFORMATION
The HR102 uses a CR2032 lithium battery for the transmitter and a
CR2032 for the receiver. Both are included with the unit.
When the battery of the receiver is running low, the low-battery
indicator will light up.
If the heart rate readings become erratic or stop, your transmitter battery
may need replacing. You can do this by yourself very easily without
any special tools.
To change the battery,
1. Remove the battery compartment door.
2. Replace the old battery with a new one.
7
GB
Battery
TOP VIEW
Battery contact plate
SIDE VIEW
3. Replace the battery compartment door.
4. Open the transmitter battery lid with a coin by turning
counterclockwise.
5. Insert one CR2032, 3V lithium battery with writing facing you.
Note: Take care not to touch the two contacts, otherwise the
battery can discharge.
6. Replace lid.
If you are unsure about the procedure consult your dealer.
ENERGY SAVE FEATURE
If no transmitter signal is received by the watch after 15 minutes, the
HR102 will switch back to previous display mode.
PRECAUTIONS
- Read the user’s manual thoroughly.
- Do not subject the unit to excessive force, shock, dust and
temperature.
- Do not tamper with the unit’s internal components.
8
GB
- Do not mix fresh and old batteries, or batteries of different
specifications.
SPECIFICATIONS
Function
Real time clock
Stopwater
Heart rate measurement
Upper limit
Lowr limit
Weight
:
:
:
:
:
:
12/24 hour with hour / minute / second
00:00:00 to 29:59:59 (hrs : min : sec)
30 - 240 bpm
80 - 240 bpm
30 - 220 bpm
Watch - approx. 40 g (included battery)
Chestbelt - approx. 68 g (included
battery)
Power
: Watch - 1 ps CR 2032 3V battery
Chestbelt - 1pc CR 2032 3V battery
Operating temperature : -10°C to +50°C (14°F to 122°F)
Storage temperature
: -20°C to +60°C (-4°F to 140°F)
Water resistance
: not actuating keys to 30 meters
MAINTENANCE
1. Do not clean the unit with abrasive or corrosive materials. Abrasive
cleaning agents may scratch the plastic parts and corrode the
electronic circuit.
2. Do not subject the unit to excessive: force, shock, dust, temperture,
or humidity. Such treatment may result in malfunction, a shorter
electronic life span, damaged batteries, or distorted parts.
3. Do not tamper with the unit’s internal components. Doing so will
terminate the unit’s warranty and may cause damage. The unit
contains no user-serviceable parts.
Read this instruction manual thoroughly before operating the unit.
9
GB
CAUTION
— The content of this manual is subject to change without
further notice.
— Due to printing limitation, the displays shown in this
manual may differ from the actual display.
— The contents of this manual may not be reproduced without
the permission of the manufacturer.
10
GB
GB
F
LEGEND : ITALIC - PRESS
ITALIC - PRESS AND HOLD
- FAST INCREAMENT
LEGENDE : ITALIQUE - APPUYEZ
ITALIQUE - APPUYEZ, PUIS GARDEZ ENFONCEE
- DEFILEMENT RAPIDE
D
LEGENDE : KURSIV - DRÜCKEN
KURSIV - GEDRÜCKT HALTEN
- SCHNELLVORLAUF
I
ES
LEGENDA : CORSIVO - PREMERE
CORSIVO SOTTOLINEATO - TENERE PREMUTO
- INCREMENTO RAPIDO
CLAVE : CURSIVAS - PRESIONE
CURSIVAS - MANTENGA PRESIONADO
- INCREMENTO RÁPIDO
11
GB
[FIG. A]
12
GB
[FIG. B]
[FIG. C]
13
GB
[FIG. D]
14
GB
[FIG. E]
[FIG. F]
15
GB
[FIG. G]
16