1
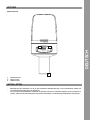
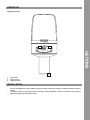
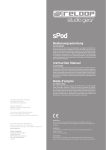
sPodcaster
Bedienungsanleitung
ACHTUNG!
Instruction Manual
CAUTION!
For your own safety, please read this operation manual carefully before initial operation! All persons involved in the installation, setting-up, operation,
maintenance and service of this device must be appropriately qualified and
observe this operation manual in detail. This product complies with the requirements of the applicable European and national regulations. Conformity has
been proven. The respective statements and documents are deposited at the
manufacturer.
Mode d‘emploi
ATTENTION!
Pour votre propre sécurité, veuillez lire attentivement ce mode d‘emploi
avant la première utilisation ! Toutes les personnes chargées de l‘installation, de la mise en service, de l‘utilisation, de l‘entretien et la maintenance
de cet appareil doivent posséder les qualifications nécessaires et respecter les instructions de ce mode d‘emploi. Ce produit est conforme aux
directives européennes et nationales, la conformité a été certifiée et les
déclarations et documents sont en possession du fabricant.
Technische Änderungen vorbehalten!
Alle Abbildungen ähnlich!
Keine Haftung für Druckfehler!
Subject to alterations!
Illustrations similar to original product!
Misprints excepted!
Sous réserve de modifications techniques.
Toutes les illustrations sont similaires.
Aucune responsabilité pour les erreurs d‘impression!
Für weiteren Gebrauch aufbewahren!
Keep information for further reference!
Gardez ces instructions pour des utilisations ultérieurs!
www.reloop.com
Reloop Trademark
Global Distribution GmbH
Schuckertstr. 28
48153 Muenster / Germany
Fax: +49 251 6099368
© 2012
WARNUNG!
Um Feuer oder einen elektrischen Schock zu vermeiden, setzen Sie
dieses Gerät nicht Wasser oder Flüssigkeiten aus! Öffnen Sie niemals das
Gehäuse!
WARNING!
To prevent fire or avoid an electric shock do not expose the device to
water or fluids!
Never open the housing!
ATTENTION !
Afin d‘éviter un incendie ou une décharge électrique, veillez à tenir cet
appareil à l‘écart des liquides et de l‘humidité ! N´ouvrez jamais le boîtier !
DEUTSCH
Lesen Sie sich vor der ersten Inbetriebnahme zur eigenen Sicherheit diese Bedienungsanleitung sorgfältig durch! Alle Personen, die mit der Aufstellung, Inbetriebnahme, Bedienung, Wartung und Instandhaltung dieses
Gerätes zu tun haben, müssen entsprechend qualifiziert sein und diese Betriebsanleitung genau beachten. Dieses Produkt erfüllt die Anforderungen
der geltenden europäischen und nationalen Richtlinien, die Konformität
wurde nachgewiesen, die entsprechenden Erklärungen und Unterlagen sind
beim Hersteller hinterlegt.
Wir gratulieren Ihnen zum Kauf des Reloop Studio sPodcaster. Vielen Dank, dass Sie unserer Technologie
Ihr Vertrauen schenken. Vor Inbetriebnahme bitten wir Sie, alle Anweisungen sorgfältig zu studieren und
zu befolgen.
Nehmen Sie das Reloop Studio sPodcaster aus der Verpackung. Bitte überprüfen Sie vor der ersten Inbetriebnahme, ob
keine offensichtlichen Transportschäden vorliegen. Sollten Sie Schäden am Kabel oder am Gehäuse entdecken, nehmen
Sie das Gerät nicht in Betrieb und setzen Sie sich bitte mit Ihrem Fachhändler in Verbindung.
Aus Sicherheits- und Zulassungsgründen (CE) ist das eigenmächtige Umbauen und/oder Verändern der Produkte nicht
gestattet. Beachten Sie bitte, dass Schäden, die durch manuelle Veränderungen an den Produkten verursacht werden,
nicht unter den Gewährleistungsanspruch fallen.
Diese Produkte sind ab Werk in einem einwandfreien Zustand. Beachten Sie unbedingt alle Hinweise in dieser Bedienungsanleitung, um diesen Zustand und einen gefahrlosen Betrieb dieser Produkte zu gewährleisten!
Durch Nichtbeachtung dieser Bedienungsanleitung verursachte Schäden lassen jeden Gewährleistungsanspruch erlöschen. Für Sach- oder Personenschäden, die durch unsachgemäße Handhabung der Produkte oder Nichtbeachtung der
Bedienungsanleitung verursacht werden, übernimmt der Hersteller keine Haftung.
DEUTSCH
Werden die Geräte anders verwendet als in dieser Bedienungsanleitung beschrieben, kann dies zu Schäden an den Produkten führen und die Gewährleistungsansprüche erlöschen. Außerdem ist jede andere Verwendung mit Gefahren wie
z.B. Kurzschluss, Brand, elektrischem Schlag, etc. verbunden.
Hinweis:
Im Falle einer Rücksendung, verwenden sie bitte ausschließlich die Originalverpackung, um das Gerät vor
Transportschäden zu schützen. Transportschäden aufgrund unsachgemäßer Verpackung können zu einem
Erlöschen der Gewährleistung führen. Der Hersteller übernimmt keinerlei Haftung für Transportschäden,
welche aufgrund unsachgemäßer Verpackung während einer Rücksendung an den Verkäufer entstanden
sind. Solche Kosten gehen zu Lasten des Versenders!
Betriebsumgebung
-Die Produkte dürfen nur im Trockenen betrieben und gelagert werden! Spritzwasser, Regen, Feuchtigkeit, Nebel
kann die Geräte zerstören. Der Grenzwert für die relative Luftfeuchtigkeit liegt bei 50% bei 45 Grad Celsius.
-Die Produkte dürfen nur bei einer Temperatur zwischen -5 und 45 Grad Celsius betrieben werden. Schützen Sie die
Produkte dazu vor direkter Sonneneinstrahlung oder anderweitiger externer Erhitzung wie z.B. durch Heizkörper!
-Wenn die Produkte von einem kalten Raum in einen warmen Raum gebracht wurden, dürfen Sie sie erst in Betrieb
nehmen, wenn sie Zimmertemperatur erreicht haben, da das dabei entstehende Kondenswasser sie unter Umständen zerstören kann!
-Die Produkte müssen vor Staub geschützt werden!
BestimmungsgemäSSe Verwendung
-Bei diesem Gerät handelt es sich um ein Kondensatormikrofon mit einseitiger Richtcharakteristik.
-Das Mikrofon wurde speziell für Anwendungen in Recording Umgebungen (Stimmenaufzeichung) und in TV- und
Radiostationen konzipiert.
-Das Reloop Studio sPodacster wird per USB-Kabel mit einem PC oder Mac verbunden und benötigt keinen separaten Stromanschluss.
-Wird das Gerät anders verwendet als in dieser Bedienungsanleitung beschrieben, kann dies zu Schäden am Produkt
führen und der Gewährleistungsanspruch erlischt. Außerdem ist jede andere Verwendung mit Gefahren wie z.B.
Kurzschluss, Brand, elektrischem Schlag, etc. verbunden.
-Die vom Hersteller festgelegte Seriennummer darf niemals entfernt werden, da ansonsten der Gewährleistungsanspruch erlischt.
Betrieb
Bedienelemente
2
DEUTSCH
1
3
1.Volumenwahlrad
2. Power On LED
3.USB-Anschluss
Installation
-Befestigen Sie das sPodcaster mit der im Set enthaltenen Mikrofonhalterung, um eine einwandfreie, stabile und
schwingungsfreie Positionierung zu garantieren.
-Um mit Ihrem hochempfindlichen sPodcaster Kondensatormikrofon ein optimales Ergebnis bei der Aufnahme zu
erzielen, sollten Sie für jede Anwendung verschiedene Aufstellungs- und Einstellungsmöglichkeiten ausprobieren.
Bedienung
1. Anschlüsse vornehmen
Fahren Sie wie gewohnt Ihren Rechner (Mac/PC) hoch und warten Sie, bis dieser vollständig geladen ist. Verbinden Sie
nun Ihren Rechner mit dem Reloop Studio sPodcaster mit Hilfe des beiliegenden USB-Kabels.
2. Software einstellen (Bespiel: Windows XP)
Sobald Sie den Reloop Studio sPodcaster mit dem Computer verbinden, sollte Windows in Form einer Sprechblase die
Meldungen in der Symbolleiste anzeigen. Durch die integrierte Plug and Play-Technologie werden alle nötigen Treiber
automatisch von alleine installiert. Zuletzt sollte die Meldung „Die neue Hardware wurde installiert und kann jetzt verwendet werden“ angezeigt werden. Die Hardware-Installation ist somit erfolgreich abgeschlossen.
Um sicherzustellen, dass in den Systemeinstellungen alles reibungslos gelaufen ist, öffnen Sie in der „Systemsteuerung“
den Punkt „Sounds und Audiogeräte“. Klicken Sie nun den Reiter „Audio“ an, um die Lautstärkeregelung einzusehen. Als
Standardgerät für die Aufnahme sollte der sPodacster automatisch eingestellt worden sein.
Hinweis:
Im System wird der Reloop Studio sPodcaster als „C-Media“ gekennzeichnet.
DEUTSCH
3. Einstellung der Lautstärke / Brillanz
Mit dem Lautstärkeregler können Sie den Signal-Eingangspegel und die Brillanz der Mikrofonkapsel verändern, um das
Mikrofon bei einem extrem hohen Schalldruckpegel nicht zu überlasten.
Hinweis:
Für optimale Ergebnisse empfehlen wir den Lautstärkeregler an Ihrem Reloop Studio sPodcaster auf ein 3/4
Maximum zu stellen – die Wiedergabelautstärke lässt sich unter dem Punkt „Soundaufnahme“ -> „Lautstärke“ an ihrem Rechner einstellen.
4. Mit der Aufnahme loslegen!
Starten Sie nun ihre favorisierte Aufnahme-Software. Stellen Sie dabei das Reloop Studio sPodcaster als Aufnahmequelle in ihrer Software ein („C-Media“).
Nun sind Sie bereit Ihre Aufnahme zu starten.
Wartung
-Überprüfen Sie regelmäßig die technische Sicherheit des Gerätes auf Beschädigungen des Kabels oder des Gehäuses, sowie auf die Abnutzung von Verschleißteilen wie Reglern.
-Wenn anzunehmen ist, dass ein gefahrloser Betrieb nicht mehr möglich ist, so ist das Gerät außer Betrieb zu ersetzten und gegen unbeabsichtigten Betrieb zu sichern.
-Es ist anzunehmen, dass ein gefahrloser Betrieb nicht mehr möglich ist, wenn das Gerät sichtbare Beschädigungen
aufweist, das Gerät nicht mehr funktioniert, nach längerer Lagerung unter ungünstigen Verhältnissen oder nach
schweren Transportbeanspruchungen.
Technische Daten
- Spannung:
- Sensibilität:
- Rauschabstand:
- Frequenzgang:
- Anschluss:
- Maße:
- Gewicht:
USB Speisung, 5,0 V
-65 +/- 5 dB @ 1KHz
-59 dB
50 Hz – 18 kHz
USB
148 x 65 x 56 mm
350 g
Technische Änderungen vorbehalten.
Alle Abbildungen ähnlich.
Keine Haftung für Druckfehler.
DEUTSCH
Congratulations on purchasing your Reloop Studio sPodcaster. Thank you for placing your trust in our technology. Before operating this equipment we ask you to carefully study and observe all instructions.
Please remove the Reloop Studio sPodcaster from its packaging. Check before initial operation to make sure that the
device has not been visibly damaged during transport. If you detect any damage to the cable, do not operate the device.
Contact your specialised dealer.
For reasons of safety and approval (CE) the personal reconstruction and/or modification of these products are prohibited.
Please observe that damage caused by modifications performed manually to this device is not covered by the implied
warranty.
These products leave our works in a perfect condition. Please observe all notes in these operating instructions to warrant
this condition and the safe operation of the products!
Any damage caused as a result of the non-compliance with these operating instructions leads to the expiration of any
implied warranty claim. The manufacturer does not accept liability for any damage to property or for personal injury
resulting from the improper handling of the products, or non-observance of the operating instructions.
ENGLISH
If used for any purpose other than described in these operating instructions, the products may suffer damage and the
implied warranty expires. Also, any other use is linked with risks such as short circuits, fire, electrical shock, etc.
Note:
In case of return consignment please only use the original packaging to protect the unit against transport
damage. Transport damage that occurs due to improper packaging can lead to expiration of warranty rights.
The manufacturer is not liable for any transport damages that occur due to improper packaging during
return consignment to the seller. Similar costs are at the expense of the sender!
Operating Environment
-The products must be operated and stored in a dry environment only! Splash water, rain, humidity, fog may cause
serious damage. The limit value for relative humidity is 50% at 45°C.
-The products must be operated at a temperature range of between -5 °C and 45 °C only. Protect the products
against direct exposure to sunlight or other heat, such as from radiators!
-If the products are taken from a cold environment into a warm environment they must only be taken into operation
once they have reached ambient temperature, since the condensation created by the difference in temperature may
destroy the products!
-Protect the products against dust!
Application in accordance with regulations
- This device is a condenser microphone with one-sided directional pattern.
-This microphone is designed specifically for applications in recording surroundings (vocal recordings), television and
radio studios.
-The Reloop Studio sPodcaster has to be connected to a PC or Mac via USB cable and does not necessitate a separate power supply.
-If the device is used for any other purposes than those described in the operation manual, damage can be caused
to the product, leading to the exclusion of implied warranty rights. Moreover, any other application that does not
comply with the specified purpose harbours risks such as short circuit, fire, electric shock, etc.
-The serial number determined by the manufacturer must never be removed to uphold the implied warranty rights.
Operation
Operating Controls
2
ENGLISH
1
3
1. Volume Dial
2. Power On LED
3. USB Connection
Installation
-Connect the sPodcaster to the included microphone bracket to guarantee a flawless, stable and vibration-free positioning.
-To achieve an ideal recording result with your highly sensitive sPodcaster condenser microphone you should try
different installation and adjustment types.
Operation
1. Connecting hardware
Boot your computer (Mac/PC) as usual and wait until everything is completely loaded. Now connect the Reloop Studio
sPodcaster to your computer.
2. Configuring Software (For instance: Windows XP)
As soon as connecting the Reloop Studio sPodcaster to the computer Windows should display a pop-up in the toolbar.
Due to the integrated plug and play technology all required drivers will be installed automatically. As last step the message “The new hardware is installed and can now be used” should appear. Now the hardware installation is complete.
To make sure that all configurations are accurate, open the item “Sounds and Audio Devices”. Now click the “Audio” rider
to review the volume adjustment. The sPodcaster should be appointed automatically as standard device for recordings.
Note:
The Reloop Studio sPodcaster is labeled “C-Media” in the system.
ENGLISH
3. Volume Adjustment/Brilliance
Via the volume dial you can adjust the signal input level and the microphone capsule‘s brilliance to avoid a capacity
overload at extremely high sound levels.
Note:
For ideal results we recommend to adjust the volume dial of your Reloop Studio sPodacster to 3/4 max. - the
volume can be adjusted under item “Sound Recording” -> “Volume” on your computer.
4. Starting a Recording
Now start your preferred recording software. The Reloop Studio sPodcaster has to be adjusted as recording source in
your software (“C-Media”).
Now you can start recording.
Maintenance
-Regularly check the technical safety of the device, for damages to the cable or housing as well as wearout of wear
parts such as dials.
-
If it is to be assumed that the safe operation is no longer feasible then the Reloop Studio sPodcaster must be disconnected and secured against accidental use.
-It must be assumed that a safe operation is no longer feasible if the device bears visible defects, if the device no
longer functions, following longer storage under unfavourable conditions or after major transport stress.
Technical information
- Voltage: - Sensitivity:
- S/N Ratio:
- Frequency Range:
- Connection:
- Dimensions:
- Weight:
USB supply, 5.0V
-65 +/- 5 dB @ 1KHz
-59 dB
50 Hz – 18 kHz
USB
148 x 65 x 56 mm
350 g
ENGLISH
Nous vous félicitons d’avoir choisi la console Reloop Studio sPodcaster, preuve de la confiance que vous
accordez à notre technologie. Avant la mise en service, nous vous prions de lire attentivement ce mode
d’emploi et de respecter les instructions pendant l’utilisation.
Retirez le Reloop Studio sPodcaster de son emballage. Avant la première mise en service, vérifiez le bon état de l’appareil. Si le boîtier ou le câble sont endommagés, n’utilisez pas l’appareil et contactez votre revendeur.
Pour des raisons de sécurité et de certification (CE), il est interdit de transformer ou modifier cet appareil. Tous les
dégâts dus à une modification de cet appareil ne sont pas couverts par la garantie.
Ces produits ont quitté l‘usine dans un état irréprochable. Afin de conserver cet état et assurer la sécurité de fonctionnement, l‘utilisateur doit absolument respecter les consignes de sécurité et les avertissements indiqués dans ce
mode d‘emploi.
Les dommages causés par le non-respect des instructions de ce mode d‘emploi annulent tous les droits de garantie. Le
fabricant décline toute responsabilité pour les dommages matériels ou personnels dus à une manipulation incorrecte
des produits ou au non-respect des instructions du mode d‘emploi.
FRANCAIS
L‘usage de ces équipements dans un but différent de celui décrit dans leur mode d‘emploi respectif, peut provoquer
des dégâts et annuler les droits de garantie. Toute autre utilisation est en outre liée à des risques tels que court-circuit,
incendies, décharges électriques, etc.
Note :
En cas de renvoi, veuillez exclusivement utiliser l‘emballage d‘origine afin de protéger l‘appareil contre les
dommages de transport. Les dommages de transport causés par un emballage incorrect peuvent annuler
la garantie. Le fabricant décline toute responsabilité en cas de dommages de transport dus à un emballage
incorrect lors du renvoi de l‘appareil au vendeur. Ces frais sont à la charge de l‘expéditeur !
Environnement de service
-Les équipements doivent uniquement être utilisés et stockés dans des locaux secs ! Les projections d‘eau, la pluie,
l‘humidité et le brouillard peuvent détruire les appareils. L‘humidité relative de l‘air maximale est de 50% à 45
degrés Celsius.
-Uniquement utiliser les équipements à une température entre 5 et 35 degrés Celsius. Protéger les équipements
des contre les rayons solaires directs ou toute autre source de chaleur, par exemple un radiateur !
-Lorsque les équipements passent d‘une pièce froide à une pièce chaude, il faut attendre qu‘ils soient à température ambiante avant de les mettre en marche pour éviter toute défaillance par l‘eau condensée !
-Protéger les produits contre les poussières !
UTILISATION CONFORME
-Cet appareil est un microphone à condensateur avec diagramme unidirectionnel.
-Le microphone a été spécialement conçu pour les applications dans les environnements d‘enregistrement (enregistrement vocal) et les stations TV et radio.
-Le Reloop Studio sPodacster se branche via câble USB sur un ordinateur PC ou Mac et ne requiert pas une propre
alimentation électrique.
-Toute utilisation non conforme peut endommager le produit et annuler les droits de garantie. En outre, toute
utilisation autre que celle décrite dans ce mode d’emploi peut être source de courts-circuits, incendies, décharge
électrique, etc.
-Le numéro de série attribué par le fabricant ne doit jamais être effacé sous peine d’annuler les droits de garantie.
Utilisation
Éléments de commande
2
FRANCAIS
1
3
1.
2.
3.
Molette de volume
DEL Power On
Port USB
Installation
-Fixer le sPodcaster à l‘aide du support de microphone fourni afin d‘assurer une position impeccable, stable et
exempte de vibrations.
-Pour obtenir un résultat optimal lors de l‘enregistrement avec votre sPodcaster ultrasensible, il convient d‘essayer
toutes les possibilités d‘installation et de configuration pour chaque application.
Utilisation
1. Réaliser les branchements
Démarrez votre ordinateur (Mac/PC) comme d‘habitude et attendez qu‘il soit entièrement chargé. Branchez à présent
votre ordinateur et le Reloop Studio sPodcaster au moyen du câble USB livré.
2. Configuration du logiciel (exemple : Windows XP)
Dès que le Reloop Studio sPodcaster est connecté à l‘ordinateur, Windows doit afficher un message sous forme de
bulle dans la barre des symboles. Grâce à la technologie Plug and Play intégrée, tous les pilotes requis sont installés
automatiquement. Enfin, le message „Le nouveau matériel a été installé et peut maintenant être utilisé“ doit s‘afficher.
L‘installation matérielle est ainsi correctement achevée.
Afin d‘assurer que tous les paramétrages sont corrects dans la Configuration système, ouvrez la rubrique „Sons et
périphériques audios“. Cliquez à présent sur l‘onglet „Audio“ pour visualiser le réglage du volume. Normalement, le
sPodacster doit être automatiquement réglé en tant qu‘appareil par défaut pour l‘enregistrement.
Note :
Dans le système, le Reloop Studio sPodcaster est désigné en tant que „C.-Media“.
FRANCAIS
3. Réglage du volume/brillance
Le régleur de volume permet de modifier le niveau d‘entrée du signal et la brillance de la capsule microphone afin de ne
pas saturer le microphone en cas de niveau de pression acoustique extrêmement élevé.
Note :
Pour un résultat optimal, nous recommandons de régler le volume de votre Reloop Studio sPodcaster au 3/4
du maximum ; le volume de sortie se règle dans l‘option „Enregistrement“ -> „Volume“ sur votre ordinateur.
4. Commencer l‘enregistrement
Lancer votre logiciel d‘enregistrement favori. Dans votre logiciel, régler le Reloop Studio sPodcaster en tant que source
d‘enregistrement („C-Media“).
Vous pouvez à présent enregistrer.
ENTRETIEN
-Contrôlez régulièrement le bon état de l’appareil (boîtier, cordon) et l’usure éventuelle des molettes et curseurs.
-Si vous supposez que l’appareil ne peut plus être utilisé en toute sécurité, mettez l’appareil hors-service et assurez-le contre toute réutilisation involontaire. Débranchez la fiche électrique de la prise de courant !
-La sécurité d’emploi est susceptible d’être affectée lorsque l’appareil est visiblement endommagé, ne fonctionne
plus correctement, après un stockage prolongé dans des conditions défavorable ou après une forte sollicitation de
transport.
Caractéristiques
- Alimentation en tension:
- Sensibilité:
- Rapport signal/bruit:
- Réponse en fréquence:
- Port:
- Dimensions:
- Poids:
USB, 5,0 V
-65 +/- 5 dB @ 1KHz
-59 dB
50 Hz - 18 kHz
USB
148 x 65 x 56 mm
350 g
FRANCAIS