1
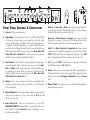
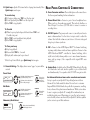
®
Spider IV
®
Pilot’s Handbook
Manuel de pilotage
Pilotenhandbuch
Pilotenhandboek
Manual del Piloto
取扱説明書
Get free lessons and tones! Join Spider Online!
www.line6.com/spideronline
40-00-0186
Pilot’s Handbook available @ www.line6.com/manuals
Rev F
Important Safety Instructions
C AU T IO N
RISK OF ELECTRIC
SHOCK DO NOT OPEN
WARNING : TO REDUCE THE RISK OF FIRE OR ELECTRIC SHOCK, DO NOT REMOVE SCREWS. NO USER-SERVICEABLE PARTS INSIDE.
REFER SERVICING TO QUALIFIED SERVICE PERSONNEL.
WARNING : TO REDUCE THE RISK OF FIRE OR ELECTRIC SHOCK, DO NOT EXPOSE THE APPLIANCE TO RAIN OR MOISTURE.
CAUTION: This equipment has been tested and found to comply with the limits for a Class B digital device pursuant to Part 15 of FCC Rules. Operation is subject to the
following two conditions: (1) This device may not cause harmful interference, and (2) this device must accept any interference received, including interference that may
cause undesired operation.
The lightning symbol within a triangle means “electrical caution!” It indicates the presence of information about operating voltage and potential
risks of electrical shock.
The exclamation point within a triangle means “caution!” Please read the
information next to all caution signs.
Please Note:
Line 6 and Spider are trademarks of Line 6, Inc. All other product names, trademarks, and artists’ names are the property of their respective owners,
which are in no way associated or affiliated with Line 6. Product names, images, and artists’ names are used solely to identify the products whose tones
andsoundswerestudiedduringLine6’ssoundmodeldevelopmentforthisproduct.Theuseof theseproducts,trademarks,images,andartists’names
does not imply any cooperation or endorsement.
Line 6, Inc.
The POD, Clifton House, Butler’s leap.
Rugby, Warwickshire, United Kingdom, CV 21 3RQ
26580 Agoura Road,
Calabasas, CA 91302-1921 USA
SERIAL NO:
You should read these Important Safety Instructions. Keep these instructions in a safe place
•
•
•
•
•
•
•
•
•
•
•
•
•
•
Read these instructions.
Keep these instructions. Heed all warnings.
Follow all instructions. Do not use this apparatus near water. Clean only with dry cloth.
Do not block any ventilation openings. Install in accordance with the manufacturer’s instructions.
Do not install near any heat sources such as radiators, heat registers, stoves, or other apparatus (including amplifiers) that produce heat.
This apparatus shall be connected to a MAINS socket outlet with a protective earthing connection.
Do not defeat the safety purpose of the polarized or grounding-type plug. A polarized plug has two blades with one wider than the other. A grounding type plug
has two blades and a third grounding prong. The wide blade or the third prong are provided for your safety. If the provided plug does not fit into your outlet,
consult an electrician for replacement of the obsolete outlet.
Protect the power cord from being walked on or pinched particularly at plugs, convenience receptacles, and the point where they exit from the apparatus.
Only use attachments/accessories specified by the manufacturer.
Use only with the cart, stand, tripod, bracket, or table specified by the manufacturer, or sold with the apparatus. When a cart is used, use caution when moving
the cart/apparatus combination to avoid injury from tip-over.
Unplug this apparatus during lightning storms or when unused for long periods of time.
Refer all servicing to qualified service personnel. Servicing is required when the apparatus has been damaged in any way, such as power-supply cord or plug is damaged, liquid has been spilled or objects have fallen into the apparatus, the apparatus has been exposed to rain or moisture, does not operate normally, or has been
dropped.
The apparatus shall not be exposed to dripping or splashing and that no objects filled with liquids, such as vases, shall be placed on the apparatus.
WARNING: To reduce the risk of fire or electric shock do not expose this apparatus to rain or moisture.
The appliance coupler is used as the disconnect device, the disconnect device shall remain readily operable.
Connect only to AC power outlets rated: 100/120V 220/240V 50/60Hz (depending on the voltage range of the included power supply).
•
•
Prolonged listening at high volume levels may cause irreparable hearing loss and/or damage. Always be sure to practice “safe listening.”
Service is required when the apparatus has been damaged in any way, such as:
• power-supply cord or plug is damaged. • liquid has been spilled or objects have fallen into the apparatus.
• the unit has been exposed to rain or moisture. • the unit is dropped or the enclosure is damaged.
• the unit does not operate normally or changes in performance in a significant way.
•
•
•
•
•
4
5
7
10
16
POWER
A
1
2
3
B
C
6
Front Panel Controls & Connections
8
9
will show red or green giving you two model types in each model
category. All the guitar tone and FX controls will automatically be set
to sound great with that Amp Model, so you can just play! When you
turn this knob, the Display will briefly show the currently loaded Amp
Model name, along with the current settings of the Drive, Bass, Mid,
Treble, Chan Vol and Reverb knobs. Models get progressively heavier
and distorted as you turn the model knob clockwise.
3. Tone Controls – Drive is like the volume or gain knob on other amps;
controls how much “dirt” or “distortion” you get in your sound. Bass,
Mid, and Treble controls are customized for each Amp Model to give
you optimal tonal control. When you turn any of these knobs, the
display will briefly show the current settings of the Drive, Bass, Mid,
Treble, Chan Vol and Reverb knobs.
4. Manual – Press to bypass current presets shown in your display. Now
your physical knob positions, where each knob is set, will determine
settings and sound.
5. Channel Memories – Four programmable channels come pre loaded
with great factory presets. To save a preset hold any A, B, C, or D
button for two seconds.
6. Smart Control FX – Spin one of these knobs to get great FX.
IMPORTANT NOTE: Each Smart Effect (or swoosh!) has an alternate
effect “behind” it. Turn the Presets knob next to the display to access
this alternate Smart Effect.
12
13
14
15
Knob A picks Gain, Auto or Pitch with a range of settings “from subtle
Knob B picks Chorus, Phaser or Tremolo, with a range of settings
Knob C picks Delay, Tape Echo or Sweep Echo, with a range of mix
settings from low to high. The display shows the active effect and the
TAP LED flashes the delay time. To change the delay time, tap the TAP
button. Turning this knob all the way down turns the effect off.
1. Guitar In – Plug your guitar in here.
2. Amp Models – Spin this knob to select one of 16 Amp Models. LED
11
to extreme” for each effect. The display shows the active effect. Turning
the knob all the way down turns this effect off.
“from subtle to extreme ” for each effect. The display shows the active
effect. Turning the knob all the way down turns this effect off.
7. Tap – Tapping the TAP button a few times sets the tempo of your Delay
and Modulation effects (A, B & C Knobs).
8. Reverb – Dial up more or less virtual room. While turning the knob,
the display will show you the current setting. When displayed you can
change your reverb from Lux Spring to Dark Hall by turning the Preset
knob.
9. Master Volume – You can choose the overall volume of the amplifier,
without affecting your tone.
10.Quick Loop – Spider IV features built in looping functionality. Press
Quick Loop to arm looper:
13.Phones/Direct Outs – Connect a pair of stereo headphones here.
To Overdub
A) When loop is in playback press, hold and release TAP to set
Overdub start point
B) Press TAP to end overdub and start playback
C) Press TAP to stop playback
tap tempo, wah/volume control and tuner capabilities. Connect a Line
6 FBV Shortboard MkII™ controller for channel switching, effects
on/off control, wah/volume pedals, access to more channel memories,
tuner, and tap tempo. (Also compatible with original FBV series
controllers)
11. Presets & Editing – The display shows various “pages” as you work the
controls.
Left/right selects between preset
types (Bands, Style, User)
PRESETS
Knob selects
next/previous
preset from
PUSH TO EDIT current folder
Up/down selects next/previous
folder of this preset type
Edit Mode
FeedBk
15%
16. Speaker Outs – Available on the 150 and HD150 models only. Provides
an 8 ohm load at each jack, wired in parallel, to give a 4 ohm load if
used simultaneously. Use a speaker cable, DO NOT use a guitar cable.
Preset Mode
FX 3: TAPE ECHO
14.CD/MP3 Inputs – Plug in any audio source to jam with your favorite
15.FBV – Connect a Line 6 FBV Express MkII™ for channel switching,
To Exit Loop Control Mode, press Quick Loop button again.
USER PRESET NAME
When you do so, the speakers are muted. This jack also doubles as a
Direct Output. Use a stereo 1/4” TRS cable to connect to a mixer or
recording device.
music or drum machine. Use the device’s output control to adjust the
volume. Start with the volume on your device at it’s lowest setting and
bring it up to volume you desire.
To Clear your Loop
A) Stop loop playback
B) Press and hold TAP for 3 seconds
C) Display will confirm your loop is cleared.
11A
12. Power Connector and Fuse – The included power cable connects here.
See the rear panel markings for fuse information.
To record a loop
A) To begin recording, press TAP to set the loop start B) To start playback, press TAP to set the loop end
C) Press TAP to stop playback
USER
Rear Panel Controls & Connections
Left/right selects between
blocks of parameters
PRESETS
Up/down selects next/previous
parameter in this block of
parameters
Momentary Model Select
PRESETS
Knob selects alternate Models,
while display is shown.
ANALOG W/ MOD
PUSH TO EDIT
Knob adjusts
selected
parameter
PUSH TO EDIT
Get Advanced Guide and more online www.line6.com/manuals
Get up to speed on your Spider IV deep editing features with our
Advanced User Guide available online. Discover how to customize
Amp and Effect Model defaults, deep edit effects parameters, enabling
boosts, advanced Loop functions and much more. While you’re online
be sure to register your Spider IV or simply fill out and mail us your
included registration card. Registering gets you all set up for warranty
service should you have an issue with your Spider IV, and also qualifies
you for contests, special offers and more.