1
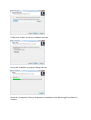
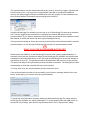
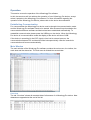
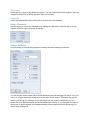
TFA
KlimaLogg Pro
User Manual
Revision: 0.1
Table of Contents
Overview ............................................................................................................................... 2
Getting Started ...................................................................................................................... 2
Setting up the KlimaLogg Pro device ................................................................................. 2
Installing the USB-Stick ..................................................................................................... 2
Installation ............................................................................................................................. 2
System Requirements........................................................................................................ 2
Downloading the software .................................................................................................. 2
Installing the software ........................................................................................................ 2
Synchronizing ........................................................................................................................ 5
What is Synchronizing? ..................................................................................................... 5
Requirements .................................................................................................................... 5
Performing the Synchronization ......................................................................................... 5
Operation .............................................................................................................................. 7
Establishing Communication .............................................................................................. 7
Main Window ..................................................................................................................... 7
Overview ........................................................................................................................ 7
Sensors .......................................................................................................................... 8
Main Menu ......................................................................................................................... 8
Toolbar .............................................................................................................................. 9
Options .............................................................................................................................. 9
Logger Settings.................................................................................................................10
Export Data .......................................................................................................................11
Active Channels ................................................................................................................12
Sensor Settings ................................................................................................................12
Overview
Welcome to the KlimaLogg Pro software, the application used to administer your TFA
KlimaLogg Pro device.
Using the KlimaLogg Pro software the data measured by the sensors of your KlimaLogg Pro
device can be transferred and stored on your PC.
The following pages detail the features and usage of the KlimaLogg Pro software application.
Getting Started
Setting up the KlimaLogg Pro device
Before installing the KlimaLogg Pro software on your PC you should complete the setup of
your KlimaLogg Pro device. For further information regarding your KlimaLogg Pro device
please refer to the KlimaLogg Pro device documentation.
Installing the USB-Stick
Before installing the KlimaLogg Pro software on your PC you should complete the setup of
the USB-Stick which is used for wireless communication with your KlimaLogg Pro device. To
install the USB-Stick, plug it into any available USB port on the PC where you want to install
the KlimaLogg Pro software.
Although the USB communication device can be installed on any USB port connected to your
computer, using a non-powered USB hub or extension cable increases the risk for
communication interruptions between the USB communication device and your computer.
Where obstructions are an issue, a good quality USB extension cable can be used if it is
directly connected to either a powered hub or a port on the computer itself.
Installation
System Requirements
The minimum requirements for your PC are as follows:
Supported Operating Systems:
•
•
•
•
•
Windows XP (SP3 or greater)
Windows Vista (SP1 or greater)
Windows 7
min. 1GB main memory
Suggested display resolution 1024x768 pixels.
Downloading the software
The latest version of the KlimaLogg Pro software can be downloaded at www.tfadostmann.de.
Installing the software
At this point you should have met the following requirements:
•
The KlimaLogg Pro device receives data from the internal and external sensors.
•
•
The PC meets the minimum system requirements.
The KlimaLogg Pro software has been downloaded or otherwise acquired and
transferred to the PC.
Open the KlimaLogg Pro setup file, which you have downloaded. Double click the file to start
the installation. Once the dialog below appears, please click „OK“.
Please click “Next” when the welcome dialog is shown.
Please click “Next” again to accept the default location for installation.
Please click “Next” again to accept the start menu folder where the program shortcuts will be
created.
Finally click “Install” to start the installation process:
During the installation a progress dialog is shown:
When the “Completing” dialog is displayed the installation of the KlimaLogg Pro software is
finished.
Click “Finish” to complete the installation and to start the KlimaLogg Pro Software. Setup
added shortcuts to your start menu and desktop from which you can start the application at
any time.
Synchronizing
What is Synchronizing?
Synchronizing is the process of telling the KlimaLogg Pro device and the KlimaLogg Pro
software how to talk to each other. Usually the synchronize process needs to be done only
once. Software and device are linked to each other during this process through the
exchange of their ID numbers. If device and software somehow loose contact, they will find
each other again through these IDs. Additionally other devices will be ignored so that multiple
devices can work without interfering with each other.
Requirements
Before synchronizing all components should be ready to go:
•
•
•
•
The KlimaLogg Pro device is set up and receiving data from the connected sensors.
The USB stick is connected to the PC.
The KlimaLogg Pro software is installed.
The KlimaLogg Pro device is within the transmission range (10m in a free area) of the
USB transceiver. If necessary place the devices side by side.
Performing the Synchronization
If no device has been synchronized, after startup, the KlimaLogg Pro Software shows
automatically the synchronize dialog:
The synchronization can be started manually at any time by choosing “Logger / Synchronize”
from the main menu. You may want to synchronize manually to synchronize additional
devices, the KlimaLogg Pro device and USB stick have lost contact or if the installation has
been finished without successfully synchronizing device and PC.
Using the KlimaLogg Pro software you can use up to 10 KlimaLogg Pro devices at the same
time. Use the logger channel selection to configure the channel that will be used for
synchronization. If you want to resynchronize an already synchronized device please choose
the channel on which the device has been synchronized previously.
If the synchronize dialog is shown and you have selected the channel that should be used for
synchronization you can bring the KlimaLogg Pro device into synchronization mode.
DON’T CLICK THE SYNCHRONIZE BUTTON YET!
Please press the USB key on the KlimaLogg Pro device until it beeps (approximately 3-4
seconds). Next click the synchronize button in the KlimaLogg Pro software (der synchronize
message box should still be shown on the PC) and the KlimaLogg Pro device will attempt to
synchronize to your PC. The process should be finished within the next one or two minutes.
The device will beep if the synchronize process has been successful. The dialog will be close
automatically to show the overview tab in the main window.
You may have to try the synchronization process more than once.
If the synchronization process is not successful, you will see a message similiar to the one
below. At this point, you need to retry the synchronization.
To repeat the synchronization process, please put both the KlimaLogg Pro device and the
KlimaLogg Pro software into synch mode again. To do this please press the USB button on
the device until it beeps, then click the synchronize button in the “Synchronize” dialog.
Operation
This section covers the operation of the KlimaLogg Pro software.
In this document we will not address the operation of your KlimaLogg Pro device, except
where it pertains to the KlimaLogg Pro software. For more information regarding the
operation of the KlimaLogg Pro device, please refer to the device documentation.
Establishing Communication
For communication the KlimaLogg Pro device must be brought into communication mode
and the KlimaLogg Pro software needs to be started. After successful synchronization the
communication between software and device has been established automatically. To
reestablish communication please press the USB key on the device. When the KlimaLogg
Pro device is in communication mode the display of the device will show “USB“.
If the device is searching for the DCF signal or has lost its external sensors, the
communication between PC and device will be interrupted briefly. After the search the
communication will resume automatically.
Main Window
The main window of the KlimaLogg Pro software contains the main menu, the toolbar, the
main area and the status bar. The main area is divided into several tabs.
Overview
The tab “Overview” shows all recorded data of all sensors of a KlimaLogg Pro device. New
datasets are appended at the end of the list.
Sensors
The sensor tabs show all information available for the selected sensor. On the left hand side
the recorded data is displayed. On the right hand side the alarm settings, min./ max. values
and other detailed information about the sensor are displayed. If a custom name was entered
in the sensor settings it will be used as the caption of the sensor tab. It is not possible to set
a custom name for the internal sensor. Clicking on “Edit Sensor Settings” will show the
“Sensor Settings” dialog which can be used to change sensor properties. For additional
information about changing sensor settings please refer to section “Sensor Settings”.
Main Menu
File
•
Exit: Closes the KlimaLogg Pro software.
View
• Show Only Alarm Events: The data area will show only datasets that have triggered
alarm events.
• Show Dew point In Device Overview: Shows or hides dew point columns in the device
overview tab.
• Set Active Channels in Device Overview...: Use the dialog to define which channels
are shown in the device overview tab. For details about how to do this please refer to
section „Active Channels“.
Logger
Settings…: Opens the “Logger Settings” dialog. Here you can find all information and
settings of the currently selected logger. You can find a detailed description of all
settings in section Logger Settings.
• Synchronize Logger…: Allows performing the synchronize process between
KlimaLogg Pro software und KlimaLogg Pro device again. For more information
please refer to section Synchronization.
• Export Data To Text File...: Shows the “Export data“ Dialog. Using this dialog the
recorded data can be written into a text file that can be processed or analyzed
further. For more information please refer to section Export data.
• Remove Logger: This menu entry deletes the current KlimaLogg Pro device including
all recorded data such as history datasets and alarm events. Attention! Deleting the
logger can’t be undone; all recorded data will be lost and can’t be recovered. Please
backup your data before deleting the logger using the menu entry “Logger / Export
Data To Text File...“.
Extras
•
Options…: Opens the options dialog. Here you can find all settings of the KlimaLogg
Pro software such as language, temperature format and date format. These settings
will be used in the whole program. For a detailed description of all available options
please refer to section Options.
•
•
•
Help…: Opens the online help.
Visit the TFA Homepage…: http://www.tfa-dostmann.de.
About the Thermo Hygro Logger…: Shows version and copyright information about
the KlimaLogg Pro software.
?
Toolbar
The toolbar can be used to quickly access often used functions.
The functions are from left to right:
•
•
•
•
•
•
•
Select the active KlimaLogg Pro device. If there is more than one KlimaLogg Pro
device synchronized you can select the device to display.
Logger settings. Opens the “Logger Settings” dialog. Please refer to section Logger
Settings for detailed information about the possible settings.
Export Data to Text File. Shows the “Data Export“ dialog.
Delete selected datasets. Deletes the datasets that have been selected in the list.
Show Only Alarm Events: Only datasets that have triggered alarm events will be
shown in the data area.
Show Dew point In Device Overview: Shows or hides the dew point columns in the
device overview.
Show version and copyright information.
Options
You can use the options dialog to change the default settings of the Klimalogg Pro software.
Language:
This option selects the language used in all windows and dialogs of the KlimaLogg Pro
software. If you choose a different language the KlimaLogg Pro software needs to be
restarted.
Date:
Select the format used for displaying dates in the KlimaLogg Pro software.
Time:
Select if time should be displayed in 12 hour or 24 hour format in the KlimaLogg Pro
software.
Temperature:
Select if temperatures should be shown in °C (Celsi us) or °F (Fahrenheit) in the KlimaLogg
Pro Software.
Automatic export file:
Select the path and filename where the automatic export file of the KlimaLogg Pro Service
will be stored. The automatic export file contains the last transferred dataset only.
Work as service:
If this option is selected the KlimaLogg Pro service will continue reading data from the device
that is synchronized on channel 1 even if the KlimaLogg Pro Software has been closed. The
KlimaLogg Service is started automatically when the PC starts. There is no need to actually
log in into the PC to communicate with the KlimaLogg Pro device on channel 1. To establish
communication press the USB key on the device once the PC has finished starting.
Show Data Folder:
Opens Windows-Explorer within the Folder were the KlimaLogg Pro software stores its data.
Logger Settings
In the Logger Settings dialog the preferences of the currently selected KlimaLogg Pro device
can be changed.
Logger Name & Logger Channel
Identifies the KlimaLogg Pro device to which the settings in the dialog applies.
Reread All History Data
Clicking this button reads again all data that is stored on the KlimaLogg Pro device and
transfers it to the PC. Already existing datasets will be overwritten.
Show Automatic Export File
Opens Windows Explorer and selects the export file that is used for the current KlimaLogg
Pro device.
Recording Interval
Sets the interval used by the KlimaLogg Pro device for storing measurements.
Reset Min/Max Values
Reset the min./max. values of the KlimaLogg Pro device.
Device Overview Display
Select the visible channels in device overview. Additionally the device overview can be
configured to show alarm events only and if dew point columns should be displayed.
To reread history data, change the recording interval or reset the min/max values, the
KlimaLogg Pro device must be in communication mode. To establish communication mode
press the USB key on the KlimaLogg Pro device.
Export Data
Use the “Export Data” dialog to archive the recorded datasets into a text file.
Time range
Select the time range of the datasets to export. You can find common time ranges in the time
range drop down box or define the exact start and end time.
Target File
Select the folder and filename which will be used to store the datasets.
Active Channels
Use this dialog to select the channels to be displayed in the device overview tab. You can
hide the channels were no sensor is learned.
Sensor Settings
Use this dialog to change the properties including the alarm settings of a sensor.
You can set the sensor name which will be displayed on the KlimaLogg Pro device. You can
use up to 10 alphanumerical characters for the name of the sensor. This name will also be
used in KlimaLogg Pro software as the tab caption for this sensor. Additionally you can
define the Hi/Lo alarm threshold and activate/deactivate alarms. If you changed the name of
the sensor or alarm settings the changed settings will be transferred to the KlimaLogg Pro
device after clicking OK.
To transfer the settings the KlimaLogg Pro device must be in communication mode. To
establish communication mode please press the USB key on the KlimaLogg Pro device.