1
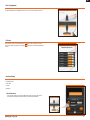
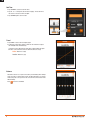
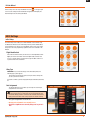
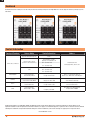
Instruction Manual
Bedienungsanleitung
Manuel d’utilisation
Manuale di Istruzioni
EN
Getting Started
To get more information, including details on downloading
the Spektrum™ AS3X® Mobile Programming Application,
visit www.SpektrumRC.com/AS3X or scan this QR code.
*Minimum system requirements:
iOS 6.0, iPhone 4, iPod 4th gen and Android 4.0
Transmitter Setup
Connecting to the Receiver
1.Connect the servo plug on the
audio interface cable to the BIND/
PROG port on your receiver.
• Set all transmitter settings to
default.
Important: The Aileron, Elevator
and Rudder settings in the
transmitter must remain at their
factory default values. Settings for
reverse, sub trim, travel adjustment,
expo and dual rate must be done in
the App only.
2.Power the receiver through any
open channel.
CLEAR
BACK
®
™
3.Connect the audio plug on the
interface cable to the audio jack
on your mobile device. The volume
MUST be turned up to full.
4.Ensure you have secure receiver
data port and audio data port
connections.
If the receiver is being connected
for the first time, the App will
automatically open in Model Wizard
in the Model Setup screen.
Installing the Receiver
1.Install the receiver in one of 8
possible orientations using double
sided tape.
2.The servo ports must be facing the
front or rear of the aircraft.
If your Android device does not recognize the receiver*
AR636 shown
Binding
1.Insert the bind plug into in the
receiver bind port and power on
the receiver. The LED should blink
to indicate the receiver is in bind
mode.
2.Bind the transmitter to the receiver AR636 shown
at low throttle. Refer to your
transmitter’s manual for details
on how to bind to your specific
transmitter.
1.Ensure you have secure receiver data
port and audio data port connections.
2.Disconnect the audio plug from the
device.
3.Separate the servo plugs in the middle of the interface cable.
4.Flip the device servo plug 180 degrees and re-connect the servo plugs.
5.Re-connect the audio plug to the
device.
*Does not apply to iOS Devices.
Plug servo leads into assigned ports
Typical Servo Port Assignments*:
Normal Model Type
Delta /
Elevon Model Type
• Port 1: Throttle
• Port 1: Throttle
• Port 2: Aileron
• Port 3: Elevator
• Port 4: Rudder
• Port 5: Gear/ Flap
• Port 6: Left
Aileron
(if equipped with dual servos)
• Port 2: Right
Aileron
• Port 3: Left
Aileron
• Port 4: Rudder
• Port 5: Gear
• Port 6: Aux 1
*AR636 shown for reference. Port assignments
will be similar for all AS3X receivers. Refer to your
receivers manual for more information.
2
Bind/Prog
Port 1
Port 2
Port 3
Port 4
Port 5
Port 6
3.The receiver must be mounted
parallel to the roll, pitch and yaw
axis (NOT ANGLED).
™
EN
Navigation
1.
2.The
and move to the next or previous screen in the Wizard.
appears at the end of the Wizard. Tap the square to save the airplane configuration and to exit the Wizard.
The Wizard
The Wizard starts automatically when you open the app for the first time.
Model Setup
1.Select a photo for the model (optional).
2.Name the Model.
3.Select the receiver that you want to program. If a receiver is already bound
and connected to the mobile device, the app will auto-detect the receiver.
4.Select your transmitter.
™
3
EN
Receiver orientation
Tell the app how the receiver is mounted in your aircraft. 1.To flip the receiver horizontally, swipe LEFT or RIGHT. 2.To flip the receiver vertically, swipe UP or DOWN.
The servo pins must always point toward the nose or tail of the aircraft.
Flight Mode Setup
Select the transmitter channel you want to use for flight modes.
Wing Type
1.Swipe left or right across the wing to change the wing type.
2.Swipe left or right across the tail to change the tail type. If a tail type is not
available, it is because you have run out of channels in the receiver. 4
™
EN
Port Assignment
The port assignment screen shows you where to connect the servos to the
receiver. No options are available on this screen; it is only used for reference.
Failsafe
You have the option of selecting Preset or Hold for each receiver port. If you
aren’t sure what each port does, tap the
to return to the Port Assignment
screen.
Surface Setup
Tap each surface to access the following:
• Servo Reverse
• Sub Trim
• Travel
• Balance
Servo Reverse
If the surface moves in the wrong direction when you move the control
stick on the transmitter, tap the selector to reverse the direction.
™
5
EN
Sub Trim
1.Tap SUBTRIM to access the sub trim value.
2.Tap the - or + to change the sub trim value. Tapping - moves the trim to
the Left and + moves the trim to the Right.
3.Tap SUBTRIM again to save the value.
Travel
1.Tap TRAVEL to access the travel adjust graph.
2.To adjust the travel values drag up or down on the vertical line to adjust
the Left/Right values simultaneously.
• Directions can be adjusted at the same time or independently. To adjust
directions at the same time, make sure both directions are orange.
Active: Direction is orange
Inactive: Direction is gray
Balance
The balance function is a 7-point curve used to prevent binding when multiple
servos are used on a single control surface. To adjust the balance on a control
surface, drag each of the 7 points on the curve until the control surface moves
without binding.
Press
6
to return to the Wizard.
™
EN
Exit the Wizard
Surface Setup is the last step in the Wizard. Press the
in the upper right
corner to save settings and exit the Wizard. The application will display the
AS3X Settings menu after exiting the Wizard.
AS3X Settings
Initial Setup
The Initial Setup menu enables you to view individual screens without using
the Wizard. You will also use the Initial Setup menu to perform a Model Reset,
share model files via e-mail or access the Wizard. Some screens in the Initial
Setup menu also have programming capabilities that are not available in the
Wizard.
Flight Mode Switch
Select the transmitter channel you wish to use for the Flight Mode switch.
Tip: If you wish to use the Gear channel for flight modes, but also wish
to use a 3-position switch, you will need to assign the Gear channel to a
3-position switch in the transmitter.
Wing Type
IMPORTANT: If you select Aircraft Type in the Initial Setup menu, the
following pop-up alert appears:
“Reselecting your aircraft type will reset all your surface settings. Are
you sure you want to continue.”
If you select “Continue”, you must re-program all of your travel values, dual rates,
etc.
Port Assignment
The Port Assignment screen enables you to change the receiver port
assignment for each surface. CAUTION: Changing the port assignments may cause issues with
other control surfaces or mixes that you have programmed in your
transmitter. Always perform a control test and set failsafe values before
flying your aircraft. Failure to do so may result in the aircraft crashing.
• Gray port assignemnts are not in use.
• Orange port assignments are currently in use.
• Red port assignments are currently being used as part of a
mix.
™
7
EN
Model Reset
Resets the active model in the application.
Share Via Email
Attaches the active model file to a new email. The email recipient can open
the attachment in the AS3X Programmer app.
Expo
• Positive Expo decreases control stick sensitivity near center.
• Negative Expo increases control stick sensitivity near center.
1.Swipe left or right to change between Roll, Pitch and Yaw.
2.Select a flight mode to access the Expo curve.
3.Drag the curve UP or DOWN to adjust the Expo values.
• Directions can be adjusted at the same time or independently. To adjust
directions at the same time, make sure both directions are orange.
Active: Direction is orange
Inactive: Direction is gray
4.Press the
to return to the main Expo screen.
Dual Rate
Dual Rate is a percentage of the Travel value.
1.Swipe left or right to change between Roll, Pitch and Yaw.
2.Select a flight mode to access the Dual Rate curve.
3.Drag the curve UP or DOWN to adjust the Dual Rate values.
• Directions can be adjusted at the same time or independently. To adjust
directions at the same time, make sure both directions are orange.
Active: Direction is orange
Inactive: Direction is gray
4.Press the
8
to return to the main Dual Rate screen.
™
EN
Gain & Priority
Gain is a percentage of the Travel value.
1.Swipe left or right to change between Roll, Pitch and Yaw
2.Select a flight mode to access the Gain curve.
3.Drag the curve to adjust the Gain values.
• Directions can be adjusted at the same time or independently. To adjust
directions at the same time, make sure both directions are orange.
Active: Direction is orange
Inactive: Direction is gray
ABS- Absolute
When ABS is selected, the Rate and Heading Gain values that are
programmed in the Application are fixed (absolute) for each given flight
mode and are not adjustable from the transmitter.
REL- Relative
When REL is selected, the Rate and Heading gain values are adjustable
from the transmitter. This allows in flight gain adjustments. Some Spektrum
transmitters feature an AS3X screen that allows the gain to be adjusted
from the transmitter and displays the active value for each gain that
includes priority in real time.
IMPORTANT: When REL is selected, the gain value in the application
represents the maximum available gain. 1.Drag up or down in the black area of the curve to adjust the Rate Gain.
2.Drag up or down on the vertical line to adjust the Heading Gain. Heading
Gain is only active when the transmitter control stick is near center.
3.Drag left or right across the vertical line to adjust the Stick Priority.
Adjusting the Priority enables you to turn the gain off when the
transmitter control stick reaches a certain position.
4 Press the
to return to the Gain screen.
Mixing
The Mixing menu in the AS3X Programmer App is only used for mixes
involving control surfaces. Any mixes involving lights, retracts, etc. should
be programmed in your transmitter as usual. Six programmable mixes are
available in the app.
1.Press the “+” to create a new mix.
2.Assign the master and slave channels.
3.Assign mix values.
4.Press the sync button to save the mix and send the programming to the
receiver. You must send the mix programming to the receiver before you can
create another mix.
™
9
EN
Dashboard
The Dashboard screen enables you to see all of the gain, dual rate and expo settings for each Flight Mode. You can also adjust the values by selecting any of the
value boxes.
Contact Information
Country of Purchase
United States of America
Horizon Hobby
Contact Information
Horizon Service Center
(Repairs and Repair Requests)
servicecenter.horizonhobby.com/RequestForm/
Horizon Product Support
(Product Technical Assistance)
Address
www.quickbase.com/db/
bghj7ey8c?a=GenNewRecord
Heli 888-959-2304
Air 888-959-2305
4105 Fieldstone Rd
Champaign, Illinois, 61822 USA
[email protected]
Sales
Heli 888-959-2304
Air 888-959-2305
Service/Parts/Sales:
Horizon Hobby Limited
[email protected]
Horizon Technischer Service
[email protected]
Sales: Horizon Hobby GmbH
+49 (0) 4121 2655 100
France
Service/Parts/Sales:
Horizon Hobby SAS
[email protected]
China
Service/Parts/Sales:
Horizon Hobby – China
[email protected]
United Kingdom
Germany
+44 (0) 1279 641 097
+33 (0) 1 60 18 34 90
+86 (021) 5180 9868
Units 1–4 , Ployters Rd, Staple Tye
Harlow, Essex, CM18 7NS, United Kingdom
Christian-Junge-Straße 1
25337 Elmshorn, Germany
11 Rue Georges Charpak
77127 Lieusaint, France
Room 506, No. 97 Changshou Rd.
Shanghai, China 200060
©2014 Horizon Hobby, LLC. DSM, DSM2, DSMX, the DSMX logo, AS3X, and the Horizon Hobby logo are registered trademarks of Horizon Hobby LLC. The Spektrum trademark is used with permission of Bachmann Industries, Inc. Apple® is a trademark of Apple Inc., registered in the U.S. and other countries. Android
and Google are trademarks or registered trademarks of Google Inc. All other trademarks, service marks and logos are property of their respective owners.
Created 07/2014 • 42221
10
™