1
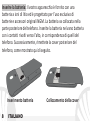
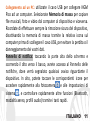
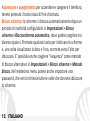
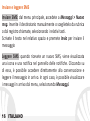
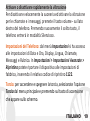
Guida rapida - Italiano............ 5
Quick guide - English............ 22
Kurzanleitung - Deutsch....... 39
Guía rápida - Español............ 56
Guide rapide - Français......... 73
4
ITALIANO
Guida rapida - Italiano
ITALIANO
5
Benvenuti nel mondo di NGM. Grazie per aver acquistato NGM
Pico, uno straordinario esempio di connubio perfetto tra
semplicità e tecnologia. Con questo dispositivo infatti potrete
facilmente effettuare telefonate, mandare e ricevere SMS. Grazie
al servizio SOS potrete avviare una procedura automatica di
chiamata verso alcuni numeri precedentemente impostati in caso
di emergenza. Le funzionalità essenziali sono racchiuse in un
software funzionalmente avanzato, dinamico e moderno, ma
comunque immediato e intuitivo, grazie alle icone grandi e al
touch screen. Visitando il sito ufficiale www.ngm.eu potrete
conoscere l’intera gamma di telefoni NGM, provare il nostro
pratico e funzionale servizio di e-commerce per acquistare
telefoni ed accessori, richiedere assistenza, accedere al forum di
assistenza tecnica e scaricare aggiornamenti software.
6
ITALIANO
D
Inserire la SIM card: la SIM card contiene il vostro numero telefonico,
codice PIN, i collegamenti ai servizi dell’operatore, contatti e
messaggi SMS. Per accedere al vano contenente lo slot della SIM,
spegnete il telefono e fate scorrere la cover verso il basso. Rimuovete
la batteria. Inserite la scheda SIM nello slot con i contatti dorati rivolti
verso il basso.
Inserire una scheda di memoria: per poter utilizzare le funzioni di
fotocamera e lettore multimediale di NGM Pico, è necessaria una
micro-SD (non compresa nella confezione): lo slot
micro-SD si trova subito a destra dello slot SIM.
Sbloccate lo sportellino metallico spingendolo
Slot micro -SD
verso destra. Inserite la scheda micro-SD, con i Slot SIM
contatti dorati rivolti verso il basso e richiudete lo
sportellino. Bloccate lo sportellino sulla micro-SD
facendolo scorrere nella direzione opposta.
ITALIANO
7
Inserire la batteria: Il vostro apparecchio è fornito con una
batteria a ioni di litio ed è progettato per l’uso esclusivo di
batterie e accessori originali NGM. La batteria va collocata nella
parte posteriore del telefono. Inserite la batteria nel vano batteria
con i contatti rivolti verso l’alto, in corrispondenza di quelli del
telefono. Successivamente, rimettete la cover posteriore del
telefono, come mostrato qui di seguito.
Inserimento batteria
8
ITALIANO
Collocamento della cover
Caricare la batteria: Caricate la batteria prima di iniziare ad
utilizzare l’apparecchio. Connettete il caricatore ad una presa
della rete elettrica e quindi inserite lo spinotto nella basetta di
ricarica oppure inseritelo direttamente nell’apposito ingresso sul
lato inferiore del telefono. La basetta di ricarica può anche essere
collegata ad un cavo micro USB per ricaricare il telefono. Quando
la batteria è in carica, un’icona animata sullo schermo mostra lo
stato di avanzamento del processo, mentre sulla basetta si
accende un led rosso. Una volta che l’icona della batteria è
riempita e il led sulla basetta diventa verde, la carica è completata
e il telefono può essere disconnesso dalla carica.
Attenzione: Per preservare la corretta funzionalità del prodotto e l'integrità della garanzia
si raccomanda l'utilizzo di caricabatterie originali NGM. Procedete alla ricarica
esclusivamente al coperto e in luoghi asciutti. Un leggero riscaldamento del telefono
durante il processo di ricarica è del tutto normale. La batteria raggiungerà la sua piena
efficienza funzionale solo dopo alcuni cicli completi di ricarica.
ITALIANO
9
LED di Ricevitore
notifica
Ingresso
auricolare
Fotocamera
Basetta di ricarica
Flash
Touch
screen
LED di carica:
Rosso = in carica
Verde = batteria carica
Speaker
Ingresso USB
Tasto
chiamata
Tasto
Home
10 ITALIANO
Microfono
Tasto Fine Chiamata,
Accensione / Spegnimento
e Indietro
Tasti
volume
+e-
Collegamento ad un PC: utilizzate il cavo USB per collegare NGM
Pico ad un computer. Selezionate Memoria di massa per copiare
file musicali, foto e video dal computer al dispositivo e viceversa.
Ricordate di effettuare sempre la rimozione sicura del dispositivo,
disattivando la memoria di massa tramite la relativa icona sul
computer prima di scollegare il cavo USB, per evitare la perdita o il
danneggiamento dei vostri dati.
Pannello di notifica: toccando la parte alta dello schermo e
scorrendo il dito verso il basso, avrete accesso al Pannello delle
notifiche, dove verrà segnalato qualsiasi avviso riguardante il
dispositivo. In alto, potete toccare le corrispondenti icone per
accedere rapidamente alla fotocamera
e alle impostazioni di
sistema , e controllare rapidamente altre funzioni (Bluetooth,
modalità aereo, profili audio) tramite i tasti rapidi.
ITALIANO
11
Accensione e spegnimento per accendere e spegnere il telefono,
tenete premuto il tasto rosso di fine chiamata.
Blocco schermo: lo schermo si blocca automaticamente dopo un
periodo di inattività configurabile in Impostazioni > Blocco
schermo > Bloccoschermo automatico, dove potete scegliere tra
diverse opzioni. Premete qualsiasi tasto per riattivare lo schermo
e, una volta visualizzata la data e l’ora, scorrete verso l’alto per
sbloccare. E’ possibile anche scegliere “sequenza” come metodo
di blocco alternativo in Impostazioni > Blocco schermo > Metodo
blocco. Nel medesimo menu potete anche impostare una
password, che verrà richiesta tutte le volte che dovrete sbloccare
lo schermo.
12 ITALIANO
Personalizzare la schermata di sblocco: in Impostazioni >
Impostazioni tema potete impostare uno sfondo da visualizzare
sullo schermo di blocco, scegliendo tra gli sfondi previsti dal
sistema o le foto presenti in Galleria.
Menu principale: dalla pagina principale scorrete da destra a
sinistra per sfogliare tutte e 4 le pagine del menu, e da sinistra a
destra per tornare indietro. Premete in qualsiasi momento il tasto
rosso per tornare alla schermata precedente ed il tasto Home per
tornare alla pagina principale.
ITALIANO
13
Effettuare una chiamata: per effettuare una chiamata,
selezionate l’icona Telefono. Digitate il numero selezionato
utilizzando la tastiera virtuale e avviate la chiamata selezionando
l’icona cornetta verde o il tasto verde in basso a sinistra. Per
terminare la chiamata toccate l’icona rossa di fine chiamata o il
tasto rosso in basso a destra. Durante la chiamata, selezionando
Opzioni, avrete accesso alle impostazioni di chiamata.
Per rispondere ad una chiamata in arrivo premete il tasto cornetta
verde.
Chiamare un numero dalla rubrica: dal menu principale,
selezionate Rubrica. Scorrete i contatti con il touch screen,
selezionate il contatto da chiamare e premete il tasto verde di
chiamata. Selezionando Opzioni avrete accesso ad importanti
Impostazioni relative alla Rubrica (importa/esporta, filtro
contatti…)
14 ITALIANO
Richiamare un numero dal registro chiamate: tramite il tasto
verde di chiamata o da Telefono accedete al registro chiamate;
verranno visualizzate in automatico le chiamate perse, ricevute
ed in uscita. Scorretele con il touch screen, selezionate il numero
da chiamare e premete il tasto verde di chiamata.
Aggiungere contatti in rubrica: dal menu principale selezionate
Rubrica > Aggiungi. Inserite il nome, il nuovo numero ed altre
opzioni, nel caso esse siano supportate, e confermate con Salva.
Composizione rapida: in Rubrica > Opzioni > Impostazioni >
Chiamata rapida si possono assegnare ai tasti 2-9 dei numeri
telefonici che verranno chiamati automaticamente se viene
tenuto premuto il tasto corrispondente sul tastierino virtuale.
ITALIANO
15
Inviare e leggere SMS
Inviare SMS: dal menu principale, accedete a Messaggi > Nuovo
msg. Inserite il destinatario manualmente o sceglietelo da rubrica
o dal registro chiamate, selezionando i relativi tasti.
Scrivete il testo nel relativo spazio e premete Invia per inviare il
messaggio
Leggere SMS: quando ricevete un nuovo SMS, viene visualizzata
una icona e una notifica nel pannello delle notifiche. Cliccando su
di essa, è possibile accedere direttamente alla conversazione e
leggere il messaggio in arrivo. In ogni caso, è possibile visualizzare
i messaggi in arrivo dal menu, selezionando Messaggi.
16 ITALIANO
Funzione S.O.S.: NGM Pico è dotato di un servizio di inoltro rapido
di chiamate d’emergenza (*). Questa funzione può essere attivata
e disattivata dal menu principale, all’interno del menu SOS. In
caso di emergenza, l’utente può premere a lungo il tasto Home
richiedere aiuto ad un massimo di cinque numeri
telefonici che avrà precedentemente impostato in
4-5 sec
Menù > SOS > Numeri SOS. Poi, il telefono inizierà
a chiamare a rotazione i 5 numeri SOS, per 20
secondi circa ciascuno. Se a fine ciclo non avrà ottenuto alcuna
risposta, attenderà circa 30 secondi e quindi lancerà un secondo
ciclo di chiamate a rotazione. Questa procedura sarà ripetuta per
5 volte. In caso di risposta da uno dei numeri chiamati, il ciclo sarà
interrotto e la chiamata passerà automaticamente in vivavoce.
Attenzione: Il ciclo di chiamate S.O.S. sarà interrotto anche se scatta la segreteria
telefonica di uno dei numeri S.O.S. chiamati.
ITALIANO
17
Radio FM: dal menu principale selezionate l’icona Radio FM e
premete il tasto d’accensione. Non occorre collegare gli auricolari
per avviare la radio, in quanto NGM Pico ha l’antenna radio
incorporata. Scorrete i canali attraverso la rotellina sopra il tasto
d’accensione, per avviare la ricerca canali selezionate Elenco
Canali > Ricerca.
Visualizzare e riprodurre file multimediali: nel menu principale
selezionate Galleria per visualizzare foto e video e Lettore
musicale per riprodurre i file audio. Gli stessi file possono essere
visualizzati dal File Manager, nel menu principale.
Impostare le suonerie: dal menu principale, selezionate
Impostazioni > Impostazioni Toni. Selezionate Suoneria chiamate
in arrivo ed impostare il tono desiderato tra quelli disponibili. Nel
medesimo menu è possibile impostare anche i toni per messaggi,
touch, tastierino, e attivare la vibrazione al tocco.
18 ITALIANO
Attivare o disattivare rapidamente la vibrazione
Per disattivare velocemente la suoneria ed attivare la vibrazione
per le chiamate e i messaggi, premete il tasto volume - sul lato
destro del telefono. Premendo nuovamente il solito tasto, il
telefono entrerà in modalità Silenzioso.
Impostazioni del Telefono: dal menù Impostazioni si ha accesso
alle impostazioni di Data e Ora, Display, Lingua, Chiamate,
Messaggi e Rubrica. In Impostazioni > Impostazioni Avanzate >
Ripristina potete riportare il dispositivo alle impostazioni di
fabbrica, inserendo il relativo codice di ripristino 1122.
Torcia: per accendere e spegnere la torcia, selezionate l’opzione
Torcia dal menu principale e premendo sul tasto di accensione
che appare sullo schermo.
ITALIANO
19
Bluetooth: In Impostazioni > Rete > Bluetooth è possibile attivare
il Bluetooth mentre in Impostazioni > Rete > Impostazioni
Bluetooth, in Associati è possibile visualizzare i dispositivi
associati e ricercarne altri (auricolari, telefoni…) selezionando
l’opzione Cerca. Selezionate il dispositivo con cui desiderate
associarvi e confermate su entrambi i dispositivi. In Bluetooth
invece, potete gestire la durata della visibilità del vostro
dispositivo, cambiarne il nome e accedere alle impostazioni
avanzate.
Fotocamera: accedete alla Fotocamera dal menu principale
oppure dal pannello delle notifiche. Spostate l’interruttore
sull’icona della fotocamera o della videocamera e premete il tasto
centrale per acquisire foto e video. Selezionate l’icona in alto a
sinistra dello schermo per visualizzare le impostazioni di
fotocamera e videocamera.
20 ITALIANO
*Limitazione di responsabilità:
questo non è un dispositivo salva-vita ma un telefono
cellulare. NGM non sarà responsabile per qualsiasi danno
indiretto, speciale, incidentale o consequenziale derivante
da o in connessione con l'uso di questo prodotto.
Avvertenza: il produttore non assume alcuna responsabilità per qualsiasi
inadempienza delle linee di condotta sopra stabilite o per ogni uso improprio del
telefono cellulare. Il produttore si riserva il diritto di modificare senza preavviso le
informazioni contenute in questa guida. Il contenuto di questo manuale potrebbe
differire dal contenuto effettivamente mostrato nel telefono cellulare. In tale
caso, il secondo prevale.
Copyright © 2014 NGM Italia
Nessuna parte di questo manuale può essere riprodotta, distribuita, tradotta trasmessa
in alcuna forma o tramite alcun mezzo, elettronico o meccanico, compresi fotocopie,
registrazione o salvataggio in qualsiasi archivio di informazioni o sistema di recupero,
senza previa autorizzazione scritta da parte di NGM Italia.
ITALIANO
21
Quick Guide - English
22 ENGLISH
Welcome to the NGM world. Thank you for purchasing NGM Pico,
an extraordinary example of perfect balance between simplicity
and technology. With this device you can easily make phone calls,
send and receive SMS. Thanks to the SOS function you can start an
automatic call procedure to a few previously set numbers in case
of emergency. The essential features are enclosed in a functionally
advanced, dynamic and modern though immediate and intuitive
software, thanks to large icons and the touch screen. By visiting
the official website www.ngm.eu you can appreciate the whole
range of NGM mobile phones, ask for after sales assistance, access
the forum for technical assistance and download software
updates.
ENGLISH
23
Insert the SIM card: The SIM card contains your phone number, PIN
code, links to operator services, contacts and SMS messages. To
access the compartment containing the SIM slot, turn off the phone
and slide down the cover. Remove the battery. Insert the SIM card
into the slot with its gold contacts facing down.
Insert a memory card: In order to use the camera and media player
functions of NGM Pico, a micro-SD memory card is required (not
included in the package): place it into the
backside of the phone, next to the SIM slot.
Unlock the grid by pushing it to the right. Insert
Slot micro -SD
the micro SD with its gold contacts facing Slot SIM
downwards and close the flap. Lock the grid on
the micro-SD by sliding it into the opposite
direction.
24 ENGLISH
Inserting the Battery: Your device is provided with a lithium-ion
battery and is designed to be used exclusively with original NGM
batteries and chargers. The battery must be inserted into the
backside of the phone. Insert the battery into the battery
compartment with the contacts facing up, matching those of the
phone. When done, put the hind cover back into position as
shown in the following illustrations.
Inserting the battery
Placement of the cover
ENGLISH
25
Charging the battery: Charge the battery before starting to use
the device. Connect the charger to a provided wall socket adaptor
and then plug the jack into the charging base or insert it directly
into its connector on the lower side of the phone. The charging
base can also be connected to a micro USB cable to charge your
phone. When the battery is charging, an animated icon on the
screen will show the charging progress and the charging base
shows a red LED light. Once the battery icon is filled and the
charging LED becomes green, it is fully charged and the phone can
be disconnected from the grid.
Attention: To preserve the functionality of the product and the integrity of the warranty, we
recommend the use of original NGM chargers. Please charge the battery indoors, in a dry
and favorable environment. It’s normal for the battery to get slightly warm during the
charging process. The battery will reach its full capacity when cycled several times.
26 ENGLISH
Notification LED
Receiver
Earphone
Plug
Camera
Charging base
Flash
Touch
screen
Speaker
USB port
Call key
Home Key
Charging LED:
Red = in charge
Green = fully charged
Microphone
Volume
+ and -
End call, power On/Off key
and Back
ENGLISH
27
Connecting to a PC: Use the USB cable to connect NGM Pico to a
computer. Selected USB memory to copy music files, photos and
videos from your computer to your device and vice versa.
Remember to always make the safe removal of the device by
deactivating the USB storage with the icon on your computer
before disconnecting the USB cable, to avoid data loss or damage.
Notification panel: By tapping the top of the screen and scrolling
your finger down, you'll open the notifications panel, where you
will find any notice regarding the device. At the top, you find the
corresponding icons for quick access to the camera
and the
system settings , moreover the quick settings keys to other
functions (Bluetooth, airplane mode, audio profiles) via the quick
keys.
28 ENGLISH
Turning the device on and off
To turn on and turn off the phone, press and hold the red end call
key.
Lock screen
The screen automatically locks after a period of inactivity
configurable in Settings > Screen Lock > Automatic screen lock,
where you can choose between different options. Press any key to
wake up the screen and scroll upwards to unlock, once the date
and time are displayed. You can also choose "sequence" as a
method of alternate block in Settings > Screen Lock > Blocking
method. In the same menu you can also set a password that will
be asked every time the screen is unlocked.
ENGLISH
29
Customize the unlock screen
Under Settings > Theme settings you can set the background to
display on your unlock screen, choosing between the backgrounds
provided by the system or the pictures in the Gallery.
Main Menu
From the main page scroll from right to left to browse through all
4 menu pages, and from left to right to go back. Press the back
key to return to the previous screen and press the Home key to
return to the main screen.
30 ENGLISH
Making a call
To make a call, select the Phone icon.
Type the number selected by using the virtual keyboard and start
the call by selecting the green handset icon or the green key at
the bottom left. To terminate the call, tap the red end call icon or
press the red key at the bottom right. During the call, you will
have access to call settings by selecting Options.
To answer an incoming call, press the green handset.
Call a number from the phone book: from the main menu, select
Contacts. Scroll through the contacts with the touch screen,
select the contact you want to call and press the green call key. By
selecting Options you will have access to important settings for
the Phone Book (import/export, filter contacts…)
ENGLISH
31
Call a number from the call logs: through the green call keyor
through the Phoneapp, go to call logs; the missed, received and
outgoing calls will be displayed automatically. Scroll the through
with the touch screen, select the number to call and press the
green call key.
Add contacts in your address book: from the main menu select
Contacts > Add new. Enter the name, the new number and other
options, if they are supported, and confirmed with Save.
Speed dialing: in Contacts > Options > Settings > Speed Dial, you
can assign to keys 2-9 some numbers that will be called
automatically if you press and hold down the related key.
32 ENGLISH
Send and read SMS
Send SMS: From the main menu, go to Messaging > New msg.
Enter the recipient manually or choose it from the address book
or from the call logs by selecting the corresponding keys.
Write the text in its dedicated space and press Send
Read SMS: When you receive a new SMS, an icon appears in the
notification panel. By clicking onto this icon, you can access
directly the conversation and read the incoming message. In any
case, you can view the incoming messages from the home screen
by selecting Messaging.
ENGLISH
33
SOS function: NGM Pico is equipped with a dedicated key for the
fast forwarding of emergency calls (*). This feature can be turned
on and off from the main menu, within the SOS menu. In case of
emergency, use this function to ask for help up to five phone
numbers previously set in Menu > SOS > SOS
numbers by long pressing the Home key. Then, the
4-5 sec
phone will call the five SOS numbers, for about 20
seconds each. If at the end of the cycle it will not
have received no response, the phone will wait for about 30
seconds and then will launch a second cycle of calls. This
procedure will be repeated for 5 times. If one of the called
numbers answers, the cycle will be interrupted and the call will
automatically switch to speaker phone (handsfee).
Warning: The SOS calls cycle will be interrupted if the answering machine or voicemail of
one of the called SOS numbers takes the call.
34 ENGLISH
FM radio: From the main menu select the FM Radio icon and
press the Power ON key. No need to connect earphones to listen
to the radio, since NGM Pico has a built-in radio antenna. Scroll
through the channels through the trackwheel or start the
automatic search of channels in Channel List > Search.
View and play media files: In the main menu select Gallery to
display photos, videos and Music player to play audio files. The
same files can be viewed from the File Manager, in the main
menu.
Set Ringtones: from the main menu, select Settings > Sounds
Management. Select Ringtone for incoming calls and set the
desired tone from those available. In the same menu, you can also
set the tone for messages, touch, keypad, and activate the
vibration-feedback.
ENGLISH
35
Quickly turn on/off the vibration mode
To quickly turn off the ringtone and turn on the vibration for calls
and messages, press the volume key - on the right side of the
phone. By pressing volume - again, the phone will enter the silent
mode.
Phone Settings: from the Settings menu you can access the Date
& Time, Display, language, Messaging, Network and Call settings.
Under Settings > Advanced Settings > Restore you can return the
device to factory settings by entering the recovery code 1122.
Torch: to turn on and turn off the torch, select the Torch icon
from the main menu and press the power key that appears on the
screen.
36 ENGLISH
Bluetooth: Under Settings > Network > Bluetooth it is possible to
activate Bluetooth while in Settings > Network > Bluetooth
Settings, in Associated and you can see the associated devices
and search for others (headsets, phones…) by selecting Search.
Select the device you would like to associate with and confirm it
on both devices. Inside the Bluetooth menu you can manage the
visibility of your device, change its name and access the advanced
settings.
Camera: Open the camera from the main menu or from the
notification panel. Move the switch between camera and video
and press the center key to capture photos and videos. Select the
icon
in the top left-hand corner of the screen to display the
settings of your camera and video camera.
ENGLISH
37
* Limitation of Liability:
this is not a life-saving device but a mobile phone. NGM
will not be liable for any indirect, special, incidental or
consequential damage arising from, or in connection with
the use of this product.
Warning: The manufacturer assumes no responsibility for any failure of the
policies set out above, or for any misuse of the phone. NGM reserves the right to
modify any of the content in this user guide without previous public
announcement. The content of this manual may vary from the actual content
displayed in the mobile phone. In that case, the latter shall govern.
Copyright © 2014 NGM Italia
No part of this manual may be reproduced, distributed, translated, or transmitted in
any form or by any means, electronic or mechanical, including photocopying,
recording, or storing in any information storage and retrieval system, without the prior
written permission of NGM Italia.
38 ENGLISH
Kurzanleitung - Deutsch
DEUTSCH
39
Willkommen in der Welt von NGM. Danke für den Kauf von NGM
Pico, ein außergewöhnliches Beispiel für die perfekte Kombination
von Einfachheit und Technologie. Mit diesem Gerät können Sie
problemlos telefonieren und SMS senden bzw. empfangen. Dank
der SOS-Funkton kann im Notfall eine automatische
Anrufprozedur an einige vorher eingestellten Nummern gestartet
werden. Die wesentlichen Funktionen sind in einer
fortgeschrittenen, erweiterten, dynamischen und modernen
Software enthalten, die dank der großen Symbole und dem
Berührungsempfindlichen Bildschirm intuitiv und leicht zu
verwenden ist. Besuchen Sie unsere offizielle Webseite
www.ngm.eu um unsere gesamte NGM Telefonkollektion und
Zubehöre zu sehen, zum Kundenservice Zugang zu haben,
Software Aktualisierungen herunterzuladen und um in das
technische Assistenz-Forum einzutreten.
40 DEUTSCH
ot
SIM-Karte einlegen: Die SIM-Karte enthält Ihre Telefonnummer, PINCode, Verknüpfungen zu den Betreiber-Services, Kontakte und SMSNachrichten. Um Zugang zum SIM-Slot zu haben, schalten Sie das
Telefon aus und schieben Sie die Cover nach unten. Entfernen Sie den
Akku. Legen Sie die SIM-Karte ins Slot mit den goldenen Kontakten
nach unten gerichtet ein. Speicherkarte einfügen: um Die Kamera
und Multimedia-Player Funktionen von NGM Pico zu verwenden, ist
eine Mikro SD-Karte nötig (nicht in der Packung enthalten): der
Steckplatz befindet sich neben dem SIM Slot. Entsperren Sie die
metallische Klappe indem Sie sie nach rechts
schieben. Legen Sie die Speicherkarte mit
den goldenen Kontakten nach unten
Micro-SD Slot
gerichtet ein und schließen Sie die Klappe.
SIM Slot
Sperren Sie die metallische Klappe mit der
eingefügten Speicherkarte indem Sie sie in
die entgegengesetzte Richtung schieben.
DEUTSCH
41
Akku einsetzen: Ihr Gerät wird mit einem Lithium Akku geliefert
und ist dazu entworfen worden, ausschließlich mit originalen
NGM Akkus und Zubehör betrieben zu werden. Der Akkufach für
den Akku befindet sich in der Rückseite des Telefons. Legen Sie
den Akku so ein, das es mit den Kontaktflächen des Telefons
ausgerichtet ist. Wenn Sie fertig sind, setzen Sie das Cover wieder
richtig auf die Telefonrückseite auf, siehe Abbildung.
Akku einsetzen
42 DEUTSCH
Cover aufschieben
Akku aufladen: Laden Sie den Akku vollständig auf bevor Sie das
Gerät benutzen. Schließen Sie das Ladegerät an eine Steckdose an
und stecken Sie dann den Stecker in das Tischladegerät ein, oder
stecken Sie es direkt in die Buchse in der unteren Seite des
Telefons ein. Das Tischladegerät kann auch an einen Micro-USBKabel angeschlossen werden, um das Handy zu laden. Während
das Telefon geladen wird, zeigt ein Ladesymbol den Status des
Vorganges an und auf dem Tischladegerät geht ein rotes LED Licht
an. Sobald alle Balken gefüllt sind und das LED Licht grün wird, ist
der Akku geladen und das Telefon kann vom Stromnetz getrennt
werden.
Achtung: Um die korrekte Funktion und die Produkt-Garantie zu bewahren,
verwenden Sie immer originale NGM Ladegeräte. Laden Sie das Gerät immer in
trockenen Innenräumen auf. Eine leichte Erwärmung des Gerätes während der Ladung
ist normal. Der Akku erreicht seinen vollen Leistungsumfang wenn es einige Male
vollständig aufgeladen wurde.
DEUTSCH
43
Benachrichtigungs-LED
Hörer
Kopfhörer Kamera
Buchse
Tischladegerät
Blitz
Touchscreen
Ladevorgang - LED
Rot = Lädt
Grün = Akku voll
geladen
Lautsprecher
Micro USB
Eingang
Anrufen
Taste
Home
Taste
44 DEUTSCH
Mikrofon
Ende-Taste, Ein/Aus
und Zurück
Lautstärke
+ und -
Verbindung mit einem PC: verbinden Sie NGM Pico an einem
Computer mit dem USB Kabel. Wählen Sie Massenspeicher um
Musikdateien, Fotos und Videos von Ihrem Computer auf das
Gerät und umgekehrt zu kopieren. Erinnern Sie sich immer an die
sichere Entfernung vom Gerät; schalten Sie den Massenspeicher
über das Icon auf dem Computer aus bevor Sie das USB-Kabel
trennen, um den Verlust oder die Beschädigung von Daten zu
vermeiden.
Hinweistafel: Berühren Sie den oberen Bildschirmrand und ziehen
Sie Ihren Finger nach unten um die Hinweistafel zu öffnen, die alle
Notizen und Benachrichtigungen des Geräts anzeigt. Oben finden
Sie die Symbole für den schnellen Zugriff auf die Kamera
und
Systemeinstellungen , sowie die Tasten zu anderen Funktionen
(Bluetooth, Flugmodus, Audio-Profile).
DEUTSCH
45
Ein-und Ausschalten um das Telefon Ein-und Auszuschalten,
drücken und halten Sie die rote Taste.
Bildschirmsperre: Der Bildschirm wird nach einer einstellbaren
Zeit von Inaktivität automatisch gesperrt in Einstellungen >
Bildschirmsperre > Automatische Bildschirmsperre, wo Sie aus
mehreren Optionen wählen können. Drücken Sie eine beliebige
Taste, um den Sperrbildschirm zu aktivieren auf dem Datum und
Uhrzeit anzeigt werden; schieben Sie es nach oben um das Telefon
zu entriegeln. Sie können auch ein Entsperrungsmuster in
Einstellungen > Bildschirmsperre > Methode einstellen. Im selben
Menü können Sie auch ein Kennwort einstellen, das jedes Mal
beim Entsperren des Bildschirmes eingefügt werden muss.
46 DEUTSCH
Entsperrungsbild personalisieren
In Einstellungen > Themen Einstellungen können Sie ein
Hintergrundbild für den Sperrbildschirm aus System oder Galerie
auswählen.
Hauptbildschirm
Aus dem Hauptbildschirm scrollen Sie von rechts nach links durch
die vier Seiten des Menüs und von links nach rechts rückwärts.
Mit der roten Taste kehren Sie in dem vorherigen Bildschirm
zurück, die Home-Taste bringt Sie immer in den Hauptbildschirm
zurück.
DEUTSCH
47
Einen Anruf tätigen: um einen Anruf zu tätigen, wählen Sie
Telefon. Wählen Sie die Nummer mit der virtuellen Tastatur ein
und starten Sie den Anruf, indem Sie den grünen Hörer-Symbol
oder die grüne Taste unten links wählen. Um den Anruf zu
beenden, drücken Sie das rote Ende-Symbol oder die rote Taste
unten rechts. Während des Gesprächs, können Sie Optionen
drücken und auf die Anrufeinstellungen zugreifen.
Um einen eingehenden Anruf zu beantworten, drücken Sie die
grüne Hörer-Taste.
Eine Nummer aus dem Telefonbuch anrufen: aus dem
Hauptmenü, wählen Sie Kontakte. Scrollen Sie die Kontakte mit
dem Touch-Screen durch, wählen Sie den gewünschten Kontakt
und drücken Sie die grüne Anruf-Taste. Wählen Sie Optionen um
Zugriff auf wichtige Funktionen des Telefonbuch zu haben
(Import/Export, Kontakte filtern...)
48 DEUTSCH
Eine Nummer aus den Anrufprotokollen zurückrufen: durch das
Drücken der grünen Anruf-Taste oder aus Telefon können Sie die
Anrufprotokolle mit den verpassten, empfangenen und
ausgehenden Anrufen sehen. Scrollen Sie sie mit dem TouchScreen durch, wählen Sie die gewünschte Nummer aus und
drücken Sie die grüne Anruftaste.
Kontakte ins Telefonbuch einfügen: aus dem Hauptmenü, wählen
Sie Kontakte > Neuer Kontakt. Fügen sie den Namen, die neue
Nummer und weitere Elemente ein, falls sie unterstützt werden,
und bestätigen Sie mit Speichern.
Kurzwahl: in Kontakte > Optionen > Einstellungen > Kurzwahl
können Sie den Tasten 2-9 Nummern zuordnen, die automatisch
aufgerufen werden, wenn Sie die Taste gedrückt halten.
DEUTSCH
49
SMS senden und lesen
SMS senden: aus dem Hauptmenü, öffnen Sie Nachrichten > Neue
Nachricht. Geben Sie die Empfänger Nummer manuell ein oder
aus dem Telefonbuch oder Anrufprotokollen, indem Sie die
entsprechenden Tasten drücken.
Schreiben Sie den Text und drücken Sie Senden, um die Nachricht
zu versenden.
SMS lesen: wenn Sie ein neues SMS erhalten, wird ein Symbol in
der Hinweistafel erscheinen. Mit einem Klick auf das Symbol
können Sie direkt das Gespräch öffnen und die eingehende
Nachricht lesen. In jedem Fall können Sie auch durch das
Nachrichten-Symbol im Hauptbildschirm Ihre Nachrichten öffnen.
50 DEUTSCH
S.O.S. Funktion: NGM Pico ist mit einer Funktion für den schnellen
Aufbau von Notrufen (*) ausgestattet. Diese Funktion kann im SOS
Menü des Hauptmenüs ein-und ausgeschaltet werden. Im Notfall
kann der Benutzer die Home-Taste gedrückt halten um maximal
fünf Telefonnummern um Hilfe zu bitten, die
vorher in Menü > SOS > SOS Nummern eingestellt
4-5 Sek
worden sind. Das Telefon wird starten, zyklisch die
5 SOS Nummern anzurufen, jede für etwa 20
Sekunden. Wenn es am Ende des Zyklus keine Antwort gab,
wartet das Telefon zirka 30 Sekunden und startet einen weiteren
Zyklus von Anrufen. Dieser Vorgang wird 5 mal wiederholt. Wenn
eine Nummer antwortet, wird der Zyklus unterbrochen und der
Anruf wird auf Freisprechen geschaltet.
Achtung: Der Zyklus der SOS Anrufe wird ebenso unterbrochen, wenn der
Anrufbeantworter einer der SOS Nummern antwortet.
DEUTSCH
51
FM Radio: aus dem Hauptmenü wählen Sie das FM Radio Symbol
und schalten Sie es ein. Es ist nicht notwendig die Kopfhörer
anzuschließen um Radio zu hören, da NGM Pico eine eingebaute
Radioantenne hat. Suchen Sie die Kanäle mit dem Rad durch; um
die automatische Kanal-Suche zu starten wählen Sie Kanalliste >
Suche.
Ansicht und Wiedergabe von Mediendateien: im Hauptmenü
wählen Sie Galerie um Fotos und Videos anzuzeigen und Music
Player um Audio-Dateien abzuspielen. Die gleichen Dateien
können aus dem Dateimanager im Hauptmenü angezeigt werden.
Klingeltöne einstellen: aus dem Hauptmenü wählen Sie
Einstellungen > Ton-Verwaltung. Wählen Sie den Klingelton für
Eingehende Anrufe aus und stellen Sie einen der verfügbaren
Töne ein. Im gleichen Menü können Sie auch den Ton für
Nachrichten, Touch-Tastatur und die Tastatur-Vibration einstellen.
52 DEUTSCH
Schnelle Aktivierung der Vibration
Um schnell den Klingelton zu deaktivieren und die Vibration für
Anrufe und Nachrichten einzustellen, drücken Sie die Lautstärke "" Taste auf der rechten Seite des Telefons. Nochmaliges Drücken
der Lautstärke "-" Taste wird das Telefon auf Stumm stellen.
Telefon-Einstellungen: aus dem Einstellungen Menü haben Sie
Zugriff auf die Einstellungen von Datum & Uhrzeit, Display,
Sprache, Anrufe und Telefonbuch. In Einstellungen > Erweiterte
Einstellungen > Werksrücksetzung können Sie das Gerät auf die
Werkseinstellungen zurücksetzen, mit dem Reset-Code 1122.
Taschenlampe: zum Ein-und Ausschalten der Taschenlampe,
wählen Sie die Lampe Option aus dem Hauptmenü und drücken
Sie die Power-Taste, die auf dem Bildschirm erscheint.
DEUTSCH
53
Bluetooth: In Einstellungen > Netzwerk > Bluetooth können Sie
Bluetooth aktivieren; in Einstellungen > Netzwerk > BluetoothEinstellungen wählen Sie Gekoppelte um die gekoppelten Geräte
anzuzeigen und weitere zu suchen (Headsets, Handys, ...). Wählen
Sie das Gerät das Sie koppeln möchten und bestätigen Sie es auf
beiden Geräten. In Bluetooth können Sie die Dauer der
Sichtbarkeit einstellen, Namen wechseln und zu den
fortgeschrittenen Einstellungen Zugang haben.
Kamera: Zugriff auf die Kamera ist über das Hauptmenü oder aus
der Hinweistafel möglich. Schalten Sie Kamera und Videokamera
mit dem Schalter-Symbol um und drücken Sie die mittlere Taste,
um Fotos und Videos aufzuzeichnen. Wählen Sie das
Symbol
oben links, um die Einstellungen von Kamera und Videokamera
anzuzeigen.
54 DEUTSCH
* Haftungsbeschränkung:
dies ist nicht ein Lebensrettung-Gerät sondern ein Handy.
NGM haftet nicht für jegliche indirekte, spezielle, zufällige
oder Folge-Schäden, die sich aus oder im Zusammenhang
mit der Verwendung dieses Produkts erstellen sollten.
Warnung: Der Hersteller übernimmt keine Verantwortung für die
Nichteinhaltung der angegebenen Richtlinien, oder für jeglichen Missbrauch des
Mobiltelefons. NGM behält sich das Recht vor, Änderungen am Inhalt dieser
Bedienungsanleitung auch ohne öffentliche Bekanntgabe vorzunehmen. Der
Inhalt dieser Anleitung kann vom tatsächlichen, im Mobiltelefon angezeigten,
Inhalt abweichen. In diesem Fall gilt das, was im Mobiltelefon angezeigt ist.
Copyright © 2014 NGM Italia
Kein Teil dieser Anleitung darf reproduziert, verbreitet, übersetzt oder übermittelt
werden, in keinerlei Form und mit keinerlei elektronischen oder mechanischen Mitteln
oder durch Fotokopierung, Aufnahme oder Speicherung in Informations-Archiven oder
Wiederherstellungssystemen ohne vorherige schriftliche Genehmigung von NGM Italia
erhalten zu haben.
DEUTSCH
55
Guía rápida - Español
56 ESPAÑOL
Bienvenidos al mundo de NGM. Gracias por haber comprado
NGM Pico, un extraordinario ejemplo de unión entre simplicidad y
tecnología. Con este dispositivo podrá fácilmente hacer llamadas
telefónicas, enviar y recibir SMS. Gracias a la tecla SOS se iniciará
en automático la llamada a los números de teléfono que
previamente se han configurado en caso de emergencia. Las
funciones esenciales están contenidas en un software
funcionalmente avanzado, dinámico y moderno, pero inmediato e
intuitivo, gracias a los iconos grandes y a la pantalla táctil.
Visitando el sitio Web oficial www.ngm.eu podrá conocer la
entera gama de teléfonos NGM, acceder al forum de ayuda
técnica y descargar actualizaciones software.
ESPAÑOL
57
Introducir la tarjeta SIM: la tarjeta SIM posee el número de teléfono,
el código PIN, las conexiones a los servicios del operador, contactos y
mensajes SMS. Para acceder al compartimiento que contiene la
ranura de la tarjeta SIM, apagar el teléfono y deslizar la tapa hacia
abajo. Quitar la batería. Introducir la tarjeta SIM en la ranura con los
contactos dorados hacia abajo.
Introducir una tarjeta de memoria: para poder utilizar las funciones
de la cámara de fotos y lector multimedia de NGM Pico , es necesario
una micro-SD (no incluida en el paquete): la
ranura micro-SD se encuentra a la derecha del
compartimento de la SIM. el soporte metálico
Slot micro-SD
empujándolo hacia la derecha. Introducir la
Slot SIM
tarjeta micro-SD, con los contactos dorados hacia
abajo y cerrar el soporte. Bloquear el soporte
metálico de la micro-SD desplazándolo en la
dirección contraria.
58 ESPAÑOL
Introducir la batería: este móvil está dotado de una batería de
iones de litio y diseñado para un uso exclusivo de batería y
accesorios originales NGM. La batería se coloca en la parte
posterior del teléfono. Alinear las placas doradas de la batería con
los conectores situados en la parte superior del hueco de la
batería, a continuación, deslizar la batería en esta posición. Una
vez concluidas las operaciones descritas, colocar la carcasa
posterior del teléfono, como se muestra en los siguientes
esquemas.
Introducir batería
Colocar la carcasa
ESPAÑOL
59
Cargar la batería: cargar la batería antes de empezar a utilizar el
teléfono. Conecte el cargador a una toma de corriente e introducir
la clavija en la base de carga o introducirlo directamente dentro
de la entrada en la parte inferior del teléfono. La base de carga
también se puede conectar a un cable micro USB para cargar el
teléfono. Cuando la batería se está cargando, en la pantalla se
visualizará un icono animado que muestra el estado de carga del
proceso, sin embargo en la base de carga se encenderá un led
rojo. Cuando el icono de la batería está lleno y el led de la base de
carga está en verde, la carga se ha completado y se puede
desconectar el teléfono de la carga.
Atención: Para conservar la correcta funcionalidad del producto y la integridad de la
garantía se recomienda el uso del cargador original NGM. Proceder con la carga
exclusivamente en un lugar abierto y seco. Un ligero calentamiento del teléfono durante el
proceso de carga es normal. La batería alcanzará su eficiencia funcional sólo después de
algunos ciclos completos de carga.
60 ESPAÑOL
Receptor
LED de
notificación
Entrada
auricular
Cámara
Base de carga
Flash
Pantalla
táctil
LED de carga:
Rojo = en carga
Verde = batería
cargada
Teclas
Altavoz
Entrada USB
Tecla
llamada
Tecla
Home
Micrófono
volumen
+y-
Tecla Fin llamada,
Encender/Apagar y Atrás
ESPAÑOL
61
Conexión a un PC: utilizar el cable USB para conectar NGM Pico a
un ordenador. Seleccionar Memoria de almacenamiento para
copiar archivos musicales, fotos y vídeo desde el ordenador al
dispositivo y viceversa. Recuerde efectuar siempre la eliminación
segura del dispositivo, desactivando la memoria de
almacenamiento mediante el relativo icono en el ordenador antes
de desconectar el cable USB, para evitar la pérdida o el deterioro
de sus datos.Panel de notificación: tocando la parte alta de la
pantalla y desplazando el dedo hacia abajo, tendrá acceso al Panel
de notificaciones, donde se señalarán todos los avisos relativos al
dispositivo. En alto, podrá tocar los correspondientes iconos para
y a las
acceder rápidamente a la cámara de fotos
configuraciones de sistema
, y controlar rápidamente otras
funciones (Bluetooth, modalidad vuelo, perfiles audio) mediante
las teclas rápidas.
62 ESPAÑOL
Encendido y apagado: para encender y apagar el teléfono, tener
pulsada la tecla roja de fin de llamada.
Bloqueo pantalla: la pantalla se bloquea automáticamente
después de un período de inactividad configurable en
Configuraciones > Bloqueo pantalla > Bloqueo pantalla
automático, donde se pueden elegir diversas opciones. Pulsar
cualquier tecla para reactivar la pantalla y, una vez visualizada la
fecha y hora, desplazar hacia arriba para desbloquear. Se puede
elegir "secuencia" como método de bloqueo alternativo en
Configuraciones > Bloqueo pantalla > Método bloqueo. En el
mismo menú podrá también configurar una contraseña, que se
solicitará todas las veces que deberá desbloquear la pantalla.
ESPAÑOL
63
Personalizar la pantalla de desbloqueo: en Configuraciones >
Configuraciones tema podrá configurar un fondo de pantalla que
se visualizará en la pantalla de bloqueo, eligiendo entre los fondos
del sistema o las fotos de la Galería.
Menú Principal: desde la página principal desplazarse de derecha
a izquierda para visualizar las 4 páginas del menú, e de izquierda a
derecha para volver atrás. Pulsar en cualquier momento la tecla
roja para volver a la pantalla anterior y la tecla Home para volver a
la página principal.
64 ESPAÑOL
Realizar una llamada: para realizar una llamada, seleccionar el
icono Teléfono. Digitar el número seleccionado utilizando el
teclado virtual e iniciar la llamada seleccionando el icono con el
teléfono verde o la tecla verde en la parte inferior a la izquierda.
Para terminar la llamada tocar el icono rojo de fin de llamada o la
tecla roja en la parte inferior a la derecha. Durante la llamada,
seleccionado Opciones, tendrá acceso a las configuraciones de
llamada.
Para reponder a una llamada pulsar la tecla verde.
Llamar a un número de la agenda: desde el menú principal,
seleccionar Agenda. Desplazar los contactos con la pantalla táctil,
seleccionar el contacto que desea llamar y pulsar la tecla verde de
llamada. Seleccionando Opciones tendrá acceso a importantes
Configuraciones relativas a la Agenda (importar/exportar, filtro
contactos...)
ESPAÑOL
65
Llamar un número desde el registro llamadas: mediante el botón
verde de llamada o desde Teléfono accederá a registro llamadas;
se visualizará en automático las llamadas perdidas, recibidas y
realizadas. Desplazarlas con la pantalla táctil, seleccionar el
número que se quiere llamar y pulsar la tecla verde de llamada.
Añadir contactos en agenda: desde el menú principal seleccionar
Agenda > Añadir. Introducir el nombre, el nuevo número y otras
opciones, y confirmar con Guardar.
Marcación rápida: en Agenda > Opciones > Configuraciones >
Llamada rápida se pueden asignar a las teclas 2-9 los números
que se llamarán automáticamente si se pulsa la tecla
correspondiente en el teclado virtual.
66 ESPAÑOL
Enviar y leer SMS
Enviar SMS: desde el menú principal, acceder a Mensajes >
Nuevo msg. Introducir el destinatario manualmente o elegirlo
desde la agenda o desde el registro de llamadas, seleccionando las
teclas relativas.
Escribir el texto en el espacio relativo y pulsar Enviar para enviar
el mensaje
Leer SMS: cuando se recibe un nuevo SMS o MMS, se visualizará
un icono y una notificación en el panel de las notificaciones.
Clicando en la notificación, podrá acceder directamente a la
conversación y leer el mensaje recibido. También se pueden
visualizar los mensajes recibidos desde el menú, seleccionando
Mensajes.
ESPAÑOL
67
Función S.O.S.: NGM Pico está equipado de un servicio de envío rápido
de llamadas de emergencia(*). Esta función puede ser activada y
desactivada desde el menú principal, dentro del menú SOS. En caso de
emergencia, el usuario puede pulsar prolongadamente la tecla Home
para pedir ayuda a un máximo de cinco números de
teléfono que previamente se han establecido en Menú
4-5 seg
> SOS > Números SOS. A continuación, el teléfono
segsegun comenzará a llamar en rotación a los 5 números SOS,
dos
por 20 segundos aproximadamente cada uno. Si al final
del ciclo no ha recibido ninguna respuesta, espere unos 30 segundos y se
volverá a iniciar un segundo ciclo de llamadas en rotación. Este
procedimiento se repetirá 5 veces. En el caso de respuesta de uno de los
números a los que se ha llamado, el ciclo se interrumpe y la llamada
pasará automáticamente en altavoz.
Atención: El ciclo de llamadas S.O.S. terminará si responde el buzón de voz de uno de los
números S.O.S a los que se ha llamado.
68 ESPAÑOL
Radio FM: desde el menú principal seleccionar el icono Radio FM
y pulsar la tecla de encender. No es necesario conectar los
auriculares para activar la radio, ya que NGM Pico tiene la antena
radio incorporada. Desplazar los canales mediante al rueda
situada arriba de la tecla encender, para iniciar la búsqueda
canales seleccionar Lista canales > Búsqueda.
Visualizar y reproducir archivos multimediales: en el menú
principal seleccionar Galería para visualizar fotos y vídeos y Lector
musical para reproducir los archivos audio. Los mismos archivos
se visualizarán en Documentos , en el menú principal.
Configurar las melodías: desde el menú principal, seleccionar
Configuraciones > Configuraciones Tonos. Seleccionar Melodía
llamadas recibidas y configurar el tono deseado entre las
disponibles. En el mismo menú se pueden configurar los tonos
para mensajes, toques, teclado, y activar la vibración al tocar.
ESPAÑOL
69
Activar o desactivar rápidamente la vibración
Para desactivar rápidamente la melodía y activar la vibración para
las llamadas y los mensajes, pulsar la tecla volumen - en el lado
derecho del teléfono.Pulsando de nuevo la misma tecla, el
teléfono pasará a la modalidad silencio.
Configuraciones del Teléfono: desde menú Configuraciones se
tiene acceso a las configuraciones de Fecha y Hora, Pantalla,
Idioma, Llamadas, Mensajes y Agenda. En Configuraciones >
Configuraciones Avanzadas > Restablecer el dispositivo se
configurará con los datos de fábrica, introduciendo el código
1122.
Linterna: para encender y apagar la linterna, seleccionar la opción
Linterna del menú principal y pulsar la tecla de encendido que
aparece en la pantalla.
70 ESPAÑOL
Bluetooth: en Configuraciones > Redes > Bluetooth se puede
activar el Bluetooth mientras que en Configuraciones > Redes >
Configuraciones Bluetooth > Asociados se puede visualizar los
dispositivos asociados y buscar otros (auriculares, teléfonos…)
seleccionando la opción Búsqueda. Seleccionar el dispositivo con
el que deseáis asociaros y confirmar en ambos dispositivos. En
Bluetooth, podrá gestionar la duración de la visibilidad del
dispositivo, cambiar el nombre y acceder a las configuraciones
avanzadas.
Cámara: acceder a la cámara de fotos desde el menú principal o
desde el panel de notificaciones. Seleccionar el icono en alto a la
izquierda de la pantalla
para visualizar las configuraciones de
cámara de fotos y cámara de vídeo.
ESPAÑOL
71
* Limitación de Responsabilidad:
este dispositivo no es un elemento salva-vidas es un
teléfono móvil. NGM no se hace responsable de ningún
daño indirecto, especial o consecuente a causa de o en
conexión con el uso de este producto.
Advertencia: el fabricante no asume ninguna responsabilidad por cualquier
incumplimiento de las directrices establecidas anteriormente o cualquier uso no
autorizado del teléfono. El fabricante se reserva el derecho de modificar sin
previo aviso la información contenida en este manual. El contenido de este
manual podría cambiar con respecto al contenido mostrado por el teléfono. En
tal caso, prevalece el contenido mostrado por el teléfono.
Copyright © 2014 NGM Italia
Ninguna parte de esta publicación puede ser extraída, reproducida, traducida o
utilizada de cualquier forma o en cualquier medio, electrónico o mecánico, incluido
fotocopias y microfilm, sin previa autorización escrita por la NGM Italia.
72 ESPAÑOL
Guide rapide - Français
FRANÇAIS
73
Bienvenue dans le monde de NGM. Merci de l'achat de NGM Pico,
un exemple extraordinaire de combinaison parfaite entre la
simplicité et la technologie. Avec cet appareil, vous pourrez
facilement effectuer des appels, envoyer et recevoir des SMS.
Grâce à la touche SOS vous pourrez lancer une procédure
automatique d'appel vers certains numéros précédemment
définis en cas d'urgence. Les caractéristiques essentielles sont
contenues dans un logiciel fonctionnellement avancé, dynamique
et moderne, mais immédiat et intuitif, grâce aux grandes icônes et
à l'écran tactile. Visitant le site officiel www.ngm.eu vous pourrez
connaitre l'entière gamme des mobiles NGM, essayez notre
service pratique et fonctionnel e-commerce pour acheter des
téléphones et accessoires, demander assistance, accès au forum
d'assistance technique et télécharger des mises à jour logicielles.
74 FRANÇAIS
o
Insérez la carte SIM: la carte SIM contient votre numéro de
téléphone, le code PIN, des liens vers des services de l'opérateur, les
contacts et les messages SMS. Pour accéder au compartiment
contenant la fente de la SIM, éteignez le téléphone et faites glisser la
coque vers le bas. Enlevez la batterie et insérez la SIM dans sa fente
avec les contacts dorés retournés vers le bas.
Introduire la carte mémoire: pour pouvoir utiliser les fonctions de
caméra et lecteur multimédia de NGM Pico, une micro SD est
nécessaire (pas comprise dans l'emballage): la
fente micro SD se trouve à droite de la fente SIM.
Débloquez le clapet métallique en le poussant vers
Fente micro SD
la droite. Insérez la carte micro-SD avec les
Fente SIM
contacts dorés retournés vers le bas. puis refermez
le clapet. Bloquez le clapet métallique sur la carte
micro-SD en le faisant glisser dans la direction
opposée.
FRANÇAIS
75
Insérez la batterie: votre appareil est fourni avec une batterie au
ion de lithium-et est conçu pour être utilisé uniquement avec des
batteries et des accessoires originaux NGM. La batterie doit être
placée dans la partie postérieure du téléphone. Insérez la batterie
dans son compartiment avec les contacts retournés vers le haut,
en correspondance avec ceux du téléphone. Ensuite, remettez la
coque postérieure du téléphone comme indiqué ci-dessous.
Insérez la batterie
76 FRANÇAIS
Mise en place de la coque
Charger la batterie: charger la batterie avant de commencer à
utiliser l'appareil. Branchez le chargeur à une prise électrique, puis
insérer la fiche dans la base de chargement ou l'insérer
directement dans l'entrée sur le côté inférieur du téléphone. La
base de chargement peut également être connectée à un câble
micro USB pour recharger le téléphone. Lorsque la batterie est en
charge, une icône animée sur l'écran indique l'état d'avancement
du processus, alors que sur la base de recharge un led rouge
s'allume. Une fois que l'icône de la batterie est pleine et le led sur
la base de recharge devient vert, la charge est complétée et le
téléphone peut être déconnecté de la charge.
Attention: Afin de préserver le bon fonctionnement du produit et l'intégrité de la garantie,
nous vous recommandons l'utilisation de chargeurs originaux NGM. Procédez à la Charge
exclusivement dans des endroits couverts et secs. Un léger réchauffement du téléphone
pendant la charge est normal. La batterie atteindra son efficacité fonctionnelle uniquement
après quelques cycles complets de recharge.
FRANÇAIS
77
Led de Receveur
notification
Entrée
écouteur
Camera
Base de recharge
Flash
Écran
tactile
LED de charge
Rouge = en charge
Vert = batterie chargée
Haut
parleur
Entrée USB
Touche
d'appel
Touche
accueil
78 FRANÇAIS
Microphone
Touche fin d'appel /
allumage/éteignement
et précédent
Touches
volume +
et -
Se relier à un ordinateur: utiliser le câble USB pour relier NGM
Pico à un ordinateur et sélectionner le stockage de masse pour
copier des fichiers de musique, photos et vidéos à partir de
l’ordinateur vers l'appareil et inversement. N'oubliez pas de
toujours enlever en toute sécurité de l'appareil, éteignant le
stockage de masse via l'icône sur l'ordinateur avant de débrancher
le câble USB, pour éviter la perte ou des dommages à vos
données.
Panneau de notification: touchant le haut de l'écran et faites
glisser votre doigt vers le bas, vous aurez accès au panneau des
notifications, où sera signalé tout avis concernant le dispositif. En
haut, vous pouvez toucher l'icône correspondante pour un accès
rapide à l'appareil photo
et les paramètres du système
et
vérifier rapidement d'autres fonctionnalités (Bluetooth, mode
avion, profils audio) avec les touches rapides.
FRANÇAIS
79
Allumage et éteignement
Pour allumer et éteindre le téléphone, appuyez et maintenez la
touche rouge fin d'appel.
Verrouillage de l\'écran
L'écran se verrouille automatiquement après une période
d'inactivité configurable dans Paramètres > Verrouillage écran >
Verrouillage écran automatique, où vous pouvez choisir parmi
plusieurs options. Appuyez sur n'importe quelle touche pour
activer l'écran et, une fois visualisé la date et l'heure, faites défiler
vers le haut pour débloquer. Il est possible aussi choisir "Motif"
comme méthode de blocage alternatif Paramètres > Verrouillage
écran > méthode de verrouillage. Dans le même menu, vous
pouvez également définir un mot de passe qui sera nécessaire à
chaque fois que vous devrez déverrouiller l'écran.
80 FRANÇAIS
Personnaliser l'écran de déverrouillage
Dans Paramètres > Paramètres thème vous pouvez définir un
fond d'écran pour afficher sur l'écran de verrouillage,
sélectionnant parmi les fonds d'écran fournis par le système ou les
photos présentes dans la galerie.
Menu principal
De la page principale, faites défiler de droite à gauche pour
parcourir les 4 pages du menu, et de gauche à droite pour revenir
en arrière. Appuyez sur la touche rouge pour revenir en arrière à
l'écran précédent, et sur la touche Accueil pour revenir à l'écran
principal.
FRANÇAIS
81
Effectuer un appel: pour effectuer un appel, sélectionnez l'icône
Téléphone. Composez le numéro sélectionné avec le clavier
virtuel, et lancez l'appel en sélectionnant l'icône du combiné vert
ou la touche verte en bas à gauche. Pour terminer l'appel,
appuyez sur l'icône rouge de fin d'appel ou la touche rouge en bas
à droite. Pendant l'appel, sélectionnant Options, vous pouvez
accéder aux paramètres d'appel.
Pour répondre à un appel entrant, appuyez sur le combiné vert.
Appeler un numéro à partir de la rubrique: dans le menu
principal, sélectionnez Rubrique Faites défiler les contacts avec
l'écran tactile, sélectionnez le contact à appeler et appuyez la
touche verte d'appel. Sélectionnant Options vous aurez accès à
d'importants paramètres relatifs à la rubrique (importer/exporter,
filtrer les contacts...)
82 FRANÇAIS
Rappeler un numéro du registre des appels: en appuyant la
touche verte d'appel ou de Téléphone vous accédez au registre
des appels; les appels manqués, reçus et effectués seront
visualisés automatiquement. Faites défiler avec l'écran tactile,
sélectionnez le numéro à appeler et appuyez la touche verte
d'appel.
Ajouter des contacts en rubrique: du menu principal, sélectionnez
Rubrique > Ajouter. Insérez le nom, le nouveau numéro et autres
options, si elles sont supportées, et confirmez avec Enregistrer.
Numérotation rapide: Rubrique > Option > Paramètres > Appel
rapide vous pouvez attribuer aux touches 2 à 9 des numéros qui
seront appelés automatiquement si vous maintenez la touche
correspondante enfoncée sur le clavier virtuel.
FRANÇAIS
83
Envoyer et lire SMS
Envoyer SMS: dans le menu principal, accédez à Message >
Nouveau message. Insérez le destinataire manuellement ou le
sélectionnez dans la rubrique ou le registre des appels,
sélectionnant les touches relatives. Écrivez le texte dans l'espace
relatif et appuyez Envoyer pour envoyer le message
Lire SMS: lorsque vous recevez un SMS, une icône et une
notification apparaissent dans le panneau de notification. En
cliquant sur la notification, vous pouvez accéder directement à la
conversation et lire le message entrant. Dans tous les cas, vous
pouvez visualiser les messages entrants de l'écran principal,
sélectionnant Messages.
84 FRANÇAIS
Fonction S.O.S.: NGM Pico est équipé d'un service de transfert
rapide d'appels d'urgence (*). Cette fonction peut être activée et
désactivée dans le menu principal, dans menu SOS . En cas
d'urgence, l'utilisateur peut appuyer longuement la touche home
pour demander de l'aide à un maximum de cinq
numéros de téléphone qui ont été configurés dans
4-5
Menu > SOS > numéros SOS. Puis, le téléphone
Sec
appellera en rotation les 5 numéros SOS, pendant
environ 20 secondes. Si à la fin du cycle vous n'aurez obtenu
aucune réponse, il attendra environ 30 secondes, puis lancera un
deuxième cycle d'appels à rotation. Cette procédure sera répétée
5 fois. En cas de réponse de l'un des numéros appelés, le cycle
sera interrompu et l'appel passera en haut-parleur.
Attention: Le cycle d'appels S.O.S sera interrompu si le répondeur de l'un des numéros
appelés S.O.S. s'enclenchera.
FRANÇAIS
85
Radio FM: dans le menu principal, sélectionnez l'icône Radio FM
et appuyez sur le bouton d'alimentation. Il n'est pas nécessaire de
connecter les écouteurs pour allumer la radio, car NGM Pico a
l'antenne de la radio intégrée. Faites défiler les canaux de la roue
au-dessus du bouton d'alimentation pour démarrer la recherche
de canaux sélectionnés dans Liste des chaînes > Recherche.
Visualiser et reproduire des fichiers multimédias: du menu
principal, sélectionnez Galerie pour visualiser les photos et vidéo
et Lecteur musical pour reproduire des fichiers audio. Ces fichiers
peuvent être visualisés dans Gestionnaire de fichiers, du menu
principal. Définir les sonneries: du menu principal, sélectionnez
Paramètres > Paramètres sonnerie. Sélectionnez Sonnerie Appels
entrants et configurer la tonalité désirée parmi celles disponibles.
Dans le même menu, vous pouvez également définir la sonnerie
des messages, clavier tactile et activer la vibration au toucher.
86 FRANÇAIS
Activer ou désactiver rapidement la vibration
Pour désactiver rapidement la sonnerie et activer la vibration pour
les appels et les messages, appuyez sur volume - sur le côté droit
du téléphone. Appuyant de nouveau volume, le téléphone entrera
en mode silencieux.
Paramètres du téléphone: du menu Paramètres vous avez accès
aux configurations de Date et heure, Affichage, langue, messages
et rubrique. Dans Paramètres > Paramètres avancés > Rétablir
vous pouvez réinitialiser l'appareil aux réglages d'usine, en entrant
le code de réinitialisation 1122.
Torche: pour allumer et éteindre la torche, sélectionnez l'option
Torche dans le menu principal et appuyant sur le bouton
d'alimentation qui apparaît sur l'écran.
FRANÇAIS
87
Bluetooth: dans Paramètres > Réseau > Bluetooth vous pouvez
activer Bluetooth alors que dans Paramètres > Réseau >
Paramètres Bluetooth, dans Associés vous pouvez visualiser les
appareils associés et en rechercher d'autres (casques, téléphones
etc) sélectionnant l'option Recherche. Sélectionnez l'appareil avec
lequel vous souhaitez vous associer et confirmez sur les deux
appareils. Dans le menu Bluetooth, vous pouvez gérer la durée de
visibilité de votre appareil, en changer le nom et accéder aux
paramètres avancés.
Caméra: accédez à la caméra à partir du menu principal ou depuis
le panneau des notifications. Déplacez le commutateur sur l'icône
de l'appareil photo ou la caméra et appuyez sur le bouton central
pour capturer des photos et des vidéos. Sélectionnez l'icône en
haut à gauche de l'écran
pour afficher les paramètres de
l'appareil photo et caméra.
88 FRANÇAIS
*Limitation de responsabilité:
Ceci n'est pas un dispositif de sauvetage mais un téléphone
mobile. NGM ne sera pas tenu responsable des dommages
indirects, spéciaux, accidentels ou consécutifs dérivant de
ou par connexion avec l'utilisation de ce produit.
Attention: le producteur n'assume aucune responsabilité pour toute violation des
lignes de comportement énoncées ci-dessus ou toute utilisation non autorisée du
téléphone. Le producteur se réserve le droit de modifier sans préavis les
informations contenues dans ce guide. Le contenu de ce manuel pourrait différer
du contenu réel illustré sur le téléphone. Dans ce cas, le second l'emporte.
Copyright © 2014 NGM Italia
Aucune partie de ce manuel peut être reproduite, distribuée, traduite, transmise sous
aucune forme ou moyen électronique ou mécanique, y compris photocopie,
enregistrement ou sauvegarde dans un système de stockage et de récupération, sans
l'autorisation écrite par NGM Italia.
FRANÇAIS
89
www.ngm.eu