Transcript
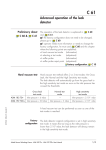
Installation Guide
Case components
120 mm fan
3.5" HDD cage
for 3.5" HDD x 10
(Hot swap x 2)
120 mm fans x 3
Removable
air filter
Ventilation holes
in the PCI slots
Dual LED
Power switch
(Blue LED for power)
(Red LED for HDD)
Female clip
Removable
PSU bracket
2.5" HDD mount
Multi-media ports
Hardware list
Extra quantities are spare parts.
Buzzer (1)
Anti-vibration rubber rings (5)
for 2.5" HDD / 3.5" HDD
Thumb screws (44)
for 3.5" HDD
Screws (5)
for PSU mounting
Screws M3*9.5 (5)
for 2.5" HDD
Anti-vibration silica gel rings (44)
for 3.5" HDD
Screws (5)
for M/B
Clamp (2)
Cable ties (1)
Remove side panels Remove air filters
Motherboard installation
Removing fan modules
Place the M/B onto the copper bolt
and fasten screws to secure.
Slide the anti-vibration fan sideways to remove.
Push to release.
Pull side panel out to
remove.
Reserved hole for
installation 120 mm fan
(Fan is not included)
2.5" HDD installation
Install screws along with
anti-vibration rubber rings
onto the HDD.
3.5" HDD installation-1 (hot swap)
Install screws along with
anti-vibration silica gel rings
onto the 3.5" HDD.
Slide the HDD into the
holes on the HDD platform.
Slide the HDD into the
HDD cage.
PSU installation
Loose 4 thumb screws to
remove the PSU
mounting bracket.
Cable management
Assembly power supply with
PSU mounting bracket.
Push in gently.
I/O port installation
HD AUDIO
BLUE 10
BLACK PURPLE 8
YELLOW 6
GRAY 4
RED 2
GREEN
KEY
ORANGE
N.C.
GND+H.S. TUBE
Fasten 4 thumb screws
to secure.
Press to release.
Cable installation guide
USB 3.0
9
7
5
3
1
Close the gate to secure
the HDD.
11
20
10
1
Supports motherboard
USB 3.0 20 Pin header
BLACK / WHITE
BLACK
POWER SW
BLACK / WHITE +
POWER LED
BLACK -
POWER LED
BLACK / WHITE BLACK +
HDD LED
RED+
NC
NC
Blue
SPEAKER
C50.Q2600.00E