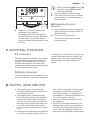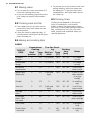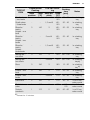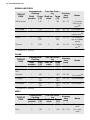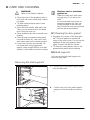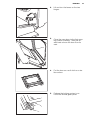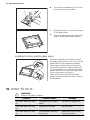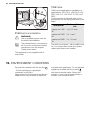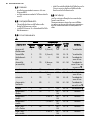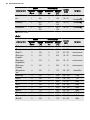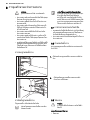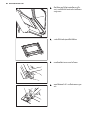
1
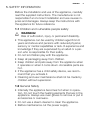
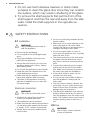
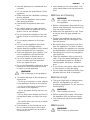
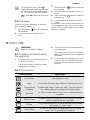
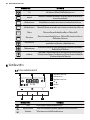
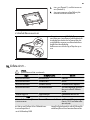
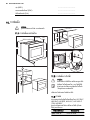
EOB3400 ................................................ ............................................. EN OVEN USER MANUAL 2 TH เตาอบ คูมือการใชงาน 23 2 www.electrolux.com CONTENTS 1. 2. 3. 4. 5. 6. 7. 8. 9. 10. 11. SAFETY INFORMATION . . . . . . . . . . . . . . . . . . . . . . . . . . . . . . . . . . . . . . . . . . . . . . . . . . . 3 SAFETY INSTRUCTIONS . . . . . . . . . . . . . . . . . . . . . . . . . . . . . . . . . . . . . . . . . . . . . . . . . . 4 PRODUCT DESCRIPTION . . . . . . . . . . . . . . . . . . . . . . . . . . . . . . . . . . . . . . . . . . . . . . . . . 6 BEFORE FIRST USE . . . . . . . . . . . . . . . . . . . . . . . . . . . . . . . . . . . . . . . . . . . . . . . . . . . . . . 6 DAILY USE . . . . . . . . . . . . . . . . . . . . . . . . . . . . . . . . . . . . . . . . . . . . . . . . . . . . . . . . . . . . . 7 CLOCK FUNCTIONS . . . . . . . . . . . . . . . . . . . . . . . . . . . . . . . . . . . . . . . . . . . . . . . . . . . . . 8 ADDITIONAL FUNCTIONS . . . . . . . . . . . . . . . . . . . . . . . . . . . . . . . . . . . . . . . . . . . . . . . . . 9 HELPFUL HINTS AND TIPS . . . . . . . . . . . . . . . . . . . . . . . . . . . . . . . . . . . . . . . . . . . . . . . . 9 CARE AND CLEANING . . . . . . . . . . . . . . . . . . . . . . . . . . . . . . . . . . . . . . . . . . . . . . . . . . . 17 WHAT TO DO IF… . . . . . . . . . . . . . . . . . . . . . . . . . . . . . . . . . . . . . . . . . . . . . . . . . . . . . . 20 INSTALLATION . . . . . . . . . . . . . . . . . . . . . . . . . . . . . . . . . . . . . . . . . . . . . . . . . . . . . . . . . 21 WE’RE THINKING OF YOU Thank you for purchasing an Electrolux appliance. You’ve chosen a product that brings with it decades of professional experience and innovation. Ingenious and stylish, it has been designed with you in mind. So whenever you use it, you can be safe in the knowledge that you’ll get great results every time. Welcome to Electrolux. Visit our website for: Get usage advice, brochures, trouble shooter, service information: www.electrolux.com Register your product for better service: www.electrolux.com/productregistration Buy Accessories, Consumables and Original spare parts for your appliance: www.electrolux.com/shop CUSTOMER CARE AND SERVICE We recommend the use of original spare parts. When contacting Service, ensure that you have the following data available. The information can be found on the rating plate. Model, PNC, Serial Number. Warning / Caution-Safety information General information and tips Environmental information Subject to change without notice. ENGLISH 3 1. SAFETY INFORMATION Before the installation and use of the appliance, carefully read the supplied instructions. The manufacturer is not responsible if an incorrect installation and use causes injuries and damages. Always keep the instructions with the appliance for future reference. 1.1 Children and vulnerable people safety WARNING! Risk of suffocation, injury or permanent disability. • This appliance can be used by children aged from 8 years and above and persons with reduced physical, sensory or mental capabilities or lack of experience and knowledge if they are supervised by an adult or a person who is responsible for their safety. • Do not let children play with the appliance. • Keep all packaging away from children. • Keep children and pets away from the appliance when it operates or when it cools down. Accessible parts are hot. • If the appliance has a child safety device, we recommend that you activate it. • Cleaning and user maintenance shall not be made by children without supervision. 1.2 General Safety • Internally the appliance becomes hot when in operation. Do not touch the heating elements that are in the appliance. Always use oven gloves to remove or put in accessories or ovenware. • Do not use a steam cleaner to clean the appliance. • Before maintenance cut the power supply. 4 www.electrolux.com • Do not use harsh abrasive cleaners or sharp metal scrapers to clean the glass door since they can scratch the surface, which may result in shattering of the glass. • To remove the shelf supports first pull the front of the shelf support and then the rear end away from the side walls. Install the shelf supports in the opposite sequence. 2. SAFETY INSTRUCTIONS 2.1 Installation WARNING! Only a qualified person must install this appliance. • Remove all the packaging. • Do not install or use a damaged appliance. • Obey the installation instruction supplied with the appliance. • Always be careful when you move the appliance because it is heavy. Always wear safety gloves. • Do not pull the appliance by the handle. • Keep the minimum distance from the other appliances and units. • Make sure that the appliance is installed below and adjacent safe structures. • The sides of the appliance must stay adjacent to appliances or to units with the same height. Electrical connection WARNING! Risk of fire and electrical shock. • All electrical connections should be made by a qualified electrician. • The appliance must be earthed. • Make sure that the electrical information on the rating plate agrees with the power supply. If not, contact an electrician. • Always use a correctly installed shockproof socket. • Do not use multi-plug adapters and extension cables. • Make sure not to cause damage to the mains plug and to the mains cable. Contact the Service or an electrician to change a damaged mains cable. • Do not let mains cables to come in touch with the appliance door, specially when the door is hot. • The shock protection of live and insulated parts must be fastened in such a way that it cannot be removed without tools. • Connect the mains plug to the mains socket only at the end of the installation. Make sure that there is access to the mains plug after the installation. • If the mains socket is loose, do not connect the mains plug. • Do not pull the mains cable to disconnect the appliance. Always pull the mains plug. • Use only correct isolation devices: line protecting cut-outs, fuses (screw type fuses removed from the holder), earth leakage trips and contactors. • The electrical installation must have an isolation device which lets you disconnect the appliance from the mains at all poles. The isolation device must have a contact opening width of minimum 3 mm. 2.2 Use WARNING! Risk of injury, burns or electric shock or explosion. ENGLISH • Use this appliance in a household environment. • Do not change the specification of this appliance. • Make sure that the ventilation openings are not blocked. • Do not let the appliance stay unattended during operation. • Deactivate the appliance after each use. • Be careful, when you open the appliance door while the appliance is in operation. Hot air can release. • Do not operate the appliance with wet hands or when it has contact with water. • Do not apply pressure on the open door. • Do not use the appliance as a work surface or as a storage surface. • Always keep the appliance door closed when the appliance is in operation. • Open the appliance door carefully. The use of ingredients with alcohol can cause a mixture of alcohol and air. • Do not let sparks or open flames to come in contact with the appliance when you open the door. • Do not put flammable products or items that are wet with flammable products in, near or on the appliance. WARNING! Risk of damage to the appliance. • To prevent damage or discoloration to the enamel: – Do not put ovenware or other objects in the appliance directly on the bottom. – Do not put aluminium foil directly on the bottom of the appliance. – do not put water directly into the hot appliance. – do not keep moist dishes and food in the appliance after you finish the cooking. – be careful when you remove or install the accessories. • Discoloration of the enamel has no effect on the performance of the appliance. It is not a defect in the sense of the warranty law. 5 • Use a deep pan for moist cakes. Fruit juices cause stains that can be permanent. 2.3 Care and Cleaning WARNING! Risk of injury, fire or damage to the appliance. • Before maintenance, deactivate the appliance and disconnect the mains plug from the mains socket. • Make sure the appliance is cold. There is the risk that the glass panels can break. • Replace immediately the door glass panels when they are damaged. Contact the Service. • Be careful when you remove the door from the appliance. The door is heavy! • Clean regularly the appliance to prevent the deterioration of the surface material. • Remaining fat or food in the appliance can cause fire. • Clean the appliance with a moist soft cloth. Only use neutral detergents. Do not use abrasive products, abrasive cleaning pads, solvents or metal objects. • If you use an oven spray, obey the safety instructions on the packaging. • Do not clean the catalytic enamel (if applicable) with any kind of detergent. 2.4 Internal light • The type of light bulb or halogen lamp used for this appliance, is only for household appliances. Do not use it for house lighting. WARNING! Risk of electrical shock. • Before replacing the lamp, disconnect the appliance from the power supply. • Only use lamps with the same specifications. 2.5 Disposal WARNING! Risk of injury or suffocation. 6 www.electrolux.com • Disconnect the appliance from the mains supply. • Cut off the mains cable and discard it. • Remove the door catch to prevent children and pets to get closed in the appliance. 3. PRODUCT DESCRIPTION 1 2 3 4 5 Temperature indicator 5 6 Grill 7 Oven lamp 6 5 4 11 3 2 8 Fan 7 9 Shelf support, removable 10 Rating plate 8 11 Shelf positions 1 3.1 Oven accessories 10 9 1 Knob for the oven functions 2 Power indicator 3 Electronic programmer 4 Knob for the temperature • Wire shelf For cookware, cake tins, roasts. • Baking tray For cakes and biscuits. • Grill- / Roasting pan To bake and roast or as pan to collect fat. 4. BEFORE FIRST USE WARNING! Refer to the Safety chapters. Press the + or - button to set the correct time. 4.1 Initial cleaning • Remove all accessories and removable shelf supports (if applicable). • Clean the appliance before first use. Refer to the chapter "Care and cleaning". 4.2 Setting the time You must set the time before you operate the oven. When you connect the appliance to the electrical supply or after a power cut, the indicator for the Time of Day function flashes. After approximately five seconds, the flashing stops and the display shows the time of day you set. ENGLISH To change the time, press again and again until the indicator for the Time of Day function flashes. You must not set the Duration or End function at the same time. 4.3 Preheating Preheat the empty appliance to burn off the remaining grease. 1. 2. Set the function and the maximum temperature. Let the appliance operate for one hour. 3. 4. 7 Set the function and the maximum temperature. Let the appliance operate for ten minutes. 5. Set the function and the maximum temperature. 6. Let the appliance operate for ten minutes. Accessories can become hotter than usual. The appliance can emit an odour and smoke. This is normal. Make sure that the airflow is sufficient. 5. DAILY USE WARNING! Refer to the Safety chapters. 5.1 Activating and deactivating the appliance 1. Turn the knob for the oven functions to an oven function. The power indicator comes on while the appliance operates. 2. 3. Turn the knob for the temperature to a temperature. The temperature indicator comes on while the temperature in the appliance increases. To deactivate the appliance, turn the knob for the oven functions and the knob for the temperature to the Off position. 5.2 Oven functions Oven function Application Off position The appliance is off. Light To activate the oven lamp without a cooking function. Conventional Cooking To bake and roast on one oven level. The top and bottom heating elements operate at the same time. Top Heat To finish cooked dishes. Only the top heating element operates. Bottom Heat To bake cakes with crispy or crusty bottom. Only the bottom heating element operates. Grilling To grill flat food items in small quantities in the middle of the shelf. To make toast. Fast Grilling To grill flat food items in large quantities. To make toast. The full grill element operates. 8 www.electrolux.com Oven function Application Turbo Grilling To cook large pieces of meat. The grill element and the oven fan operate one after the other and circulate hot air around the food. True Fan Cooking To roast or roast and bake food with the same cooking temperature, on more than one shelf, without flavour transference. Pizza Setting To make pizza, quiche or pie. The grill and bottom element provide direct heat and the fan circulates the hot air to cook the pizza toppings or pie filling. 6. CLOCK FUNCTIONS 6.1 Electronic programmer 1 2 3 1 Function indicators 2 Time display 3 Function indicator 4 Button + hr min 5 Selection button 6 Button - 6 5 4 Clock function Time of day Minute Minder Duration End Application To set, change or check the time of day. To set a countdown time. This function has no effect on the operation of the oven. To set how long the appliance must operate. To set when the appliance must be deactivated. You can use Duration and End at the same time to set the time when the appliance must be activated and then deactivated. , then End First set Duration . 6.2 Setting the clock functions 1. For Duration and End , set an oven function and temperature. This 2. is not necessary for the Minute Mind. er Press the Selection button again and again until the indicator for the necessary clock function flashes. ENGLISH hr min 4. 5. 9 With the Duration and End functions, the appliance deactivates automatically. Press a button to stop the signal. Turn the knob for the oven functions and the knob for the temperature to the off position. 6.3 Cancelling the clock functions 3. Press + or - to set the time for the necessary clock function. The display shows the indicator for the clock function you set. When the set time ends, the indicator flashes and an acoustic signal sounds for two minutes. 1. 2. Press the Selection button again and again until the necessary function indicator flashes. Press and hold the button -. The clock function goes out after some seconds. 7. ADDITIONAL FUNCTIONS 7.1 Cooling fan When the appliance operates, the cooling fan activates automatically to keep the surfaces of the appliance cool. If you deactivate the appliance, the cooling fan continues to operate until the temperature in the appliance cools down. overheating. To prevent this, the oven has a safety thermostat which interrupts the power supply. The oven activates again automatically when the temperature drops. 7.2 Safety thermostat Incorrect operation of the appliance or defective components can cause dangerous 8. HELPFUL HINTS AND TIPS • The appliance has five shelf levels. Count the shelf levels from the bottom of the appliance floor. • The appliance has a special system which circulates the air and constantly recycles the steam. With this system you can cook in a steamy environment and keep the food soft inside and crusty outside. It decreases the cooking time and energy consumption to a minimum. • Moisture can condense in the appliance or on the door glass panels. This is nor- mal. Always stand back from the appliance when you open the appliance door while cooking. To decrease the condensation, operate the appliance for 10 minutes before cooking. • Clean the moisture after each use of the appliance. • Do not put the objects directly on the appliance floor and do not put aluminium foil on the components when you cook. This can change the baking results and cause damage to the enamel. 10 www.electrolux.com • To prevent too much smoke in the oven during roasting, add some water into the deep pan. To prevent the smoke condensation, add water each time after it dries up. 8.1 Baking cakes • Do not open the oven door before 3/4 of the set cooking time is up. • If you use two baking trays at the same time, keep one empty level between them. 8.3 Cooking times Cooking times depend on the type of food, its consistency, and volume. Initially, monitor the performance when you cook. Find the best settings (heat setting, cooking time, etc.) for your cookware, recipes and quantities when you use this appliance. 8.2 Cooking meat and fish • Use a deep pan for very fatty food to prevent the oven from stains that can be permanent. • Leave the meat for approximately 15 minutes before carving so that the juice does not seep out. 8.4 Baking and roasting table CAKES TYPE OF DISH Conventional Cooking True Fan Cooking Cooking time Temp [min] [°C] Notes Shelf position Temp [°C] Shelf position Whisked recipes 2 170 3 (2 and 4) 160 45 - 60 In a cake mould Shortbread dough 2 170 3 (2 and 4) 160 20 - 30 In a cake mould Buttermilk cheesecake 1 170 2 165 60 - 80 In a 26 cm cake mould Apple cake (Apple pie) 2 170 2 (left and right) 160 80 - 100 In two 20 cm cake moulds on a wire shelf1) Strudel 3 175 2 150 60 - 80 In a baking tray Jam-tart 2 170 2 (left and right) 165 30 - 40 In a 26 cm cake mould Sponge cake 2 170 2 160 50 - 60 In a 26 cm cake mould Christmas cake / Rich fruit cake 2 160 2 150 90 - 120 In a 20 cm cake mould1) Plum cake 1 175 2 160 50 - 60 In a bread tin1) Small cakes - one level 3 170 3 140 150 20 - 30 In a baking tray ENGLISH TYPE OF DISH Conventional Cooking True Fan Cooking Cooking time Temp [min] [°C] 11 Notes Shelf position Temp [°C] Shelf position Small cakes - two levels - - 2 and 4 140 150 25 - 35 In a baking tray Small cakes - three levels - - 1, 3 and 5 140 150 30 - 45 In a baking tray Biscuits / pastry stripes - one level 3 140 3 140 150 30 - 35 In a baking tray Biscuits / pastry stripes - two levels - - 2 and 4 140 150 35 - 40 In a baking tray Biscuits / pastry stripes three levels - - 1, 3 and 5 140 150 35 - 45 In a baking tray Meringues one level 3 120 3 120 80 - 100 In a baking tray Meringuestwo levels - - 2 and 4 120 80 - 100 In a baking tray1) Buns 3 190 3 190 12 - 20 In a baking tray1) Eclairs - one level 3 190 3 170 25 - 35 In a baking tray Eclairs - two levels - - 2 and 4 170 35 - 45 In a baking tray Plate tarts 2 180 2 170 45 - 70 In a 20 cm cake mould Rich fruit cake 1 160 2 150 110 120 In a 24 cm cake mould Victoria sandwich 1 170 2 160 50 - 60 In a 20 cm cake mould 1) Preheat for 10 minutes. 12 www.electrolux.com BREAD AND PIZZA TYPE OF DISH Conventional Cooking True Fan Cooking Cooking time Temp [min] [°C] Notes Shelf position Temp [°C] Shelf position White bread 1 190 1 190 60 - 70 Rye bread 1 190 1 180 30 - 45 In a bread tin Bread rolls 2 190 2 (2 and 4) 180 25 - 40 6 - 8 rolls in a baking tray1) Pizza 1 230 250 1 230 250 10 - 20 In a baking tray or a deep pan1) Scones 3 200 3 190 10 - 20 In a baking tray1) 1 - 2 pieces, 500 gr per piece1) 1) Preheat for 10 minutes. FLANS TYPE OF DISH Conventional Cooking True Fan Cooking Cooking time Temp [min] [°C] Notes Shelf position Temp [°C] Shelf position Pasta flan 2 200 2 180 40 - 50 In a mould Vegetable flan 2 200 2 175 45 - 60 In a mould Quiches 1 180 1 180 50 - 60 In a mould1) Lasagne 2 180 190 2 180 190 25 - 40 In a mould1) Cannelloni 2 180 190 2 180 190 25 - 40 In a mould1) 1) Preheat for 10 minutes. MEAT TYPE OF DISH Conventional Cooking True Fan Cooking Cooking time Temp [min] [°C] Notes Shelf position Temp [°C] Shelf position Beef 2 200 2 190 50 - 70 On a wire shelf Pork 2 180 2 180 90 - 120 On a wire shelf ENGLISH TYPE OF DISH Conventional Cooking True Fan Cooking Cooking time Temp [min] [°C] 13 Notes Shelf position Temp [°C] Shelf position Veal 2 190 2 175 90 - 120 On a wire shelf English roast beef, rare 2 210 2 200 50 - 60 On a wire shelf English roast beef, medium 2 210 2 200 60 - 70 On a wire shelf English roast beef, well done 2 210 2 200 70 - 75 On a wire shelf Shoulder of pork 2 180 2 170 120 150 With rind Shin of pork 2 180 2 160 100 120 2 pieces Lamb 2 190 2 175 110 130 Leg Chicken 2 220 2 200 70 - 85 Whole Turkey 2 180 2 160 210 240 Whole Duck 2 175 2 220 120 150 Whole Goose 2 175 1 160 150 200 Whole Rabbit 2 190 2 175 60 - 80 Cut in pieces Hare 2 190 2 175 150 200 Cut in pieces Pheasant 2 190 2 175 90 - 120 Whole Cooking time Shelf po- Temp [min] sition [°C] Notes FISH TYPE OF DISH Conventional Cooking True Fan Cooking Shelf position Temp [°C] Trout / Sea bream 2 190 2 175 40 - 55 3 - 4 fish Tuna fish / Salmon 2 190 2 175 35 - 60 4 - 6 fillets 8.5 Grilling Preheat the empty oven for 10 minutes, before cooking. 14 www.electrolux.com Quantity Grilling Cooking time [min] TYPE OF DISH Pieces [g] Shelf position Temp [°C] 1st side 2nd side Fillet steaks 4 800 4 max. 12 - 15 12 - 14 Beef steaks 4 600 4 max. 10 - 12 6-8 Sausages 8 - 4 max. 12 - 15 10 - 12 Pork chops 4 600 4 max. 12 - 16 12 - 14 Chicken (cut in 2) 2 1000 4 max. 30 - 35 25 - 30 Kebabs 4 - 4 max. 10 - 15 10 - 12 Breast of chicken 4 400 4 max. 12 - 15 12 - 14 Hamburger 6 600 4 max. 20 - 30 - Fish fillet 4 400 4 max. 12 - 14 10 - 12 Toasted sandwiches 4-6 - 4 max. 5-7 - Toast 4-6 - 4 max. 2-4 2-3 8.6 Turbo Grilling Beef TYPE OF DISH Quantity Shelf position Temperature [°C] Time [min] Roast beef or fillet, rare per cm of thickness 1 190 - 200 1) 5-6 Roast beef or fillet, medium per cm of thickness 1 180 - 190 1) 6-8 Roast beef or fillet, well done per cm of thickness 1 170 - 180 1) 8 - 10 Quantity Shelf position Temperature [°C] Time [min] Shoulder, neck, ham joint 1 - 1.5 kg 1 160 - 180 90 - 120 Chop, spare rib 1 - 1.5 kg 1 170 - 180 60 - 90 Meat loaf 750 g - 1 kg 1 160 - 170 50 - 60 Pork knuckle (precooked) 750 g - 1 kg 1 150 - 170 90 - 120 1) Preheat the oven. Pork TYPE OF DISH ENGLISH Veal TYPE OF DISH Quantity Shelf position Temperature [°C] Time [min] Roast veal 1 kg 1 160 - 180 90 - 120 Knuckle of veal 1.5 - 2 kg 1 160 - 180 120 - 150 TYPE OF DISH Quantity Shelf position Temperature [°C] Time [min] Leg of lamb, roast lamb 1 - 1.5 kg 1 150 - 170 100 - 120 Saddle of lamb 1 - 1.5 kg 1 160 - 180 40 - 60 Quantity Shelf position Temperature [°C] Time [min] Poultry portions 200 - 250 g each 1 200 - 220 30 - 50 Chicken , half 400 - 500 g each 1 190 - 210 35 - 50 Chicken, poulard 1 - 1.5 kg 1 190 - 210 50 - 70 Duck 1.5 - 2 kg 1 180 - 200 80 - 100 Goose 3.5 - 5 kg 1 160 - 180 120 - 180 Turkey 2.5 - 3.5 kg 1 160 - 180 120 - 150 Turkey 4 - 6 kg 1 140 - 160 150 - 240 Quantity Shelf position Temperature [°C] Time [min] 1 - 1.5 kg 1 210 - 220 40 - 60 1 level 2 levels Temperature [°C] Time [hr] Beans 3 1/4 60 - 70 6-8 Peppers 3 1/4 60 - 70 5-6 Lamb Poultry TYPE OF DISH Fish (steamed) TYPE OF DISH Whole fish 8.7 Drying - True Fan Cooking Cover the oven shelves with baking parchment. VEGETABLES TYPE OF DISH Shelf position 15 16 www.electrolux.com TYPE OF DISH Shelf position 1 level 2 levels Temperature [°C] Time [hr] Vegetables for soup 3 1/4 60 - 70 5-6 Mushrooms 3 1/4 50 - 60 6-8 Herbs 3 1/4 40 - 50 2-3 FRUIT TYPE OF DISH Shelf position 1 level 2 levels Temperature [°C] Time [hr] Plums 3 1/4 60 - 70 8 - 10 Apricots 3 1/4 60 - 70 8 - 10 Apple slices 3 1/4 60 - 70 6-8 Pears 3 1/4 60 - 70 6-9 Information on acrylamides Important! According to the newest scientific knowledge, if you brown food (specially the one which contains starch), acrylamides can pose a health risk. Thus, we recommend that you cook at the lowest temperatures and do not brown food too much. ENGLISH 17 9. CARE AND CLEANING WARNING! Refer to the Safety chapters. • Clean the front of the appliance with a soft cloth with warm water and a cleaning agent. • To clean metal surfaces use a usual cleaning agent. • Clean the oven interior after each use. Then you can remove dirt more easily and it does not burn on. • Clean stubborn dirt with a special oven cleaner. • Clean all oven accessories after each use and let them dry. Use a soft cloth with warm water and a cleaning agent. • If you have nonstick accessories, do not clean them using aggressive agents, sharp-edged objects or a dishwasher. It can destroy nonstick coating. Stainless steel or aluminium appliances: Clean the oven door with a wet sponge only. Dry it with a soft cloth. Do not use steel wool, acids or abrasive materials, as they can cause damage to the oven surface. Clean the oven control panel with the same precautions. 9.1 Cleaning the door gasket • Regularly do a check of the door gasket. The door gasket is around the frame of the oven cavity. Do not use the appliance if the door gasket is damaged. Contact the Service Centre. • To clean the door gasket, refer to the general information about cleaning. 9.2 Shelf supports You can remove the shelf supports to clean the side walls. Removing the shelf supports 1. Pull the front of the shelf support away from the side wall. 2. 1 2 Pull the rear end of the shelf support away from the side wall and remove it. 18 www.electrolux.com Installing the shelf supports 1. Install the shelf supports in the opposite sequence. 2. 3. The rounded ends of the shelf supports must point to the front. 9.3 Oven lamp WARNING! Be careful when you change the oven lamp. There is a risk of electrical shock. Before you change the oven lamp: • Deactivate the oven. • Remove the fuses in the fuse box or deactivate the circuit breaker. 4. Turn the glass cover counterclockwise to remove it. Clean the glass cover. Replace the oven light bulb with an applicable 300 °C heat-resistant oven light bulb. Use the same oven lamp type. Install the glass cover. 9.4 Cleaning the oven door The oven door has two glass panels. You can remove the oven door and the internal glass panel to clean it. The oven door can close if you try to remove the internal glass panel before you remove the oven door. Put a cloth on the bottom of the oven to prevent damage to the oven light and glass cover. Always hold the halogen lamp with a cloth to prevent grease residue from burning on the lamp. Removing the oven door and the glass panel 1. Open the door fully and hold the two door hinges. ENGLISH 19 2. Lift and turn the levers on the two hinges. 3. Close the oven door to the first opening position (halfway). Then pull forward and remove the door from its seat. 4. Put the door on a soft cloth on a stable surface. 5. Release the locking system to remove the internal glass panel. 20 www.electrolux.com 6. Turn the two fasteners by 90° and remove them from their seats. 7. Carefully lift (step 1) and remove (step 2) the glass panel. Clean the glass panel with water and soap. Dry the glass panel carefully. 90° 8. 1 2 Installing the door and the glass panel When the cleaning is completed, install the glass panel and the oven door. Do the above steps in the opposite sequence. The screen-printing zone must face the inner side of the door. Make sure that after the installation the surface of the glass panel frame on the screen-printing zones is not rough when you touch it. Make sure that you install the internal glass panel in the seats correctly. Refer to the illustration. 10. WHAT TO DO IF… WARNING! Refer to the Safety chapters. Problem Possible cause Remedy The oven does not heat up. The appliance is deactivated. Activate the appliance. The oven does not heat up. The clock is not set. Set the clock. The oven does not heat up. The necessary settings are not set. Make sure that the settings are correct. ENGLISH Problem Possible cause 21 Remedy The oven does not heat up. The fuse in the fuse box is released. Do a check of the fuse. If the fuse is released more than one time, contact a qualified electrician. The oven lamp does not operate. The oven lamp is defective. Replace the oven lamp. The display shows 12.00. There was a power cut. Set the clock. Steam and condensation settle on the food and in the oven. Do not keep the dishes in the oven for longer than 15 - 20 minutes after the cooking ends. You left the dish in the oven for too long. If you cannot find a solution to the problem yourself, contact your dealer or the service centre. The necessary data for the service centre is on the rating plate. The rating plate is on the front frame of the appliance cavity. We recommend that you write the data here: Model (MOD.) ......................................... Product number (PNC) ......................................... Serial number (S.N.) ......................................... 11. INSTALLATION WARNING! Refer to the Safety chapters. 11.1 Building In 548 558 20 590 min. 550 20 min. 560 573 589 594 5 600 min. 550 20 min. 560 22 www.electrolux.com 11.3 Cable A B Cable types applicable for installation or replacement: H07 RN-F, H05 RN-F, H05 RRF, H05 VV-F, H05 V2V2-F (T90), H05 BB-F. For the section of the cable refer to the total power (on the rating plate) and to the table: Total power 11.2 Electrical installation WARNING! Only a qualified person must do the electrical installation. The manufacturer is not responsible if you do not follow the safety precautions from the chapter "Safety Information". Section of the cable maximum 1380 3 x 0.75 mm² W maximum 2300 3 x 1 mm² W maximum 3680 3 x 1.5 mm² W The earth cord (green / yellow cable) must be 2 cm longer than phase and neutral cables (blue and brown cables). This appliance is only supplied with a main cable. 12. ENVIRONMENT CONCERNS Recycle the materials with the symbol . Put the packaging in applicable containers to recycle it. Help protect the environment and human health and to recycle waste of electrical and electronic appliances. Do not dispose appliances marked with the symbol with the household waste. Return the product to your local recycling facility or contact your municipal office. 23 สารบัญ 1. 2. 3. 4. 5. 6. 7. 8. 9. 10. 11. คำแนะนำดานความปลอดภัย . . . . . . . . . . . . . . . . . . . . . . . . . . . . . . . . . . . . . . . . . . . . . . . . . . . . . . . . . . . . . . . คำแนะนำเพื่อความปลอดภัย . . . . . . . . . . . . . . . . . . . . . . . . . . . . . . . . . . . . . . . . . . . . . . . . . . . . . . . . . . . . . . . รายละเอียดของผลิตภัณฑ . . . . . . . . . . . . . . . . . . . . . . . . . . . . . . . . . . . . . . . . . . . . . . . . . . . . . . . . . . . . . . . . กอนการใชงานครั้งแรก . . . . . . . . . . . . . . . . . . . . . . . . . . . . . . . . . . . . . . . . . . . . . . . . . . . . . . . . . . . . . . . . . . การใชงานประจำวัน . . . . . . . . . . . . . . . . . . . . . . . . . . . . . . . . . . . . . . . . . . . . . . . . . . . . . . . . . . . . . . . . . . . . . ฟงกชั่นนาฬิกา . . . . . . . . . . . . . . . . . . . . . . . . . . . . . . . . . . . . . . . . . . . . . . . . . . . . . . . . . . . . . . . . . . . . . . . . ฟงกชั่นเพิ่มเติม . . . . . . . . . . . . . . . . . . . . . . . . . . . . . . . . . . . . . . . . . . . . . . . . . . . . . . . . . . . . . . . . . . . . . . . . เคล็ดวิธีและขอแนะนำที่มีประโยชน . . . . . . . . . . . . . . . . . . . . . . . . . . . . . . . . . . . . . . . . . . . . . . . . . . . . . . . . . . การดูแลรักษาและทำความสะอาด . . . . . . . . . . . . . . . . . . . . . . . . . . . . . . . . . . . . . . . . . . . . . . . . . . . . . . . . . . . . สิ่งที่ตองทำถา... . . . . . . . . . . . . . . . . . . . . . . . . . . . . . . . . . . . . . . . . . . . . . . . . . . . . . . . . . . . . . . . . . . . . . . . . การติดตั้ง . . . . . . . . . . . . . . . . . . . . . . . . . . . . . . . . . . . . . . . . . . . . . . . . . . . . . . . . . . . . . . . . . . . . . . . . . . . . 24 25 26 27 27 28 29 29 36 39 40 เราใสใจคุณอยูเสมอ ขอบพระคุณที่ซื้อเครื่องใชไฟฟาจาก Electrolux คุณไดเลือกผลิตภัณฑจากผูผลิตที่ไดสั่งสมประสบการณและนวัตกรรมที่ล้ำ สมัยในวงการมาเปนเวลาหลายสิบป ผลิตภัณฑที่ชาญฉลาดและมีสไตลไดรับการออกแบบเพื่อคุณโดยเฉพาะ ดังนั้นจงมั่นใจได วาทุกครั้งที่ใชงาน คุณจะไดรับความปลอดภัยและประสิทธิภาพที่ยอดเยี่ยมในทุกๆ ครั้ง ยินดีตอนรับสู Electrolux แวะไปยังเว็บไซทของเราำเพื่อ: ขอรับคำแนะนำในการใชงาน โบรชัวร การแกไขปญหา ขอมูลการใหบริการ: www.electrolux.com ลงทะเบียนผลิตภัณฑของคุณเพื่อบริการที่ดีกวา: www.electrolux.com/productregistration ซื้ออุปกรณเสริม วัสดุสิ้นเปลือง และอะไหลของแทสำหรับอุปกรณของคุณ: www.electrolux.com/shop การดูแลลูกคาและการบริการ เราขอแนะนำใหใชอะไหลของแท ในการติดตอฝายบริการ ตรวจสอบใหแนใจวาคุณมีขอมูลตอไปนี้ ขอมูลดังกลาวระบุไวบนปายบอกกำลังไฟ รุน, PNC, หมายเลขเครื่อง คำเตือน / ขอควรระวัง-ขอมูลความปลอดภัย ขอมูลทั่วไปและเคล็ดลับในการใชเครื่อง ขอมูลดานสิ่งแวดลอม เปลี่ยนแปลงได โดยไมตองแจงใหทราบ 24 www.electrolux.com 1. คำแนะนำดานความปลอดภัย กอนติดตั้งและใชงานเครื่อง กรุณาอานคำแนะนำที่จัดมาใหโดยละเอียด‐ กอนในเบื้องตน ผูผลิตจะไมรับผิดชอบใด ๆ ตอการติดตั้งที่ไมถูกตองละ‐ การใชงานที่นำไปสูการบาดเจ็บและความเสียหาย เก็บคูมือไวกับเครื่องเพื่อ‐ ใชอางอิงในอนาคต 1.1 ความปลอดภัยตอเด็กและกลุมเสี่ยง คำเตือน อาจเสียชีวิตเนื่องจากขาดอากาศหายใจ บาดเจ็บหรือทุพพลภาพ‐ ถาวรได • อุปกรณนี้สามารถใชไดโดยเด็กอายุตั้งแต 8 ปขึ้นไป และบุคคลที่มีขอ‐ จำกัดทางรางกาย ประสาทสัมผัส สภาพจิตหรือบุคคลที่ขาด‐ ประสบการณและความรูหากมีคนกำกับดูแลดานความปลอดภัยและคอย‐ ใหคำแนะนำในการใชงานเครื่อง • อยาใหเด็กเลนเครื่อง • เก็บบรรจุภัณฑใหพนมือเด็ก • อยาใหเด็กและสัตวเลี้ยงอยูใกลเครื่องขณะทำงานหรือขณะกำลังรอให‐ เย็นลง ชิ้นสวนที่สามารถเขาถึงไดอาจรอนมาก • หากเครื่องมีอุปกรณนิรภัยปองกันเด็ก แนะนำใหใชดวย • หามทำความสะอาดและดูแลรักษาเครื่องโดยเด็กหากไมมีผูกำกับดูแล 1.2 ความปลอดภัยทั่วไป • เครื่องอาจมีความรอนภายในเนื่องจากการทำงาน อยาสัมผัสที่ชิ้นสวน‐ ทำความรอนในเครื่อง ใชถุงมือกันความรอนเพื่อนำสิ่งของออกหรือเขา‐ ในเครื่อง • อยาใชเครื่องพนไอน้ำรอนเพื่อทำความสะอาดเครื่องใช • กอนซอมบำรุง ใหถอดสายจายไฟ • อยาใชน้ำยาที่มีฤทธิ์กัดกรอนหรือวัสดุแหลมคมเพื่อทำความสะอาดชอง‐ กระจก เนื่องจากอาจทำใหพื้นผิวเกิดรอยและทำใหกระจกแตกเสีย‐ หายได • นำฐานรองชั้นวางออกกอนโดยดึงดานหนาของฐานรองชั้นวาง จากนั้น‐ ดึงปลายดานหลังออกจากผนังดานขาง ใสฐานรองชั้นวางโดยยอน‐ ลำดับขางตน 25 2. คำแนะนำเพื่อความปลอดภัย แหลงจายไฟไดทุกขา อุปกรณแยกสวนจะตองมี‐ ความกวางชองเปดหนาสัมผัสอยางนอย 3 มม. 2.1 การติดตั้ง คำเตือน ติดตั้งเครื่องโดยชางผูเชี่ยวชาญเทานั้น • นำบรรจุภัณฑออกทั้งหมด • อยาติดตัง้ หรือใชเครื่องที่เสียหาย • ปฏิบัติตามคำแนะนำในการติดตั้งที่จัดมาใหพรอม‐ กับเครื่อง • ใชความระมัดระวังขณะเคลื่อนยายเครื่อง เนื่องจาก‐ เครื่องมีน้ำหนักมาก สวมถุงมือเพื่อความปลอดภัย‐ ทุกครั้ง • อยาดึงเครื่องจากมือจับ • เวนระยะขั้นต่ำจากเครื่องและอุปกรณอื่น • เครื่องจะตองติดตั้งอยูดานลางหรือใกลกับ‐ โครงสรางที่ปลอดภัย • ดานขางของเครื่องจะตองอยูในแนวเดียวกับเครื่อง‐ ใชอื่น ๆ ที่มีความสูงใกลเคียงกัน การตอระบบไฟ คำเตือน อาจเกิดเพลิงไหมหรือไฟฟาช็อตได • ตอระบบไฟโดยชางไฟฟาที่มีความเชี่ยวชาญเทานั้น • เครือ่ งจะตองตอสายดิน • ขอมูลทางไฟฟาที่แผนพิกัดจะตองตรงกับแหลงจาย‐ ไฟที่ใช หากไมเปนตามนี้ กรุณาติดตอชางไฟ • ใชเตารับแบบทนแรงกระแทกที่ติดตั้งไดอยางถูก‐ ตอง • อยาใชหัวตอหลายทางและสายพวง • อยาทำใหปลั๊กไฟและสายไฟเสียหาย ติดตอฝาย‐ บริการหรือชางไฟเพื่อใหเปลี่ยนสายไฟที่เสียหาย • อยาใหสายไฟสัมผัสโดนฝาเครื่อง โดยเฉพาะใน‐ กรณีที่ฝารอนอยู • ระบบปองกันการกระแทกของชิ้นสวนที่มีกระแส‐ หรือชิ้นสวนหุมฉนวนจะตองยึดแนนโดยไมสามารถ‐ นำออกโดยไมใชเครื่องมือพิเศษได • ตอปลั๊กไฟเขากับเตารับไฟฟาเมื่อทำการติดตั้งเสร็จ‐ สิ้นแลวเทานั้น จะตองมีชองสำหรับเสียบปลั๊กได‐ สะดวกหลังการติดตั้ง • หากเตารับไฟฟาหลวมคลอน อยาตอปลั๊กไฟเขาไป • อยาดึงที่สายไฟเพื่อปดเครื่อง ดึงที่หัวปลั๊กไฟทุกครั้ง • ใชเฉพาะอุปกรณแยกสวนที่เหมาะสมเทานั้น เชน ระบบตัดนิรภัย ฟวส (ฟวสแบบสกรูยึดกับฐาน) ตัว‐ ตัดไฟรั่วและคอนแทคเตอร • การติดตั้งทางไฟฟาจะตองติดตั้งรวมกับอุปกรณ‐ แยกสวนเพื่อใหสามารถตัดการเชื่อมตอเครื่องจาก‐ 2.2 การใชงาน คำเตือน อาจทำใหเกิดการบาดเจ็บ ไหม ไฟฟาช็อต‐ หรือการระเบิดได • • • • • • • • • • • • • ใชเครื่องในครัวเรือนเทานั้น หามแกไขสวนประกอบทางเทคนิคของเครื่องนี้ ชองเปดระบายอากาศจะตองไมถูกกีดขวาง อยาเปดเครื่องใชงานทิ้งไวโดยไมมีคนดูแล ปดเครื่องหลังการใชงานทุกครั้ง ใชความระมัดระวังขณะเปดฝาเครื่องในกรณีที่‐ เครื่องทำงานอยู อากาศรอนอาจระบายออกมา อยาเปดเครื่องขณะมือเปยกหรือในกรณีที่เปยกน้ำ อยาใชแรงดันฝาที่เปดอยู อยาใชเครื่องเปนพื้นผิวสำหรับทำงานหรือพื้นผิว‐ สำหรับวางของ ปดฝาเครื่องทุกครั้งขณะไมใชงาน เปดฝาเครื่องดวยความระมัดระวัง การใช‐ แอลกอฮอลกับเครื่องอาจทำใหแอลกอฮอลผสมกับ‐ อากาศ อยาใหมีประกายไฟหรือเปลวไฟใกลกับเครื่องขณะ‐ เปดฝา อยาใสของไวไฟที่เปยกสารไวไฟภายใน ใกลหรือ‐ บนตัวเครื่อง คำเตือน ความเสียหายที่อาจเกิดขึ้นกับเครื่อง • เพื่อปองกันความเสียหายหรือการเปลี่ยนเสียของอี‐ นาเมล: – อยาวางภาชนะหรือวัตถุอื่น ๆ ในเครื่องที่ดานลาง‐ โดยตรง – อยาวางฟอยลอะลูมิเนียมที่ดานลางของเครื่อง‐ โดยตรง – อยาใสน้ำโดยตรงในเครื่องที่กำลังรอน – อยาเก็บจานชื้นและอาหารไวในเครื่องหลังปรุง‐ อาหารเสร็จสิ้น – ใชความระมัดระวังขณะถอดหรือติดตั้งอุปกรณ‐ ตาง ๆ • การเปลี่ยนสีของอีนาเมลไมสงผลตอประสิทธิภาพ‐ ของเครื่องแตอยางใด และไมถือเปนขอบกพรอง‐ ภายใตกฎหมายการรับประกัน • ใชกะทะกนลึกเพื่อใหความชื้นแกเคก น้ำผลไมอาจ‐ ทำใหเกิดคราบติดฝงถาวรได 26 www.electrolux.com 2.3 การดูแลและทำความสะอาด คำเตือน ความเสี่ยงตอการบาดเจ็บ เพลิงไหมหรือ‐ ความเสียหายตอเครื่อง • กอนทำการซอมบำรุง ใหปดเครื่องและปลดสายไฟ‐ ออกจากเตารับไฟฟา • เครื่องจะตองเย็นลงแลว แผงกระจกอาจแตกเสีย‐ หายได • เปลี่ยนแผงกระจกทันทีหากมีการแตกเสียหาย ติดตอศูนยบริการ • ใชความระมัดระวังขณะนำฝาออกจากตัวเครื่อง ฝามีน้ำหนักมาก! • ทำความสะอาดเครื่องเปนประจำเพื่อปองกันการ‐ เสื่อมสภาพของวัสดุบริเวณพื้นผิว • ไขมันหรือเศษอาหารตกคางในเครื่องอาจทำใหเกิด‐ เพลิงไหมได • ทำความสะอาดเครื่องโดยใชผาเนื้อนุมชุบน้ำบิด‐ หมาด ใชเฉพาะน้ำยาทำความสะอาดที่เปนกลาง อยาใชผลิตภัณฑที่มีฤทธิ์กัดกรอน แผนขัดที่หยาบ สารละลายหรือวัตถุโลหะที่อาจทำใหเกิดความเสีย‐ หาย • หากใชสเปรยสำหรับฉีดเตา ใหปฏิบัติตามคำ‐ แนะนำดานความปลอดภัยบนบรรจุภัณฑ • อยาทำความสะอาดชั้นอีนาเมลแคทาลิติค (ถามี) โดยใชน้ำยาทำความสะอาด 2.4 ไฟดานใน • หลอดไฟหรือหลอดฮาโลเจนที่ใชกับเครื่องนี้ มีไว‐ ใชสำหรับเครื่องใชในครัวเรือนเทานั้น หามใชเปน‐ ไฟสองสวางในบาน คำเตือน อาจเกิดไฟฟาช็อตได! • กอนเปลี่ยนหลอดไฟ ใหปลดสายไฟเครื่องจาก‐ แหลงจายไฟกอน • ใชเฉพาะหลอดไฟที่มีพิกัดทางไฟฟาเหมือนกัน 2.5 การทิ้ง คำเตือน ความเสี่ยงตอการบาดเจ็บหรือขาดอากาศ‐ หายใจ • ถอดปลั๊กจากเตารับไฟฟา • ตัดสายไฟจากนั้นจึงนำไปทิ้ง • นำล็อคฝาออกเพื่อปองกันเด็กหรือสัตวเลี้ยงติดคาง‐ อยูในเครื่อง 3. รายละเอียดของผลิตภัณฑ 1 2 3 4 5 สวนแสดงอุณหภูมิ 5 6 ตะแกรง 7 ไฟเตาอบ 6 5 7 4 11 3 8 2 10 9 1 แปนฟงกชั่นของเตาอบ 3 โปรแกรมอิเล็กทรอนิกส 4 แปนปรับอุณหภูมิ 9 ฐานรองชั้นวางถอดได 10 แผนระบุพิกัด 11 ตำแหนงชั้นวาง 3.1 อุปกรณเสริมเตาอบ 1 2 สวนแสดงการทำงาน 8 พัดลม • ตะแกรงชั้นวาง สำหรับภาชนะ ถาดเคกและอุปกรณปงยาง • ถาดอบ สำหรับเคกและบิสกิต • ถาดปง/ยาง สำหรับอบและยางหรือใชเปนอางรองไขมัน 27 4. กอนการใชงานครั้งแรก คำเตือน ดูรายละเอียดจากหัวขอ ความปลอดภัย หลังผานไปประมาณหาวินาที การกะพริบจะหยุดลง‐ และจอแสดงผลแสดงเวลาที่คุณตั้งไว เปลี่ยนเวลาโดยกด ซ้ำ ๆ จนกระทั่งสวน‐ แสดงผลเวลาติดกะพริบ หามกำหนดระยะ‐ เวลาหรือ เวลาสิ้นสุด พรอมกัน 4.1 การทำความสะอาดเบื้องตน • นำอุปกรณทั้งหมดและฐานรองชั้นวางที่ถอดได (ถามี) ออก • ทำความสะอาดเครื่องกอนใชงานเปนครั้งแรก ดูในหัวขอ "การดูแลและทำความสะอาด" 4.3 การอุนรอน อุนรอนเครื่องเปลาเพื่อไลไขมันที่ตกคาง 1. 4.2 การตั้งเวลา สามารถตั้งเวลาไดกอนใชงานเตาอบ ขณะตอเครื่องเขากับแหลงจายไฟหรือหลังจากไฟตัด สวนแสดงเวลาจะติดกะพริบ กดปุม + หรือ - เพื่อตั้งเวลาที่ถูกตอง 2. 3. 4. 5. ตั้งคาฟงกชั่น และอุณหภูมิสูงสุด ปลอยใหเครื่องทำงานเปนเวลาหนึ่งชั่วโมง ตั้งคาฟงกชั่น และอุณหภูมิสูงสุด ปลอยใหเครื่องทำงานเปนเวลาสิบนาที ตั้งคาฟงกชั่น และอุณหภูมิสูงสุด ปลอยใหเครื่องทำงานเปนเวลาสิบนาที อุปกรณเสริมอาจรอนกวาปกติ เครื่องอาจสงกลิ่นและมี‐ ควัน ซึ่งถือเปนเรื่องปกติ อากาศจะตองถายเทไดสะดวก 6. 5. การใชงานประจำวัน คำเตือน ดูรายละเอียดจากหัวขอ ความปลอดภัย 5.1 การเปดและปดเครื่อง 1. ปรับแปนฟงกชั่นของเตาไปยังฟงกชั่นที่ตองการ สวนแสดงการทำงานจะติดสวางขณะเครื่อง‐ ทำงาน 2. 3. ปรับแปนควบคุมคุณหภูมิเพื่อเลือกอุณหภูมิที่‐ ตองการ สวนแสดงอุณหภูมิจะติดสวางขณะที่อุณหภูมิของ‐ เครื่องเพิ่มขึ้น ปดเครื่องโดยปรับแปนฟงกชั่นเตาอบและแปน‐ ปรับอุณหภูมิไปที่ตำแหนง Off 5.2 ฟงกชั่นเตาอบ ฟงกชั่นเตาอบ ตำแหนง Off การใชงาน เครื่องปดทำงาน 28 www.electrolux.com ฟงกชั่นเตาอบ การใชงาน ไฟ เปดไฟเตาอบไดโดยไมใชฟงกชั่นปรุงอาหาร อบปกติ ใชอบและยางบนชั้นเตาอบหนึ่งชั้น สวนทำความรอนดานบนและดาน‐ ลางจะทำงานพรอมกัน เปดรอนดานบน สิ้นสุดขั้นตอนการปรุงสุก เฉพาะสวนทำความรอนดานบนที่ทำงาน เปดรอนดานลาง ใชอบเคกใหดานลางกรอบแข็ง เฉพาะสวนทำความรอนดานลางที่ทำงาน ปงยาง ปงอาหารปริมาณเล็กนอยที่กลางชั้นวาง ใชสำหรับปง ปงยางดวน ปงอาหารแบบแผนเรียบปริมาณมาก ใชสำหรับปง สวนประกอบในการ‐ ปงทั้งหมดจะเริ่มทำงาน ปงยางเทอรโบ ปรุงสุกเนื้อชิ้นใหญ ตะแกรงและพัดลมเตาอบจะทำงานตอกันและ‐ หมุนเวียนอากาศรอนรอบ ๆ ผลิตภัณฑอาหาร ใชพัดลมปรุงสุก ยางหรือยางและอบอาหารโดยใชอุณหภูมิเทากันบนชั้นวางตั้งแตหนึ่ง‐ ชั้นขึ้นไปโดยไมใหเสียรส อบพิซซา ใชทำพิซซา แปงอบกรอบหรือพาย ตะแกรงและสวนประกอบดานลาง‐ ใชจายความรอนโดยตรง โดยพัดลมทำหนาทีห ่ มุนเวียนอากาศรอนเพื่อ‐ ใหหนาของพิซซาหรือไสพายสุก 6. ฟงกชั่นนาฬิกา 6.1 โปรแกรมอิเล็กทรอนิกส 1 2 3 1 สัญลักษณการทำงาน 2 สวนแสดงเวลา 3 สัญลักษณการทำงาน 4 ปุม + 5 ปุมเลือก hr min 6 ปุม - 6 5 ฟงกชั่นนาฬิกา เวลา Minute Minder Duration 4 การใชงาน ตั้งเวลาโดยแกไขหรือตรวจสอบเวลาจริง ใชตั้งเวลานับถอยหลัง ฟงกชั่นนี้ไมมีผลตอการทำงานของเตาอบ ใชกำหนดระยะเวลาที่เครื่องจะตองทำงาน 29 ฟงกชั่นนาฬิกา End การใชงาน กำหนดเวลาที่เครื่องจะปดการทำงาน สามารถใชฟงกืชั่น Duration และ End ไดพรอมกันเพื่อตั้งเวลาสำหรับเปดและ‐ ปดใชงานเครื่อง เริ่มจากตั้งคา Duration จากนั้นจึงตั้งคา End 6.2 การตั้งนาฬิกา 1. 2. สำหรับ Duration และ End ใหตั้งคา‐ การทำงานของเตาอบและอุณหภูมิ ไมจำเปนตอง‐ ทำตามนี้สำหรับ Minute Minder กดปุม Selection ซ้ำ ๆ กันจนกระทั่งสวนแสดง‐ ผลนาฬิกาติดกะพริบ 3. 4. 5. ในกรณีที่ใช Duration และ End เครื่องจะปดการทำงานอัตโนมัติ กดปุมเพื่อปดสัญญาณดังกลาว ปรับแปนฟงกชั่นเตาอบและแปนปรับอุณหภูมิไป‐ ที่ตำแหนงปด 6.3 การยกเลิกฟงกชั่นนาฬิกา 1. 2. hr min กด + หรือ - เพื่อตั้งเวลาที่ตองการ หนาจอจะแสดงคาเวลาที่คุณตั้งไว หลังจากพน‐ กำหนดเวลาที่ตั้งไว สวนแสดงผลจะติดกะพริบ‐ และมีเสียงสัญญาณดังขึ้นสองนาที กดปุม Selection ซ้ำ ๆ กันจนกระทั่งสวนแสดง‐ ผลฟงกชั่นที่ตองการติดกะพริบ กดปุม - คางไว ฟงกชั่นนาฬิกาจะดับลงหลังผานไปครูหนึ่ง 7. ฟงกชั่นเพิ่มเติม 7.1 พัดลมระบายความรอน 7.2 เทอรโมสตัทนิรภัย ขณะเครื่องทำงาน พัดลมระบายความรอนจะทำงาน‐ อัตโนมัติเพื่อใหพื้นผิวของเครื่องเย็น หากคุณปดเครื่อง พัดลมระบายความรอนจะทำงานตอไปจนกระทั่ง‐ อุณหภูมิของเครื่องลดลง การใชงานเครื่องอยางไมถูกตองหรือสวนประกอบที่มี‐ ปญหาอาจทำใหความรอนสูงเกินไป เพื่อปองกัน‐ ปญหานี้ เตาจึงมีเทอรโมสตัทเพื่อตัดกระแสไฟ เตาอบ‐ จะทำงานอีกครั้งอัตโนมัติเมื่ออุณหภูมิลดลง 8. เคล็ดวิธีและขอแนะนำที่มีประโยชน • เครื่องมีชั้นวางหาชั้น นับชั้นเครื่องจากดานลางของ‐ พื้นเครื่อง • เครื่องมีระบบพิเศษสำหรับหมุนเวียนอากาศและ‐ รีไซเคิลไอรอนอยางตอเนื่อง ระบบนี้ทำใหคุณ‐ สามารถปรุงอากาศในสภาพที่มีไอรอน ทำให‐ อากาศดานในออนนุมและดานนอกกรอบ อีกทั้งยัง‐ ลดเวลาในการปรุงและอัตราการสิ้นเปลืองพลังงาน‐ ใหนอยที่สุด • ความชื้นอาจควบแนนในเครื่องหรือที่แผงฝาปด ซึ่ง‐ ถือเปนเรื่องปกติ ยืนหางจากเครื่องขณะเปดฝาหลัง‐ ปรุงอาหาร เพื่อลดปญหาไอน้ำ ใหเดินเครื่อง 10 นาทีกอนปรุงอาหาร • ทำความสะอาดคราบความชื้นหลังจากใชงานเครื่อง • อยาใสวัตถุใด ๆ เขาไปที่พื้นเครื่องโดยตรง และอยาใสฟอยลอะลูมิเนียมบนสวนประกอบดัง‐ กลาวขณะปรุงอาหาร เนื่องจากจะทำให‐ ประสิทธิภาพในการอบเปลี่ยนไปและอาจทำใหอีนา‐ เมลเคลือบผิวเสียหาย 30 www.electrolux.com 8.1 การอบเคก • เติมน้ำในถาดกนลึกเพื่อปองกันไมใหมีควันมากเกิน‐ ไประหวางการยาง เติมน้ำทุกครั้งที่น้ำแหงเพื่อ‐ ปองกันการเกิดไอน้ำเนื่องจากควัน • อยาเปดฝาเตาอบกอนพนกำหนดเวลา 3/4 ของ‐ โปรแกรมที่ตั้งไว • หากใชถาดอบสองถาดพรอมกัน ใหใสถาดเปลาคั่น‐ กลางไว 8.3 เวลาปรุงสุก เวลาในการปรุงสุกจะขึ้นอยูกับประเภทของวัตถุดิบ โครงสรางและปริมาณ ใหคอยตรวจสอบขณะปรุงสุก พิจารณาคาที่ดีที่สุด (ความรอน เวลาปรุง ฯลฯ) สำหรับภาชนะ สูตรอาหาร‐ และปริมาณของผลิตภัณฑอาหารของคุณขณะใช‐ เครื่อง 8.2 การปรุงสุกเนื้อและปลา • ใชถาดกนลึกสำหรับอาหารที่มีไขมันมากเพื่อ‐ ปองกันไมใหเกิดคราบถาวรที่เตา • วางเนื้อทิ้งไวประมาณ 15 นาทีกอนตัดเพื่อไมใหน้ำ‐ เนื้อเล็ดรอดออกมา 8.4 ตารางการอบและยาง เคก อบปกติ ใชพัดลมปรุงสุก เวลาปรุง [min] หมายเหตุ 160 45 - 60 ในแมพิมพเคก 3 (2 และ 4) 160 20 - 30 ในแมพิมพเคก 2 165 60 - 80 ในแมพิมพเคก‐ ขนาด 26 ซม. 170 2 (ซายและ‐ ขวา) 160 80 - 100 ในแมพิมพเคก‐ ขนาด 20 ซม. บน‐ ตะแกรงวาง1) 3 175 2 150 60 - 80 ในถาดอบ ทารตแยม 2 170 2 (ซายและ‐ ขวา) 165 30 - 40 ในแมพิมพเคก‐ ขนาด 26 ซม. สปอนจเคก 2 170 2 160 50 - 60 ในแมพิมพเคก‐ ขนาด 26 ซม. คริสตมาสเคก / ริชฟรุตเคก 2 160 2 150 90 - 120 ในแมพิมพเคก‐ ขนาด 20 ซม.1) เคกพลัม 1 175 2 160 50 - 60 ในถาดขนมปง 1) เคกขนาดเล็ก ชั้นเดียว 3 170 3 140 150 20 - 30 ในถาดอบ เคกขนาดเล็ก สองชั้น - - 2 และ 4 140 150 25 - 35 ในถาดอบ เคกขนาดเล็ก สามชั้น - - 1, 3 และ 5 140 150 30 - 45 ในถาดอบ บิสกิต / แผน‐ แปง - ชั้นเดียว 3 140 3 140 150 30 - 35 ในถาดอบ บิสกิต / แผน‐ แปง - สองชั้น - - 2 และ 4 140 150 35 - 40 ในถาดอบ ประเภทอาหาร ตำแหนง‐ ชั้นวาง อุณหภูมิ [°C] ตำแหนงชั้น‐ วาง อุณหภูมิ [°C] สูตรอาหารที่‐ ตองตีสวนผสม 2 170 3 (2 และ 4) โดขนมปงสั้น 2 170 ชีสเคกบัตเตอร‐ มิลค 1 170 เคกแอปเปล (พายแอปเปล) 2 สทรูเดิล 31 อบปกติ ใชพัดลมปรุงสุก เวลาปรุง [min] หมายเหตุ 140 150 35 - 45 ในถาดอบ 3 120 80 - 100 ในถาดอบ - 2 และ 4 120 80 - 100 ในถาดอบ 1) 3 190 3 190 12 - 20 ในถาดอบ 1) เอแคลร - ชั้น‐ เดียว 3 190 3 170 25 - 35 ในถาดอบ เอแคลร - สอง‐ ชั้น - - 2 และ 4 170 35 - 45 ในถาดอบ เพลททารต 2 180 2 170 45 - 70 ในแมพิมพเคก‐ ขนาด 20 ซม. ฟรุตเคกเนื้อเขม‐ ขน 1 160 2 150 110 - 120 ในแมพิมพเคก‐ ขนาด 24 ซม. วิคตอเรีย‐ แซนดวิช 1 170 2 160 50 - 60 ในแมพิมพเคก‐ ขนาด 20 ซม. ประเภทอาหาร ตำแหนง‐ ชั้นวาง อุณหภูมิ [°C] ตำแหนงชั้น‐ วาง อุณหภูมิ [°C] บิสกิต / แผน‐ แปง - สามชั้น - - 1, 3 และ 5 เมอแรง - ชั้น‐ เดียว 3 120 เมอแรง - สอง‐ ชั้น - บัน 1) อุนลวงหนา 10 นาที ขนมปงและพิซซา อบปกติ ประเภทอาหาร ใชพัดลมปรุงสุก เวลาปรุง [min] หมายเหตุ ตำแหนง‐ ชั้นวาง อุณหภูมิ [°C] ตำแหนงชั้น‐ วาง อุณหภูมิ [°C] ขนมปงขาว 1 190 1 190 60 - 70 ขนมปงขาวไรล 1 190 1 180 30 - 45 ในถาดขนมปง โรลลขนมปง 2 190 2 (2 และ 4) 180 25 - 40 6 - 8 โรลลใน‐ ถาดอบ 1) พิซซา 1 230 250 1 230 250 10 - 20 ในถาดอบหรือ‐ ถาดกนลึก1) สโคน 3 200 3 190 10 - 20 ในถาดอบ 1) เวลาปรุง [min] หมายเหตุ 40 - 50 ในแมพิมพ 1 - 2 ชิ้น 500 ก. ตอชิ้น1) 1) อุนลวงหนา 10 นาที แฟลน อบปกติ ประเภทอาหาร พาสตาแฟลน ใชพัดลมปรุงสุก ตำแหนง‐ ชั้นวาง อุณหภูมิ [°C] ตำแหนงชั้น‐ วาง อุณหภูมิ [°C] 2 200 2 180 32 www.electrolux.com อบปกติ ประเภทอาหาร ใชพัดลมปรุงสุก เวลาปรุง [min] หมายเหตุ 175 45 - 60 ในแมพิมพ 1 180 50 - 60 ในแมพิมพ1) 180 190 2 180 190 25 - 40 ในแมพิมพ1) 180 190 2 180 190 25 - 40 ในแมพิมพ1) เวลาปรุง [min] หมายเหตุ ตำแหนง‐ ชั้นวาง อุณหภูมิ [°C] ตำแหนงชั้น‐ วาง อุณหภูมิ [°C] แฟลนผัก 2 200 2 คีช 1 180 ลาซานญา 2 แคนเนลโลนี 2 1) อุนลวงหนา 10 นาที เนื้อสัตว อบปกติ ประเภทอาหาร ใชพัดลมปรุงสุก ตำแหนง‐ ชั้นวาง อุณหภูมิ [°C] ตำแหนงชั้น‐ วาง อุณหภูมิ [°C] เนื้อวัว 2 200 2 190 50 - 70 บนตะแกรงลวด เนื้อหมู 2 180 2 180 90 - 120 บนตะแกรงลวด เนื้อลูกวัว 2 190 2 175 90 - 120 บนตะแกรงลวด เนื้อยางแบบ‐ อังกฤษดิบ 2 210 2 200 50 - 60 บนตะแกรงลวด เนื้อยางแบบ‐ อังกฤษมีเดียม 2 210 2 200 60 - 70 บนตะแกรงลวด เนื้อยางแบบ‐ อังกฤษสุก 2 210 2 200 70 - 75 บนตะแกรงลวด เนื้อหมูบริเวณ‐ ไหล 2 180 2 170 120 - 150 พรอมเปลือก เนื้อแขงหมู 2 180 2 160 100 - 120 2 ชิ้น เนื้อแกะ 2 190 2 175 110 - 130 ขา ไก 2 220 2 200 70 - 85 ทั้งตัว ไกงวง 2 180 2 160 210 - 240 ทั้งตัว เปด 2 175 2 220 120 - 150 ทั้งตัว เนื้อหาน 2 175 1 160 150 - 200 ทั้งตัว เนื้อกระตาย 2 190 2 175 60 - 80 ตัดเปนชิ้น ๆ เนื้อกระตายปา 2 190 2 175 150 - 200 ตัดเปนชิ้น ๆ เนื้อไกฟา 2 190 2 175 90 - 120 ทั้งตัว 33 ปลา อบปกติ ประเภทอาหาร ใชพัดลมปรุงสุก เวลาปรุง [min] หมายเหตุ 175 40 - 55 ปลา 3 - 4 ตัว 175 35 - 60 เนื้อไมติดกระดูก 4 - 6 ชิ้น ตำแหนง‐ ชั้นวาง อุณหภูมิ [°C] ตำแหนงชั้น‐ วาง อุณห‐ ภูมิ [°C] ปลาเทราท/ ซีบรีม 2 190 2 ปลาทูนา / ซาลมอน 2 190 2 8.5 ปงยาง อุนเตาเปลาลวงหนา 10 นาทีกอนปรุงสุก ปริมาณ ประเภทอาหาร ปงยาง เวลาปรุง [min] ชิ้น [g] ตำแหนงชั้น‐ วาง อุณหภูมิ [°C] ดานที่ 1 ดานที่ 2 สเต็กไมติดกระดูก 4 800 4 สูงสุด 12 - 15 12 - 14 สเต็กเนื้อวัว 4 600 4 สูงสุด 10 - 12 6-8 ไสกรอก 8 - 4 สูงสุด 12 - 15 10 - 12 พอรคชอป 4 600 4 สูงสุด 12 - 16 12 - 14 ไก (ตัดเปน 2 ชิ้น) 2 1000 4 สูงสุด 30 - 35 25 - 30 เคบับ 4 - 4 สูงสุด 10 - 15 10 - 12 อกไก 4 400 4 สูงสุด 12 - 15 12 - 14 แฮมเบอรเกอร 6 600 4 สูงสุด 20 - 30 - เนื้อหาไมมีกระดูก 4 400 4 สูงสุด 12 - 14 10 - 12 แซนดวิชปง 4-6 - 4 สูงสุด 5-7 - ขนมปงปง 4-6 - 4 สูงสุด 2-4 2-3 8.6 ปงยางเทอรโบ เนื้อวัว ปริมาณ ตำแหนงชั้นวาง อุณหภูมิ [°C] เวลา [นาที] ยางเนื้อวัวหรือเนื้อ‐ เลาะกระดูก ดิบ ประเภทอาหาร ตอความหนาทุก ซม. 1 190 - 200 1) 5-6 ยางเนื้อวัวหรือเนื้อ‐ เลาะกระดูก มีเดียม ตอความหนาทุก ซม. 1 180 - 190 1) 6-8 ยางเนื้อวัวหรือเนื้อ‐ เลาะกระดูก เวลดัน ตอความหนาทุก ซม. 1 170 - 180 1) 8 - 10 1) อุนรอนเตาอบ 34 www.electrolux.com เนื้อหมู ประเภทอาหาร ไหล คอ ขอตอแฮม ชอป สแปรริบ ปริมาณ ตำแหนงชั้นวาง อุณหภูมิ [°C] เวลา [นาที] 1 - 1.5 กก. 1 160 - 180 90 - 120 1 - 1.5 กก. 1 170 - 180 60 - 90 มีทโลฟ 750 ก. - 1 กก. 1 160 - 170 50 - 60 ขาหมู (ปรุงสุกมากอน) 750 ก. - 1 กก. 1 150 - 170 90 - 120 เวลา [นาที] เนื้อลูกวัว ประเภทอาหาร เนื้อลูกวัวยาง ปริมาณ ตำแหนงชั้นวาง อุณหภูมิ [°C] 1 กก. 1 160 - 180 90 - 120 1.5 - 2 กก. 1 160 - 180 120 - 150 ปริมาณ ตำแหนงชั้นวาง อุณหภูมิ [°C] เวลา [นาที] ขาแกะ แกะยาง 1 - 1.5 กก. 1 150 - 170 100 - 120 สันหลังแกะ 1 - 1.5 กก. 1 160 - 180 40 - 60 ปริมาณ ตำแหนงชั้นวาง อุณหภูมิ [°C] เวลา [นาที] เนื้อสัตวปก 200 - 250 ก. ตอ‐ ชิ้น 1 200 - 220 30 - 50 ไก ครึ่งตัว 400 - 500 ก. ตอ‐ ชิ้น 1 190 - 210 35 - 50 ไก ไกตัวเมีย 1 - 1.5 กก. 1 190 - 210 50 - 70 เปด 1.5 - 2 กก. 1 180 - 200 80 - 100 ขาลูกวัว เนื้อแกะ ประเภทอาหาร สัตวปก ประเภทอาหาร เนื้อหาน 3.5 - 5 กก. 1 160 - 180 120 - 180 ไกงวง 2.5 - 3.5 กก. 1 160 - 180 120 - 150 ไกงวง 4 - 6 กก. 1 140 - 160 150 - 240 ปริมาณ ตำแหนงชั้นวาง อุณหภูมิ [°C] เวลา [นาที] 1 - 1.5 กก. 1 210 - 220 40 - 60 อุณหภูมิ [°C] เวลา [ชม.] 60 - 70 6-8 ปลา (นึ่ง) ประเภทอาหาร ปลาทั้งตัว 8.7 การอบแหง - ใชพัดลมปรุงสุก ปดชั้นเตาอบโดยใชกระดาษรองอบ ผัก ประเภทอาหาร ถั่ว ตำแหนงชั้นวาง 1 ชั้น 2 ชั้น 3 1/4 35 ประเภทอาหาร ตำแหนงชั้นวาง อุณหภูมิ [°C] เวลา [ชม.] 1/4 60 - 70 5-6 3 1/4 60 - 70 5-6 3 1/4 50 - 60 6-8 3 1/4 40 - 50 2-3 อุณหภูมิ [°C] เวลา [ชม.] 1 ชั้น 2 ชั้น พริกไทย 3 ผักสำหรับทำซุป เห็ด สมุนไพร ผลไม ประเภทอาหาร ตำแหนงชั้นวาง 1 ชั้น 2 ชั้น พลัม 3 1/4 60 - 70 8 - 10 แอปริคอท 3 1/4 60 - 70 8 - 10 แอปเปลหั่น 3 1/4 60 - 70 6-8 แพร 3 1/4 60 - 70 6-9 ขอมูลเกี่ยวกับอะคริลาไมด ขอสำคัญ ขอมูลลาสุดทางวิทยาศาสตรระบุวา อาหารที่ ปรุงสุกจนไหมเกรียม (โดยเฉพาะอาหารที่มีแปงเปน สวนประกอบ) อาจมีอะคริลาไมดที่เปนอันตรายตอ สุขภาพ ดังนั้น ขอแนะนำใหทานปรุงอาหารที่อุณหภูมิ ต่ำสุดและอยาปรุงอาหารใหสุกเกรียมจนเกินไป 36 www.electrolux.com 9. การดูแลรักษาและทำความสะอาด คำเตือน ดูรายละเอียดจากหัวขอ ความปลอดภัย • ทำความสะอาดดานหนาของเครื่องโดยใชผานุมชุบ‐ น้ำอุนและน้ำยาทำความสะอาด • ทำความสะอาดพื้นผิวโลหะโดยใชน้ำยาทำความ‐ สะอาดตามปกติ • ทำความสะอาดดานในเตาหลังการใชงานทุกครั้ง วิธีนี้จะทำใหขจัดคราบสกปรกไดโดยงายและไม‐ ทำใหเกิดรอยไหม • ทำความสะอาดคราบฝงลึกโดยใชน้ำยาสำหรับ‐ ทำความสะอาดเตาอบ • ทำความสะอาดอุปกรณใชงานตาง ๆ หลังการใช‐ งานแลวปลอยใหแหง ใชผานุมชุบน้ำอุนและน้ำยา‐ ทำความสะอาด • หากมีอุปกรณใชงานแบบไมติดผิว อยาใชน้ำยาที่มี‐ ฤทธิ์รุนแรงหรือวัถตุแหลมคมทำความสะอาด หรือ‐ ใชเครื่องลางจาน เนื่องจากจะทำใหพื้นผิวเคลือบ‐ กันติดเสียหายได เครื่องใชสแตนเลสสตีลหรืออะลูมิเนียม: ทำความสะอาดฝาเตาอบโดยใชฟองน้ำชุบ‐ น้ำเทานั้น เช็ดใหแหงโดยใชผาแหง อยาใชใยเหล็ก กรดหรือวัสดุที่ทำใหเกิด‐ รอยได เนื่องจากจะทำใหพื้นผิวของเตาเสีย‐ หาย ทำความสะอาดแผงควบคุมเตาอบโดย‐ ใชแนวทางเดียวกันดวยความระมัดระวัง 9.1 การทำความสะอาดปะเก็นฝาปด • ตรวจสอบปะเก็นที่ฝาปดเปนประจำ ปะเก็นฝาปดอยู‐ บริเวณรอบชองเปดของเตาอบ อยาใชเครื่องหาก‐ ปะเก็นฝาปดเสียหาย ติดตอศูนยบริการ • ทำความสะอาดปะเก็นฝาปดตามขอมูลทั่วไปในการ‐ ทำความสะอาด 9.2 สวนรองรับชั้นวาง สามารถถอดฐานรองชั้นวางเพื่อทำความสะอาดผนัง‐ ดานในได การถอดฐานรองชั้นวาง 1. ดึงดานหนาของฐานรองชั้นวางออกจากผนังดาน‐ ขาง 2. 1 ดึงดานหลังของฐานรองชั้นวางออกจากผนัง‐ ดานขาง จากนั้นนำออก 2 การติดตั้งฐานรองชั้นวาง ใสฐานรองชั้นวางโดยยอนลำดับขางตน ปลายดานมนของรางรองรับชั้นวางจะตอง‐ หันออกดานหนา 9.3 ไฟเตาอบ คำเตือน ระวังขณะเปลี่ยนไฟเตาอบ อาจเกิดไฟฟา‐ ช็อตได กอนเปลี่ยนหลอดไฟเตาอบ: • ปดเตาอบ 37 • ถอดฟวสออกจากกลองฟวส หรือปดตัวตัดวงจร รองผาไวดานลางของเตาอบเพื่อปองกัน‐ ความเสียหายตอไฟและฝาครอบกระจกของ‐ เตาอบ ใชผาจับหลอดไฟฮาโลเจนเพื่อปองกันคราบ‐ มันตกคางไหมบนหลอดไฟ 1. 2. 3. เปดฝากระจกครอบทวนเข็มนาฬิกาเพื่อนำออก ทำความสะอาดฝากระจกครอบ ใสหลอดไฟเตาอบกลับเขาที่โดยใชหลอดไฟเตา‐ อบทนความรอน 300 °C 4. ใชหลอดไฟสำหรับเตาอบประเภทเดียวกัน ใสฝากระจกครอบ 9.4 ทำความสะอาดฝาปดเตาอบ ฝาปดเตาอบเปนแผงกระจกสองชั้น สามารถนำฝาปด‐ และแงกระจกดานในออกเพื่อทำความสะอาดได ฝาปดเตาอบสามารถปดไดหากคุณนำแผง‐ กระจกดานในออกกอนถอดฝาปดเตาอบ การถอดฝาปดเตาอบและแผงกระจก 1. เปดฝาปดใหสุดและจับที่บานพับทั้งสองดาน 2. ยกและหมุนแปานที่บานพับทั้งสอง 38 www.electrolux.com 90° 3. ปดฝาปดเตาอบไปยังตำแหนงเปดแรก (ครึ่ง‐ ระยะ) จากนั้นดึงไปดานหนาแลวนำฝาปดออก‐ จากฐานรอง 4. วางฝาปดไวบนผานุมบนพื้นผิวที่มั่นคง 5. คลายล็อคเพื่อนำแผงกระจกดานในออก 6. หมุนตัวยึดสองตัว 90° จากนั้นนำออกจากฐาน‐ รอง 39 7. 8. 1 คอย ๆ ยก (ขั้นตอนที่ 1) จากนั้นนำแผงกระจก‐ ออก (ขั้นตอนที่ 2) ทำความสะอาดแผงกระจกโดยใชน้ำสบู เช็ด‐ แหงแผงกระจกดวยความระมัดระวัง 2 การติดตั้งฝาปดและแผงกระจก หลังจากทำความสะอาดเสร็จสิ้น ใหติดตั้งแผงกระจก‐ และฝาปดเตาอบ ทำตามขั้นตอนขางตนโดยยอนลำดับ สวนพิมพสกรีนจะตองหันเขาดานในของฝาปด หลัง‐ จากติดตั้งพื้นผิวกรอบแผงกระจกที่สวนพิมพสกรีนจะ‐ ตองรูสึกเรียบเนียนเมื่อสัมผัสดู ติดตั้งแผงกระจกภายในเขากับฐานใหถูกตอง ดูจาก‐ ภาพ 10. สิ่งที่ตองทำถา... คำเตือน ดูรายละเอียดจากหัวขอ ความปลอดภัย ปญหา สาเหตุที่เปนไปได วิธีแกไข เตาอบไมทำความรอน เครื่องปดทำงาน เปดเครื่อง เตาอบไมทำความรอน ไมไดตั้งนาฬิกา ตั้งเวลา เตาอบไมทำความรอน ไมไดตั้งคาที่จำเปน ตรวจสอบวาตั้งคาไดถูกตอง เตาอบไมทำความรอน ฟวสในกลองฟวสตัด ทำการตรวจสอบฟวส หากฟวส‐ ตัดมากกวาหนึ่งครั้ง ใหติดตอ‐ ชางไฟ ไฟเตาอบไมทำงาน ไฟเตาอบมีปญหา เปลี่ยนหลอดไฟเตาอบใหม จอแสดงผลเปน 12.00 ไฟตัด ตั้งเวลา ควันและไอน้ำสะสมตัวอยูใน‐ อาหารและเตาอบ ทิ้งอาหารไวในเตานานเกินไป อยาทิ้งอาหารไวในเตาอบนาน‐ เกินกวา 15-20 นาทีหลังจากสิ้น‐ สุดการปรุงสุก หากไมสามารถแกไขปญหาไดเอง ใหติดตอตัวแทน‐ จำหนายหรือศูนยบริการ แนะนำใหเขียนขอมูลไวที่นี่ ขอมูลที่จำเปนสำหรับศูนยบริการมีแจงไวที่แผนพิกัด แผนพิกัดอยูที่โครงดานหนาของชองเปดของเครื่อง 40 www.electrolux.com รุน (MOD.) ......................................... หมายเลขผลิตภัณฑ (PNC) ......................................... ซีเรียลนัมเบอร (S.N.) ......................................... 11. การติดตั้ง คำเตือน ดูรายละเอียดจากหัวขอ ความปลอดภัย 11.1 การติดตั้งแบบบิลทอิน 548 558 20 min. 550 20 600 min. 560 573 589 A B 594 5 590 min. 550 20 min. 560 11.2 การติดตั้งทางไฟฟา คำเตือน ติดตั้งโดยชางไฟที่มีความเชี่ยวชาญเทานั้น ผูผลิตจะไมรับผิดชอบใด ๆ หากไมปฏิบัติ‐ ตามคำแนะนำเพื่อความปลอดภัยในหัวขอ "ขอมูลดานความปลอดภัย" เครื่องจายไฟผานสายไฟหลักเทานั้น 11.3 สายตอ ประเภทสายสำหรับติดตั้งหรือเปลี่ยนใหม: H07 RN-F, H05 RN-F, H05 RRF, H05 VV-F, H05 V2V2-F (T90), H05 BB-F ดูรายละเอียดสายตอไดจากพิกัดทางไฟฟา (ที่แผน‐ พิกัด) และที่ตาราง: กำลังไฟทั้งหมด สูงสุด 1380 W สวนของสาย 3 x 0.75 ตร.ม. 41 กำลังไฟทั้งหมด สูงสุด 2300 W สวนของสาย 3 x 1 ตร.ม. กำลังไฟทั้งหมด สูงสุด 3680 W สวนของสาย 3 x 1.5 ตร.ม. สายดิน (เขียว/เหลือง) จะตองยาวกวาสายเฟสและสาย‐ นิวทรัล 2 ซม. (สายสีน้ำเงินและน้ำตาล) 12. ขอมูลเพื่อการรักษาสิ่งแวดลอม รีไซเคิลวัสดุที่มีสัญลักษณ ใสบรรจุภัณฑลงใน ภาชนะบรรจุที่เหมาะสมเพื่อนำไปรีไซเคิล ชวยปกปองสิ่งแวดลอมและสุขภาพของมนุษย และเพื่อ รีไซเคิลขยะอุปกรณไฟฟาและอิเล็กทรอนิกส อยาทิ้ง อุปกรณที่มีเครื่องหมายสัญลักษณ รวมกับขยะใน ครัวเรือน สงคืนผลิตภัณฑไปยังโรงงานรีไซเคิลในทอง ถิ่น หรือติดตอสำนักงานเทศบาลของคุณ 42 www.electrolux.com 43 397298401-A-372012 www.electrolux.com/shop