
1
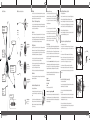
F Introduction
Merci d’avoir acheté ce produit! Votre nouveau micro-casque a été développé en intégrant la
technologie la plus récente et conçu pour assurer confort et liberté dans l’émission et la réception d’appels téléphoniques par rapport à l’utilisation d’un téléphone standard.
Lisez le mode d’emploi
Bien que micro-casque soit très simple à utiliser et à régler, nous vous recommandons avant
d’effectuer tout appel de lire le présent mode d’emploi afin de profiter au maximum de votre
nouvel achat.
Désemballage
Retirez votre micro-casque de son emballage et assurez-vous que vous avez bien le présent
mode d’emploi de l’utilisateur ainsi que les bons accessoires spécifiés. Conservez le carton
d’emballage pour stocker votre appareil, mais aussi dans l’hypothèse peu probable où l’appareil devrait être retourné à des fins de SAV ou de réparation.
Important
Assurez-vous que les raccordements électriques (y compris les rallonges électriques et les
interconnexions entre des éléments de l’appareil) ont été effectués correctement et conformément aux instructions correspondantes des fabricants. Ne continuez pas à utiliser l’appareil si vous doutez de son bon fonctionnement ou s’il présente un dommage quelconque.
• Débranchez vos appareils téléphoniques et consultez votre revendeur
• N’exposez pas les appareils électriques à la pluie ni à l’humidité
• N’introduisez jamais rien dans les trous, fentes ou aucune ouverture car ceci pourrait
entraîner un choc électrique mortel
• En matière d’appareils électriques, ne faites jamais les choses au hasard
• N’ouvrez pas les boîtiers des micro-casques, vous perdriez ainsi le bénéfice de la garantie
Avertissement
Les micro-casques téléphoniques sont capables de produire un niveau sonore élevé. Une
exposition prolongée à des niveaux sonores élevés risque d’endommager votre ouïe.
Raccordement et utilisation de votre micro-casque
Réglage de la perche du micro
La perche du micro peut être ajustée en fonction des besoins. Pour
obtenir une performance optimale, placez le micro à moins de 2 cm
de votre bouche.
Le micro-casque peut être porté sur les deux oreilles. Pour faire passer la prise de l’oreille gauche vers la droite, maintenez le contour
d’oreille dans votre main gauche et utilisez la droite pour faire pivoter
la perche du micro à 180° en vous éloignant du câble.
sup_201403_Bedien_Wings_def.indd 1
F
Ajustement du serre-tête
Placez le récepteur du micro-casque sur votre ou vos oreille(s); si
vous utilisez un micro-casque monaural, placez la barre en T au-dessus de l’autre oreille. Ajustez le serre-tête jusqu’à ce qu’il soit placé
confortablement, si possible de façon à ne sentir pratiquement aucune pression sur les oreilles.
Duo
Ce micro-casque est idéal si vous préférez avoir le son dans les deux
oreilles de façon à ne pas être dérangé par les sons qui vous entourent. Le serretête peut être ajusté de sorte à reposer confortablement sur les deux oreilles. Vous pouvez ajuster le serre-tête exactement à votre tête. Pour ce faire, tirez doucement sur le serre-tête pour
le faire glisser facilement à l’intérieur ou à l’extérieur de son support.
Garantie
Votre produit FreeVoice a été fabriqué avec soin et testé à 100% en utilisant des composants
garantis de haute qualité. Il est garanti contre tout défaut de fabrication et de matériel pour
une période de 24 mois à compter de la date d’achat. Dans l’hypothèse improbable d’un
défaut, le produit sera réparé ou remplacé gratuitement s’il est retourné par colis affranchi
à l’adresse ci-dessus durant la période de garantie. Cette garantie ne comprend pas les
dommages ou défauts résultant d’un usage erroné, les dommages de transport ou le non-respect par l’utilisateur des règles à observer (cette liste n’est pas exhaustive). Vos droits commerciaux définis par la jurisprudence ne sont pas affectés par la présente garantie. Pour tout
SAV durant la période de garantie ou en-dehors de celle-ci, retournez le produit par colis affranchi à:
Suprag SA
Friedackerstrasse 14
CH-8050 Zürich
Suisse
Veuillez utiliser l’outil de RMA en ligne:
www.freevoice.ch -> Support -> Reparatur/RMA
En renvoyant votre appareil, veuillez vous assurer que le colis contient une lettre d’accompagnement indiquant quand vous avez acheté l’appareil et décrivant le problème rencontré.
Si l’appareil est toujours sous garantie, veuillez joindre une preuve d’achat.
E
Introduction
Thank you for purchasing this product! Your new headset has been developed using the
latest technology, designed for comfort and freedom compared with using a standard telephone for making and receiving calls.
Read the User Guide
This headset is very easy to use and set-up, although to get the best from your new purchase, we recommend you read this User Guide before getting down to any calls.
Unpacking
Remove your headset from its packaging and ensure that along with this User Guide you
have the correct specified accessories. Retain the packing carton for storage of your unit,
and also in the unlikely event that the unit needs to be returned for service or repair.
Important
Ensure that all electrical connections (including extension leads and interconnections between pieces of equipment) are properly made and in accordance with the relevant manufacturers instructions. Do not continue to operate the equipment if you are in any doubt
about it working normally, or if it is damaged in any way
• Disconnect from your telephone equipment and consult your dealer.
• Do not allow electrical equipment to be exposed to rain or moisture.
• Never push anything into holes, slots or any other opening as this could
• result in fatal electrical shock.
• Never guess or take chances with electrical equipment.
• Do not open the headset housings as doing so will void your warranty.
E
Adjusting the Headband
Place the headset receiver to your ear(s), if using a single ear headset
you should set the T-bar above
your other ear. Adjust the headband until comfort-able, ideally ensuring there is virtually no pressure felt on the ears.
Duo
This headset is ideal if you prefer sound in both ears so that you are
not disturbed by sounds around you. The headband can be adjusted
to always rest comfortably on both ears.
Guarantee
Your FreeVoice product has been carefully manufactured and 100%
tested using high quality assured components. It is guaranteed against faulty workmanship
and materials for a period of 24 months from the date of purchase. In the unlikely event that
a failure should occur, the unit will be repaired or replaced free of charge when returned
postage paid to the address below within the guarantee period. This guarantee does not include damage or failure resulting from misuse, damage in transit or failure by the user to
comply with the Do’s and Don’t s (this list is not exhaustive). Your statutory rights under
common law are in no way affected by this guarantee.
For service in or out of the guarantee period please return the unit postage paid to:
Telephone headsets are capable of producing high levels of sound. Prolonged exposure to
high sound levels can cause damage to hearing.
Connecting and using your headset
www.freevoice.ch -> Support -> Reparatur/RMA
Adjusting the Microphone Boom
The boom arm can be adjusted as required. For optimum performance, the microphone should be positioned less than 2 cm from
your mouth.
When returning your unit please ensure that the package contains a covering letter stating
when and where you purchased the unit and a description of the problem encountered. If the
unit is within the guarantee period please enclose proof of purchase.
The headset can be worn on both ears. To change from left- to
right-ear fitting, hold the earloop in your left hand and use your
right hand to rotate the boom arm 180° away from the cord.
D
Folge- und Begleitschäden, einschliesslich, jedoch nicht beschränkt auf Sachschäden sowie
Schäden, die aus der Verletzung von expliziten oder impliziten Garantien resultieren, unterliegen nicht der Verantwortlichkeit der Suprag AG und sind innerhalb des gesetzlich zulässigen Rahmens ausgeschlossen.
F
Les dommages indirects ou fortuits, y compris, sans limite aucune, les pertes de propriété et
les dommages résultant du non-respect de toute garantie explicite ou implicite ne tombent
pas sous la responsabilité de Suprag AG et sont exclus dans la mesure où ceci est autorisé
par la loi.
E
Consequential and incidental damages, including without limitation, loss of property and
those arising from breach of any express or implied warranty, are not the responsibility of
Suprag AG and to the extent permitted by law, are excluded.
You can adjust the headband to fit your head exactly. To adjust, gently
pull the headband to slide it smoothly in or out of the support piece.
Suprag AG
Friedackerstrasse 14
CH-8050 Zürich
Switzerland
Please use the online RMA-Tool:
Warning
Garantie/Garantie/Warranty
Benötigen Sie Hilfe?
Besoin d’aide?
Need help?
Suprag AG
Friedackerstrasse 14
CH-8050 Zürich
Schweiz
Tel. +41 (0)58 317 20 60
Fax +41 (0)58 310 20 99
[email protected]
www.suprag.ch
Registration No. CH-020.3.005.682-9 (Switzerland)
VAT No. 100684 (MwSt)
Zertifikat/Certificate
Suprag AG
Friedackerstrasse 14
CH-8050 Zürich
Schweiz
Tel: +41 (0)44 317 20 60
Fax. +41 (0)44 310 20 60
[email protected]
www.suprag.ch
Bedienungsanleitung
Manuel d’Utilisation
User Manual
EMC Directive 2004/108/EC
Certificate No. RXM09102151-1, RXM09102151-2
03.04.14 17:05
Headset Features
D Einführung
Zubehör/accessoires/accessories
Vielen Dank, dass Sie sich für dieses Produkt entschieden haben! Ihr neues Headset wurde
nach den neuesten Technologien entwickelt und bietet erheblich mehr Komfort und Bewegungsfreiheit beim Telefonieren als ein herkömmliches Telefon.
Hörkapsel
Récepteur
Receiver
Verstellbarer Kopfbügel
Serre-tête réglable
Adjustable Headband
NC-Mikrofon
NC-Microphone
NC-Microphone
Nehmen Sie Ihr Headset aus der Verpackung und kontrollieren Sie mit Hilfe der vorliegenden
Bedienungsanleitung, dass sämtliche Zubehörteile wie beschrieben vorhanden sind. Bewahren Sie die Originalverpackung zur Lagerung sowie für den unwahrscheinlichen Fall auf, dass
Sie das Gerät zum Kundendienst oder zur Reparatur einsenden müssen.
Einstellbarer
Überkopfbügel
L’anneau serre-tête
Headband
Noise-Canceling-Mikrofon
Microphone antibruit (NC)
Noise-canceling microphone
Dieses Headset ist sehr einfach zu bedienen und einzurichten. Um Ihre Neuanschaffung jedoch
bestmöglich nutzen zu können, empfehlen wir Ihnen, diese Bedienungsanleitung aufmerksam
zu lesen, bevor Sie den ersten Anruf tätigen.
Auspacken
T-Bar
Ohrkissen
Coussinets
Ear Cushion
Bitte lesen Sie die Bedienungsanleitung
Nackenbügel
Tour de nuque
Neckband
Flexibler Ohrhaken
Contour d’oreille souple
Flexible earhook
Leder-Ohrpolster
coussinets d’oreille en cuir
Leatherette earcushion
Wichtige Hinweise
Überprüfen Sie, ob alle elektrischen Anschlüsse (einschliesslich Verlängerungskabel und Verbindungen zwischen den einzelnen Teilen) korrekt und entsprechend den Anweisungen der
jeweiligen Hersteller ausgeführt sind. Benutzen Sie das Gerät nicht, wenn Sie Zweifel an der
korrekten Funktionsweise haben oder wenn es Beschädigungen aufweist.
• Trennen Sie das Gerät von Ihrem Telefon und wenden Sie sich an Ihren Händler
• Setzen Sie elektrische Geräte niemals Regen oder Feuchtigkeit aus
• Führen Sie niemals Gegenstände in Löcher, Schlitze oder andere Öffnungen ein, da dies einen
tödlichen elektrischen Schlag zur Folge haben könnte
• Gehen Sie bei einem Elektrogerät niemals ein Risiko ein
• Ö ffnen Sie das Headset-Gehäuse nicht, da andernfalls Ihr Garantieanspruch erlischt
Warnhinweis
Lautsprecher
Auditeur
Receiver (Speaker)
Schaumstpoff-Ohrpolster
coussinets d’oreille en mousse
Foam earcushion
Telefon-Headsets können sehr hohe Lautstärken erzeugen. Eine lang anhaltende Lärmbelastung kann zu Hörschäden führen.
Anschluss und Bedienung Ihres Headsets
Einstellung des Mikrofonarms
Der Arm kann nach Bedarf eingestellt werden. Für optimale Leistungen sollte das Mikrofon mindestens 2 cm Abstand zu Ihrem Mund
haben.
Headsetkabel
Câble pour casque
Headset Cable
Quick-Disconnect
Headset Aufhänger
Support de Garniture
Headset hanger
sup_201403_Bedien_Wings_def.indd 2
Der Headset-Hörer kann an beiden Ohren getragen werden. Um die
Kopfhörerposition von rechts auf links umzustellen, halten Sie den
Ohrbügel mit Ihrer linken Hand fest und drehen Sie den Mikrofonarm
um 180° vom Kabel weg.
D
Einstellung des Kopfhörerbügels
Setzen Sie den Headset-Hörer auf Ihr(e) Ohr(en). Falls Sie ein Headset mit nur einem Hörer verwenden, sollten Sie den T-Bügel oberhalb
Ihres anderen Ohrs anordnen. Stellen Sie sich den Kopfhörerbügel so
ein, dass er bequem sitzt: Idealerweise sollten Sie praktisch keinen
Druck auf den Ohren spüren.
Duo
Dieses Headset ist ideal geeignet, wenn Sie den Ton auf beiden Ohren bevorzugen, so dass Sie nicht durch Nebengeräusche abgelenkt
werden. Der Kopfhörerbügel kann so eingestellt werden, dass er
stets bequem auf beiden Ohren sitzt. Der Kopfhörerbügel lässt sich
dabei genau Ihrem Kopf anpassen. Ziehen den Kopfhörerbügel zu
diesem Zweck vorsichtig aus bzw. in das Klemmstück.
Gewährleistung
D Headset-Montage/Änderung des Tragestils
1. Überkopfbügel entfernen.
Drücken Sie von innen mit Ihrem Daumen, bis das Headset aus dem Überkopfbügel springt.
2. Headset in den Ring Ihres Überkopfbügels / Nackenbügel montieren.
Nehmen Sie den Überkopfbügel in die eine Hand und das Headset in die andere. Richten Sie
das Headset so zur Aussenseite des Überkopfbügelrings aus, dass das Headsetkabel nach
unten zeigt. Drücken Sie das Headset sanft in den Überkopfbügelring, bis es einrastet.
3. Headset in den Ring des Ohrbügels drücken.
Nehmen Sie den Ohrbügelring in die eine Hand und das Headset in die andere. Drücken Sie
das Headset sanft in den Ohrbügelring, bis es einrastet.
F Montage du micro casque/Changement d’ergonomie
1. Comment démonter le serre tête.
Retirez le coussinet de l›oreillette en tirant doucement dessus pour l›en séparer. Appuyez sur
la partie intérieure avec votre pouce jusqu›à ce que l›oreillette se désenclenche du serre
tête.
Ihr FreeVoice-Produkt wurde sorgfältig mit hochwertigen, qualitätsgeprüften Bauteilen hergestellt und zu 100 % getestet. Wir übernehmen eine Gewährleistung für Verarbeitungsmängel und Materialien über einen Zeitraum von 24 Monaten ab Kaufdatum. In dem unwahrscheinlichen Fall, dass ein Mangel auftreten sollte, wird das Gerät kostenfrei repariert oder
umgetauscht, sofern es innerhalb des Gewährleistungszeitraums franko an die unten aufgeführte Adresse eingesandt wird.
Suprag AG
Friedackerstrasse 14
CH-8050 Zürich
Schweiz
Bitte nutzen Sie dazu unser Online-RMA-Tool:
www.freevoice.ch -> Support -> Reparatur/RMA
Wenn Sie Ihr Gerät einsenden, legen Sie Ihrer Sendung bitte ein Begleitschreiben bei. Teilen
Sie uns darin bitte mit, wann und wo Sie das Gerät gekauft haben und beschreiben Sie das
aufgetretene Problem. Besteht für das Gerät noch ein Gewährleistungsanspruch, fügen Sie
bitte auch den Kaufbeleg bei.
2
2. Comment insérer l›oreillette dans l›anneau du serre tête / Tour de nuque.
Maintenez le serre tête dans une main et l›oreillette dans l›autre. Alignez l›oreillette contre
le bord de l›anneau du serre tête avec le câble de l›oreillette pointant vers le bas. Appuyez
doucement l›oreillette sur le serre tête jusqu›à ce qu›elle se clique en place.
Diese Gewährleistung erstreckt sich nicht auf Schäden oder Mängel, die aus missbräuchlicher Verwendung, Transportschäden oder Missachtung der Hinweise und Gebote durch den
Nutzer resultieren (diese Liste ist nicht abschliessend). Ihre gesetzlichen Ansprüche nach
allgemeinem Recht werden durch diese Gewährleistung in keiner Weise beeinträchtigt.
Für Kundendienst-Leistungen während oder nach Ablauf des Gewährleistungszeitraums senden Sie das Gerät bitte franko an die nachstehende Adresse:
1
E
3. Comment insérer l›oreillette dans son anneau de crochet auriculaire.
Maintenez l›anneau du crochet auriculaire dans une main et l›oreillette dans l›autre. Appuyez
doucement l›oreillette sur l›anneau du crochet auriculaire jusqu›à ce qu›elle s›enclenche correctement.
3
Assembly of headset/Change of wearing styles
1. How to remove the headband
Remove the ear cushion by gently pulling it off the ear-plate. Push on the inner part with your
thumb until the headset clicks out of the headband.
2. How to press the headset into the headband ring on the headband /
Neckband.
Hold the headband in one hand and the headset in the other. Align the headset against the
outside of the headband ring with the headset cable pointing down. Gently press the headset
into the headband ring until it clicks into place.
2. How to press the headset into its ear hook ring on the ear hook.
Hold the ear hook ring in one hand and the headset in the other. Gently press the headset into
the ear hook ring until it clicks into place.
03.04.14 17:05


![[English] (P/N 72-122249](http://vs1.manualzilla.com/store/data/006797913_1-d7ef2374a522344790c454087ba47c61-150x150.png)
