1
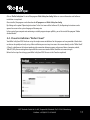
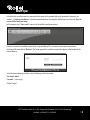
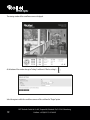
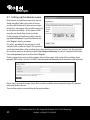
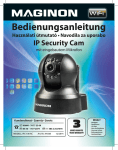
Dear customer, Congratulations on purchasing a high-quality ROLLEI product. You have chosen a modern surveillance camera with excellent technical equipment and respective accessory, which is particularly easy to operate. Please study all notices carefully and diligently. Please study this information in detail observing, in particular, the safety instructions. The device comes with a 3-year warranty. In case of a defect in the surveillance camera you require the enclosed warranty card and proof of purchase. Keep these in a safe place together with the Instruction Manual. Please include the Instruction Manual when passing the camera on to a third party. 1. Contents of box Carefully unpack the surveillance camera and check that all parts listed below are present: 1. 2. 3. 4. 5. 6. 7. 8. • IP Surveillance camera ROLLEI SafetyCam 10 HD Mains adapter Wall fixing LAN cable Alarm terminals Software CD Instruction manual Warranty documents Note: Caution! Keep plastic foil and bags away from babies and small children as danger of suffocation. RCP Technik GmbH & Co. KG, Tarpen 40/Gebäude 7b, D-22419 Hamburg Hotline: +49 (0)6 31/3 42 84 49 1 User data supplied with camera • Note: Please make sure that when first using the surveillance camera to create a password for the user account “admin“! User name: admin Password: there is no default password! New password: _______________________ 2.Contents 1. CONTENTS OF BOX 2.CONTENTS 3. HAZARD, SAFETY AND WARNING NOTICES 4.PREPARATION 4.1. Part names 4.2. Views of surveillance camera 4.3. Assembly of surveillance camera 5. INSTALLATION OF SURVEILLANCE CAMERA 5.1. Hardware installation 5.2. System requirements 5.3. Software installation 5.4. Cloud installation “Rollei Cloud” 5.5. Manual set up of surveillance camera 5.6. Setting up the router 5.7. Setting up the domain name 5.8. Setting up an app 5.9. Installation on Mac OS X. 5.10.Installation tips 6. THE PROGRAM ROLLEI SAFETYCAM CONFIG 2 RCP Technik GmbH & Co. KG, Tarpen 40/Gebäude 7b, D-22419 Hamburg Hotline: +49 (0)6 31/3 42 84 49 1 2 4 6 6 7 8 9 9 10 10 11 16 20 23 24 25 28 30 USE OF SURVEILLANCE CAMERA 7.1. Activating the surveillance camera 7.2. Controlling the surveillance camera 8.SETTINGS 8.1. Device status 8.2. Camera name 8.3. Date and time 8.4. User account 8.5. Network settings 8.6. Wireless settings 8.7. UPNP settings 8.8. DDNS settings 8.9. Mail settings 8.10.FTP settings 8.11.Alarm settings 8.12.Camera head settings 8.13.Resetting 8.14.Restarting the camera 9. POTENTIAL LEGAL INFRINGEMENTS 10. LICENSE DECLARATION 11.CONFORMITY 12.DISPOSAL 13. WARRANTY AND SERVICE 14. TECHNICAL SPECIFICATION 15.INDEX 7. RCP Technik GmbH & Co. KG, Tarpen 40/Gebäude 7b, D-22419 Hamburg Hotline: +49 (0)6 31/3 42 84 49 32 32 33 36 36 37 38 39 40 42 44 45 47 49 50 53 54 54 55 56 57 57 57 58 59 3 3. Hazard, safety and warning notices Incorrect use of the surveillance camera and accessories can be dangerous for you and others and can damage or destroy the surveillance camera. We therefore ask you to read and strictly observe the following Hazard, safety and warning notices. Intended use This IP Security Camera is solely designed for the surveillance of internal areas. It is your responsibility to ensure that you do not infringe any third-party rights when using the camera. The surveillance camera is only suitable for private and not for commercial use. Hazards for children and persons with limited ability to operate electronic equipment The camera, accessory and packaging are not toys for children. These should therefore always be kept away from children. Danger of electrocution, poisoning and suffocation. The camera and accessory may not be used by children and persons with limited abilities. This device is not designed to be used by persons (including children) with limited physical, sensory or mental capacity or lack of experience and/or know-how. The camera and the power supply may only be used by persons, that are physically and mentally able to operate it safely unless they are supervised by a person responsible for their safety or are instructed in the use of the device by this person. Children should be supervised to ensure that they do not play with the device. Electrocution hazard in wet and humid conditions Do not expose camera and its components to dripping or spraying water. Also do not place any containers filled with liquid, such as vases or glasses on top or immediately next to the device. Danger of fire and electrocution. Do not use the camera and its components near water and protect it against wetness and moisture. Danger of fire and electrocution. Electrical hazard In case of ingress of foreign bodies or liquid, switch off camera. Let all parts dry thoroughly. Otherwise danger of fire or electrocution When the camera has been dropped or the housing is damaged , switch off camera. Otherwise danger of fire or electrocution The camera and its components may not be taken apart, modified or repaired. Danger of fire and electrocution. 4 RCP Technik GmbH & Co. KG, Tarpen 40/Gebäude 7b, D-22419 Hamburg Hotline: +49 (0)6 31/3 42 84 49 Only use the suppliedpower supply or a power supply with the same specifications. Only connect the power supply to a power supply corresponding with the ratings on the rating plate. Damaged power supplies or output cables may not be used. Replace it with a power supply of the same type. Ensure that all sockets used are always freely accessible so that the power supply can be quickly disconnected, when necessary. Disconnect from mains only by pulling out plug from mains socket. Ensure adequate ventilation and do not cover power supply to prevent overheating. The power supply may not be used during athunderstorm. Otherwise danger of electrocution. Damage from heat – fire hazard Do not leave camera in places that are susceptible to considerable increases in temperature (e.g. a vehicle). The housing and internal parts may be damaged, which in turn could cause a fire. Do not wrap up camera or place on textiles. This could produce a build-up of heat in the camera that can cause deformation of the housing and may represent a fire hazard. Injuries and material damage When installing and assembling the camera ensure that a 10 cm gap is maintained on all sides in order to provide adequate ventilation. Ensure, in particular, that ventilation slots are not covered by newspaper, table clothes or curtains. Never place open fire sourceson or near the camera. Damage to the electronics, lens or accessory caused by external influences such as impacts, falls or others are not covered by the warranty and are chargeable. RCP Technik GmbH & Co. KG, Tarpen 40/Gebäude 7b, D-22419 Hamburg Hotline: +49 (0)6 31/3 42 84 49 5 4.Preparation 4.1.Part names 2. 1. 3. 4. 5. 1. IP Surveillance camera ROLLEI SafetyCam 10 HD 6. Assembly material (not shown) 2. Wall fixing 7. Software CD (not shown) 3. LAN cable 8. Operating Instructions (not shown) 4. Mains adapter 9. Warranty documents (not shown) 5. Alarm terminals 6 RCP Technik GmbH & Co. KG, Tarpen 40/Gebäude 7b, D-22419 Hamburg Hotline: +49 (0)6 31/3 42 84 49 4.2. Views of surveillance camera 90° 3 2 1 5 330° 4 6 7 11 8 9 10 1. Lens 7. Network connection (LAN) 2. Infrared LED 8. Power supply connection (DC 5V) 3. Sensor 9. Alarm connection (In/Out) 4. Focus ring 10. Reset button 5. WLAN aerial 11. Microphone 6. Audio connection (no function) • Note: The focus ring (4) allows setting of the camera focus. RCP Technik GmbH & Co. KG, Tarpen 40/Gebäude 7b, D-22419 Hamburg Hotline: +49 (0)6 31/3 42 84 49 7 4.3.Assembly of surveillance camera Using the supplied wall fixing, the surveillance camera can be installed at a fixed location. • • Note: Do not place surveillance camera directly next to electronic devices as this could produce interference. In case of picture interference, test camera at another location. Select the installation site for the surveillance camera so that the lens is not exposed to sun light. 4.3.1. Install wall fixing Hold the plate of the wall fixing containing holes against the surface of the selected installation site and mark the holes on the surface, using a pencil. To drill suitable holes, use a 6 mm masonry drill for dowels in stone or concrete surfaces or a 3 mm wood drill for timber surfaces. After drilling the holes insert supplied wall plugs into holes so that they are flush with the surface. Secure wall fixings with supplied bolts. 4.3.2. User data supplied with camera Place the tripod socket of the surveillance camera on the mounting plate of the wall bracket and screw the camera with the tripod screw. Align the surveillance camera as desired. 4.3.3. Complete camera assembly Connect the supplied mains unit first into the surveillance camera and then into the socket 8 RCP Technik GmbH & Co. KG, Tarpen 40/Gebäude 7b, D-22419 Hamburg Hotline: +49 (0)6 31/3 42 84 49 5. Installation of surveillance camera 5.1.Hardware installation In order to carry out the first settings in the IP surveillance camera, the network cable must be connected to the router. A wireless connection via WLAN is only available once this has been set up in the surveillance camera using the cable connection. Plug the suppliednetwork cable into camera and router as shown in the illustrations. The network connection of the surveillance camera contains two control LEDs. • Yellow: Indicates that network activity is taking place. • Green: Indicates that the surveillance camera is connected to a network. • • Note: If your router does not contain a port for connecting the network cable, the surveillance camera can also be set up without a router. For this purpose deactivate all networks existing on your computer and plug the network cable of the surveillance camera directly into the computer. You can also access the surveillance camera via the program Rollei SafetyCam Config (see section 5.4). RCP Technik GmbH & Co. KG, Tarpen 40/Gebäude 7b, D-22419 Hamburg Hotline: +49 (0)6 31/3 42 84 49 9 5.2.System requirements Operating system: The software provided on the enclosed CD is only suitable for Windows operating systems. Using the Browser access, the surveillance camera can also be set up using Mac OS, Linux or other operating systems. Operating systems: Processor: RAM memory: Network card: RAM memory: Internet-Browser: Screen resolution: Windows 2000 (SP 4), Windows XP (SP 2), Vista, 7, 8 2.0 GHz or higher 512 MByte or higher 10MBit/s or higher 512 MByte or higher Internet Explorer (from version 9), Firefox (from version 3),Google Chrome, Safari, Opera (latest version) 1024x768 or higher 5.3.Software installation The supplied software is only suitable for Windows systems. For installation on Mac systems, please read section 5.9., Installation on Mac OS X. The software must installed on a computer connected to the same router as the surveillance camera. Place supplied software CD into CD/DVD drive of your computer. The below selection menu should then appear automatically. If the menu does not start automatically, select drives from your computer and open the CD/DVD drive named “Rollei IP Camera” by clicking on it with the mouse. Start program by double clicking on CDMenu/CDMenu.exe. 10 RCP Technik GmbH & Co. KG, Tarpen 40/Gebäude 7b, D-22419 Hamburg Hotline: +49 (0)6 31/3 42 84 49 Click on “Rollei SafetyCam“ to install the program Rollei SafetyCam Config. Follow on-screen information until software installation is completed. Once installed, the program can be found under All programs and Rollei SafetyCam Config. By clicking on the option “Operating Instructions” in the Start menu of the Software CD, the Operating Instructions can be opened on screen in the system language of the computer. In the event of your computer not containing a suitable program to open pdf files, you cal also install the program "Adobe Acrobat Reader“. 5.4.Cloud installation “Rollei Cloud” Your Rollei SafetyCam10 HD has been set up for simple camera installation. For this purpose we have provided a Cloud solution that can be quickly and easily set up. After installation you can at any time access the camera directly via the “Rollei Cloud”. A Cloud is a platform on the Internet producing the connection between camera and your end device (computer, mobile, TabletPC) Only the connecting data required for the camera are stored at Rollei Cloud but not camera images. Below the few steps for setting up your Rollei SafetyCam10 HD for use via the Cloud are explained. RCP Technik GmbH & Co. KG, Tarpen 40/Gebäude 7b, D-22419 Hamburg Hotline: +49 (0)6 31/3 42 84 49 11 5.4.1. Implement Setup assistant 1. In the program IPCam Config call up the Setup assistant under “Settings”. 2. Select “Rollei SafetyCam 10 HD“ as camera model and click on “OK”. This calls up the existing settings of the camera. 3. In order to set up the camera for use via Rollei Cloud, select the third option “Camera with Rollei Cloud during the next step (recommended)“. 4. Enter any name for the camera in the next window, describing, for instance, the location. 5. In the next step select Wireless network and set region to “Europe” and enter the key. 12 RCP Technik GmbH & Co. KG, Tarpen 40/Gebäude 7b, D-22419 Hamburg Hotline: +49 (0)6 31/3 42 84 49 6. Now enter the registration data for logging on to Rollei Cloud. Select any user name and a password consisting of at least 8 characters. Also enter a valid email address. Note down this log-on information. 7. The last step repeats again the implemented settings. 8. Click on “Continue” to carry out the camera set-up. RCP Technik GmbH & Co. KG, Tarpen 40/Gebäude 7b, D-22419 Hamburg Hotline: +49 (0)6 31/3 42 84 49 13 5.4.2 Select “Rollei Cloud” Next open the start page of Rollei Cloud. in the Internet Browser using link http://rollei-cloud.de or http://rollei-cloud.com Enter user name specified in the Set-up assistant. The overview now lists all products of your IP camera. Select these to call up your camera. The following page then appears. 14 RCP Technik GmbH & Co. KG, Tarpen 40/Gebäude 7b, D-22419 Hamburg Hotline: +49 (0)6 31/3 42 84 49 5.4.3. Use camera via Rollei Cloud Select symbol to call up the image of your Rollei SafetyCam 10 HD. Using call up the Web surface of your camera. Log on with user name “admin” and without a password. You then have access to all settings of your Rollei SafetyCam10 HD. 5.4.4. Use of the App The app “Rollei SafetyCam“ is available for your camera from the App Store and from Google Play. Load the App onto a Smartphone or a TabletPC and start App. Use symbol to log onto Rollei Cloud. Use the log-on information used in the Setup Assistant. After logging on, the camera is immediately available from a list under the chosen camera name. Select it from the display in order to view the camera image. RCP Technik GmbH & Co. KG, Tarpen 40/Gebäude 7b, D-22419 Hamburg Hotline: +49 (0)6 31/3 42 84 49 15 5.5.Manual set up of surveillance camera In the subsequent graphics it is schematically shown how the surveillance camera is integrated in your existing home network and how it is accessed from the Internet. The router is central to this operation. The router is the connection between your home network and the Internet. The router is thus connected to two networks at the same time, the Internet and your home network. The router is accessed via a different address ( IP address ) from each of the networks. The IP surveillance camera is directly connected to the router, either via a network cable or wireless via WLAN. This allows access to the surveillance camera from the home network and the Internet. RCP Technik GmbH & Co. KG, Tarpen 40/Gebäude 7b, D-22419 Hamburg Hotline: +49 (0)6 31/3 42 84 49 16 As the router is, however, protected from Internet access via so-called Firewall a separate access must be set up for the surveillance camera. This is referred to as Port forwarding. The following installation steps are required to set up the surveillance camera in the home network and via the Internet: 1. The surveillance camera must be connected to the router using the supplied network cable (see section 5.1. Hardware Installation). 2. Install the supplied software (see section 5.3. Software installation). 3. Set up surveillance camera automatically or manually in home network: for Windows systems: See section 5.5. Manual set up of surveillance camera for Mac systems: See section 5.9. Installation on Mac OS X. 4. Where desired, a wireless connection can be set up between the surveillance camera and the router using WLAN (see section 5.5. Manual set up of surveillance camera. 5. Set up a Port forwarding in the router to allow access to the surveillance camera via the Internet (see section 5.6., Router settings). 6. Set up a fixed Internet address (see section 5.7. Setting up the domain name ) 7. Installation of Apps for Smartphones and TabletPCs (see section 5.8. Set up App). 8. The standard set-up of the surveillance camera is described from section 5.4. onwards. Further information relating to the use and settings are provided from chapter 7 onwards. 17 RCP Technik GmbH & Co. KG, Tarpen 40/Gebäude 7b, D-22419 Hamburg Hotline: +49 (0)6 31/3 42 84 49 Ensure that the surveillance camera is connected to the router via the network cable and is connected to the mains (see section 5.1., Hardware Installation). A network connection between the computer and the router must also exist. Open the program Rollei SafetyCam Config. In the program select ”Start search“, to open a list of available surveillance cameras. From the list select the surveillance camera to be set up or called up. This is also necessary if only one camera exists. At the top of the menu click on “Browser“. The log-on page of the surveillance camera then appears in the window of the Internet browser. Select the desired language and then enter the following in the text window: User name: admin Password: Leave empty Click on “Log on”. RCP Technik GmbH & Co. KG, Tarpen 40/Gebäude 7b, D-22419 Hamburg Hotline: +49 (0)6 31/3 42 84 49 18 The viewing window of the surveillance camera is displayed. At the bottom of the window change to “Settings“ and then to ” Wireless settings“ . Select the region in which the surveillance camera will be used from the “Region” option. 19 RCP Technik GmbH & Co. KG, Tarpen 40/Gebäude 7b, D-22419 Hamburg Hotline: +49 (0)6 31/3 42 84 49 In order to automatically search for the wireless network of your router, click on “Search“ below the entries. Select the desired WLAN network from the list by marking it under “Selection” and click on “Use“. The settings then change back to Wireless settings. Enter the wireless network key of your router under “PSK” or “Key”. This should be stored in your router documents. Click on “Apply“, to accept the changed settings. Next, restart the surveillance camera to accept the changes. The restart takes about 2 minutes. You can now remove the network cable between the surveillance camera and the router. Do, however, note that the surveillance camera has a different local address through the wireless connection than when connected via the network cable. Once restarted, the surveillance camera must be searched for using the program Rollei SafetyCam Config and opened through “Browser“ . 5.6.Setting up the router The surveillance camera is now set up in such a way that you can access it from your home network. You now have to set up your router in such a way that access from the Internet is allowed. As in most cases, the router is protected against such access by a Firewall, a separate access for the surveillance camera must be opened in the router. If your router supports the function UPnP, access is set up automatically. As the option UPnP is activated in the surveillance camera as a default setting, you can test in the following manner whether automatic set-up to the Internet has been successful: Open address http://rolleicam.net/ip.aspx in a Browser window.The public IP address of your home network will be displayed. The software must installed on a computer connected to the same home network as the surveillance camera. RCP Technik GmbH & Co. KG, Tarpen 40/Gebäude 7b, D-22419 Hamburg Hotline: +49 (0)6 31/3 42 84 49 20 Enter the shown public IP address in the Browser of a device that is not connected to the Internet via your home network. Activation from the same network is generally not possible. If the log-on page of your surveillance camera opens automatically, access for the surveillance camera has been set up automatically in the router. You can then continue the installation with section 5.7., Set up Domain name,. Where automatic set up via the UPnP function is not possible, the respective access must be set up manually. This is referred to as Port forwarding. During this process, a single access is directly passed on to the surveillance camera. The below example shows the settings to be selected in the router to set up such an access. As the settings of the router can differ considerably, a general description cannot be provided at this point. Please check in the router documents how individual devices can access the router. This information can generally be found under “Port Forwarding“. We also have provided more detailed descriptions for different router models of how to set up Port forwarding. These descriptions can be found on Internet page: http://www.safetycam-info.com. If your router is not listed, please contact our Service Hotline. First start the configuration program of your router. For this you require the local network address of your router. You can check the local network connection by searching for the surveillance camera in the program Rollei SafetyCam Config and then displaying the network settings using option “Address“. Note down the address listed as „Standard gateway”. Further information for activating the router can also be found in the Operating Instructions of your router. For this, enter the local network address of your router in the Browser and open the configuration menu. Next, open the Port forwarding menus in the Configuration menu. 21 RCP Technik GmbH & Co. KG, Tarpen 40/Gebäude 7b, D-22419 Hamburg Hotline: +49 (0)6 31/3 42 84 49 In the below example, this can be found under “Applications & Games“ as “Simple Port forwarding”. In the provided example two surveillance cameras are connected to the router, one camera with the name IPCamera1 and the local network address 192.168.1.110, a second camera with the name IPCamera2 and the local network address 192.168.1.111. Only the external port 81 is set up for the surveillance camera IPCamera1. TCP and UDP are the allowed protocols although only TCP is required. These cameras are accessed via the Internet using address http://xxx.xxx.xxx.xxx:81 (with xxx.xxx.xxx. xxx being the public IP address of the router). In order to avoid problems the same internal and external port of the surveillance camera should be chosen. Activate the surveillance camera again using the program “Rollei SafetyCam Config”. Under “Settings” change to “Network settings” and change the value under “Port” also to 81. Save the changes. You should then be able to access the surveillance camera via the camera as described at the beginning of this section. • Note: Ensure that for every existing surveillance camera a separate port is being used and that an external Port may not be assigned twice. RCP Technik GmbH & Co. KG, Tarpen 40/Gebäude 7b, D-22419 Hamburg Hotline: +49 (0)6 31/3 42 84 49 22 5.7.Setting up the domain name On the Internet, the surveillance camera can be accessed through the public IP address of the router. As in many cases the public IP address of the Internet access changes constantly, it is advantageous if the surveillance camera can be accessed via a fixed address. For this purpose, a DDNS server (Dynamic Domain Name System) is available. For free registration of a fixed Internet address, open the page http://rolleicam.net/ in your Internet Browser and select “Register” in the log-on window, First, enter a user name. This may only consist of small and capital letters, numbers or a hyphen. The user name is used for the Internet address of the surveillance camera. Enter, for instance, the user name “ipcamera“ and, after registration, the surveillance camera can be called up via address http://ipcamera.rolleicam.net as soon as it is connected to the Internet. Enter another password , repeat it and then click on “Register“. The thus registered name must now also be entered in the surveillance camera. In the settings of the surveillance camera open point „DDNS settings“ and select “Use DDNS“. Under User name and Password enter the same data used for registration. Click on “Apply“, to accept the changed settings. Next, restart the surveillance camera to accept the changes. This operation takes around another 2 minutes. The surveillance camera is now reachable under the registered address. 23 RCP Technik GmbH & Co. KG, Tarpen 40/Gebäude 7b, D-22419 Hamburg Hotline: +49 (0)6 31/3 42 84 49 5.8.Setting up an app The app “Rollei SafetyCam“ sis a program for accessing the IP surveillance camera from your iPhone or Android Smartphone. The App can be downloaded free of charge from the ”App Store“ and also from “Google Play“. Upon opening the App after installation, an empty window appears. Select “New” to set up the App for your surveillance camera. The entry window opens showing the data required for the surveillance camera as follows. The following general information must be provided: • Name: Enter any name for the surveillance camera to be set up. • User name:Enter “admin” as user name. • Password:Leave password field blank. • Connection mode: Select “Dynamic“ as connecting mode. • Domain name: Enter the fixed Internet address specified under http://rolleicam.net/. If the surveillance camera can, for instance be reached via http://ipcamera.rolleicam.net/ you can enter “ipcamera“ or also “ipcamera.rolleicam.net“ . Select to save the entries and return to the camera list. In order to select the set-up surveillance camera for display or editing, touch the respective entry in the list on the display. A preview with camera image, processing functions and information of the selected surveillance camera opens. In order to obtain a full-size view of the camera image, touch the image in Preview or select “Display”. The Live image of the surveillance camera is then shown as a full image. RCP Technik GmbH & Co. KG, Tarpen 40/Gebäude 7b, D-22419 Hamburg Hotline: +49 (0)6 31/3 42 84 49 24 5.9. Installation on Mac OS X. First install the surveillance camera following the steps up to section 5.2. In order to be able to configure the surveillance camera on your Mac OS X you first have to determine the IP address of your router. This IP address allows access to the configuration page of the router. Next, you require the IP address of the surveillance camera from the settings data of the router. The configuration page of the SafetyCam 10 HD can be opened with this address and settings of the surveillance camera can be entered. Determine IP address of your router. In order to determine the IP address of the router on your Mac computer, click on the Apple symbol in the menu bar . Now click on “System settings” and then on “Network”. Select the current network connection from the window. This is indicated by the preceding green point, in this case “WLAN”), click on “Further Options”: 25 RCP Technik GmbH & Co. KG, Tarpen 40/Gebäude 7b, D-22419 Hamburg Hotline: +49 (0)6 31/3 42 84 49 Change to page “TCP/IP“ where you find the IP address of your router under “Router”. The address in the below example is 192.168.16.1. RCP Technik GmbH & Co. KG, Tarpen 40/Gebäude 7b, D-22419 Hamburg Hotline: +49 (0)6 31/3 42 84 49 26 Determine the IP address of the surveillance camera Open Internet Browser “Safari“ and enter the previously determined IP address of the router. The configuration page of the router opens. Generally an option “DHCP table“ or “DHCP reservation“, can be found under Settings, which can be called up. You then receive a list of all devices in the network as shown in the below example. Please note that the illustration of the configuration of your router can differ from the one in the example. In this list, the surveillance camera can be found under the name “ipcam_xxx“ . In the above example this would be “ipcam_006E060241B6“. Next to it is the local IP address of the surveillance camera (here: 192.168.1.113). Enter it in a new window of the Browser (Safari) in order to open the configuration page of the surveillance camera. Now continue the installation as specified in section 5.5., Manual set-up of surveillance camera. 27 RCP Technik GmbH & Co. KG, Tarpen 40/Gebäude 7b, D-22419 Hamburg Hotline: +49 (0)6 31/3 42 84 49 5.10.Installation tips Below, we have provided different information relating to the installation of the surveillance camera in case of problems with the standard installation. For further information see page http://www.safetycam-info.com. The program Rollei SafetyCam Configcannot find the camera. Are surveillance camera and computer connected to router? If various wireless networks are active on the computer, deactivate the wireless networks to which the camera is not connected. Deactivate the Firewall of the computer. The router has no port for the network cable. Connect the surveillance camera directly to the computer. 1. Deactivate all networks on the computer. 2. Connect the surveillance camera to the computer using the network cable 3. Use program Rollei SafetyCam Config to search for the surveillance camera. 4. Under Rollei SafetyCam Config select camera and then the “address“ 5. Deactivate “DHCP“ and enter under “Static configuration“: IP address 169.254.10.100; Subnet mask: 255.255.0.0 “Standard gateway“ and “DNS Server“ remain empty Click on “Apply” and wait until the program shows the camera. The wireless connection between the surveillance camera and the router is not working. Check the wireless settings and in particular the entered code. All WLAN channels may not be enabled. Adjust the “Region” setting when entering the Wireless settings. You router may allocate changing local IP addresses each time it connects. Search for the camera again using Rollei SafetyCam Config. RCP Technik GmbH & Co. KG, Tarpen 40/Gebäude 7b, D-22419 Hamburg Hotline: +49 (0)6 31/3 42 84 49 28 Camera can be reached locally but not through the Internet. This generally always occurs when Port forwarding is not or is incorrectly set up in the router. read section 5.6., Setting up the Router, and information contained on Internet page: http://www.safetycam-info.com. Internet connection via 3G/4G mobile phone networks. In case of an Internet connection via a 3G/4G mobile phone network, no public IP address may be allocated to your Internet access. In this case you have to apply to your Internet provider to provide you with a public IP address. Also, the option “Open Internet” must be activated with the Internet provider “Drei.at“. Access via the public address is not possible from your own network. Generally it is not possible to call up the surveillance camera via the Internet from the same network the camera is connected to. This can only be done using the local network address. 29 RCP Technik GmbH & Co. KG, Tarpen 40/Gebäude 7b, D-22419 Hamburg Hotline: +49 (0)6 31/3 42 84 49 6. The program Rollei SafetyCam Config Below we have provided a detailed description of the program Rollei SafetyCam Config, as installed in section 5.3., Software Installation. Ensure that the surveillance camera is connected to the router via the network cable and is connected to the mains (see section 5.1., Hardware Installation). A network connection between the computer and the router must also exist. Open the program Rollei SafetyCam Config. In the program select ”Start search“, to open a list of available surveillance cameras. From the list select the surveillance camera to be set up or called up. This is also necessary if only one camera exists. After selecting the function “Address“ the network data are displayed for the selected surveillance camera. The network setup for the camera is completed automatically provided that the option”Use DHCP “ has been activated, the router supports DHCP and is also activated . If an address different to 0.0.0.0 appears under address, the automatic network setup of the surveillance camera has been completed successfully. To change the internal Port used by the surveillance camera, enter the new port number. When using port forwarding, the external and internal port of the surveillance camera should be the same. You can, however, also manually specify the network data if the automatic configuration is not functioning. First deactivate “Use DHCP “. This opens the input fields for Static Configuration. RCP Technik GmbH & Co. KG, Tarpen 40/Gebäude 7b, D-22419 Hamburg Hotline: +49 (0)6 31/3 42 84 49 30 Under Static Configuration enter the network data for the surveillance camera. These data are generally obtained via the network settings of the computer or of the router. Click on “Apply“, to accept the changed settings. You will be prompted to enter the user name and password of the Administrator. The default user account is ”admin“ without password. To call up a surveillance camera from the camera list Rollei SafetyCam Config in the Browser window, click on “Browser“ in the menu. This opens the standard browser with the log-in page of the camera. You can then either call up the camera image or enter further settings for the camera. Select menu option ”Version“ to obtain information about the selected surveillance camera and the software. Use option ”Firmware“ to automatically update the system firmware of the camera as well as the firmware for the Web interface. First select “Start search“ to search for existing IPC cameras. Select one of the cameras from the list and click on “Firmware“. The program then asks for the model of the selected camera. Select the model of the camera and confirm the selection by clicking on “OK“. The program then shows for the system and the Web interface what firmware version is installed and whether a newer version is available. If a newer Firmware version is available, this can be installed on your IPC camera by selecting “Install“ When prompted, enter the user name and password of an account with Administrator rights (the default setting is user “admin” without password) to complete the installation. The camera is restarted after a successful installation 31 RCP Technik GmbH & Co. KG, Tarpen 40/Gebäude 7b, D-22419 Hamburg Hotline: +49 (0)6 31/3 42 84 49 7. Use of surveillance camera 7.1.Activating the surveillance camera First open your Browser program (Internet Explorer, Firefox, Opera, Google Chrome, Safari or similar). Next to it is the local IP address of the surveillance camera. If you wish to access a surveillance camera from a computer in the same network, you can also enter the local network address at this point. Enter a User name and respective password to log on. Next click on “Log on“. When using the surveillance camera for the first time enter “admin“ as User name and leave password field empty.. This starts the operating and settings program of the surveillance camera. RCP Technik GmbH & Co. KG, Tarpen 40/Gebäude 7b, D-22419 Hamburg Hotline: +49 (0)6 31/3 42 84 49 32 7.2.Controlling the surveillance camera Various elements and options are available for controlling the camera. Below the camera image control elements directly controlling the alignment of the camera head, are provided as well as some basic camera settings. What operating elements are available and what settings may be changed depend on the level of access assigned to the user account. Administrators can access all control elements and settings. Operators can control the alignment of the camera head and can set up the camera image but not change any settings. Users can only call up the camera image but not control the camera or change any settings. 7.2.1.Aligning the camera head Horizontal patrolling Vertical patrolling Direction arrows Calibrating Patrolling OFF Digital output OFF Digital output ON Using the direction arrows the camera can be directly moved into the different directions. By keeping the mouse button depressed whilst pointing on a direction arrow the camera moves until the mouse button is released or the end stop of the chosen direction has been reached. The center Calibrating button, serves to realign the camera head. Click on the button once and leave the mouse button on the button until the camera head no longer moves. A calibration should be carried out if the camera head has been moved manually, causing the stored positions to no longer work. As soon as the IP Security Camera is connected to power, a calibration is automatically carried out. 33 RCP Technik GmbH & Co. KG, Tarpen 40/Gebäude 7b, D-22419 Hamburg Hotline: +49 (0)6 31/3 42 84 49 Pressing the buttons Horizontal patrolling or Vertical patrolling starts an automatic pivoting of the camera in horizontal or vertical direction. The movement can be stopped by clicking on the respective buttons . Further information about the speed of movement of the camera head can be found in section 8.12. The control buttons can also be used to switch the digital input on or off. 7.2.2. Storing positions The option “Positions” offers the facility to store up to 3 fixed positions of the camera head, which can then be called up at a later stage. Click on button of option 1, 2 or 3 to store the current camera position under this number. This deletes the position previously stored under the respective number. Click on button of option 1, 2 or 3 to move the camera head in the position stored under the respective number. RCP Technik GmbH & Co. KG, Tarpen 40/Gebäude 7b, D-22419 Hamburg Hotline: +49 (0)6 31/3 42 84 49 34 7.2.1. Camera image settings Under View enter the settings for the camera image. 1. Resolution: This allows you to select whether the image of the surveillance camera is shown in a resolution of 1280 x 720 pixels, 640 x 480 pixels or 320 x 240 pixel. 2. Light frequency: Where the surveillance camera is used in a room with neon lights, set the network frequency for the local power grid (50 Hz or 60 Hz). Where the surveillance camera is used externally, select External use. 3. Brightness: Specify a brightness value between 0 and 6. The higher the value, the brighter the camera image. 4. Contrast: Specify contrast value between 0 and 6. The higher the value, the higher in contrast the camera image. 5. Mirror horizontally: Select this option to mirror the camera image horizontally. 6. Mirror vertically: Select this option to mirror the camera image vertically. 7. Sound on/off: Here you can switch the sound of the security-camera on or off. In order to use the sound-function, the Adobe Flashplayer has to be installed on the operating net browser. It can be downloaded via http://get.adobe.com/go/ getflashplayer/. Horizontal and vertical mirroring of the camera image can, for instance be used when the surveillance camera is ceiling mounted. 35 RCP Technik GmbH & Co. KG, Tarpen 40/Gebäude 7b, D-22419 Hamburg Hotline: +49 (0)6 31/3 42 84 49 8. Settings The below sections provide an overview of all possible options of the surveillance camera. In case of problems during the installation or use or changing of the settings of the surveillance camera, these sections contain information outlining the available options. In Your Internet Browser open access to the surveillance camera (see section 6) and log on using a user account with administrator rights. The surveillance camera is shipped with the user account “admin”, not requiring a password. Once logged on select “Settings” and the respective desired Settings category. 8.1.Device status The device status provides information about current data and settings values of the surveillance camera. Select 1 from the below menu. Symbol “Device status”. RCP Technik GmbH & Co. KG, Tarpen 40/Gebäude 7b, D-22419 Hamburg Hotline: +49 (0)6 31/3 42 84 49 36 8.2.Camera name You can assign a name to the surveillance camera in order to for instance make it easier to find in the network or to allow a clear assignment where several surveillance cameras are used. Select 2nd symbol “Camera name” from the below menu. Enter the desired name for the surveillance camera in the text field and click on “Save”. The camera name can consist of any characters and can contain up to 20 characters. The camera name is saved without having to restart the surveillance camera. 37 RCP Technik GmbH & Co. KG, Tarpen 40/Gebäude 7b, D-22419 Hamburg Hotline: +49 (0)6 31/3 42 84 49 8.3.Date and time Set the time zone of the surveillance camera and whether date and time should be automatically updated via a so-called NTP server (Time server). The correct time is, for instance, required for planning alarms or FTP transfers. 1. Current date and time: This option shows the date and time as it saved in the surveillance camera. This data is synchronised with the settings of the local system during saving. Where the option “Synchronise with NTP Server “ is not selected, the date and time can be set with this function. 2. Time zone: Select the time zone in which the surveillance camera is located. 3. Synchronise with NTP server: Select this option if the date and time are to be automatically updated via a NTP server. 4. NTP Server: Select the NTP Server via which the date and time are to be updated from the specified list. You can also enter NTP servers by name or IP address that are not listed.. Click on “Apply“, to accept the changed settings. The changes are saved without having to restart the surveillance camera. RCP Technik GmbH & Co. KG, Tarpen 40/Gebäude 7b, D-22419 Hamburg Hotline: +49 (0)6 31/3 42 84 49 38 8.4.User account You can set up anything up to 8 user accounts for the surveillance camera. The surveillance camera is then accessed via these user accounts. The surveillance camera is shipped with the user account “admin”, not requiring a password. This account can neither be removed nor can the authority “Administrator” be changed. Only a password can be determined. Click on “Add” to create a new user account. Enter the user name for the new account and a password. User name and password can contain up to 12 characters. The password can also be left empty. In order to delete a User account, click on “Delete” at the end of the line. Where a new User account has been accidentally deleted without having confirmed this by clicking on “Save”, you can select “User accounts” again to reinstate the account. The following authorisations are available for a user account. 1. Visitor: can only call up the camera image but not control the camera or change any settings. 2. Operator: can control the alignment of the camera head and can set up the camera image but not change any settings. 3. Administrator: can access all control elements and settings. Click on “Apply“, to accept the changed settings.The surveillance camera is restarted to save the changes to the user account. The restart takes about 2 minutes. 39 RCP Technik GmbH & Co. KG, Tarpen 40/Gebäude 7b, D-22419 Hamburg Hotline: +49 (0)6 31/3 42 84 49 8.5.Network settings In order to connect the surveillance camera to an existing network or a router, network settings must be entered. Use DHCP:If your network allows automatic addition of a new device (Client). select this option. All required data are obtained directly from the server or router. Port of Web user interface: Connections in a network are made via so-called Ports. Server and any connected device (Client) can operate via a different ports if the network address is identical. A standard value of 80 is specified for the surveillance camera. Where necessary this can be changed in the are 1-65535. The port of Web user interface should always be set to the same port as the external port of the surveillance camera in the router. (see section 5.6.Setting up the router). RCP Technik GmbH & Co. KG, Tarpen 40/Gebäude 7b, D-22419 Hamburg Hotline: +49 (0)6 31/3 42 84 49 40 Where automatic acceptance of new devices is not supported by your router, please deselect “Use DHCP“. Several ne input fields appear. Manually enter the access data of your network. The required data can generally be called up from the computer via the network properties or can be obtained from the System Administrator of the network. IP address:Enter an individual network address for the surveillance camera. If, for instance, the network setting of the computer for “Default Gateway“ (Standard gateway) is address 192.168.1.1 , the address of the surveillance camera must be 192.168.1.x. x represents a value between 2 and 254 not as yet used in the network. Example: 192.168.1.100. Subnet mask: Generally, the value 255.255.255.0 must be specified. Standard gateway: Connection to standard gateway is used for connecting to the Internet. Generally this is the network address of the router. DNS Server: The address of the so-called DNS or name server can be called up from the network settings of your computer. Generally this is the network address of the router. Click on “Apply“, to accept the changed settings. You have to restart the surveillance camera before the changes are saved in the network settings. 41 RCP Technik GmbH & Co. KG, Tarpen 40/Gebäude 7b, D-22419 Hamburg Hotline: +49 (0)6 31/3 42 84 49 8.6.Wireless settings If the surveillance camera is to be connected to a network using the wireless option W-LAN (Wireless LAN), the required settings can be entered under this option. Select option “Wireless settings” from the bottom of the menu. Use Wireless LAN: Select this option if a wireless connection to the network is to be used. The configuration page of the router opens. All data required for the used wireless network are stored in the router or Access Point through which the network is controlled. Select the router or access point settings and open the wireless network settings. Further information of how you can find this data is provided in the manual of your router or is available from your System Administrator. Network name (SSID): Enter the name of your wireless network (also referred to as SSID). RCP Technik GmbH & Co. KG, Tarpen 40/Gebäude 7b, D-22419 Hamburg Hotline: +49 (0)6 31/3 42 84 49 42 Region: Depending on the region, W-LAN does not support various channels. Select the region in which the surveillance camera will be used from the “Region” option. Encoding:Data in wireless networks are in most cases transmitted encoded to prevent third-party access. State what type of encoding is used in your W-LAN network. When “Uncoded“ is selected, data are not encoded prior to transmission. When using“WEP“, “WPA“ or “WPA2“ encoding, additional encoding information must be provided. Enter the same settings as shown for the router or access point. • • Note: Enter wireless network settings without changing. This is the only way to ensure the correct connection of the surveillance camera. Also, general settings of the router or access points should not be changed where this is not required. Otherwise this could result in problems with other W-LAN devices in the network. Use the“Search“ function to start an automatic search of existing wireless networks. Select the desired WLAN network from the list by marking it under “Selection” and click on “Use“. Where encoding data is required for the selected network, these must still be entered. Click on “Apply“, to accept the changed settings. Next, restart the surveillance camera to accept the wireless settings changes. The restart takes about 2 minutes. 43 RCP Technik GmbH & Co. KG, Tarpen 40/Gebäude 7b, D-22419 Hamburg Hotline: +49 (0)6 31/3 42 84 49 8.7.UPNP settings • Note: These settings are only of importance where manual installation was selected. When using Rollei Cloud, no further settings have to be entered. Universal Plug and Play (UPnP) is used for controlling devices via an IP-based network. Where the router supports UPnP and where this function is activated, the required Firewall settings are automatically selected. Select option “UPNP settings” from the bottom of the menu. Select “Use UPNP “, if UPNP is to be used for the connection of the surveillance camera. “Use UPNP” is set as default. Click on “Apply“, to accept the changed settings. The changes are saved without having to restart the surveillance camera. RCP Technik GmbH & Co. KG, Tarpen 40/Gebäude 7b, D-22419 Hamburg Hotline: +49 (0)6 31/3 42 84 49 44 8.8.DDNS settings • Note: These settings are only of importance where manual installation was selected. When using Rollei Cloud, no further settings have to be entered. On the Internet, the surveillance camera can be accessed through the IP address of the router or server. As in many cases the public IP address of the Internet access changes constantly, it is advantageous if the surveillance camera can be accessed via a fixed address. For this purpose, a DDNS server (Dynamic Domain Name System) is available through which a fixed address can be set up for the surveillance camera. For free registration of a fixed Internet address, open the page http://rolleicam.net/. in your Internet Browser. Next, select “Register” from the log-on window. 45 RCP Technik GmbH & Co. KG, Tarpen 40/Gebäude 7b, D-22419 Hamburg Hotline: +49 (0)6 31/3 42 84 49 First, enter a user name. This may only consist of small and capital letters, numbers or a hyphen. The user name is used for the Internet address of the surveillance camera. Enter, for instance, the user name “ipcamera“ and, after registration, the surveillance camera can be called up via address http:// ipcamera.rolleicam.net as soon as it is connected to the Internet. After successful registration, the following adjacent information is provided. Change to DDNS settings of the surveillance camera and select “Use DDNS“. Under User name and Password enter the same data used for registration via the DDNS Server. Also enter the User name specified during registration in the text field “Domain name” . Click on “Apply“, to accept the changed settings. Next, restart the surveillance camera to accept the DDNS settings changes. The restart takes about 2 minutes. RCP Technik GmbH & Co. KG, Tarpen 40/Gebäude 7b, D-22419 Hamburg Hotline: +49 (0)6 31/3 42 84 49 46 8.9.Mail settings In certain circumstances, the surveillance camera can send out a alarm message by email. For this purpose an email account must be specified from which emails will be sent out. A private email address can, for instance, be used or you can set up a separate email address for the surveillance camera. Select option “Mail settings” from the bottom of the menu and select “Use SMTP”. Activate “Use SMTP“, if an email is to be sent out in the event of an alarm. Please note that the alarm must be activated under alarm settings. The data required as regards the used email account will be provided by the Email provider. For your private email account you can also find this data in email programs such as Outlook or Thunderbird. The so-called SMTP Server (Simple Mail Transfer Protocol) is a post output server of an email provider. Emails are sent to this server for forwarding. 47 RCP Technik GmbH & Co. KG, Tarpen 40/Gebäude 7b, D-22419 Hamburg Hotline: +49 (0)6 31/3 42 84 49 Server: Enter address of SMTP server of Email account. Port: Enter port of SMTP server. The standard value is 25. Encoding:State the encoding used by the SMTP server. Requires authentication: State whether the SMTP server requires authentication. If yes, mark this option and state the user name and password of the email account. Sender: State email address via which an alarm message is to be sent. Recipient 1-4: Provide up to 4 email addresses via which an alarm message is to be sent. If you want to a message to be sent to the email address, sending out the alarm messages, you have to enter the address also as recipient. send IP address: This option allows you to determine whether an email will be sent with the current IP address of the surveillance camera to the listed email addresses as soon as the IP address of the surveillance camera changes. Fields “Server“, “Port“, “Sender“ and “Recipient1“ are mandatory fields. Click on”Test“, to test the email settings. A test email is then sent to the listed email addresses. Click on “Apply“, to accept the changed settings. The changes are saved without having to restart the surveillance camera. RCP Technik GmbH & Co. KG, Tarpen 40/Gebäude 7b, D-22419 Hamburg Hotline: +49 (0)6 31/3 42 84 49 48 8.10.FTP settings The surveillance camera offers the option to upload images to an FTP server once or regularly. Specify the required additional data for an FTP server to be used. Select option “FTP settings” from the bottom of the menu and select “Use FT”. Activate “Use FTP “, if images of the surveillance camera are to be uploaded to an FTP server. Server:Enter address of FTP server. Port: Enter the port used for FTP-Server access. The standard value is 21. User name: Enter the name of a user account entitled to write to the FTP Server. Password: Enter password for User account. Path: Enter the path under which images are to be stored on the FTP server. Transfer mode: Select whether a passive or active FTP connection is to be requested for the transfer. Upload in interval: Select this option if you wish images of the surveillance camera to be uploaded to the FTP server at regular intervals. 49 RCP Technik GmbH & Co. KG, Tarpen 40/Gebäude 7b, D-22419 Hamburg Hotline: +49 (0)6 31/3 42 84 49 Interval (seconds): Specify at what intervals an image is to be taken and transferred. Values are in seconds. Enter file name: Select this option if you wish to specify a file name. If this option has not been selected, a predefined file name will be used when saving the images. File name: Enter your own file name. A sequential number is assigned to the specified name during saving of the images. To test entries for the FTP settings, click on“Test“. A single image is the transferred to the FT server. Click on “Apply“, to accept the changed settings. The changes to the FTP settings are saved without having to restart the surveillance camera. 8.11.Alarm settings Specify under which circumstances the surveillance camera should issue an alarm message and what should be done in the event of an alarm. Select option “Alarm settings” from the bottom of the menu. Depending on the set options, the following will be displayed: Motion detection: Select this option to activate motion detection. RCP Technik GmbH & Co. KG, Tarpen 40/Gebäude 7b, D-22419 Hamburg Hotline: +49 (0)6 31/3 42 84 49 50 Use time schedule: You can restrict the period of time during which alarms can be triggered. As soon as this option is selected, the adjacent time schedule appears, in which the active times can be selected. Select the times during which the alarm settings should be active. Sensitivity Enter the sensitivity for movement sensing using a value between 0 and 9. The higher the value, the higher the movement sensing sensitivity. Recognition at digital input: If an alarm message is triggered via the alarm connection, this can be accepted by the IP Security Camera if this option has been activated. Alarm level: Determines whether an alarm is triggered if no voltage is applied to the alarm input (setting low) or if voltage is applied (setting high). Report at digital output: Any alarm message at the IP Security Camera is forwarded via the digital output if this option has been activated. Alarm level: Determine whether the alarm is triggered at the digital output by an applied voltage (setting high) or by a cessation of the voltage (setting low). Report to email: Activate this option if an email is to be sent out in the event of an alarm. Report to FTP: Activate this option if images are to be stored on the FTP server in the event of an alarm. Interval:Activate this option if images are to be stored on the FTP server in the event of an alarm. Values are in seconds. Report to FTP: Activate this option if an HTTP address is to be called up in the event of an alarm. URL: State the HTTP address to be called up in the event of an alarm. Click on “Apply“, to accept the changed settings. The changes to the alarm settings are saved without having to restart the surveillance camera. 51 RCP Technik GmbH & Co. KG, Tarpen 40/Gebäude 7b, D-22419 Hamburg Hotline: +49 (0)6 31/3 42 84 49 The alarm connection to the rear of the IP Security Camera contains 4 connections: 1. Alarm output (GND) 2. Alarm output (+5V) 3. Alarm input (Source) 4. Alarm input (GND) An external device such as an alarm unit, a siren or a door opener can be connected to the alarm output (1 and 2). A signal is emitted as soon as the digital output is switched onmanually or where the digital output has been selected for alarm messages and theIP Security Camera detects an alarm. An alarm is triggered if the contacts of alarm input (3 and 4) are externally connected to each other. A connection can be produced via a switch or relay, such as a motion sensor or other alarm triggering devices. If an alarm signal has been applied, a signal is emitted according to the above settings. RCP Technik GmbH & Co. KG, Tarpen 40/Gebäude 7b, D-22419 Hamburg Hotline: +49 (0)6 31/3 42 84 49 52 8.12.Camera head settings In this category, settings for the positioning of the camera head can be entered. Use infrared LEDs in dark conditions: If this option has been activated, the infrared LEDs are used as an additional light source in dark conditions. Fixed position during switch on: Activate this option if the camera head should take up a predetermined position when the IP Security Camera is switched on. Position during switch on: Geben Sie vor, welche Position der Kamerakopf beim Einschalten einnehmen soll. Wählen Sie Mitte aus, wenn der Kamerakopf zentriert werden soll, oder wählen Sie eine der Positionen, die in der Kameraansicht gespeichert wurden (siehe Abschnitt 7.2.2). Manual speed: Determine how quickly the camera head should move if controlled manually. The higher the value the slower the movement of the head. Click on “Save” to accept changes to the settings. Changes to the camera head settings are accepted without the IP Security Camera having to be restarted. 53 RCP Technik GmbH & Co. KG, Tarpen 40/Gebäude 7b, D-22419 Hamburg Hotline: +49 (0)6 31/3 42 84 49 8.13.Resetting Click on “reset now” to reset the surveillance camera to the default settings. Resetting takes 2 minutes. Wait until the Browser window shows the logging on option again. • • • Note: Selection of this function deletes all previous settings. If the network settings have been changed, the surveillance camera may no longer be attainable under the current address. The surveillance camera can be found again using the configuration program. The surveillance camera can also be reset by pressing the RESET button underneath the camera. Keep RESET button depressed for 15 seconds. 8.14.Restarting the camera Click on “Restart now” to restart the surveillance camera. This saves all entered settings. Resetting takes 2 minutes. Wait until the Browser window shows the logging on option again. • Note: If the network settings have been changed, the surveillance camera may no longer be attainable under the current address. The surveillance camera can be found again using the configuration program. RCP Technik GmbH & Co. KG, Tarpen 40/Gebäude 7b, D-22419 Hamburg Hotline: +49 (0)6 31/3 42 84 49 54 9. Potential legal infringements Observe the following information for using the IP surveillance camera: Copyright Generally every person owns his/her own image. According to the copyright law, images may only be published without the consent of the respective person if the person appears only as a person embellishment to a landscape image, or a location as a public place. The answer to the question of whether a person is embellished depends on the individual circumstances. For reasons of legal certainty persons should be informed in all cases in which images are taken with the IP surveillance camera from which persons can be identified (see also section “Duty of notification”). Protection of privacy Shown images may not infringe the privacy of others. Do not point camera onto the garden or entrance door of your neighbour, even if these locations are visible from your known home or public locations. This does not entitle you to publish respective photos or videos. Personal determinability Personal determinability exists, where it can be determined that a certain person was at a certain place at a certain time. The person can also be identified by a personal identifier such as a vehicle registration plate. Personal determinability of persons must be absolutely avoided. Surveillance cameras at the place of work Surveillance of workplaces is subject to particular strict regulations. Employers should not use surveillance cameras at the place of work unless potential legal infringements can be fully excluded. Please inform yourself about the applicable laws in your country. Traffic surveillance cameras When using surveillance cameras facing traffic, it is recommended to configure the location and view of the camera in such a way that road users are identifiable from any images through a vehicle registration plate. Road users could also be determined from lettering on vehicles. RCP Technik GmbH & Co. KG, Tarpen 40/Gebäude 7b, D-22419 Hamburg Hotline: +49 (0)6 31/3 42 84 49 55 Duty of notification Where a personal identification of persons cannot be excluded, a clearly visible notice concerning the surveillance camera must be erected at all accesses to the monitored area. Passers-by must also be informed that by entering the monitored area they give their permission to pictures/videos being taken so that if they do not wish to give their consent they can avoid the picture/video being taken by not accessing the area. The voluntary nature of the declaration must be observed. If the camera trap is located at a point persons have to pass to reach their destination (e.g. entrance of a sight), no consent is deemed to have been given as no voluntary nature applies. 10. License declaration The software used by this product is licensed under a license governed by the conditions of GNU – General Public License. We expressly point out that for software based on the license conditions of the GNU - General Public License, no liability is accepted. The software is based on the software published on page http://sg-gpl.net/ . The listed software is licensed according to the conditions of GNU – General Public License. For the product software adjustments specific to the device were made. The source text of the software implemented in this product will be forwarded by email. [email protected] In this case, your email must contain information stating the product, serial number, proof of commercial purchase source and proof of purchase date of product from a commercial source. We guaranty that the source text of the implemented software will be forwarded for a period of at least three years from the date of purchase, provided that the commercial source has obtained the product directly from us or with the involvement of only commercial agents. 56 RCP Technik GmbH & Co. KG, Tarpen 40/Gebäude 7b, D-22419 Hamburg Hotline: +49 (0)6 31/3 42 84 49 11. Conformity The Manufacturer hereby declares that the CE marking was applied to the product in accordance with the basic requirements and other relevant provisions of the following European Directives: 2011/65/EC RoHs Guideline 2004/108/EC Low Voltage Directive 1999/5/EG R&TTE Guideline The EC Declaration of Conformity can be requested from the address specified on the Warranty card. 12. Disposal Correct disposal of product: The adjacent symbol indicates that electrical and electronic equipment may not be disposed of in domestic waste in the EU. Please use the returns and collection points of your local council or contact your dealer you purchased the product from. This prevents potentially harmful effects on the environment and health as a result of incorrect disposal. For further information contact the respective department of your local council. 13. Warranty and Service Our service outlets will be happy to assist you in case of problems with the operation of the device or with any queries and problems. The device comes with a 3-year manufacturer’s warranty. Please see the enclosed Warranty Card for details. Please contact our hotline prior to returning a defective device. Service address: Manufacturer's address: Rollei Service Germany RCP Technik GmbH & Co. KG Denisstr. 28A 67663 Kaiserslautern Germany Tarpen 40/Gebäude 7b D-22419 Hamburg Germany Hotline: +49 (0)6 31/3 42 84 49 RCP Technik GmbH & Co. KG, Tarpen 40/Gebäude 7b, D-22419 Hamburg Hotline: +49 (0)6 31/3 42 84 49 57 14. Technical specification Model SafetyCam 10 HD Image sensor 1/5“ Megapixels CMOS sensor, 1280 x 720 pixels Lens F=2.4, f=3.6 mm, Infrared lens Infrared light 9 Infrared LEDs Night vision 15 m Minimum lighting 0.5 Lux (w/o LEDs) angle of view 60° Supported protocols HTTP, FTP, TCP/IP, SMTP, DHCP, DDNS, UPnP WLAN standards IEEE 802.11 b/g/n LAN connection 10/100 Mbit/s RJ-45 Power supply AC adapter: Baolijin BLJ15W050200P-V input: 100 - 240 V~, 50/60 Hz; 500 mA max. Output: 5 V , 2000 mA camera: 5 V DC, 2,0 A LAN Connections Input/output alarm (output max. load 100 mA ) Permissible ambient temperature 0°C to+35 °C Ambient humidity 20 - 85% Dimensions(HxWxD) 95 mm (H) x 100 mm (B) x 120 mm (T) Weight approx. 238 g • 58 Note: We reserve the right to make technical and optical changes to the product as part of product improvements. RCP Technik GmbH & Co. KG, Tarpen 40/Gebäude 7b, D-22419 Hamburg Hotline: +49 (0)6 31/3 42 84 49 15.Index A Accessories 1 Address 30 Administrator 39 Administrators 33 alarm connection 52 Alarm connection (In/Out) 7 Alarm message 47 Alarm settings 50 Alarm terminal 6 angle of view 58 App 15 Assembly of surveillance camera 8 B DHCP 40 direction arrows 33 Disposal 57 DNS Server 41 Domain name: 46 E Encoding 43 F Firewall 17 Firmware 31 Focus ring 7 FTP settings 49 H Brightness 35 Hardware installation 9 Hazard 4 C Calibrating button 33 camera head 33 Camera head 53 Camera image 35 Camera name 37 Cloud installation 11 Conformity 57 Contrast 35 Controls 33 I D LAN cable 6 Legal regulations 55 License declaration 56 Light frequency 35 Log-on 32 Date 38 DDNS server 23 DDNS settings 23 Device status 36 Image sensor 58 Infrared LED 7 Installation on Mac OS X. 25 Install wall fixing 8 Intended use 4 IP address 16, 41 L RCP Technik GmbH & Co. KG, Tarpen 40/Gebäude 7b, D-22419 Hamburg Hotline: +49 (0)6 31/3 42 84 49 59 M S Mail settings 47 Manual set up 16 Manual speed: 53 Microphone 7 Mirror 35 Motion sensing 50 Sensitivity 51 Service 57 Settings 36 Setting up an app 24 Setting up the domain name 23 SMTP 47 Software installation 10 speed of movement 34 Standard gateway 21, 41 Subnet mask 41 System requirements 10 N Network cable 9 Network connection (LAN) 7 Network name 42 Network settings 40 NTP Server 38 Technical specification 58 Time 38 Time schedule 51 Time zone 38 O Operator 39 P Port 30, 40 Port forwarding 17, 21 Power supply connection (DC 5V) 7 Protocols 58 R Region 43 Reset button 7 Resetting 54 Resolution 35 Rollei Cloud 11, 14, 15 Rollei SafetyCam Config 30 router 16, 20, 25 60 T U UPNP 44 Use DHCP 30 User account 39 User data 2 Users 33 V Visitor 39 W Wall fixing 6 Warranty 57 Wireless settings 19, 42 WLAN aerial 7 WLAN Settings 42 RCP Technik GmbH & Co. KG, Tarpen 40/Gebäude 7b, D-22419 Hamburg Hotline: +49 (0)6 31/3 42 84 49