1
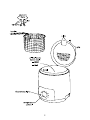
instructions
2
Read the instructions, keep them safe, pass them on if you pass the fryer on.
Remove all packaging, but keep it in case you ever need to return the fryer.
important safeguards
Follow basic safety precautions, including:
1 The fryer must only be used by a responsible adult. Use and store it out of reach of
children.
2 Don’t put the fryer in liquid, don’t use it in a bathroom, near water, or
outdoors.
3Don’t touch hot surfaces (including the outside of the fryer) – use oven gloves.
4 Don’t lean or reach over the fryer while the oil is hot.
5Don’t carry or pass anything through the space over or near the fryer – if anything
drops into the fryer, hot oil will splash out.
6Don’t try to move or carry the fryer if it contains hot oil. Let it cool down fully first.
7 Steam will billow out as you open the lid, so stand well back before opening.
8Don’t use the fryer without first filling, with good quality cooking oil, to
between the MIN (450ml) and MAX (900ml) marks inside the bowl.
caution If the oil level is below the MIN mark, you may damage the fryer. If above the
MAX mark, hot oil may escape, causing damage and injury.
9Sit the fryer on a stable, level, heat-resistant surface, at least 75cm above floor level.
10 Leave a space of at least 5cm (2”) all round the fryer.
11 Position the fryer so that the basket handle doesn’t extend up to or over the edge of
the work surface, where it might be caught accidentally when passing.
12 Don’t put the fryer under cupboards, shelves, or anything that might be damaged
by heat or steam. Keep it clear of combustible materials like curtains, or drapes.
13 Keep the fryer and cable away from the edge of the work surface, and out of reach
of children, the infirm, and anyone under the influence of alcohol or other
judgement-affecting substance.
14 Route the cable so it doesn’t overhang, and can’t be tripped over or caught.
15 Don’t leave the fryer unattended while plugged in.
16 Don’t use the fryer with an external timer or remote control.
17 Close the lid when cooking, and when the oil is cooling.
18 Don’t put anything on top of the fryer while it’s in use.
19 Before using an aerosol spray in the kitchen, or anywhere that the spray might drift
into the kitchen, check that the lid is closed, to avoid contaminating the oil.
20Keep the fryer and cable away from sources of heat.
21Unplug the fryer when not in use, before moving and before cleaning, let it cool
down fully before cleaning or storing away.
22Don’t use accessories or attachments unless we supply them.
23Don’t use the fryer for anything other than heating cooking oil for deep frying.
24Don’t use the fryer if it’s damaged or malfunctions.
25If the cable is damaged, return the fryer, to avoid hazard.
household use only
before using for the first time
• Clean the fryer, to remove manufacturing dust, etc. – care and maintenance, page 9.
3
preparation
1 Sit the fryer on a stable, level, heat-resistant surface, at least 75cm (30”) above the
floor, with at least 5cm (2”) space all round it.
2 Keep it away from cupboards, curtains, anything combustible, and anything that
might be damaged by heat or steam.
3With the basket in the fryer, and the basket handle unfolded, position the fryer so
the basket handle doesn’t extend up to or over the edge of the work surface, where
it might be caught accidentally when passing.
4 Line a colander with paper towel, to drain the food after frying.
5Fetch your oven gloves – and use them! They protect your hands from heat. They
protect them from drips and splashes too.
filling
caution Steam will billow out as you open the lid, so stand well back
6Stand back, and use the grip to open the lid.
7 If the bowl is empty, fill with good quality liquid cooking oil, to between the MIN
(450ml) and MAX (900ml) marks. If it already contains oil, check the level, and top up
as necessary.
8Don’t use solid cooking oil, fat, butter, margarine, or olive oil.
a) Solid cooking media of any kind will overheat and burn out the element.
b) Olive oil generally contains too much water, and it’s smoking point is a bit low for
deep frying.
c) Buy a good quality liquid cooking oil suitable for deep frying, like sunflower or
corn oil.
9Don’t mix oils of different types, as they’ll have different temperature characteristics.
heating the oil
10 Close the lid (use the grip) before you start to heat the oil.
11 Move the temperature control to the temperature you need (the marked range is
80°C to 190°C).
12 Put the plug into a wall socket (switch the socket on, if it’s switchable).
13 The thermostat light will glow, to show that the fryer is heating up (10-15 minutes).
14 It’ll go out when the correct temperature is reached, then cycle on and off as the
thermostat works to maintain the temperature.
14 When it reaches the correct temperature, the thermostat light will go out, then it’ll
cycle off and on as the thermostat works to maintain the temperature.
15 When the thermostat light goes out, you can start frying.
prepare the food
16 Cut food into uniformly sized pieces.
17 Coat wet food (e.g. fish, fruit) with flour, crumbs, batter, etc.
18 Don’t defrost food in the fryer. Any food other than pre-cooked, quick-frozen foods
(e.g. frozen chips, scampi in breadcrumbs, chicken pieces in batter) must be fully
defrosted before putting into the fryer.
19 When frying pre-packed or pre-cooked frozen foods, follow the instructions on the
packet.
20When frying raw vegetables (e.g. chips), dry them with paper towel or a tea towel.
4
loading the basket
caution Steam will billow out as you open the lid, so stand well back
21Stand back, and use the grip to open the lid.
22Use the handle to lift the basket out of the oil.
23Put the prepared food pieces in the basket.
24Try not to put more than two layers of food in the basket. If you need to fry more, do
it in batches.
25Lower the basket slowly into the oil.
26The oil will foam as it comes into contact with water from the food. As long as the
foam doesn’t threaten to overflow the bowl, this should not be a cause for alarm.
27If the foam threatens to overflow the bowl, raise the handle, to lift the basket out of
the oil, then turn to problems on page 8.
28Close the lid – the slots in the lid go over the handle wires.
frying the food
29Stay in the kitchen, and keep an eye on the frying process.
30Don’t lean or reach over the fryer while the oil is hot.
31Wait till the food has cooked
empty the basket
32Unplug the fryer from the wall socket (switch the socket off first, if it’s switchable).
caution Steam will billow out as you open the lid, so stand well back
33Put on an oven glove.
34Stand back, and use the grip to open the lid.
35Use the handle to lift the basket out of the oil.
36Hold the basket over the fryer for a few seconds, to let it drain.
37Empty the food into the colander, to drain further before serving.
38If you’ve finished, leave the dryer to cool down before cleaning.
39If you want to fry another batch of food, check the oil level and top up as necessary.
frying guide
the wrong way
40Bring the oil to the ideal frying temperature.
41Fill the basket to the rim. You’ve got an extra 25% of the original mass sharing the
heat, so the temperature plummets.
42The thermostat recognises this, turns the element on, and it tries to bring the whole
mass back up to frying temperature. This takes time.
43The oil, being a liquid, heats up fairly uniformly.
44The food, as it’s solid, heats up from the outside in.
45The heat causes a skin to form on the outside of the food:
a) the skin prevents moisture leaving the food
b) so it takes even longer for the food to reach temperature
c) so the skin gets thicker
d) so it becomes even more difficult for the moisture to escape
e) so some of the moisture is trapped forever
f) so your food is soggy
5
46That’s only half the story.
47When you put food into the fryer, you should see bubbles.
48This is steam, formed when the moisture inside the food heats up.
49This steam normally prevents oil from soaking into the food.
50If the food heats up slowly, there’s not enough steam, so more oil soaks into the
food, so it gets even soggier.
the right way
51Bring the oil to the ideal frying temperature.
52Put a single layer of cold food into the basket. You’ve got an extra 8% of the original
mass, so the temperature only drops a little.
53The element brings the whole mass back up to frying temperature very quickly.
54Steam forms inside the food, keeping the oil out.
55The food cooks uniformly – firm and crisp.
coatings
56Coat all foods, except those high in starch, like potatoes and doughnuts. The coating
protects the food, helps prevent juices leaking into the oil, and gives a crisp tasty
result. Generally, coatings won’t stick to frozen foods.
seasoned flour
57Thicker coatings don’t stick well to wet/damp foods, so coat them first in seasoned
flour. Use on its own to coat small whole oily fish like whitebait.
egg and breadcrumbs
58Popular on fish, chicken, and scotch eggs, it gives an attractive, crisp, crunchy
exterior. Ideal for foods that are to be served cold, as it stays crisp for hours.
• Coat in seasoned flour, to dry the food. Dip in beaten egg, then breadcrumbs, repeat
till fully coated, press well, then shake off any excess.
• Fresh breadcrumbs give a rough appearance. Make dry breadcrumbs or raspings by
baking scraps of bread till golden, then crush or process to a fine crumb.
basic batter
100g self raising flour
pinch of salt
cold water
Just before it’s needed, mix the salt and flour with enough water to form a smooth
cream that will coat the back of a spoon.
basic fritter batter
100g self-raising flour
5ml (1tsp) cooking oil
pinch of salt
cold water
Sift the flour and salt into a bowl. Stir in the oil. Just before it’s needed, stir in enough
water to form a smooth batter.
6
posh fritter batter
100g plain flour
1 egg, separated
150ml liquid
15ml (1tbsp) cooking oil
pinch of salt
Sift the flour and salt into a bowl. Stir in the egg yolk, then the liquid. Beat in the oil.
Just before it’s needed, whisk the egg white and fold into the batter.
crispy Chinese batter
75g cornflour
1 large egg
10ml (2tsp) baking powder
5ml (1tsp) cooking oil
good pinch of salt
cold water
Mix the egg, cornflour, salt, oil, and enough cold water to form a creamy base on which
to add either egg and breadcrumbs or batter. It holds the other coatings on the food.
frying times
Use these times purely as a guide. Check that food is cooked through before serving. If
in doubt, cook it a bit more. Chips and other veg should be crisp. Cook meat, poultry,
and any derivatives (mince, burgers, etc.) till the juices run clear. Cook fish till the flesh is
opaque throughout.
chips (french fries)
Use a chipping potato, like King Edward, Cara, Maris Piper, Romano or Desirée.
• Peel, cut, rinse, drain, and dry thoroughly. Don’t put more than two layers of chips in
the basket at a time. For best results, fry in two stages:
stage 1fry for 5-10 minutes (depending on quantity) at 170°C. When the chips reach
pale gold, and the outside is firm, lift the basket out of the oil, and let the chips
drain and cool
stage 2fry for 2-4 minutes at 190°C. When golden brown and crisp, remove from the
oil, and drain in a colander lined with paper towel.
frozen chips (french fries)
Follow the directions on the package.
other vegetables
Many vegetables may be deep fried – onion rings, mushrooms, cauliflower florets. They
can be fried from fresh or frozen, and should be coated.
frozen food (small pieces in batter, breadcrumbs, etc.)
• Frozen food cools oil quickly, so fry a single layer at a time..
• Keep the pieces apart, or they’ll stick together.
• Shake off excess ice or water before adding the food to the oil.
• Use the highest temperature setting, and lower the basket slowly into the oil, to
reduce foaming.
• For pre-packed food, follow the instructions on the package.
7
fish – frozen
temp (°C)
time (min)
You may fry pre-coated fish – follow the directions on the package.
plaice 190°C 5-6
fillets
170°C 10-15
goujons 190°C 3
scampi 170°C 3-5
fish cakes – small 170°C 3
fish cakes – medium/large 170°C 4-5
whitebait
190°C 2-3
fish – fresh
temp (°C)
time (min)
Fish has a high water content. Dry with paper towel, and coat before frying. Use whole,
or cut into fillets, cutlets or goujons.
fillets, goujons, scampi, fish cakes 190°C 3-4
whitebait
190°C 1-2
meat
Only deep fry fresh/thawed meat. Coat in egg and breadcrumbs or batter. For frozen
meat products, follow directions on the package.
goujons
190°C 3
chops, cutlets – small/large 170°C 10/15
scotch eggs 170°C 10
rissoles, meat balls 190°C 6
Wiener schnitzel (depending on thickness)
170°C 3-8
poultry
Only deep fry fresh or thawed poultry. Coat in egg and breadcrumbs or batter. Remove
the skin for better results. Allow time for poultry to cook to the centre. A crisp golden
exterior doesn’t necessarily denote this, so test before serving. For frozen poultry
product, follow directions on the package.
goujons
170°C 4
drumsticks
170°C 14-15
croquettes
190°C 2-3
chicken in crumbs – small
170°C 15-20
chicken in crumbs – large
170°C 20-30
bread, cakes, fritters
ring doughnuts
pineapple, banana or apple fritters croutons (diced bread)
temp (°C)
time (min)
190°C 190°C 190°C
2
2-3
1
problems
59If the oil foams and threatens to overflow, there’s too much food in the basket (take
some out), the food is too moist (dry it a bit and try again), or the oil is old or
contaminated (replace it).
60Every time oil is heated, it deteriorates.
61Every time food is put into it, moisture, particles of food and fat, flour and spices
from coatings, water from frozen foods, cause further deterioration.
8
62Particles blacken, burn, and stick to the next batch of food, altering its look and taste.
Filtering can alleviate this a bit.
63Pre-cooked and oven chips have a coating of oil from the pre-cooking process. This
will thicken and discolour the oil in your fryer.
64If you fry coated foods often, it’s worth keeping two lots of oil, one for coated foods
and one for “oil-friendly” foods. Keep them in separate, labelled containers.
65Even filtered oil will be past its best after 10 to 12 uses. It may look OK, but it’ll
already have affected the quality and taste of your food.
66As a rough guide, if you notice a marked improvement in flavour after changing the
oil, you should have changed it earlier.
67Don’t top up oil that’s past its best. You’re just wasting new oil.
68Switch off, let the fryer cool down fully, then remove the old oil, clean the fryer, and
fill it with fresh, new oil.
69Don’t pour old oil down the sink or toilet. This can cause blockages.
70Don’t put it in the wheelie bin. When the crusher on the dustcart operates, it’ll burst
the container and the oil will spread over the street.
71Your Local Authority will have a depot where old oil can be taken for recycling or
environmentally friendly disposal.
thermal cut-out
72The deep fryer is fitted with a thermal cut-out. If it overheats, and the thermostat
fails to switch off, the thermal cut-out will cut the power to the element. This is not
self-resetting. If the thermal cut-out operates, get in touch with Customer Service
Department, so that the cause may be investigated, and rectified/repaired as
appropriate.
care and maintenance
1 Unplug the fryer, and leave it to cool down fully.
2 If you intend to move the fryer without emptying it, take care, it’ll be heavy.
3Don’t put the fryer in water or any other liquid.
4 Don’t put the fryer in a dishwasher.
5Don’t use harsh or abrasive cleaning agents or solvents.
6Cover the work surface generously with paper towel (at least three layers thick).
7 You’ll need a suitable container (2 litre) for the used cooking oil. If the container isn’t
wide necked, use a wide necked funnel.
9If you want to filter the oil at the same time, support a fine sieve over a wide necked
container, or fit the funnel with a filter paper.
10 Use the grip to open the lid.
11 Use the handle to lift the basket up and out of the fryer.
emptying the bowl
12 If you’re using a funnel, fit it to the oil container.
13 Pour the oil from the side or rear of the bowl into the container or funnel – don’t
pour from the front, or you may get in on the controls.
16 If you’re filtering at the same time, you’ll need to pour the oil a little at a time,
waiting till the last lot has filtered through before adding the next lot.
9
cleaning
17 To avoid the build up of jelly-like deposits, it’s best to clean the deep fryer after
every few uses. If you leave it too long, solid layers of oil will build up.
18 Wash the basket in warm soapy water, rinse thoroughly and leave to air dry.
19 Wipe all other surfaces with a damp cloth.
20If the bowl is empty, you may squeeze the upright parts of the handle to free them
from the clips, and swing the handle down into the basket, for ease of storage.
dishwasher
21You may wash the basket in a dishwasher, but we don’t recommend this.
22If you use a dishwasher, the harsh environment inside the dishwasher will affect the
surface finishes. The damage should be cosmetic only, and should not affect the
operation of the fryer.
discolouration
23With use, the basket and bowl will discolour. This is inevitable, harmless, and won’t
affect the operation of the fryer.
10
11
connection
The product must be earthed. It has a 13A BS1362 fuse in a 13A BS1363
plug. To replace the plug, fit the green/yellow wire to E or E, the blue wire
to N, and the brown wire to L. Fit the cord grip. If in doubt, call an
electrician. Don’t use a non-rewireable plug unless the fuse cover is in
place. If you remove the plug, dispose of it.
wheelie bin symbol
To avoid environmental and health problems due to hazardous substances in
electrical and electronic goods, appliances marked with this symbol mustn’t be
disposed of with unsorted municipal waste, but recovered, reused, or recycled.
service
If you ring Customer Service, please have the Model No. to hand, as we won’t be able
to help you without it. It’s on the rating plate (usually underneath the product).
The product isn’t user-serviceable. If it’s not working, read the instructions, check the
plug fuse and main fuse/circuit breaker. If it’s still not working, consult your retailer.
If that doesn’t solve the problem – ring Customer Service – they may be able to offer
technical advice.
If they advise you to return the product to us, pack it carefully, include a note with your
name, address, day phone number, and what’s wrong. If under guarantee, say where
and when purchased, and include proof of purchase (till receipt). Send it to:
Customer Service, Russell Hobbs Ltd, Fir Street, Failsworth, Manchester M35 0HS
email: [email protected]
telephone: 0845 658 9700 (local rate number)
guarantee
Defects affecting product functionality appearing within one year of purchase will be
corrected by replacement or repair provided the product is used and maintained in
accordance with the instructions. Your statutory rights are not affected.
Documentation, packaging, and product specifications may change without notice.
online
550-772
www.russellhobbs.co.uk for more products
12