Download Remington NE3750
Transcript
NE3450
NE3750
le
u m pro
ry
us duc
t r tre
eg gi
s
of ist ter
pu er w .co
rch it .uk
as hin /re
e. 2 mi
8 d ng
ay ton
s
.
Re
g
£1 iste
0 r
EX ,0 o
TR 0 nl
FR A y 0 p ine
EE ea r
re r g ize fo
r
w ua
ar ra d
Vis
ds n ra
it w
t
ga ee w
w
Yo w.
l
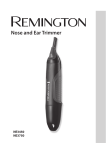
Nose and Ear Trimmer
Thank you for buying your new Remington® product. Please read these
instructions carefully and keep them safe. Remove all packaging before use.
F IMPORTANT SAFETY INSTRUCTIONS
WARNING – TO REDUCE THE RISK OF BURNS, ELECTROCUTION, FIRE, OR
INJURY TO PERSONS:
1 This appliance can be used by children aged from 8 years and above and persons with reduced physical, sensory or mental capabilities or lack of experience and knowledge if they have been supervised/instructed and understand the hazards involved. Children shall not play with the appliance. Cleaning and user maintenance shall not be done by children unless they are older than 8 and supervised. Keep the appliance and cable out of reach of children under 8 years.
2 Store the product at a temperature between 15°C and 35°C.
3 Do not disassemble the cutter assembly.
4 Always remember to turn the trimmer on before you insert it into your nose or ear to avoid injury.
5 This appliance is not intended for commercial or salon use.
1
3
2
8
4
5
6
7
2
C KEY FEATURES
1
2
3
4
5
6
7
8
Vertical trimmer Rotary trimmer (NE3450)
Detail trimmer (NE3750)
5 setting guide comb for detail trimmer (NE3750)
Vertical trimmer attachment combs
On/off switch
Battery compartment
Wash out feature
C GETTING STARTED
,
•
•
•
•
•
•
•
•
•
,
Inserting Batteries
Your NE3450 requires 1 ‘AA’ alkaline battery (first one included).
Your NE3750 requires 1 ‘AA’ lithium battery.
We recommend that you use VARTA® batteries.
Ensure the product is switched off.
Rotate the battery compartment cap approximately ¼ turn anti-clockwise then pull off.
Insert the battery so that the (+) and (-) marks on the battery face the same mark in the battery compartment.
Place the cap back on the unit opposite to how it came off and rotate clockwise until the cap snaps into place.
Your trimmer will not work if the batteries are inserted incorrectly.
Remove batteries if the appliance is not in use for long periods.
Note: the vertical trimmer head housing has a Nano Silver Antimicrobial coating for hygienic trimming.
,
•
•
•
EXCHANGING THE ATTACHMENTS
Ensure the product is switched off.
Remove the head by turning it anti-clockwise to the unlocked position and pull off.
Attach the other head by placing it on the top of the unit and turning it clockwise to lock into position.
,
•
•
•
TURNING ON THE TRIMMER
The On/Off switch is integrated into the battery cap.
Rotate the battery cap clockwise to turn on.
To turn off, simply rotate the battery cap anti-clockwise to the off position.
3
F INSTRUCTIONS FOR USE
, Note: your trimmer has been designed to be used in the shower if desired. •
Do not submerge trimmer when is use. It can be rinsed, or used in shower, but not underwater.
,
•
•
•
•
TO REMOVE HAIR FROM NOSE
The vertical trimmer or rotary trimmer (NE3450) can be used for trimming the nose.
Insert groomer’s cutting unit gently into the nostril.
Gently move the groomer in and out of the nostril and at the same time rotate the groomer.
Avoid inserting the cutting unit more than 6mm into your nostril.
, TO REMOVE HAIR FROM EYEBROWS
•
Attach the vertical linear trimmer.
•
For trimming, attach one of the attachment combs onto the vertical linear trimmer.
•
Gently guide the cutting unit to stray, unwanted hairs along the eyebrow line or protruding from the eyebrow itself.
•
To remove the hairs completely, remove the attachment comb and lower the trimmer onto the skin and move over desired area.
•
Use slow and well-controlled movements.
, TO REMOVE HAIR FROM EAR
•
The vertical trimmer or rotary trimmer (NE3450) can be used for trimming ears.
•
Insert the cutting unit gently into the outer ear canal opening.
•
Gently rotate appliance in a circular motion.
•
Avoid inserting the cutting unit more than 6mm into your ear canal.
, NOTE: Do not apply excessive pressure as this damages the trimmer head and may cause skin injury.
, TO SHAPE SIDEBURNS AND BEARD LINES (NE3750)
•
Hold trimmer with detail trimmer blade (NE3750) facing you.
•
Start with edge of beard/moustache line and gently lower the trimmer blade onto your skin. Use motions towards edge of beard/moustache line to trim to desired locations in facial area and away from beard in neck area.
, TO TRIM SIDEBURNS AND OTHER FACIAL HAIR AREAS (NE3750)
•
The detail trimmer (NE3750) comes with an adjustable comb to trim sideburns and other facial hair areas to any length between 1 and 5mm.
4
•
•
•
•
To attach the comb onto the detail trimmer (NE3750), ensure the trimmer blade is facing away from you and then slide the guide comb over the back of the trimmer blade until fitted securely.
Hold trimmer with cutting blade facing you.
Use a small comb to lift the hairs. Hold the comb at the desired beard or moustache length.
Move the trimmer along the comb to cut the hairs. Use light pressure and well-controlled movements to trim hair.
, CARE FOR YOUR GROOMER
•
Care for your product to ensure a long lasting performance. We recommend that you clean your groomer after each use.
,
•
WASHOUT PORT INSTRUCTIONS.
For best results, keep trimmer running while running it under the tap, allow water to run through the washout port and over the blades. Recommended to rinse after each use.
,Troubleshooting
•
The trimmer is not running but has battery power left:
•
If the trimmer is not running it may need cleaning; rinse the trimmer in warm water with the unit turned on. If the trimmer still won’t run, look for and remove any dried debris from the cutting blades.
, AFTER EACH USE
•
Rinse the accumulated hair from the cutters as noted above and shake off excess water.
C CLEANING CAUTIONS
•
•
•
Do not use harsh or corrosive cleaners on the units or their blades.
Do not apply pressure or hard objects to cutters.
Do not submerge in water as damage will occur.
BATTERY REMOVAL
•
•
•
•
Rotate the battery compartment cap approximately ¼ turn anti-clockwise then pull off.
Place the cap back on the unit opposite to how it came off and rotate clockwise until the cap snaps into place.
The battery must be removed from the appliance before it is scrapped.
The battery is to be disposed of safely.
5
H ENVIRONMENTAL PROTECTION
To avoid environmental and health problems due to hazardous
substances in electrical and electronic goods, appliances marked with this
symbol must not be disposed of with unsorted municipal waste, but
recovered, reused or recycled.
E SERVICE AND GUARANTEE
Defects affecting product functionality appearing within the guarantee period will
be corrected by replacement or repair at our option provided the product is used
and maintained in accordance with the instructions.
Your statutory rights are not affected.
Consumables are excluded.
Defects from repair by an unauthorized dealer are not covered.
If you call the Service Centre, please have the Model No. to hand, as we won’t be
able to help you without it. The Model No. can be found on the rating plate of the
appliance.
Replacement parts and accessories are available to buy at
www.remington.co.uk/parts-accessories
E SERVICE CENTRE
United Kingdom
G Tel 0800 212 438 (free call mainland UK)
G +44 161 947 3111 (call outside the UK)
Spectrum Brands (UK) Ltd
Fir Street, Failsworth, Manchester
M35 0HS, UK
www.remington.co.uk
Ireland
G Tel 142 951 40
Remington Consumer Products,
Unit B12, Ballymount Corporate Park,
Ballymount, Dublin 12.
www.remington.co.uk
6
I REGISTER ONLINE FOR
£10,000 prize draw, EXTRA year guarantee, FREE rewards gallery.
Visit www.productregister.co.uk/remington. You must register within 28 days
of purchase.
Model No. NE3450 / NE3750
6,/&/&57FSTJPO
3FNJOHUPO¥JTB3FHJTUFSFE5SBEF.BSLPG4QFDUSVN#SBOET*ODPSPOFPGJUTTVCTJEJBSJFT
Spectrum Brands (UK) Ltd
Fir Street,
Failsworth,
.BODIFTUFS
.)4
www.remington.co.uk
© 2014 SBI
P44-3750-401000
7


