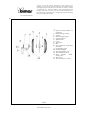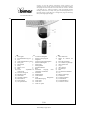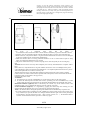
1
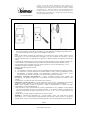
Copies of the I/B. Please reproduce them without any
changes except under special instruction from Bimar (Italy).
The pages must be reproduced and folded in order to obtain
a booklet A5 (+/- 148.5 mm width x 210 mm height). When
folding, make sure you keep the good numbering when you
turn the pages of the I/B. Don’t change the page numbering.
Keep the language integrity.
Fax +32 030 9904733
LIBRETTO ISTRUZIONI
NOTICE D'INSTRUCTIONS
INSTRUCTION BOOKLET
BEDIENUNGSANLEITUNG
VENTILATORE A PARETE
WALL FAN
VENTILATEUR MURAL
WANDLÜFTER
mod. VM40.EU (mod.WF-40R)
1/20
Assembly page 1/16
Copies of the I/B. Please reproduce them without any
changes except under special instruction from Bimar (Italy).
The pages must be reproduced and folded in order to obtain
a booklet A5 (+/- 148.5 mm width x 210 mm height). When
folding, make sure you keep the good numbering when you
turn the pages of the I/B. Don’t change the page numbering.
Keep the language integrity.
Fax +32 030 9904733
I
1)
2)
3)
4)
5)
6)
7)
8)
9)
10)
11)
12)
13)
14)
15)
16)
17)
2/20
Assembly page 2/16
Griglia anteriore/schermo di
protezione
Ghiera fissaggio ventola
Ventola
Ghiera fissaggio griglia
Griglia posteriore
Albero motore
Corpo
Vite metrica
Base
Vite regolazione inclinazione
alto/basso
Viti fissaggio griglie
Piastrina fissaggio
Tasto spegnimento “off”
Tasto oscillazione dx/sx
Tasto
funzioni:
normal,
natural, sleep
Tasto Timer
Tasto accensione e velocità
Copies of the I/B. Please reproduce them without any
changes except under special instruction from Bimar (Italy).
The pages must be reproduced and folded in order to obtain
a booklet A5 (+/- 148.5 mm width x 210 mm height). When
folding, make sure you keep the good numbering when you
turn the pages of the I/B. Don’t change the page numbering.
Keep the language integrity.
Fax +32 030 9904733
GB
1) Front grille
2) Fan attachment ring nut
3) Fan
4) Grille attachment ring nut
5) Rear grille
6) Motor shaft
7) Body
8) Metric screw
9) Base
10) Screw
Adjustable
up/down tilt
11) Screw fix the grids
12) Mounting plate
13) Off button
14) Oscillation button
15) Mode button
16) Timer button
17) On-speed button
D
1.
2.
3.
4.
5.
6.
7.
8.
9.
10.
11.
12.
13.
14.
15.
16.
17.
Vorderes Schutzgitter
Hinterer Transportgriff
Flügelrad
Arretierring des Schutzgitters
Hinteres Schutzgitter
Motorwelle
Motorgehäuse
Feinstellschraube
Base
Schrauben
Neigung
nach
oben/unten, einstellbar
Schrauben
Montageplatte
Taste On/Off
Taste
Waagrechte
Schwenkbewegung
Taste mode
Taste timer
Taste on- speed
3/20
Assembly page 3/16
FR
Grille antérieure.
Bague de fixation du
rotor
3) Rotor du ventilateur
4) Vis à anneau en plastique
5) Grille postérieure
6) Corps
7) Arbre moteur
8) Vis métrique
9) Base
10) Vis Inclinaison haut/bas
11) Vis
12) Plaque de montage
13) Touche Off
14) Touche oscillation
15) Touche Mode
16) Touche Minuterie
17) Touche on-vitesse
1)
2)
Copies of the I/B. Please reproduce them without any
changes except under special instruction from Bimar (Italy).
The pages must be reproduced and folded in order to obtain
a booklet A5 (+/- 148.5 mm width x 210 mm height). When
folding, make sure you keep the good numbering when you
turn the pages of the I/B. Don’t change the page numbering.
Keep the language integrity.
Fax +32 030 9904733
Questo simbolo vi invita a leggere attentamente queste istruzioni prima dell’uso
dell’apparecchio, ed eventualmente informare terzi, se necessario.
CONSERVARE IL LIBRETTO PER ULTERIORI CONSULTAZIONI.
Questo simbolo vi invita a prestare attenzione, ed a leggere gli specifici avvertimenti sul
libretto istruzioni.
AVVERTENZE GENERALI
• Questo apparecchio è destinato solo all’impiego domestico, per la ventilazione di ambienti interni: non
utilizzatelo per altro scopo. Ogni altro uso è da considerarsi improprio e pericoloso. Il costruttore non
potrà essere ritenuto responsabile di eventuali danni derivanti da uso improprio, erroneo e irresponsabile
e/o da riparazioni effettuate da personale non qualificato.
• Alcuni modelli possono essere corredati con porta aromi per la profumazione d’ambienti, ideali per uffici,
soggiorni, ecc…Per diffondere gli aromi, inumidire con alcune gocce di oli/essenze (non inclusi) il filtro,
senza eccedere nella quantità in modo da non danneggiare le vernici del ventilatore, per effetto
dell’olio/liquido ossidante. Agganciare il porta aromi alla griglia anteriore o posteriore (comunque
all’esterno) tramite i gancetti ricavati posteriormente.
• Non infilare alcun utensile o le dita fra le maglie della griglia di protezione della ventola.
• Non utilizzare l’apparecchio con temperatura ambiente superiore a 40°C.
• L’apparecchio non è destinato a essere usato da persone (bambini compresi) le cui capacità fisiche,
sensoriali o mentali siano ridotte, oppure con mancanza di esperienza o di conoscenza, a meno che esse
abbiano potuto beneficiare, attraverso l’intermediazione di una persona responsabile della loro sicurezza,
di una sorveglianza o di istruzioni riguardanti l’uso dell’apparecchio. I bambini devono essere sorvegliati
per sincerarsi che non giochino con l’apparecchio.
• L’apparecchio deve essere mantenuto fuori dalla portata di bambini.
• Attenzione: quando si utilizzano apparecchi elettrici, occorre sempre rispettare le precauzioni di sicurezza
di base per evitare i rischi di incendio, di scosse elettriche e di lesioni fisiche.
• Non usare l’apparecchio se non funziona correttamente o se sembra danneggiato; in caso di dubbio
rivolgersi a personale professionalmente qualificato.
• Assicurarsi che la ventola funzioni correttamente: nel caso contrario spegnere l’apparecchio e farlo
controllare da personale professionalmente qualificato.
• Non spostare l’apparecchio durante il funzionamento.
• Se l’apparecchio non è in funzione togliere la spina dalla presa di corrente.
• Scollegare sempre l’apparecchio dalla presa di corrente prima di assemblare, smontare e prima di pulire
l’apparecchio.
• Non lasciare l’apparecchio esposto agli agenti atmosferici (sole, pioggia, ecc.).
• Non toccare l’apparecchio con mani o piedi bagnati.
• Non tirare il cavo per spostare l’apparecchio.
• Non spostare l’apparecchio quando è in funzione.
• Non tirare il cavo d’alimentazione o l’apparecchio stesso per disinserire la spina dalla presa di corrente.
• Se il cavo di alimentazione è danneggiato, esso deve sostituito dal costruttore o dal suo servizio assistenza
tecnica o comunque da una persona con qualifica similare, in modo da prevenire ogni rischio.
INSTALLAZIONE
• Dopo aver tolto l’imballaggio, assicurarsi dell’integrità dell’apparecchio; in caso di dubbio non utilizzarlo
e rivolgersi a personale professionalmente qualificato. Gli elementi d’imballaggio (sacchetti di plastica,
polistirolo espanso, chiodi, ecc.) non devono essere lasciati alla portata di mano di bambini in quanto
potenziali fonti di pericolo, ma vanno smaltiti secondo le norme vigenti
negli appositi contenitori per la raccolta differenziata. Attenzione: eventuali adesivi o fogli pubblicitari
applicati sull agriglia, devono essere rimossi prima dell’uso dell’apparecchio.
• Prima di collegare l’apparecchio controllare che i valori di tensione riportati sulla targa dati corrispondano
a quelli della rete elettrica, e che la presa sia dotata di efficace messa a terra. In caso di incompatibilità tra
4/20
Assembly page 4/16
Copies of the I/B. Please reproduce them without any
changes except under special instruction from Bimar (Italy).
The pages must be reproduced and folded in order to obtain
a booklet A5 (+/- 148.5 mm width x 210 mm height). When
folding, make sure you keep the good numbering when you
turn the pages of the I/B. Don’t change the page numbering.
Keep the language integrity.
Fax +32 030 9904733
•
•
•
•
•
•
•
la presa e la spina dell’apparecchio, far sostituire la presa con altra di tipo adatto da personale
professionalmente qualificato, il quale accerti che la sezione dei cavi della presa sia idonea alla potenza
assorbita dall’apparecchio. In generale è sconsigliato l’uso di adattatori e/o prolunghe; se il loro uso si
rendesse indispensabile, devono essere conformi alle vigenti norme di sicurezza e la loro portata di
corrente (ampères) non deve essere inferiore a quella massima dell’apparecchio.
Prima di ogni utilizzo verificare che l’apparecchio sia in buono stato, che il cordone elettrico non sia
danneggiato: in caso di dubbio rivolgersi a personale professionalmente qualificato.
La presa di corrente deve essere facilmente accessibile in modo da poter disinserire con facilità la spina in
caso di emergenza.
Posizionare l’apparecchio lontano da:
- fonti di calore (ad es. fiamme libere, fornello gas, ecc. )
- contenitori di liquidi (ad esempio, vasche da bagno, doccia, lavelli ecc.) per evitare schizzi d’acqua o
che vi possa cadere (distanza minima 2 metri)
- tessuti (tende, ecc.) o materiali volatili che possano ostruire la griglia di aspirazione; verificare che
anche la parte anteriore sia sgombra da materiali volatili ( polvere, ecc.).
Posizionare il ventilatore lontano da finestre.
Questo apparecchio non è destinato a essere fatto funzionare per mezzo di un temporizzatore esterno o con
un sistema di comando a distanza separato, per evitare il rischio di incendio nel caso l’apparecchio sia
coperto o sia posizionato in modo non corretto.
Non allacciare l’apparecchio a sistemi di controllo termico o programmatore o timer o ad altro dispositivo
che possa accendere l’apparecchio automaticamente, evitando così rischi di danni a persone, animali o
cose.
In caso di guasto o cattivo funzionamento spegnere l’apparecchio e farlo controllare da personale
professionalmente qualificato; le riparazioni effettuate da personale non qualificato possono essere
pericolose e fanno decadere la garanzia.
ASSEMBLAGGIO
Attenzione: il ventilatore può essere utilizzato solo se completamente e correttamente assemblato, cioè
completo di griglie di protezione (anteriore e posteriore). Nel caso di dubbio far controllare o eseguire
l’operazione da personale professionalmente qualificato. Scollegare sempre l’apparecchio dalla presa di
corrente prima di assemblare l’apparecchio. Per l’assemblaggio si prenda come riferimento la fig.1.
Ventilatore
• Fissare la griglia posteriore (5) al corpo motore, posizionarla in modo che perni e fori siano
corrispondenti, e bloccarla con l’apposita ghiera (4).
• Inserire la ventola (3) sull’albero motore (6) e bloccare con l’apposita ghiera (2) avvitandola in senso
antiorario e in modo serrato.
• Accoppiare la griglia anteriore (1) a quella posteriore (5), assicurando il fissaggio con n.2 viti c/dado
(11). Al termine dell’operato, verificare che le griglie di protezione siano saldamente accoppiate e
fissate al motore.
Installazione murale
• Il ventilatore deve essere impiegato solo se fissato a parete, la cui superficie deve essere piana, priva di
asperità, ben stabile (in quanto l’apparecchio potrebbe ribaltarsi).
• Posizionare il ventilatore lontano da fonti di calore, da materiali infiammabili (tende, tappezzerie, ecc.),
da gas infiammabili o materiale esplosivo (bombolette spray).
Nell’istallazione murale, la parete cui è fissato l’apparecchio deve essere in muratura e/o in materiale
resistente (non in legno o materiale sintetico); inoltre seguire questi indicazioni per l’installazione:
- l’apparecchio deve essere installato ad almeno 2m dal suolo (Fig.3)
- Appoggiare la piastrina metallica alla parete, praticare alla parete n.3 fori, distanti come in figura n.1
(prima eseguire i fori è bene misurare l’interasse delle asole citate), inserirvi i tasselli ad espansione nei
fori, posizionare la piastrina metallica e avvitare le viti come in figura n.2, agganciare il corpo motore
alla piastrina e fissarla con la vite in dotazione (8).)
5/20
Assembly page 5/16
Copies of the I/B. Please reproduce them without any
changes except under special instruction from Bimar (Italy).
The pages must be reproduced and folded in order to obtain
a booklet A5 (+/- 148.5 mm width x 210 mm height). When
folding, make sure you keep the good numbering when you
turn the pages of the I/B. Don’t change the page numbering.
Keep the language integrity.
Fax +32 030 9904733
Fig.1
Fig.2
Fig.3
• Se installato in una stanza da bagno, oltre che all’altezza scritta al paragrafo precedente; l’apparecchio
deve essere installato in modo che gli interruttori e gli altri dispositivi di comando non possano essere
toccati da una persona che si trovi nella vasca da bagno o nella doccia.
USO
Prima di ogni utilizzo verificare che l’apparecchio sia in buono stato, che il cordone elettrico non sia
danneggiato: se il cavo di alimentazione è danneggiato, esso deve sostituito dal costruttore o dal suo
servizio assistenza tecnica o comunque da una persona con qualifica similare, in modo da prevenire ogni
rischio.
Le funzioni del ventilatore possono essere azionate sia con la pulsantiera posta sul pannello comandi, che
col telecomando. Il telecomando deve essere puntato nella direzione del pannello comandi, e prima
ancora bisogna inserirvi le batterie (aprire lo sportello posteriore e inserire due batterie tipo “AAA”
rispettando la polarità. Richiudere lo sportello)
Inserire la spina nella presa di corrente.
Ventilazione:
1) Per accendere il ventilatore, premere il tasto “ON-SPEED” del telecomando o del pannello comandi.
2) Per selezionare la velocità desiderata in modalità normale “NOR”, premere ripetutamente il tasto
“ON-SPEED”: sul pannello comandi o del telecomando, si illuminerà la spia “NOR” e la spia
corrispondente alla velocità selezionata (Low=minima, Med=media, Hi= massima).
Oscillazione orizzontale (destra-sinistra): si ottiene premendo l’apposito tasto “OSCIL” del
telecomando o del pannello comandi (14). Per disattivare l’oscillazione, premere nuovamente il tasto
“OSCIL”.
Per eliminare il movimento premere nuovamente il tasto “OSCIL”.
Inclinazione verticale (alto-basso): si regola impugnando il corpo motore e dirigendolo nella direzione
desiderata; avvitare l’apposita vite (10) per bloccare il corpo motore nella posizione desiderata.
Timer: questa funzione consente di impostare il tempo di funzionamento, al termine del quale
l’apparecchio si arresta automaticamente.
• Per impostare il tempo di funzionamento, premere ripetutamente il tasto “TIMER” del telecomando
(16): ad ogni pressione del tasto varia il tempo impostato, e sul pannello comandi si illumina la spia
luminosa corrispondente al tempo selezionato (0,5 ora- 1 ora - 2 ore - 4 ore ): il tempo massimo è di
7ore e 30’.
• Per disattivare il timer, spegnere l’apparecchio con il tasto “0-OFF.
Modalità: il ventilatore può funzionare sia a velocità costante “NOR”, che a due diverse velocità
intermittenti: “rhy”, la ventola funziona alternativamente alla massima e media velocità, e si spegne per
qualche istante. “Sleep” la ventola funziona alternativamente a velocità e intermittenze diverse da quella
6/20
Assembly page 6/16
Copies of the I/B. Please reproduce them without any
changes except under special instruction from Bimar (Italy).
The pages must be reproduced and folded in order to obtain
a booklet A5 (+/- 148.5 mm width x 210 mm height). When
folding, make sure you keep the good numbering when you
turn the pages of the I/B. Don’t change the page numbering.
Keep the language integrity.
Fax +32 030 9904733
precedente. La selezione delle modalità, si esegue premendo l’apposito tasto ”MODE” del telecomando
(15): ad ogni pressione del tasto varia la modalità.
• Per spegnere il ventilatore, premere il tasto “OFF” presente sul telecomando o sul pannello comandi,
poi disinserire la spina dalla presa di corrente.
Per lunghi periodi di inattività, togliere la spina dalla presa di corrente.
PULIZIA E MANUTENZIONE
Attenzione: prima di eseguire le normali operazioni di pulizia, togliere la spina dalla presa di corrente.
• Assicurarsi che il ventilatore sia scollegato dalla rete di alimentazione prima di togliere lo schermo di
protezione (1).
• Per la pulizia utilizzare un panno morbido, leggermente inumidito; non utilizzare prodotti abrasivi o
corrosivi.
• Non immergere nessuna parte del ventilatore in acqua o altro liquido: nel caso dovesse succedere non
immergere la mano nel liquido ma per prima cosa togliere la spina dalla presa di corrente. Asciugare
con cura l’apparecchio e verificare che tutte le parti elettriche siano asciutte: in caso di dubbio
rivolgersi a personale professionalmente qualificato.
• E’ indispensabile mantenere i fori di aerazione del motore liberi da polvere e lanugine.
• Controllare periodicamente che il cordone elettrico non sia danneggiato, per la sua sostituzione
necessita un utensile speciale: rivolgersi ad un centro assistenza autorizzato anche per eventuali
riparazioni.
• Per periodi lunghi di inutilizzo, è necessario stivare il ventilatore al riparo da polvere e umidità;
consigliamo di utilizzare l’imballo originale.
• Se si decide di non utilizzare più l’apparecchio, si raccomanda di renderlo inoperante tagliando il cavo
di alimentazione (prima assicurarsi d’aver tolto la spina dalla presa di corrente), e di rendere innocue
quelle parti che sono pericolose qualora utilizzate per gioco dai bambini (ad esempio l’elica).
• Non disperdere nell’ambiente prodotti non biodegradabili, ma smaltirli nel rispetto delle norme vigenti.
Alla fine della sua vita utile il prodotto non deve essere smaltito insieme ai rifiuti urbani. Può essere
consegnato presso gli appositi centri di raccolta differenziata predisposti dalle amministrazioni
comunali, oppure presso i rivenditori che forniranno questo servizio all’acquisto di un nuovo
apparecchio. Smaltire separatamente un elettrodomestico consente di evitare possibili conseguenze
negative per l’ambiente e per la salute derivanti da un suo smaltimento inadeguato e permette di
recuperare i materiali di cui è composto al fine di ottenere un importante risparmio di energia e risorse.
Per rimarcare l’obbligo di smaltire separatamente gli elettrodomestici, sul prodotto è riportato il
marchio del contenitore di spazzatura mobile barrato. Si tenga presente che: le ghiere, il pannello
comandi, la ventola, il corpo sono in plastica. -le griglie, i piedi, asta regolabile e fissa sono in metallo.I conduttori elettrici sono in rame rivestito in gomma. - Il motorino elettrico è composto da ferro e
rame.
7/20
Assembly page 7/16
Copies of the I/B. Please reproduce them without any
changes except under special instruction from Bimar (Italy).
The pages must be reproduced and folded in order to obtain
a booklet A5 (+/- 148.5 mm width x 210 mm height). When
folding, make sure you keep the good numbering when you
turn the pages of the I/B. Don’t change the page numbering.
Keep the language integrity.
Fax +32 030 9904733
Please read these instructions carefully before using the appliance, and instruct other persons using it, too,
when necessary. Keep booklet handy for further use.
GENERAL NOTICES
• This device is intended for home use only, to ventilate internal rooms, and in the manner described in
this manual: do not use it for any other purpose. Any other use is to be considered inappropriate and
therefore dangerous. The manufacturer cannot be held responsible for eventual damage caused by
inappropriate, improper or irresponsible use and/or for repairs made to the product by unauthorised
personnel.
• Some models can be provided with perfume diffusers to refresh the environment, ideal for offices,
sitting rooms, etc…To diffuse the aromas, moisten the filter with a few drops of oil/essence (not
included). Do not exaggerate the quantity because the oxidising effect of the oil could damage the paint
on the fan. Attach the diffuser to the front or back grid (always outside) by means of the hooks on the
back.
• Do not touch the appliance with wet hands or feet.
• Do not insert any tool, or your fingers, into the grille protecting the blades.
• This appliance is not intended for use by persons (including children) with reduced physical, sensory or
mental capabilities, or lack of experience and knowledge, unless they have been given supervision or
instruction concerning use of the appliance by a person responsible for their safety. Children should be
supervised to ensure that they do not play with the appliance.
• The appliance must be kept out of children’s reach.
• Attention: when using electric appliances, the basic safety precautions must always be observed to
avoid risks of fire, electric shocks and physical injury.
• Do not use the appliance if it is not operating correctly or seems damaged; if in doubt, contact
professionally qualified personnel.
• Always unplug the appliance before you assemble, disassemble or make adjustments to the appliance.
• Make sure that the appliance is working correctly: if not, turn the appliance off and have it checked by
professionally qualified personnel.
• Do not move the appliance when it is operating.
• Unplug the appliance when not in use.
• Do not use the device at room temperatures above 40 °C.
• Do not move the appliance when it is in function.
• Do not leave the device exposed to the weather (sun, rain, etc.).
• Do not pull on the cord to disconnect the plug from the socket.
• If the electric cord is damaged, it has to be replaced by the supplier or an authorized service center or a
professionally qualified, to avoid any risks.
INSTALLATION
• After removing the packing materials, check the integrity of the appliance; if you are unsure, do not use
it and ask for qualified professional help. The packing materials (plastic bags, polystyrene foam, nails,
etc.) must be kept out the reach of children because they are potential sources of danger. Attention:
any stickers or advertising material applied to the grid removed before using the appliance. The
manufacturer declines all responsibility in case this is not safe working practices will be respected.
• Before connecting the appliance, check that the voltage values shown on the data plate correspond to
those of the electricity supply network, and that the electric plug is grounded. In the event of
incompatibility between the electric outlet and the plug of the heater, have the outlet replaced with
another more suitable type by professionally qualified personnel, who will make sure that the section of
the wires of the outlet is appropriate for the absorbed power of the heater. In general, the use of
adapters or extension cords is not recommended; if their use is indispensable, they must conform to
8/20
Assembly page 8/16
Copies of the I/B. Please reproduce them without any
changes except under special instruction from Bimar (Italy).
The pages must be reproduced and folded in order to obtain
a booklet A5 (+/- 148.5 mm width x 210 mm height). When
folding, make sure you keep the good numbering when you
turn the pages of the I/B. Don’t change the page numbering.
Keep the language integrity.
Fax +32 030 9904733
•
•
•
•
•
•
•
existing safety standards and their current capacity (amperes) must not be less that the maximum of the
appliance.
The power socket must be easy to reach so the plug can be removed quickly in case of emergency.
To not place the appliance near sinks or other container of liquids (minimum distance of 2 meters) to
avoid the risk of it falling in.
Do not place the appliance near an open flame, cooking or other heating appliance.
Keep the fan far away from fabrics (curtains, etc.) or unstable materials that could obstruct the air
intake grille; make sure that the front is free of unstable materials (dust, etc.).
Make sure that the electric cord is not touching rough, hot or moving surfaces and not twisted or
wrapped around the appliance.
Do not use the appliance with a timer or a programmer or with a system that can switch on the
appliance automatically, to avoid risk of fire, since a fire risk exists if the heater is covered or
positioned incorrectly.
In the event of a breakdown or poor operation, turn the fan heater off and ask for professionally
qualified help: repairs made by unqualified persons can be dangerous and render void the warranty.
ASSEMBLY
Attention: the fan can be used only when completely and correctly assembled, that is complete with
protection grids (rear and front). If in doubt, have the appliance checked or assembled by a qualified
professional person. Always unplug the appliance before you assemble the appliance.
For assembly, refer to below pictures.
Ventilator
1. Fasten the rear grid (5) to the motor casing, positioning the corresponding pins and holes, and lock
using the appropriate ring nut (4).
2. Insert the fan (3) on the motor shaft (6) and lock with the appropriate ring nut (2) turning it tightly
anti-clockwise.
3. Couple the front grid (1) with the rear grid (5) and lock with the plastic ring and ensure the fastening
with the appropriate locking screws (11), (the screw must be in the lower part). Having done this,
check that the protection grid is firmly coupled and fastened to the motor.
Wall installation
• The appliance must only be used if secured to a wall: the wall must be flat, smooth, very stable (as the
appliance could tip over) and resistant.
• Position the appliance far from other sources of heat, inflammable materials (curtains, carpets, etc.),
inflammable gases or explosive materials (spray cans).
• If the appliance is fitted to a wall, the same must be made of masonry and/ or of resistant material (not
of wood or synthetic material); follow the indications below for installation:
- The wall fan must be installed at least 2 m above the floor
- Place the metal plate to the wall, make 3 holes in the wall, as far apart as in Figure 1 (before drilling
holes is good to measure the distance between the slots above), insert the screw anchors into the holes,
place the plate metal and tighten the screws as shown in Figure 2, attach the motor housing to the plate
and secure it with the supplied screw (8).)
9/20
Assembly page 9/16
Copies of the I/B. Please reproduce them without any
changes except under special instruction from Bimar (Italy).
The pages must be reproduced and folded in order to obtain
a booklet A5 (+/- 148.5 mm width x 210 mm height). When
folding, make sure you keep the good numbering when you
turn the pages of the I/B. Don’t change the page numbering.
Keep the language integrity.
Fax +32 030 9904733
Fig.1
Fig.2
Fig.3
• If
fixed
in
a
bathroom
shall
state
that
the
heater
is
to be installed so that switches and other controls cannot be touched by a person in the bath or shower.
• Warning: don’t use wet hand touch the working machine and don’t cover the wind outlet and inlet.
• Before each use, verify that the heater is in good condition and that the electrical cord is not damaged:
in the case of doubt, ask for professionally qualified help.
• Make sure that the cable is correctly positioned and that it is not in contact with hot parts or sharp
edges, nor wrapped around the device or twisted.
• The power socket must be easy to reach so the plug can be removed quickly in case of emergency.
Use
Attention: the fan can be used only when completely and correctly assembled, that is complete with its
base.
Before each use, verify that the unit is in good condition, the electric cord is not damaged, if the power
cord is damaged, it must be replaced by the manufacturer or a competent qualified electrician or a person
with similar qualifications, in order to avoid any risk.
The fan's functions can be controlled either with the keypad located on the control panel or with the
remote control. The remote control must be pointed at the control panel; for the first use take off the tab
transparent plastic of the batteri’s side (type AAA).
Insert the plug in the socket.
Ventilation:
1) To turn the fan on, press the “ON/SPEED” key on the remote control or the control panel.
2) To select the desired speed in normal mode “NOR”, repeatedly press the “ON-SPEED” key: on the
control panel shows the selected speed (Low=minimum, Med=medium, Hi=maximum) and “NOR”.
Horizontal oscillation (right-left): this is controlled by the “OSCIL” key on the remote control or the
pushbutton panel (14). To eliminate this motion, press the “OSCIL” key again.
Vertical inclination (high-low): it is regulated by gripping the motor body and orienting it in the
direction desired; throught the screw (10) to lock the body in the desired position.
Timer: this function allows setting the operating time and the fan will automatically stop at the end.
• To set the operating time, repeatedly press the “TIMER” key on the remote control or the control panel:
every time the key is pressed, the time set is changed and the indicator light on the control panel lights
corresponding to the time selected (0.5 hour, 1 hour, 2 hours, 4 hours, ecc….): the maximum time is
7,5 hours. To eliminate this motion, press the “0-OFF” key again.
10/20
Assembly page 10/16
Copies of the I/B. Please reproduce them without any
changes except under special instruction from Bimar (Italy).
The pages must be reproduced and folded in order to obtain
a booklet A5 (+/- 148.5 mm width x 210 mm height). When
folding, make sure you keep the good numbering when you
turn the pages of the I/B. Don’t change the page numbering.
Keep the language integrity.
Fax +32 030 9904733
Mode: the fan can work at a constant speed “NOR”or with two different intermittent speeds: In “RHY”
mode, the fan alternates between the maximum and minimum speed and turns-off for several seconds. In
“Sleep” mode, the fan alternates with speeds and interruptions different from the preceding. The mode is
selected by pressing the “MODE” key on the remote control or the control panel (15).
To turn the fan off, press the “OFF” key on the remote control or control panel, then remove the plug
from the socket.
When not in use for long periods, the plug must always be removed from the socket.
CLEANING AND MAINTENANCE
Attention: before normal cleaning, remove the plug from the socket.
• Ensure that the fan is switched off from the supply mains before removing the guard (12).
• Clean the body with soft, slightly damp, cloth; do not use abrasive or corrosive products.
• Do not immerse any part of the fan in water or other liquid: if this should happen, do not put your hand
in the liquid, but first remove the plug from the socket. Carefully dry the appliance and make sure that
all the electrical parts are dry: in the case of doubt, ask for professionally qualified help.
• It is essential that the motor's air holes be kept from dust and lint.
• Periodically check the electric cord for damage; its replacement requires a special tool: contact an
authorized service center, also for any repairs.
• If the fan will not be used for long periods, it must be protected from dust and humidity; we
recommend storing it in its original packaging.
• Should you decide not to use the appliance any more, we recommend making it inoperative by cutting
the power cord (after making sure you have disconnected the plug from the socket) and make
dangerous parts harmless if children are allowed to play with them (such as the blade).
• Do not dispose of non-biodegradable products in the environment but dispose of them in accordance
with current law. At the end of its working life, the product must not be disposed of as urban waste. It
must be taken to a special local authority differentiated waste collection centre or to a dealer providing
this service. Disposing of a household appliance separately avoids possible negative consequences for
the environment and health deriving from inappropriate disposal and enables the constituent materials
to be recovered to obtain significant savings in energy and resources. Keep in mind that: -the ring nut,
control panel, the fan and the body are plastic. -the grille, the feet, adjustable and fixed pole are metal. wires of copper covered with rubber. –Electric motor is of iron and copper made.
11/20
Assembly page 11/16
Copies of the I/B. Please reproduce them without any
changes except under special instruction from Bimar (Italy).
The pages must be reproduced and folded in order to obtain
a booklet A5 (+/- 148.5 mm width x 210 mm height). When
folding, make sure you keep the good numbering when you
turn the pages of the I/B. Don’t change the page numbering.
Keep the language integrity.
Fax +32 030 9904733
Bitte lesen Sie vor der Benutzung des Gerätes sorgfältig diese Anleitungen und setzen Sie gegebenenfalls
Dritte darüber in Kenntnis. Gebrauchsanleitung zum weitren Nachschlagen aufbewahren.
ALLGEMEINE HINWEISE
• Dieses Gerät ist ausschließlich für den Gebrauch im Haushalt zum Ventilieren der Räume bestimmt
und darf nur in der in dieser Bedienungsanleitung beschriebenen Weise gebraucht werden: Verwenden
Sie es zu keinem anderen Zweck. Jede andere Anwendung wird als unsachgemäß und deshalb
gefährlich betrachtet. Wir übernehmen keine Haftung für Schäden, welche durch unsachgemäße
Behandlung entstanden sind und/oder für Reparaturen, die nicht von Fachpersonal gemacht sind.
• Einige Modelle können mit einem Dufthalter ausgestattet sein, um für frischen Raumduft zu sorgen;
ideal für Büros, Wohnzimmer usw...Zum Duften den Filter mit einigen Öl/Essenztropfen (nicht
mitgeliefert) befeuchten, ohne mit der Menge zu übertreiben, um den Lack des Ventilators durch die
Oxidationswirkung des Öls/der Flüssigkeit nicht zu beschädigen. Den Dufthalter an das vordere oder
hintere Gitter hängen (grundsätzlich an der Außenseite) und dazu die speziellen Haken benutzen.
• Benutzen Sie das Gerät nicht, wenn es nicht einwandfrei funktioniert oder beschädigt zu sein scheint.
Im Zweifelsfall wenden Sie sich an eine Fachkraft.
• Personen (einschließlich Kinder), die aufgrund ihrer physischen, sensorischen oder geistigen
Fähigkeiten oder ihrer Unerfahrenheit oder Unkenntnis nicht in der Lage sind, das Gerät sicher zu
benutzen, sollten dieses Gerät nicht ohne Aufsicht oder Anweisung durch eine verantwortliche Person
benutzen. Kinder sollten beaufsichtigt werden, um sicherzustellen, dass sie nicht mit dem Gerät
spielen.
• Bewahren Sie das Gerät außer Reichweite von Kindern auf.
• Achtung: Beim Umgang mit Elektrogeräten immer die grundsätzlichen Sicherheitsmaßnahmen
beachten. Damit vermeiden Sie Brandgefahr sowie die Gefahr von Stromschlägen und
Körperverletzungen.
• Das Gerät niemals mit nassen oder feuchten Händen oder Füßen berühren.
• Keinesfalls ein Werkzeug oder die Finger durch das Schutzgitter des Flügelrads einführen.
• Verwenden Sie das Gerät nicht bei Umgebungstemperaturen über 40°C.
• Setzen Sie das Gerät nicht der Witterung (direkte Sonneneinstrahlung, Regen usw.) aus.
• Ziehen Sie nicht am Kabel, um den Netzstecker aus der Steckdose zu ziehen.
• Stellen Sie das Gerät nicht um während des Gebrauches.
• Gestatten Sie nicht, dass Kinder oder geistig behinderte Personen das Gerät ohne Aufsicht verwenden.
• Eine beschädigte Anschlussleitung muss von dem Lieferanten, von einem Kundendienst oder von
einem Fachmann ausgewechselt werden.
INSTALLATION
• Prüfen Sie nach dem Auspacken, ob das Gerät unversehrt ist; benutzen Sie im Zweifelsfall auf keinen
Fall das Gerät und wenden Sie sich an eine Fachkraft. Lassen Sie das Verpackungsmaterial
(Kunststoffbeutel, PS- Hartschaum, Nägel usw.) nicht in Reichweite von Kindern. Es stellt eine
Gefahrenquelle für Kinder dar. Achtung: jeder Aufkleber oder jedes Publizitätsmaterial auf der
Vorderes Schutzgitter soll vor dem Gebrauch des Gerätes entfernt werden.
• Kontrollieren Sie, ob die Netzspannung mit der auf dem Gerät vermerkten Spannung übereinstimmt
bevor Sie den Stecker in die Steckdose stecken. Die Steckdose muss geerdet sein. Im Fall einer
Unvereinbarkeit zwischen dem Stecker und der Steckdose, lassen Sie die Anschlussleitung von einem
Fachmann auswechseln, der sich vergewissern wird, dass die Netzspannung mit der der
Anschlussleitung übereinstimmt. Im Allgemeinen ist es abgeraten
Verlängerungsschnur oder Adapter zu benutzen. Falls es jedoch unbedingt notwendig wäre, diese zu
benutzen, vergewissern Sie sich, dass diese den geltenden Sicherheitsvorschriften entsprechen, und
dass deren Stromstärke nicht niedriger ist, als die maximale Stromstärke des Gerätes.
12/20
Assembly page 12/16
Copies of the I/B. Please reproduce them without any
changes except under special instruction from Bimar (Italy).
The pages must be reproduced and folded in order to obtain
a booklet A5 (+/- 148.5 mm width x 210 mm height). When
folding, make sure you keep the good numbering when you
turn the pages of the I/B. Don’t change the page numbering.
Keep the language integrity.
Fax +32 030 9904733
• Stellen Sie das Gerät nicht zu nahe an Waschbecken oder Flüssigkeitsbehältern auf (Mindestabstand 2
Meter), um zu verhindern, dass es in sie hinein fallen kann.
• Die Steckdose muss leicht zugänglich sein: Damit kann der Stecker im Bedarfsfall problemlos aus der
Steckdose gezogen werden.
• Stellen Sie den Ventilator entfernt von Vorhängen u.ä. auf, um zu verhindern, dass das Schutzgitter auf
der Saugseite verdeckt wird. Vergewissern Sie sich auch, dass der vordere Teil sauber ist (Staub usw.).
• Stellen Sie sicher, dass das Netzkabel nicht über scharfe Kanten oder heiße oder bewegliche Teile
verläuft. Es darf auch nicht um das Gerät gewickelt bzw. aufgewickelt sein.
• Um Feuergefahr zu umgehen, benutzen Sie das Gerät nicht mit einer Zeitschaltuhr, einem
Programmierungssystem oder mit einem System, Zum Vermeiden von Brandgefahr, falls das Gerät
abgedeckt ist oder nicht ordnungsgemäß positioniert ist.
• Schalten Sie das Gerät bei einem Defekt oder einer Störung ab und lassen Sie dasselbe von einer
Fachkraft kontrollieren.
MONTAGE
Achtung: der Ventilator kann ausschließlich bei vollständiger und ordnungsgemäßer Montage mit
Halterung und Schutzgitter. Im Zweifelsfall lassen Sie bitte diese Arbeit von qualifizierten Fachkräften
kontrollieren oder durchführen. Für die Montage verweisen wir auf Abb. 1.
Ventilator
1. Das Rückgitter (5) am Motorgehäuse befestigen, dabei so positionieren, dass Stifte und Löcher fluchten
und durch die entsprechende Nutmutter (4) feststellen.
2. Das Gebläse (3) auf die Motorwelle (6) stecken und durch die entsprechende Nutmutter (2) feststellen,
dabei gegen den Uhrzeigersinn festschrauben.
3. Vordergitter (1) und Rückgitter (5) miteinander verbinden und mit dem Kunststoffring feststellen. Die
Befestigung mit der entsprechenden Schraube /Gegenmutter (11) sichern (die Schraube muss sich im
unteren Teil befinden). Am Ende des Vorgangs stellen Sie bitte sicher, dass die Schutzgitter fest
miteinander verbunden und am Motor befestigt sind.
Wandmontage
• Stellen Sie den Wandlüfter nicht in der Nähe von anderen Wärmequellen, entzündbaren Stoffen
(Vorhänge, Tapeten usw.), von feuergefährlichem Gas oder explosionsgefährdetem Material
(Sprühdosen usw).
• Der Wandlüfter muss für den Betrieb an der Wand befestigt werden. Die Wand muss eben, glatt, stabil
(damit sie das Gewicht des Geräts tragen kann) und wärmebeständig sein. Das Gerät muss entfernt von
Wärmequellen angeordnet werden. - Das Gerät muss entfernt von Badewannen und Duschen
angebracht werden, damit es nicht von Spritzwasser oder Dampf getroffen werden kann.
• Bei der Wandmontage muss die Wand, an der das Gerät befestigt wird, aus Mauerwerk und/oder
hitzebeständigem Material (also nicht aus Holz oder leicht überhitzbarem Kunstostoff) bestehen. Zur
Montage beachten Sie bitte folgende Hinweise.
• Das Gerät Heizgerät muss mindestens 2 m über dem Boden installiert werden (Abb. 3
• Setzen Sie die Metallplatte an der Wand, Bohrer 3 Löcher in die Wand, so weit auseinander, wie in
Abbildung 1 (vor Bohrungen ist gut, um den Abstand zwischen den Schlitzen oben messen), setzen Sie
die Dübel in die Löcher wird die Platte Metall und ziehen Sie die Schrauben wie in Abbildung 2
dargestellt, schließen Sie das Motorgehäuse an der Platte und befestigen Sie sie mit der mitgelieferten
Schraube (8).)
13/20
Assembly page 13/16
Copies of the I/B. Please reproduce them without any
changes except under special instruction from Bimar (Italy).
The pages must be reproduced and folded in order to obtain
a booklet A5 (+/- 148.5 mm width x 210 mm height). When
folding, make sure you keep the good numbering when you
turn the pages of the I/B. Don’t change the page numbering.
Keep the language integrity.
Fax +32 030 9904733
Fig.1
Fig.2
Fig.3
GEBRAUCH
Sie können die Funktionen des Ventilators sowohl mit dem Bedienfeld als auch mit der Fernbedienung
wählen. Vor Gebrauch müssen Sie die Batterien in die Fernbedienung einsetzen. Öffnen Sie hierzu die
Klappe auf der Rückseite, setzen Sie zwei Batterie vom Type (AAA).
Stecken Sie den Netzstecker in die Netzsteckdose.
Ventilation:
1) Drücken Sie die Taste “ON/SPEED” der Fernbedienung oder des Bedienfelds, um den Ventilator
einzuschalten. Der Ventilator schaltet sich mit der niedrigsten Geschwindigkeit ein.
2) Für die Wahl der gewünschten Geschwindigkeit müssen Sie wiederholt die Taste “SPEED” drücken:
Auf dem Bedienfeld leuchtet die der gewählten Geschwindigkeit entsprechende Kontrolllampes auf
(Lo=langsame, Med=mittlere oder Hi=maximale Geschwindigkeit) und „NOR“.
Waagrechte Schwenkbewegung (rechts-links): Zum Aktivieren der Schwenkbewegung müssen Sie die
Taste “OSCIL” auf der Fernbedienung oder dem Bedienfeld drücken. Zum Stoppen der Bewegung
drücken Sie erneut die Taste “OSCIL” (die zugehörige Kontrolllampe erlischt dann wieder),14.
Senkrechte Neigung (oben-unten): Neigen Sie das Motorgehäuse mit den Händen in die gewünschte
Richtung.
Timer: Mit dieser Funktion können Sie die Betriebsdauer einstellen, nach deren Ablauf das Gerät
automatisch ausgeschaltet wird.
• Zum Einstellen der Betriebsdauer drücken Sie die Taste “TIMER” der Fernbedienung oder des
• Bedienfelds: Die eingestellte Zeit ändert sich mit jedem Drücken der Taste und auf dem Bedienfeld
leuchtet die der gewählten Zeit entsprechende Kontrolllampe auf
(0,5 Stunde - 1 Stunde – 2- 4
Stunde, Stunden,….): Es kann eine Zeit von maximal 7,30 Stunden eingestellt werden.
Betriebsart: Der Ventilator kann sowohl mit konstanter Geschwindigkeit als auch mit zwei
verschiedenen, intermittierenden Geschwindigkeiten funktionieren: “RHY”: Der Ventilator läuft
abwechselnd mit der maximalen und der mittleren Geschwindigkeit und schaltet sich für kurze Zeit aus.
“Sleep”: Der Ventilator läuft abwechselnd mit von den vorherigen verschiedenen Geschwindigkeiten und
Pausenzeiten. Für die Wahl der Betriebsart drücken Sie die Taste ”MODE” der Fernbedienung oder des
Bedienfelds: Die Betriebsart wechselt bei jeder Betätigung der Taste und die entsprechende
Kontrolllampe (“RHY ” oder “Sleep”) leuchtet auf.
Zum Ausschalten des Ventilators müssen Sie die Taste “0/OFF” der Fernbedienung oder des Bedienfelds
drücken und den Netzstecker aus der Netzsteckdose ziehen.
Bei längerem Gerätestillstand den Stecker aus der Steckdose ziehen.
14/20
Assembly page 14/16
Copies of the I/B. Please reproduce them without any
changes except under special instruction from Bimar (Italy).
The pages must be reproduced and folded in order to obtain
a booklet A5 (+/- 148.5 mm width x 210 mm height). When
folding, make sure you keep the good numbering when you
turn the pages of the I/B. Don’t change the page numbering.
Keep the language integrity.
Fax +32 030 9904733
REINIGUNG UND PFLEGE
Achtung: ziehen Sie den Netzstecker aus der Netzsteckdose, bevor Sie das Gerät reinigen.
• Verwenden Sie zum Reinigen ein weiches, leicht feuchtes Tuch. Verwenden Sie keine scheuernden
oder aggressiven Reinigungsmittel.
• Kein Teil des Ventilators darf in Wasser oder andere Flüssigkeiten eingetaucht werden: Sollte dies
geschehen, keinesfalls die Hand in die Flüssigkeit tauchen, sondern als Erstes den Netzstecker aus der
Netzsteckdose ziehen. Trocknen Sie das Gerät sorgfältig und vergewissern Sie sich, dass alle
elektrischen Teile trocken sind: Wenden Sie sich im Zweifelsfall an einen Fachmann.
• Die Lüftungsöffnungen des Motors müssen unbedingt frei von Staub und sonstigen Verunreinigungen
gehalten werden.
• Vergewissern Sie sich regelmäßig, dass das Netzkabel intakt ist. Für den Austausch benötigt man ein
Spezialwerkzeug: Wenden Sie sich - auch für eventuelle Reparaturen - an ein Kundendienstzentrum.
• Wenn Sie den Ventilator längere Zeit nicht verwenden wollen, müssen Sie ihn geschützt vor Staub und
Feuchtigkeit aufbewahren. Wir empfehlen Ihnen, hierzu die Originalverpackung zu verwenden.
• Wenn Sie vorhaben, das Gerät nicht mehr zu verwenden, sollten Sie es unbrauchbar machen, indem Sie
das Netzkabel abschneiden. Vergewissern Sie sich vorher, dass Sie den Netzstecker aus der
Netzsteckdose gezogen haben! Außerdem sollten Sie dafür Sorge tragen, dass die gefährlichen Teile
(wie z.B. das Flügelrad) keine Verletzungen verursachen können, wenn Sie von Kindern zum Spielen
verwendet werden.
• Belasten Sie die Umwelt nicht mit Produkten, die biologisch nicht abbaubar sind, sondern entsorgen
Sie dieselben im Einklang mit den geltenden Vorschriften. Am Ende seiner Nutzzeit darf das Produkt
nicht zusammen mit dem Stadtmüll beseitigt werden. Es kann zu den eigens von den städtischen
Behörden eingerichteten Sammelstellen oder zu den Fachhändlern, die einen Rücknahmeservice
anbieten, gebracht werden. Die getrennte Entsorgung eines Haushaltsgerätes vermeidet mögliche
negative Auswirkungen auf die Umwelt und die menschliche Gesundheit, die durch eine nicht
vorschriftsmäßige Entsorgung bedingt sind. Zudem wird die Wiederverwertung des Materials, aus dem
sich das Gerät zusammensetzt, ermöglicht, was wiederum eine erhebliche Einsparung an Energie und
Ressourcen mit sich bringt. Das Produkt ist mit einer durchgestrichenen Mülltonne gekennzeichnet, um
an die Verpflichtung zur getrennten Entsorgung von elektrischen Haushaltsgeräten zu erinnern. Bitte
bemerken Sie: Arretierring, das Flügelrad, Motorgehäuse plastik.- Schutzgitters, Füße,
Höhenverstellbares Festes und Standrohr metall.- Elektromotor besteht auf Eisenund und Kupfer .
Nous vous prions de lire attentivement ces instructions avant d’utiliser l'appareil et de les divulguer à
toutes les personnes qui pourraient en avoir besoin. Gardez-les à portée de main.
AVERTISSEMENTS GÉNÉRAUX
• Cet appareil est destiné exclusivement à l’emploi domestique pour la ventilation des pièces et
conformément aux modalités indiquées dans le présent manuel : ne l’utilisez pour aucune autre
destination. Tout autre usage est considéré comme inopportun et donc dangereux. Aucune
responsabilité ne peut être engagée pour des détériorations dues à une utilisation inappropriée ou non
conforme au mode d’emploi et/ou pour des réparations faites par du personnel non autorisé.
• Certains modèles peuvent être associés à un diffuseur d’arômes pour parfumer l’ambiance. Parfait pour
le bureau, le salon, etc.Pour diffuser les aromes, verser quelques gouttes d’huile/d’essences
(non incluses) sur le filtre ; ne pas exagérer en quantité pour ne pas risquer d’endommager la peinture
du ventilateur à cause de l’huile/du liquide oxydant. Accrocher le diffuseur d’arômes à la grille de
devant ou de derrière (toujours à l’extérieur) grâce aux crochets situés à l’arrière.
15/20
Assembly page 15/16
Copies of the I/B. Please reproduce them without any
changes except under special instruction from Bimar (Italy).
The pages must be reproduced and folded in order to obtain
a booklet A5 (+/- 148.5 mm width x 210 mm height). When
folding, make sure you keep the good numbering when you
turn the pages of the I/B. Don’t change the page numbering.
Keep the language integrity.
Fax +32 030 9904733
•
•
•
•
•
•
•
•
•
•
•
•
Ne touchez pas l’appareil les pieds ou les mains mouillés.
N’introduisez aucun outil ni les droits entre les mailles de la grille de protection de l’hélice.
N’utilisez pas l’appareil à une température ambiante supérieure à 40°C.
Ne laissez pas l’appareil exposé aux agents atmosphériques (soleil, pluie, etc.).
Ce produit n’est pas prévu pour être utilisé par des personnes (y compris les enfants) possédant des
capacités physiques, sensorielles ou mentales réduites ou bien une expérience et connaissance
insuffisante, à moins qu’elles ne se trouvent sous la surveillance de quelqu’un ou qu’elles n’aient reçu
des instructions concernant l’utilisation de l’appareil de la part des personnes responsables de leur
sécurité. Il convient de surveiller les enfants pour s’assurer qu’ils ne jouent pas avec l’appareil.
Tenir hors de portée des enfants.
Attention: pendant l’emploi d’appareils électriques, les consignes de sécurité doivent toujours être
respectées afin d’éviter tout risque de feu, électrocution ou blessure.
N'utilisez pas l’appareil s’il ne fonctionne pas correctement ou semble endommagé ; en cas de doute,
adressez-vous à un technicien spécialisé.
Ne tirez pas sur le câble pour déplacer l’appareil.
Ne déplacez pas le l'appareil quand il est en fonctionnement.
Ne tirez pas sur le câble d’alimentation ou sur l’appareil lui-même pour débrancher la fiche de la prise
de courant.
Si le câble est endommagé, il doit être obligatoirement remplacé par un service qualifié compétent ou
par une personne qualifiée.
INSTALLATION
• Après avoir enlevé l’emballage, s’assurer de l’intégrité de l’appareil; en cas de doute, ne pas l’utiliser et
s’adresser à un personnel qualifié professionnellement. On ne doit pas laisser les
éléments d’emballage (sachets en matière plastique, polystyrène expansé, clous, etc...) à portée de main
des enfants étant donné que ce sont des sources de danger potentielles. Attention : les autocollants
publicitaires et autres films sur grid, doivent être retirés avant d’utiliser l’appareil.
• Avant d'utiliser l'appareil, vérifiez que la tension du réseau corresponde bien à celle indiquée sur la
plaque signalétique de l'appareil. Cet appareil doit être branché à une prise de courant équipée d’un
dispositif efficace de mise à la terre .En cas d'incompatibilité entre la prise et la fiche de l'appareil,
faites remplacer le cordon d'alimentation par un service qualifié compétent qui devra s'assurer que la
tension du cordon corresponde à la tension du réseau électrique. En général l'utilisaton d'adaptateurs ou
de rallonges est déconseillée; cependant, s'il s'avère indispensable d'en utiliser, ils doivent être
conformes aux normes de sécurité en vigueur et leur ampérage ne peut pas être inférieur au maximum
de l'appareil.
• Avant chaque utilisation, vérifier si l’appareil est en bon état, si le cordon électrique n’est pas
endommagé: en cas de doute, il faut s’adresser au personnel qualifié professionnellement.
• La prise secteur doit être facile d’accès afin de pouvoir débrancher facilement l’appareil en cas
d'urgence.
• Ne pas placer l’appareil à proximité de lavabos ou de récipients contenant des liquides (distance
minimum 2 mètres) afin d’éviter qu’il risque de tomber dedans.
• Placer le ventilateur éloigné de tissus (rideaux, etc.) ou de matériaux volatiles susceptibles de boucher la
grille d’aspiration ; vérifier que la partie antérieure aussi est libre de matériaux volatiles (poussière,
etc.).
• N'utilisez pas l'appareil avec une minuterie ou un programmateur ou avec un système qui peut mettre
l'appareil en marche automatiquement, pour éviter tout risque d'incendie si l’appareil est couvert ou
situé en position non appropriée.
• En cas de panne ou de mauvais fonctionnement, éteindre l’appareil et le faire contrôler par un
personnel qualifié professionnellement.
ASSEMBLAGE
Attention: le ventilateur ne peut être utilisé que s'il est entièrement et correctement assemblé, avec sa
base, son support et sa grille de protection. En cas de doute, faites contrôler ou effectuer l’opération par
du personnel qualifié. Pour l’assemblage, reportez-vous à la Fig. 1.
16/20
Assembly page 16/16
Copies of the I/B. Please reproduce them without any
changes except under special instruction from Bimar (Italy).
The pages must be reproduced and folded in order to obtain
a booklet A5 (+/- 148.5 mm width x 210 mm height). When
folding, make sure you keep the good numbering when you
turn the pages of the I/B. Don’t change the page numbering.
Keep the language integrity.
Fax +32 030 9904733
1) Fixez la grille à l’arrière (5) du carter du moteur en la positionnant de manière à ce que les chevilles et
les trous correspondent et bloquez-la avec l'écrou prévu à cet effet (4).
2) Placez le ventilateur (3) sur le vilebrequin (6) et bloquez-le avec l'écrou prévu à cet effet (2) en le
vissant fortement dans le sens contraire des aiguilles d'une montre.
3) Unissez la grille avant (1) à la grille arrière (5) en les bloquant avec une bague en plastique, et fixez le
tout à l’aide de la vis avec écrou prévue à cet effet (11), (la vis doit se trouver dans la partie inférieure).
À la fin de l'opération, assurez-vous que la grille de protection est solidement unie et fixée au moteur.
Installation murale
• Placer le Ventilateur loin des autres sources de chaleur, loin des matériaux inflammables (rideaux,
tapisseries, etc.), des gaz inflammables ou d’une matière explosive (petites bouteilles spray) et des
matériaux qui peuvent se déformer avec la chaleur.
• Il faut employer le radiateur soufflant uniquement s’il est fixé au mur, dont la superficie doit être plate
et sans aspérité et bien stable (car l’appareil pourrait se renverser).
• En cas d’installation murale, le mur auquel l’appareil est fixé doit être en maçonnerie et/ou en matériau
thermorésistant (le bois et les matériaux synthétiques sont à éviter) ; se conformer aux instructions cidessous pour l’installation :
- L'appareil de chauffage doit être installé à au moins 2 m au-dessus du sol (Fig. 3)
- Placer la plaque de métal au mur, percez 3 trous dans le mur, aussi loin que dans la figure 1 (avant
trous de forage est bon de mesurer la distance entre les fentes au-dessus), insérer les chevilles dans les
trous, placer la plaque métal et serrer les vis comme indiqué sur la figure 2, fixez le carter du moteur à
la plaque et la fixer avec la vis fournie (8).
Fig.1
Fig.3
Fig.2
UTILISATION
Les fonctions du ventilateur peuvent être actionnées soit à travers les boutons-poussoirs situés sur le
tableau de commande, soit à l’aide de la télécommande. Introduire le pile (type CR2025), puis pointer la
télécommande en direction du tableau de commande.
Introduire la fiche dans la prise de courant.
Ventilation :
1) Pour allumer le ventilateur, appuyer sur la touche “ON-SPEED” de la télécommande ou du tableau de
commande.
2) Pour sélectionner la vitesse souhaitée, appuyer à plusieurs reprises sur la touche “SPEED": on verra
s’allumer sur le tableau de commande la lampe témoin qui correspond à la vitesse sélectionnée
(Low=minimum, Med=moyenne ou Hi=maximum) and vitesse « NOR ».
Oscillation horizontale (droite-gauche): appuyer sur la touche “OSCIL” de la télécommande ou du
tableau à poussoirs. Pour supprimer le mouvement, appuyer à nouveau sur la touche “OSCIL”.
Inclinaison verticale (haut-bas) : pour la régler, empoigner le corps moteur et l'orienter dans la direction
souhaitée.
17/20
Assembly page 17/16
Copies of the I/B. Please reproduce them without any
changes except under special instruction from Bimar (Italy).
The pages must be reproduced and folded in order to obtain
a booklet A5 (+/- 148.5 mm width x 210 mm height). When
folding, make sure you keep the good numbering when you
turn the pages of the I/B. Don’t change the page numbering.
Keep the language integrity.
Fax +32 030 9904733
Minuterie: cette fonction permet de configurer le temps de fonctionnement au terme duquel l'appareil
s'arrête automatiquement.
• Pour définir le temps de fonctionnement, appuyer à plusieurs reprises sur la touche “TIMER” de la
télécommande ou du tableau de commande. À chaque pression de la touche, le temps programmé varie
et le témoin lumineux correspondant au temps sélectionné s'allume sur le tableau de commande (0,5
heure - 1 heure – 2 heures - 4 heures, ….. ) : le temps maximum est de 7,5 heures.
Pour éteindre le ventilateur, appuyer sur la touche "0-OFF" de la télécommande ou du tableau de
commande, puis débrancher la fiche de la prise de courant.
Mode: le ventilateur peut fonctionner soit à vitesse constante, soit à deux vitesses intermittentes
différentes : “Rhy”, le rotor du ventilateur fonctionne de façon alternée à la vitesse maximum et à la
vitesse intermédiaire, et s'éteint quelques instants. “Sleep” le rotor du ventilateur fonctionne de façon
alternée à des vitesses et des intermittences différentes des précédentes. Pour sélectionner le mode de
fonctionnement, il faut appuyer sur la touche “MODE” de la télécommande ou du tableau à poussoirs : à
chaque pression de la touche, le mode de fonctionnement change ; quand les modes " Natural " ou
"Sleep" respectivement sont sélectionnés, le témoin lumineux correspondant s'allume.
Pour éteindre le ventilateur, appuyer sur la touche "0-OFF" de la télécommande ou du tableau de
commande, puis débrancher la fiche de la prise de courant.
En cas d'inutilisation prolongée, débrancher la fiche de la prise de courant.
NETTOYAGE ET ENTRETIEN
Attention: avant d'exécuter les opérations de nettoyage ordinaires, débrancher la fiche de la prise de
courant.
• Pour le nettoyage, utiliser un chiffon doux, légèrement humide ; éviter les produits abrasifs ou
corrosifs.
• Ne plonger aucune partie du ventilateur dans l'eau ou dans un autre liquide ; si cela devait arriver, ne
pas plonger la main dans le liquide, mais débrancher avant toute chose la fiche de la prise de courant.
Sécher l'appareil avec soin et vérifier que toutes les parties électriques sont sèches : en cas de doute,
s'adresser à un personnel professionnel qualifié.
• Il est indispensable de maintenir les trous d'aération du moteur dégagés de toute présence de poussière
et de particules textiles.
• Vérifier périodiquement que le cordon électrique n'est pas endommager ; son remplacement requiert le
cas échéant l'emploi d'un outil spécial : s'adresser à un centre après-vente agréé même pour les
réparations éventuelles.
• En cas de longues périodes d'inutilisation, ranger le ventilateur à l'abri de la poussière et de l'humidité ;
nous recommandons d'utiliser son emballage original.
• Si l'on décide de ne plus utiliser l'appareil, il est recommandé de le rendre inopérant en coupant le câble
d'alimentation (s'assurer au préalable d'avoir débranché la fiche de la prise de courant) et de rendre
inoffensives les parties qui sont dangereuses si des enfants devaient s'en servir pour jouer (par exemple
l'hélice).
• Ne pas jeter dans l'environnement des produits non biodégradables, mais les éliminer dans le respect
des réglementations en vigueur. À la fin de sa vie utile, ne pas jeter le produit avec les ordures
ménagères. Vous pouvez le remettre à un centre de collecte en tri sélectif dépendant de
l’administration municipale, ou aux revendeurs qui assurent ce service. En séparant les composants
d’un électroménager avant de les jeter, on évitera les conséquences négatives pour l’environnement et
la santé qui pourraient dériver d’une élimination inappropriée et on pourra récupérer les matériaux
composants et obtenir un gain important d’énergie et de ressources. Pour rappeler l’obligation
d’éliminer séparément les appareils électroménagers, le produit porte le symbole d’un conteneur à
ordures barré. Ne pas oublier que: - Bague de fixation, l'hélice, Panneau de commande et corps en
plastique. -grille, pieds, tige fixe et réglable sont en métal.- Conducteurs électriques sont en cuivre
revêtu en gomme. – Moteur électrique composé de fer et cuivre.
18/20
Assembly page 18/16
Copies of the I/B. Please reproduce them without any
changes except under special instruction from Bimar (Italy).
The pages must be reproduced and folded in order to obtain
a booklet A5 (+/- 148.5 mm width x 210 mm height). When
folding, make sure you keep the good numbering when you
turn the pages of the I/B. Don’t change the page numbering.
Keep the language integrity.
Fax +32 030 9904733
Tabella 3/Table 3
Prescrizioni relative alle informazioni/Information requirements
mod. VM40.EU (type WF-40R)
Descrizione/Description
Portata massima d’aria/Maximum fan
flow rate
Potenza assorbita del ventilatore/Fan
power input
Valori di esercizio/Service value
Consumo
elettrico
in
modo
“attesa”/Standby power consumption
Livello di potenza sonora del
ventilatore/Fan sound power level
Velocità massima dell’aria/Maximum
air velocity
Norme di misura per il valore di
esercizio/Measurement standard for
service value
Simbolo/Symbol
F
Valore/Value
56.41
Unità/Unit
m³/min
P
60.10
W
SV
PSB
0.94
0.63
(m³/min)/W
W
LWA
57.10
dB(A)
c
2.09
m/sec
Regolamento (UE) n.206/2012/Commission Regulation (EU) no 206/2012
19/20
Assembly page 19/16
Copies of the I/B. Please reproduce them without any
changes except under special instruction from Bimar (Italy).
The pages must be reproduced and folded in order to obtain
a booklet A5 (+/- 148.5 mm width x 210 mm height). When
folding, make sure you keep the good numbering when you
turn the pages of the I/B. Don’t change the page numbering.
Keep the language integrity.
Fax +32 030 9904733
Via G.Amendola, 16/18
25019 Sirmione (BS) – ITALY
www.bimar-spa.it e-mail: [email protected]
Servizio clienti Bimar: 8955895542
20/20
Assembly page 20/16