1
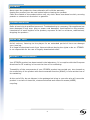
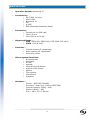
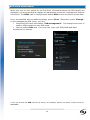
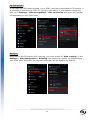
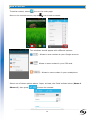
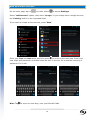
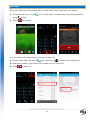
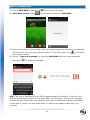
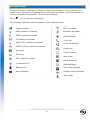
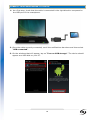
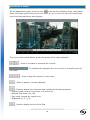
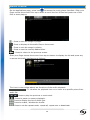
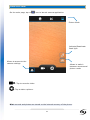
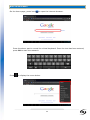
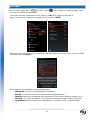
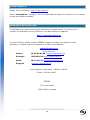
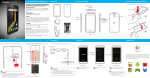
1
CONTENT
SECURITY INFORMATION ......................................................................................... 3
GENERALITIES....................................................................................................... 3
SECURITY ............................................................................................................. 3
POWER SUPPLY ..................................................................................................... 3
PRODUCT LOCATION ............................................................................................... 3
CLEANING ............................................................................................................ 4
TROUBLESHOOTING ................................................................................................ 4
IMPORTANT HINT ................................................................................................... 4
SECURITY – ENVIRONMENT ...................................................................................... 4
MAIN FEATURES..................................................................................................... 6
PREPARING YOUR SMARTPHONE ................................................................................ 7
SMARTPHONE PRESENTATION ................................................................................... 9
SIM CARD MANAGEMENT ....................................................................................... 10
APN CONFIGURATION (ACCESS POINT NAME) .......................................................... 11
3G CONNECTION ................................................................................................. 12
ROAMING ........................................................................................................... 12
ADD A CONTACT ................................................................................................... 13
ADD AN E-MAIL ACCOUNT ...................................................................................... 14
CALLING ............................................................................................................ 15
WRITE A SMS/MMS ............................................................................................ 16
NOTIFICATIONS................................................................................................... 17
CONNECT YOUR SMARTPHONE TO THE PC .................................................................. 18
VISUALIZE A VIDEO .............................................................................................. 19
LISTEN TO MUSIC ................................................................................................. 20
TAKE A PICTURE .................................................................................................. 21
SUR ON INTERNET ................................................................................................ 22
INSTALL AN APPLICATION ...................................................................................... 23
SETTINGS .......................................................................................................... 24
GUARANTEE CONDITIONS ...................................................................................... 25
STOREX WEBSITE ................................................................................................. 26
GUARANTEE REGISTRATION.................................................................................... 26
2
SECURITY INFORMATION
This appliance was designed and manufactured to ensure your safety. The security
mechanisms incorporated in the product will protect you if you observe the following
procedures for installation, use and troubleshooting: read carefully the following
instructions and observe them before handling and installing your hardware. Save these
instructions so that you can refer to later.
Some people are susceptible to seizures or have loss of consciousness at the sight of
certain kinds of flashing lights or frequent elements in our environment. Those people
are exposed to attacks when they watch certain images or playing certain video games.
These phenomena may occur even though the subject has no established medical
history or has never been confronted with an epileptic seizure. If you have already
submitted symptoms related to epilepsy (seizures or loss of consciousness) in the
presence of light stimulations, consult your doctor.
GENERALITIES
Do not shake the product under penalty of damaging it.
Use only parts and accessories (power supply...) specified by the manufacturer.
The illustrations of the product may vary from the actual product.
SECURITY
To avoid fire or electric shock, do not place the appliance near objects filled with liquid.
If a heavy object or liquid should fall on the device, have it checked by qualified personnel
before using it again.
In operation, the surface of the housing gives off heat; therefore, do not cover it or put
an object on it.
POWER SUPPLY
The supplied power adapter is specific to the product. The use of a different adapter
may damage the product or cause accidents.
PRODUCT LOCATION
Install the unit away from any equipment to strong attraction such as microwave, large
speakers...
3
CLEANING
Never open the product to clean otherwise will void the warranty.
Unplug the product from the wall outlet before cleaning the product.
Clean the outside of the product with a soft, dry cloth. Never use abrasive cloth, scouring
powder or solvent such as alcohol or gasoline.
TROUBLESHOOTING
Refer all servicing to qualified personnel. Troubleshooting is necessary if the appliance has
been damaged in any way: plug or power cord damaged, liquid spilled on the product,
introduction of small objects in the product, exposure to rain or moisture, malfunctions,
dropping the product...
IMPORTANT HINT
At full volume, listening to the player for an extended period of time can damage
your hearing.
It is illegal to download music from Internet without buying the rights to do so. STOREX
is not responsible for the use of illegally downloaded music.
SECURITY – ENVIRONMENT
Your STOREX product has been tested in the laboratory; It is complies with the European
directives for CE marking in force at the time of its marketing.
Traceability of the components of your STOREX product has carried out; she showed us
the conformity of the product with environmental directive (ROHS) in force at the time of
its marketing.
At the end of life, do not dispose in the garbage but bring to your site who will move the
product in a chain of electrical, electromechanical and electronic waste (WEEE)
recycling.
4
Children: Be very careful with the children.
A mobile phone contains many spare parts, therefore to be very alert when a child is in
contact with a cell phone. The product contains small parts that can be ingested or cause
choking if swallowed. Your device is equipped with a camera or a lighting device, do not
use it too close to the eyes of children or animals.
Audition: At full power, listening to extended periods through headphones or earphones
can damage your hearing. Be sure to reduce the volume to the minimum necessary
when you listen to music or a conversation. Avoid high sound volumes for long periods.
Driving: Caution when driving. Driving requires extreme and regular attention to
minimize the risk of accidents. Using a mobile phone can distract the user and lead to an
accident. It comes to scrupulously respect the legislation and local regulations in force
relating to the restrictions on use of cordless driving. It is therefore forbidden to phone
while driving and the use of a hands-free kit cannot be considered a solution.
Plane: Turn off your phone in the airplane. Remember to turn off your phone when you
are in an airplane (GSM + Bluetooth). This can cause interference.
5
MAIN FEATURES
•
Operative System: Android 4.2™
•
Connectivity :
- Wi-Fi 802.11 b/g/n
- Micro-USB
- Bluetooth 2.1
- 3G
- A-GPS
- EPO (Extended Prediction Orbit)
•
Connectors :
- Double slot for SIM card
- Jack 3,5 mm
- Micro-SD up to 32 Gb
•
Supported Bands :
- GSM : GSM 850, EGSM 900, DCS 1800, PCS 1900
- UMTS : 900 & 2100
•
Functions :
- Frontal camera (5 megapixels)
- Rear camera (13 megapixels)
- Proximity sensor
•
Others system functions :
- Accelerometer
- Calculator
- E-mail
- Agenda
- Internal clock & alarms
- Audio & video player
- Gallery
- File explorer
- Microphone
- Speakers
•
Hardware :
-
Screen : QHD IPS 540x960
Processor : Dual Core 1.2Ghz (MT6572M)
Internal memory (ROM) : 4Gb
Memory (RAM) : 1Gb
Size : 146 x 70 x 7.68 mm
6
PREPARING YOUR SMARTPHONE
INSERTING THE SIM CARD
The back cover of the phone is set with clips, please loosen using the notch in the hull
and following the contour of the phone. Insert the SIM card(s) according to the
diagrams below.
INSERTING THE SD CARD
Insert the micro SD card to the location indicated by the symbol
. Careful to
respect the direction of insertion of the micro SD card. Golden paws should be turned
down.
7
INSERTING THE BATTERY
Insert the battery according to the diagram below. Careful to observe the direction of
battery polarization (+ and -) compared to what is indicated on your smartphone.
CHARGING THE BATTERY
Your phone is powered by a rechargeable battery.
When the LED is flashing red, this indicates that the battery charge is very low, please
charge the battery, a low charge level may reduce the life expectancy of your phone.
Plug the charger that comes with the phone to a power outlet and the micro USB tip to
the USB port on the phone.
The phone status light changes to red, indicating that he is in charge.
Once charging is completed, the status led turns green. You can disconnect the phone
from the charger.
TURN ON/OFF THE SMARTPHONE
To turn on the phone, press the button On/Off for a long time until the phone turns on.
If your SIM card is locked, you will need to enter the correct PIN code to unlock the
SIM card when the phone is powered.
After three bad seizures of the PIN code, the smartphone locks automatically. You
need to unlock it using your PUK code (supplied with the SIM card, if this is not the
case, contact your operator).
To switch the phone off, press hold the On/Off button until the menu opens, press the
option "Power off". Then press OK to confirm.
The smartphone vibrate a bit when it’s completely turned off.
8
SMARTPHONE PRESENTATION
Earphones
connector
On/Off
Volume +/-
Micro USB
Buttons
Functions
On/Off
Long press: Turn On/Off the smartphone.
Short press: lock the screen.
Home
Back to the home screen, open the list of recent applications
(holding the button).
Menu
Display menus of options available on the active application.
Retour
Return to the previous screen. Close the keyboard on the screen.
VOLUME + / -
Return to the previous screen. Increase or decrease the volume of
the call, ringtone, music, games and other audio functions.
9
SIM CARD MANAGEMENT
When you turn on your phone for the first time, information about the SIM card(s) are
displayed, you are prompted to change the parameters to the call, message and internet
connection. The SIM1 card is configured as default SIM for the connection of the data.
If you are satisfied with the default settings, press "Close". Otherwise, press "Change",
on the management SIM menu, you can:
• Customize SIM card information “SIM management”. The background colour is
used to differentiate the two SIM cards.
• Set the default SIM card * for voice call, video call, SMS/MMS and data
connection for internet.
* You can choose the SIM card for an action, for example, before you make a call or send an
SMS/MMS.
10
APN CONFIGURATION (ACCESS POINT NAME)
If your operator is not on the list, or the list is empty, check with your operator to
manually configure the APN.
To do so, press “Home
settings” option.
” button, then “Menu
” button. Select “System
Select “More…”, “Mobile networks” then “Access Point Names”.
Press “Menu
” button then “New APN”. Input all information about the access point
name delivered by your operator. Press again the “MENU” button and select “Save”. Come
back to previous menu and select the inputted access point name (APN).
11
3G CONNECTION
If you have two SIM cards inserted, only a SIM1 card can be activated for 3G service, it
is advisable to activate the SIM1 for optimal performance. If you want to change the
SIM, go to Settings > SIM management > data connection and select the number
corresponding to your SIM1 card.
ROAMING
Note that for the SIM cards while roaming, you must enable its “data roaming” in the
Settings > SIM management > Roaming then select the number corresponding to
your SIM1 card. Otherwise the internet connection will be disabled by default.
12
ADD A CONTACT
To add a contact, select
icon on the main page.
Once on the contacts screen, tap the
icon to add a contact.
This windows should appear with different options:
: Allows to save contact to your Google account.
: Allows to save contact in your SIM card.
: Allows to save contact in your smartphone.
Select one of those options above. Input, at least, the fields indicate below (Name &
Phone n°) then press
to save the contact.
13
ADD AN E-MAIL ACCOUNT
On the main page, tap on
icon then select
to access Settings.
Select “add account” option, then select “Google”. If you already have a Google account,
tap “Existing” and fill in the requested fields.
If you want to create a new account, press “New”.
Enter your first and last name, and then press
to move to the next step. Enter your
new email and password, and then select an item in the list, for a possible recovery of
password if it is lost.
Hint: Tap
to move to next step, once you filled all fields.
14
CALLING
Once your SIM card inserted and set, you can make voice calls from your phone.
1. On main page, tap on the
press
2. Press
icon. Fill the phone number with virtual keyboard then
to call.
to end call.
You can make voice calls directly from the contact list.
1. On the main page, tap on the
icon, then tap on
to access the contacts list.
2. Select the contact, then tap on the number to do a voice call.
3. Press
to end call.
15
WRITE A SMS/MMS
To write a SMS/MMS, please select
On SMS/MMS screen, select
icon on the main page.
icon to start to write your SMS/MMS.
1. Enter the number of your contact, either by directly typing its number or by selecting
it in the list of your previously saved contacts. To do this, select the
icon shown
in the picture below.
2. Tap on “Type text message” to write the SMS/MMS with the virtual keyboard,
then press
to send the message.
Hint: The limit of characters for an SMS is approximately 160 letters. If this limit, the
SMS will automatically switch to the mode MMS. The sending or receiving of messages
outside the area covered by your operator may result in additional charges, depending
on the offer to which you have subscribed. To learn more please contact with your
operator.
16
NOTIFICATIONS
For a list of all your notifications, drag your finger up and down on the position of the
home screen. Information regarding the arrival of new messages, upcoming calendar of
events, the status of downloads... will then be displayed.
Tap on
icon to clear all notifications.
The following notifications should appear on the notification bar:
Signal strength
WiFi connected
GPRS network connected
Bluetooth activated
EDGE network connected
GPS activated
3G network connected
Voice call
HSPA (3G+) network connected
Voice call standby
HSPA+ (3G++) network connected
Missed call
No signal
Synchronization
Roaming
New e-mail
WiFi network available
Alarm activated
Connected to PC
Mute activated
Battery level
New vocal message
New SMS/MMS
Airplane mode activated
Downloads
17
CONNECT YOUR SMARTPHONE TO THE PC
1. As a first step, check that the cable is connected in the right direction compared to
the USB port of the smartphone.
2. Once the cable correctly connected, scroll the notifications bar down and then select
“USB connected”.
3. On the windows that will appear, tap on “Turn on USB storage”. The device should
appear as a USB disk on your PC.
18
VISUALIZE A VIDEO
On the applications page, press the icon
to access the interface of the video player.
Slide your finger across the screen from down to up, to scroll the list of files and press
one of the desired files to start playing.
The icons in the toolbar above are the functions of the video playback:
: Press to increase or decrease the volume.
: To visualize the playback time or to move to a specific point of
the video.
: Press to play the previous / next video.
: Press to pause / resume playback.
-
: Press to display the submenu that includes the following options:
Display mode (normal, full screen, 4:3 and 16:9).
Resume Play mode (on, off).
Play mode (repeat all, repeat one).
Brightness (1, 2, 3, 4).
: Press to display the list of the files.
19
LISTEN TO MUSIC
On the applications page, press icon
to access the music player interface. Slide your
finger across the screen from up to down to scroll the list of files and press one of the
files to start playing.
: Press to sort the songs by singer.
: Press to display all the audio files on the screen.
: Press to sort the songs by album.
: Press to see the recently added titles.
: Press to return to the previous screen.
Slide your finger across the screen from top to bottom to display the list and press any
to access the audio interface to as follows:
The icons in the toolbar above are functions of the audio playback:
: To visualize the playback time or to move to a specific point of the
audio file.
: Press to play the previous or next music.
/ : Press to pause or resume playback.
: Press to display the list of audio files.
: Press to enable / disable the shuffle.
: Press to set the repeat mode, repeat all, repeat one or deactivate.
20
TAKE A PICTURE
On the main page, tap on
icon to launch camera application.
Picture Mode
Activate/Deactivate
flash light
Allows to access to the
camera settings
Allows to switch
between camera and
picture mode
: Tap to record a video.
: Tap to take a picture.
Hint: records and photos are stored on the internal memory of the phone.
21
SUR ON INTERNET
On the home page, press icon
to open the internet browser.
Press the above part to reveal the virtual keyboard. Once the text has been entered,
press OK to start the research.
Press
to display the menu below.
22
INSTALL AN APPLICATION
On the main page, tap on
icon then select
interface below should appear:
to access Google Play™. The
Fill the name of the application you want to install than press
application.
to research your
Tap « Install » in order to install the application on your S’Phone. Tap « OK » to
finalize the installation or tap « Open » if you want to launch the application.
23
SETTINGS
On the main page, tap on
icon then select
you can set different parameters:
icon to open the settings page. Here
To set the wireless connection (Wi-Fi) tap on « Wi-Fi » option to activate it.
Select your wireless network by tapping on his name (SSID).
Select the security mode of your wireless network then fill security code. Once you filled
the code press “Connect”.
Other
-
options are available in the settings page:
Bluetooth: Allows to set Bluetooth connection.
Sound: To set the volume of notifications and applications.
Display: Allows you to adjust the brightness of the screen and the rotation of it.
Storage: To check the status of the internal memory storage, USB or SD card.
Applications: To manage your applications (uninstall, move, or delete data).
…
24
GUARANTEE CONDITIONS
STOREX’s available guarantee is valid for 1 year for your product and 3 months for its
accessories (power supply, USB cables...).
STOREX guarantees your products against any manufacturing or assembling faults. This
guarantee only applies to the first purchase of your product by the end user and is not
transferable if the device is resold. This warranty does not cover any incompatibilities
found by end user apart from recommendations specified on the packaging, or any other
incompatibility generated by other hardware or software on the computer that is
connected to the your product.
Proof of purchase must be presented to our services to apply STOREX guarantee.
The guarantee doesn’t cover failures or defects induced by non-compliance to this
manual’s instructions, neglect, alteration, improper installation or maintenance,
reparation or alteration not authorized by STOREX, improper tests, accident or external
factor such as (not exhaustive) excessive heat or dampness, power failures or bad
installation / uninstalling of your product.
The only contractual obligation endorsed by STOREX pertains to the reparation or
replacement of a defective product. In no case, STOREX cannot be held responsible for
any loss of data, or its consequences induced by operational fault or a product failure. In
any case, STOREX won't be bound to any financial responsibility for any amount
exceeding the value of the product purchased by the end user.
This guarantee is well defined and cannot be modified, decreased or increased without
written consent from STOREX. In addition, STOREX cannot be held responsible for any
technical advice or service provided in relation to your product.
For any request not covered by this guarantee, please contact STOREX support or log on
to www.e-storex.com to order accessories.
You are not the grantee of this current warranty. This warranty covers only your product
and is governed by French law.
Note:
STOREX ™ reserves the right to modify the user manual without prior notice according
to the product's evolutions. You can find the latest version of the manual on our
website: http://www.storex.eu
25
STOREX WEBSITE
Please visit our website: http://www.storex.fr.
Select "Smartphone" category. You can download the latest full version of the manual
as well as software updates.
GUARANTEE REGISTRATION
To facilitate your support during any call with our support team, we invite you to
register the warranty of your product on our Web site at the address:
http://garantie.storex.eu
In case of failure, please contact STOREX support to repair your product under
warranty, or please send your request by e-mail to the address:
[email protected]
or by phone at
France:
01 55 85 82 00 ([email protected])
Portugal:
308 800 836 ([email protected])
Spain:
902 110 572 ([email protected])
England:
([email protected])
From Monday to Thursday - 09h30 at 19h30.
Friday - 9h30 at 18h30.
STOREX
33 rue du ballon
93160 Noisy le grand
26
27