Transcript
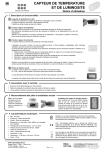
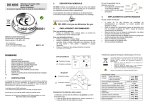
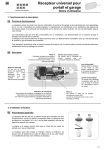
EN IT TEMPERATURE AND LIGHT SENSOR PT GR ES NL PL Internet user interface User Instructions 1. Description and functionality 1 Battery protection tab Remove the tab to power the sensor and trigger the connection to the main unit. The sensor operates with two AA LR6 alkaline batteries. It detects when the batteries are low and alerts the user. 2 Temperature sensor function The sensor measures the ambient temperature to within one tenth of a degree and sends it to the main unit. Home automation scenarios can therefore be linked to reaching or exceeding a temperature threshold. Warning: for optimum temperature measurement, the sensor must be placed far from any heat source that could affect the readings. 3 Light sensor function The sensor measures the ambient light and sends the reading to the main unit. The user is invited to select a reference threshold from five possible choices, configurable in the user interface, from full brightness to total darkness. This threshold can be adjusted at any time and home automation scenarios can therefore be linked to reaching or exceeding the chosen threshold: Full brightness: strong luminosity from direct exposure to the sun or a strong light fixture Daylight: ambient brightness in the middle of the day Low light: ambient brightness which might not be sufficient for comfortable reading Twilight: light level requiring the use of light fixtures Darkness: absence of light Warning: for optimum light measurement, the sensor must be placed far from any light source that could affect the readings, such as television sets, computer screens, night lights, etc. 4 Wall-mounting plate or standing on a surface The sensor can be secured to its wall-mounting plate or can stand on a flat surface. The face with the sensor's reading eye must be the most exposed to light. In the wall-mounted position, the sensor is clipped to its plate when the plate is properly mounted. Check that it is properly fastened by listening for a "click" when it snaps into place. The plate and sensor must be kept away from any risk of contact with water and electricity. 2. Connection to the main unit Go into learning mode on your main unit Remove the battery protection tab located behind the sensor The main unit emits an audible signal to confirm successful connection 3. Battery replacement and wall mounting Installing the sensor on the wall: use double-sided adhesive strip to secure the plate to the wall, or use screws as follows: drill a hole in the wall, install the wall plug, and insert the screw supplied, leaving a 5-mm gap between the screw head and the wall. Place the slot on the head of the screw. The sensor and plate cannot be flush-mounted. Batteries: Use a screwdriver to open the battery hatch at the back of the sensor, and insert the batteries in the correct orientation (polarity). 4. Technical characteristics Note: Replacing the batteries with the wrong type of battery will cause a risk of explosion. Dispose of used batteries in accordance with instructions. Cat. No. : TA 4007 Frequency: Radio 433.92 MHz Range: 150 m in free field 'Battery low' supervision and alert via message from main unit Operating temperature: -10°C to +50°C Maximum operating altitude: 2000 m Impact protection factor IP 33 Batteries: Two AA LR6 alkaline batteries Battery life: 2 years Dimensions: L 100 mm x W 50 mm x D 25 mm Weight: 125 g TAG Technologies S.A.S. Regent Park II – Bât 1 - Rue du Lac 31670 Labège – France © TAG Technologies. All rights reserved. TAG Technologies declares that this product complies with the essential requirements of R&TTE Directive 1999/5/EC. A full version of the declaration of compliance is available from www.myfox.fr/certificats When sorting your waste, please observe the disposal regulations in force. Please place waste in the facilities provided for that purpose and with all due respect for the environment. EMAIL: [email protected] HOTLINE: +33 (0)5 61 00 07 11 121105 – V1.1