1
NTK
Instruction Manual
www.rodemic.com
(EMC, LVD)
Introduction
Thank you for investing in the multi award-winning
NTK valve condenser microphone.
The NTK is the result of an extensive development
program to create a truly superior valve condenser
microphone.
The heart of the NTK is the Australian designed and
manufactured HF-2 capsule. The electronic circuitry
complementing this very sensitive transducer includes
a hand-selected twin-triode 6922 valve and audiophile
grade components and layout.
The result is an ultra-wide dynamic range, very low
noise, and stunning tube warmth that has made the
NTK a favourite in the hearts and studios of tens
of thousands of audio professionals around the world.
The NTK’s rich valve sound is ideal for vocals, acoustic
instruments, drum overheads, guitar amps and pianos.
Please take the time to visit www.rodemic.com and
register your microphone for a full ten year warranty.
While there you can view studio tips and techniques, as
well as browse the comprehensive range of accessories
microphones.
for
Peter Freedman
Microphones
Sydney, Australia
-2-
Specifications
Acoustic
Principle:
Pressure gradient
Active
Electronics:
Valve/tube impedance
converter with bipolar output
buffer
Directional
Pattern:
Cardioid
(see graph)
Frequency
Range:
20Hz ~ 20,000Hz
(see graph)
Output
Impedence:
200Ω
Sensitivity:
-38dB re 1V/Pa @ 1kHz
(25mV/Pa @ 94dB SPL)
±2dB @ 1kHz
Equivalent Noise:
12dBA SPL
(per IEC651)
Maximum
Output:
+29dBu
Dynamic Range:
>147dB (per IEC651)
Maximum SPL:
>158dB
(@ 1kHz, 1% THD into 1kΩ)
Signal/Noise:
>82dB SPL
(@ 1kHz, rel 1Pa per IEC651)
Power
Requirement:
Dedicated power supply
(100-120V / 200-240V AC
50/60Hz)
Net Weight:
760g
Dimensions:
208 x 55 x 55mm
(@ 1kHz, 1% THD into 1kΩ)
-3-
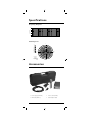
Specifications
Frequency Response
Óä
Ê
£ä
`ÊÀiÊ£Ê6É*>
Ê
Ê
ä
Ê £ä
Ê Óä
Ê Îä
ÊÓä â Ê
£ä ä Ê
£äääÊ
£äÊäääÊ ÓäÊäää
Polar Response
äÂ
³x°ä
ä°ä
Ó°ä
{°ä
È°ä
n°ä
£ä°ä
£Ó°ä
£{°ä
£È°ä
£n°ä
Óä°ä
ÓÓ°ä
Ó{°ä
Ó°ä
Ê£ä°äÊÊ
Óä°ä
äÂ
Óx°ä
ÓÇä
`ÊÀi°Ê£6É*>
––
–
ÀiµÕiVÞ\
Ê xääÊâ\
£äääÊâ\
{äääÊâ\
£näÂ
Accessories
• Power supply (NTK-PS)
• Power cable (PL100)
• NTK cable (NTK-C)
• Stand adaptor (M2)
-4-
Features
• Large capsule (1”) with gold-plated diaphragm
• Class “A” valve circuitry
• Hand selected and graded 6922 twin-triode valve
• Dedicated power supply
• Ultra low noise
• Wide dynamic range
• High strength heat treated steel mesh head
• High level of RF rejection
• Designed & manufactured in Australia
• Full 10 year guarantee*
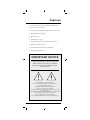
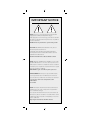
IMPORTANT NOTICE
DO NOT DISCONNECT THE MICROPHONE
CABLE WHILE THE SYSTEM IS POWERED
AS THIS MAY RESULT IN DAMAGE TO THE
MICROPHONE
NEVER REMOVE THE MAINS EARTH
DOING SO CAN HAVE LETHAL CONSEQUENCES
ACHTUNG: LEBENSGEFAHR
ENTFERNE NIEMALS DEN SCHUTZLEITER
NON SCOLLEATE IL FILO DI TERRA
POTREBBE ESSERE MOLTO PERICOLOSO PER IL RISCHIO DI
SCOSSE ELETTRICHE
RELIEZ IMPERATIVEMENT L’ALIMENTATION A LA PRICE TERRE
SOUS RRISQUE MORTEL S’ÉLECTROCUTION
NUNCA MANIPULE LA TOMA DE TIERRA
ESTA ACCION PUEDE TENER GRAVES CONSECUENCIAS
*Online product registration required.
-5-
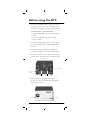
Before using the NTK
• Ensure that your NTK has been set to the correct
voltage, as used in your country. The NTK can be
used with mains suppliy voltages of between either
110-120V 50/60Hz or 220-240V 50/60Hz.
- To select for 110-120V use, set the voltage selector
to 115V.
- To select for 220-240V use, set the voltage
selector to 230V.
• On either voltage selection the mains fuse (inside
the mains socket) is always to be a T500mA slow
blow fuse.
• The back panel of the NTK power supply has a
microphone output socket, a ground (earth) lift, a
microphone input socket, a voltage selector, and a
mains power socket which also incorporates a fuse.
Microphone input
Mains socket & fuse
Microphone
output
Ground lift
Voltage selector
• The front panel of the NTK power supply has
the mains power on/off switch and a blue LED to
indicate power status.
Power LED
Power switch
-6-
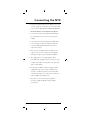
Connecting the NTK
• Having ensured that the power supply is set to the
correct voltage you can begin to connect the NTK
to the power supply. Do not connect the power to
the mains before connecting the microphone.
• Connect the male 7-pin plug of the NTK cable to
the 7-pin input socket on the rear of the power
supply.
• Connect the female 7-pin plug of the NTK cable
to the microphone. Ensure that both plugs are
correctly aligned and pushed firmly into their
respective sockets.
• Now connect an XLR microphone cable to the
output socket on the rear of the power supply,
taking that output to your mixer/pre-amplifier.
• We suggest the use of a high quality cable,
preferably with gold plated contacts. Use as short
a cable as possible, as long cables can adversely
affect sound quality.
• Ensure that the NTK is fixed securely (using the
supplied stand mount, or optional SM2 shock
mount) to a stable microphone stand. The NTK
condenser microphone is a precision instrument
and should be treated with care.
• Now you can connect the power supply to
the mains supply and begin using the NTK
microphone.
-7-
Using the NTK
• The gold dot on the face of the NTK indicates the
front of the microphone, and the pick-up area of
the cardioid pattern. Please be sure to have the
side with the dot facing the sound source you wish
to record.
• Microphone technique, or how to get the sound
you want, requires experimentation.
We suggest that you start with the channel EQ
set to ‘OFF’ or ‘FLAT’ (no boost or cut). Try to get
the sound you want by placing either reflective or
absorbent panels at various angles adjacent to the
source being recorded.
• Changing the acoustic properties of the space
around the microphone is our recommended initial
approach for obtaining best sound quality.
Remember you cannot change a room’s acoustic
properties with EQ.
When the preferred sound has been achieved
(as above) then EQ and effects such as reverb
or indeed any signal processing can be used for
enhancement, but should be used sparingly.
• It is worth mentioning that sometimes ‘cutting’ a
particular frequency (sound) may be preferable
to ‘boosting’ another. Of course ‘boosting’ can
increase noise level and so should be done
minimally.
As with many other aspects of the recording
process, finding the preferred ‘sound’ is a matter of
experimentation.
-8-
• We strongly recommend the use of a pop shield or
filter for all vocal recording. These aid in minimising
plosive sounds (hard ‘P’, ‘B’, ‘T’ and ‘K’ sounds)
that produce a sudden jet of air which can cause
the capsule to overload and produce a ‘popping’
sound.
• Any moisture on the microphone capsule can
cause problems for condenser microphones,
however the use of a pop shield or wind shield
(optional accessory WS2) will reduce the risk of this
occurring.
• Placement of the microphone and pop shield
relative to the vocalist may be varied on several
factors including room acoustics, the vocal
performance, and whether the vocalist has a high
or deep voice.
• An ideal reference is to begin with the pop shield
directly in front of the vocalist, and approximately
15cm (6”) away from the microphone. This will assist
in keeping the performer at a constant minimum
distance from the microphone and helps to
maintain reasonable recording levels.
• Experimentation should be made with the angle
from which the microphone is addressed, as
different results can be achieved when the vocalist
is ‘off-axis’ to the microphone (and the gold dot).
• If an earth loop is present (a mains frequency hum)
there is a ground lift switch on the rear panel of
the power supply, which should be raised to the
‘lift’ position. This earth loop can appear when two
devices which are both earthed are connected
together.
-9-
Storage
• After use the NTK should be removed from its
mount, wiped with a dry, soft cloth and placed in its
protective case.
• Be sure to place the moisture-absorbent crystals
(supplied) at the head of the microphone, so as to
absorb any moisture present.
Eventually this pack of crystals will need to be
dried. This is indicated by the crystals turning pink
in colour.
They can easily be re-used by placing them in an
oven at 100 - 150 degrees celsius for approximately
ten minutes. The crystals will operate effectively
again once they have turned blue.
- 10 -
IMPORTANT NOTICE
NOTE: There are no user-serviceable parts inside the NTK
supply, but there ARE potentially lethal voltages.
If the supply does not work correctly, you should consult either
the dealer you purchased the microphone from, or a qualified
electronic technician.
DO NOT under any circumstance open the unit yourself!
ACHTUNG: Das NTK Netzteil enthält keine Teile, die vom
Benutzer repariert werden können.
Gefahr: Das Gerät enth ält spannungführende Bauteile!
Für Reparaturen suchen Sie bitte Ihren Händler oder einen
qualifizierten Fachbetrieb auf.
Auf keinen Fall dürfen Sie selbst das Gehäuse offnen!
NOTA: All’interno dell’alimentatore del NTK non ci sono parti
riparabili dall’utente ma ci sono invece tensioni pericolose! Se
I’alimentatore non funziona correttamente dovete consultare il
rivenditore presso il quale avete acquistato il microfono oppure
un tecnico elettronico qualificato.
NON APRITE in ogni caso I’unità in quanto pericoloso!
AVERTISSEMENT: N’enlevez pas le capot de I’alimentation,
sous risque d’éléctrocution. Si I’alimentation ne fonctionne
pas correctement, consultez votre revendeur, ou un technicien
qualifié.Vous ne devez sous aucun prétexte ouvrir
I’alimentation
vous-même!
NOTA: No manipule internamente la fuente de alimentacion
del NTK, puesto que el alto voltaje puede ser perjudicial en
caso de sufrir una descarga.
Si se apreciara un functionamiento incorrecto de la fuente de
alimentacion, debera consultarlo en el establecimiento donde
adquirio la unidad, solo puede ser manipulado por un servicio
tecnico cualificado.
Bajo ninguna circunstancia abra VD. la unidad.
- 11 -
Warranty
All
microphones are warranted for one year
from date of purchase. You can extend that to a full
ten years if you register online at www.rodemic.com.
The warranty covers parts and labour that may be
required to repair the microphone during the warranty
period. The warranty excludes defects caused by
normal wear and tear, modification, shipping damage,
or failure to use the microphone as per the instruction
guide.
If you experience any problem, or have any questions
regarding your
microphone, first contact the
dealer who sold it to you. If the microphone requires a
factory authorised service, return will be organised by
that dealer.
We have an extensive distributor/dealer network, but
if you have difficulty getting the advice or assistance
you require, do not hesitate to contact us directly.
Microphones
International
107 Carnarvon Street
Silverwater NSW 2128 Australia
Ph:
+61 2 9648 5855
Fax:
+61 2 9648 2455
USA
P.O. Box 4189
Santa Barbara, CA 93140-4189
Ph: 805 566 7777
Fax: 805 566 0071
Technical Support
For information and technical support questions contact:
[email protected]
In the Unites States and Puerto Rico, contact
[email protected] or call 805 566 7777
In Australia, contact [email protected] or call (02) 9648 5855
Anywhere except Australia, the United States and Puerto Rico,
contact [email protected] or call +61 2 9648 5855
- 12 -