1
8289692000
(586260)
Owner's Manual
32 bit/DAC Headphone amplifier
HP-A8C
Thank you very much for purchasing a Fostex product.
This manual provides instructions for basic use of the unit.
Read this before using the unit for the first time.
<Note>
Before connecting this product to a Windows computer with a USB cable, install the USB Audio
Class 2.0 driver for HP-A8C.
You can download the driver software from our website.
http://www.fostexinternational.com/docs/products/HP-A8C.shtml
For macintosh computers, you can use the product without downloading the driver software.
© FOSTEX COMPANY All Right Reserved
WARNINGS and PRECAUTIONS
Preparation
• CAUTION: TO PREVENT ELECTRIC SHOCK,
MATCH WIDE BLADE OF PLUG TO WIDE SLOT,
FULLY INSERT.
ATTENTION: POUR PREVENIR LES CHOCS
ELECTRIQUES, APAR DE LA FENTE LARGE,
FOND.
• WARNING: To reduce the risk of fire or electric
shock, do not expose this apparatus to rain or
moisture.
AVIS: Pour réduire le risque d’incendie ou de
choc électrique, ne pas exposer cet appareil
sous la pluie et l’humidité.
• CAUTION: Use of any controls or adjustments
or performance of procedures other than
those herein specified may result in hazardous
radiation exposure.
ATTENTION: L'utilisation de tout contrôle
ou de réglages ou de procédures autres que
celles indiquées ci-après peut entraîner une
exposition à des radiations dangereuses.
• WARNING: Changes or modifications to this
unit not expressly approved by the party
responsible for compliance could void the
user’s authority to operate the equipment.
AVIS: Les changements ou modifications
à cette unité n'étant pas expressément
approuvé par la partie responsable de la
conformité pourrait annuler l'autorité de
l'utilisateur de faire fonctionner l'équipement.
• WARNING: Do not place the unit on top of
any soft, porous, or sensitive surfaces to avoid
damaging the surface. Use a protective barrier
between the unit and surface to protect the
surface.
AVIS: Ne placez pas l'appareil au-dessus
de toutes les surfaces souples, poreux, ou
sensibles pour éviter d'endommager la
surface. Utilisez une barrière de protection
entre l'unité et la surface à protéger la surface.
• WARNING: Use of this unit near fluorescent
lighting may cause interference regarding use
of the remote. If the unit is displaying erratic
behavior move away from any fluorescent
lighting, as it may be the cause.
AVIS: L'utilisation de cet appareil à proximité
d'éclairage fluorescent peut provoquer
des interférences sur l'utilisation de la
télécommande. Si l'appareil affiche un
comportement erratique s'éloigner de tout
éclairage fluorescent, telle qu'elle peut être
la cause.
• CAUTION: Danger of explosion if battery is
incorrectly replaced. Replace only with the
same or equivalent type.
2
ATTENTION: Danger d’explosion si les
piles sont remplacées de façon incorrect.
Remplacer les piles seulement par le même
type de pile ou l’équivalent.
• WARNING: Do not install this equipment in a
confined space such as a book case or similar
unit.
AVIS: Ne pas installer cet équipement dans un
espace confiné comme une bibliothèque ou
une unité similaire.
• WARNING: Mains plug is used as disconnect
device and it should remain readily operable
during intended use. In order to disconnect
the apparatus from the mains completely, the
mains plug should be disconnected from the
mains socket outlet completely.
AVIS: La prise du secteur est utilisé pour
déconnecter le système. La prise du secteur ne
doit pas être obstruée ou doit être facilement
accessible pendant son utilisation. Pour être
complètement déconnecté de l’alimentation
d’entrée, la prise doit être débranchée du
secteur.
• Do not mix old and new batteries. Do not
mix alkaline, standard (carbonzinc), or
rechargeable (ni-cad, ni-mh, etc) batteries.
Ne mélangez pas une pile neuve et une pile
usée. Ne mélangez pas des piles alcalines,
standard (carbone-zinc) ou rechargeables
(Ni‑Cd, Ni-MH, etc).
CAUTION
WARNING: TO REDUCE THE RISK
OF ELECTRIC SHOCK, DO NOT
REMOVE COVER (OR BACK).
AVERTISSEMENT: POUR RÉDUIRE
LE RISQUE DE CHOC ÉLECTRIQUE,
NE PAS ENLEVER LE COUVERCLE
(NI LE DOS).
NO USERSERVICEABLE PARTS
INSIDE. REFER SERVICING TO
QUALIFIED SERVICE PERSONNEL.
AUCUNE PIÈCE À
L'INTÉRIEUR. ENTRETIEN DE
PERSONNELQUALIFIE.
The lightning flash with arrowhead
symbol, within an equilateral triangle, is
intended to alert the user to the presence of
uninsulated “dangerous voltage” within the
product’s enclosure that may be of sufficient
magnitude to constitute a risk of electric
shock to persons.
Le symbole de l’éclair fléché dans un triangle
équilatéral, est destiné à alerter l’utilisateur
de la présence d’une “tension dangereuse”
dans le boîtier du produit qui peuvent être
des ampleur suffisante pour constituer un
risque d’électrocution aux personnes.
IMPORTANT SAFETY INSTRUCTIONS
12)Use only with the cart, stand,
tripod, bracket, or table specified
by the manufacturer, or sold with
the apparatus. When a cart is
used, use caution when moving
the cart/apparatus combination
to avoid injury from tipover.
Utilisez seulement avec la charrette, position,
trépied, support ou table spécifiée par
le fabricant, ou a vendu avec l’appareil .
Lorsqu’une charrette est utilisée, utilise la
prudence quand déplacer la combinaison de
charrette / appareil pour éviter la blessure de
pointe-sur.
13)Unplug this apparatus during lightning storms
or when unused for long periods of time.
Débranchez cet appareil pendant les orages
ou lorsqu’il n’est pas utilisé pendant de
longues périodes de temps.
14)Refer all servicing to qualified service
personnel. Servicing is required when the
apparatus has been damaged in any way, such
as power supply cord or plug is damaged,
liquid has been spilled or objects have fallen
into the apparatus, the apparatus has been
exposed to rain or moisture, does not operate
normally, or has been dropped.
Confiez toute réparation à un personnel
qualifié. Une réparation est nécessaire lorsque
l’appareil a été endommagé de quelque façon
que ce cordon d’alimentation ou la fiche est
endommagé, liquide a été renversé ou des
objets sont tombés dans l’appareil, l’appareil
a été exposé à la pluie ou à l’humidité, ne
fonctionne pas normalement, ou s’il est tombé.
15)The apparatus shall be used in an open area.
Cet apprareil doit être utilisé dans un endroit
a aire ouverte.
16)Apparatus shall not be exposed to dripping or
splashing and that no objects filled with liquids,
such as vases, shall be placed on apparatus.
L’appareil ne doit pas êclaboussures et aucun
objet ne contenant de liquide, tel qu’un vase,
ne doit être placé sur lobjet.
17)Mains plug is used as disconnect device. It
shall remain readily operable and should
not be obstructed during intended use. To
completely disconnect the apparatus from
supply mains, the main plug of the apparatus
shall be disconnected from the mains socket
outlet completely.
La prise du secteur et utilisé pou déconnecter
le système. La prise du secteur ne doit pas étre
obstruée ou doit être facilement accessible
pendant son utilisation. Pour être complèment
déconnecté de l’alimentation d’entrée, la prise
doit être débranchée du secteur.
Preparation
1) Read these instructions.
Lisez ces instructions.
2) Keep these instructions.
Conservez ces instructions.
3) Heed all warnings.
Respectez tous les avertissements.
4) Follow all instructions.
Suivez toutes les instructions.
5) Do not use this apparatus near water.
Ne pas utiliser cet appareil près de l’eau.
6) Clean only with dry cloth.
Nettoyer uniquement avec un chiffon sec.
7) Do not block any ventilation openings.
Install in accordance with the manufacturer’s
instructions.
Ne pas bloquer les ouvertures de ventilation.
Installer conformément aux instructions du
fabricant.
8) Do not install near any heat sources such
as radiators, heat registers, stoves, or other
apparatus (including amplifiers) that produce
heat.
Ne pas installer près de sources de chaleur
telles que radiateurs, registres de chaleur,
poêles ou autres appareils (y compris les
amplificateurs) produisant de la chaleur.
9) Do not defeat the safety purpose of the
polarized or grounding-type plug. A
polarized plug has two blades with one wider
than the other. A grounding type plug has
two blades and a third grounding prong. The
wide blade or the third prong are provided
for your safety. If the provided plug does not
fit into your outlet, consult an electrician for
replacement of the obsolete outlet.
Ne détruisez pas la sécurité de la terre ou
polarisées - fiche. Une fiche polarisée possède
deux lames dont une est plus large que l’autre.
Une prise de terre possède deux lames et une
broche de terre. La lame large ou la troisième
broche sont prévues pour votre sécurité. Si la
fiche fournie ne rentre pas dans votre prise,
consultez un électricien pour remplacer la
prise obsolète.
10)Protect the power cord from being walked on
or pinched particularly at plugs, convenience
receptacles, and the point where they exit
from the apparatus.
Protégez le cordon d’alimentation d’être
piétiné ou pincé, particulièrement au niveau
des fiches, des prises, et le point où ils sortent
de l’appareil.
11)Only use attachments/accessories specified by
the manufacturer.
N’utilisez que des accessoires spécifiés par le
fabricant.
3
FCC (U.S.A.) & ICES-003 (Canada) INFORMATION
Preparation
1. IMPORTANT NOTICE
This product, when installed as indicated in the
instructions contained in this manual, meets FCC and
ICES-003 requirements. Changes or modifications not
expressly approved by Fostex Company for compliance
could void the user’s authority to operate the
equipment. DO NOT MODIFY THIS PRODUCT.
2. IMPORTANT
In order to comply with FCC and ICES-003 requirements,
use high quality shielded cables for connection to
accessories and / or another products. If any cables are
supplied with this product, they MUST be used. Follow
all installation instructions. Failure to do so could void
your FCC / ICES-003 authorization to use this product in
the USA / Canada.
3. NOTE
This equipment has been tested and found to comply
with the limits for a Class B digital device, pursuant
to Part 15 of the FCC Rules. These limits are designed
to provide reasonable protection against harmful
interference in a residential installation. This equipment
generates, uses and can radiate radio frequency energy
and, if not installed and used in accordance with
instructions, may cause harmful interference to radio
communications. However, there is no guarantee that
interference will not occur in a particular installation.
If this equipment does cause harmful interference to
radio or television reception, which can be determined
by turning the equipment off and on, the user is
encouraged to correct the interference by one or more
of the following measures:
• Reorient or relocate the receiving antenna.
• Increase the separation between the equipment and
receiver.
• Connect the equipment into an outlet on a circuit
different from that to which the receiver is connected.
• Consult the dealer or an experienced radio/TV
technician for help.
4.Compliance with Part 15 of FCC Rules and Canadian
ICES-003.
This device complies with Part 15 of the FCC Rules.
Operation is subject to the following two conditions:
(1) This device may not cause harmful interference, and
(2) this device must accept any interference received,
including interference that many cause undesired
operation.
This Class B digital apparatus complies with Canadian
ICES-003.
Cet appareil numérique de la classe B est conforme à la
norme NMB-003 du Canada.
Contents
WARNINGS and PRECAUTIONS.................2
IMPORTANT SAFETY INSTRUCTIONS.......3
Introductions.............................................5
Features of the HP-A8C............................. 5
Accessories.................................................... 5
Functions....................................................6
Front panel.................................................... 6
Rear panel...................................................... 7
Remote controller....................................... 8
Connecting external audio devices..........9
Connecting output devices.....................10
Connecting the power cord..................10
Listening to an external audio device....11
Listening to the external device..........11
Listening to the files on an SD card........12
Playable files...............................................12
Hierarchy example in the SD card......12
Ejecting the SD card................................13
Using remote controller.........................13
Changing the settings.............................14
Setting item list.........................................14
Troubleshooting......................................17
Resetting the product.............................17
Updating the version..............................18
Specifications...........................................19
4
*Microsoft, Windows and Windows Vista are
either registered trademarks or trademarks
of Microsoft Corporation in the United States
and/or other countries.
*Apple, Macintosh, Mac and Mac OS are
trademarks of Apple Inc., registered in the U.S.
and other countries. Other company names
and product names in this document are the
trademarks or registered trademarks of their
respective owners.
*All other company names, product names
and logos are trademarks or registered
trademarks of their respective owners.
*"DSD" is a trademark.
*ASIO is a trademark of Steinberg Media
Technologies GmbH.
<ErP Directive>
European model only
The HP-A8C conforms to ErP directive and
pursues energy efficiency. When the operation
continues for about 30 minutes, it will
automatically turn OFF the power. This mode
can be disabled by the ''AUTO POWER OFF" on
the Setting item list.
Introductions
Preparation
HP-A8C is a DAC headphone amplifier with high efficiency, high-quality sound. You can
enjoy high-quality digital audio signals from your computer or from a digital audio player.
Features of the HP-A8C
• Headphone amplifier equipped with high-quality sound 32bit-DAC (AK4399) and all discrete circuit.
• Supports a sampling frequency of up to 32 bit/192 kHz through in house developed USB driver. In
addition, supports DSD 2.8 MHz (DoP/ASIO).
• Eliminates the jitter caused by low accuracy of the source clock of the computer etc. by using the
asynchronous mode of a high precision TCXO (temperature compensated crystal oscillator) clock.
• Equipped with high-quality sound, high-accuracy electronic volume for audio level control.
• Equipped with a large capacity toroidal power transformer.
• Computers, and digital and analog audio devices can be used as the input source.
• Plays DSF files, WAV files and AIFF files on an SD (SDHC) card directly using built-in SD (SDHC) card
drive. The drive can also be used for future updates.
• Equipped with an analog output terminal (RCA pin jack).
• Both the internal clock and the external clock are available for the master clock (only for SPDIF).
• 2x or 4x upsampling function (can also be turned off ).
• Switchable digital filter.
• 24 level gain settings for headphone output.
• Direct analog output that does not pass through the volume.
• Equipped with an infrared remote controller.
• Equipped with an organic EL display.
• Equipped with independent clocks for 44.1K factor and 48K factor.
Accessories
Supplied accessories are listed below. Confirm that accessories are present after purchase.
• Remote controller × 1
• Power cord × 1
• Owner's Manual (this book) × 1
• Safety information sheet × 1
5
Functions
Preparation
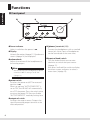
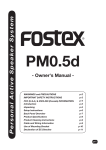
Front panel
HPA8
32BIT DAC
HEADPHONE AMPLIFIER
on
volume
off
power
output sel
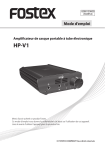
1
Power indicator
Lights in red when the power is on.
Display
Various information (page 11, 13) and menu
screen (page 14) are displayed.
volume knob
Adjusts the volume of the headphones or
the analog output.
• You can not adjust the analog output volume
when the "DIRECT" setting is set to "ON"
(page 15)
power switch
Switches the power on/off. The recessed
position is on.
When set up item ''AUTO POWER OFF'' is
set to "ON", the HP-A8C will automatically
turn OFF the power. Press the switch twice
to return the power ON. You can disable
''AUTO POWER OFF'' mode by Setting item.
output sel switch
Switches the output source. Outputs the
signal from analog output terminal at the
recessed position.
6
phones
2
input sel
[phones] terminals (1/2)
Connect the headphones with a standard
stereo jack. Up to 2 pairs of headphones
can be connected at the same time.
input sel knob/switch
Turn the knob clockwise or counterclockwise to switch the input source
(page 11).
Also, press and hold the switch to display
the menu screen, and press to select a
menu item. (page 14).
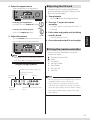
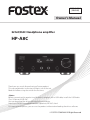
Rear panel
Preparation
USB
SD CARD
1
2
OPTICAL
COAXIAL
DIGITAL IN
ANALOG OUT
RIGHT
LEFT
OPTICAL COAXIAL
DIGITAL OUT
ANALOG IN
RIGHT
IN
LEFT
AES/EBU
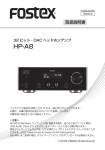
[DIGITAL IN - OPTICAL] terminals (1/2)
Connect a digital audio device as an input
source using a square optical cable. Up to
2 devices can be connected at the same
time.
[DIGITAL IN - COAXIAL] terminal
Connect a digital audio device as an input
source using a coaxial cable.
[DIGITAL OUT - OPTICAL] terminal
Outputs a digital audio signal to the
connected digital audio device via a square
optical cable.
[DIGITAL OUT - COAXIAL] terminal
Outputs a digital audio signal to the
connected digital audio device via a coaxial
cable.
[USB] terminal
Connect a computer (Win/Mac) as an input
source using a USB cable.
AC IN
[ ANALOG IN] terminals (RIGHT/LEFT)
Connect an analog audio device as an
input source using an RCA pin cable.
[AES/EBU] terminal (IN)
Connect a digital audio device as an input
source using an AES/EBU cable.
[AC IN] terminal
Connect the supplied power cable.
• S/PDIF format is used for digital audio input/
output.
• The signal is always output from the [DIGITAL OUT]
terminal regardless of the "OUTPUT SEL" setting
(page 11, 13). Digital signal does not output when
the input source is set to [ANALOG IN] ("RCA") or a
DSD signal is input.
[SD CARD] slot
Insert an SD (SDHC) card including WAV
files, AIFF files or DSF files with the label
side facing upward.
[ANALOG OUT] terminals (RIGHT/LEFT)
Connect a device such as an amplifier
using an RCA pin cable.
7
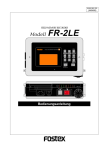
Remote controller
Preparation
• Read "Safety information for Fostex product
using electricity" (attached sheet) and handle the
battery correctly.
• Dispose of the battery in the proper manner
according to the local regulations.
REC
MENU
INPUT
SEL
• The included battery is for checking operation.
Replace it as soon as possible.
MUTE
RC-N1
key
Playback stops when the input source is set
to SD (SDHC) card ("SD").
key
Playback starts when the input source is set
to SD (SDHC) card ("SD").
REC key
Not used.
+/− keys
Adjusts the volume of the headphones or
the analog output. It has the same function
as the volume knob of the main unit.
MUTE key
Mutes the sound of the headphones or the
analog output temporarily. Press again to
return the sound.
MENU key
Menu screen is displayed. Press again to
exit the menu.
• Mute is cancelled when you change the
volume.
• You cannot mute the analog output sound
when the "DIRECT" setting is set to "ON"
(page 14).
key
Unmounts the SD card.
In the menu screen, selects the displayed
menu item.
8
INPUT SEL key
Switches the input source (page 11). It has
the same function as the input sel knob of
the main unit.
<
/ keys
Selects the previous/next folder when the
input source is set to SD (SDHC) card ("SD").
<
</> keys
Selects the previous/next file when the
input source is set to SD (SDHC) card ("SD").
In the menu screen, switches the menu
item or the setting value.
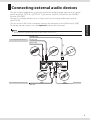
Connecting external audio devices
Connect a digital audio device as an input source to the digital audio input terminal, square
optical terminals [OPTICAL 1]/[OPTICAL 2], the coaxial terminal [COAXIAL] or the AES/EBU
terminal [AES/EBU].
Connect an analog audio device as an input source to the analog audio input terminal
[ANALOG IN].
To listen to music files from a computer, connect the computer to the USB terminal [USB].
Connection
To change the input source, turn the input sel knob on the front panel.
• Do not connect the power cord until all connections are finished.
AES/EBU cable
To a digital audio device
Coaxial cable
Optical cable
USB
SD CARD
1
2
OPTICAL
COAXIAL
DIGITAL IN
ANALOG OUT
RIGHT
LEFT
OPTICAL COAXIAL
DIGITAL OUT
IN
ANALOG IN
RIGHT
LEFT
AES/EBU
To an analog audio device, etc.
RCA cable
AC IN
USB cable
To a computer
9
Connecting output devices
Connect headphones to the headphone terminals [phones] (1/2) on the front panel, or
connect an amplifier or active speaker to the analog output terminal [ANALOG OUT] to
enjoy music.
To change the output, use the output sel switch on the left side of the front panel.
You can obtain S/PDIF format signals through the square optical terminal [OPTICAL] or
coaxial terminal [COAXIAL] when connecting a digital audio device.
Connection
• Do not connect the power cord until all connections are finished.
• The signal is always output from the [DIGITAL OUT] terminal regardless of the "OUTPUT SEL" setting
(page 11, 13). Digital signal does not output when the input source is set to [ANALOG IN] ("RCA") or a DSD
signal is input.
Front panel
Headphones
HPA8
32BIT DAC
Fostex
TH900, etc. (sold separately)
HEADPHONE AMPLIFIER
on
volume
off
power
output sel
1
phones
2
input sel
Coaxial cable
To a digital audio device
Optical cable
Rear panel
USB
SD CARD
1
2
OPTICAL
COAXIAL
DIGITAL IN
ANALOG OUT
RIGHT
Fostex
PM0.5d, etc. (sold separately)
LEFT
OPTICAL COAXIAL
DIGITAL OUT
IN
ANALOG IN
RIGHT
LEFT
AES/EBU
AC IN
To an AC outlet
To an analog amplifier, etc.
RCA cable
Connecting the power cord
Connect the power cord after all connections are finished.
10
Listening to an external audio device
You can enjoy music from the external audio device connected to the unit through
headphone output or analog output.
Connect the desired device before the operation. (page 9)
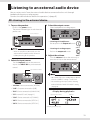
Listening to the external device
1 Turn on the product.
Push in the power switch.
3 Select the output source.
Select headphones or analog output.
The power indicator lights in red when the
power is on.
HPA8
HPA8
32BIT DAC
32BIT DAC
HEADPHONE AMPLIFIER
HEADPHONE AMPLIFIER
Power indicator
on on
volume
volume
off off
power
power
outputsel
sel
output
11
phones
phones
22
input
sel sel
input
Listening
HPA8
HPA8
32BIT DAC
32BIT DAC
C
HEADPHONE AMPLIFIER
HEADPHONE AMPLIFIER
R
on
on
volumevolume
off
off
power
output
outputselsel
1 1
phones
phones
2
input input
sel sel
2
• When an amplifier is connected, turn the
volume of the amplifier to the minimum
before powering on the product.
2 Select the input source.
Turn the input sel knob on the main unit,
or press the INPUT SEL key on the remote
control.
Input source name
• Listening via headphones:
Do not push in the output sel switch
• Listening via analog output:
Push in the output sel switch
4 Adjust the volume.
Turn the volume knob on the main unit, or
press the +/– key on the remote control.
HPA8
HPA8
32BIT
DAC
32BIT
DAC
HEADPHONE
AMPLIFIER
HEADPHONE
AMPLIFIER
on
off
on
volume
volume
off
power
power
output sel
output sel
1
1
phones
phones
2
2
input sel
input sel
HPA8
HPA8
HPA8
32BIT
DAC
32BIT
DAC
32BIT DAC
HEADPHONE
AMPLIFIER
HEADPHONE
AMPLIFIER
HEADPHONE AMPLIFIER
onon on
volume
volume
volume
offoff off
power
power
power
output
selsel
output
sel
output
1 11
phones
phones
phones
22
2
inputsel
sel
input
input
sel
• "AES/EBU": Device connected to [AES/EBU]
• You cannot adjust the analog output volume
when the "DIRECT" setting is set to "ON".
• You can change the input source selecting
method with the "INPUT SEL MODE" setting
(page16).
• "USB": Computer connected to [USB]
• "RCA": Device connected to [ANALOG IN]
• "SD": Inserted SD card (page 12)
<Display during playback>
Input source name
Volume
• "COX": Device connected to [COAXIAL]
• "OPT1": Device connected to [OPTICAL 1]
• "OPT2": Device connected to [OPTICAL 2]
Sampling frequency (Fs)
11
Listening to the files on an SD card
You can enjoy DSF files, WAV files and AIFF files.
Playable files
Listening
• Format the card in FAT32.
• The maximum number of folders you can
create on an SD card is 15.
• The maximum number of files you can copy in
each folder is 30.
• You can use up to 50 alphanumeric characters
for folder names, 70 characters for file names.
2 byte characters are displayed as "".
DSF files (extension: .dsf)
Format: 2.8 MHz
WAV files (extension: .wav), AIFF files
(extension: .aiff )
1 Insert an SD card.
Insert an SD (SDHC) card into the slot on
the rear panel with the label side facing
upward.
[SD CARD] slot
USB
USB
SD
SD CARD
CARD
1
1
2 2
OPTICAL
COAXIAL
OPTICAL
COAXIAL
DIGITAL
DIGITAL
ININ
ANALOG
OUT
ANALOG
OUT
RIGHT
LEFT
RIGHT
LEFT
OPTICAL COAXIAL
COAXIAL
OPTICAL
DIGITALOUT
OUT
DIGITAL
IN
IN
ANALOGIN
IN
ANALOG
RIGHT
LEFT
RIGHT
LEFT
AES/EBU
AES/EBU
2 Turn on the product.
Push in the power switch.
The power indicator lights in red when the
power is on.
Input source name
• Sampling frequency: 44.1 kHz, 48 kHz, 88.2
kHz, 96 kHz
• Bit rate: 16 Bit, 24 Bit, 32 Bit
• Format: Linear PCM
HPA8
HPA8
32BIT
DAC
32BIT DAC
AC
HEADPHONE AMPLIFIER
HEADPHONE AMPLIFIER
LIFIER
on
on
FOLDER1…… folder 1
ABC.wav… music file 1
123.dsf…… music file 2
DEF.aiff…… music file 3
FOLDER2…… folder 2
456.aif…… music file 4
volumevolume
off
off
Hierarchy example in the
SD card
SD (root)
power
power
output sel
output sel
1
1
phones
phones
2
2
input sel
input sel
• When an amplifier is connected, turn the
volume of the amplifier to the minimum
before turning on the product.
3 Select the input source.
Turn the input sel knob on the main unit,
or press the INPUT SEL key on the remote
control to select "SD".
HPA8
HPA8
HPA8
32BIT
DAC
32BIT
DAC
32BIT
DAC
HEADPHONE AMPLIFIER
HEADPHONE
AMPLIFIER
HEADPHONE
AMPLIFIER
on
onon
offoff
volume
volume
volume
off
power
power
power
12
AC IN
AC IN
output sel
outputsel
sel
output
1
11
phones
phones
phones
2
22
input sel
inputsel
sel
input
Ejecting the SD card
4 Select the output source.
Select headphones or analog output.
Unmount the SD card by the following
procedure before ejection. Otherwise, the
data may be damaged.
HPA8
HPA8
32BIT DAC
32BIT DAC
HEADPHONE
AMPLIFIER
HEADPHONE
AMPLIFIER
on on
volume
volume
off off
power
power
output sel
output sel
1
1
phones
phones
2
2
input sel
input sel
1 Stop playback.
Press the key on the remote controller.
• Listening via headphones:
Do not push in the output sel switch
2 P
ress the key on the remote
controller.
SD (SDHC) card is unmounted, and "EJECT" is
displayed.
• Listening via analog output:
Push in the output sel switch
3 Push in the card gently until a clicking
sound is heard.
Turn the volume knob on the main unit, or
press the +/– key on the remote control.
The card pops out a little.
Listening
5 Adjust the volume.
4 Grasp the card and pull it out straight.
HPA8
HPA8
32BIT DAC
32BIT DAC
HEADPHONE
AMPLIFIER
HEADPHONE
AMPLIFIER
on
off
off
power
volume
volume
power
output sel
output sel
1
1
phones
phones
2
2
input sel
input sel
• You cannot adjust the analog output volume
when the "DIRECT" setting is set to "ON".
Repeat mode indicator (page 16)
Input source
name
Play/Stop
indicator
You can control the product using the
remote controller.
: Playback (current file)
: Stop
: Unmount
: Previous folder
: Next folder
< : Previous file
> : Next file
<
<Display during playback>
Using the remote controller
<
on
Upsampling indicator
(page 14)
Volume
File information/Folder name/File
name
• You can select the repeat playback range with the
"SD REPEAT MODE" setting (page 16).
• If you change the settings on the menu screen
during SD card playback, the changes are stored
when you stop playback. Also, the volume setting
of the "IN/VOL MEM" setting is stored when you
stop playback.
13
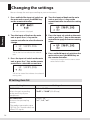
Changing the settings
You can change the settings according to your environment.
1 Press and hold the input sel switch on
the main unit or press the MENU key
on the remote controller.
4 Turn the input sel knob on the main
unit or press the </> key on the
remote controller to select the setting
value.
The menu screen is displayed.
Listening
2 Turn the input sel knob on the main
unit or press the </> key on the
remote controller to select the item to
change.
"" on the first line indicates the selected
item.
3 Press the input sel switch on the main
unit or press the key on the remote
controller to select the current item.
5 Press the input sel switch on the main
unit or press the key on the remote
controller to apply the current setting
value.
6 Press and hold input sel switch on the
main unit or press the MENU key on
the remote controller.
The display changes from the menu screen
to the normal screen.
"" on the second line indicates the selected
setting value.
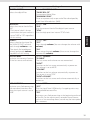
Setting item list
Setting item
14
Setting value
"AMP GAIN"
Selects the gain according
to the sensitivity of your
headphones.
Default: "0 dB"
"0 dB" to "20 dB" (0.5 dB step)
"UP SAMPLING"
Activates the upsampling
function.
*The product upsamples up to
192 kHz. This function does not
affect DSD signals.
Default: "×1"
"x 1", "x 2", "x 4"
Setting item
Setting value
Default: "SHARP ROL-OF"
"SHARP ROL-OF"
Conventional digital filter
"MINIMUM DELAY"
Close to unprocessed, no pre-echo filter developed by
Asahi Kasei Microdevices (AKM)
"MSCK SEL"
Selects the master clock of the
DAC.
* The internal clock is always
used when the input source is
set to "USB" or "SD" regardless
of this setting.
Default: "DIR"
"DIR"
Uses the external clock of the digital input source.
"XTAL"
Uses the high precision internal TCXO clock.
"DIRECT"
Selects whether the signal for
the [ANALOG OUT] terminal
goes through volume or not.
*The signals for headphones
always go through volume
regardless of this setting.
Default: "OFF"
"OFF"
Goes through volume (You can change the volume with
volume)
"ON"
Does not go through volume (You can not change the
volume with volume)
"IN/VOL MEM"
Activates the memory function
of the last source and volume.
Default: "DISABLE"
"DISABLE"
The last source and volume are not memorized.
"INPUT"
Switches to the last source automatically at power on.
The volume is set to MUTE.
"VOLUME"
Switches to the last volume automatically at power on.
The source is set to "COX".
"INPUT+VOLUME"
Switches to the last source and volume automatically at
power on.
"USB MUTE SEL"
Activates cross-fade processing
(volume down) between files
when the input source is set to
"USB".
Default: "OFF"
"OFF"
Play the signal from USB directly. A snapping noise may
be produced between files.
"ON"
Activates cross-fade processing at the beginning and end
of the file. For the continuously recorded sound source,
such as a live recording album, sound may be interrupted
for a moment.
Listening
"DIGITAL FILTER"
Selects the digital filter.
15
Setting item
Listening
16
Setting value
"INPUT SEL MODE"
Selects the function of the
input sel switch on the main
unit or the INPUT SEL key on
the remote controller.
Default: "INCREMENT"
"INCREMENT"
The input source will change at every operation of the
input sel knob on the main unit or the INPUT SEL key
on the remote controller.
"DIRECT SELECT"
To change the input source, select the desired source first
with the input sel on the main unit or the INPUT SEL
key on the remote controller, and then press the input
sel switch on the main unit or the key on the remote
controller.
You can change to the desired source quickly by skipping
unnecessary sources.
"SD REPEAT MODE"
Selects the repeat range of the
SD card playback.
Default: "FOLDER"
"FOLDER"
Repeats the current folder ("F" indicator is displayed).
"ALL"
Repeats the whole card ("A" indicator is displayed).
"SINGLE"
Repeats the current file ("1" indicator is displayed).
"LCD ON/OFF"
Selects the lighting pattern of
the LCD display.
Default: "ON"
"ON":
LCD is always on.
"OFF":
LCD turns off 8 seconds after the operation.
"AUTO POWER OFF"
Selects the ''AUTO POWER OFF''
mode ON or OFF.
Default: ''ON''
"ON":
The HP-A8C will automatically turn OFF the power, when
the operation continues for about 30 minutes.
"OFF'':
The HP-A8C does not automatically power OFF. i.e., it
keeps powering ON even after 30 minutes of operation.
"SYSTEM INFO"
Displays the current software
version.
Default: "VerX.XXX"
"VerX.XXX"
Current version.
"VERSION UP"
Executes the update. (page 18)
"RESET"
Returns to the factory settings (page 17).
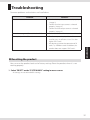
Troubleshooting
Common problems and solutions are listed below.
Problem
Solutions
• Confirm that the product is connected properly
(page 9).
• Confirm that the input source is selected
properly. (page 11)
• Confirm that the output source is selected
properly. (page 11)
Cannot be recognized from a Windows PC.
• Download the driver from our site and install.
Cannot playback the SD card.
• The files may not be played back if the
transfer rate is insufficient. Use a Class 6 or
higher SDHC card.
• We do not guarantee the operation of all
cards. Try a different card. In addition, this
product does not support SDXC cards.
Information
There is no sound.
Resetting the product
You can reset the product back to the factory settings. Reset the product when it is not
working properly.
1 Select "RESET" on the "SYSTEM INFO" setting in menu screen.
All settings are set to the default settings.
17
Updating the version
An update file may be released to solve
problems and provide a better listening
environment. Update the product by the
following procedure.
1 Save the obtained update file on an
SD (SDHC) card.
Save the file in the root directory.
• Format the card in FAT32.
• Do not save files other than the update file on
the SD card.
2 Insert the card into the slot on the
rear panel with the label side facing
upward.
Information
3 Turn on the product, and select "COX"
as the input source.
4 Press and hold the input sel switch on
the main unit or press the MENU key
on the remote controller to display
the menu screen.
It takes about 30 seconds to finish updating.
Wait until "VER UP COMPLETED/POWER OFF"
or "VERSION UP END/POWER OFF" is displayd,
and do not turn off the product during
updating.
8 Turn off the product.
The update is now completed.
5 Select "SYSTEM INFO" from the menu
item.
The current version is displayed.
6 Select "VERSION UP" from the setting
value.
7 Select "VERSION UP".
Updating starts.
18
• Refer page 14 for menu screen operations.
• All settings will return to the factory settings after
updating.
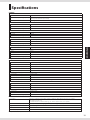
Specifications
<Input>
<Output>
PHONES (1, 2) terminal
Connector
Maximum output
Conformity load impedance
THD
Frequency response
ANALOG OUTPUT (L, R) terminal
Connector
Conformity load impedance
THD
Frequency response
DIGITAL OUTPUT-OPTICAL terminal
Connector
Format
Quantization, sampling frequency
DIGITAL OUTPUT-COAXIAL terminal
Connector
Format
Quantization, sampling frequency
<General>
Accessories
External dimensions (mm)
Weight
Power input
Power consumption
Information
USB terminal
Connector
B type (Standard)
Quantization, sampling frequency 16/24/32 bit, 44.1 kHz/48 kHz/88.2 kHz/96 kHz/176.4 kHz/
192 kHz, DSD 2.8 MHz (DoP/ASIO)
Interface
USB High Speed
DIGITAL INPUT-OPTICAL (1, 2) terminal
Connector
Square optical
Format
S/P DIF
Quantization, sampling frequency 16/24 bit, 44.1 kHz/48 kHz/88.2 kHz/96 kHz/176.4 kHz/192 kHz
DIGITAL INPUT-COAXIAL terminal
Connector
RCA pin jack
Format
S/P DIF
Quantization, sampling frequency 16/24 bit, 44.1 kHz/48 kHz/88.2 kHz/96 kHz/176.4 kHz/192 kHz
DIGITAL INPUT-AES/EBU terminal
Connector
XLR-3-31 type (No.2 hot)
Format
AES/EBU
Quantization, sampling frequency 16/24 bit, 44.1 kHz/48 kHz/88.2 kHz/96 kHz/176.4 kHz/192 kHz
ANALOG INPUT (L, R) terminal
Connector
RCA pin jack
SD card
Card
SDHC
File system
FAT32
Format
DSF/WAV/AIFF
Quantization, sampling frequency 16/24/32 bit, 44.1 kHz/48 kHz/88.2 kHz/96 kHz, DSD 2.8 MHz
Standard stereo jack
700 mW (load resistance32 Ω)
16 Ω to 600 Ω
0.002% or less (at 1 kHz, load resistance 32 Ω, 1 Vrms )
10 Hz to 80 kHz ± 3 dB
RCA pin jack
10 kΩ or more
0.002% or less
10 Hz to 80 kHz ±3 dB (at 192 kHz usage)
Square optical
S/P DIF
16/24 bit, 44.1 kHz/48 kHz/88.2 kHz/96 kHz/176.4 kHz/192 kHz
RCA pin jack
S/P DIF
16/24 bit, 44.1 kHz/48 kHz/88.2 kHz/96 kHz/176.4 kHz/192 kHz
Remote controller (x 1), Power cord (x 1), Owner's Manual (this book) (x 1)*1, Safety
information sheet (x 1)
*1: A
ddendums for added setthings, etc. will be attached at each update.
213 (W) x 78 (H, including legs) x 315 (D, including protrusions)
approx. 3.8 kg
AC 100 V
24 W
* This product is compatible with European RoHS Directive.
19
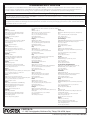
Declaration of EC Directive
This equipment is compatible with the EMC Directive (2004/108/EC) - Directive on approximation of member nation's ordinance
concerning the electromagnetic compatibility and with the Low Voltage Directive (73/23/EEC) - Directive on approximation of
member nation's ordinance concerning electric equipment designed to be used within the specified voltage range.
The Affect of Immunity on This Equipment
The affect of the European Specification EN61000-6-1 (coexistence of electromagnetic waves - common immunity specification)
on this equipment are as shown below.
In the electrical fast transient/burst requirements, surge, conducted disturbances by radio-frequency fields, power frequency
magnetic field, radiate electromagnetic field requirements and static electricity discharging environment, this could be affected by
generation of noise in some cases.
FOSTEX DISTRIBUTORS LIST IN EUROPE
Austria
NAME: Mega Audio GmbH
ADD: Stromberger Str. 32, 55411 Bingen, Germany
TEL: (+49) 6721-94330, FAX: (+49) 6721-32046
Email: [email protected]
Web Site: http://www.megaaudio.de
Belgium
NAME: XLR sprl/bvba
ADD: Pierre Strauwenstraat 24, 1020 Brussels, Belgium
TEL: (+32) 2 520 0827, FAX: (+32) 2 521 1977
Email: [email protected]
Web Site: http://www.xlrpro.be
Czecho
NAME: Praha Music Center spol s.r.o.
ADD: Ocelarska 937/39, Praha 9, 190 00, Czecho
TEL: (+420) 226-011-111, FAX: (+420) 226-011-112
Email: [email protected]
Web Site: http://www.pmc.cz
Denmark
NAME: SC Sound A/S
ADD: Dalgas Alle 15, DK-6600 Vejen, Denmark
TEL: (+45) 4399 8877, FAX: (+45) 4399 8077
Email: [email protected]
Web Site: http://www.sc-sound.dk
Finland
NAME: Noretron Oy Audio
ADD: Mankkaantie 32, FIN-02180 ESPOO, Finland
TEL: (+358) 10-525-8000, FAX: (+358) 10-525-8010
Web Site: http://www.noretron.fi
France
NAME: Sennheiser France
ADD: 128 bis, avenue Jean-Jaures, 94851 Ivry-sur-Seine Cedex, France
TEL: (+33) 1 4987 0300, FAX: (+33) 1 4987 0324
Web Site: http://www.sennheiser.fr
France
NAME: Selectronic (Speaker Components Only)
ADD: Zac de L’Oree du Golf, 16 rue Jules Verne, 59790 Ronchin, France
TEL: (+33) 328 550 328, FAX: (+33) 328 550 329
Email: [email protected]
France
NAME: Hamy Sound (Headphones and USB DAC Only)
ADD: 28 Rue Edith Cavell, 92400 Courvevoie, France
TEL: (+33) 1 4788 4702, FAX: (+33) 1 4789 4872
Email: [email protected]
Web Site: http://www.hamysound.com
Germany
NAME: Mega Audio GmbH
ADD: Stromberger Str. 32, 55411 Bingen, Germany
TEL: (+49) 6721-94330, FAX: (+49) 6721-32046
Email: [email protected]
Web Site: http://www.megaaudio.de
* Including non-EU countries (as of Jan. 2014)
Greece
NAME: Bon Studio S.A
ADD: 6 Zaimi Street, Exarchia, 106.83 Athens, Greece
TEL: (+30) 210-3809-605, 606, 607, 608
FAX: (+30) 210-3845-755, 210-3827-868
Email: [email protected]
Web Site: http://www.bonstudio.gr
Hungary
NAME: Mega Audio GmbH
ADD: Stromberger Str. 32, 55411 Bingen, Germany
TEL: (+49) 6721-94330, FAX: (+49) 6721-32046
Email: [email protected]
Web Site: http://www.megaaudio.de
Italy
NAME: Backline S.u.r.l.
ADD: Via dell’Aprica, 16 - 20158 Milano, Italy
TEL: (+39) 02 6901 5709, FAX: (+39) 02 6901 5645
Email: [email protected]
Web Site: http://www.backline.it
Italy
NAME: Art of Music sas (Hi-Fi system & Speaker Components)
ADD: Via Dal Lino 23/2, 40134 Bologna, Italy
TEL: (+39) 347 2532215
Email: [email protected]
Web Site: http://www.balloacoustics.it
The Netherlands
NAME: Iemke Roos Audio B.V.
ADD: Kuiperbergweg 20, 1101 AG Amsterdam, The Netherlands
TEL: (+31) 20-697-2121, FAX: (+31) 20-697-4201
Email: [email protected]
Web Site: http://www.iemkeroos.nl
Norway
NAME: Siv. Ing. Benum AS
ADD: P. O. Box 145, Vinderen, 0319 Oslo, Norway
TEL: (+47) 2213 9900, FAX: (+47) 2214 8259
Email: [email protected]
Web Site: http://www.benum.no
Poland
NAME: Mega Music Spolka z o.o
ADD: Ul. Lesna 15, 81-876 Sopot, Poland
TEL: (+48) 58-551-18-82, FAX: (+48) 58-551-18-72
Email: [email protected]
Web Site: http://pro.megamusic.pl
Portugal
NAME: Letusa (Pro Audio Products Only)
ADD: C/Laguna No.10, Poligono Industrial Urtinsa, 28923 Alcorcon,
Madrid, Spain
TEL: (+34) 91-4862800, FAX: (+34) 91-6414597
Email: [email protected]
Web Site: http://www.letusa.es
Russia
NAME: MS-MAX
ADD: Entrance 12B, Kutuzovsky prospekt, 30/32, 121165, Moscow,
Russia
TEL: (+7) 495-234-0006, FAX: (+7) 495-249-8034
Email: [email protected]
Web Site: http://www.ms-max.ru
Spain & Portugal
NAME: ATCONSUMER (Consumer, Hi-Fi system & Speaker Components)
ADD: PO BOX 15, 08340Vilassar de Mar, Barcelona, Spain
TEL: (+34) 609 288310
Email: [email protected]
Web Site: http://www.atconsumer.es
Spain
NAME: Letusa (Pro Audio Products Only)
ADD: C/Laguna No.10, Poligono Industrial Urtinsa, 28923 Alcorcon,
Madrid, Spain
TEL: (+34) 91-4862800, FAX: (+34) 91-6414597
Email: [email protected]
Web Site: http://www.letusa.es
Sweden
NAME: Benum Nordic AS
ADD: Aldermansvagen 17, 171 48 Solna, Sweden
TEL: (+46) 8 207710
Email: [email protected]
Web Site: http://www.benum.se
Sweden, Norway, Finland & Denmark
NAME: Supersonic Svenska AB (Speaker Components Only)
ADD: PO BOX 42043, 126 12 Stockholm, Sweden
TEL: (+46) 8 744 4700
Email: [email protected]
Switzerland
NAME: Audio Bauer Pro AG
ADD: Bernerstrasse-Nord 182, CH-8064 Zurich, Switzerland
TEL: (+41) 44 432 3230, FAX: (+41) 44 432 6558
Email: [email protected]
Web Site: http://www.audio-bauerpro.ch
Turkey
NAME: Radikal Elektronik Ltd. Sti.
ADD: Ihlamur-Yildiz Cad, Kessaf Sok. 4/12 Besiktas, Istanbul 34353,
Turkey
TEL: (+90) (212) 259 7971, FAX: (+90) (212) 259 7993
Email: [email protected]
Web Site: http://www.radikaltr.com
UK
NAME: SCV London
ADD: Unit C1 Belcon Industrial Estate, Geddings Road, Hodesdon,
Hertfordshire, EN11 0NT, UK
TEL: (+44) 03 301 222500, FAX: (+44) 20-8418-0624
Email: [email protected]
Web Site: http://www.scvlondon.co.uk
Ukraine
NAME: A & T Trade Petroshop
ADD: 29, Obolonskaya Str., Kiev, Ukraine 04071
TEL: (+380) 44-462-5358, FAX: (+380) 44-462-5092
Email: [email protected]
Web Site: http://kiev.attrade.ru
FOSTEX CO.
1-1-109, Tsutsujigaoka, Akishima City, Tokyo, 196-8550, Japan
© Printed in Japan April. 2014 8289692000 586260