1
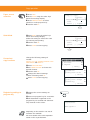
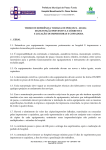
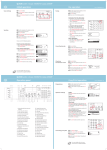
QUICKGUIDE P-4030/P-4035 MFP
Operation panel
1 Displays the System Menu/Counter
screen.
16 Lights or blinks when an error occurs
and a job is stopped.
2 Displays the Status/Job Cancel screen.
17 Used to select a menu item, move
the cursor when entering characters,
change a value etc.
3 Displays the Copy screen.
4 Displays the Document Box/USB
screen.
5 Displays the Send screen. You can
change it to display the Address Book
screen.
6 Displays the Fax screen.
7 Displays the Address Book screen.
8 Calls the previous destination. Also
used to enter a pause when entering a
fax number.
9 destination.
10 Switches between on-hook and
off-hook when manually sending a fax.
11 Recalls the destination registered for
One Touch Keys.
12 Displays the setting menu, machine
status, and error messages.
13 Message Display. Check what is shown
here while operating the machine.
14 Blinks when printing or
sending/receiving.
15 Blinks while the machine is accessing
the machine memory, fax memory or
USB memory (general purpose item).
Switch off the machine only when LED
is dark!
18 entered value.
19 Displays the function menu for copy,
print, transmission and document box.
20 Returns the Message Display to the
previous screen.
21 Clears entered numbers and
characters.
22 Resets settings and displays the basic
screen.
23 Starts copying and scanning operations
and processing for setting operations.
24 Cancels the printing job in progress.
25 Authenticates user switching, and exits
the operation for the current user (i. e.
log out).
26 Puts the machine into Sleep Mode.
Recovers from Sleep if in Sleep Mode.
27 Used to register or recall programs.
28 Numeric keys. Enter numbers and
symbols.
Copy operation
Paper source
selection
❶ Press COPY.
❷ Press PAPER using the select keys
below the message display.
❸ Press ARROW UP/DOWN to select
cassette or multi-purpose tray.
❹ OK.
Quiet Mode
❶ Press QUIET using the select keys
below the message display.
Select the setting to reduce the noise
for scanning and printing.
❷ OK.
❸ Press START to start copying.
Convenient
copy functions
Change the following settings if
needed:
DUPLEX, COLLATE, COMBINE, ORIGINAL SIZE/ORIENTATION, and DENSITY.
❶ Press FUNCTION MENU.
❷ Use ARROW UP/DOWN to choose the
desired function.
❸ OK.
❹ Change the desired settings.
OK.
❺ Press START to start copying.
Registering settings to
program key
Ready to copy.
Copies: 1
Letterq sA Lettera
100%
[ Zoom ] [ Paper ]
Ready to copy.
Copies: 1
Letterq sA Lettera
100%
[ Quiet ] [ Paper ]
Function Menu:
a b
1
Paper
Selection
T
*********************
2 Collate
T
T
3 Duplex
[
Exit]
Function Menu:
a b
4 Zoom
T
5 Combine
T
T
6 Original Size
[ Exit]a b
Function Menu:
7 Orig OrientationT
8 Original Image T
T
9 Density
[
Exit]
Function Menu:
a b
❶ Change the current settings as
desired.
❷ Press one program key for 3 seconds.
❸ The destination registered to the
program keys is recalled and automatically entered on the screen.
Registered.
z Program 2
Depending on the model in use not all
functions are available.
For more details refer to the Operation
Guide on the co-packed DVD.
QUICKGUIDE P-4030/P-4035 MFP
Send operation
Sending E-mail
Place the originals on the platen or in
the document processor.
❶ Press SEND.
❷ Use ARROW UP/DOWN to select [E-MAIL].
❸ OK.
❹ Enter the destination e-mail address.
Use ABC TEXT to select the type of
characters. Use LEFT/RIGHT ARROW to
move the cursor.
❺ OK.
❻ If there are additional destinations,
Send to:
a b
1
p
E-mail
*********************
2 G Folder(SMB)
3 H Folder(FTP)
Address Entry:
*
press ADD DESTINATION.
[
❼ Press CONFIRM DESTINATION
B b
ABC
Text
]
the registered destinations.
❽ Press START. Transmission starts.
Ready to send.
Dest.: 1
p :sally@###########N
1-sided
300x300dpi
[ Duplex ] [ScanRes.]
Check
transmission
result
❶ Press STATUS/JOB CANCEL.
❷ To check received documents use
ARROW UP/DOWN and select PRINT JOB
STATUS.
To check send documents use ARROW UP/
DOWN and select SEND JOB STATUS.
❸ OK.
❹ Use ARROW UP/DOWN to select the
desired job.
❺ The result is displayed. Press [DETAIL]
to view all related items.
Cancelling fax job
Send
0004
0003
0002
Job Log:
a
p Broadcast
b 0756545865
p Morgan@homeN
[ Detail
b
u
u
v
]
If the documents are still fed, press
STOP.
❶ Press STATUS/JOB CANCEL.
❷ Use ARROW UP/DOWN to select SEND JOB
STATUS.
❸ OK.
❹ Use ARROW UP/DOWN to select the job
to be cancelled.
❺ Press CANCEL using the select keys
below the message display.
❻ YES using the select
keys below the message display. Com
slip might be printed.
Send Job Status: a b
0010 b 0123456789 r
0011 p Broadcast
0017
b 9876543210
*********************
[ Cancel ]
[ Menu ]
Sending Fax
Place the originals on the platen or in the
document processor.
❶ Press FAX.
❷ Press FAX RES. using the select keys below the
message display. Select the resolution suitable
OK.
❸ Enter the fax number of the receiving system
using the numeric keys.
You can also select the fax destination from the
addressbook by pressing ADDRESSBOOK.
Ready to send.
2010/05/25
12:30
Text+Photo 200x100dpi
[Orig.Img] [FAX Res.]
❹ Press START. The documents are fed and the
transmission begins.
Registering a new
destination
❶ Press SYSTEM MENU/COUNTER.
❷ Use ARROW UP/DOWN to choose EDIT
DESTINATION.
❸ Press OK.
❹ Use ARROW UP/DOWN to choose ADDRESSBOOK.
❺ OK.
If the addressbook contains no entries, press
the menu key using the select keys below the
message display.
❻ Use ARROW UP/DOWN to choose ADD ADDRESS.
❼ Choose CONTACT
OK. Next,
enter destination name, fax number and e-mail
address.
❽ Press EDIT to see more details. Use LEFT/RIGHT
ARROW to select the items.
❾ OK.
Edit Destination:a b
1
Addressbook
*********************
2 Print List
[
]
Menu:
a b
1 Detail Edit
2 Delete
3
Add Address
*********************
Detail:
Contact Name
Sally
[
Registering a new
One-touch key
Exit
C b
1/7
Edit
]
❶ In the basic screen for fax, press the
ONE-TOUCH key that you want to register and
hold it (2 seconds).
❷ Use ARROW UP/DOWN to choose a key.
❸ OK.
❹ Use ARROW UP/DOWN to choose an entry from
Select Key No.: a b
1
No. 1
*********************
2 No. 12
the addressbook.
❺ OK.
Depending on the model in use not all
functions are available.
For more details refer to the Operation
Guide on the co-packed DVD.
[
Exit
]