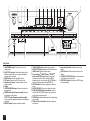
1
HT-RC630
AV RECEIVER
En
Fr
Es
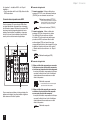
Basic Manual
Advanced Manual found here
http://www.onkyo.com/manual/htrc630/adv/en.html
En
Before Start
Advanced Manual
Advanced Manual is always updated with the latest
information and its user friendly interface, which does not
matter whether you access from PC or Smartphone, helps
you to understand more deeply about the AV Receiver.
Advanced Manual is consisted of the following chapters.
r AM/FM Radio Receiving Function
r Playing music files on a USB storage device
r Operating music files with the remote controller
r Listening modes
r Advanced settings
r Operating other components with the remote controller
r Connecting and operating Onkyo RI components
r Firmware update
r Troubleshooting
r Reference information
Advanced Manual found here
http://www.onkyo.com/manual/htrc630/adv/en.html
2
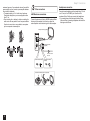
Supplied Accessories
Indoor FM antenna --- (1)
AM loop antenna --- (1)
Color labels for speaker cable --- (1)
Speaker Cable
1
r Equipped with 5-channel amplifier
r Equipped with 4K/60 Hz Passthrough-compatible HDMI
IN/OUT jacks
r Supports the HDMI Through function which allows
transmission from playback devices to the TV in standby
state
r Supports ARC (Audio Return Channel)
r Supports playback of USB storage device
r Supports Bluetooth connection
r A/V Sync Function to correct deviation of audio and
video
r Multi-zone function which allows you to play a different
source in another room from the main room
r 32 bit DSP (Digital Signal Processor) with excellent
calculation performance
r Music Optimizer™ for compressed digital music files
r Phase Matching Bass System
r Supports playback of MP3, FLAC, WAV, Ogg Vorbis,
Apple Lossless and DSD music files via USB storage
device
2
Features
The Basic Manual leads you through the fundamental steps
to enjoy the AV Receiver from connections to TV, speaker
system and playback devices, to necessary functions for
playback. As well as that, Basic Manual informs you with
the instructions on frequently used functions. Besides, there
is another part of the manual called Advanced Manual to
inform you with more detailed information, which we have
decided to publish on the web from the ecological point of
view.
3
About the Basic Manual
Remote controller (RC-879M) --- (1)
Batteries (AA/R6) --- (2)
The number in parenthesis indicates the quantity. On packaging, the letter
¼
at the end of the product name indicates the color.
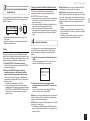
How to use the remote controller
Remote control sensor
AV Receiver
Batteries (AA/R6)
#DQWV|HV
(5 m)
If you do not use the remote controller for a long time, remove the batteries
¼
to prevent leakage.
Note that keeping consumed batteries inside may cause corrosion resulting
¼
in damage of the remote controller.
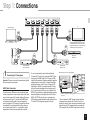
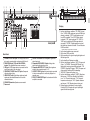
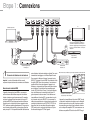
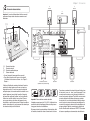
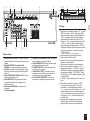
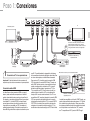
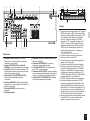
Step 1: Connections
TV
Personal computer
HDMI
IN
HDMI
OUT
HDMI cable
To use the ARC function, connect to the ARC
compatible HDMI jack of the TV and make an
appropriate setting on the unit. See the section
3 "HDMI Setup" of "Step 2: Setting Up".
HDMI
OUT
HDMI
OUT
HDMI
OUT
Game console
1
HDMI
OUT
Set-top box/Digital
video recorder, etc.
Satellite/Cable
set-top box, etc.
For how to make settings, see the Advanced Manual.
Connecting the TV and players
Important: The power cord must be connected only after all
other connections are completed.
HDMI Cable Connection
The unit has many HDMI jacks on its rear panel and each
of them corresponds to an input selector button of the same
name on the front panel. For example, a Blu-ray Disc player
will be connected to the IN 1 jack and the BD/DVD button
on the front panel will be used to listen to the playback
sound (if the player is CEC compliant, input will be switched
automatically). If you add another Blu-ray Disc player, you
can use any other jack than IN 1. It is possible to change
assignment of the input jacks and input selector buttons.
Blu-ray Disc/
DVD player
To connect the TV and the unit, connect the HDMI OUT jack
of the unit and the HDMI IN jack of the TV using an HDMI
cable. With this connection, it becomes possible to display the
setting screen of the unit on the TV or transmit video/audio
signals from the player to the TV. If your TV supports ARC
(Audio Return Channel), it is possible to play the TV sound
with the AV receiver's speakers with this connection only. If
your TV does not support ARC, you need, in addition to the
HDMI OUT jack connection, a digital optical cable connection
between the digital audio out optical jack of the TV and the
DIGITAL IN OPTICAL jack of the unit or an analog audio
(RCA) cable connection between the audio output jack of the
TV and the TV/CD analog audio input jack of the unit.
z
Connection with a TV not supporting ARC
TV
DIGITAL
OPTICAL
OUT
AUDIO
OUT
Select an appropriate connection
¼
for your TV.
The unit supports the HDMI Through function that allows
transmission from players to the TV even if the unit is in
standby. You have to modify the settings to enable the input
selection link with CEC compliant device, connection with
ARC compatible TV, and HDMI Through function. See the
3
Step 1: Connections
section 3 "HDMI Setup" of "Step 2: Setting Up".
r To play 4K or 1080p video, use the high speed HDMI
cable.
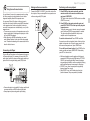
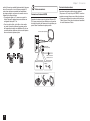
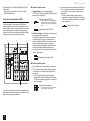
Connecting Components without HDMI
3
1 Digital connection: Use a digital optical cable
(OPTICAL) or digital coaxial cable (COAXIAL) for
connection with a player.
Digital optical cable (OPTICAL)
If your AV component does not have HDMI jack, use an
available jack of your component for cable connection with
this unit. Just as the HDMI jacks, other jacks on this unit have
a preassigned input selector button on the front panel. See
the name of the input selector button shown with the jack
when connecting the device.
1
Audio signal connection
4
As the digital in optical jack of the unit has a
¼
cover, push in the cable against the cover as it is
turned inside.
Digital coaxial cable (COAXIAL)
2 Analog connection: Use an analog audio (RCA) cable
for connection with a player.
To enjoy multi-zone playback of audio of a CD player
or such other player without HDMI output jack, you
need to use the analog audio (RCA) cable to connect
the corresponding jacks of the player and this unit. For
details on the multi-zone function, see the section 6
"Using the multi-zone function" of "Step 3: Playing Back".
Analog audio (RCA) cable
Video signal connection
3 Use a component video cable to connect a TV
with component video input jacks and a player with
component video output jacks.
r When a component video cable is used for
connecting the unit and the player, the unit and TV
must also be connected with a component video
cable.
Component video cable
Its transmitted video has higher quality than that
¼
of composite video cable.
2
If you connect a turntable which does not have a builtin audio equalizer, you need to install an external audio
equalizer between the unit and the turntable.
4 Use a composite video cable to connect a TV with
composite video input jack or a player with composite
video output jack.
r When a component video cable is used for
connecting the unit and the player, the unit and TV
must also be connected with a component video
cable.
Composite video cable
4
Step 1: Connections
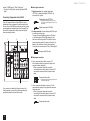
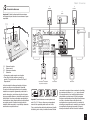
2
2
Front R
Connecting speakers
1
Front L
3
Center
Important: The power cord must be connected only after all
other connections are completed.
12
3
6
45
1 2 Front speakers
Center speaker
3
4 5 Surround speakers
Subwoofer
6
r Only one subwoofer can be connected.
r To use the ZONE function, refer to the section 6 "Using
the multi-zone function" of "Step 3: Playing Back".
It is ideal to install the front speakers and center speaker
at the height not too far from that of the screen. As for the
surround speakers, it is recommended to install at the
position slightly backward of the listening position and
higher than the listener's ears, since it is preferable to
obtain a diffused sound rather than a direct sound. As a
bass sound reproduced by subwoofer is less directional,
it is possible to place it at any position. Consider the best
installation position where a bass sound can be clearly
heard by listening to actual playback.
6
Subwoofer with built-in
power amplifier
5
Surround R
3/8"-1/2" (10-12 mm)
Important%QPPGEVURGCMGTUYKVJŝVQŝKORGFCPEG
Using a speaker with less impedance than the supported
value may result in failure.
Cut and remove the plastic coating from the end of the
speaker cable, twist the core and connect it to the terminal.
4
Surround L
Make correct connection between the unit's jacks and
speaker's jacks (+ to + and - to -) for each channel. If
connection is wrong, a bass sound may become poor due to
reverse phase. Attaching the supplied colored speaker cable
labels to the + side on the both ends of each channel's cable
will help correct connection. The subwoofer jack supports
connection of a subwoofer with built-in power amplifier. Set
the cut-off filter selection switch of the subwoofer to DIRECT.
If the subwoofer does not have a cut-off filter selection
switch but has a cut-off frequency adjusting dial, turn it to the
5
Step 1: Connections
maximum frequency. If your subwoofer does not have built-in
power amplifier, you can connect a power amplifier between
the unit and the subwoofer.
r The speaker setting is 5.1 ch at the time of purchase.
Change the setting when you use a configuration other
than 5.1 ch.
r Short-circuiting the + cable and - cable or contacting the
cable core to the rear panel of the unit may cause failure.
Also do not connect two or more cables to one speaker
jack or one speaker to several jacks.
3
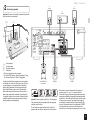
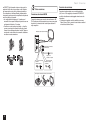
Headphones connection
Other connections
AM/FM antenna connections
Connect the antennas to listen to AM/FM broadcast. When
listening to the broadcast for the first time, adjust the
antenna position and orientation to get the best reception.
AM loop antenna (supplied)
Indoor FM antenna
(supplied)
Fix with a tack on
the wall.
(North American model)
(European and Asian
models)
Assemble the AM loop antenna (supplied).
6
%QPPGEVUVGTGQJGCFRJQPGUYKVJCUVCPFCTFRNWI
|KPEJ
QTÔ|OOVQVJG2*10'5LCEM5QWPFHTQOVJG
speakers will be off while you are using the headphones.
r If you selected any other listening mode than Stereo,
Mono and Direct, connecting headphones will switch the
listening mode to Stereo.
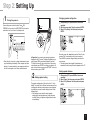
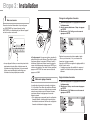
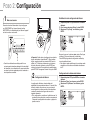
Step 2: Setting Up
1
Changing speaker configuration
Turning the power on
1. After pressing RCV, press HOME on the remote
controller.
Connect the power cord to the outlet. Press zON/
STANDBY on the main unit or zRECEIVER on the remote
controller to turn the unit on or to standby mode.
r When the unit is turned on, a large instantaneous current
may flow affecting functionality of the computer and other
devices. It is recommended to use a separate outlet from
that for the computer or such other sensitive devices.
2. With the cursor, select "Setup", and press ENTER.
3. Select "5. Sp Config" with the cursor, and press
ENTER.
z Operation: You can set up by viewing the guidance
displayed on the TV screen. To display the guidance, you
need to make HDMI connection between the unit and
TV. Select the item with the cursor buttons of the remote
controller and press ENTER to confirm your selection. To
return to the previous screen, press RETURN. To return to
the Home menu, press HOME.
2
Move the cursor with d/c buttons and set "None" for the
speaker ("No" for subwoofer) which is not connected.
Press HOME to save the changed setting and close the
menu screen.
r This setting cannot be changed if headphones are
connected or audio is output from the speakers of the TV.
Setting speaker distance
1. After pressing RCV, press HOME on the remote
Making speaker setting
The speaker configuration of this unit is set to 5.1 ch by
default. To use the unit in a different environments such as
a configuration without center speaker, surround speaker
or subwoofer, you need to make settings for each of the
following items.
r If the settings do not match the actual speaker
configuration, audio playback may not be performed
correctly. Check your speaker configuration and make
correct settings.
controller.
2. Select "Setup" with the cursor, and press ENTER.
3. Select "6. Sp Distance" with the cursor, and press
ENTER.
7
Step 2: Setting Up
Move the cursor with d/c buttons and set the distance
from each speaker to the listening position. Press HOME to
save the changed setting and close the menu screen.
r This setting cannot be changed if headphones are
connected or audio is output from the speakers of the TV.
r The distance of speakers cannot be changed if "No" or
"None" is set for them in "Sp Config".
Adjusting volume level of speakers
1. After pressing RCV, press HOME on the remote
controller.
2. With the cursor, select "Setup", and press ENTER.
3. Select "7. Level Cal" with the cursor, and press
ENTER.
3
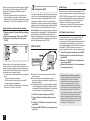
HDMI Setup
HDMI Through
The unit supports the linked system function such as power
on/off link when connected via HDMI cable with a CEC
(Consumer Electronics Control) compliant TV or player. You
need to change the initial setting to use the linked system
function, HDMI Through function and ARC (Audio Return
Channel) function.
The function allows transmission from players to the TV
even if the unit is in standby. Setting the HDMI CEC (RIHD)
setting mentioned above to "On" can enable this setting
automatically. It is also necessary to make the HDMI linked
system setting on the TV. See the TV's instruction manual
for details.
r Although enabling the HDMI Through function increases
power consumption during standby.
z Operation: You can set up by viewing the guidance
displayed on the TV screen. To display the guidance, you
need to make HDMI connection between the unit and
TV. Select the item with the cursor buttons of the remote
controller and press ENTER to confirm your selection. To
return to the previous screen, press RETURN.
ARC (Audio Return Channel)
HDMI CEC (RIHD)
Simple connection to the ARC compatible TV using a
single HDMI cable allows to listen to the TV sound from the
speakers connected to the unit. To use the ARC function,
connect the unit to the ARC compatible HDMI jack of the
TV. Then, set the HDMI CEC (RIHD) mentioned above to
"On" on the unit, and make the following setting.
1. Press RCV on the remote controller and then press
HOME.
2. Select "Setup" with the cursor buttons and press
ENTER.
3. Select "11. HDMI Setup" with the cursor buttons and
Move the cursor with d/c buttons and change the volume
level of each speaker. A test tone will be output each time
you change the level. Select the desired level. Press HOME
to save the changed setting and close the menu screen.
r In the following cases, the setting cannot be changed:
– Headphones are connected.
– Audio is output from the speakers of the TV.
– Muting is enabled.
r You cannot change the volume level of speakers when
"No" or "None" is set for them in "Sp Config".
press ENTER.
4. Select "Audio Return Ch" with the cursor buttons
and select "Auto".
Turning the TV to standby mode will turn the unit to
standby mode.
On the TV side, it is possible to set whether to output
audio from the speakers connected to the unit or from
the TV's speakers.
Starting playback of a CEC compliant player/recorder will
automatically switch the unit's input to the HDMI input of
the player/recorder. If the unit is in standby mode, it will
automatically be turned on.
1. Press RCV on the remote controller and then press
HOME.
2. Select "Setup" with the cursor buttons and press
ENTER.
3. Select "11. HDMI Setup" with the cursor buttons and
press ENTER.
4. Select "HDMI CEC (RIHD)" with the cursor buttons
and select "On".
8
Audio output of connected players
To enjoy digital surround sound including Dolby Digital
and DTS, audio output should be set to "Bitstream
output" on the connected blu-ray disc player or other
devices. If the TV does not support bitstream signals,
set the audio output to "PCM output" on the player to
listen to the audio from the TV's speakers. For how
to set the player, see the instruction manual of the
player. Some settings of the blu-ray disc player may
prevent reproduction of DTS-HD Master Audio. In
that case, turn "BD video supplementary sound" (or
secondary sound) to "Off" and try again.
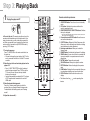
Step 3: Playing Back
1
Playing the player and TV
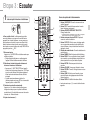
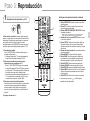
Remote controller parts name
1
2
3
1 zRECEIVER button: Turns the unit on or into standby
mode.
8
2 RCV button: Switches the remote controller to the
mode for operating this unit.
3 REMOTE MODE/INPUT SELECTOR buttons: Switches
the input to be played.
9
z To control the unit: The remote controller may be in the
remote mode that enables control of other devices. In the
state of remote mode, you will not be able to operate this
unit. When you operate the unit, operate it from back to (a
mode in which to operate this unit) RECEIVER mode by
pressing 2 RCV always.
1. Turning the power on.
Press 1 zRECEIVER on the remote controller to turn
the power on.
r You need to change the input setting of the TV to the
one for connection with this unit. Use the TV's remote
controller.
2. Select the input of the unit and start playback on the
player or TV.
r Press 3 INPUT SELECTOR to which the desired
player has been assigned. Press TV/CD to play the
TV's sound. You can also use the input selector
buttons on the main unit.
r Input will automatically be selected if the TV or player
is CEC compliant and connected to the unit with
HDMI cable.
F
4 Cursor buttons and ENTER button: Moves the cursor
and confirms the selection.
5 Q SETUP button: Displays the Quick Setup menu that
6
4
5
¼
The input selector button NET has no effect on this unit, since the unit
does not have input selector “NET”.
G
H
7
8
9
F
G
6
H
I
7
I
allows you to set the frequently used functions including
input selection and volume adjustment.
Listening mode buttons: Allows you to select the
listening mode.
DIMMER button: Switches the brightness of the display.
ZONE2 button: For use when the unit is connected with
a pre-main amplifier in a separate room and sound is
played there.
MUTING button: Temporarily mutes audio.
VOLUME buttons: Allows you to adjust the volume.
RETURN button: Returns the display to the previous
state.
HOME button: Displays the Home menu that allows you
to make advanced settings and use other functions.
DISPLAY button: Switches the information on the
display.
r The buttons other than 1- I are for operating other
devices.
3. Select the desired listening mode.
Press the 6 listening mode buttons to switch the
mode so that you can enjoy different listening modes.
For details about the listening modes, see "Listening
modes".
4. Adjust the volume with F.
9
Step 3: Playing Back
Listening modes
Select the desired mode by switching and listening actual
sound in different modes. The selectable listening modes
depend on the format of the input signals.
MOVIE/TV: You can select a listening mode suitable for
movies and TV programs.
MUSIC: You can select a listening mode suitable for music.
GAME: You can select a listening mode suitable for games.
STEREO: You can select a listening mode for stereo and all
channel stereo sources.
r For details on the listening modes, see the Advanced
Manual.
"Direct" for playing the input signals as-is
Selecting this mode allows the input signals to be
played as they are. For example, 2 ch signals of music
CD will be played in stereo, 5.1 ch signals in 5.1 ch,
and Dolby Digital signals of blu-ray disc or DVD in the
Dolby Digital sound field according to the specified
number of channels.
Other useful functions
Playing Video and Audio from Different Sources: It
is possible to play audio and video from different sources.
For example, you can play audio from the CD player and
video from the BD/DVD player. In this case, press BD/DVD
and then TV/CD. Then start playback on the BD/DVD player
and CD player. This function is effective when an input with
audio only has been selected (TV/CD, AM or FM in the
initial setting).
10
Adjusting Sound Quality: It is possible to enhance
or moderate the bass and treble of front speakers. Press
TONE on the main unit several times to select the desired
setting from "Bass", "Treble", and "PM Bass" (Phase
Matching Bass), and adjust with +/-.
"Bass": Allows you to enhance or moderate the bass.
"Treble": Allows you to enhance or moderate the treble.
"PM Bass": Allows you to keep the clear midrange and
effectively enhance the bass.
Muting Temporarily: Press MUTING on the remote
controller. Press MUTING again to cancel muting.
Changing the Display Brightness: Press DIMMER on
the remote controller several times to select the desired
brightness.
Changing the Input Display: Press DISPLAY on the
remote controller several times to switch the display of the
main unit in order of:
2
Listening to AM/FM Radio
Auto tuning method is explained in Basic Manual. For more
details on AM/FM radio station, see Advanced Manual.
1. Press AM or FM on the unit to select either "AM" or
"FM".
2. Press TUNING MODE on the unit so that the "AUTO"
indicator on the unit's display lights.
3. Press TUNING on the unit.
The automatic search for a radio station starts.
Searching stops when one is found. When tuned into a
radio station, the " TUNED " indicator on the unit's
display lights. The "FM STEREO" indicator lights if the
radio station is an FM radio station.
TUNED
AUTO
Input source &
volume
FM STEREO
Listening
mode
Signal
format
Sampling
frequency
r If "Dolby D 5.1" is displayed in signal format, the
Dolby Digital 5.1 ch signals are being input. When
listening to AM/FM radio, the band, frequency and
preset number are displayed.
(Actual display depends on the country.)
Registering a Radio Station: It allows you to register up to
40 of your favorite AM/FM radio stations.
1. Tune into the AM/FM radio station you want to register.
2. Press MEMORY on the unit so that the preset number
on the display flashes.
3. Repeatedly press PRESET on the unit to select a
number between 1 and 40 while the preset number is
flashing (about 8 seconds).
4. Press MEMORY on the unit again.
When registered, the preset number stops flashing.
Repeat this procedure for all of your favorite AM/FM
radio stations. Press PRESET or CH +/- to select
the registered radio station.
Step 3: Playing Back
3
Connecting and playing the Bluetoothenabled device
You can wirelessly enjoy music files stored in a smartphone
or other Bluetooth-enabled device. The coverage area is
|HGGV
|OGVGTU
r The Bluetooth-enabled device needs to support the
A2DP profile.
r Note that connection is not always guaranteed with all
Bluetooth-enabled devices.
Pairing
Pairing is necessary when using the Bluetooth-enabled
device for the first time. Before starting the procedure, learn
how to enable the Bluetooth setting function and to connect
with other devices on the Bluetooth-enabled device.
1. Press BLUETOOTH on the remote controller.
The unit enters the pairing mode and the BLUETOOTH
indicator starts flashing.
2. While the BLUETOOTH indicator is flashing,
complete connection on the Bluetooth-enabled
device in the nearby area within about 2 minutes.
If the name of this unit is displayed on the Bluetoothenabled device's display, select this unit. Paring will end
after a short time.
r If a password is requested, enter "0000".
r When connecting the unit to any other Bluetoothenabled device, start pairing by pressing and holding
BLUETOOTH until the BLUETOOTH indicator starts
flashing. This unit can store the data of up to ten
paired devices.
Playing sound of the Bluetooth-enabled device
If the unit is on and the Bluetooth-enabled device is
connected, the input will be automatically switched to
BLUETOOTH. Play music in this state.
r It may take about a minute until connection is established
when the unit is on since the Bluetooth function takes
some time to start up.
r If the volume setting on the Bluetooth-enabled device is
low, the sound will not be output from this unit.
r Due to the characteristics of Bluetooth wireless
technology, the sound produced on this unit may slightly
be behind the sound played on the Bluetooth-enabled
device.
4
Sleep Timer: Select to turn the unit into standby mode
automatically when the specified time elapses.
InstaPrevue: Select to preview videos input from the
HDMI input jacks collectively in a single screen. The screen
has a main window (current input video) and sub windows
(other input videos). To switch the current input, select the
desired sub window with the cursor buttons and press
ENTER.
r A black sub window is shown for the input with no video
signals.
r "InstaPrevue" cannot be selected if the video is being
input from HDMI IN 6 or there is no signal from the input
currently selected.
r Depending on video signals, the picture may not be
properly rendered on the preview thumbnails.
Using the Home menu
In the Home menu, you can make advanced settings and
use functions such as playback of files in USB storage
device. For details on the operation, see the Advanced
Manual.
1. Press RCV on the remote controller and then press
HOME.
The Home menu displays on the TV screen. You can
also use the HOME button on the main unit.
Home
Setup
USB
Sleep Timer
InstaPrevue
2. Select the item with the cursor buttons of the
remote controller and press ENTER to confirm your
selection.
To return to the previous screen, press RETURN. To
return to the Home menu, press HOME.
Setup: You can change the assignment of input terminals
and input selector buttons and also make various speaker
settings and other advanced settings.
USB: Select to connect a USB storage device to the USB
port so that it can be played.
r "USB" becomes selectable after the USB function starts
up even if it cannot be selected first. It may take about a
minute to start up.
11
Step 3: Playing Back
5
Using Quick Setup menu
In the Quick Setup menu, you can set frequently used
functions including input selection and volume adjustment.
1. Press Q SETUP on the remote controller.
The Quick Setup menu is displayed on the connected
TV's screen.
Quick Setup
Input
Audio
Information
Listening Mode
2. Select the item with the cursor buttons of the
remote controller and press ENTER to confirm your
selection.
To return to the previous screen, press RETURN.
Input: Select the input and check the assignment of input
selector buttons.
Audio: You can change various audio settings including
the ones for adjusting audio quality and speaker level.
r You cannot select this item when audio is played from the
TV's speakers.
A/V Sync: If the video is behind the audio, you can
delay the audio to offset the gap.
r It cannot be set if the input is "USB" or
"BLUETOOTH".
r It cannot be set if the listening mode is Direct.
Bass, Treble: Adjust volume of the front speaker.
r It cannot be set if the listening mode is Direct.
PM Bass (Phase Matching Bass): Suppress phase
shift in the midrange to enhance bass sound. Thus
smooth and powerful bass sound can be obtained.
r It cannot be set if the listening mode is Direct.
Subwoofer Level, Center Level: Adjust the speaker
level while listening to the sound. The adjustment you
made will be reset to the previous status when you turn
the unit to standby mode.
r The speakers cannot be adjusted if they have been
set to "No" or "None" in "Sp Config".
12
Late Night: Make small sounds to be easily heard. It
is useful when you need to reduce the volume while
watching a movie late night. You can enjoy the effect
on Dolby Digital, Dolby Digital Plus and Dolby TrueHD
sources only.
r Turning the unit to standby mode will set the setting
to "Off". In case of Dolby TrueHD, the setting will be
set to "Auto".
Music Optimizer : Improve the quality of the
compressed audio. Playback sound of lossy
compressed files such as MP3 will be improved. The
setting can be separately set to each input.
r The setting is effective in the signals of 48 kHz or
less. The setting is not effective in the bitstream
signals.
r It cannot be set if the listening mode is Direct.
Cinema Filter: Adjust the soundtrack that was
processed to enhance its high pitch range, in order to
make it suitable for home theater.
r This function can be used in the following listening
modes: Multichannel, Dolby Digital, Dolby Digital
Plus, Dolby TrueHD, DTS, DTS-HD High Resolution
Audio, DTS-HD Master Audio, DTS Express, DTS
96/24, Dolby PL II Movie, DTS Neo:6 and Neo:6
Cinema.
Information: Display the audio information.
Listening Mode: Select the listening mode from the
categories of "MOVIE/TV", "MUSIC" and "GAME".
r It cannot be set when audio is played from the TV's
speakers.
Step 3: Playing Back
6
Using the multi-zone function
You can listen to the sound in a separate room by making
the Zone connection (analog) between the unit and an
integrated amplifier placed in the separate room.
You can use a Blu-ray Disc player in the main room in
which the unit is placed, while receiving AM/FM broadcast
in the separate room. Audio can be played in the main
room and the separate room simultaneously, or only in the
separate room.
r The sources you can enjoy in the separate room are the
players connected to the analog audio input jacks of the
unit, and AM/FM broadcast.
r When listening to AM/FM broadcasting, you cannot
select different stations for the main room and separate
room. Therefore broadcasting of the same station will be
heard in the both rooms.
Connecting with Player
To use a Blu-ray Disc player or other players as the source
of Zone audio output, it is necessary to connect the RCA
audio output jacks of the player and the analog audio input
jacks of the unit using the analog audio (RCA) cable.
AUDIO
OUT
Making multi-zone connection
Performing multi-zone playback
Connect the ZONE 2 LINE OUT jacks of the unit and the
line-in jacks of the pre-main amplifier in a separate room
with an analog audio (RCA) cable.
1. Press ZONE2 on the remote controller, point the
remote controller at the remote controller sensor
and press zRECEIVER.
"Z2" lights on the unit and the ZONE function is enabled.
(ZONE 2 is now on.)
2. Press ZONE2 on the remote controller again and
press INPUT SELECTOR of the input to be played in
a separate room.
To play the same source in the main room and separate
room, hold down ZONE2 for approximately 3 seconds.
The volume should be adjusted with the pre-main
amplifier used in the separate room.
To control on the main unit: Press ZONE2 and within
|UGEQPFURTGUUVJGKPRWVUGNGEVQTDWVVQPQHVJGKPRWVVQDG
played in a separate room. To play the same source in the
main room and separate room, press ZONE2 twice.
To turn off the multi-zone function: Press ZONE2 on the
remote controller and press zRECEIVER. Alternatively
press OFF on the main unit.
r Multi-zone playback cannot be performed if a player is
connected to HDMI jack using HDMI cable or OPTICAL/
COAXIAL jack using digital cable. Connect the players
using analog audio cable for multi-zone playback. Analog
audio output setting may be necessary on the player.
r If ZONE 2 is on, power consumption during standby
becomes larger than normal.
r While ZONE 2 is on, the RI linked system function
(interlink between Onkyo components) is disabled.
r Zone audio output is not possible if the player and the unit
are connected only via HDMI cable or digital cable.
r Some players require analog audio output setting.
13
1
2
3
4 5
6
7
8
9
F
G
H
I
J
K
(European and Asian
models)
L
M
N
O
Q
P
R
Front Panel
1 zON/STANDBY button: Turns the unit on or into
2
3
4
5
6
7
8
9
standby mode.
BLUETOOTH indicator: Flashes while pairing with a
Bluetooth-enabled device is in progress and stays lit
when pairing is completed.
ZONE 2 button: Controls the ZONE function.
OFF button: Switches the ZONE function to off.
Remote control sensor: Receives signals from the
remote controller.
Display
LISTENING MODE buttons: Allows you to select the
listening mode.
DIMMER button (North American model): Switches
the brightness of the display.
RT/PTY/TP button (European and Asian models):
Can be used when receiving the station transmitting text
information.
MEMORY button: Registers or deletes a station.
14
F
G
H
I
J
K
L
M
N
TUNING MODE button: Switches the tuning mode.
QUICK SETUP button: Displays the Quick Setup menu.
HOME button: Displays the Home menu.
Cursor buttons, lTUNINGj button, dPRESETc
button and ENTER button: Moves the cursor and
confirms the selection. When listening to AM/FM
broadcasting, tune in to the station with lTUNINGj or
select the registered station with dPRESETc.
RETURN button: Returns the display to the previous
state.
MASTER VOLUME: Allows you to adjust the volume.
MUSIC OPTIMIZER button and indicator: Turns on/
off the MUSIC OPTIMIZER function that improves the
quality of the compressed audio.
PHONES jack: Stereo headphones with a standard plug
are connected.
TONE and Tone Level buttons: Adjusts the high tone
and low tone.
O Input selector buttons: Switches the input to be
played.
P DISPLAY button: Switches the information on the
display.
Q AUX INPUT AUDIO/VIDEO jacks: A video camera or
such other device is connected.
R HDMI THRU indicator: Lights when HDMI Through
function is enabled.
1
2
3
4
6
5
7
1 23
4
9
5
6
7
8
Display
1 Lights in the following conditions. "Z2": ZONE 2 output
8
9
F
is on. / "HDMI": HDMI signals are input and HDMI input
selector is selected. / "ARC": Audio signals are input
from ARC compatible TV and TV/CD input selector
is selected. / "3D": Input signals are 3D. / "USB" (¼):
"USB" input is selected and USB storage device is
connected. / "DIGITAL": Digital signals are input and
the digital input selector is selected. / Cursor indicators:
USB is controlled.
G H
¼
"USB" will flash if the connection is not correct.
2 Lights when headphones are connected.
3 Lights when USB is controlled.
4 Lights according to the type of input digital signals and
Rear Panel
1 RI REMOTE CONTROL jack: An Onkyo product with RI
2
3
4
5
6
7
jack can be connected and synchronized with this unit.
(/#06'00#LCEM
ŝCPF#/#06'00#
terminal: The supplied antennas are connected.
USB port: A USB storage device is connected so that
music files stored in it can be played.
COMPONENT VIDEO IN and OUT jacks: Component
video input/output jacks
HDMI IN/OUT jacks: Digital video signals and audio
signals are transmitted between the unit and the
connected devices.
SPEAKERS terminals: Speakers are connected.
Power cord
8 DIGITAL IN COAXIAL/OPTICAL jacks: Digital audio
9
F
G
H
signals are input.
Composite VIDEO/AUDIO IN jacks: Analog video
signals and audio signals are input.
Composite MONITOR OUT V jack: Video signals are
output to the connected monitor or TV.
LINE OUT ZONE 2 jacks: Audio output jacks connected
to the pre-main amplifier for multi-zone playback in a
separate room.
PRE OUT SUBWOOFER jack: A subwoofer with built-in
amplifier is connected.
the listening mode.
5 Lights when Music Optimizer is enabled.
6 Lights in the following conditions. "AUTO": Tuning mode
is auto. / "fTUNEDe": Receiving AM/FM radio. fe
flashes while tuning is automatically performed. / "FM
STEREO": Receiving FM stereo. / "RDS" (European and
Asian models): Receiving RDS broadcasting.
7 "MUTING": Flashes when muting is on.
8 Lights in the following conditions. "SLEEP": Sleep timer
has been set. / "ASb" (Auto Standby): Auto Standby
is on. / "ch": Channel is being set. / "Hz": Crossover
frequencies are being set. / "m ft": Speaker distances
are being set. / "dB": Speaker volume is being set.
9 Displays various information of the input signals.
Pressing DISPLAY displays the type of input digital
signals and the listening mode.
15
Troubleshooting
The remote controller does not work.
Before starting the procedure
Problems may be solved by simply turning the power
on/off or disconnecting/connecting the power cord,
which is easier than working on the connection, setting
and operating procedure. Try the simple measures
on both the unit and the connected device. If the
problem is that the video or audio is not output or the
HDMI linked operation does not work, disconnecting/
connecting the HDMI cable may solve it. When
reconnecting, be careful not to wind the HDMI cable
since if wound the HDMI cable may not fit well.
After reconnecting, turn off and on the unit and the
connected device.
The AV receiver turns off unexpectedly.
r The AV receiver will automatically enter standby mode
when Auto Standby is set and launched.
There’s no sound, or it’s very quiet.
r A wrong input selector button has been selected. Select
a correct input for the player. Also check that muting is
not on.
r Not all listening modes use all speakers.
r Be sure to press RCV first before operating the unit with
the remote controller.
There is no sound when multi-zone function is
used.
r With multi-zone function, sound is output only when an
external component connected to the analog audio input
jacks of the unit is used, or when AM/FM broadcast is
received. Multi-zone audio output is not possible if the
player and the unit are connected via HDMI cable or
digital cable. Connect the RCA audio output jacks of the
player and the analog audio input jacks of the unit with
an analog audio (RCA) cable. Also, some players require
analog audio output setting.
Resetting the unit
Resetting the unit to the status at the time of shipment may
solve the problem. If the measures above do not solve the
problem, reset the unit with the following procedure. If you
reset the unit status, your preferences will be reset to the
defaults. Note them down before starting reset.
z How to reset:
1. While holding down CBL/SAT on the main unit (note
that step 2 must be performed with this button
pressed down)
2. Press zON/STANDBY on the main unit ("Clear"
appears on the display and the unit returns to standby)
Clear
Bluetooth
r Try plugging/unplugging the unit and the Bluetoothenabled player. After that, check that the Bluetooth
function is enabled on the Bluetooth-enabled device and
the connection with the unit has been established.
2. Press zON/STANDBY.
holding down
1. While
CBL/SAT,
z How to reset the remote controller:
1. While holding down RCV on the remote controller,
There’s no picture.
r A wrong input selector button has been selected.
r To display video from the connected player on the TV
screen while the unit is in standby, you need to enable
"HDMI Through".
r When the TV image is blurry or unclear, power code or
connection cables of the unit may have interfered. In
that case, keep distance between TV antenna cable and
cables of the unit.
press HOME until the remote indicator stays lit
(about 3 seconds)
2. Within 30 seconds, press RCV again
RCV
Remote
indicator
HDMI control does not function correctly.
r Set the CEC setting of the unit to "On". It is also
necessary to make the HDMI linked system setting on
the TV. See the TV's instruction manual for details.
16
HOME
Specifications
Amplifier Section
Tuner Section
HDMI
Rated Output Power
All channels: 60 watts minimum continuous power per channel,
|QJONQCFUEJCPPGNUFTKXGPHTQO*\VQM*\YKVJC
maximum total harmonic distortion of 0.7% (FTC)
90 watts minimum continuous power per channel, 6 ohm loads,
2 channels driven at 1 kHz, with a maximum total harmonic
distortion of 0.7% (FTC)
(North American)
5 ch × 100 W at 6 ohms, 1 kHz, 1 ch driven of 1% (IEC) (Others)
Maximum Effective Output Power
5 ch × 120 W at 6 ohms, 1 kHz, 1 ch driven (JEITA) (Asian)
Dynamic Power (¼)
IEC60268-Short-term maximum output power
¼
9
ŝ(TQPV
9
ŝ(TQPV
9
ŝ(TQPV
THD+N (Total Harmonic Distortion+Noise)
0.7% (20 Hz - 20 kHz, half power)
Damping Factor
(TQPVM*\ŝ
Input Sensitivity and Impedance (Unbalance)
O8Mŝ
.+0'
Rated RCA Output Level and Impedance
O8Mŝ
.+0'176
Maximum RCA Output Level and Impedance
8Mŝ
.+0'176
Frequency Response
5 Hz - 100 kHz/+1 dB, –3 dB (Direct mode)
Tone Control Characteristics
±10 dB, 20 Hz (BASS)
±10 dB, 20 kHz (TREBLE)
Signal to Noise Ratio
100 dB (LINE, IHF-A)
Speaker Impedance
ŝŝ
FM Tuning Frequency Range
87.5 MHz - 107.9 MHz (North American)
87.5 MHz - 108.0 MHz, RDS (Others)
AM Tuning Frequency Range
522/530 kHz - 1611/1710 kHz
Preset Channel
40
Input
Video Section
Input Sensitivity/Output Level and Impedance
8RRŝ
%QORQPGPV;
8RRŝ
%QORQPGPV2B/CB, PR/CR)
8RRŝ
%QORQUKVG
Component Video Frequency Response
5 Hz - 100 MHz/+0 dB, –3 dB
Bluetooth Section
Communication system
Bluetooth Specification version 2.1 + EDR (Enhanced Data Rate)
Maximum communication range
Line of sight approx. 15 m (¼)
Frequency band
2.4 GHz band (2.4000 GHz - 2.4835 GHz)
Modulation method
FHSS (Freq Hopping Spread Spectrum)
Compatible Bluetooth profiles
A2DP 1.2 (Advanced Audio Distribution Profile)
AVRCP 1.3 (Audio Video Remote Control Profile)
Supported Codecs
SBC
Transmission range (A2DP)
20 Hz - 20,000 Hz (Sampling frequency 44.1 kHz)
¼
The actual range will vary depending on factors such as obstacles
between devices, magnetic fields around a microwave oven, static
electricity, cordless phone, reception sensitivity, antenna’s
performance, operating system, software application, etc.
General
Power Supply
AC 120 V, 60 Hz (North American)
AC 230 V, 50 Hz (European)
AC 220 - 240 V, 50/60 Hz (Others)
Power Consumption
3.2 A (North American)
330 W (European)
360 W (Others)
0.2 W (Stand-by, North American)
0.3 W (Stand-by, Others)
55 W (No-sound)
Dimensions (W × H × D)
435 mm × 150 mm × 321 mm
17-1/8" × 5-7/8" × 12-5/8"
Weight
7.6 kg (16.8 lbs.) (North American)
8.1 kg (17.9 lbs.) (Others)
IN1 (BD/DVD), IN2 (CBL/SAT), IN3 (STB/DVR), IN4 (GAME), IN5 (PC),
IN6
Output
OUT
Video Resolution
Pass Through : 4K 60 Hz (YCbCr 4:2:0)
Audio Format
DTS-HD Master Audio, DTS-HD High Resolution Audio, Dolby TrueHD,
Dolby Digital Plus, DSD, Multichannel PCM
Supported
3D, Audio Return Channel, DeepColor, x.v.Color, LipSync, CEC (RIHD)
Video Inputs
Component
IN (GAME)
Composite
IN1 (CBL/SAT), IN2 (STB/DVR), IN3 (GAME), AUX
Video Outputs
Component
OUT
Composite
MONITOR OUT
Audio Inputs
Digital
OPTICAL (TV/CD)
COAXIAL 1 (BD/DVD), 2 (CBL/SAT)
Analog
BD/DVD, CBL/SAT, STB/DVR, GAME, PC, TV/CD, AUX
Audio Outputs
Analog
ZONE2 LINE OUT
SUBWOOFER PRE OUT
Speaker Outputs
FRONT L/R, CENTER, SURROUND L/R
Phones
PHONES (Front, ø 6.3)
Others
RI
USB
1
1
Specifications and features are subject to change without notice.
17
License and Trademark Information
“x.v.Color” is a trademark of Sony Corporation.
Manufactured under license from Dolby Laboratories. Dolby, Pro Logic and the
double-D symbol are trademarks of Dolby Laboratories.
MPEG Layer-3 audio coding technology licensed from Fraunhofer IIS and
Thomson.
“All other trademarks are the property of their respective owners.”
Precautions
For DTS patents, see http://patents.dts.com.
Manufactured under license from DTS Licensing Limited. DTS, DTS-HD, the
Symbol, & DTS and the Symbol together are registered trademarks of DTS,
Inc. © DTS, Inc. All Rights Reserved.
"CINEMA FILTER" and "CINEMA FILTER (logo)" are trademarks of Onkyo
Corporation.
AccuEQ, Music Optimizer, RIHD and WRAT are trademarks of Onkyo
Corporation.
"RIHD" and "RIHD (logo)" are trademarks of Onkyo Corporation.
The terms HDMI and HDMI High-Definition Multimedia Interface, and the HDMI
Logo are trademarks or registered trademarks of HDMI Licensing LLC in the
United States and other countries.
The Bluetooth® word mark and logos are registered trademarks owned by
Bluetooth SIG, Inc. and any use of such marks by Onkyo is under license.
Other trademarks and trade names are those of their respective owners.
Onkyo does not guarantee Bluetooth compatibility between the AV receiver and
all Bluetooth-enabled devices.
For compatibility between the AV receiver and another device with Bluetooth
technology, consult the device’s documentation and dealer. In some countries,
there may be restrictions on using Bluetooth devices. Check with your local
authorities.
InstaPrevue and the InstaPrevue logo are trademarks or registered trademarks
of Silicon Image, Inc. in the United States and other countries.
Apple, iPod and iPhone are trademarks of Apple Inc., registered in the U.S. and
other countries.
Apple TV is a trademark of Apple Inc., registered in the U.S. and other
countries.
This product is protected by certain intellectual property rights of Microsoft. Use
or distribution of such technology outside of this product is prohibited without a
license from Microsoft.
Windows and the Windows logo are trademarks of the Microsoft group of
companies.
QR Code is a registered trademark of DENSO WAVE INCORPORATED.
Safari is a trademark or registered trademark of Apple Computer, Inc. in the
United States and other countries.
18
For European Models
Declaration of Conformity
We declare, under our sole responsibility, that this
product complies with the standards:
– Safety
– Limits and methods of measurement of radio
disturbance characteristics
– Limits for harmonic current emissions
– Limitation of voltage changes, voltage fluctuations and flicker
– RoHS Directive, 2011/65/EU
– Hereby, Onkyo Corporation, declares that this HT-RC630 is in compliance
with the essential requirements and other relevant provisions of Directive
1999/5/EC.
– µÑÄÕÖÒãÝÉÖÒ2QN\R&RUSRUDWLRQÈÉÎÏÄÔÌÔÄÛÉ+75&ÉÆ
ÕÞÒÖÆÉÖÕÖÆÌÉÕÞÕÕÞÝÉÕÖÆÉÑÌÖÉÌËÌÕÎÆÄÑÌãÌÈÔ×ÇÌÖÉÓÔÌÏÒÊÌÐÌ
ÔÄËÓÒÔÉÈÅÌÑĨÌÔÉÎÖÌÆÄ(&
– 1PM[Q%QTRQTCVKQPVÉOVQRTQJNCwWLGzG*64%URNĢWLG\½MNCFPÉ
RQzCFCXM[CXwGEJPCRįÉUNWwP½WUVCPQXGPK5OøTPKEG'5
– Undertegnede Onkyo Corporation erklærer herved, at følgende udstyr
HT-RC630 overholder de væsentlige krav og øvrige relevante krav i direktiv
1999/5/EF.
– Hiermit erklärt Onkyo Corporation, dass sich das Gerät HT-RC630 in
Übereinstimmung mit den grundlegenden Anforderungen und den übrigen
einschlägigen Bestimmungen der Richtlinie 1999/5/EG befindet.
– Käesolevaga kinnitab Onkyo Corporation seadme HT-RC630 vastavust
direktiivi 1999/5/EÜ põhinõuetele ja nimetatud direktiivist tulenevatele
teistele asjakohastele sätetele.
– ΜΕ ΤΗΝ ΠΑΡΟΥΣΑ Ο ΚΑΤΑΣΚΕΥΑΣΤΗΣ Onkyo Corporation ΔΗΛΩΝΕΙ
ΟΤΙ HT-RC630 ΣΥΜΜΟΡΦΩΝΕΤΑΙ ΠΡΟΣ ΤΙΣ ΟΥΣΙΩΔΕΙΣ ΑΠΑΙΤΗΣΕΙΣ
ΚΑΙ ΤΙΣ ΛΟΙΠΕΣ ΣΧΕΤΙΚΕΣ ΔΙΑΤΑΞΕΙΣ ΤΗΣ ΟΔΗΓΙΑΣ 1999/5/ΕΚ
– Por la presente, Onkyo Corporation, declara que este HT-RC630 cumple
con los requisitos esenciales y otras exigencias relevantes de la Directiva
1999/5/EC.
– Par la présente, Onkyo Corporation déclare que l’appareil HT-RC630 est
conforme aux exigences essentielles et aux autres dispositions pertinentes
de la directive 1999/5/CE.
– Con la presente Onkyo Corporation dichiara che questo HT-RC630 è
conforme ai requisiti essenziali ed alle altre disposizioni pertinenti stabilite
dalla direttiva 1999/5/CE.
– #TwQ1PM[Q%QTRQTCVKQPFGMNCTðMC*64%CVDKNUV&KTGMVĈXCU
'-DĿVKUMCLÞORTCUĈDÞOWPEKVKGOCTVQUCKUVĈVCLKGOPQVGKMWOKGO
– Šiuo Onkyo Corporation deklaruoja, kad šis HT-RC630 atitinka esminius
reikalavimus ir kitas 1999/5/EB Direktyvos nuostatas.
– A Onkyo Corporation ezzennel kijelenti, hogy a HT-RC630 típusú berenFG\ÅUVGNLGUÉVKC\CNCRXGVĩMÒXGVGNOÅP[GMGVÅUO½U'-KT½P[GNXDGP
OGIJCV½TQ\QVVXQPCVMQ\ÏTGPFGNMG\ÅUGMGV
– Hierbij verklaart Onkyo Corporation dat het toestel l HT-RC630 in
overeenstemming is met de essentiële eisen en de andere relevante
bepalingen van richtlijn 1999/5/EG.
– 0KPKGLU\[O1PM[Q%QTRQTCVKQPFGMNCTWLGŏG*64%LGUV\IQFP[
\\CUCFPKE\[OKY[OCICPKCOKKKPP[OKYĜCıEKY[OKRQUVCPQYKGPKCOK
Dyrektywy 1999/5/EC.
– Eu, Onkyo Corporation, declaro que o HT-RC630 cumpre os requisitos
essenciais e outras provisões relevantes da Directiva 1999/5/EC.
– 2TKPRTG\GPVC1PM[Q%QTRQTCVKQPFGENCTàEàCRCTCVWN*64%GUVG
ÊPEQPHQTOKVCVGEWEGTKPķGNGGUGPķKCNGĵKEWCNVGRTGXGFGTKRGTVKPGPVGCNG
Directivei 1999/5/CE.
– 1PM[Q%QTRQTCVKQPVÙOVQX[JNCUWLGzG*64%CURĔĢC\½MNCFPÅ
RQzKCFCXM[CXwGVM[RTÉUNWwPÅWUVCPQXGPKC5OGTPKEG'5
– Onkyo Corporation izjavlja, da je ta HT-RC630 v skladu z bistvenimi
\CJVGXCOKKPFTWIKOKTGNGXCPVPKOKFQNQêKNKFKTGMVKXG'5
– Onkyo Corporation vakuuttaa täten että HT-RC630 tyyppinen laite on
direktiivin 1999/5/EY oleellisten vaatimusten ja sitä koskevien direktiivin
muiden ehtojen mukainen.
– *ÀTOGFHÒTMNCTCT1PM[Q%QTRQTCVKQPCVVFGPPC*64%HÒNLGTFG
väsentliga kraven och andra relevanta stadgar i Direktiv 1999/5/EC.
– Hér með lýsir Onkyo Corporation því yfir að varan HT-RC630 er í samræmi
XKÌITWPPMTÒHWTQICÌTCTMTÒHWTUGOIGTÌCTGTWÉVKNUMKRWP'%
– Onkyo Corporation erklærer herved at denne HT-RC630 er i
overensstemmelse med vesentlige krav og andre relevante bestemmelser i
direktiv 1999/5/EC.
– 1XKOG1PM[Q%QTRQTCVKQPRQVXTîWLGFCLG*64%WUWINCUPQUVKUC
osnovnim zahtjevima i ostalim relevantnim odredbama Direktive 1999/5/EC.
HT-RC630
AV RECEIVER
Mode d'Emploi Base
Mode d'Emploi Avancé trouvé ici
http://www.onkyo.com/manual/htrc630/adv/fr.html
Fr
Avant de Démarrer
Mode d'Emploi Avancé
Le Mode d'Emploi Avancé est toujours mis à jour avec les
toutes dernières informations et son interface intuitive, qui
peu importe si vous l'utilisez depuis le PC ou le Smartphone,
aide à en apprendre davantage sur l’ampli-tuner AV. Le
Mode d'Emploi Avancé est constitué des chapitres suivants.
r Détails sur la lecture AM/FM
r Lire des fichiers musicaux à partir d'un appareil de
stockage USB
r Faire fonctionner des fichiers musicaux avec la
télécommande
r Mode d'écoute
r Configuration avancée
r Faire fonctionner les autres composants avec la
télécommande
r Connecter et faire fonctionner les composants Onkyo RI
r Mise à jour du micrologiciel
r Dépannage
r Informations de référence
Mode d'Emploi Avancé trouvé ici
http://www.onkyo.com/manual/htrc630/adv/fr.html
2
Accessoires Fournis
Antenne FM intérieure --- (1)
Antenne cadre AM --- (1)
Etiquettes de couleur pour le câble d'enceinte --- (1)
Speaker Cable
1
r Équipé d'un amplificateur 5 canaux
r Équipé de prises HDMI IN/OUT compatibles passthrough
4K/60 Hz
r Supporte la fonction HDMI Through qui permet la
r transmission depuis un appareil de lecture en veille à la
TV
r Supporte ARC (Audio Return Channel)
r Supporte la lecture depuis un appareil de stockage USB
r Prend en charge la connexion Bluetooth
r Fonction de synchronisation A/V pour corriger l'écart
audio et vidéo
r La fonction multi-zone qui vous permet de lire une
r source différente dans une pièce autre que la pièce
r principale
r 32 bit DSP (Digital Signal Processor) avec une
r performance de calcul excellente
r Music Optimizer pour les fichiers musicaux™
numériques compressés
r Système de Basses avec synchronisation des phases
r Supporte la lecture de MP3, FLAC, WAV, Ogg Vorbis,
Apple Lossless and DSD et les périphériques de
stockage USB
2
Fonctionnalités
Le Mode d'Emploi Base vous guide à travers les étapes
fondamentales, afin d'utiliser l’ampli-tuner AV depuis les
connexions de la TV, du système d'enceintes et des appareils
d'écoute, aux fonctions nécessaires pour l'écoute. De cette
façon, le Mode d'Emploi Base vous informe des instructions
sur les fonctions fréquemment utilisées. Par ailleurs, il existe
une autre partie du manuel intitulée Mode d'Emploi Base qui
vous explique les informations détaillées, que nous avons
décidé de publier sur Internet pour des raisons écologiques.
3
A propos du Mode d'Emploi Base
Télécommande (RC-879M) --- (1)
Piles (AA/R6) --- (2)
Le nombre entre parenthèses indique la quantité. Sur l'emballage, la lettre
¼
à la fin du nom du produit indique la couleur.
Comment utiliser la télécommande
Capteur de la télécommande
Ampli-tuner AV
Piles (AA/R6)
Env.
16 pieds (5 m)
Si la télécommande reste longtemps inutilisée, retirez les piles pour éviter
¼
toute fuite.
Veuillez noter que garder des piles consommées à l'intérieur de la
¼
télécommande peut causer des corrosions et l'endommager.
Etape 1 : Connexions
TV
Ordinateur personnel
HDMI
IN
HDMI
OUT
Câble HDMI
Pour utiliser la fonction ARC, connectez à la
prise HDMI compatible ARC du téléviseur et
effectuez un réglage approprié sur l'appareil. Voir
NCUGEVKQP|+PUVCNNCVKQP*&/+|FG|¥VCRG
+PUVCNNCVKQP|
HDMI
OUT
HDMI
OUT
HDMI
OUT
Console de jeu
1
HDMI
OUT
Décodeur/Magnétoscope
numérique, etc.
Connexion du téléviseur et des lecteurs
Important : Le cordon d'alimentation doit être connecté
uniquement lorsque toutes les autres connexions sont effectuées.
Branchement de câble HDMI
L'appareil a beaucoup de prises HDMI sur son panneau
arrière et chacune d'entre elles correspond à un sélecteur
d'entrée du même nom sur le panneau avant. Par exemple,
un lecteur de disques Blu-ray sera connecté à la prise IN 1
et le bouton BD/DVD sur le panneau frontal sera utilisé pour
l'écoute du son de la lecture (si le lecteur respecte la norme
CEC, l'entrée sera activée automatiquement). Si vous ajoutez
un autre lecteur de disques Blu-ray, vous pouvez utiliser une
autre prise que IN 1. Il est possible de modifier l'attribution des
Disque Blu-ray/
Lecteur de DVD
Satellite/Câble
décodeur, etc.
prises d'entrée et des boutons sélecteurs d'entrée. Pour savoir
comment faire des réglages, voir le Mode d'Emploi Avancé.
Pour connecter le téléviseur et l'appareil, connectez la prise
HDMI OUT à l'appareil et la prise HDMI IN au téléviseur à l'aide
d'un câble HDMI. Grâce à ce raccordement, il est maintenant
possible d'afficher l'écran des réglages de l'appareil sur le
téléviseur ou de transmettre les signaux audio/vidéo du lecteur
vers le téléviseur. Si votre téléviseur est compatible avec la
fonction ARC (Audio Return Channel), il est possible d'écouter
le son du téléviseur avec les enceintes du ampli-tuner AV
grâce uniquement à cette connexion. Si votre téléviseur est
incompatible avec la fonction ARC, vous avez besoin, en plus
de la connexion de la prise HDMI OUT, d'une connexion de
câble optique numérique entre la prise optique de sortie audio
numérique du téléviseur et la prise DIGITAL IN OPTICAL de
l'appareil ou bien d'une connexion câble audio analogique
(RCA) entre la prise de sortie audio du téléviseur et la prise
d'entrée audio analogique TV/CD de l'appareil.
z
Connexion avec un téléviseur qui n'est pas compatible avec la fonction ARC
TV
DIGITAL
OPTICAL
OUT
AUDIO
OUT
Sélectionnez une connexion
¼
appropriée pour votre téléviseur.
L'appareil est compatible avec la fonction HDMI Through
qui permet la transmission des lecteurs vers le téléviseur
même lorsque celui-ci est en veille. Vous devez modifier
les paramètres pour activer le lien de sélection d'entrée
avec un dispositif compatible CEC, la connexion avec un
téléviseur compatible ARC et la fonction HDMI Through.
3
Etape 1 : Connexions
8QKTNCUGEVKQP|+PUVCNNCVKQP*&/+|FG|¥VCRG
+PUVCNNCVKQP|
r Pour lire des vidéos de 4K ou de 1080p, utilisez le câble
HDMI haute vitesse.
Si votre composant AV n'a pas de prise HDMI, utilisez
une prise disponible de votre appareil pour la connexion
du câble avec cet appareil. Comme pour les prises HDMI,
les autres prises de cet appareil possèdent un bouton
sélecteur d'entrée attribué au préalable sur le panneau
frontal. Voir le nom du bouton sélecteur d'entrée visible
avec la prise lors de la connexion du périphérique.
3
1 Connexion numérique : Utilisez un câble optique
numérique (OPTICAL) ou un câble coaxial numérique
(COAXIAL) pour une connexion avec un lecteur.
Câble optique numérique (OPTICAL)
Connexion des composants sans HDMI
1
Connexion de signal audio
4
Comme la prise optique d'entrée numérique de
¼
l'appareil possède un cache, poussez le câble
sur le cache car il est tourné vers l'intérieur.
Câble coaxial numérique (COAXIAL)
2 Connexion analogique : Utilisez un câble audio
analogique (RCA) pour la connexion à un lecteur.
Pour profiter de la lecture multi-zone de l'audio
d’un lecteur CD ou d'un autre lecteur similaire sans
prise de sortie HDMI, vous devez utiliser le câble
audio analogique (RCA) pour brancher les prises
correspondantes du lecteur et de cet appareil. Pour plus
de détails sur la fonction multi-zone, voir la section 6
|7VKNKUCVKQPFGNCHQPEVKQPOWNVK\QPG|FG|¥VCRG
¥EQWVGT|
Câble audio analogique (RCA)
Connexion du signal vidéo
3 Utilisez un câble vidéo composante pour connecter
le téléviseur aux prises d'entrée vidéo composante
et un lecteur aux prises de sortie vidéo composante.
r Lorsqu'un câble vidéo à composantes est utilisé pour
connecter l'unité et le lecteur, l'unité et le téléviseur
doivent également être connectés avec un câble
vidéo à composantes.
Câble vidéo composante
La vidéo transmise est d'une meilleure qualité
¼
que celle du câble vidéo composite.
2
Si vous connectez une platine qui n'est pas équipée d'un
égaliseur audio intégré, vous devez installer un égaliseur
audio externe entre l'unité et la platine.
4 Utilisez un câble vidéo composite pour connecter
un téléviseur à la prise d'entrée vidéo composite
avec une prise de sortie vidéo composite.
r Lorsqu'un câble vidéo à composantes est utilisé pour
connecter l'unité et le lecteur, l'unité et le téléviseur
doivent également être connectés avec un câble
vidéo à composantes.
Câble vidéo composite
4
Etape 1 : Connexions
2
2
Avant D
Connexion des enceintes
1
Avant G
3
Centre
Important : Le cordon d'alimentation doit être connecté
uniquement lorsque toutes les autres connexions sont
effectuées.
12
3
6
45
1 2 Enceintes frontales
Enceinte centrale
3
4 5 Enceintes ambiophoniques
Caisson de basse
6
r Un seul caisson de basses peut être connecté.
r Pour utiliser la fonction multi-zone, voir la section 6
|7VKNKUCVKQPFGNCHQPEVKQPOWNVK\QPG|FG|¥VCRG
¥EQWVGT|
L'idéal est d'installer les enceintes frontales et l'enceinte
centrale à la même hauteur que l'écran, mais pas trop
éloignées de celui-ci. En ce qui concerne les enceintes
ambiophoniques, il est recommandé de les installer à une
position légèrement en retrait de la position d'écoute et
au dessus des oreilles de l'auditeur, car il est préférable
d'obtenir un son diffus plutôt qu'un son direct. Comme
un son grave émis par un caisson de basse est moins
directionnel, on peut le placer partout. Évaluez la meilleure
position de montage où un son grave peut être entendu par
une écoute en temps réel de la lecture.
6
Caisson de basse avec
amplificateur de puissance intégré
5
Surround D
3/8"-1/2" (10-12 mm)
Important : Raccordez des enceintes de valeur
FKORÅFCPEGEQORTKUGGPVTGŝGVŝ.WVKNKUCVKQPFWPG
enceinte de valeur d'impédance inférieure à celle prise en
charge peut entraîner une défaillance.
Découpez et retirez la gaine plastique à l'extrémité du câble
de l'enceinte, torsadez son cœur et connectez-le à la borne.
4
Surround G
Connectez correctement les prises de l'appareil et les prises
de l'enceinte (+ avec + et - avec -) pour chaque canal. Si une
connexion est mauvaise, un son grave peut se détériorer à
cause d'une inversion de phase. Pour faciliter une connexion
correcte, attachez les étiquettes colorées pour enceintes
fournies du côté + aux deux extrémités du câble de chaque
canal. La prise du caisson de basse est compatible avec la
connexion d'un caisson de basse doté d'un amplificateur de
puissance intégré. Réglez le commutateur de sélection du
seuil du filtre du caisson de basse sur DIRECT. Si le caisson
de basse ne possède pas de commutateur de sélection de
5
Etape 1 : Connexions
seuil du filtre mais une molette d'ajustement de la fréquence
de seuil, tournez celle-ci sur sa fréquence maximale. Si
votre caisson de basse ne possède pas d'amplificateur
de puissance intégré, vous pouvez en connecter un entre
l'appareil et le caisson de basse.
r L'enceinte est réglée sur 5.1 canaux au moment de
l'achat. Changez le réglage lorsque vous utilisez une
configuration autre que 5.1 ch.
r Court-circuiter le câble + et le câble - ou bien mettre
en contact le cœur du câble avec le panneau arrière
de l'appareil peut entraîner une défaillance. De plus, ne
raccordez pas deux câbles ou plus à une seule prise ou
bien une enceinte à plusieurs prises.
3
Connexion des écouteurs
Autres connexions
Connexions d'antenne AM/FM
Raccordez les antennes pour écouter les diffusions AM/
FM. Lorsque vous écoutez une diffusion pour la première
fois, réglez la position de l'antenne et son orientation pour
pouvoir obtenir la meilleure réception possible.
Antenne cadre AM (fournie)
Antenne FM
intérieure (fournie)
Fixez à l'aide d'une
punaise sur le mur.
(Modèles nord-américains)
(Modèles européen et
asiatique)
Assemblez l'antenne cadre AM (fournie).
6
Connectez des écouteurs stéréo de prise standard
|RQWEGQWÔOO¼NCRTKUG2*10'5.GUQPFGU
enceintes sera coupé lorsque vous utilisez les écouteurs.
r Si vous avez sélectionné un autre mode d'écoute que,
Stéréo, Mono et Direct, alors les écouteurs basculeront
le mode d'écoute vers Stéréo.
Etape 2 : Installation
1
Changer la configuration d'enceinte
Mise sous tension
1. Après avoir appuyé sur RCV, appuyez sur HOME sur
la télécommande.
Raccordez le cordon d'alimentation à la prise. Appuyez
sur zON/STANDBY sur l'appareil principal ou bien
zRECEIVER sur la télécommande pour allumer l'appareil
ou bien le mettre en mode veille.
r Lorsque l'appareil s'allume, un courant important circule
instantanément et peut affecter le fonctionnement de
l'ordinateur et autres périphériques. Il est recommandé
d'utiliser une prise différente de celle utilisée pour
l'ordinateur ou autres périphériques sensibles.
2. #XGENGEWTUGWTUÅNGEVKQPPG\|5GVWR|GVCRRW[G\
sur ENTER.
3. 5ÅNGEVKQPPG\|5R%QPHKI|CXGENGEWTUGWTGV
appuyez sur ENTER.
z Fonctionnement : Vous pouvez régler en visualisant le
guide affiché à l'écran du téléviseur. Pour afficher le guide,
vous devez effectuer la connexion HDMI entre l'unité et
le téléviseur. Sélectionnez l'élément avec les boutons du
curseur de la télécommande et appuyez sur ENTER pour
confirmer votre sélection. Pour revenir à l'écran précédent,
appuyez sur RETURN. Pour revenir au menu d'accueil,
appuyez sur HOME.
2
Déplacez le curseur avec les boutons d/c et réglez
|0QPG|RQWTNGPEGKPVG
|0Q|RQWTNGECKUUQPFG
basses) qui n'est pas connectée.
Appuyez sur HOME pour enregistrer le réglage modifié et
fermer l'écran du menu.
r Ce réglage ne peut pas être modifié si le casque est
connecté ou si l'audio est émis par les enceintes du
téléviseur.
Régler la distance d'enceinte
Effectuer le réglage d'enceinte
La configuration d'enceinte de cette unité est réglée sur
5.1 ch par défaut. Pour utiliser cette unité dans différents
environnements, comme une configuration sans enceinte
centrale, sans enceinte surround ni caisson de basses,
vous devez effectuer les réglages pour chacun des
éléments suivants.
r Si les réglages ne correspondent pas à la configuration
d'enceinte actuelle, la lecture audio risque de ne pas
être effectuée correctement. Vérifiez votre configuration
d'enceinte et effectuez les réglages corrects.
1. Après avoir appuyé sur RCV, appuyez sur HOME sur
la télécommande.
2. 5ÅNGEVKQPPG\|5GVWR|CXGENGEWTUGWTGVCRRW[G\
sur ENTER.
3. 5ÅNGEVKQPPG\|5R&KUVCPEG|CXGENGEWTUGWTGV
appuyez sur ENTER.
7
Etape 2 : Installation
Déplacez le curseur avec les boutons d/c et réglez la
distance depuis chaque enceinte sur la position d'écoute.
Appuyez sur HOME pour enregistrer le réglage modifié et
fermer l'écran du menu.
r Ce réglage ne peut pas être modifié si le casque est
connecté ou si l'audio est émis depuis les enceintes ou
la distance des enceintes ne peut pas être changée si
|0Q|QW|0QPG|GUVTÅINÅRQWTNGUGPEGKPVGUFCPU
|5R%QPHKI|
Régler le niveau de volume des enceintes
1. Après avoir appuyé sur RCV, appuyez sur HOME sur
la télécommande.
2. #XGENGEWTUGWTUÅNGEVKQPPG\|5GVWR|GVCRRW[G\
3
Installation HDMI
L'appareil est compatible avec la fonction de système lié tel que
le lien Marche/Arrêt lorsqu'il est connecté via un câble HDMI
à un téléviseur ou un lecteur aux normes CEC (Contrôle de
l'Électronique pour Consommateurs). Vous devez changer le
réglage initial pour utiliser la fonction de système lié, la fonction
HDMI Through et la fonction ARC (Audio Return Channel).
La fonction permet la transmission depuis les lecteurs vers le téléviseur
même si l'appareil est en veille. Le positionnement du réglage HDMI
%'%
4+*&KPFKSWÅRNWUJCWVUWT|1P|RGTOGVNCEVKXCVKQPFGEG
réglage automatiquement. Il est également nécessaire de faire les
réglages du système lié par HDMI sur la TV. Pour plus d'informations,
reportez-vous au mode d'emploi de la télévision.
r Bien que l'activation de la fonction HDMI Through
augmente la consommation d'énergie en veille.
z Opération : Vous pouvez installer en regardant les instructions
affichées à l'écran du téléviseur. Pour afficher les instructions,
vous devez établir une connexion HDMI entre l'appareil et le
téléviseur. Sélectionnez l'élément grâce aux boutons curseurs de
la télécommande et appuyez sur ENTER pour confirmer votre
sélection. Pour retourner à l'écran précédent, appuyez sur RETURN.
ARC (Audio Return Channel)
sur ENTER.
3. 5ÅNGEVKQPPG\|.GXGN%CN|CXGENGEWTUGWTGV
appuyez sur ENTER.
HDMI Through
HDMI CEC (RIHD)
Une connexion simple au téléviseur compatible ARC avec
un seul câble HDMI permet d'écouter le son du téléviseur
avec les enceintes connectées à l'appareil. Pour utiliser
la fonction ARC, branchez l'appareil à la prise HDMI
compatible ARC du téléviseur. Puis, réglez le paramètre
*&/+%'%
4+*&OGPVKQPPÅEKFGUUWUUWT|1P|UWT
l'appareil et effectuez le réglage suivant.
1. Appuyez sur RCV sur la télécommande puis
appuyez sur HOME.
2. 5ÅNGEVKQPPG\|Setup|CXGENGUDQWVQPUEWTUGWTUGV
appuyez sur ENTER.
3. 5ÅNGEVKQPPG\|*&/+5GVWR|CXGENGUDQWVQPU
curseurs et appuyez sur ENTER.
Déplacez le curseur avec les boutons d/c et changez
le niveau de volume de chaque enceinte. Une tonalité de
test est émise à chaque fois que vous changez de niveau.
Sélectionnez le niveau désiré. Appuyez sur HOME pour
enregistrer le réglage modifié et fermer l'écran du menu.
r Dans les cas suivants, le réglage ne peut pas être
changé :
– Un casque est connecté.
– L'audio est émis depuis les enceintes du téléviseur.
– La mise en sourdine est activée.
r Vous ne pouvez pas changer le niveau de volume des
GPEGKPVGUNQTUSWG|0Q|QW|0QPG|GUVTÅINÅRQWTNGU
GPEGKPVGUFCPU|5R%QPHKI|
4. 5ÅNGEVKQPPG\|#WFKQ4GVWTP%J|CXGENGUDQWVQPU
EWTUGWTUGVUÅNGEVKQPPG\|#WVQ|
La mise en veille du téléviseur entraîne la mise en veille
de l'appareil.
Sur la TV, il est possible de définir si le son doit sortir des
haut-parleurs connectés à l’unité ou des haut-parleurs de
la TV.
La mise en route de la lecture d'un lecteur/enregistreur
répondant aux normes CEC fera basculer automatiquement
l'entrée de l'appareil vers l'entrée HDMI du lecteur/enregistreur.
Si l'appareil est en veille, il s'allumera automatiquement.
1. Appuyez sur RCV sur la télécommande puis
appuyez sur HOME.
2. 5ÅNGEVKQPPG\|5GVWR|CXGENGUDQWVQPUEWTUGWTUGV
appuyez sur ENTER.
3. 5ÅNGEVKQPPG\|*&/+5GVWR|CXGENGUDQWVQPU
curseurs et appuyez sur ENTER.
4. 5ÅNGEVKQPPG\|*&/+%'%
4+*&|CXGENGUDQWVQPU
EWTUGWTUGVUÅNGEVKQPPG\|1P|
8
Sortie audio des lecteurs connectés
Pour bénéficier du son ambiophonique numérique,
y compris Dolby Digital et DTS, la sortie audio doit
ÆVTGTÅINÅGUWT|$KVUVTGCOQWVRWV|RQWTNGNGEVGWT
de disque Blu-ray ou autres périphériques. Si le
téléviseur n'est pas compatible avec les signaux en
flux binaires, réglez la sortie audio du lecteur sur
|2%/QWVRWV|RQWTRQWXQKTÅEQWVGTNCWFKQFGRWKU
les enceintes du téléviseur. Pour savoir comment
régler le lecteur, voir le manuel d'instructions du
lecteur. Certains réglages du lecteur de disques
Blu-ray peuvent empêcher la reproduction du DTS*&/CUVGT#WFKQ&CPUEGECUOGVVG\|$&XKFGQ
UWRRNGOGPVCT[UQWPF|
QWUQPUGEQPFCKTGUWT
|1HH|GVGUUC[G\¼PQWXGCW
Etape 3 : Ecouter
1
Lecture à partir du lecteur et le téléviseur
Noms des parties de la télécommande
1
2
3
1 Bouton zRECEIVER : Permet la mise en marche ou
veille de l'appareil.
8
2 Bouton RCV : Passe la télécommande sur le mode
faisant fonctionner cet appareil.
3 Boutons REMOTE MODE/INPUT SELECTOR :
Change l'entrée à lire.
9
z Pour contrôler l'unité : La télécommande peut être
en mode à distance, ce qui permet le contrôle d'autres
appareils. Avec le mode à distance, vous ne pouvez pas
faire fonctionner cette unité. Lorsque vous utilisez l'unité,
faites-la fonctionner depuis le retour au mode (un mode
dans lequel vous pouvez utiliser cette unité) RECEIVER en
appuyant toujours sur 2 RCV.
4
1. Mise sous tension
5
Appuyez sur 1 zRECEIVER sur la télécommande pour
mettre sous tension.
r Réglez l'entrée du téléviseur sur celle assignée à
l'appareil. Utilisez la télécommande du téléviseur.
2. Sélectionnez l'entrée de l'appareil et démarrez la
lecture sur le lecteur ou le téléviseur.
r Appuyez sur 3 INPUT SELECTOR pour lequel le
lecteur choisi a été assigné. Appuyez sur TV/CD pour
jouer le son du téléviseur. Vous pouvez également
utiliser les boutons sélecteurs d'entrée de l'unité
principale.
r L'entrée sera automatiquement choisie si le
téléviseur répond aux normes CEC et est connecté à
l'appareil grâce à un câble HDMI.
3. Choisissez le mode d'écoute souhaité.
F
G
H
¼
La touche du sélecteur d’entrée NET n’a aucun effet sur cet appareil,
RWKUSWGNoCRRCTGKNPCRCUFGUÅNGEVGWTFoGPVTÅG0'6
4 Boutons curseurs et bouton ENTER : Déplace le
curseur et confirme la sélection.
5 Bouton Q SETUP : Affiche le menu de réglage rapide
6
7
8
9
6
F
G
H
7
I
I
qui vous permet de paramétrer les fonctions les plus
souvent utilisées, y compris la sélection d'entrée et le
réglage du volume.
Boutons de mode d'écoute : Permet de sélectionner le
mode d'écoute.
Bouton DIMMER : Modifie la luminosité de l'affichage.
Bouton ZONE2 : Pour une utilisation lorsque l'appareil
est connecté à un pré-amplificateur principal dans une
pièce séparée et le son est joué dans cette pièce.
Bouton MUTING : Mise temporaire de l'audio en
sourdine.
Boutons VOLUME : Vous permet d'ajuster le volume.
Bouton RETURN : Permet à l'affichage de retourner à son
état précédent.
Bouton HOME : Affiche le menu d'accueil qui vous
permet d'effectuer les réglages avancés et d'utiliser
d'autres fonctions.
Bouton DISPLAY : Modifie l'information affichée.
r Les boutons autres que 1-I servent à utiliser d'autres
appareils.
Appuyez sur 6 les boutons de mode d'écoute pour
changer de mode pour pouvoir profiter de différents
modes d'écoute. Pour les détails concernant les modes
FÅEQWVGXQKT|/QFGUFÅEQWVG|
4. Ajuster le volume avec F.
9
Etape 3 : Ecouter
Modes d'écoute
Sélectionnez le mode choisi en commutant et en écoutant le
son en temps réel dans différents modes. Les modes d'écoute
sélectionnables dépendent du format des signaux d'entrée.
MOVIE/TV : Vous pouvez choisir un mode d'écoute
approprié aux films et programmes télé.
MUSIC : Vous pouvez choisir un mode d'écoute approprié à
la musique.
GAME : Vous pouvez choisir un mode d'écoute approprié
aux jeux vidéo.
STEREO : Vous pouvez sélectionner un mode d'écoute en
stéréo et toutes les sources stéréo de canaux.
r Pour plus d'informations sur les modes d'écoute, voir le
manuel avancé.
|&KTGEV|RQWTNCNGEVWTGVGNNGSWGNNGFGUUKIPCWZ
d'entrée
La sélection de ce mode permet la lecture sans
modification des signaux d'entrée. Par exemple, les
signaux de canaux 2 d'un CD de musique seront
joués en stéréo, les signaux de canaux 5.1 en canaux
5.1 et les signaux Dolby Digital d'un disque Blu-ray ou
d'un DVD en champ sonore Dolby Digital en accord
avec le nombre de canaux spécifiés.
Autres fonctions utiles
Lecture Vidéo et Audio de Sources Différentes : Il est
possible de jouer l'audio et la vidéo depuis des sources
différentes. Par exemple, vous pouvez jouer l'audio d'un
lecteur CD et la vidéo d'un lecteur BD/DVD. Dans ce cas,
appuyez sur BD/DVD puis TV/CD. Puis démarrez la lecture
sur les lecteurs BD/DVD et CD. Cette fonction est efficace
lorsqu'une entrée avec audio seule a été sélectionnée (TV/
CD, AM ou FM depuis le réglage initial).
10
Réglage de la qualité du son: Il est possible d'améliorer
ou de modérer les basses et les aigus des enceintes avant.
Appuyez plusieurs fois sur TONE sur l’appareil principal
RQWTUÅNGEVKQPPGTNGTÅINCIGFGXQVTGEJQKZRCTOK|$CUU|
|6TGDNG|GV|2/$CUU|
2JCUG/CVEJKPI$CUURWKU
ajustez avec +/-.
|$CUU|: Vous permet d'améliorer ou de modérer les
basses.
|6TGDNG|: Vous permet d'améliorer ou de modérer les
aigus.
|2/$CUU|: Vous permet de garder le milieu de
gamme clair et d'améliorer efficacement les basses.
Couper le Son Temporairement : Appuyez sur MUTING
sur la télécommande. Appuyez à nouveau sur MUTING
pour annuler la mise en sourdine.
Changer la Luminosité de l'Affichage : Appuyez
sur DIMMER sur la télécommande plusieurs fois pour
sélectionner la luminosité voulue.
Changer l'Affichage d'Entrée : Appuyez sur DISPLAY
sur la télécommande plusieurs fois pour commuter
l'affichage de l'unité principale afin de :
Source d'entrée
& volume
2
Écouter la radio AM/FM
La méthode du tuning auto est expliquée dans le manuel
de base. Pour plus de détails sur les stations de radio AM/
FM, consultez le Mode d'Emploi Avancé.
1. Appuyez sur AM ou FM sur l’unité pour sélectionner
|#/|QW|(/|
2. Appuyez sur TUNING MODE sur l’unité afin
SWGNoKPFKECVGWT|#761|UWTNoÅETCPFGNoWPKVÅ
s’illumine.
3. Appuyez sur TUNING sur l’unité.
La recherche automatique de stations de radio débute. La
recherche s’arrête lorsqu’une station est trouvée. Lorsqu’une
UVCVKQPFGTCFKQGUVFÅVGEVÅGNoKPFKECVGWT| TUNED |
sur l’écran de l’unité s’illumine.
.oKPFKECVGWT|(/56'4'1|UoKNNWOKPGUKNCUVCVKQPFGTCFKQ
est une station FM.
TUNED
AUTO
FM STEREO
(L’affichage peut être différent d’un pays à l’autre.)
Mode
d'écoute
Format
du signal
Échantillonnage
de la fréquence
r 5K|&QND[&|GUVCHHKEJÅGPHQTOCVFWUKIPCNNGU
signaux Dolby Digital de canaux 5.1 sont entrés. Lors
de l'écoute de la radio AM/FM, la bande, fréquence et
numéro de présélection sont affichés.
Enregistrement d’une Station de Radio : Cela vous
permet d’enregistrer jusqu’à 40 de vos stations de radio
AM/FM préférées.
1. Sélectionnez la station radio AM/FM de votre choix pour
l’enregistrer.
2. Appuyez sur MEMORY sur l'appareil.
Le numéro préréglé clignote sur l'affichage.
3. Appuyez plusieurs fois sur PRESET sur l’unité pour
sélectionner un nombre entre 1 et 40 pendant que le
nombre de préréglage clignote (environ 8 secondes).
4. Appuyez à nouveau sur MEMORY sur l’unité.
Une fois l’enregistrement terminé, le numéro de
préréglage arrête de clignoter. Répétez cette procédure
pour toutes vos chansons de radio AM/FM préférées.
PRESET ou CH +/- pour sélectionner
Appuyez sur
la station de radio enregistrée.
Etape 3 : Ecouter
3
Connexion et lecture du son du
périphérique compatible Bluetooth
Vous pouvez profiter sans fil des fichiers musicaux stockés
dans votre smartphone ou autre périphérique compatible
Bluetooth. La zone de couverture est de 48 pieds (15 mètres).
r Le périphérique compatible Bluetooth a besoin d'être
compatible avec le profile A2DP.
r Notez que la connexion n'est pas toujours garantie avec
les périphériques compatibles Bluetooth.
Jumelage
Le jumelage est nécessaire lorsque le périphérique
compatible Bluetooth est utilisé pour la première fois. Avant
de commencer, apprenez comment activer la fonction de
paramétrage Bluetooth et comment se connecter à d'autres
périphériques compatibles Bluetooth.
1. Appuyez sur BLUETOOTH sur la télécommande.
L'appareil entre en mode jumelage et l'indicateur
BLUETOOTH commence à clignoter.
Lecture du son du périphérique compatible Bluetooth
Si l'appareil est en marche et que le périphérique
compatible Bluetooth est connecté, l'entrée sera
automatiquement mise sur BLUETOOTH. Lecture de la
musique dans cet état.
r Il peut s'écouler une minute environ avant que la
connexion ne soit établie lorsque l'appareil est en marche
car la fonction Bluetooth prend du temps à se lancer.
r Si le volume du périphérique compatible Bluetooth est
bas, le son peut ne pas être en sorti depuis cet appareil.
r À cause des caractéristiques de la technologie sans
fil Bluetooth, le son produit par cet appareil peut être
légèrement en retard sur le son joué par le périphérique
compatible Bluetooth.
4
Utilisation du menu principal
Dans le menu d'accueil, vous pouvez effectuer les réglages
avancés et utiliser des fonctions telles que la lecture de
fichiers stockés sur un périphérique de stockage USB.
Pour plus de détails sur le fonctionnement, voir le manuel
avancé.
1. Appuyez sur RCV sur la télécommande puis
appuyez sur HOME.
Le menu principal s'affiche à l'écran du téléviseur. Vous
pouvez également utiliser le bouton HOME sur l'unité
principale.
Setup : Vous pouvez modifier l'attribution des bornes
d'entrée et des boutons sélecteurs d'entrée et effectuer
divers paramétrages d'enceintes et autres réglages
avancés.
USB : Sélectionnez pour connecter un périphérique de
stockage USB au port USB afin qu'il puisse être lu.
r |75$|FGXKGPVUÅNGEVKQPPCDNGCRTÄUSWGNCHQPEVKQP
USB démarre même si elle ne peut pas être sélectionnée
au préalable. Cela peut prendre environ une minute à
démarrer.
Sleep Timer : Sélectionnez pour mettre
automatiquement l'appareil en veille lorsque le temps
spécifié s'est écoulé.
InstaPrevue : Sélectionnez pour obtenir un aperçu
collectif de l'entrée des vidéos depuis les prises d'entrée
HDMI sur un seul écran. L'écran possède un écran
principal (entrée vidéo actuelle) et des sous-fenêtres
(autres entrées vidéo). Pour changer d'entrée actuelle,
sélectionnez la sous-fenêtre souhaitée avec les boutons
curseurs et appuyez sur ENTER.
r Une sous-fenêtre noire s'affiche pour l'entrée sans aucun
signal vidéo.
r |+PUVC2TGXWG|PGRGWVÆVTGUÅNGEVKQPPÅUKNCXKFÅQ
est entrée depuis HDMI IN 6 ou s'il n'y a pas de signal
depuis l'entrée sélectionnée.
r En fonction des signaux vidéos, l'image peut ne pas être
correctement reproduite sur les onglets d'aperçu.
2. Pendant que l'indicateur BLUETOOTH clignote,
établissez la connexion du périphérique compatible
Bluetooth dans une zone avoisinante avant environ
2 minutes.
Si le nom de l'appareil s'affiche à l'écran du périphérique
compatible Bluetooth, sélectionnez cet appareil. Le
jumelage se terminera peu après.
r 5KWPOQVFGRCUUGGUVTGSWKUGPVTG\||
r Lorsque vous connectez l'appareil à tout autre
périphérique Bluetooth, démarrez le jumelage en
pressant et en maintenant appuyé BLUETOOTH
jusqu'à ce que l'indicateur BLUETOOTH commence
à clignoter. Cet appareil peut contenir les données de
jusqu'à dix périphériques jumelés.
Home
Setup
USB
Sleep Timer
InstaPrevue
2. Sélectionnez l'élément grâce aux boutons curseurs
de la télécommande et appuyez sur ENTER pour
confirmer votre sélection.
Pour retourner à l'écran précédent, appuyez sur
RETURN. Pour retourner à l'écran principal, appuyez
sur HOME.
11
Etape 3 : Ecouter
5
Utilisation du menu de réglage rapide
Dans le menu de réglage rapide, vous pouvez paramétrer
les fonctions les plus souvent utilisées, y compris la
sélection d'entrée et le réglage du volume.
1. Appuyez sur Q SETUP sur la télécommande.
Le menu de réglage rapide s'affiche à l'écran du
téléviseur connecté.
Quick Setup
Input
Audio
Information
Listening Mode
2. Sélectionnez l'élément grâce aux boutons curseurs
de la télécommande et appuyez sur ENTER pour
confirmer votre sélection.
Pour retourner à l'écran précédent, appuyez sur
RETURN.
Input : Sélectionnez l'entrée et vérifiez l'attribution des
boutons sélecteurs d'entrée.
Audio: Vous pouvez modifier différents paramètres
audio, tels que le réglage du niveau et de la qualité de son
de l'enceinte.
r Vous ne pouvez pas sélectionner ce réglage lorsque le
son est émis par les enceintes du téléviseur.
A/V Sync : Si la vidéo est en retard avec l'audio, vous
pouvez retarder l'audio pour compenser l'écart.
r +NPGRGWVÆVTGTÅINÅUKNGPVTÅGGUV|75$|QW
|$.7'6116*|
r Impossible de régler si le mode d'écoute est Direct.
Bass, Treble : Ajuster le volume de l'enceinte frontale.
r Impossible de régler si le mode d'écoute est Direct.
PM Bass (Phase Matching Bass) : Supprime le
changement de phase en milieu de gamme pour
améliorer le son grave. Ainsi un son grave puissant et
fluide peut être obtenu.
r Impossible de régler si le mode d'écoute est Direct.
12
Subwoofer Level, Center Level : Ajuster le niveau de
l'enceinte lorsque vous écoutez le son. L'ajustement que
vous effectuez reviendra à l'état précédent lorsque vous
mettrez l'appareil en mode veille.
r Les enceintes ne peuvent être ajustées si elles
QPVÅVÅTÅINÅGUUWT|0Q|QW|0QPG|FCPU|5R
%QPHKI|
Late Night : Produit des petits sons facilement
entendus. Utile lorsque vous avez besoin de baisser le
volume lorsque vous regardez un film tard la nuit. Vous
pouvez uniquement bénéficier de l'effet pour les sources
Dolby Digital, Dolby Digital Plus et Dolby TrueHD.
r La mise en veille du téléviseur entraînera la définition
FWRCTCOÄVTGUWT|1HH|2QWTNG&QND[6TWG*&NG
RCTCOÄVTGUGTCFÅHKPKUWT|#WVQ|
Music Optimizer : Améliore la qualité de l'audio
compressé. La lecture de sons depuis des fichiers
compressés avec perte tels que les MP3 peut être améliorée.
Le réglage peut être défini séparément pour chaque entrée.
r Le réglage est efficace pour les signaux de 48 kHz
ou moins. Le réglage n'est pas efficace pour les
signaux en flux binaires.
r Impossible de régler si le mode d'écoute est Direct.
Cinema Filter : Ajustez la piste sonore traitée pour
améliorer la gamme des aigus, afin de la rendre
appropriée pour le home cinéma.
r Cette fonction peut être utilisée avec les modes
d'écoute suivants : Multicanal, Dolby Digital, Dolby
Digital Plus, Dolby TrueHD, DTS, DTS-HD Audio haute
résolution, DTS-HD Master Audio, DTS Express, DTS
96/24, Dolby PL II Film, DTS Neo:6 et Neo:6 Cinéma.
Information : Affichez les informations audio.
Listening Mode : Sélectionnez le mode d'écoute depuis
NGUECVÅIQTKGUFCPU|/18+'68||/75+%|GV|)#/'|
r Il ne peut être réglé lorsque l'audio est joué sur les
enceintes du téléviseur.
Etape 3 : Ecouter
6
Utilisation de la fonction multi-zone
Vous pouvez écoutez de la musique dans une pièce
séparée en créant la connexion (analogique) de Zone entre
l'unité et un amplificateur intégré placé dans une pièce
séparée.
Vous pouvez utiliser un lecteur de disques Blu-ray dans
la pièce principale dans laquelle l'unité est placée, tout en
recevant une émission AM/FM dans une pièce séparée.
L'audio peut être lu dans la pièce principale et dans la
pièce séparée simultanément, ou seulement dans la pièce
séparée.
r Les sources dont vous pouvez profiter dans la pièce
séparée sont les lecteurs connectés aux prises d'entrée
audio analogique de l'unité, ainsi que l'émission AM/FM.
r Lorsque vous écoutez la diffusion AM/FM, vous ne
pouvez pas sélectionner des stations différentes pour
la pièce principale et la pièce séparée. Cependant, la
diffusion de la même station sera entendue dans les
deux pièces.
Connexion d'un lecteur
Pour émettre l'audio du lecteur de Disques Blu-ray ou d'un
autre lecteur similaire comme source de la Zone de lecture,
il est nécessaire de connecter les prises de sortie audio
RCA du lecteur et les prises d'entrée audio analogique de
l'appareil à l'aide d'un câble audio analogique.
AUDIO
OUT
Établir une connexion de la multi-zone
Effectuer une lecture multi-zone
Connectez les prises ZONE 2 LINE OUT de l'appareil et les
prises d'entrée de ligne de l'amplificateur pré-principal dans
une autre pièce avec un câble audio analogique (RCA).
1. Appuyez sur ZONE2 sur la télécommande, pointez
la télécommande dans la direction du capteur de la
télécommande et appuyez sur zRECEIVER.
|<|UoCHHKEJGUWTNoWPKVÅGVNCHQPEVKQP<10'GUV
activée. (ZONE 2 est maintenant activée.)
2. Appuyez à nouveau sur ZONE2 sur la télécommande
et appuyez sur INPUT SELECTOR de l'entrée qui doit
être utilisée dans la pièce séparée.
Pour jouer la même source dans la pièce principale et la
pièce séparée, maintenir appuyé ZONE2 pendant
3 secondes.
Le volume doit être ajusté depuis le pré-amplificateur
principal utilisé dans la pièce séparée.
Pour contrôler sur l'appareil principal : Appuyez sur
ZONE2 et dans les 8 secondes qui suivent, appuyez sur
le bouton sélecteur d'entrée de l'entrée devant être utilisée
dans la pièce séparée. Pour lire la même source dans la
pièce principale et dans la pièce séparée, appuyez deux
fois sur ZONE2.
Pour désactiver la fonction multi-zone : Appuyez
sur ZONE2 sur la télécommande puis appuyez sur
zRECEIVER. Alternativement, appuyez sur OFF sur l'unité
principale.
r La lecture multi zone ne peut pas être effectuée si
un lecteur est connecté à la prise HDMI à l'aide d'un
câble HDMI ou à la prise OPTICAL/COAXIAL à l'aide
d'un câble numérique. Connectez les lecteurs à l'aide
d'un câble audio analogique pour une lecture multizone. Le réglage de la sortie audio analogique peut être
nécessaire sur le lecteur.
r Si ZONE 2 est activée, la consommation d'énergie en
veille est supérieure à la normale.
r Lorsque la ZONE 2 est activée, la fonction RI du
système lié (interconnexion des composants Onkyo) est
désactivée.
r La sortie de la multi-zone n'est pas possible si la
connexion est uniquement faite avec un câble HDMI ou
un câble numérique.
r Le réglage de la sortie audio analogique peut être
nécessaire sur le lecteur.
13
1
2
3
4 5
6
7
8
9
F
G
H
I
J
K
(Modèles européen)
L
M
N
O
Q
P
R
Panneau frontal
1 Bouton zON/STANDBY : Permet la mise en marche
2
3
4
5
6
7
8
ou veille de l'appareil.
Indicateur BLUETOOTH : Clignote lorsque le jumelage
avec un périphérique compatible Bluetooth est en cours
et reste allumé lorsque le jumelage est effectué.
Bouton ZONE 2 : Contrôle la fonction ZONE.
Bouton OFF : Désactive la fonction ZONE.
Capteur de la télécommande : Reçoit les signaux de la
télécommande.
Affichage
Boutons LISTENING MODE : Permet de sélectionner
le mode d'écoute.
Bouton DIMMER (Modèles nord-américains) : Modifie
la luminosité de l'affichage.
Bouton RT/PTY/TP (Modèles européen) :Peut être
utilisé lors de la réception d'une station transmettant de
l'information textuelle.
14
9 Bouton MEMORY: Enregistre ou supprime une station.
F Bouton TUNING MODE: Commute le mode de
G
H
I
J
K
L
syntonisation.
Bouton QUICK SETUP : Affiche le menu de réglage
rapide.
Bouton HOME: Affiche le menu principal.
Boutons curseurs, bouton lTUNINGj, bouton
dPRESETc et bouton ENTER : Déplace le curseur
et confirme la sélection. Lors de l'écoute de la diffusion
AM/FM, syntonisez la station à l'aide de lTUNINGj
ou sélectionnez la station enregistrée à l'aide de
dPRESETc.
Bouton RETURN : Permet à l'affichage de retourner à
son état précédent.
MASTER VOLUME : Vous permet d'ajuster le volume.
Bouton et indicateur MUSIC OPTIMIZER : Démarrer/
arrêter la fonction MUSIC OPTIMIZER qui améliore la
qualité du son compressé.
M Prise PHONES : Des casques stéréo avec une prise
standard sont connectés.
N Boutons TONE et Tonalité du son : Ajuste les
fréquences aiguës et basses.
O Boutons de sélections d'entrée : Change l'entrée à
lire.
P Bouton DISPLAY : Modifie l'information affichée.
Q Prises AUX INPUT AUDIO/VIDEO : Une caméra vidéo
ou tout autre appareil du même type est connecté.
R Indicateur HDMI THRU : S'allume lorsque la fonction
HDMI Through est activée.
1
2
3
4
6
5
7
1 23
4
5
6
9
7
8
Affichage
1 5CNNWOGUQWUNGUEQPFKVKQPUUWKXCPVGU|<|.CUQTVKG
8
9
F
<10'GUVCEVKXÅG|*&/+|&GUUKIPCWZ*&/+
entrent et un sélecteur d'entrée HDMI est sélectionné. /
|#4%|&GUUKIPCWZCWFKQGPVTGPVFGNCVÅNÅXKUKQP
compatible ARC et le sélecteur d'entrée TV/CD est
UÅNGEVKQPPÅ|&|.GUUKIPCWZFGPVTÅGUQPVGP&
|75$|
¼.GPVTÅG|75$|GUVUÅNGEVKQPPÅGGV
NCRRCTGKNFGUVQEMCIG75$GUVEQPPGEVÅ|&+)+6#.|
Des signaux numériques entrent et le sélecteur d'entrée
numérique est sélectionné. / Indicateurs du curseur :
USB sont contrôlés.
G H
¼
|75$|ENKIPQVGTQPVUKNCEQPPGZKQPGUVFÅHGEVWGWUG
Panneau arrière
1 Prise RI REMOTE CONTROL : Un produit Onkyo avec
2
3
4
5
6
7
une prise RI peut être connecté et synchronisé avec cet
appareil.
2TKUG(/#06'00'
ŝGVVGTOKPCN#/
#06'00'|: Les antennes fournies sont connectées.
Port USB : Un appareil de stockage USB est connecté
afin que les fichiers de musique qu'il contient puissent
être joués.
Prises du COMPOSANT VIDEO IN et OUT : Prises du
composant vidéo entrée/sortie
Prises HDMI IN/OUT : Des signaux vidéo et audio
numériques sont transmis entre l'appareil et les
appareils connectés.
Terminaux des SPEAKERS : Les enceintes sont
connectées.
Cordon d'alimentation
8 2TKUGU&+)+6#.+0%1#:+#.126+%#.|: Des signaux
vidéo numériques sont envoyés en entrée.
9 Prises VIDEO/AUDIO IN : Des signaux vidéo et audio
analogiques sont envoyés en entrée.
F Prise MONITOR OUT V : Des signaux vidéo sortent
vers l'écran ou TV connectés.
G Prises LINE OUT ZONE 2 : Prises de sortie audio
connectées au pré-amplificateur principal pour une
lecture multi-zone dans une pièce séparée.
H Prises PRE OUT SUBWOOFER : Un caisson de
basses avec un amplificateur intégré est connecté.
2 S'allume lorsque le casque audio est connecté.
3 S'allume lorsque USB est contrôlé.
4 S'allume en fonction du type de signaux numériques
d'entrée et du mode d'écoute.
5 S'allume lorsque l'optimiseur de musique est activé.
6 5CNNWOGUQWUNGUEQPFKVKQPUUWKXCPVGU|#761|.G
TÅINCIGGUVCWVQOCVKSWG|fTUNEDe4GÃQKVNC
radio AM/FM. fe clignote pendant que le réglage est
CWVQOCVKSWGOGPVGHHGEVWÅ|(/56'4'1|4GÃQKV
NC(/GPUVÅTÅQ|4&5|
/QFÄNGUGWTQRÅGP4GÃQKV
une diffusion RDS.
7 |/76+0)|%NKIPQVGNQTUSWGNGOQFG|5KNGPEG|GUV
activé.
8 5CNNWOGUQWUNGUEQPFKVKQPUUWKXCPVGU|5.''2||
.GOKPWVGWTFGXGKNNGCÅVÅTÅINÅ|#5D
8GKNNG
automatique) : La veille automatique est activée. /
|EJ|.GECPCNGUVGPVTCKPFÆVTGTÅINÅ|*\||&GU
fréquences de transition sont en train d'être réglées. /
|OHV|.GUFKUVCPEGUGPVTGNGUGPEGKPVGUUQPVGPVTCKP
FÆVTGTÅINÅGU|F$|.GXQNWOGFGPEGKPVGGUVGP
train d'être réglé.
9 Affiche des informations diverses sur les signaux
d'entrée. Appuyer sur DISPLAY affiche le type de
signaux d'entrée numériques et le mode d'écoute.
15
Dépannage
Avant de démarrer la procédure
Les problèmes peuvent être résolus simplement
en allumant et en coupant l'alimentation, ou en
débranchant/rebranchant le cordon d'alimentation, ce
qui est plus facile que de travailler sur la connexion,
la procédure de paramétrage et de fonctionnement.
Essayez d'effectuer les mesures les plus simples à
la fois sur l'appareil et sur le périphérique connecté.
Si le problème est que la vidéo ou l'audio ne sont
pas sortis, ou que le fonctionnement lié HDMI ne
fonctionne pas, la déconnexion/connexion du câble
HDMI peut le résoudre. Lors de la reconnexion, veillez
à ne pas enrouler le câble HDMI car s'il est enroulé,
le câble HDMI peut ne pas bien s'adapter. Après la
reconnexion, éteignez puis rallumez l'appareil et le
périphérique connecté.
L’ampli-tuner AV s'éteint de manière inattendue.
r L’ampli-tuner AV se mettra automatiquement en mode
veille lorsque la Veille Automatique est réglée et lancée.
Le contrôle HDMI ne fonctionne pas
correctement.
r 4ÅING\NGURCTCOÄVTGU%'%FGNCRRCTGKNUWT|#EVKXÅ|
Il est également nécessaire de faire les réglages du
système lié par HDMI sur la TV. Pour plus d'informations,
reportez-vous au mode d'emploi de la télévision.
La réinitialisation de l'appareil à l'état au moment de l'expédition
peut résoudre le problème. Si les mesures ci-dessus ne
résolvent pas le problème, réinitialisez l'appareil à l'aide de la
procédure suivante. Si vous réinitialisez le statut de l'appareil,
vos préférences seront réinitialisées à leurs valeurs par défaut.
Notez-les avant de commencer la réinitialisation.
La télécommande ne fonctionne pas.
z Comment réinitialiser :
r Assurez-vous d'appuyer d'abord sur RCV avant de faire
fonctionner l'appareil avec la télécommande.
Il n'y a pas de son lorsque la fonction Multi-Zone
est utilisée.
r Avec la fonction Multi-Zone, le son est émis uniquement
lorsqu'un composant externe connecté aux prises
d'entrée audio analogique de l'unité est utilisé, ou
lorsque l'émission AM/FM est reçue. La sortie audio de
zone est impossible si le lecteur et l'unité sont connectés
via un câble HDMI ou un câble numérique. Connectez
les prises de sortie audio RCA du lecteur et les prises
d'entrée audio analogique de l'unité avec un câble (RCA)
audio analogique. De plus, certains lecteurs nécessitent
un réglage de sortie audio analogique.
Il n'y a pas de son, ou alors c'est très discret.
r Un mauvais sélecteur d'entrée a été sélectionné.
Sélectionnez une entrée adéquate pour le lecteur.
8ÅTKHKG\ÅICNGOGPVSWGNGOQFG|/76+0)|PGUVRCU
activé.
r Tous les modes d'écoute n'utilisent pas toutes les
enceintes.
Réinitialisation de l'appareil
Bluetooth
r Essayez de brancher/débrancher l'appareil et le lecteur
compatible Bluetooth. Après ça, vérifiez que la fonction
Bluetooth est activée sur l'appareil compatible Bluetooth
et que la connexion avec l'appareil a été établie.
1. Tout en maintenant enfoncée la touche CBL/SAT
sur l'appareil principal (notez que l'étape 2 doit être
effectuée avec cette touche enfoncée)
2. Appuyez sur z1056#0&$;UWTNCRRCTGKNRTKPEKRCN
|%NGCT|
apparaît à l'écran et l'appareil revient en mode veille)
Clear
sur
2. Appuyez
zON/STANDBY.
en maintenant enfoncée
1. Tout
la touche CBL/SAT,
z Comment réinitialiser la télécommande :
1. Tout en maintenant enfoncé RCV sur la
télécommande, appuyez sur HOME jusqu'à ce que le
témoin à distance s'allume (après environ 3 secondes)
2. Dans les 30 secondes, appuyez de nouveau sur RCV
Il n'y a pas d'image.
r Un mauvais bouton de sélection de saisie a été
sélectionné.
r Pour afficher une vidéo depuis le lecteur connecté sur
l'écran de la télévision lorsque l'appareil est en veille,
XQWUCXG\DGUQKPFCEVKXGT|*&/+|6JTQWIJ
r Lorsque l'image du téléviseur est floue ou manque de
netteté, il se peut qu'il y ait un problème avec le code
d'alimentation ou les câbles de connexion de l'appareil.
Dans ce cas, gardez une distance entre le câble
d'antenne TV et les câbles de l'appareil.
16
RCV
Indicateur
à distance
HOME
Spécifications
Partie de l'Amplificateur
Partie du Tuner
Puissance de sortie nominale
Toutes les chaînes :
60 watts minimum de puissance en continu par chaîne, 8 ohm de
charge, 2 canaux allant de 20 Hz à 20 kHz, avec un maximum de
distorsion harmonique totale de 0,7% (FTC)
90 watts minimum de puissance en continu par chaîne, 6 ohm
de charge, 2 canaux allant jusqu'à 1 kHz, avec un maximum de
distorsion harmonique totale de 0,7% (FTC)
(Nord-américains)
5 canaux × 100 W à 6 ohms, 1 kHz,
1 canal étant composé de 1% (IEC) (Autres)
Puissance dynamique (¼)
IEC60268-Puissance de sortie maximale à court terme
¼
9
ŝ#XCPV
9
ŝ#XCPV
9
ŝ#XCPV
TDA + B (Taux d'harmonique+bruit)
0,7% (20 Hz - 20 kHz, mi-puissance)
Facteur d'amortissement
#XCPVM*\ŝ
Sensibilité d'entrée et impédance (déséquilibre)
O8Mŝ
.+0'
Niveau de sortie RCA nominale et impédance
O8Mŝ
.+0'176
Niveau de sortie RCA maximal et impédance
8Mŝ
.+0'176
Réponse en fréquence
5 Hz - 100 kHz/+1 dB, –3 dB (mode direct)
Spécificités de la commande de tonalité
±10 dB, 20 Hz (BASS)
±10 dB, 20 kHz (TREBLE)
Rapport signal-bruit
100 dB (LINE, IHF-A)
Impédance de l'enceinte
ŝŝ
Réglage de la plage de fréquence FM
87,5 MHz - 107,9 MHz (Nord-américains)
87,5 MHz - 108,0 MHz, RDS (Autres)
Réglage de la plage de fréquence AM
522/530 kHz - 1611/1710 kHz
Chaîne préréglée
40
Partie Vidéo
Sensibilité d'entrée/niveau de sortie et impédance
8RRŝ
%QORQUCPVG;
8RRŝ
%QORQUCPVG2B/CB, PR/CR)
8RRŝ
%QORQUKVG
Réponse en fréquence de la composante vidéo
5 Hz - 100 MHz/+0 dB, –3 dB
Partie Bluetooth
Système de communication
Spécification Bluetooth version 2.1 + EDR (Enhanced Data Rate)
Portée maximale
Portée approx. 15 m (¼)
Bande de fréquence
Bande 2,4 GHz (2,4000 GHz - 2,4835 GHz)
Méthode de modulation
FHSS (Freq Hopping Spread Spectrum)
Profils Bluetooth compatibles
A2DP 1.2 (Advanced Audio Distribution Profile)
AVRCP 1.3 (Audio Video Remote Control Profile)
Formats supportés
SBC
Portée de transmission (A2DP)
20 Hz - 20 000 Hz (Fréquence d'échantillonnage 44,1 kHz)
¼
La portée effective peut varier selon les facteurs comme : les obstacles
entre les appareils, les champs magnétiques autour d'un micro-ondes,
l'électricité statique, les téléphones sans fil, la sensibilité de réception, la
performance de l'antenne, le système d'exploitation, le logiciel, etc.
Général
Alimentation
AC 120 V, 60 Hz (Nord-américains)
AC 230 V, 50 Hz (Européen)
Consommation d'énergie
3,2 A (Nord-américains)
330 W (Européen)
0,2 W (En veille, nord-américains)
0,3 W (En veille, autres)
55 W (pas de son)
Dimensions (L × H × P)
435 mm × 150 mm × 321 mm
17-1/8" × 5-7/8" × 12-5/8"
HDMI
Entrée
IN1 (BD/DVD), IN2 (CBL/SAT), IN3 (STB/DVR), IN4 (GAME), IN5 (PC),
IN6
Sortie
OUT
Résolution vidéo
Pass Through : 4K 60 Hz (YCbCr 4:2:0)
Format audio
DTS-HD Master Audio, DTS-HD High Resolution Audio, Dolby TrueHD,
Dolby Digital Plus, DSD, Multichannel PCM
Supportés
3D, Audio Return Channel, DeepColor, x.v.Color, LipSync, CEC (RIHD)
Entrées Vidéo
Composant
IN (CBL/SAT)
Composite
IN1 (CBL/SAT), IN2 (STB/DVR), IN3 (GAME), AUX
Sorties Vidéo
Composant
OUT
Composite
MONITOR OUT
Entrées Audio
Numérique
OPTICAL (TV/CD)
COAXIAL 1 (BD/DVD), 2 (CBL/SAT)
Analogique
BD/DVD, CBL/SAT, STB/DVR, GAME, PC, TV/CD, AUX
Sorties Audio
Analogique
ZONE2 LINE OUT
SUBWOOFER PRE OUT
Sorties haut-parleurs
FRONT L/R, CENTER, SURROUND L/R
Casques
PHONES (Avant, ø 6.3)
Autres
RI
USB
1
1
Les spécifications et fonctionnalités peuvent changer sans préavis.
Poids
7,6 kg (16,8 lbs.) (Nord-américains)
8,1 kg (17,9 lbs.) (Autres)
17
Informations de Licence et les Marques
Windows et le logo Windows sont des marques déposées du groupe
d’entreprises Microsoft.
Fabriqué sous licence de Dolby Laboratories. Dolby, Pro Logic et le symbole
double-D sont des marques déposées de Dolby Laboratories.
Pour les brevets DTS, voir http://patents.dts.com.
Fabriqué sous licence de DTS Licensing Limited. DTS, DTS-HD, le symbole, et
DTS et le symbole ensemble sont, des marques déposées de DTS, Inc. © DTS,
Inc. Tous droits réservés.
|%+0'/#(+.6'4|GV|%+0'/#(+.6'4
NQIQ|UQPVFGUOCTSWGU
déposées de Onkyo Corporation.
AccuEQ, Music Optimizer, RIHD et WRAT sont des marques déposées de
Onkyo Corporation.
|4+*&|GV|4+*&
NQIQ|UQPVFGUOCTSWGUFÅRQUÅGUFG1PM[Q
Corporation.
Les termes HDMI et HDMI High-Definition Multimedia Interface, ainsi que le
logo HDMI Logo sont des marques commerciales ou des marques déposées
de HDMI Licensing LLC aux États-Unis et dans d’autres pays.
La marque et les logos Bluetooth ® sont des marques déposées possédées par
Bluetooth SIG, Inc. et toute utilisation de ces marques par Onkyo fait l’objet
d’une licence. Les autres marques déposées et commerciales appartiennent à
leurs propriétaires respectifs.
Onkyo ne garantit pas la compatibilité Bluetooth entre l’ampli-tuner AV et tous
les appareils compatibles Bluetooth.
Pour assurer la compatibilité entre l’ampli-tuner AV et un autre périphérique à
technologie Bluetooth, consultez la documentation de l’appareil et le vendeur.
Dans certains pays, il peut exister des restrictions sur l’utilisation d’appareils
Bluetooth. Vérifiez auprès des autorités locales.
InstaPrevue et le logo InstaPrevue sont des marques déposées ou
commerciales de Silicon Image, Inc. aux États-Unis et dans d’autres pays.
Apple, iPod et iPhone sont des marques déposées de Apple Inc., enregistrées
aux États-Unis et dans d’autres pays.
Apple TV est une marque déposée de Apple Inc., enregistrée aux États-Unis et
dans d’autres pays.
Ce produit est protégé par certains droits de propriété intellectuelle de
Microsoft. L’utilisation ou la distribution d’une telle technologie au-delà de ces
restrictions est interdite sans une licence de Microsoft.
18
Prècautions
QR Code est une marque déposée de DENSO WAVE INCORPORATED.
Safari est une marque déposée ou commerciale de Apple Computer, Inc. aux
États-Unis et dans d’autres pays.
Modèles pour l’Europe
|ZX%QNQT|GUVWPGOCTSWGFÅRQUÅGFG5QP[%QTRQTCVKQP
Déclaration de Conformité
La technologie de codage vidéo MPEG Layer-3 est accordée sous licence par
Fraunhofer IIS and Thomson.
Nous déclarons, sous notre seule responsabilité,
que le produit est conforme aux normes :
– Sécurité
– Limites et méthodes de mesure des
caractéristiques des perturbations
radioélectriques
– Limites pour les émissions de courant
harmonique
– Limitation des variations de tension, des fluctuations de tension et du
papillotement
– Directive RoHS, 2011/65/UE
– Par la présente, Onkyo Corporation déclare que l’appareil HT-RC630 est
conforme aux exigences essentielles et aux autres dispositions pertinentes
de la directive 1999/5/CE.
|6QWVGUNGUCWVTGUOCTSWGUFÅRQUÅGUUQPVNCRTQRTKÅVÅFGNGWTURTQRTKÅVCKTGU
TGURGEVKHU|
HT-RC630
AV RECEIVER
Manual Básico
Aquí encontrará el Manual Avanzado
http://www.onkyo.com/manual/htrc630/adv/es.html
Es
Antes de Empezar
Manual Avanzado
El Manual Avanzado se actualiza siempre con la
KPHQTOCEKÏPO½UTGEKGPVG[VKGPGWPCKPVGTHC\COKICDNG
Tanto si accede desde un PC o un teléfono inteligente, le
C[WFCT½CEQPQEGTEQPO½URTQHWPFKFCFGN4GEGRVQTFG#8
El Manual Avanzado consiste en los siguientes capítulos.
r &GVCNNGUUQDTGNCTGRTQFWEEKÏPFG#/(/
r 4GRTQFWEEKÏPFGCTEJKXQUFGOÖUKECFGUFGWP
dispositivo de almacenamiento USB
r Manejar archivos de música mediante el mando a
distancia
r /QFQFGCWFKEKÏP
r %QPHKIWTCEKÏPCXCP\CFC
r Manejar otros componentes mediante el mando a
distancia
r %QPGZKÏP[HWPEKQPCOKGPVQFGEQORQPGPVGU1PM[Q4+
r #EVWCNK\CEKÏPFG(KTOYCTG
r 4GUQNWEKÏPFGRTQDNGOCU
r +PHQTOCEKÏPFGTGHGTGPEKC
#SWÉGPEQPVTCT½GN/CPWCN#XCP\CFQ
http://www.onkyo.com/manual/htrc630/adv/es.html
2
Accesorios Suministrados
Antena de FM para interiores --- (1)
Antena en bucle de AM --- (1)
Etiquetas de colores para el cable del altavoz --- (1)
Speaker Cable
1
r Equipado con amplificador de 5 canales
r Equipado con conexiones HDMI IN/OUT compatibles
con Passthrough de 4K/60 Hz
r %QORCVKDNGEQPNCHWPEKÏP*&/+6JQWIJSWGRGTOKVGNC
VTCPUOKUKÏPFGUFGFKURQUKVKXQUFGTGRTQFWEEKÏPCNC68
en modo de espera
r Compatible con ARC (Audio Return Channel)
r %QORCVKDNGEQPNCTGRTQFWEEKÏPFGFKURQUKVKXQUFG
almacenamiento USB
r %QORCVKDNGEQPNCEQPGZKÏP$NWGVQQVJ
r (WPEKÏPFGUKPETQPK\CEKÏPFG#8RCTCEQTTGIKT
desviaciones de audio y vídeo
r (WPEKÏPOWNVK\QPCSWGNGRGTOKVGTGRTQFWEKTWPCHWGPVG
FKHGTGPVGGPQVTCJCDKVCEKÏPFGUFGNCJCDKVCEKÏPRTKPEKRCN
r DSP (Procesador Digital de Señal) de 32 bits con un
TGPFKOKGPVQFGE½NEWNQGZEGNGPVG
r Music Optimizer™ para archivos comprimidos de música
digital
r Sistema de graves que coinciden con la fase
r %QORCVKDNGEQPNCTGRTQFWEEKÏPFG/2(.#%9#8
Ogg Vorbis, Apple Lossless y DSD y de dispositivos de
almacenamiento USB
2
Características
'N/CPWCN$½UKEQNGIWÉCCVTCXÅUFGNQURCUQU
fundamentales para disfrutar el Receptor de AV desde
las conexiones a la TV, dispositivos de altavoces y
TGRTQFWEEKÏPJCUVCNCUHWPEKQPGUPGEGUCTKCURCTCNC
TGRTQFWEEKÏP#RCTVGFGGUQGN/CPWCN$½UKEQNGKPHQTOC
con las instrucciones para las funciones usadas con
HTGEWGPEKC#FGO½UJC[QVTCRCTVGFGNOCPWCNNNCOCFC
/CPWCN#XCP\CFQRCTCFCTNGKPHQTOCEKÏPO½UFGVCNNCFC
SWGJGOQUFGEKFKFQRWDNKECTGPNCR½IKPCYGDFGUFGGN
RWPVQFGXKUVCGEQNÏIKEQ
3
Acerca del Manual Básico
Mando a distancia (RC-879M) --- (1)
Pilas (AA/R6) --- (2)
El número entre paréntesis indica la cantidad. En el embalaje, la letra que
¼
aparece al final del nombre del producto indica el color.
Cómo utilizar el mando a distancia
Sensor del mando a distancia
Receptor de AV
Pilas (AA/R6)
Aprox. 16 ft.
(5 m)
Si no utiliza el mando a distancia durante un período de tiempo
¼
prolongado, retire las pilas para evitar fugas.
Tenga en cuenta que mantener pilas gastadas dentro puede causar
¼
EQTTQUKÏPEQUCSWGFCÍCTÉCGNOCPFQCFKUVCPEKC
Paso 1: Conexiones
TV
Ordenador personal
HDMI
IN
HDMI
OUT
Cable HDMI
HDMI
OUT
HDMI
OUT
HDMI
OUT
Consola de
videojuegos
1
HDMI
OUT
Decodificador/grabador
de vídeo digital, etc.
Conexión de la TV o los reproductores
Importante: 'NECDNGFGCNKOGPVCEKÏPFGDGEQPGEVCTUGUÏNQ
después de que todas las otras conexiones se hayan completado.
Conexión de cable HDMI
La unidad tiene muchas conexiones HDMI en su panel
VTCUGTQ[ECFCWPCFGGNNCUEQTTGURQPFGCWPDQVÏPFGN
selector de entrada del mismo nombre en el panel frontal.
2QTGLGORNQWPTGRTQFWEVQTFGFKUEQU$NWTC[UGEQPGEVCT½
CNCGPVTCFC+0[GNDQVÏP$&&8&GPGNRCPGNHTQPVCN
UGWUCT½RCTCGUEWEJCTGNUQPKFQFGNCTGRTQFWEEKÏP
UK
GNTGRTQFWEVQTGUEQORCVKDNGEQP%'%NCGPVTCFCUGT½
ECODKCFCCWVQO½VKECOPVG5KCÍCFGQVTQTGRTQFWEVQTFG
FKUEQU$NW4C[RQFT½WVKNK\CTEWCNSWKGTQVTCEQPGZKÏPSWGPQ
2CTCWUCTNCHWPEKÏP#4%EQPGEVGCNCEQPGZKÏP
HDMI compatible con ARC de la TV y realice un
CLWUVGCRTQRKCFQGPNCWPKFCF%QPUWNVGNCUGEEKÏP
p%QPHKIWTCEKÏP*&/+FGNp2CUQ%QPHKIWTCEKÏPq
Reproductor de discos Blu-ray/
reproductor de DVD
Decodificador de
satélite/cable, etc.
UGC+0'URQUKDNGECODKCTNCCUKIPCEKÏPFGNQUDQVQPGU
de las conexiones de entrada y del selector de entrada. Para
XGTEÏOQTGCNK\CTCLWUVGUEQPUWNVGGN/CPWCNCXCP\CFQ
2CTCEQPGEVCTNC68[NCWPKFCFEQPGEVGNCEQPGZKÏP*&/+
176FGNCWPKFCF[NCEQPGZKÏP*&/++0FGNC68WUCPFQWP
ECDNG*&/+%QPGUVCEQPGZKÏPUGJCEGRQUKDNGXKUWCNK\CTNC
RCPVCNNCFGEQPHKIWTCEKÏPFGNCWPKFCFGPNC68QVTCPUOKVKT
señales de audio/vídeo desde el reproductor a la TV. Si su
TV es compatible con ARC (Canal de retorno de audio), es
posible reproducir el sonido de la TV con los altavoces del
TGEGRVQTFG#8EQPGUVCEQPGZKÏPUQNCOGPVG5KUW68PQGU
EQORCVKDNGEQP#4%PGEGUKVCT½CFGO½UFGNCEQPGZKÏP*&/+
176WPCEQPGZKÏPFGECDNGÏRVKEQFKIKVCNGPVTGNCEQPGZKÏP
ÏRVKECFGUCNKFCFGCWFKQFKIKVCNFGNC68[NCEQPGZKÏP&+)+6#.
+0126+%#.FGNCWPKFCFQWPCEQPGZKÏPFGECDNGFGCWFKQ
CPCNÏIKEQGPVTGNCEQPGZKÏPFGUCNKFCFGCWFKQFGNC68[NC
EQPGZKÏPFGGPVTCFCFGCWFKQCPCNÏIKEQFG68%&FGNCWPKFCF
z
%QPGZKÏPEQPWPC68SWGPQGUEQORCVKDNGEQP#4%
TV
DIGITAL
OPTICAL
OUT
AUDIO
OUT
5GNGEEKQPGWPCEQPGZKÏP
¼
apropiada para su TV.
.CWPKFCFGUEQORCVKDNGEQPNCHWPEKÏP*&/+6JTQWIJSWG
RGTOKVGNCVTCPUOKUKÏPFGUFGTGRTQFWEVQTGUCNC68KPENWUQ
UKNCWPKFCFGUV½GPOQFQFGGURGTC6KGPGSWGOQFKHKECT
NQUCLWUVGURCTCJCDKNKVCTGNGPNCEGFGUGNGEEKÏPFGGPVTCFC
EQPWPFKURQUKVKXQGPEQPHQTOKFCFEQP%'%EQPGZKÏP
EQP68EQORCVKDNGEQP#4%[HWPEKÏP*&/+6JTQWIJ
3
Paso 1: Conexiones
%QPUWNVGNCUGEEKÏPp%QPHKIWTCEKÏP*&/+qFGNp2CUQ
%QPHKIWTCEKÏPq
r Para reproducir vídeo de 4K o 1080p, use un cable
HDMI de alta velocidad.
Si su componente de AV no tiene un conector HDMI, use un
EQPGEVQTFKURQPKDNGFGUWEQORQPGPVGRCTCNCEQPGZKÏPRQTECDNG
con esta unidad. Al igual que los conectores HDMI, otros conectores
FGGUVCWPKFCFVKGPGPWPDQVÏPUGNGEVQTFGGPVTCFCRTGCUKIPCFQ
GPGNRCPGNHTQPVCN8GCGNPQODTGFGNDQVÏPFGNUGNGEVQTFGGPVTCFC
OQUVTCFQEQPNCEQPGZKÏPEWCPFQEQPGEVGGNFKURQUKVKXQ
3
1 Conexión digital7UGWPECDNGÏRVKEQFKIKVCN
(OPTICAL) o un cable coaxial digital (COAXIAL) para la
EQPGZKÏPEQPWPTGRTQFWEVQT
%CDNGÏRVKEQFKIKVCN
126+%#.
Conexión de componentes sin HDMI
1
Conexión de señal de audio
4
;CSWGNCEQPGZKÏPÏRVKECFGGPVTCFCFKIKVCNFG
¼
la unidad tiene una cubierta, presione el cable
hacia adentro contra la cubierta volviéndola del
revés.
Cable coaxial digital (COAXIAL)
2 Conexión analógica7UGWPECDNGFGCWFKQCPCNÏIKEQ
RCTCNCEQPGZKÏPFGWPTGRTQFWEVQT
2CTCFKUHTWVCTNCTGRTQFWEEKÏPOWNVK\QPCFGCWFKQFG
un reproductor de CD o de otros reproductores sin
conector de salida de HDMI, tiene que utilizar el cable
FGCWFKQCPCNÏIKEQRCTCEQPGEVCTNQUEQPGEVQTGU
correspondientes del reproductor y esta unidad. Para
QDVGPGTO½UFGVCNNGUUQDTGNCHWPEKÏPOWNVK\QPC
EQPUWNVGNCUGEEKÏPp7UQFGNCHWPEKÏPOWNVK\QPCqFGN
p2CUQ4GRTQFWEEKÏPq
%CDNGFGCWFKQCPCNÏIKEQ
4%#
Conexión de señal de vídeo
3 Use un cable de vídeo componente para conectar una
TV con conectores de entrada de vídeo componente
y un reproductor con conectores de salida de vídeo
componente.
r Al usar un cable de vídeo componente para la
EQPGZKÏPFGNCWPKFCF[FGNTGRTQFWEVQTNCWPKFCF[
el TV deben conectarse igualmente con un cable de
vídeo componente.
2
Si conecta un tocadiscos que no posea un ecualizador de
CWFKQKPVGITCFQPGEGUKVCT½KPUVCNCTWPGEWCNK\CFQTFGCWFKQ
externo entre la unidad y el tocadiscos.
4
Cable de vídeo componente
Su vídeo transmitido tiene una calidad superior
¼
que la del cable de vídeo compuesto.
4 Use un cable de vídeo componente para conectar una
TV con conectores de entrada de vídeo componente
y un reproductor con conectores de salida de vídeo
componente.
r Al usar un cable de vídeo componente para la
EQPGZKÏPFGNCWPKFCF[FGNTGRTQFWEVQTNCWPKFCF[
el TV deben conectarse igualmente con un cable de
vídeo componente.
Cable de vídeo compuesto
Paso 1: Conexiones
2
2
Frontal R
Conexión de altavoces
1
Frontal L
3
Centro
Importante'NECDNGFGCNKOGPVCEKÏPFGDGEQPGEVCTUG
UÏNQFGURWÅUFGSWGVQFCUNCUQVTCUEQPGZKQPGUUGJC[CP
completado.
12
3
6
45
1 2 Altavoces frontales
Altavoz central
3
4 5 Altavoces envolventes
Subwoofer
6
r Únicamente se puede conectar un subwoofer.
r 2CTCWVKNK\CTNCHWPEKÏPOWNVK\QPCEQPUWNVGNC
UGEEKÏPp7UQFGNCHWPEKÏPOWNVK\QPCqFGNp2CUQ
4GRTQFWEEKÏPq
Lo ideal es instalar los altavoces frontales y el altavoz
central a una altura no muy diferente de la pantalla.
En cuanto a los altavoces envolventes, se recomienda
KPUVCNCTNQUGPWPCRQUKEKÏPNKIGTCOGPVGRQTFGVT½UFGNC
RQUKEKÏPFGGUEWEJC[O½UCNVCSWGNQUQÉFQUFGNQ[GPVG
ya que es preferible obtener un sonido difuso antes que un
sonido directo. Ya que los sonidos bajos reproducidos por
el subwoofer son menos direccionales, es posible colocarlo
GPEWCNSWKGTRQUKEKÏP%QPUKFGTGNCOGLQTRQUKEKÏPFG
KPUVCNCEKÏPFQPFGUGRWGFCQÉTWPUQPKFQDCLQENCTCOGPVG
GUEWEJCPFQWPCTGRTQFWEEKÏPTGCN
6
Subwoofer con amplificador
de potencia incorporado
5
Envolvente R
3/8"-1/2" (10-12 mm)
Important: Conecte altavoces con una impedancia de
GPVTGŝ[ŝ7UCTWPCNVCXQ\EQPWPCKORGFCPEKC
menor al valor soportado puede resultar en un fallo.
%QTVG[SWKVCNCEWDKGTVCFGRN½UVKEQFGNGZVTGOQFGNECDNG
del altavoz, gire el núcleo y conéctelo al terminal. Realice
4
Envolvente L
WPCEQPGZKÏPEQTTGEVCGPVTGNCUEQPGZKQPGUFGNCWPKFCF[
las conexiones del altavoz (+ a + y - a -) para cada canal.
5KNCEQPGZKÏPGUV½OCNWPUQPKFQDCLQRWGFGXQNXGTUG
pobre debido a una fase inversa. Colocar las etiquetas
de colores suministradas para los cables de los altavoces
en el lado + de ambos extremos del cable de cada
ECPCNC[WFCT½CWPCEQPGZKÏPEQTTGEVC.CEQPGZKÏPFGN
UWDYQQHGTGUEQORCVKDNGEQPNCEQPGZKÏPFGWPUWDYQQHGT
con amplificador de potencia incorporado. Coloque el
KPVGTTWRVQTFGUGNGEEKÏPFGHKNVTQFGEQTVGFGNUWDYQQHGT
5
Paso 1: Conexiones
en DIRECT. Si el subwoofer no tiene un interruptor de
UGNGEEKÏPFGHKNVTQFGEQTVGRGTQVKGPGWPFKCNFGCLWUVG
FGHTGEWGPEKCFGEQTVGIÉTGNQCNCHTGEWGPEKCO½ZKOC
5KUWUWDYQQHGTPQVKGPGCORNKHKECFQTFGCNKOGPVCEKÏP
incorporado, puede conectar un amplificador de potencia
entre la unidad y el subwoofer.
r .CEQPHKIWTCEKÏPFGNCNVCXQ\GUECPCNGUGPGN
momento de la compra. Modifique el ajuste al usar una
EQPHKIWTCEKÏPFKUVKPVCFGECPCNGU
r Provocar un cortocircuito entre el cable + y el cable o poner en contacto el núcleo del cable con el panel
trasero de la unidad puede producir un fallo. Tampoco
EQPGEVGFQUQO½UECDNGUCWPCEQPGZKÏPFGCNVCXQ\Q
un altavoz a varias conexiones.
3
Conexión de auriculares
Otras conexiones
Conexiones de antena AM/FM
Conecte las antenas para escuchar transmisiones en AM/
(/%WCPFQGUEWEJGNCVTCPUOKUKÏPRQTRTKOGTCXG\CLWUVG
NCRQUKEKÏP[NCQTKGPVCEKÏPFGNCCPVGPCRCTCQDVGPGTNC
OGLQTTGEGREKÏP
Antena de bucle AM (suministrada)
Antena FM para interiores
(suministrada)
Fije con una
tachuela a la pared.
(Modelos
norteamericanos)
(Modelos europeos
[CUK½VKEQU
Montaje de la antena de bucle AM (suministrada).
6
%QPGEVGCWTKEWNCTGUGUVÅTGQEQPWPCENCXKLCGUV½PFCT
ÔOOQFGRWNICFCCNCEQPGZKÏP2*10'5'N
UQPKFQFGNQUCNVCXQEGUGUVCT½CRCICFQOKGPVTCUWUCNQU
auriculares.
r 5KUGNGEEKQPÏEWCNSWKGTOQFQFGCWFKEKÏPSWGPQUGC
5VGTGQ/QPQ[&KTGEVEQPGEVCTNQUCWTKEWNCTGUECODKCT½
GNOQFQFGCWFKEKÏPC5VGTGQ
Paso 2: Configuración
1
Modificación de la configuración del altavoz
Mise sous tension
1. Después de pulsar RCV, pulse HOME en el mando a
distancia.
Raccordez le cordon d'alimentation à la prise. Appuyez
sur zON/STANDBY sur l'appareil principal ou bien
zRECEIVER sur la télécommande pour allumer l'appareil
ou bien le mettre en mode veille.
r %WCPFQNCWPKFCFGUV½GPEGPFKFCRWGFGHNWKTWPC
EQTTKGPVGITCPFGKPUVCPV½PGCCHGEVCPFQNCHWPEKQPCNKFCF
del ordenador y otros dispositivos. Se recomienda utilizar
una toma de corriente separada que la del ordenador u
otros dispositivos sensibles.
2. Con el cursor, seleccione “Setup” y pulse ENTER.
3. Seleccione “5. Sp Config” con el cursor, y pulse
ENTER.
z Operación2QFT½TGCNK\CTNCEQPHKIWTCEKÏPEQPUWNVCPFQ
la guía visualizada en la pantalla del TV. Para visualizar
NCIWÉCPGEGUKVCT½TGCNK\CTWPCEQPGZKÏP*&/+GPVTGNC
unidad y el TV. Seleccione el elemento con los botones
del cursor del mando a distancia y pulse ENTER para
EQPHKTOCTNCUGNGEEKÏP2CTCTGITGUCTCNCRCPVCNNCCPVGTKQT
pulse RETURN. Para regresar al menú Inicio, pulse HOME.
2
Mueva el cursor con los botones d/c y ajuste “None” para
el altavoz (“No” para el subwoofer) no conectado.
2WNUG*1/'RCTCIWCTFCTNCEQPHKIWTCEKÏPOQFKHKECFC[
cierre la pantalla del menú.
r 'UVGCLWUVGPQRWGFGOQFKHKECTUGUKNQUCWTKEWNCTGUGUV½P
conectados o si el audio es emitido desde los altavoces
del TV.
Configuración de la distancia del altavoz
%QPƂIWTCEKÏPFGNCNVCXQ\
.CEQPHKIWTCEKÏPFGNCNVCXQ\FGGUVCWPKFCFGUV½
establecida de forma predeterminada en 5.1 canales. Para
utilizar la unidad en otros entornos, como por ejemplo
WPCEQPHKIWTCEKÏPUKPCNVCXQ\EGPVTCNCNVCXQ\GPXQNXGPVG
QUWDYQQHGTPGEGUKVCT½EQPHKIWTCTECFCWPQFGNQU
siguientes elementos.
r 5KNCEQPHKIWTCEKÏPPQEQKPEKFGEQPNCFGNCNVCXQ\TGCNNC
TGRTQFWEEKÏPFGCWFKQRQFTÉCPQGOKVKTUGEQTTGEVCOGPVG
%QORTWGDGNCEQPHKIWTCEKÏPFGUWCNVCXQ\[CRNKSWGNQU
ajustes correctos.
1. Después de pulsar RCV, pulse HOME en el mando a
distancia.
2. Seleccione “Setup” con el cursor y pulse ENTER.
3. Seleccione “6. Sp Distance” con el cursor y pulse
ENTER.
7
Paso 2: Configuración
Mueva el cursor con los botones d/c y ajuste la distancia
FGECFCCNVCXQ\CNCRQUKEKÏPFGGUEWEJC2WNUG*1/'
RCTCIWCTFCTNCEQPHKIWTCEKÏPOQFKHKECFC[EKGTTGNC
pantalla del menú.
r Este ajuste no puede modificarse si los auriculares
GUV½PEQPGEVCFQUQUKGNCWFKQGUGOKVKFQFGUFGNQU
altavoces del TV y la distancia de los altavoces no puede
modificarse si “No” o “None” es ajustado en “Sp Config”.
Ajuste del nivel de volumen de los altavoces
1. Después de pulsar RCV, pulse HOME en el mando a
distancia.
2. Con el cursor, seleccione “Setup” y pulse ENTER.
3. Seleccione “7. Level Cal” con el cursor y pulse
ENTER.
3
%QPƂIWTCEKÏP*&/+
.CWPKFCFGUEQORCVKDNGEQPNCHWPEKÏPFGUKUVGOCXKPEWNCFQ
EQOQGNXÉPEWNQFGGPEGPFKFQCRCICFQFGNCCNKOGPVCEKÏP
EWCPFQGUV½EQPGEVCFQOGFKCPVGECDNG*&/+EQPWPC68
o reproductor compatible con CEC (Control de productos
GNGEVTÏPKEQUFGEQPUWOQ0GEGUKVCECODKCTNCEQPHKIWTCEKÏP
KPKEKCNRCTCWVKNK\CTNCHWPEKÏPFGUKUVGOCXKPEWNCFQNCHWPEKÏP
*&/+6JTQWIJ[NCHWPEKÏP#4%
#WFKQ4GVWTP%JCPPGN
z Funcionamiento2WGFGTGCNK\CTNCEQPHKIWTCEKÏPUKIWKGPFQ
la guía mostrada en la pantalla de la TV. Para mostrar la guía,
PGEGUKVCTGCNK\CTNCEQPGZKÏP*&/+GPVTGNCWPKFCF[NC68
Seleccione el elemento con los botones del cursor del mando
CFKUVCPEKC[RWNUG'06'4RCTCEQPHKTOCTUWUGNGEEKÏP2CTC
volver a la pantalla anterior, pulse RETURN.
HDMI CEC (RIHD)
HDMI Through
'UVCHWPEKÏPRGTOKVGNCVTCPUOKUKÏPFGUFGTGRTQFWEVQTGUCNC68
KPENWUQUKNCWPKFCFGUV½GPOQFQFGGURGTC%QPHKIWTCTGNCLWUVG
HDMI CEC (RIHD) mencionado arriba en “On” puede activar este
CLWUVGCWVQO½VKECOGPVG6CODKÅPGUPGEGUCTKQTGCNK\CTGNCLWUVG
del sistema vinculado HDMI en la TV. Consulte el manual de
KPUVTWEEKQPGUFGNC68RCTCQDVGPGTO½UKPHQTOCEKÏP
r #WPSWGCEVKXCTNCHWPEKÏP*&/+6JTQWIJKPETGOGPVCGN
consumo de energía durante el modo de espera.
ARC (Audio Return Channel)
Conectarse simplemente a un televisor compatible con ARC
OGFKCPVGGNWUQFGWPECDNGGUV½PFCT*&/+NGRGTOKVKT½
escuchar el sonido del televisor desde los altavoces conectados
CNCWPKFCF2CTCWUCTNCHWPEKÏP#4%EQPGEVGNCWPKFCFCN
EQPGEVQT*&/+EQORCVKDNGEQP#4%FGNVGNGXKUQT#EQPVKPWCEKÏP
ajuste HDMI CEC (RIHD) anteriormente mencionado a la
RQUKEKÏPp#EVKXCFQqFGNCWPKFCF[TGCNKEGNQUUKIWKGPVGUCLWUVGU
1. Pulse RCV en el mando a distancia y pulse HOME.
2. Seleccione “Setup” con los botones del cursor y
pulse ENTER.
3. Seleccione “11. HDMI Setup” con los botones del
cursor y pulse ENTER.
Mueva el cursor con los botones d/c y modifique el
PKXGNFGNXQNWOGPFGECFCCNVCXQ\5GGOKVKT½WPVQPQFG
prueba cada vez que modifique el volumen. Seleccione el
PKXGNFGUGCFQ2WNUG*1/'RCTCIWCTFCTNCEQPHKIWTCEKÏP
modificada y cierre la pantalla del menú.
r .CEQPHKIWTCEKÏPPQRWGFGOQFKHKECTUGGPNQUUKIWKGPVGU
casos:
– .QUCWTKEWNCTGUGUV½PEQPGEVCFQU
– El audio se emite a través de los altavoces del TV.
– 'NOQFQUKNGPEKQUQGUV½JCDKNKVCFQ
r 0QRQFT½OQFKHKECTGNPKXGNFGNXQNWOGPFGNQUCNVCXQEGU
al ajustar “No” o “None” en “Sp Config”
4. Seleccione “Audio Return Ch” con los botones del
cursor y seleccione “Auto”.
2QPGTNC68GPOQFQFGGURGTCRQPFT½CNCWPKFCFGP
modo de espera.
En cuanto al televisor, se puede ajustar si emite el
audio por los altavoces conectados a la unidad o por los
altavoces del televisor.
+PKEKCTNCTGRTQFWEEKÏPGPWPTGRTQFWEVQTITCDCFQTEQORCVKDNG
EQP%'%ECODKCT½CWVQO½VKECOGPVGNCGPVTCFCFGNCWPKFCF
CNCGPVTCFC*&/+FGNTGRTQFWEVQTITCDCFQT5KNCWPKFCFGUV½
GPOQFQFGGURGTCUGGPEGPFGT½CWVQO½VKECOGPVG
1. Pulse RCV en el mando a distancia y pulse HOME.
2. Seleccione “Setup” con los botones del cursor y pulse
ENTER.
3. Seleccione “11. HDMI Setup” con los botones del cursor y
pulse ENTER.
4. Seleccione “HDMI CEC (RIHD)” con los botones del cursor
y pulse “On”.
8
Salida de audio de reproductores conectados
Para disfrutar de sonido envolvente digital incluyendo
Dolby Digital y DTS, la salida de audio debe ser
ajustada en “Bitstream output” en el reproductor de
discos blu-ray u otros dispositivos. Si la TV no es
compatible con señales bitstream, ajuste la salida de
audio a “PCM output” en el reproductor para escuchar
el audio desde los altavoces de la TV. Para obtener
KPHQTOCEKÏPUQDTGEÏOQCLWUVCTGNTGRTQFWEVQTEQPUWNVG
el manual de instrucciones del reproductor. Algunos
ajustes del reproductor de discos blu-ray puede impedir
NCTGRTQFWEEKÏPFGN&65*&/CUVGT#WFKQ'PGUGECUQ
coloque el “BD video supplementary sound” (o sonido
secundario) en “Off” e intente otra vez.
Paso 3: Reproducción
1
Reproducción del reproductor y la TV
Nombres de las partes del mando a distancia
1
2
3
1 Botón zRECEIVER: Enciende la unidad o la pone en
modo de espera.
8
2 Botón RCV: Cambia el mando a distancia al modo
usado para operar esta unidad.
3 Botones REMOTE MODE/INPUT SELECTOR: Cambia
la entrada a reproducir.
9
z Para controlar la unidad: El mando a distancia podría
estar en el modo remoto, el cual permite el control de otros
FKURQUKVKXQU0QRQFT½QRGTCTGUVCWPKFCFUKUGGPEWGPVTC
en el estado de modo remoto. Al operar la unidad,
CEEKÏPGNCFGUFGGNOQFQ4'%'+8'4
WPOQFQGPGNEWCN
se puede operar esta unidad) pulsando siempre 2 RCV.
1. Encendiendo la unidad
Pulse 1 zRECEIVER en el mando a distancia para
GPEGPFGTNCCNKOGPVCEKÏP
r Cambie la entrada en la TV a aquella asignada a la
unidad. Utilice el mando a distancia de la TV.
F
4
5
G
H
2. Seleccione la entrada de la unidad e inicie la
reproducción en el reproductor o la TV.
r Pulse 3 INPUT SELECTOR al que se ha asignado
el reproductor deseado. Pulse TV/CD para reproducir
el sonido de la TV. También puede utilizar los botones
del selector de entrada en la unidad principal.
r .CGPVTCFCUGT½UGNGEEKQPCFCCWVQO½VKECOGPVGUKNC
68QGNTGRTQFWEVQTGUEQORCVKDNGEQP%'%[GUV½
conectado a la unidad con un cable HDMI.
3. Seleccione el modo de audición deseado.
¼
'NDQVÏPUGNGEVQTFGGPVTCFC0'6PQVKGPGPKPIÖPGHGEVQGPGUVC
unidad, ya que la unidad no tiene selector de entrada “NET”.
4 Botones del cursor y botón ENTER: Mueve el cursor
[EQPHKTOCNCUGNGEEKÏP
5 Botón Q SETUP/WGUVTCGNOGPÖ#LWUVGT½RKFQSWG
6
7
8
9
F
G
H
6
I
7
I
le permite configurar las funciones frecuentemente
WVKNK\CFCUKPENW[GPFQNCUGNGEEKÏPFGGPVTCFC[GNCLWUVG
del volumen.
Botones de modo de audición: Le permite seleccionar
GNOQFQFGCWFKEKÏP
Botón DIMMER: Cambia el brillo de la pantalla.
Botón ZONE22CTCWVKNK\CTEWCPFQNCWPKFCFGUV½
conectada con un pre-amplificador principal en una
JCDKVCEKÏPUGRCTCFC[GNUQPKFQUGTGRTQFWEGCJÉ
Botón MUTING: Silencia el audio temporalmente.
Botones VOLUME: Le permiten ajustar el volumen.
Botón RETURN: Regresa la pantalla al estado anterior.
Botón HOME: Muestra el menú Inicio, el cual le permite
realizar configuraciones avanzadas así como utilizar
otras funciones.
Botón DISPLAY: %CODKCNCKPHQTOCEKÏPGPNCRCPVCNNC
r Los botones que no sean 1-I se utilizan para la
QRGTCEKÏPFGQVTQUFKURQUKVKXQU
2WNUGNQUDQVQPGUFGOQFQFGCWFKEKÏP6 para cambiar
el modo de manera que pueda disfrutar diferentes
OQFQUFGCWFKEKÏP2CTCQDVGPGTO½UKPHQTOCEKÏP
CEGTECFGNQUOQFQUFGCWFKEKÏPEQPUWNVGp/QFQUFG
CWFKEKÏPq
4. Ajuste el volumen con F.
9
Paso 3: Reproducción
Modos de audición
Seleccione el modo deseado cambiando y escuchando sonido
TGCNGPFKHGTGPVGUOQFQU.QUOQFQUFGCWFKEKÏPUGNGEEKQPCDNGU
dependen del formato de las señales de entrada.
MOVIE/TV2WGFGUGNGEEKQPCTWPOQFQFGCWFKEKÏP
adecuado para películas y programas de TV.
MUSIC2WGFGUGNGEEKQPCTNQUOQFQUFGCWFKEKÏP
adecuados para música.
GAME2WGFGUGNGEEKQPCTWPOQFQFGCWFKEKÏPCFGEWCFQ
para juegos.
STEREO2WGFGUGNGEEKQPCTWPOQFQFGCWFKEKÏPRCTC
estéreo y todas las fuentes estéreo.
r 2CTCO½UKPHQTOCEKÏPUQDTGNQUOQFQUFGGUEWEJC
consulte el Manual Avanzado.
“Direct” para reproducir las señales de entrada tal
como vienen
Seleccionar este modo permite que las señales
de entrada sean reproducidas tal como son. Por
ejemplo, señales de 2 canales de un CD de música se
TGRTQFWEKT½PGPGUVÅTGQNCUUGÍCNGUGPECPCNGUGP
5.1 canales y las señales en Dolby Digital de un disco
blu-ray o DVD en el campo de sonido Dolby Digital de
acuerdo al número especificado de canales.
Ajuste de la calidad de sonido: es posible mejorar
o moderar los sonidos graves y agudos de los altavoces
delanteros. Pulse TONE en la unidad principal varias veces
para seleccionar el ajuste deseado entre “Bass”, “Treble” y
“PM Bass” (Phase Matching Bass), y ajuste con +/-.
“Bass”: Le permite mejorar o moderar el nivel de
graves.
“Treble”: Le permite mejorar o moderar los agudos.
“PM Bass”: Le permite mantener el registro medio
limpio y mejorar eficazmente los graves.
Silenciar Temporalmente: Pulse MUTING en el mando a
distancia. Pulse MUTING de nuevo para cancelar el silencio.
Cambio del Brillo de la Pantalla: Pulse DIMMER en el
mando a distancia varias veces para seleccionar el brillo
deseado.
Cambio de la Pantalla de Entrada: Pulse DISPLAY en
el mando a distancia varias veces para cambiar la pantalla
de la unidad principal en el siguiente orden:
'NOÅVQFQFGUKPVQPK\CEKÏPCWVQO½VKECUGGZRNKECGPGN
/CPWCN$½UKEQ2CTCO½UKPHQTOCEKÏPEQPUWNVGGN/CPWCN
Avanzado.
1. Pulse AM o FM en la unidad para seleccionar “AM” o
“FM”.
2. Pulse TUNING MODE en la unidad para que se
ilumine el indicador “AUTO” en la pantalla de la
misma.
3. Pulse TUNING en la unidad.
%QOKGP\CNCDÖUSWGFCCWVQO½VKECFGGOKUQTCUFG
radio. La búsqueda se para cuando encuentra una.
Al sintonizar una emisora de radio, el indicador
“ TUNED ” de la pantalla de la unidad se ilumina.
El indicador “FM STEREO” se ilumina si la emisora de
radio es una emisora FM.
TUNED
AUTO
Modo de
CWFKEKÏP
FM STEREO
(El contenido visualizado en la pantalla depende del
país.)
Otras funciones útiles
10
Escuchar la radio AM/FM
Fuente de entrada
y volumen
Formato de
señal
Reproducción de Vídeo y Audio desde Diferentes
Fuentes: Es posible reproducir audio y vídeo desde
diferentes fuentes. Por ejemplo, puede reproducir audio
desde el reproductor de CD y vídeo desde el reproductor
de BD/DVD. En ese caso, pulse BD/DVD y luego TV/CD.
+PKEKGGPVQPEGUNCTGRTQFWEEKÏPGPGNTGRTQFWEVQTFG$&
&8&[GNTGRTQFWEVQTFG%&'UVCHWPEKÏPGUGHGEVKXC
EWCPFQUGJCUGNGEEKQPCFQWPCGPVTCFCSWGUÏNQVKGPG
CWFKQ
68%&#/Q(/GPNCEQPHKIWTCEKÏPKPKEKCN
2
Frecuencia de
muestreo
r 5KUGOWGUVTCp&QND[&qGPHQTOCVQFGUGÍCNGUV½P
entrando las señales Dolby Digital de 5.1 canales.
%WCPFQGUEWEJGNCTCFKQ#/(/UGOQUVTCT½PNCDCPFC
la frecuencia y el número de presintonía.
Guardar una Emisora de Radio: Le permite guardar hasta
40 de sus emisoras de radio AM/FM preferidas.
1. Sintonice la emisora AM/FM que quiera guardar.
2. Pulse MEMORY en la unidad: El número preestablecido
de la pantalla parpadea.
3. Pulse PRESET varias veces en la unidad para
elegir un número del 1 al 40 mientras el número de
preajuste esté iluminado (unos 8 segundos).
4. Pulse de nuevo MEMORY en la unidad.
Cuando esté guardado, el número de preajuste deja de
iluminarse. Repita este proceso con todas sus emisoras
AM/FM preferidas. Pulse PRESET o CH +/- para
seleccionar la emisora de radio guardada.
Paso 3: Reproducción
3
Conexión y reproducción del dispositivo
con Bluetooth
Puede disfrutar de archivos de música almacenados en un
teléfono inteligente u otros dispositivos con Bluetooth de forma
KPCN½ODTKEC'N½TGCFGEQDGTVWTCGUFGRKGU
OGVTQU
r Los dispositivos compatibles con Bluetooth deben ser
compatibles con el perfil A2DP.
r 6GPICGPEWGPVCSWGNCEQPGZKÏPEQPVQFQUNQUFKURQUKVKXQU
SWGVGPICP$NWGVQQVJPQUKGORTGGUV½ICTCPVK\CFC
Emparejado
El emparejado es necesario cuando se utilizan dispositivos
compatibles con Bluetooth por primera vez. Antes de
EQOGP\CTGNRTQEGFKOKGPVQCRTGPFCEÏOQCEVKXCTNC
HWPEKÏPFGEQPHKIWTCEKÏP$NWGVQQVJ[EQPGEVCTEQPQVTQU
dispositivos en el dispositivo con Bluetooth.
Reproducción de sonido del dispositivo con
Bluetooth
5KNCWPKFCFGUV½CEVKXCFC[GNFKURQUKVKXQEQORCVKDNGEQP
$NWGVQQVJGUV½EQPGEVCFQNCGPVTCFCECODKCT½CWVQO½VKECOGPVG
a BLUETOOTH. Reproduzca música en este estado.
r 2WGFGVQOCTCNTGFGFQTFGWPOKPWVQJCUVCSWGNCEQPGZKÏP
UGGUVCDNG\ECEWCPFQNCWPKFCFGUV½CEVKXCFC[CSWGNC
HWPEKÏP$NWGVQQVJPGEGUKVCCNIQFGVKGORQRCTCEQOGP\CT
r Si el ajuste del volumen en el dispositivo compatible con
$NWGVQQVJGUDCLQGNUQPKFQPQUCNFT½FGUFGGUVCWPKFCF
r &GDKFQCNCUECTCEVGTÉUVKECUFGNCVGEPQNQIÉCKPCN½ODTKEC
Bluetooth, el sonido producido en esta unidad puede
SWGFCTNKIGTCOGPVGFGVT½UFGNUQPKFQTGRTQFWEKFQGPGN
dispositivo Bluetooth.
4
&GUFGGNOGPÖ+PKEKQRQFT½TGCNK\CTCLWUVGUCXCP\CFQU
[WUCTHWPEKQPGUVCNGUEQOQNCTGRTQFWEEKÏPFGCTEJKXQU
GPGNFKURQUKVKXQFGCNOCEGPCOKGPVQ75$2CTCO½U
KPHQTOCEKÏPUQDTGGNHWPEKQPCOKGPVQEQPUWNVGGN/CPWCN
avanzado.
1. Pulse RCV en el mando a distancia y pulse HOME.
#RCTGEGT½GNOGPÖ+PKEKQGPNCRCPVCNNCFGNC686CODKÅP
RWGFGWVKNK\CTGNDQVÏP*1/'GPNCWPKFCFRTKPEKRCN
1. Pulse BLUETOOTH en el mando a distancia.
La unidad entra en el modo de emparejado y el
indicador BLUETOOTH empieza a parpadear.
2. Mientras el indicador BLUETOOTH está
parpadeando, complete la conexión en el dispositivo
compatible con Bluetooth en el área cercana dentro
de los 2 minutos siguientes aproximadamente.
Si el nombre de esta unidad se muestra en la pantalla
del dispositivo con Bluetooth, seleccione esta unidad. El
GORCTGLCFQVGTOKPCT½GPRQEQVKGORQ
r Si se le pide una contraseña, introduzca “0000”.
r Cuando conecte la unidad a cualquier otro dispositivo
con Bluetooth, comience el emparejado pulsando y
manteniendo BLUETOOTH hasta que el indicador
BLUETOOTH comience a parpadear. Esta unidad
RWGFGCNOCEGPCTNCKPHQTOCEKÏPFGJCUVCFKG\
dispositivos emparejados.
Uso del menú Inicio
Setup2WGFGECODKCTNCCUKIPCEKÏPFGNQUDQVQPGU
de los terminales de entrada y del selector de entrada y
también realizar varios ajustes de los altavoces y otros
ajustes avanzados.
USB: Seleccione para conectar un dispositivo de
almacenamiento USB al puerto USB de manera que pueda
ser reproducido.
r p75$qUGXWGNXGUGNGEEKQPCDNGFGURWÅUFGSWGNCHWPEKÏP
USB comienza incluso si no puede ser seleccionado
primero. Puede tomar alrededor de un minuto iniciar.
Sleep Timer: Seleccione para poner a la unidad en
OQFQFGGURGTCCWVQO½VKECOGPVGEWCPFQRCUCGNVKGORQ
especificado.
InstaPrevue: 5GNGEEKQPGRCTCNCRTGXKUWCNK\CEKÏPFG
la entrada de vídeos desde las conexiones de entrada de
HDMI colectivamente en una sola pantalla. La pantalla tiene
una ventana principal (vídeo de entrada actual) y ventanas
secundarias (otros vídeos de entrada). Para cambiar la
entrada actual, seleccione la ventana secundaria deseada
con los botones del cursor y pulse ENTER.
r Una ventana secundaria negra se muestra para la
entrada sin señales de vídeo.
r p+PUVC2TGXWGqPQUGRWGFGUGNGEEKQPCTUKGNXÉFGQGUV½
entrando desde HDMI IN 6 o no hay señal en la entrada
seleccionada actualmente.
r Dependiendo de las señales de vídeo, es posible que la
imagen no se muestre correctamente en las miniaturas
FGRTGXKUWCNK\CEKÏP
Home
Setup
USB
Sleep Timer
InstaPrevue
.
2. Seleccione el elemento con los botones del
cursor del mando a distancia y pulse ENTER para
confirmar su selección.
Para volver a la pantalla anterior, pulse RETURN. Para
volver al menú Inicio, pulse HOME.
11
Paso 3: Reproducción
5
Uso del menú de Ajuste rápido
'PGNOGPÖ#LWUVGT½RKFQRWGFGEQPHKIWTCTNCUHWPEKQPGU
HTGEWGPVGOGPVGWVKNK\CFCUKPENW[GPFQNCUGNGEEKÏPFG
entrada y el ajuste del volumen.
1. Pulse Q SETUP en el mando a distancia.
'NOGPÖFG#LWUVGT½RKFQUGOWGUVTCGPNCRCPVCNNCFG
TV conectada.
Quick Setup
Input
Audio
Information
Listening Mode
2. Seleccione el elemento con los botones del
cursor del mando a distancia y pulse ENTER para
confirmar su selección.
Para volver a la pantalla anterior, pulse RETURN.
Input5GNGEEKQPGNCGPVTCFC[EQORTWGDGNCCUKIPCEKÏP
de los botones del selector de entrada.
Audio: Puedes cambiar los diferentes ajustes de sonido,
como el ajuste del nivel del altavoz y la calidad del sonido.
r No se puede seleccionar este ajuste cuando el audio se
reproduce desde los altavoces de la TV.
A/V Sync5KGNXÉFGQXCRQTFGVT½UFGNCWFKQRWGFG
retrasar el audio para corregir la diferencia.
r No puede seleccionarse si la entrada es “USB” o
“BLUETOOTH”.
r No puede ajustarse si el modo de escucha es
Directo.
Bass, Treble: Ajusta el volumen del altavoz frontal.
r No puede ajustarse si el modo de escucha es
Directo.
PM Bass (Phase Matching Bass): Suprime el cambio de
fase en el rango medio para mejorar el sonido de los bajos.
Así se puede obtener un sonido de bajos suave y poderoso.
r No puede ajustarse si el modo de escucha es
Directo.
12
Subwoofer Level, Center Level: Ajusta el nivel del
CNVCXQ\OKGPVTCUGUEWEJCGNUQPKFQ'NCLWUVGSWGTGCNK\Ï
UGT½TGUVCWTCFQCNGUVCFQRTGXKQEWCPFQRQPICNC
unidad en modo de espera.
r Los altavoces no pueden ser ajustado si han sido
ajustados en “No” o “None” en “Sp Config”.
Late Night: Hace que los sonidos pequeños se oigan
con facilidad. Es muy útil cuando necesita reducir el
volumen al ver una película muy tarde por la noche.
Puede disfrutar el efecto únicamente con fuentes Dolby
Digital, Dolby Digital Plus y Dolby TrueHD.
r 2QPGTNCWPKFCFGPOQFQFGGURGTCEQNQECT½GN
ajuste en “Off”. En el caso de Dolby TrueHD, el ajuste
UGGUVCDNGEGT½GPp#WVQq
Music Optimizer: Mejora la calidad del audio
EQORTKOKFQ.CTGRTQFWEEKÏPFGUQPKFQFGCTEJKXQU
EQORTKOKFQUEQPRÅTFKFCUVCNGUEQOQ/2UGT½
OGLQTCFC.CEQPHKIWTCEKÏPRWGFGCLWUVCTUGFGHQTOC
separada en cada entrada.
r .CEQPHKIWTCEKÏPGUGHGEVKXCGPNCUUGÍCNGUFG
M*\QOGPQU.CEQPHKIWTCEKÏPPQGUGHGEVKXCGP
las señales bitstream.
r No puede ajustarse si el modo de escucha es
Directo.
Cinema Filter: Ajusta la banda de sonido que fue
procesada para mejorar su rango de agudos para
JCEGTNCO½UCFGEWCFCRCTCGNUKUVGOCFGEKPGGPECUC
r 'UVCHWPEKÏPUGRWGFGWVKNK\CTGPNQUUKIWKGPVGUOQFQU
FGCWFKEKÏP/WNVKECPCN&QND[&KIKVCN&QND[&KIKVCN
Plus, Dolby TrueHD, DTS, DTS-HD High Resolution
Audio, DTS-HD Master Audio, DTS Express, DTS
96/24, Dolby PL II Movie, DTS Neo:6 y Neo:6 Cinema.
Information/WGUVTCNCKPHQTOCEKÏPFGNCWFKQ
Listening Mode5GNGEEKQPGGNOQFQFGCWFKEKÏPFGUFG
las categorías de “MOVIE/TV”, “MUSIC” y “GAME”.
r No puede seleccionarse cuando el audio se reproduce
desde los altavoces de la TV.
Paso 3: Reproducción
6
Para desactivar la función multizona
2QFT½GUEWEJCTGNUQPKFQGPQVTCJCDKVCEKÏPTGCNK\CPFQ
NCEQPGZKÏPFG\QPC
CPCNÏIKEQGPVTGNCWPKFCF[GN
CORNKHKECFQTKPVGITCFQWDKECFQGPNCQVTCJCDKVCEKÏP
2QFT½WUCTTGRTQFWEVQTGU$NWTC[&KUEGPNCJCDKVCEKÏP
principal en la cual se encuentra la unidad al mismo tiempo
SWGTGEKDGGOKUKQPGUFG#/(/GPNCQVTCJCDKVCEKÏP
'NCWFKQRWGFGTGRTQFWEKTUGUKOWNV½PGCOGPVGGPNC
JCDKVCEKÏPRTKPEKRCN[GPNCQVTCJCDKVCEKÏPQUQNCOGPVGGP
NCQVTCJCDKVCEKÏP
r Las fuentes de las que puede disfrutar en la otra
JCDKVCEKÏPUQPNQUTGRTQFWEVQTGUEQPGEVCFQUCNCU
ENCXKLCUFGGPVTCFCFGCWFKQCPCNÏIKEQ[NCUGOKUKQPGU
de AM/FM.
r Cuando escuche transmisiones AM/FM, no puede
UGNGEEKQPCTFKHGTGPVGUGUVCEKQPGURCTCNCJCDKVCEKÏP
RTKPEKRCN[NCJCDKVCEKÏPUGRCTCFC2QTNQVCPVQGPCODCU
JCDKVCEKQPGUUGQKT½NCVTCPUOKUKÏPFGNCOKUOCGUVCEKÏP
Conexión con el reproductor
Para enviar audio de un reproductor de Discos Blu-ray o de
QVTQTGRTQFWEVQTEQOQNCHWGPVGFGTGRTQFWEEKÏPFG<QPC
es necesario conectar los conectores de salida de audio
RCA del reproductor y los conectores de entrada de audio
CPCNÏIKEQFGNCWPKFCFWUCPFQGNECDNGFGCWFKQCPCNÏIKEQ
AUDIO
OUT
Realizar la conexión multizona
Ejecutando la reproducción multizona
Conecte los conectores ZONE 2 LINE OUT de la unidad y
los conectores de entrada de línea del preamplificador en
QVTCJCDKVCEKÏPEQPWPECDNGFGCWFKQCPCNÏIKEQ
4%#
1. Pulse ZONE2 en el mando a distancia, apunte el
mando a distancia al sensor del mando a distancia y
pulse zRECEIVER.
p<qUGKNWOKPCGPNCWPKFCF[NC<10#FGHWPEKÏPGUV½
CEVKXCFC
<10'GUV½CJQTCCEVKXCFC
2. Pulse ZONE2 en el mando a distancia otra vez
y pulse INPUT SELECTOR de la entrada a ser
reproducida en una habitación separada.
2CTCTGRTQFWEKTNCOKUOCHWGPVGSWGGPNCJCDKVCEKÏP
RTKPEKRCN[GPNCJCDKVCEKÏPUGRCTCFCOCPVGPICRWNUCFQ
ZONE2 durante 3 segundos.
El volumen debería ser ajustad con el pre-amplificador
RTKPEKRCNWVKNK\CFQGPNCJCDKVCEKÏPUGRCTCFC
Para controlar en la unidad principal: Pulse ZONE2
[FGPVTQFGNQUUKIWKGPVGUUGIWPFQURWNUGGNDQVÏP
FGNUGNGEVQTFGNCGPVTCFCSWGUGT½TGRTQFWEKFCGPWPC
JCDKVCEKÏPUGRCTCFC2CTCTGRTQFWEKTNCOKUOCHWGPVGGP
NCJCDKVCEKÏPRTKPEKRCN[GPNCJCDKVCEKÏPUGRCTCFCRWNUG
ZONE2 dos veces.
Para desactivar la función multizona: Pulse ZONE2 en el
mando a distancia y pulse zRECEIVER. O pulse OFF en
la unidad principal.
r .CTGRTQFWEEKÏPOWNVK\QPCPQRQFT½UGTTGCNK\CFCUK
WPTGRTQFWEVQTGUV½EQPGEVCFQCWPEQPGEVQT*&/+
utilizando un cable HDMI o a un conector ÓPTICO/
COAXIAL utilizando el cable digital. Conecte los
TGRTQFWEVQTGUOGFKCPVGECDNGFGCWFKQCPCNÏIKEQRCTC
NCTGRTQFWEEKÏPOWNVK\QPC'NCLWUVGFGUCNKFCFGCWFKQ
CPCNÏIKECRQFTÉCUGTPGEGUCTKQGPGNTGRTQFWEVQT
r 5K<10'GUV½CEVKXCFQGNEQPUWOQFGGPGTIÉCFWTCPVG
el modo de espera es mayor que el normal.
r %WCPFQ<10'GUV½CEVKXCFQNCHWPEKÏPFGNUKUVGOC
vinculado RI (entrelazado entre componentes Onkyo)
GUV½FGUCEVKXCFC
r .CUCNKFCCOWNVK\QPCPQGURQUKDNGUKNCEQPGZKÏPUG
realiza solamente con el cable HDMI o el cable digital.
r Podría ser necesario el ajuste de la salida de audio
CPCNÏIKEQGPGNTGRTQFWEVQT
13
1
2
3
4 5
6
7
8
9
F
G
H
I
J
K
(Modelos europeos)
L
M
N
O
Q
P
R
Panel Frontal
1 Botón zON/STANDBY: Enciende la unidad o la pone
2
3
4
5
6
7
8
9
en modo de espera.
Indicador BLUETOOTH: Parpadea mientras el
emparejamiento con un dispositivo compatible con
$NWGVQQVJGUV½GPRTQEGUQ[RGTOCPGEGKNWOKPCFQ
cuando el emparejamiento se ha completado.
Botón ZONE 2%QPVTQNCNCHWPEKÏP<10#
Botón OFF&GUCEVKXCNCHWPEKÏP<10#
Sensor del mando a distancia: Recibe señales del
mando a distancia.
Pantalla
Botones LISTENING MODE: Le permite seleccionar el
OQFQFGCWFKEKÏP
Botón DIMMER (Modelos norteamericanos): Cambia
el brillo de la pantalla.
Botón RT/PTY/TP (Modelos europeos): Puede
WVKNK\CTUGEWCPFQTGEKDGNCKPHQTOCEKÏPFGVGZVQFGNC
GUVCEKÏPVTCPUOKUQTC
Botón MEMORY4GIKUVTCQDQTTCWPCGUVCEKÏP
14
F Botón TUNING MODE: Cambia el modo de
N Botones TONE y Nivel de Tono: Ajusta el tono alto y el
G
O Botones de selector de entrada: Cambia la entrada a
H
I
J
K
L
M
UKPVQPK\CEKÏP
Botón QUICK SETUP: Muestra el menú de
EQPHKIWTCEKÏPT½RKFC
Botón HOME: Muestra el menú Inicio.
Botones del cursor, botón lTUNINGj, botón
dPRESETc y botón ENTER: Mueve el cursor y
EQPHKTOCNCUGNGEEKÏP%WCPFQGUEWEJGVTCPUOKUKQPGU
#/(/UKPVQPKEGNCGUVCEKÏPEQPlTUNINGj o
UGNGEEKQPGNCGUVCEKÏPTGIKUVTCFCEQPdPRESETc.
Botón RETURN: Regresa la pantalla al estado anterior.
MASTER VOLUME: Le permiten ajustar el volumen.
Botón e indicador MUSIC OPTIMIZER: Activa/
FGUCEVKXCNCHWPEKÏP1RVKOK\CFQTFG/ÖUKECSWGOGLQTC
la calidad del sonido del audio comprimido.
Conexión PHONES: Se conectan auriculares estéreo
EQPWPCENCXKLCGUV½PFCT
tono bajo.
reproducir.
P Botón DISPLAY: %CODKCNCKPHQTOCEKÏPGPNCRCPVCNNC
Q Conexiones AUX INPUT AUDIO/VIDEO: Una
XKFGQE½OCTCWQVTQFKURQUKVKXQUKOKNCTGUV½EQPGEVCFQ
R Indicador HDMI THRU5GKNWOKPCEWCPFQNCHWPEKÏP
*&/+6JTQWIJGUV½JCDKNKVCFC
1
2
3
4
6
5
7
1 23
4
5
6
7
9
8
Pantalla
1 Se ilumina en las siguientes condiciones. “Z2”: La salida
8
9
F
<10'GUV½CEVKXCFCp*&/+q'PVTCPUGÍCNGU*&/+[
GNUGNGEVQTFGGPVTCFC*&/+GUV½UGNGEEKQPCFQp#4%q
Entran señales de audio desde una TV compatible
EQP#4%[GNUGNGEVQTFGGPVTCFCFG68%&GUV½
seleccionado. / “3D”: Las señales de entrada son 3D. /
“USB” (¼.CGPVTCFCp75$qGUV½UGNGEEKQPCFC[GN
FKURQUKVKXQFGCNOCEGPCOKGPVQ75$GUV½EQPGEVCFQ
“DIGITAL”: Entran señales digitales y el selector de
GPVTCFCFKIKVCNGUV½UGNGEEKQPCFQ+PFKECFQTGUFG
cursor: Se controla USB.
G H
¼
p75$qRCTRCFGCT½PUKNCEQPGZKÏPPQGUEQTTGEVC
Panel Trasero
1 Conexión RI REMOTE CONTROL: Un producto
2
3
4
5
6
7
1PM[QEQPWPCEQPGZKÏP4+RWGFGUGTEQPGEVCFQ[
sincronizado con esta unidad.
%QPGZKÏP(/#06'00#
ŝ[VGTOKPCN#/
ANTENNA.CUCPVGPCUUWOKPKUVTCFCUGUV½PEQPGEVCFCU
Puerto USB: Un dispositivo de almacenamiento USB
GUV½EQPGEVCFQFGOCPGTCSWGNQUCTEJKXQUFGOÖUKEC
almacenados se pueden reproducir.
Conexiones IN y OUT de COMPONENT VIDEO:
Conexiones de entrada/salida de vídeo por
componentes
Conexiones HDMI IN/OUT: Señales de video digital y
señales de audio son transmitidas entre la unidad y los
dispositivos conectados.
Terminales SPEAKERS.QUCNVCXQEGUGUV½P
conectados.
Cable de alimentación
8 Conexiones DIGITAL IN COAXIAL/OPTICAL: Entran
señales de audio digital.
9 Conexiones VIDEO/AUDIO IN: Entran señales
CPCNÏIKECUFGXÉFGQ[UGÍCNGUFGCWFKQ
F Conexión MONITOR OUT V: Las señales de vídeo
salen a la TV o monitor conectado.
G Conexiones LINE OUT ZONE 2: Conectores de salida
de audio conectados al preamplificador principal para la
TGRTQFWEEKÏPOWNVK\QPCGPWPCJCDKVCEKÏPUGRCTCFC
H Conexiones PRE OUT SUBWOOFER: Un subwoofer
EQPCORNKHKECFQTKPVGITCFQGUV½EQPGEVCFQ
2 Se ilumina cuando se conectan unos auriculares.
3 Se ilumina cuando se controla USB.
4 Se ilumina de acuerdo al tipo de señales digitales de
GPVTCFC[CNOQFQFGCWFKEKÏP
5 5GKNWOKPCEWCPFQGN/WUKE1RVKOK\GTGUV½CEVKXCFQ
6 Se ilumina en las siguientes condiciones. “AUTO”: El
OQFQFGUKPVQPK\CEKÏPGUCWVQO½VKEQpfTUNEDe”:
4GEGREKÏPFGTCFKQ#/(/fe parpadea mientras
UGTGCNK\CWPCUKPVQPK\CEKÏPCWVQO½VKECOGPVGp(/
56'4'1q4GEGREKÏPFG(/GUVÅTGQp4&5q
/QFGNQU
GWTQRGQU4GEGREKÏPFGVTCPUOKUKÏP4&5
7 “MUTING”: Parpadea cuando se encuentra silenciado.
8 Se ilumina en las siguientes condiciones. “SLEEP”:
El temporizador apagado ha sido establecido. / “ASb”
'URGTC#WVQO½VKEC'NOQFQFG'URGTC#WVQO½VKEQ
GUV½CEVKXCFCpEJq'NECPCNJCUKFQGUVCDNGEKFQp*\q
Las frecuencias de cruce han sido establecidas: / “m ft”:
Las distancias de los altavoces han sido establecidas. /
pF$q'NXQNWOGPFGNCNVCXQ\GUV½UKGPFQCLWUVCFQ
9 /WGUVTCKPHQTOCEKÏPXCTKCUQDTGNCUUGÍCNGUFGGPVTCFC
Al pulsar DISPLAY se muestra el tipo de señales
FKIKVCNGUFGGPVTCFC[GNOQFQFGCWFKEKÏP
15
Resolución de Problemas
Antes de iniciar el procedimiento
El problema puede solucionarse simplemente
GPEGPFKGPFQ[CRCICPFQNCCNKOGPVCEKÏPQ
FGUEQPGEVCPFQEQPGEVCPFQGNECDNGFGCNKOGPVCEKÏPNQ
EWCNGUO½UUGPEKNNQSWGGNRTQEGFKOKGPVQFGEQPGZKÏP
CLWUVG[QRGTCEKÏP+PVGPVGNCUOGFKFCUUKORNGUVCPVQ
en la unidad como en el dispositivo conectado. Si el
problema es que el vídeo o el audio no son enviados
QSWGPQHWPEKQPCNCQRGTCEKÏPGPNC\CFCC*&/+
desconectar/conectar el cable HDMI podría ser la
UQNWEKÏP&WTCPVGNCTGEQPGZKÏPVGPICEWKFCFQFGPQ
doblar el cable HDMI debido a que si se dobla el cable
podría no ser insertado correctamente. Después de la
TGEQPGZKÏPCRCIWG[XWGNXCCGPEGPFGTNCWPKFCF[GN
dispositivo conectado.
El control HDMI no funciona correctamente.
z Cómo restablecer:
r #LWUVGNCEQPHKIWTCEKÏPFGN%'%FGNCWPKFCFGP
“Activado”. También es necesario realizar el ajuste del
sistema vinculado HDMI en la TV. Consulte el manual de
KPUVTWEEKQPGUFGNC68RCTCQDVGPGTO½UKPHQTOCEKÏP
1. Mientras mantiene pulsado CBL/SAT en la unidad
2. Pulse zON/STANDBY en la unidad principal (“Clear” aparece
en la pantalla y la unidad regresa al modo de espera)
El mando a distancia no funciona.
r Asegúrese de pulsar RCV primero antes de operar la
unidad con el mando a distancia.
Clear
Al usar la función Multizona no se emite sonido.
r 'NTGEGRVQTFG#8GPVTCT½CWVQO½VKECOGPVGGPGNOQFQ
en espera cuando se haya ajustado e iniciado el modo
FG'URGTC#WVQO½VKEQ
r %QPNCHWPEKÏP/WNVK\QPCGNUQPKFQUQNCOGPVGGUGOKVKFQ
al conectar un componente externo a las clavijas de
GPVTCFCFGCWFKQCPCNÏIKEQFGNCWPKFCFGPWUQQ
CNTGEKDKTGOKUKQPGUFG#/(/.CGOKUKÏPFGCWFKQ
de zona no es posible si el reproductor y la unidad
GUV½PEQPGEVCFQUOGFKCPVGWPECDNG*&/+QWPECDNG
digital. Conecte las clavijas de salida de audio RCA del
TGRTQFWEVQT[NCUENCXKLCUFGGPVTCFCFGCWFKQCPCNÏIKEQ
FGNCWPKFCFWUCPFQWPECDNGFGCWFKQCPCNÏIKEQ
4%#
+IWCNOGPVGCNIWPQUTGRTQFWEVQTGUPGEGUKVCT½PNC
EQPHKIWTCEKÏPFGNCUCNKFCFGCWFKQCPCNÏIKEQ
No hay sonido o se oye muy bajo.
Bluetooth
r 5GJCUGNGEEKQPCFQWPDQVÏPUGNGEVQTFGGPVTCFC
equivocado. Seleccione una entrada correcta para el
TGRTQFWEVQT%QORTWGDGVCODKÅPSWGGNUKNGPEKQPQGUV½
activado.
r 0QVQFQUNQUOQFQUFGCWFKEKÏPWVKNK\CPVQFQUNQU
altavoces.
r Intente desenchufar/enchufar la unidad y el reproductor
con Bluetooth. Después de eso, compruebe que
NCHWPEKÏP$NWGVQQVJGUVÅCEVKXCFCGPGNFKURQUKVKXQ
EQORCVKDNGEQP$NWGVQQVJ[SWGNCEQPGZKÏPEQPNC
unidad haya sido establecida.
El receptor de AV se apaga de forma imprevista.
principal (tenga en cuenta que el paso 2 debe ser
realizado con este botón pulsado),
2. pulse zON/STANDBY.
mantiene
1. Mientras
pulsado CBL/SAT,
z Cómo restablecer el mando a distancia:
1. Mientras mantiene pulsado RCV en el mando a
distancia, pulse HOME hasta que el indicador
remoto se encienda (aproximadamente 3 segundos)
2. En un lapso de 30 segundos, pulse nuevamente RCV
No hay imagen.
r 5GJCGNGIKFQWPDQVÏPFGUGNGEEKÏPFGGPVTCFC
equivocado.
r Para mostrar vídeo desde el reproductor conectado en
NCRCPVCNNCFGNC68OKGPVTCUNCWPKFCFGUV½GPOQFQFG
GURGTCPGEGUKVCT½CEVKXCTp*&/+6JTQWIJq
r Si la imagen del televisor aparece borrosa o mal
FGHKPKFCRWGFGSWGNQUECDNGUFGEQPGZKÏPQGN
EÏFKIQFGCNKOGPVCEKÏPFGNCWPKFCFGUVÅPECWUCPFQ
interferencias. En dicho caso, aleje el cable de la antena
del televisor de los cables de la unidad.
16
RCV
Indicador
del mando
Restauración de la unidad
Reajustar la unidad al estado en el que se encontraba en
el momento de envío podría solucionar el problema. Si las
medidas anteriores no solucionan el problema, reinicie la unidad
usando el siguiente procedimiento. Si restablece el estado de la
WPKFCFUWURTGHGTGPEKCUUGT½PTGUVCDNGEKFCUCNQUXCNQTGURQT
defecto. Apúntelos antes de comenzar el restablecimiento.
HOME
Especificaciones
Sección del Amplificador
Sección del Sintonizador
HDMI
Potencia de Salida Nominal
Todos los canales:
60 vatios mínimo de potencia continua por canal,
cargas de 8 ohmios, 2 canales activos entre 20 Hz y 20 kHz, con un
máximo total de distorsión armónica de 0,7% (FTC)
90 vatios mínimo de potencia continua por canal, cargas de
6 ohmios, 2 canales activos a 1 kHz, con un máximo de distorsión
armónica de 0,7% (FTC)
(Norteamericanos)
5 canales × 100 W a 6 ohmios, 1 kHz,
1 canal activo a un 1% (IEC) (Otros)
2QVGPEKC&KP½OKEC
¼)
+'%2QVGPEKCFGUCNKFCO½ZKOCCEQTVQRNC\Q
¼
9
ŝ(TQPVCN
9
ŝ(TQPVCN
9
ŝ(TQPVCN
6*&0
&KUVQTUKÏP#TOÏPKEC6QVCN4WKFQ
0,7% (20 Hz - 20 kHz, media potencia)
(CEVQTFG#VGPWCEKÏP
(TQPVCNM*\ŝ
Sensibilidad de Entrada e Impedancia (Desequilibrio)
O8Mŝ
.+0'
Nivel de Salida RCA Nominal e Impedancia
O8Mŝ
.+0'176
0KXGNFG5CNKFC4%#/½ZKOQG+ORGFCPEKC
8Mŝ
.+0'176
Respuesta de Frecuencia
5 Hz - 100 kHz/+1 dB, –3 dB (modo Direct)
Características de Control de Tono
±10 dB, 20 Hz (BASS)
±10 dB, 20 kHz (TREBLE)
4GNCEKÏP5GÍCN4WKFQ
100 dB (LINE, IHF-A)
Impedancia Altavoces
ŝŝ
4CPIQFG(TGEWGPEKCFG5KPVQPK\CEKÏPFG(/
87,5 MHz - 107,9 MHz(Norteamericanos)
87,5 MHz - 108,0 MHz, RDS (Otros)
4CPIQFGHTGEWGPEKCFGUKPVQPK\CEKÏPFG#/
522/530 kHz - 1611/1710 kHz
Canal Preestablecido
40
Entrada
IN1 (BD/DVD), IN2 (CBL/SAT), IN3 (STB/DVR), IN4 (GAME), IN5 (PC),
IN6
Salida
OUT
4GUQNWEKÏPFG8ÉFGQ
Pass Through : 4K 60 Hz (YCbCr 4:2:0)
Formato de Audio
DTS-HD Master Audio, DTS-HD High Resolution Audio, Dolby TrueHD,
Dolby Digital Plus, DSD, PCM multicanal
Compatible
3D, Audio Return Channel, DeepColor, x.v.Color, LipSync, CEC (RIHD)
Sección de Vídeo
Sensibilidad de Entrada/Nivel de Salida e Impedancia
8RRŝ
%QORQPGPVG;
8RRŝ
%QORQPGPVG2B/CB, PR/CR)
8RRŝ
%QORQPGPVG
Respuesta de Frecuencia de Vídeo por Componentes
5 Hz - 100 MHz/+0 dB, –3 dB
Sección Bluetooth
5KUVGOCFGEQOWPKECEKÏP
'URGEKHKECEKÏP$NWGVQQVJXGTUKÏP'&4
'PJCPEGF&CVC4CVG
4CPIQFGEQOWPKECEKÏPO½ZKOQ
.ÉPGCFGXKUKÏPFGO
¼) aprox.
Banda de frecuencia
Banda de 2,4 GHz (2,4000 GHz - 2,4835 GHz)
/ÅVQFQFGOQFWNCEKÏP
FHSS (Espectro Ensanchado por Salto de Frecuencia)
Perfiles compatibles con Bluetooth
#&2
2GTHKNFG&KUVTKDWEKÏPFG#WFKQ#XCP\CFQ
AVRCP 1.3 (Perfil de Control Remoto de Audio y Vídeo)
%ÏFGEU%QORCVKDNGU
SBC
4CPIQFGVTCPUOKUKÏP
#&2
20 Hz - 20.000 Hz (Frecuencia de muestreo 44,1 kHz)
¼
'NTCPIQTGCNXCTKCT½FGRGPFKGPFQFGHCEVQTGUEQOQNQUQDUV½EWNQU
entre los dispositivos, campos magnéticos alrededor de un horno de
OKETQQPFCUGNGEVTKEKFCFGUV½VKECVGNÅHQPQKPCN½ODTKEQUGPUKDKNKFCFFG
TGEGREKÏP
TGPFKOKGPVQFGNCCPVGPCUKUVGOCQRGTCVKXQCRNKECEKÏPFGUQHVYCTGGVE
General
#NKOGPVCEKÏP
CA 120 V, 60 Hz (Norteamericanos)
CA 230 V, 50 Hz (Europeos)
Consumo de Energía
3,2 A (Norteamericanos)
330 W (Europeos)
0,2 W (Modo de espera, norteamericanos)
0,3 W (Modo de espera, otros)
55 W (Sin sonido)
Dimensiones (An x Al x Pr)
435 mm × 150 mm × 321 mm
17-1/8" × 5-7/8" × 12-5/8"
Peso
7,6 kg (16,8 lbs.) (Norteamericanos)
8,1 kg (17,9 lbs.) (Otros)
Entradas de Vídeo
Componentes
IN (CBL/SAT)
Compuesto
IN1 (CBL/SAT), IN2 (STB/DVR), IN3 (GAME), AUX
Salidas de Vídeo
Componentes
OUT
Compuesto
MONITOR OUT
Entradas de Audio
Digital
OPTICAL (TV/CD)
COAXIAL 1 (BD/DVD), 2 (CBL/SAT)
#PCNÏIKEQ
BD/DVD, CBL/SAT, STB/DVR, GAME, PC, TV/CD, AUX
Salidas de Audio
#PCNÏIKEQ
ZONE2 LINE OUT
SUBWOOFER PRE OUT
Salidas de Altavoces
FRONT L/R, CENTER, SURROUND L/R
Auriculares
PHONES (Frontal, ø 6,3)
Otros
RI
USB
1
1
.CUGURGEKHKECEKQPGU[ECTCEVGTÉUVKECUGUV½PUWLGVCUCECODKQUUKPRTGXKQCXKUQ
17
Información sobre licencias y marcas comerciales
'N%ÏFKIQ34GUWPCOCTECTGIKUVTCFCFG&'0519#8'+0%14214#6'&
Fabricado bajo licencia de los laboratorios Dolby. Dolby, Pro Logic y el símbolo
de la doble D son marcas registradas de los laboratorios Dolby.
pZX%QNQTqGUWPCOCTECTGIKUVTCFCFGNCEQTRQTCEKÏP5QP[
6GEPQNQIÉCFGEQFKHKECEKÏPFGCWFKQ/2')%CRCNKEGPEKCFCRQT(TCWPJQHGT
IIS y Thomson.
2CTCKPHQTOCEKÏPUQDTGRCVGPVGU&65XGCJVVRRCVGPVUFVUEQO
Fabricado bajo licencia de DTS Licensing Limited. DTS, DTS-HD, el símbolo y
el conjunto de DTS y el símbolo son marcas registradas de DTS, Inc. © DTS,
Inc. Todos los derechos reservados.
“CINEMA FILTER” y “CINEMA FILTER (logotipo)” son marcas registradas de la
EQTRQTCEKÏP1PM[Q
AccuEQ, Music Optimizer, RIHD y WRAT son marcas registradas de la
EQTRQTCEKÏP1PM[Q
p4+*&q[p4+*&
NQIQVKRQqUQPOCTECUTGIKUVTCFCUFGNCEQTRQTCEKÏP1PM[Q
.QUVÅTOKPQU*&/+G+PVGTHC\/WNVKOGFKCFG#NVC&GHKPKEKÏP*&/+[GNNQIQVKRQ
HDMI son marcas registradas de HDMI Licensing LLC en los Estados Unidos y
en otros países.
La marca Bluetooth ® y los logotipos son marcas registradas propiedad de
$NWGVQQVJ5+)+PE[EWCNSWKGTWUQFGFKEJCUOCTECURQTRCTVGFG1PM[QGUV½
bajo licencia. Otras marcas registradas y nombres comerciales pertenecen a
sus respectivos propietarios.
Onkyo no garantiza la compatibilidad Bluetooth entre el receptor de AV y todos
los dispositivos con tecnología Bluetooth.
2CTCQDVGPGTKPHQTOCEKÏPUQDTGNCEQORCVKDKNKFCFGPVTGGNTGEGRVQTFG#8
y otro dispositivo con tecnología Bluetooth, consulte al distribuidor y la
FQEWOGPVCEKÏPFGNFKURQUKVKXQ'PCNIWPQURCÉUGUGURQUKDNGSWGGNWUQFG
dispositivos Bluetooth esté restringido. Consulte con las autoridades locales.
InstaPrevue y el logotipo InstaPrevue son marcas registradas de Silicon Image,
Inc. en los Estados Unidos y en otros países.
Apple, iPod y iPhone son marcas registradas de Apple Inc., registradas en los
Estados Unidos y en otros países.
Apple TV es una marca registrada de Apple Inc., registrada en los Estados
Unidos y en otros países.
Este producto esta protegido por determinados derechos de la propiedad
KPVGNGEVWCNFG/KETQUQHV'UV½RTQJKDKFQGNWUQQFKUVTKDWEKÏPFGGUCVGEPQNQIÉC
fuera de este producto sin una licencia de Microsoft.
Windows y el logotipo Windows son marcas registradas del grupo de
compañías Microsoft.
18
Precauciones
Safari es una marca registrada de Apple Inc., registrada en los Estados Unidos
y en otros países.
p6QFCUNCUFGO½UOCTECUTGIKUVTCFCUUQPRTQRKGFCFFGUWUTGURGEVKXQU
dueños”.
Para los Modelos Europeos
Declaración de Conformidad
Declaramos, bajo nuestra total responsabilidad,
que este producto cumple con las normas:
– Seguridad
– .ÉOKVGU[OÅVQFQUFGOGFKEKÏPFGNCU
ECTCEVGÉUVKECUFGRGTVWTDCEKÏPTCFKQGNÅEVTKEC
– .ÉOKVGUFGNCUGOKUKQPGUJCTOÏPKECUXKIGPVGU
– .KOKVCEKÏPFGNQUECODKQUFGVGPUKÏP
HNWEVWCEKQPGUFGVGPUKÏP[NCQUEKNCEKÏP
– &KTGEVKXCFG4GUVTKEEKÏPFGEKGTVCU5WUVCPEKCU2GNKITQUCU
4Q*5RQTUWU
siglas en inglés), 2011/65/EU
– Por la presente, Onkyo Corporation, declara que este HT-RC630 cumple
con los requisitos esenciales y otras exigencias relevantes de la Directiva
1999/5/EC.
19
Kitahama Chuo Bldg, 2-2-22 Kitahama, Chuo-ku, OSAKA 541-0041, JAPAN
http://www.onkyo.com/
The Americas
18 Park Way, Upper Saddle River, N.J. 07458, U.S.A.
For Dealer, Service, Order and all other Business Inquiries:
Tel: 201-785-2600 Fax: 201-785-2650
http://www.us.onkyo.com/
For Product Support Team Only:
1-800-229-1687
Europe
Liegnitzerstrasse 6, 82194 Groebenzell, GERMANY
Tel: +49-8142-4401-0 Fax: +49-8142-4208-213
http://www.eu.onkyo.com/
Meridien House, Ground floor, 69 - 71 Clarendon Road, Watford, Hertfordshire, WD17 1DS, United Kingdom
Tel: +44 (0)8712-00-19-96 Fax: +44 (0)8712-00-19-95
China
(Hong Kong)
Unit 1033, 10/F, Star House, No 3, Salisbury Road, Tsim Sha Tsui Kowloon, Hong Kong.
Tel: 852-2429-3118 Fax: 852-2428-9039
http://www.hk.onkyo.com/
(Mainland)
1301, 555 Tower, No.555 West NanJing Road, Jing’an District, Shanghai, China 200041,
Tel: 86-21-52131366 Fax: 86-21-52130396
http://www.cn.onkyo.com/
Asia, Oceania, Middle East, Africa
Please contact an Onkyo distributor referring to Onkyo SUPPORT site.
http://www.intl.onkyo.com/support/
The above-mentioned information is subject to change without prior notice.
Visit the Onkyo web site for the latest update.
D1405-0
SN 29401805
(C) Copyright 2014 Onkyo Corporation Japan. All rights reserved.
* 2 9 4 0 1 8 0 5 *