1
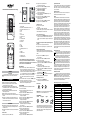
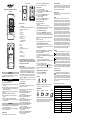
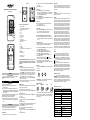
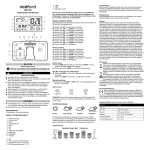
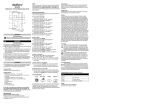
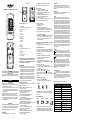
Temperatursensor WS 2200 Drücken Sie die Taste „UP“ oder „DOWN“ zur Auswahl. Drücken Sie die Taste „SET“ zur Bestätigung. 10 Wetterstation mit Funk-Thermometer und Uhr LCD display G b a 11 1 12 2 7 8 3 4 5 9 6 B C A F D E 10 Anzeige- und Bedienelemente 1 2 3 4 5 6 7 8 9 10 11 12 A B C D E F G Wettervorhersage Raumtemperatur, Raumluftfeuchtigkeit, Trend ➙ ➚ ➘ Aussentemperatur, Trend ➙ ➚ ➘ Snooze Uhrzeit Datum Komfort Index Sensor Symbol Alarm Wandbefestigung Batteriefach Standfuß SET ALARM CHANNEL DOWN (Drücken Sie die Taste für °C oder °F) UP SNOOZE SNOOZE / LIGHT a Umschalten von ºC / ºF b Kanal wechseln Es kann bis zu einer Stunde oder länger dauern, bis die tatsächlichen Temperaturdaten angezeigt werden. Es wird empfohlen, die Wetterstation 1 Stunde vor der Erstinstallation in dem Raum, in dem sie verwendet werden soll, zu aklimatisieren. 11 12 DEUTSCH Bedienungsanleitung Bitte lesen und beachten Sie die nachfolgenden Informationen und bewahren Sie diese Bedienungsanleitung zum Nachschlagen auf! WARNUNG! Sicherheitshinweise Verwenden Sie nur typgleiche Akkus oder Batterien! Behandeln Sie Akkus und Batterien stets vorsichtig und verwenden Sie Akkus und Batterien nur wie beschrieben. Verwenden Sie nie Akkus und Batterien zusammen. Verwenden Sie nie Akkus oder Batterien unterschiedlicher Kapazität oder unterschiedli chem Ladezustand zusammen. Verwenden Sie keine beschädigten Akkus oder Batterien. Erstickungsgefahr durch Kleinteile, Verpackungs- und Schutzfolien! Halten Sie Kinder vom Produkt und dessen Verpackung fern! Gefährdung von Gesundheit und Umwelt durch Akkus und Batterien! Akkus und Batterien nie öffnen, beschädigen, verschlucken oder in die Umwelt gelangen lassen. Sie können giftige und umweltschädliche Schwermetalle enthalten. ACHTUNG! Umwelteinflüsse wie z. B. Rauch, Staub, Erschütterungen, Chemikali- en, Feuchtigkeit, Hitze oder direkte Sonneneinstrahlung vermeiden. Reparaturen nur von Fachpersonal durchführen lassen. Verpackungsinhalt 1 Wetterstation, 1 Temperatursensor, Bedienungsanleitung INBETRIEBNAHME Nach dem Einlegen der Batterien wird das WS 2200 automatisch mit dem Temperatursensor verbunden. Dieser Vorgang dauert ca. 3 Minuten. Nach Abschluß zeigt das Display die Außentemperatur an. Die Wetterstation sucht 3 Kanäle automatisch ab. Sie können die Kanäle der Wetterstation auch manuell durch Drücken der Taste „CHANNEL“ (C), oder der Taste (b) am Temperatursensor synchronisie ren. Die Wetterstation kann Signale auf 3 Kanälen empfangen. Sollte die Verbindung nicht hergestellt werden, drücken Sie die Taste „CHANNEL“ (C) länger als ca. 3 Sek., um die Anmeldung zu wiederholen. Um Störungen zu vermeiden, sollte ein Mindestabstand von 2,5m zu anderen elektronischen Geräten eingehalten werden! MANUELLE EINSTELLUNGEN (Der Einstellmodus wird automatisch verlassen, wenn nicht innerhalb von 20 Sek. eine Taste betätigt wird.) Drücken und halten Sie die Taste „SET“ für ca. 2 Sek. Das Zeichen für Jahr blinkt Drücken Sie die Taste „UP“ oder „DOWN“ zur Auswahl. Drücken Sie die Taste „SET“ zur Bestätigung. Das Zeichen für Monat blinkt Drücken Sie die Taste „UP“ oder „DOWN“ zur Auswahl. Drücken Sie die Taste „SET“ zur Bestätigung. Das Zeichen für Datum blinkt Drücken Sie die Taste „UP“ oder „DOWN“ zur Auswahl. Drücken Sie die Taste „SET“ zur Bestätigung. Die Spracheinstellung für den Wochentag blinkt Drücken Sie die Taste „UP“ oder „DOWN“ zur Auswahl der Sprache. Drücken Sie die Taste „SET“ zur Bestätigung. Die Zeichen 12 / 24 Std. blinken Drücken Sie die Taste „UP“ oder „DOWN“ zur Auswahl. Drücken Sie die Taste „SET“ zur Bestätigung. Das Zeichen für Stunde blinkt Drücken Sie die Taste „UP“ oder „DOWN“ zur Auswahl. Drücken Sie die Taste „SET“ zur Bestätigung. Das Zeichen für Minute blinkt Wecker einstellen Drücken Sie die Taste „ALARM“ Die Displayanzeige wechselt auf die Anzeige AL Drücken und halten Sie die Taste „ALARM“ für ca. 2 Sek. Die Stunden-Anzeige blinkt. Drücken Sie die Taste „UP“ oder „DOWN“ zur Auswahl. Drücken Sie die Taste „ALARM“ zur Bestätigung. Die Minuten-Anzeige blinkt. Drücken Sie die Taste „UP“ oder „DOWN“ zur Auswahl. Drücken Sie die Taste „ALARM“ zur Bestätigung. Wecker ein- / ausschalten Drücken Sie die Taste „SET“ AL wird angezeigt Drücken Sie die Taste „SET“ AL wird aktiviert Drücken Sie die Taste „SET“ erneut um AL zu deaktivieren Um den Weckton auszuschalten drücken Sie eine beliebige Taste. Ansonsten schaltet sich der Weckton nach 2 Minuten automatisch ab. „Snooze“-Funktion ein- / ausschalten Drücken Sie die Taste „SNOOZE/LIGHT“ während der Weckton ertönt. Die „Snooze“-Funktion ist aktiviert und der Weckton ertönt nach 5 Minuten erneut. Die „Snooze“-Funktion wird durch drücken einer beliebigen Taste deaktiviert. Max./Min. Temperatur u. Luftfeuchtigeit für Innen u. Aussen anzeigen Drücken Sie die Taste „UP“ Drücken Sie die Taste „UP“ ca. 3 Sek. um die Werte zu löschen. Temperatur-Warnung einstellen Sie können für die Aussentemperatur eine obere und untere Maximaltemperatur einstellen. Hiermit können Sie sich z.B. bei Frostgefahr warnen lassen. Bei Erreichen der eingestellten Alarm-Temperatur ertönt ein Warnsignal am Hauptgerät. Drücken Sie die Taste „DOWN“ ca. 3 Sek. „ON/OFF blinkt Drücken Sie die Taste „UP“ oder „DOWN“ zur Auswahl Drücken Sie die Taste „SET“ Die obere Begrenzung der Aussentemperatur blinkt. Drücken Sie die Taste „UP“ oder „DOWN“ zur Auswahl der maximalen Aussentemperatur. Drücken Sie die Taste „SET“ Die untere Begrenzung der Aussentemperatur blinkt. Drücken Sie die Taste „UP“ oder „DOWN“ zur Auswahl der minimalen Aussentemperatur. Drücken Sie die Taste „SET“ zur Bestätigung. Das Symbol für die Temperaturwarnung ( ) wird angezeigt. Damit die Einstellung abgeschlossen werden kann, beachten Sie bitte, dass die Max.-Temperatur 1° höher eingestellt werden muss als die Min.Temperatur. Displaybeleuchtung ein- / ausschalten Drücken Sie die Taste „SNOOZE/LIGHT“ Die Displaybeleuchtung wird für 20 Sekunden eingeschaltet. Komfort-Index Service-Hotline Bei technischen Problemen wenden Sie sich an unsere Service-Hotline. Schweiz: Tel. 0900 00 1675 (Kosten national, Swisscom bei Drucklegung: CHF 2,60/min). Bei Garantieansprüchen wenden Sie sich an Ihren Fachhändler. Pflegehinweise Gehäuseoberflächen mit einem weichen und fusselfreien Tuch reinigen. Keine Reinigungs- oder Lösungsmittel verwenden. Garantie Dexford-Geräte werden nach den modernsten Produktionsverfahren hergestellt und geprüft. Ausgesuchte Materialien und hoch entwickelte Technologien sorgen für einwandfreie Funktion und lange Lebensdauer. Die Garantie gilt nicht für die in den Produkten verwendeten Batterien, Akkus oder Akkupacks. Die Garantiezeit beträgt 24 Monate, gerechnet vom Tage des Kaufs. Innerhalb der Garantiezeit werden alle Mängel, die auf Materialoder Herstellungsfehler zurückzuführen sind, kostenlos beseitigt. Der Garantieanspruch erlischt bei Eingriffen durch den Käufer oder durch Dritte. Schäden, die durch unsachgemäße Behandlung oder Bedienung, natürliche Abnutzung, durch falsches Aufstellen oder Aufbewahren, durch unsachgemäßen Anschluss oder Installation sowie durch höhere Gewalt oder sonstige äußere Einflüsse entstehen, fallen nicht unter die Garantieleistung. Wir behalten uns vor, bei Reklamationen die defekten Teile auszubessern, zu ersetzen oder das Gerät auszutauschen. Ausgetauschte Teile oder ausgetauschte Geräte gehen in unser Eigentum über. Schadenersatzansprüche sind ausgeschlossen, soweit sie nicht auf Vorsatz oder grober Fahrlässigkeit des Herstellers beruhen. Sollte Ihr Gerät dennoch einen Defekt innerhalb der Garantiezeit aufweisen, wenden Sie sich bitte unter Vorlage Ihrer Kaufquittung ausschließlich an das Geschäft, in dem Sie Ihr Dexford-Gerät gekauft haben. Alle Gewährleistungsansprüche nach diesen Bestimmungen sind ausschließlich gegenüber Ihrem Fachhändler geltend zu machen. Nach Ablauf von zwei Jahren nach Kauf und Übergabe unserer Produkte können Gewährleistungsrechte nicht mehr geltend gemacht werden. Entsorgung Wollen Sie Ihr Gerät entsorgen, bringen Sie es zur Sammelstelle Ihres kommunalen Entsorgungsträgers (z. B. Wertstoffhof). Nach dem Elektro- und Elektronikgerätegesetz sind Besitzer von Altgeräten gesetzlich verpflichtet, alte Elektro- und Elektronikgeräte einer getrennten Abfallerfassung zuzuführen. Das nebenstehende Symbol bedeutet, dass Sie das Gerät auf keinen Fall in den Hausmüll werfen dürfen! Sie sind gesetzlich verpflichtet, Akkus und Batterien beim batterievertreibenden Handel sowie bei zuständigen Sammelstellen, die entsprechende Behälter bereitstellen sicher zu entsorgen. Die Entsorgung ist unentgeltlich. Die Symbole bedeuten, dass Sie Akkus und Batterien auf keinen Fall in den Hausmüll werfen dürfen und sie über Sammelstellen der Entsorgung zugeführt werden müssen. Verpackungsmaterialien entsorgen Sie entsprechend den lokalen Vorschriften. Konformitätserklärung Dieses Gerät erfüllt die Anforderungen der Richtlinie 1999/5/EG über Funkanlagen und Telekommunikationsendeinrichtungen und die gegenseitige Anerkennung ihrer Konformität. Die Konformität mit der o. a. Richtlinie wird durch das CE-Zeichen auf dem Gerät bestätigt. Für die komplette Konformitätserklärung nutzen Sie bitte den kostenlosen Download von unserer Website www.dexford.com. Technische Daten (Technische Änderungen vorbehalten) Merkmal Wert WS 2200 komfortaben trocken feucht BxHxT 80 x 160 x 20 mm Gewicht 134 g (ohne Batterie) ACHTUNG! Es wird kein Symbol angezeigt, wenn die Temperatur nicht innerhalb von 20 bis 27 °C und die Luftfeuchtigkeit nicht innerhalb von 40 bis 70 % liegt. Frequenz 433 MHz Batterien 2 x 1,5V AAA, nicht enthalten Temperaturbereich 0 ~ +50 °C WETTERVORHERSAGE sonnig leicht sonnig Luftfeuchtigkeitsbereich 20 ~ 90 % bewölkt regnerisch Die Wetterstation analysiert den Wetterverlauf der letzten 24 Stunden und ermittelt daraus die Vorhersage für die nächsten 12- 24 Stunden. Die Wettervorhersage ist unverbindlich und nur für den häuslichen Gebrauch gedacht. Bei extremen Wetterlagen ist die Vorhersage weniger genau. Temperatursensor, max. 30 m Reichweite im Freien BxHxT 60 x 95 x 27 mm (inkl. Standfuß) Gewicht 55 g (ohne Batterie) Batterien 2 x 1,5V AAA, nicht enthalten Temperaturbereich -20 ~ +50 °C für Aussen- und Inneneinsatz Capteur thermo WS 2200 10 Station météo avec thermomètre sans fil et horloge LCD display G b a 11 1 12 2 7 8 3 4 5 9 6 B C A F D E 10 Afficher les icônes et éléments de commande 1 2 3 4 5 6 7 8 9 10 11 12 Prévisions Météo Température et l‘humidité intérieure, tendance ➙ ➚ ➘ Température extérieure, tendance ➙ ➚ ➘ Snooze Heure Date Index de confort Symbole de sonde Alarme Orifice de suspension Capot des piles Pied de table A B C D E F G SET ALARM CHANNEL DOWN (Changement à °C ou °F) UP SNOOZE SNOOZE / LIGHT a Changement à ºC / ºF b Commutateur de canal Lors de l‘installation initiale, la station peut prendre jusqu‘à une heure ou plus pour s‘acclimater aux conditions actuelles. Il est recommandé de mettre l‘unité principale dans la pièce où il sera utilisée pour au moins 1 heure avant l‘installation initiale. 11 12 FRANÇAIS Mode d’emploi Veuillez lire et observer les informations suivantes et conserver ce mode d‘emploi afin de pouvoir le consulter en cas de besoin! AVERTISSEMENT! Consignes de sécurité Utilisez uniquement des piles ou des batteries de meme type Traitez toujours les piles et batteries avec prudence et utilisez-les uniquement comme décrit sur leur emballage. N‘utilisez jamais piles et batteries ensemble. N‘utilisez jamais de piles et batteries de capacité ou d‘état de charge différents. N‘utilisez pas de piles ou batteries endommagées. Risque d‘étouffement lié à des éléments de petite taille, des films d‘emballage et de protection ! Tenez les enfants à l‘écart du produit et de son emballage ! Risque pour la santé de l‘être humain et l‘environnement lié aux piles et batteries ! Ne jamais ouvrir, endommager, avaler les piles et batteries ou faire pénétrer leur contenu dans l‘environnement. Ils peuvent contenir des métaux lourds toxiques et polluants. ATTENTION ! Évitez des influences provenant de l‘environnement telles que fumée, poussière, vibrations, produits chimiques, humidité, grande chaleur ou ensoleillement direct. Faire exécuter les réparations uniquement par du personnel spécialisé et qualifié. Contenu du coffret 1 Station météo, 1 Capteur thermo, Mode d‘emploi MISE EN SERVICE Après avoir inséré les piles, le WS 2200 est automatiquement con necté au capteur de température. Ce processus prend env. 3 minu tes. Ensuite, l‘écran affiche la température extérieure. La station météo va scanner les 3 chaînes automatiquement. Sélectionnez les canaux (1, 2, ou 3) manuellement en appuyant sur la touche „CHANNEL“ (C) de la station météo ou sur le bouton (b) sur le capteur de tempéra- ture. La station météo est capable de recevoir jusqu‘à 3 canaux différents. En cas d‘échec de réception, s.v.p. appuyez sur „CHANNEL“ (C) pour plus de approx. 3 secondes pour recevoir à nouveau. Pour éviter les interférences, une distance minimale de 2,5 m doit etre observée avec les autres appareils électroniques ! RÉGLAGE MANUEL (Le mode de réglage est quitté automatiquement après 20 seconde si aucune touche n’a été pressée) Appuyez et maintenez enfoncé „SET“ pour approx. 2 sec. Le signe pour l ‚année clignote Appuyer sur la touche „UP“ ou „DOWN“ pour sélectionner. Appuyer sur la touche „SET“ à confirmer. Le signe pour mois clignote Appuyer sur la touche „UP“ ou „DOWN“ pour sélectionner. Appuyer sur la touche „SET“ à confirmer. Le signe pour la date clignote Appuyer sur la touche „UP“ ou „DOWN“ pour sélectionner. Appuyer sur la touche „SET“ à confirmer. Le paramètre de langue pour les semaine clignote (IT pour le français) Appuyer sur la touche „UP“ ou „DOWN“ pour sélectionner. Appuyer sur la touche „SET“ à confirmer. Les caractères 12/24 heure clignotement Appuyer sur la touche „UP“ ou „DOWN“ pour sélectionner. Appuyer sur la touche „SET“ à confirmer. Le signe pour l‘heure clignote Appuyer sur la touche „UP“ ou „DOWN“ pour sélectionner. Appuyer sur la touche „SET“ à confirmer. Le symbole de minutes clignotent Appuyer sur la touche „UP“ ou „DOWN“ pour sélectionner. Appuyer sur la touche „SET“ à confirmer. Réglage de l‘alarme quotidienne Appuyer sur la touche „ALARM“ L‘écran change pour afficher AL Appuyez et maintenez enfoncé „ALARM“ pour approx. 2 sec. L‘affichage clignote heure. Appuyer sur la touche „UP“ ou „DOWN“ pour sélectionner. Appuyer sur la touche „ALARM“ à confirmer. Les minutes clignotent. Appuyer sur la touche „UP“ ou „DOWN“ pour sélectionner. Appuyer sur la touche „ALARM“ à confirmer. Alarme marche / arrêt Appuyer sur la touche „SET“ AL apparaît Appuyer sur la touche „SET“, AL est activée Pour arrêter l‘alarme, appuyez sur n‘importe quelle touche. sinon l‘alarme s‘arrête automatiquement au bout de 2 minutes. „Snooze“ fonction marche / arrêt Appuyer sur la touche „SNOOZE/LIGHT“ pendant que l’alarme sonne. Le „Snooze“ est activée und l‘alarme sonnera de nouveau après 5 minutes. Le „Snooze“ est désactivé en appuyant sur n‘importe quelle touche. Max. / Min. et de la température et humidité pour l‘affichage intérieur et extérieur Appuyer sur la touche „UP“ pour affiche les valeurs Appuyer sur la touche „UP“ approx. 3 sec. pour effacer les valeurs. Réglage de l‘alarme de température Par exemple il permet d‘obtenir une mise en garde dégâts dus au gel L‘unité principale émet un signal d‘alarme lorsque la température limite est atteinte. Appuyer sur la touche „DOWN“ pour approx. 3 sec. ON / OFF clignote. Appuyer sur la touche „UP“ ou „DOWN“ pour sélectionner Appuyer sur la touche „SET“ Limite supérieure de la température extérieure clignote. Appuyer sur la touche „UP“ ou „DOWN“ sélectionne la température extérieure maximale. Appuyer sur la touche „SET“ La limite inférieure de la température extérieure clignote. Appuyer sur la touche „UP“ ou „DOWN“ sélectionne la température extérieure minimale. Appuyer sur la touche „SET“ à confirmer. Le symbole alerte de température extérieure ( ) est affichée. Le réglage ne peut être effectué si la température maximale réglée est supérieure à la température minimale enregistrée. Rétroéclairage marche / arrêt Appuyer sur la touche „SNOOZE/LIGHT“ Le rétro-éclairage est allumé pendant 20 secondes. Ligne d‘assistance directe En cas de problèmes techniques, adressez-vous à notre ligne d‘assistance directe. Suisse : Tél. 0900 00 1675 (frais Swisscom à l‘impression de ce mode d‘emploi : CHF 2,60/min). En cas de recours en garantie, adressezvous à votre revendeur. Remarques d‘entretien Nettoyez les surfaces du boîtier avec un chiffon doux et non pelucheux. N‘utilisez pas de produits d‘entretien ou de solvants. Garantie Les appareils Dexford sont contrôlés et fabriqués suivant les meilleurs procédés. Des matériaux sélectionnés et des technologies de pointe leur garantissent un fonctionnement irréprochable et une longue durée de vie. La garantie ne s‘applique pas aux piles et piles rechargeables utilisées dans les produits. La durée de la garantie est de 24 mois à partir de la date d‘achat. Pendant la durée de la garantie, tous les défauts dus à des vices de matériel ou de fabrication seront éliminés gratuitement. Le droit à la garantie expire en cas d‘intervention de l‘acheteur ou de tiers. Les dommages provenant d‘un maniement ou d‘une manipulation incorrects, d‘une usure naturelle, d‘une mauvaise mise en place ou d‘une mauvaise conservation, d‘un raccordement ou d‘une installation incorrects ainsi que d‘un cas de force majeure ou autres influences extérieures sont exclus de la garantie. En cas de réclamations, nous nous réservons le droit de réparer, de remplacer les pièces défectueuses ou d‘échanger l‘appareil. Les composants remplacés ou les appareils échangés deviennent notre propriété. Les demandes de dommages et intérêts sont exclues tant que les défauts ne reposent pas sur une faute intentionnelle ou une négligence grossière du fabricant. Si votre appareil Dexford présente cependant un défaut pendant la période de garantie, veuillez vous adresser exclusivement au magasin où vous l‘avez acheté en présentant votre bon d‘achat. Vous ne pouvez faire valoir vos droits à la garantie répondant à ces dispositions qu‘exclusivement auprès de votre revendeur. Deux ans après l‘achat et la remise de nos produits, il n‘est plus possible de faire valoir les droits à la garantie. Mettre l‘appareil au rebut Si vous ne voulez plus servir de votre appareil, veuillez l‘apporter au centre de collecte de l‘organisme de traitement des déchets de votre commune (par ex. centre de recyclage). D‘après la loi relative aux appareils électriques et électroniques, les propriétaires d‘appareils usagés sont tenus de mettre tous les appareils électriques et électroniques usagés dans un collecteur séparé. L‘icône ci-contre signifie que vous ne devez en aucun cas jeter votre appareil dans les ordures ménagères ! Vous êtes tenus par la loi d‘éliminer vos piles et piles rechargeables auprès d‘un revendeur de piles ainsi qu‘auprès de centres de collecte responsables de leur élimination qui mettent à disposition des conteneurs adéquats. Leur élimination est gratuite. L‘icône ci-contre signifie que vous ne devez en aucun cas jeter les piles et piles rechargeables dans les ordures ménagères, mais que vous devez les apporter à un centre de collecte. Éliminez les fournitures d‘emballage selon les règlements locaux. Déclaration de conformité Cet appareil est en conformité avec la directive 1999/5/CE sur les installations de radio et de télécommunication et la reconnaissance réciproque de leur conformité. La conformité avec la directive mentionnée ci-dessus est confirmée sur l‘appareil par la marqe CE. Vous avez la possibilité de télécharger gratuitement la déclaration intégrale de conformité sur notre site Internet www.dexford.com. Données techniques (Sous réserve de modifications techniques) Index de confort Caractéristique Valeur WS 2200 Confortable sec humide ATTENTION! Il n‘y a aucune icône n‘apparaît si la température ne réside pas dans les 20 à 27 °C et l‘humidité entre 40 et 70%. PRÉVISION MÉTÉO ensoleillé un peu nuageux nuageux pluvieux HxLxP 80 x 160 x 20 mm Poids 134 g (sans batterie) Fréquence 433 MHz Piles 2 x 1,5 V AAA, ne figurant pas Plage de températures 0 ~ +50 °C Plage d‘humidité 20 ~ 90 % Capteur thermo, jusqu‘à 30 mètres de portée en plein air La station météorologique analyse les conditions météorologiques des dernières 24 heures afin de déterminer les prévisions pour les prochains 12 - 24 heures. La météo n‘est pas contraignant et uniquement pour un usage domestique. Dans des conditions météorologiques extrêmes, la prédiction est moins précise. HxLxP 60 x 95 x 27 mm (y compris le socle) Poids 55,5 g (sans batterie) Piles 2 x 1,5V AAA, ne figurant pas Plage de températures -20 ~ +50 °C Pour intérieur et extérieur Sensore di temperatura WS 2200 Premere il pulsante „UP“ o „DOWN“ per selezionare. Premere il pulsante „SET“ per confermare. 10 Stazione meteo con termometro senza fili e orologio LCD display b a 11 G 12 1 2 7 8 3 4 5 9 6 B C A F D E Elementi di comando 1 Previsioni Meteo 2 Andamento della temperatura interna, umidità, tendenza ➙ ➚ ➘ 3 Temperatura esterna, tendenza ➙ ➚ ➘ 4 Snooze 5 Ora del giorno 6 Data 7 Comfort index 8 Simbolo del sensore 9 Allarme 10 Foro di sospensione 11 Coperchio della batteria 12 Supporto da tavolo A B C D E F G 10 SET ALARM CHANNEL DOWN (Premere il tasto per °C o °F) UP SNOOZE SNOOZE / LIGHT a Passare da °C / °F b Cambiare il canale Durante l‘installazione iniziale, la stazione può richiedere fino a un‘ora o più per acclimatarsi alle condizioni attuali. Si raccomanda di acclimatare il meteo stazione 1 ora prima della prima installazione nello spazio in cui deve essere utilizzato. 11 12 ITALIANO Istruzioni per l’uso Leggere e osservare le seguenti informazioni e conservare le istruzioni per l’uso per consultazione futura! AVVERTENZA! Indicazioni di sicurezza Usare solo batterie dello stesso tipo! Trattare sempre con prudenza batterie e pile e usare batterie e pile solo come descritto. Non mischiare mai batterie ricaricabili e pile. Non utilizzare mai batterie ricaricabili o pile con capacità o stati di carica differenti. Evitare l’uso di batterie ricaricabili o pile difettose. Rischio di soffocamento dovuto a minuteria, pellicole protettive e di imballaggio! Tenere lontano tale imballaggio dalla portata dei bambini! Batterie ricaricabili e pile possono provocare danni alla salute e all‘ambiente! Non aprire, danneggiare, ingerire o disperdere nell‘ambiente accumulatori e pile. Queste possono contenere metalli pesanti nocivi e dannosi per l‘ambiente. ATTENZIONE! Evitare un’esposizione a fumo, polvere, vibrazioni, sostanze chimiche, umidità, calore e raggi solari diretti. Le riparazioni vanno affidate esclusivamente al personale qualificato del servizio di assistenza tecnica. Oggetto di fornitura 1 Stazione meteorologica, 1 Sensore di temperatura, Istruzioni MESSA IN FUNZIONE Dopo aver inserito le batterie, poi l‘unità principale si collega automati camente al sensore remoto. Questo processo richiede circa. 3 minuti. Poi lo schermo visualizza la temperatura esterna. La stazione meteo cercherà automaticamente tre canali. Selezionare i canali (1, 2, o 3) manualmente premendo il pulsante „CHANNEL“ (C) della stazione meteo o il pulsante (B) sul sensore remoto. La stazione meteo è in grado di ricevere fino a tre canali differenti. In caso di mancata ricezione, premere il tasto „CHANNEL“ (C) per più di appros. 3 sec. per ricevere di nuovo. Per evitare interferenze, una distanza minima di 2,5 m è osservata per altri dispositivi elettronici! IMPOSTAZIONI MANUALI (Il modo di impostazione si chiude automaticamente se non entro 20 secondi premendo un tasto qualsiasi.) Premere e tenere premuto il pulsante „SET“ per appros. 2 sec. Il segno anno lampeggia Premere il pulsante „UP“ o „DOWN“ per selezionare. Premere il pulsante „SET“ per confermare. Il segno mese lampeggia Premere il pulsante „UP“ o „DOWN“ per selezionare. Premere il pulsante „SET“ per confermare. Il segno data lampeggia Premere il pulsante „UP“ o „DOWN“ per selezionare. Premere il pulsante „SET“ per confermare. Lingua di settimana lampeggia (IT per l‘italiano) Premere il pulsante „UP“ o „DOWN“ per selezionare. Premere il pulsante „SET“ per confermare. I caratteri 12/24 lampeggiano Premere il pulsante „UP“ o „DOWN“ per selezionare. Premere il pulsante „SET“ per confermare. Il segno ora lampeggia Premere il pulsante „UP“ o „DOWN“ per selezionare. Premere il pulsante „SET“ per confermare. Il segno minuto lampeggia Di allarme impostato Premere il pulsante „ALARM“ Lo schermo cambia per visualizzare l‘allarme AL Premere e tenere premuto il pulsante „ALARM“ per appros. 2 sec. Il segno ora lampeggia Premere il pulsante „UP“ o „DOWN“ per selezionare. Premere il pulsante „ALARM“ per confermare. Il segno minuto lampeggia Premere il pulsante „UP“ o „DOWN“ per selezionare. Premere il pulsante „ALARM“ per confermare. Linea diretta di assistenza In caso di problemi tecnici, rivolgersi alla nostra linea diretta di assistenza. Svizzera: tel. 0900 00 1675 (spese da rete nazionale Swisscom alla data di stampa: CHF 2,60/min). In caso di reclami entro il periodo di garanzia commerciale, rivolgersi al rivenditore autorizzato. Indicazioni per la cura Pulire le superfici dell’involucro con un panno morbido e antipelucchi. Non utilizzare detergenti o solventi. Impostazione della temperatura di avvertimento Ad esempio questo permette di ottenere un avvertimento gelo danni L‘unità principale darà un segnale di allarme quando il limite di temperatura impostata viene raggiunta. Garanzia Gli apparecchi Dexford sono costruiti e collaudati in osservanza dei processi di produzione più moderni. L‘impiego di materiali selezionati e tecnologie altamente sviluppate sono garanti di una perfetta funzionalità e lunga durata in vita. La garanzia non si estende a pile, batterie ricaricabili o pacchi batteria utilizzati all‘interno degli apparecchi. Il periodo di garanzia commerciale ricopre 24 mesi a partire dalla data di acquisto. Entro il periodo di garanzia si procederà all‘eliminazione gratuita di tutti i guasti dovuti a difetti di materiale o produzione. Il diritto di garanzia cessa in caso di interventi da parte dell‘acquirente o di terzi. Danni dovuti a impiego o esercizio improprio, naturale usura, errato montaggio o conservazione, collegamento o installazione impropri, forza maggiore o altri influssi esterni non sono coperti da garanzia. In qualità di produttore ci riserviamo il diritto, in caso di reclami, di riparare o sostituire le parti difettose o di rimpiazzare l‘apparecchio. Parti o apparecchi sostituiti passano di nostra proprietà. Sono esclusi diritti di risarcimento per danni se non dovuti a intenzione o colpa grave del costruttore. In caso di difetti del presente apparecchio durante il periodo di garanzia, si prega di rivolgersi esclusivamente al negozio di rivendita dell‘apparecchio Dexford assieme al relativo scontrino di acquisto. In base alle presenti disposizioni, tutti i diritti di garanzia dovranno essere fatti valere esclusivamente nei confronti del rivenditore autorizzato. Decorso il termine di due anni dalla data di acquisto e consegna dei nostri prodotti non sarà più possibile fare valere alcun diritto di garanzia. Premere il pulsante „DOWN“ per appros. 3 sec., ON/OFF lampeggia Premere il pulsante „UP“ o „DOWN“ per selezionare. Premere il pulsante „SET“ Il limite superiore della temperatura esterna lampeggia. Premere il pulsante „UP“ o „DOWN“ Selezionare la temperatura esterna massima. Premere il pulsante „SET“ Il limite inferiore della temperatura esterna lampeggia. Premere il pulsante „UP“ o „DOWN“ elezionare la temperatura esterna minima. Premere il pulsante „SET“ per confermare. Il simbolo per l‘avvertimento temperatura ( ) è visualizzata In modo che l‘impostazione può essere completato, si prega di notare che la temperatura massima deve essere superiore alla temperatura minima registrata. Smaltimento Smaltire l‘apparecchio consegnandolo in uno dei punti di raccolta istituiti dalla propria società di smaltimento rifiuti comunale (ad es. centro di riciclo materiali). La legge sugli apparecchi elettrici ed elettronici prescrive ai proprietari di apparecchi esauriti la consegna di apparecchi elettrici ed elettronici in un centro di rilievo rifiuti in raccolta differenziata. Il simbolo riportato qui a lato indica che non è assolutamente consentito smaltire l‘apparecchio gettandolo nei rifiuti domestici! Per legge sussiste l‘obbligo di consegnare batterie e pile presso i rivenditori di pile utilizzando gli appositi contenitori di raccolta e provvedendo in tal modo al corretto smaltimento. Lo smaltimento è gratuito. I simboli indicano che non è assolutamente consentito gettare batterie e pile nei rifiuti domestici, consegnandoli ai fini dello smaltimento nei rispettivi punti di raccolta. Illuminazione del display accendere / spegnere Premere il pulsante „SNOOZE/LIGHT“ L‘illuminazione è acceso per 20 secondi. Dichiarazione di conformità Questo apparecchio è conforme alla direttiva 1999/5/CE concernente le apparecchiature radio, le apparecchiature terminali di telecomunicazione il reciproco riconoscimento della loro conformità. La conformità con la direttiva di cui sopra viene confermata dal marchio CE applicato sull‘apparecchio. Per la dichiarazione di conformità completa si prega di voler usufruire del servizio gratuito di download dal nostro sito web www.dexford.com. Allarme accendere / spegnere Premere il pulsante „SET“ volta AL appare Premere il pulsante „SET“ di nuovo, AL è soppresso Suono allarme spegnere, premere un tasto qualsiasi. In caso contrario, l‘allarme si spegne automaticamente dopo 2 minuti. „Snooze“ funzione accendere / spegnere Premere il pulsante „SNOOZE/LIGHT“ suoni durante l‘allarme. La funzione „snooze“ è attivato e la sveglia suonerà di nuovo dopo 5 minuti. La funzione „Snooze“ viene disattivato premendo un tasto qualsiasi. Max. / Min. Temperatura e umidità per la visualizzazione interni ed esterni Premere il pulsante „UP“ Premere il pulsante „UP“ appros. 3 sec. per cancellare i valori. Comfort Index comodamente secco umido ATTENZIONE! Non vi è alcuna icona appare quando la temperatura all‘interno di 20 a 27 °C e l‘umidità non rientra nel 40 a 70%. PREVISIONI METEO soleggiato poco nuvoloso Dati tecnici (Con riserva di modifiche tecniche) Caratteristica Valore WS 2200 nuvoloso piovoso La stazione meteorologica analizza le condizioni meteorologiche delle ultime 24 ore per determinare le previsioni per il prossimo 12 - 24 ore. Le previsioni del tempo non è vincolante e solo per uso domestico. In condizioni meteorologiche estreme, il pronostico è meno accurato. LxAxP 80 x 160 x 20 mm Peso 134 g (senza batteria) Frequenza 433 MHz Batterie 2 x 1,5V AAA, non incluso Intervallo di temperatura 0 ~ +50 °C Gamma di umidità 20 ~ 90 % Sensore di temperatura, 30 m all‘aperto LxAxP 60 x 95 x 27 mm (basamento incluso) Peso 55,5 g (senza batteria) Batterie 2 x 1,5V AAA, non incluso Intervallo di temperatura -20 ~ +50 °C Per interni ed esterni Thermo-sensor WS 2200 Weather Station with wireless-thermometer and clock The display for the minutes is flashing. Use “UP“ and “DOWN“ to select the minutes. Press “SET“ to confirm. 10 LCD display b a 11 G 12 1 2 7 8 3 4 5 9 6 B C A F D E Display icons and operating elements 1 Weather Forecast 2 Indoor temperature, humidity, trend ➙ ➚ ➘ 3 Outdoor temperature, trend ➙ ➚ ➘ 4 Snooze 5 Time 6 Date 7 Comfort index 8 Sensor symbol 9 Alarm 10 Hanging hole 11 Battery compartment cover 12 Table stand A B C D E F G 10 SET ALARM CHANNEL DOWN (Press the key to switch between °C or °F) UP SNOOZE SNOOZE / LIGHT a Change from °C / °F b Change channel During initial installation, the unit may take up to an hour or more to acclimatise to current conditions. It is recommended to put the main unit in the room where it will be used at least 1 hour prior to initial installation. 11 12 ENGLISH Operating Instructions Please read and observe the following information and keep the operating manual nearby for future reference! WARNING! Safety information Only use batteries of the same type! Always treat batteries with due care and attention and only use batteries as described. Never use standard and rechargeable batteries together. Never use rechargeable batteries or standard batteries with different capacities or charge statuses together. Never use standard or rechargeable batteries which are damaged. Risk of suffocation through small objects, packaging and protective foil! Keep children away from the product and its packaging! Risks to health and the environment from batteries! Never open, damage or swallow batteries or allow them to pollute the environment. They could contain toxic and ecologically harmful heavy metals. ATTENTION! Prevent exposure to environmental influences, e.g. smoke, dust, vibration, chemicals, moisture, heat and direct sunlight. Only allow repairs to be completed by qualified personnel. Package contents 1 Weather station main unit, 1 Thermo-sensor, Operating manual STARTING UP After inserting the batteries, the station is now connecting to the thermo sensor. This process takes about 3 minutes. Then the display shows the outdoor temperature. In case of failure of reception, pls press“CHANNEL“ (C) for more than approx. 3 sec. to receive again. The weather station is capable of receiving up to 3 different channels. Select the channel number (1, 2, or 3) by pressing the “b” switch. The weather station will scan the 3 channels automatically. Select the channel number (1, 2, or 3) by pressing the “CHANNEL” button (C) on weather station. Please observe a minimal distance of 2.5m to sources of interference such as televisions or computer screens. MANUAL SET-UP (The clock automatically changes from set-up mode to time display mode if no keys are pressed for 20 seconds.) Press and hold key “SET“ for approx. 2 seconds. The display for the year is flashing. Use “UP“ and “DOWN“ to select the year. Press “SET“ to confirm. The display for the month is flashing. Use “UP“ and “DOWN“ to select the month. Press “SET“ to confirm. The display for the date is flashing. Use “UP“ and “DOWN“ to select the date. Press “SET“ to confirm. The language selection for the display of the weekdays is flashing. Use “UP“ and “DOWN“ to select the language. (EN for English) Press “SET“ to confirm. The 12/24 hour flashing. Use “UP“ and “DOWN“ to select Press “SET“ to confirm. The display for the hour is flashing. Use “UP“ and “DOWN“ to select the hour. Press “SET“ to confirm. Alarm set-up Press “ALARM“ to switch from time display to AL display Press and hold the key “ALARM“ for approx. 2 seconds ,the flashing alarm time are shown. The hour display of the alarm time is flashing. Use “UP“ and “DOWN“ to select the hour. Press “ALARM“ to confirm. Then follow the minutes. Use “UP“ and “DOWN“ to select the minutes, Press “ALARM“ to confirm. Service hotline In the case of technical problems, contact our Service hotline. Switzerland: Tel. 0900 00 1675 (national charges, Swisscom at time of going to print: CHF 2.60/min). In the case of claims under the terms of guarantee, contact your sales outlet. Maintenance Clean the surface of the housing with a soft, fluff-free cloth. Do not use any cleaning agents or solvents. Guarantee Dexford equipment is produced and tested according to the latest production methods. The implementation of carefully chosen materials and highly developed technologies ensure trouble-free functioning and a long service Alarm on/off When showing AL alarm time, press “SET“ to activate the alarm life. The terms of guarantee do not apply to the batteries or power packs used in the products. The period of guarantee is 24 months from the date with alarm symbol showing. of purchase. All deficiencies related to material or manufacturing errors Press “SET” again cancel the alarm within the period of guarantee will be redressed free of charge. Rights to claims under the terms of guarantee are annulled following tampering by Snooze function Press the key “SNOOZE/LIGHT“, while the alarm sounds, to activate the purchaser or third parties. Damage caused as the result of improper handling or operation, normal wear and tear, incorrect positioning or the snooze function. The alarm repeat after 5 minutes. storage, improper connection or installation or Acts of God and other The snooze function can be stopped by pressing any key. external influences are excluded from the terms of guarantee. In the case of complaints, we reserve the right to repair defective parts, replace them Max./ Min. for the indoor/outdoor temperature and humidity Press “UP” for displaying indoor/outdoor max./min. of temperature or replace the entire device. Replaced parts or devices become our pro and humidity, hold “UP“ for more than approx. 3 seconds to clear up the perty. Rights to compensation in the case of damage are excluded where there is no evidence of intent or gross negligence by the manufacturer. If max./min. your device does show signs of a defect within the period of guarantee, please contact the sales outlet where you purchased the Dexford device, Temperature alert set-up As an example this allows to get a frost damage warning. The main unit will producing the purchase receipt as evidence. All claims under the terms of guarantee in accordance with this agreement can only be asserted at give an alarm signal when the set temperature limit is reached. the sales outlet. No claims under the terms of guarantee can be asserted after a period of two years from the date of purchase and hand-over of the Press and hold the key “DOWN“ for approx. 3 sec., ON/OF is flashing product. Use “UP“ and “DOWN“ to select ON/OF. Press “SET” , the upper limit temperature is flashing, Disposal Use “UP“ and “DOWN“ to set the maximum alert temperature. In order to dispose of your device, take it to a collection point Press “SET “, the lower limit temperature is flashing, provided by your local public waste authorities (e.g. recycling Use “UP“ and “DOWN“ to set the minimum alert temperature. centre). According to the laws on the disposal of electronic and Press “SET“ to confirm. electrical devices, owners are obliged to dispose of old electronic When the alert is activated, the alert symbol ( ) will be shown. and electrical devices in a separate waste container. The adjacent The set-up process cannot be completed if the maximum temperature symbol indicates that the device must not be disposed of in normal selected is lower than the minimum selected temperature. domestic waste! The minimum temperature selected must at least be 1°C below the maxiYou are legally obliged to dispose of power packs and batteries mum selected temperature. at the point of sale or in the corresponding containers provided at collection points by local public waste authorities. Disposal is free of Illumination Press the key “SNOOZE/LIGHT“ to activate the display illumination for charge. The symbols indicate that the batteries must not be disposed of in normal domestic waste and that they must be brought to collection points 20 seconds. provided by local public waste authorities. Packaging materials must be disposed of according to local regulations. Comfort index Comfortable Dry Wet PLEASE NOTE! There is no comfort display when temperature is not in 20-27°C range and humidity is in 40-70% range WEATHER FORECAST Sunny Slightly Sunny Cloudy Declaration of Conformity This device fulfils the requirements stipulated in the Directive 1999/5/EC on radio equipment and telecommunications terminal equipment and the mutual recognition of their conformity. Conformity with the above mentioned directive is confirmed by the CE mark on the device. To view the complete Declaration of Conformity, please refer to the free download available on our web site www.dexford.com. Rainy Technical data (All rights reserved) Feature Value WS 2200 The weather station analyzes the weather patterns from the past 24 hours to determine the forecast for the next 12 – 24 hours. The weather forecast is only for reference and domestic use. Accuracy rate might be lower in extreme conditions. WxHxD 80 x 160 x 20 mm Weight 134 g (without battery) Signal frequency 433 MHz Power 2 x 1,5V AAA, not included Temperature range 0 ~ +50 °C Humidity range 20 ~ 90 % Thermo-sensor, max. 30 meters in open area WxHxD 60 x 95 x 27 mm (including stand) Weight 55 g (without battery) Power 2 x 1,5V AAA, not included Temperature range -20 ~ +50 °C To use for indoor and outdoor