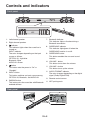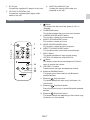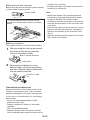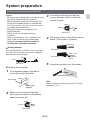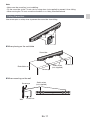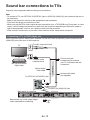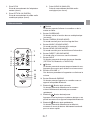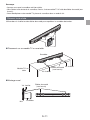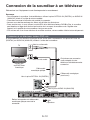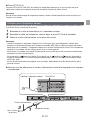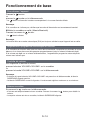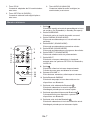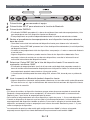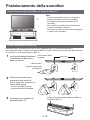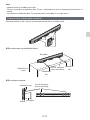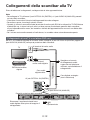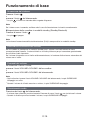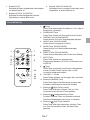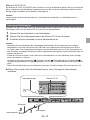
1
Soundbar System English SBT-200 Français Espanõl Instruction Manual Italiano Deutsch Contents SAFETY PRECAUTIONS...........................................2 Accessories................................................................5 Indicators....................................................................5 Controls and indicators...............................................6 System preparation....................................................9 Placing the sound bar...............................................10 Sound bar connections to TVs.................................12 Basic operations.......................................................14 Listening to Bluetooth enabled devices....................17 Troubleshooting........................................................20 Specifications...........................................................22 Thank you for purchasing an Onkyo product. Please read this manual thoroughly before making connections and plugging in your new Onkyo product. Following the instructions in this manual will enable you to obtain optimum performance and listening enjoyment from your new product. Please retain this manual for future reference. *TINSZB752AWZZ* SAFETY PRECAUTIONS WARNING: TO REDUCE THE RISK OF FIRE OR ELECTRIC SHOCK, DO NOT EXPOSE THIS APPARATUS TO RAIN OR MOISTURE. CAUTION: TO REDUCE THE RISK OF ELECTRIC SHOCK, DO NOT REMOVE COVER (OR BACK). NO USER-SERVICEABLE PARTS INSIDE. REFER SERVICING TO QUALIFIED SERVICE PERSONNEL. WARNING AVIS RISK OF ELECTRIC SHOCK DO NOT OPEN RISQUE DE CHOC ELECTRIQUE NE PAS OUVRIR The lightning flash with arrowhead symbol, within an equilateral triangle, is intended to alert the user to the presence of uninsulated “dangerous voltage” within the product’s enclosure that may be of sufficient magnitude to constitute a risk of electric shock to persons. The exclamation point within an equilateral triangle is intended to alert the user to the presence of important operating and maintenance (servicing) instructions in the literature accompanying the appliance. Important Safety Instructions 1. 2. 3. 4. 5. 6. 7. Read these instructions. Keep these instructions. Heed all warnings. Follow all instructions. Do not use this apparatus near water. Clean only with dry cloth. Do not block any ventilation openings. Install in accordance with the manufacturer’s instructions. 8. Do not install near any heat sources such as radiators, heat registers, stoves, or other apparatus (including amplifiers) that produce heat. 9. Do not defeat the safety purpose of the polarized or grounding-type plug. A polarized plug has two blades with one wider than the other. A grounding type plug has two blades and a third grounding prong. The wide blade or the third prong are provided for your safety. If the provided plug does not fit into your outlet, consult an electrician for replacement of the obsolete outlet. 10. Protect the power cord from being walked on or pinched particularly at plugs, convenience receptacles, and the point where they exit from the apparatus. 11. Only use attachments/accessories specified by the manufacturer. 12. Use only with the PORTABLE CART WARNING cart, stand, tripod, bracket, or table specified by the manufacturer, or sold with the apparatus. When S3125A a cart is used, use caution when moving the cart/apparatus combination to avoid injury from tip-over. 13. Unplug this apparatus during lightning storms or when unused for long periods of time. 14. Refer all servicing to qualified service personnel. Servicing is required when the apparatus has been damaged in any way, such as power-supply cord or plug is damaged, liquid has been spilled or objects have fallen into the apparatus, the apparatus has been exposed to rain or moisture, does not operate normally, or has been dropped. 15. Damage Requiring Service Unplug the apparatus from the wall outlet and refer servicing to qualified service personnel under the following conditions: A. When the power-supply cord or plug is damaged, B. If liquid has been spilled, or objects have fallen into the apparatus, C. If the apparatus has been exposed to rain or water, D. If the apparatus does not operate normally by following the operating instructions. Adjust only those controls that are covered by the operating instructions as an improper adjustment of other controls may result in damage and will often require extensive work by a qualified technician to restore the apparatus to its normal operation, E. If the apparatus has been dropped or damaged in any way, and F. When the apparatus exhibits a distinct change in performance this indicates a need for service. 16. Object and Liquid Entry Never push objects of any kind into the apparatus through openings as they may touch dangerous voltage points or short- En-2 out parts that could result in a fire or electric shock. The apparatus shall not be exposed to dripping or splashing and no objects filled with liquids, such as vases shall be placed on the apparatus. Don’t put candles or other burning objects on top of this unit. 17. Batteries Always consider the environmental issues and follow local regulations when disposing of batteries. 18. If you install the apparatus in a built-in installation, such as a bookcase or rack, ensure that there is adequate ventilation. Leave 20 cm (8”) of free space at the top and sides and 10 cm (4”) at the rear. The rear edge of the shelf or board above the apparatus shall be set 10 cm (4”) away from the rear panel or wall, creating a flue-like gap for warm air to escape. Precautions • Do not remove the outer cover, as this • • Warning: • The supplied AC/DC adaptor contains • • • General • Please ensure that the equipment is positioned in a well-ventilated area and ensure that there is at least 10 cm of free space along the sides and top of the equipment. 10 cm may result in electric shock. Refer internal service to your Onkyo dealer. This unit should only be used within the range of 5°C - 35°C. Onkyo is not responsible for damage due to improper use. Refer all servicing to a Onkyo dealer. 10 cm 10 cm no user serviceable parts. Never remove covers unless qualified to do so. It contains dangerous voltages, always remove mains plug from the main outlet socket before any service operation or when not in use for a long period. The AC/DC adaptor supplied with the SBT‑200 must not be used with other equipment. Never use an AC/DC adaptor other than the one specified. Otherwise, problem or serious hazards may be created. The voltage used must be the same as that specified on this unit. Using this product with a higher voltage other than that which is specified is dangerous and may result in a fire or other type of accident causing damage. Onkyo will not be held responsible for any damage resulting from use of this unit with a voltage other than that which is specified. Volume control • Use the unit on a firm, level surface free from vibration. • Keep the unit away from direct sunlight, • • • • • • strong magnetic fields, excessive dust, humidity and electronic/electrical equipment (home computers, facsimiles, etc.) which generate electrical noise. Do not place anything on top of the unit. Do not expose the unit to moisture, to temperatures higher than 60°C or to extremely low temperatures. If your system does not work properly, disconnect the AC power cord from the AC outlet and replug. In case of an electrical storm, unplug the unit for safety. Hold the AC power plug by the head when removing it from the AC outlet, as pulling the cord can damage internal wires. The AC power plug is used as a disconnect device and shall always remain readily operable. The sound level at a given volume setting depends on speaker efficiency, location and various other factors. It is advisable to avoid exposure to high volume levels, which occurs while turning the unit on with the volume control setting up high, or while continually listening at high volumes. For British models Replacement and mounting of an AC plug on the power supply cord of this unit should be performed only by qualified service personnel. IMPORTANT The wires in the mains lead are coloured in accordance with the following code: Blue: Neutral Brown: Live As the colours of the wires in the mains lead of this apparatus may not correspond with the En-3 coloured markings identifying the terminals in your plug, proceed as follows: The wire which is coloured blue must be connected to the terminal which is marked with the letter N or coloured black. The wire which is coloured brown must be connected to the terminal which is marked with the letter L or coloured red. IMPORTANT The plug is fitted with an appropriate fuse. If the fuse needs to be replaced, the replacement fuse must approved by ASTA or BSI to BS1362 and have the same ampere rating as that indicated on the plug. Check for the ASTA mark or the BSI mark on the body of the fuse. If the power cord’s plug is not suitable for your socket outlets, cut it off and fit a suitable plug. Fit a suitable fuse in the plug. For European Models Declaration of Conformity We declare, under our sole responsibility, that this product complies with the standards: -- Safety -- Limits and methods of ----- measurement of radio disturbance characteristics Limits for harmonic current emissions Limitation of voltage changes, voltage fluctuations and flicker RoHS Directive, 2011/65/EU Hereby, Onkyo Corporation, declares that this SBT-200 is in compliance with the essential requirements and other relevant provisions of Directive 1999/5/EC. WEEE http://www.onkyo.com/manual/weee/weee.pdf En-4 Accessories The following accessories are included. • Remote controller (1) • AC adapter (1) • Power cord (1) • Optical digital audio cable (1) • Stand (2) • Double-faced Tape (1) • Pattern paper (1) The remote controller contains a lithium battery (CR2025). In catalogs and on packaging, the letter at the end of the product name indicates the color. Specifications and operations are the same regardless of color. We recommend that you use the sound bar for flat-screen televisions (LED, LCD or PLASMA). Indicators /INPUT Bluetooth SURROUND [ /INPUT ] The /INPUT indicator lights when the sound bar is turned on. The color changes depending on the input source. • OPTICAL IN : Light blue • Bluetooth : Blue • AUDIO IN : Green [ Bluetooth ] The Bluetooth indicator lights in blue when the Bluetooth enabled device is connected to the sound bar and Bluetooth function is selected. • The Bluetooth indicator flashes when the Bluetooth enabled device is not connected to the sound bar. • The Bluetooth indicator flashes quickly when the sound bar is in pairing mode. AUDIO FORMAT [ SURROUND ] The SURROUND indicator lights in orange when the SURROUND function is on. • The SURROUND indicator flashes when the volume of the sound bar is maximum, minimum or muted. • The SURROUND indicator flashes once when SOUND MODE is selected. [ AUDIO FORMAT ] The AUDIO FORMAT indicator lights depending on the type of audio when OPTICAL IN is selected. • DolbyDigital : Blue • PCM : Off • No signal : Flashing En-5 Controls and indicators Front panel 1 2 14 34 5 67 8 9 10 11 12 13 1. Left channel speaker 7. Bluetooth indicator This indicator lights or flashes during a Bluetooth connection. 2. Right channel speaker 3. 4. indicator This indicator lights when the sound bar is turned on. INPUT indicator The color changes depending on the input source as follows. OPTICAL IN : Light blue Bluetooth : Blue AUDIO IN : Green 8. SURROUND indicator This indicator lights/goes off when the SURROUND function is on/off. 9. SURROUND button This button enables the surround sound function. 10. VOLUME - button This button turns down the volume. button This button sets the power to “On” or “Standby”. 11. VOLUME + button This button turns up the volume. 5. INPUT button This button switches an input source among OPTICAL IN, Bluetooth, and AUDIO IN. 6. PAIRING button This button pairs the sound bar with Bluetooth enabled devices. 12. AUDIO FORMAT indicator The color changes depending on the digital signal (Dolby Digital/PCM). 13. Remote control sensor 14. NFC pairing mark Rear panel 2 1 3 En-6 1. DC IN jack Connect the supplied AC adaptor to this jack. 2. OPTICAL IN (DIGITAL) jack Connect the supplied optical digital audio cable to this jack. 3. AUDIO IN (ANALOG) jack Connect the analog audio cable (not supplied) to this jack. Remote controller 1. 2. 3. 4. 1 2 3 4 5 6 7 5. 8 6. 9 7. Button This button sets the sound bar power to “On” or “Standby”. SURROUND button This button enables the surround sound function. CINEMA (SOUND MODE) button This mode is suitable for movie viewing. MUSIC (SOUND MODE) button This mode is suitable for music. NEWS (SOUND MODE) button This mode is suitable for news programs. DIRECT (SOUND MODE) button This mode provides sound with no processings. INPUT button This button switches an input source among OPTICAL IN, Bluetooth, and AUDIO IN. 8. 10 11 12 13 button This button mutes the volume temporarily. Press it again to restore the volume. 9. VOLUME +/- buttons These buttons increase and decrease volume. 10. Bluetooth PAIRING button This button pairs the sound bar with Bluetooth enabled devices. 11. Bluetooth Skip Up button This button selects the next song. Hold down it to fast-forward. 12. Bluetooth Play/Pause button Press this button to play or pause Bluetooth enabled devices. 13. Bluetooth Skip Down button This button selects the beginning of the current song. Hold down it to fast-reverse. En-7 ■■Aiming the remote controller Before using the remote controller, please remove a plastic shield at battery holder. Plastic shield sunshine, fire or the like. • Installing the battery incorrectly may cause the sound bar to malfunction. Note • Replace the battery if the operating distance is reduced or if the operation becomes erratic. Purchase “CR2025”, coin lithium battery. • Periodically clean the transmitter on the remote controller and the sensor on the sound bar with a soft cloth. • Exposing the sensor on the sound bar to strong light may interfere with operation. Change the lighting or the direction of the sound bar if this occurs. • Keep the remote controller away from moisture, heat, shock and vibrations. To use the remote controller, point it at the sound bar’s remote control sensor, as shown below. 5m 5m ■■Battery installation This product contains a CR coin lithium battery. 1 While pushing the locking tab towards the center of the remote controller, slide out the battery holder. Back of remote controller Locking tab 2 Remove the old battery from the battery holder, insert the new battery and then slide the battery holder back into the remote controller. Positive (+) side up Precautions for battery use Remove the battery if the sound bar will not be used for a long period of time. This will prevent pontential damage due to battery leakage such as fire, injury or contamination of a surrounding environment. • Do not use rechargeable battery (nickelcadmium battery, etc.). • Danger of explosion if battery is incorrectly replaced. • Use only specified batteries. • Batteries (battery pack or batteries installed) shall not be exposed to excessive heat such as En-8 System preparation To mount the sound bar on the wall Caution: • Be very careful to prevent the sound bar (2.4 kg) from falling when mounting on the wall. • Before mounting, check the wall strength. (Do not put on the veneer plaster or whitewashed wall. The sound bar may fall.) If unsure, consult a qualified service technician. • Mounting screws are not supplied. Use appropriate ones. • Check all wall mount angle screws for looseness. • Select a good location. If not, accidents may occur or the sound bar may get damaged. • Onkyo is not responsible for accidents resulting from improper installation. 3 Fix a wall mount plug into the hole using a hammer, until it is flush with the wall surface. 32 mm 8-9 mm Wall surface 4 Fasten the screws to the wall as shown below. (Total screw is 2 pieces.) Screw using ■■Driving screws Wall surface Onkyo designed the sound bar so you may hang it on the wall. Use proper screws (not supplied). See below for size and type. 3.2 mm 5 mm Screwdriver 4.5mm - 5mm Wall surface Gap from wall surface 9 mm 5 Hang the sound bar onto the screws. Min. 22 mm ■■Installing the sound bar 1 Fix the pattern paper to the wall in horizontal position as below. Wall surface 509 mm 548 mm 44 mm Pattern paper (supplied) Note Refer to “When mounting on the wall” in “Falling Prevention” (P.11). 2 Make a hole on the wall following the screw point marks on the pattern paper by using a drill. 32 mm 8-9 mm Wall surface En-9 Placing the sound bar Placing the sound bar on the TV rack TV VCR Note • Remove the protective film covering the sound bar before turning on the system. • The front panel of the sound bar is not removable. • Do not change the installation direction when the sound bar is turned on. • Do not stand or sit on the sound bar as you may be injured. DVD player Using the supplied stand Use the supplied stand when the TV stand becomes an obstacle to place the sound bar on the TV rack. This supplied stand allows the sound bar to be placed astride over the TV stand. 1 Affix the supplied double- faced tapes to 2 positions on the right and left. Bottom of sound bar 1. Peel off the transparent tape from the mount Cushion 2. Affix the tape 2 Confirm the position of the tapes, and press the stand to the tapes so that the tapes come to the center of each stand. • Stands should be located at the rear of the sound bar. 3 Place the sound bar on the TV rack. Align the front line of the sound bar and the TV stand. En-10 Note • Make sure the sound bar is not wobbling. • Fix the sound bar to the TV rack, etc. by using wires (not supplied) to prevent it from falling. • When moving the TV rack, move the sound bar to a safety place beforehand. Falling Prevention Use screw eyes or safety wires to prevent the sound bar from falling. ■■When placing on the rack/table Sound bar Safety wires (not supplied) Rack/table Screw eye ■■When mounting on the wall Screw eye Wall Safety wires (not supplied) Sound bar En-11 Screw eye Sound bar connections to TVs Unplug all other equipment before making any connections. Note • To connect to TV, use OPTICAL IN (DIGITAL) jack or AUDIO IN (ANALOG) jack located at the rear of the sound bar. • Refer to the instruction manual of the equipment to be connected. • Fully insert the plugs to avoid fuzzy noises. • When you use the RCA audio output terminal connection from a TV/DVD/Blu-ray Disc player, in some cases, a small background noises may emit from the sound bar depending on the brand, model or age of the equipment, and it is not a quality matter from the sound bar. • If the volume is continuously at low level, the sound bar will be automatically turned off. Connecting a TV, or DVD player, etc. If the TV/monitor has an audio output, connect it to the OPTICAL IN (DIGITAL) jack or the AUDIO IN (ANALOG) jack at the rear of the sound bar. To audio output terminals TV or Audio signal Blu-ray/DVD player/ Digital tuner Choose an audio connection that matches your TV, and then make the connection. To digital audio output terminal Optical digital audio cable To OPTICAL IN (DIGITAL) jack Analog audio cable (not supplied) To AUDIO IN (ANALOG) jack Rear panel of sound bar Remove the cap of the optical digital audio cable before connecting. Cap En-12 ■■OPTICAL IN jack The sound bar’s OPTICAL IN (DIGITAL) jack has shutter-type covers that open when an optical plug is inserted and close when it’s removed. Push plugs in all the way. Note To prevent shutter damage, hold the optical plug straight when inserting and removing. Using with the AC adaptor After checking all the connection have been made correctly, connect the AC adaptor to the DC IN jack, then to the AC outlet. 1 Plug the AC power cord into the AC adaptor. 2 Plug the AC adaptor cable into the DC IN jack on the sound bar. 3 Plug the AC power cord into an AC outlet. Note • Use only the supplied AC adaptor. Using other AC adaptor may cause a malfunction of SBT-200, an electric shock or fire. The supplied AC adaptor and AC power cord are designed exclusively for use with the sound bar. Do not connect the supplied AC adaptor and AC power cord to other equipment. • Place the sound bar near an AC outlet to plug in/out the AC power cord easily. • During power standby, the indicator goes off. If the button is pressed, the indicator lights depending on the input source. (OPTICAL IN: Light blue/Bluetooth: Blue/AUDIO IN: Green) • Unplug the AC power cord from the AC outlet if the sound bar will not be used for a long period of time. ■■Make sure to unplug the AC power cord before making any connections. AC adaptor cable DC IN jack 2 AC power cord AC outlet 3 1 AC adaptor En-13 Basic operations Turning the power on Press the button or press the • The button on the remote controller. indicator lights depending on the input source. Note If the power does not turn on, check whether the power cord is plugged in properly. ■■Setting the sound bar to standby mode (Bluetooth standby) button again. Press the • The indicator goes off. Note Auto power on function (P.16) is always activated in standby mode. Volume auto fade-in If the sound bar enters standby mode with the volume at higher level and is turned on again, the volume will start at lower level and gradually increase to the last set level. If the volume is set at relatively low level, Volume auto fade-in won’t work. Volume control To increase and decrease the volume, press the VOLUME+/VOLUME- button on the sound bar or press the VOLUME+/VOLUME- button on the remote controller. Note • Everytime the VOLUME+/VOLUME- button on the remote controller is pressed, the SURROUND indicator flashes once. • When the volume is maximum or minimum, the SURROUND indicator flashes. Muting Pressing the button on the remote controller. • The volume is muted temporarily. Press the button again to restore the volume. • When the volume is muted temporarily, the SURROUND indicator flashes. En-14 Surround Press the SURROUND button on the sound bar or press the SURROUND button on the remote controller. • The surround sound is on. (The SURROUND indicator lights in orange.) Sound mode Press the desired SOUND MODE button on the remote controller. • The SURROUND indicator flashes once. CINEMA Suitable for movie viewing MUSIC Suitable for music NEWS For news DIRECT No sound processings Selecting input source Press the INPUT button on the sound bar or press the INPUT button on the remote controller. • The input source will be changed. Input INPUT indicator PAIRING indicator OPTICAL IN Lights in light blue Off Bluetooth Lights in blue Lights or flashes in blue AUDIO IN Lights in green Off Note The backup function will protect the memorized function mode for a few hours in case of a power failure or a disconnection of the AC power cord. En-15 ■■Connecting the digital input source Connect the sound bar to the digital input source with the supplied optical digital audio cable, and press the INPUT button on the sound bar or remote controller to select Digital. The types of input source and audio format are as follows: Input Source OPTICAL IN Audio Format AUDIO FORMAT indicator No input Flashes PCM Off Dolby Digital Lights in blue Bluetooth Off AUDIO IN Off Note If the digital audio output setting is set to PCM on the TV or DVD/Blu-ray Disc player, you cannot obtain sound field effect of Dolby Digital. Auto standby/Auto power on Auto standby • The sound bar will automatically enter standby mode (the detected within 15 minutes. indicator goes off) if no audio signal is Note Auto power on function is always activated in standby mode. Auto power on • When the indicator is off, the sound bar will automatically power on if it detects audio signal from Bluetooth enabled devices. En-16 Listening to Bluetooth enabled devices ■■About Bluetooth technology Bluetooth wireless technology is a short-range wireless technology that enables wireless data communication between digital devices. Bluetooth wireless technology operates within a range of about 10 meters. You do not need to use a cable for connection, nor is it necessary for the devices to face one another, such is the case with infrared technology. Communication System and Bluetooth Profile of the sound bar There are many available Bluetooth Profiles describing the basic communication methods, specific functions and uses, to enable communication between devices. Communication System Bluetooth Specification version 2.1 Bluetooth+Enhanced Data Rate(EDR) Profile • A2DP 1.2(Advanced Audio Distribution Profile) • AVRCP 1.0(Audio Video Remote Control Profile) • A2DP enables audio streaming from an A2DP equipped Bluetooth enabled devices (eg mobile phone) to the sound bar. By converting wireless stereo audio signal to analogue audio signal, you can enjoy listening to the sound through this speaker system. • AVRCP (Audio/Video Remote Control Profile) is a technology that allows a single remote control to control all Bluetooth enabled audio video equipment to which a user has access. Notes when using the sound bar with a mobile phone • The sound bar cannot be used to talk over the telephone even when there is a Bluetooth connection made to a mobile phone. • Please refer to the instruction manual of the mobile phone for details on operation of your mobile phone while transmitting the sound using a Bluetooth connection. Audio stream Bluetooth mobile phone or other Bluetooth enabled devices ■■Pairing Bluetooth enabled devices Bluetooth enabled devices need to be initially paired first before they can exchange data. Once paired, it is not necessary to pair them again unless: • pairing is made with more than 8 devices. (Pairing can only be made one device at a time. The sound bar can be paired to a maximum of 8 devices. If subsequent device is paired, the oldest device connected, will be deleted and replaced with the new one.) • this sound bar is reset. (All pairing information is deleted when sound bar is reset.) • pairing information is deleted while repairing, etc. ■■PAIRING indicator (Blue) Unconnected Flashes Pairing mode Flashes quickly Connected Lights up ■■Near Field Communication (NFC) Near Field Communication (NFC) is a shortrange wireless connectivity technology that enables two-way interactions between electronic devices such as smart phones or IC tags only by holding the device over (or touching) NFC-mark or the like. The sound bar supports Bluetooth pairing using NFC. En-17 Pairing with Bluetooth enabled devices 1 Press the button to turn the power on. 2 Press the INPUT button to select Bluetooth function. 3 Press the PAIRING button. • The PAIRING indicator flashes. The sound bar is now in pairing mode and is ready to be paired with other Bluetooth source device. • Pairing can be made regardless of the current input source. 4 Perform pairing procedure on the source device to detect the sound bar. • Refer to the instruction manual of the source device for details. • "Onkyo SBT-200” will appear in the detected devices list (if available) in the source device. • Place the devices to be paired within 1 meter of each other when pairing. • Some source devices are unable to display lists of detected devices. To pair this sound bar with the source device, refer to the instruction manual of the source device for details. 5 Select "Onkyo SBT-200” from the source list. If passcode* is required, enter “0000”. • Pairing indicator (blue) on the sound bar will stop flashing once the sound bar is successfully paired with the source device. Pairing information is now memorized in the sound bar. * Passcode may be called PIN Code, Passkey, PIN number or Password. 6 Start the Bluetooth connection from the source device. • Some audio source devices may connect with the sound bar automatically, otherwise follow the instructions in the instruction manual of the source device to start connection. Note • If the sound bar or the source device is turned off before Bluetooth connection is completed, pairing will not be completed and the pairing information will not be memorized. Repeat step 1 to start pairing again. • To pair with other devices, repeat steps 1 - 5 for each device. • Once a device is ousted or deleted from the pairing list, the pairing information for the device is also deleted. To listen to the sound from the device again, it needs to be re-paired. Perform steps 1 - 5 to pair the device again. • Passcode of this sound bar is fixed to “0000” and can only be paired with Bluetooth source device whose passcode is also “0000”. Pairing with Bluetooth enabled devices using NFC • On an NFC enabled device, Bluetooth pairing can be made only by holding the device over the sound bar. • Check that the NFC function on the device is “ON”. 1 Turn on the sound bar and the device. 2 Start an app for reading NFC on the device. En-18 3 Press the PAIRING button on the sound bar. 4 Hold the device over the NFC mark on the upper surface center of the sound bar. • The Bluetooth indicator on the sound bar is changed from flashing to lighting, indicating that the pairing is complete. • Some types of devices do not require step 2. • Some devices such as smartphones sound alarms when they recognize NFC enabled devices. If the device is moved at this timing, connection or disconnection may not be performed. Do not move the device until a message “Connection is completed” or “Disconnection is completed” is displayed on it. Listening to the sound Check that: --Bluetooth function of the source device is on. --Pairing of the sound bar and the source device is completed. 1 Press the INPUT button to select Bluetooth function. 2 Start the Bluetooth connection from the Bluetooth enabled device. 3 Start playing on the Bluetooth enabled device. • If the source device has an extra bass function or equalizer function, set them to off. If these functions are on, sound may be distorted. Note • You need to make the Bluetooth connection again if: --the sound bar is not turned on. --the source device is not turned on, or its Bluetooth function is off or is in sleep mode. To finish listening Perform any of the followings. --Terminate the Bluetooth connection on the audio source device. (Refer to the instruction manual of the source device.) --Turn off the Bluetooth enabled devices. --Turn off the sound bar. Note • Some Bluetooth enabled devices cannot be operated with the remote controller. • The volume of the sound bar may not be controlled as intended depending on the connected device. Bluetooth operation buttons (remote controller only) Press the button to play or pause. Press the button to skip up. Hold down it to fast-forward. Press the button to skip down. Hold down it to fast-reverse. En-19 Troubleshooting If something is wrong with this product, check the following before contacting your Onkyo dealer. Restoring Default (Reset) First remove all cables connected to the sound bar, and then unplug the AC power code from the AC outlet. While holding down the button and the PAIRING button, plug the AC adaptor cable into the DC IN jack on the sound bar. Then press button. Note Note that resetting the sound bar will delete all data stored in the memory. General Symptom No sound is heard. Possible cause • Is the input signal (selection) set properly? DTS and AAC signals are not supported. • Is the volume level set to “Min(0)” ? • Is muting activated? • Are the connections made correctly? • Is the sound bar too far from the Bluetooth enabled devices? • Is the sound bar paired with the Bluetooth enabled devices? • Move the sound bar away from any computers or mobile Noise is heard during playback. phones. • Is audio cable connected to the input jack of the sound bar correctly? • Deterioration over time may cause noise. Confirm a model year of the TV, DVD/Blu-ray Disc player. • This may cause a malfunction. When the sound bar is Set the sound bar to the standby mode and then turn afflicted with noise from ÆÆ an external source (shock, it back on. If the sound bar still malfunctions, turn it excessive static electricity, off and unplug the AC power cord from the AC outlet. or abnormality of power Plug the cord into the AC outlet and turn on the sound supply voltage due to bar again. lightning). When the sound bar is operated incorrectly. • Reduce the TV volume or sound bar volume. Sound is distorted. When a button is pressed, • Set the sound bar to the standby mode and then turn it the sound bar does not back on. respond. • If the sound bar still malfunctions, reset it. • Is the AC power cord of the sound bar plugged in? The power is not turned on. • The protection circuit may be activated. Unplug and plug in the AC power cord again after 5 minutes or more. Bluetooth sound is interrupted or distorted. • Is the sound bar too near to a device that generates electromagnetic radiation? • Is there any obstacle between the sound bar and the Bluetooth enabled device? En-20 Page P.16 P.14 P.14 P.12 P.17 P.18 P.12 P.21 P.21 Above P.13 P.21 P.18 Remote controller Symptom The remote controller does not operate properly. Possible cause • Is the battery polarity correct? • Is the battery dead? • Is the distance or angle correct? • Is there any obstacle in front of the sound bar? • Is there a strong light (inverter-type fluorescent lights or direct sunshine) shining on the remote sensor? • Is the remote controller for another equipment used simultaneously? The sound bar cannot • Is the AC power cord of the sound bar plugged in? be turned on with the • Is the battery inserted? remote controller. Page P.8 P.13 P.8 Error indicators and warnings When you fail to perform operations properly, /INPUT indicator flashes in green. Display Meaning The protection circuit is activated. /INPUT indicator (Flashes in green) When the same message appears even if the sound bar is unplugged and plugged in or is set to the standby mode and on again, contact your local dealer where you purchased the sound bar. Trademarks and Licensing Manufactured under license from Dolby Laboratories. Dolby and the double-D symbol are trademarks of Dolby Laboratories. The Bluetooth® word mark and logos are registered trademarks owned by Bluetooth SIG, Inc. and any use of such marks by Onkyo is under license. Other trademarks and trade names are those of their respective owners. En-21 Specifications Amplifier Section Rated Output Power (IEC) 2 ch x 20 W at 6 ohms, 1 kHz, 2 ch Driven THD+N (Total Harmonic Distortion+N) 0.2% (1 kHz, 1 W) Damping Factor 31 (6 Ω) Input Sensitivity and Impedance (Unbalance) 1000 mV/47 kΩ (AUDIO IN) Frequency Response 80 Hz - 15 kHz/+3 dB, -3 dB (AUDIO IN, SOUND MODE: DIRECT) Signal to Noise Ratio 103 dB (AUDIO IN IHF-A) Bluetooth Section Communication System Bluetooth Version 2.1 +EDR Maximum communication range 10 m*1 Frequency band 2.4 GHz - 2.48 GHz Modulation method FHSS (Freq Hopping Spread Spectrum) Compatible Bluetooth profiles A2DP 1.2 AVRCP 1.0 Supported Codec SBC *1 The actual range will vary depending on factors such as obstacles between devices, magnetic fields around a microwave oven, static electricity, cordless phone, reception sensitivity, antenna’s performance, operating system, software application, etc. En-22 General Power Supply AC 100 - 240 V, 50/60 Hz (Power supply inputs of the sound bar: DC input 17 V, 2.8 A) Power Consumption 11 W 5 W (No-sound) 0.4 W (Network Standby [Bluetooth Standby]) *Auto power on function is always activated in standby mode. This function cannot be disabled. Dimensions 940 mm (W) x 73 mm (H) x 83 mm (D) Weight 2.4 kg Speaker 2-way Speaker System 5.7 cm (Woofer) x 4 2.5 cm (Soft dome tweeter) x 2 ■■Audio inputs Digital OPTICAL IN (DIGITAL): 1 Analog AUDIO IN (ANALOG): 1 Stereo mini jack Ø 3.5 mm ■■Others Digital inputs Dolby Digital/PCM Sound mode CINEMA, MUSIC, NEWS and DIRECT Surround On/Off *Specifications and features are subject to change without notice. En-23 Memo En-24 Systema-Soundbar SBT-200 Manuel d’instructions Table des matières Information de sécurité...............................................2 Accessoires................................................................5 Témoins......................................................................5 Contrôles et témoins...................................................6 Préparation du système..............................................9 Positionner la soundbar............................................10 Connexion de la soundbar à un téléviseur...............12 Fonctionnement de base..........................................14 Écouter un appareil compatible Bluetooth................17 Dépannage...............................................................20 Caractéristiques techniques.....................................22 Nous vous remercions d’avoir acheté un produit Onkyo. Veuillez lire attentivement ce manuel avant de procéder aux branchements de votre nouveau produit Onkyo. Suivre les instructions de ce manuel vous permet d’obtenir un plaisir d’écoute et des performances optimales grâce à votre nouveau produit. Veuillez conserver ce manuel pour une consultation ultérieure. Information de sécurité ATTENTION: AFIN DE REDUIRE LES RISQUES D’INCENDIE ET DE DECHARGE ELECTRIQUE, NE PAS EXPOSER CET APPAREIL A LA PLUIE OU A L’HUMIDITE. DANGER: AFIN D’EVITER TOUT DANGER DE DECHARGE ELECTRIQUE, NE PAS OUVRIR LE BOITIER (OU L’ARRIERE) DE L’APPAREIL. CONFIER TOUT TRAVAIL D’ENTRETIEN OU DE REPARATION A UN TECHNICIEN QUALIFIE. WARNING AVIS RISK OF ELECTRIC SHOCK DO NOT OPEN RISQUE DE CHOC ELECTRIQUE NE PAS OUVRIR Un symbole d’éclair fléché dans un triangle équilatéral est destiné à attirer l’attention de l’utilisateur sur le fait que certains organes internes non-isolés de l’appareil sont traversés par un courant électrique assez dangereux pour constituer un resque d’électrocution. Un point d’exclamation dans un triangle équilatéral est destiné à attirer l’attention de l’utilisateur sur des instructions importantes relatives à l’entretien et à l’utilisation du produit. Remarques importantes pour votre sécurité 1. 2. 3. 4. 5. Veuillez lire ces instructions. Veuillez conserver ces instructions. Respectez tous les avertissements. Suivez toutes les instructions. Ne vous servez pas de cet appareil à proximité d’eau. 6. Essuyez le boîtier avec un chiffon sec uniquement. 7. Ne bloquez pas les orifices d’aération. Installez cet appareil en suivant les instructions du fabricant. 8. Ne le placez pas à proximité de sources de chaleur telles que radiateurs, chauffage, poêles ou autre dispositif (y compris les amplificateurs) générateur de chaleur. 9. N’essayez pas de circonvenir le dispositif de sécurité que représente une fiche polarisée ou une fiche avec mise à la terre. Une fiche polarisée dispose de deux lames dont l’une est plus large que l’autre. Une fiche avec terre est munie de deux lames ainsi que d’une broche de mise à la terre. La lame la plus large ou la broche assurent votre sécurité. Si la fiche fournie ne peut être insérée dans la prise murale, demandez à un électricien de remplacer la prise. 10. Protégez le cordon d’alimentation en évitant qu’on ne marche pas dessus et qu’il ne soit plié (notamment au niveau des fiches, des cache-câbles et de la sortie de l’appareil). 11. Servez-vous exclusivement des fixations/ accessoires préconisés par le fabricant. 12. Utilisez AVERTISSEMENT POUR exclusivement SUPPORTS À ROULETTES le chariot, le support, le trépied, la fixation ou la table spécifié(e) par le fabricant S3125A ou vendu(e) avec l’appareil. Un chariot contenant l’appareil doit toujours être déplacé avec précaution pour éviter qu’il ne se renverse et blesse quelqu’un. 13. Débranchez l’appareil durant un orage ou lorsqu’il reste inutilisé longtemps. 14. Veuillez faire appel à un technicien qualifié pour l’entretien. Un entretien est indispensable si l’appareil a été endommagé d’une façon ou d’une autre : cordon d’alimentation ou fiche endommagée, liquide renversé ou chute de petits objets dans l’appareil, exposition à la pluie ou à une humidité excessive, fonctionnement anormal ou chute de l’appareil. 15. Dommages nécessitant réparation Débranchez l’appareil du secteur et confiez-le à un technicien qualifié lorsque : A. Le cordon d’alimentation ou sa fiche sont endommagés. B. Des objets sont tombés dans l’appareil ou du liquide a été renversé et a pénétré ce dernier. C. L’appareil a été exposé à la pluie. D. L’appareil ne semble pas fonctionner normalement lorsque vous l’utilisez en respectant les instructions données. N’effectuez que les réglages préconisés dans le manuel car un mauvais réglage d’autres commandes risque d’endommager l’appareil et nécessitera un long travail de remise en état par un Fr-2 technicien qualifié. E. IL’appareil est tombé ou son boîtier est endommagé. F. Ses performances semblent affectées. 16. Pénétration de corps étrangers et de liquide Veillez à ne pas insérer d’objets à l’intérieur de l’appareil car ils pourraient toucher des points de tension dangereux ou provoquer des court-circuits : il y a risque d’incendie ou d’électrocution. Veillez à ne jamais exposer l’appareil à des gouttes ou des jets d’eau. Ne déposez aucun objet contenant un liquide (un vase, par exemple) sur l’appareil. Ne déposez pas de bougies ou d’autres objets brûlants sur cette appareil. 17. Piles Songez à l’environnement et veillez dès lors à respecter les consignes officielles pour la liquidation de piles épuisées. 18. Veillez à n’installer cet appareil que dans un rack ou un meuble qui n’entrave pas la ventilation. Laissez un espace libre de 20 cm au-dessus et à côté de l’appareil ainsi que 10 cm en face arrière. La face arrière du rack ou du meuble doit se trouver à 10 cm ou plus du mur pour assurer une aération adéquate en vue de dissiper la chaleur. d’orage. • Tenez bien la prise elle-même lorsque vous la • • • • Avertissement : • L’adaptateur secteur fourni ne contient • • • Précautions Généralités • Assurez-vous que l’équipement soit placé dans un lieu bien ventilé et qu’il y ait un espace libre d’au moins 10 cm au-dessus et sur les côtés. 10 cm 10 cm 10 cm • N’utilisez cette unité que sur une surface horizontale plane, sans vibrations. • Gardez cette unité à l’abri du soleil, des • • • • champs magnétiques, de la poussière, de l’humidité, et des équipements électriques ou électroniques (ordinateurs, fax, etc.) qui génère un bruit électrique. Ne placez rien au-dessus de l’unité. N’exposez pas cette unité à l’humidité, à une température supérieure à 60 °C, ou à des températures extrêmement basses. Si votre système ne fonctionne pas correctement, déconnectez le cordon d’alimentation puis reconnectez-le. Par précaution, débranchez l’unité en cas retirez de la prise secteur, car tirer le cordon peut endommager les fils à l’intérieur. Le cordon d’alimentation s’utilisant pour déconnecter l’appareil, il doit toujours rester accessible. N’ouvrez pas le boitier extérieur, car cela peut entraîner un choc électrique. Pour toute réparation interne, adressez-vous à votre revendeur Onkyo. Cette unité ne doit être utilisée qu’entre 5 °C et 35 °C. Onkyo n’est responsable d’aucun dommage causé par une utilisation inappropriée de l’appareil. Pour toute réparation, adressezvous à votre revendeur Onkyo. aucune pièce remplaçable par l’utilisateur. N’ouvrez jamais le boitier à moins d’être qualifié pour le faire. Un courant dangereux y passant, débranchez toujours la prise du secteur avant une réparation, ou si l’appareil ne doit pas servir pendant longtemps. L’adaptateur secteur fourni avec la SBT-200 ne doit jamais être utilisé avec un équipement. N’utilisez jamais un autre adaptateur secteur que celui indiqué, sous risque de créer un danger. Le voltage doit être le même que celui indiqué sur cette unité. Utiliser ce produit avec un voltage autre que celui indiqué peut être dangereux et créer des risques d’incendie ou d’accident. Onkyo ne peut être tenue responsable pour aucun dommage résultant de l’utilisation de cette unité avec un autre voltage que celui indiqué. Contrôle du volume Le niveau sonore à un réglage donné du volume dépend de l’efficacité du haut-parleur, l’emplacement et d'autres facteurs. Il est conseillé d'éviter l’exposition à des niveaux sonores élevés, ce qui se produit en tournant l’appareil avec réglage de la commande de volume en haut, ou en écoutant sans cesse à des volumes élevés. Fr-3 Modèles pour l’Europe Déclaration de Conformité Nous déclarons, sous notre seule responsabilité, que le produit est conforme aux normes : -- Sécurité -- Limites et méthodes de ----- mesure des caractéristiques des perturbations radioélectriques Limites pour les émissions de courant harmonique Limitation des variations de tension, des fluctuations de tension et du papillotement Directive RoHS, 2011/65/UE Par la présente, Onkyo Corporation déclare que l’appareil SBT-200 est conforme aux exigences essentielles et aux autres dispositions pertinentes de la directive 1999/5/CE. WEEE http://www.onkyo.com/manual/weee/weee.pdf Fr-4 Accessoires Les accessoires suivants sont inclus : • Télécommande (1) • Adaptateur secteur (1) • Câble audio numérique optique • Support (2) (1) • Gabarit de perçage (1) • Cordon d’alimentation (1) • Ruban adhésif double face (1) La télécommande est alimentée par une pile au lithium (CR2025). La lettre figurant à la fin du nom du produit dans les catalogues et sur l’emballage indique la couleur du produit. Les caractéristiques techniques et le fonctionnement du produit ne changent pas, quelle que soit la couleur. Nous vous recommandons d’utiliser cette soundbar avec des télévisions à écran plat (LED, LCD ou plasma). Témoins /INPUT Bluetooth SURROUND [ /INPUT ] Le témoin /INPUT s’allume lorsque la soundbar est allumée. La couleur du témoin change en fonction de la source d’entrée utilisée. • OPTICAL IN : Bleu clair • Bluetooth : Bleu • AUDIO IN : Vert [ Bluetooth ] Le témoin Bluetooth s’allume en bleu lorsqu’un appareil compatible Bluetooth est connecté à la soundbar et que la fonction Bluetooth est sélectionnée. • Si aucun appareil compatible Bluetooth n’est connecté à la soundbar, le témoin Bluetooth clignote. • Le témoin Bluetooth clignote rapidement lorsque la soundbar est en mode d’appairage. AUDIO FORMAT [ SURROUND ] Le témoin SURROUND s’allume en orange lorsque la fonction SURROUND est sélectionnée. • Le témoin SURROUND clignote lorsque le volume de la soundbar est au maximum, au minimum, ou qu’il est mis en sourdine. • Le témoin SURROUND clignote une fois lorsque la fonction SOUND MODE est sélectionnée. [ AUDIO FORMAT ] La couleur du témoin AUDIO FORMAT dépend du type de signal audio utilisé avec la fonction OPTICAL IN. • Dolby Digital : Bleu • PCM : Éteint • Pas de signal : Clignotant Fr-5 Contrôles et témoins Panneau avant 1 2 14 34 5 67 8 9 10 11 12 13 1. Enceinte gauche 2. Enceinte droite 3. 4. Témoin Ce témoin s’allume lorsque la soundbar est en fonctionnement. Témoin INPUT La couleur du témoin change en fonction de la source d’entrée utilisée. OPTICAL IN : Bleu clair Bluetooth : Bleu AUDIO IN : Vert Bouton Ce bouton règle la puissance sur en marche ou en veille. 7. Témoin Bluetooth Ce témoin s’allume ou clignote lors d’une connexion en Bluetooth. 8. Témoin SURROUND Ce témoin s’allume ou s’éteint si la fonction SURROUND est activée ou désactivée. 9. Bouton SURROUND Ce bouton active la fonction de son ambiophonique (surround). 10. Bouton VOLUME Ce bouton diminue le volume. 11. Bouton VOLUME + Ce bouton augmente le volume. 5. Bouton INPUT Ce bouton permet de changer de source d’entrée (OPTICAL IN, Bluetooth, ou AUDIO IN). 12. Témoin AUDIO FORMAT La couleur de ce témoin change selon le signal numérique utilisé (Dolby Digital/PCM). 6. Bouton PAIRING Ce bouton permet d’appairer la soundbar avec un appareil compatible Bluetooth. 14. Repère d’appairage pour le NFC 13. Capteur infrarouge Panneau arrière 2 1 3 Fr-6 1. Prise DC IN Prise de raccordement de l’adaptateur secteur (fourni). 3. Prise AUDIO IN (ANALOG) Prise de raccordement du câble audio analogique (non fourni). 2. Prise OPTICAL IN (DIGITAL) Prise de raccordement du câble audio numérique optique (fourni). Télécommande 1. 2. 3. 4. 5. 1 2 3 4 5 6 7 8 6. 7. 9 Bouton Ce bouton permet d’allumer la soundbar ou de la mettre en veille. Bouton SURROUND Ce bouton active la fonction de son ambiophonique (surround). Bouton CINEMA (SOUND MODE) Ce mode convient pour le visionnage de films. Bouton MUSIC (SOUND MODE) Ce mode convient à l’écoute de la musique. Bouton NEWS (SOUND MODE) Ce mode convient pour les émissions d’information. Bouton DIRECT (SOUND MODE) Ce mode offre un son sans aucun traitement. Bouton INPUT Ce bouton permet de changer de source d’entrée (OPTICAL IN, Bluetooth, ou AUDIO IN). 8. 10 11 12 13 Bouton Ce bouton permet de couper temporairement le son. Appuyez de nouveau pour rétablir le volume normal. 9. Boutons VOLUME +/Ces boutons permettent d’augmenter ou diminuer le volume. 10. Bouton Bluetooth PAIRING Ce bouton permet d’appairer la soundbar avec un appareil compatible Bluetooth. 11. Bluetooth Bouton piste suivante Ce bouton permet de sélectionner le morceau suivant. Maintenez-le enfoncé pour avancer rapidement. 12. Bluetooth Bouton lecture/pause Appuyez sur ce bouton pour mettre en lecture ou en pause le contenu d’un appareil compatible Bluetooth. 13. Bluetooth Bouton piste précédente Ce bouton permet de sélectionner le début du morceau en cours de lecture. Maintenez-le enfoncé pour un retour rapide. Fr-7 ■■Pointage de la télécommande Avant d’utiliser la télécommande, retirez le film plastique de protection situé au niveau du support de la pile. Film plastique Pour utiliser la télécommande, pointez-la vers le capteur infrarouge de votre soundbar, comme indiqué ci-dessous. • Un remplacement inapproprié de la pile peut engendrer des risques d’explosions. • Utilisez uniquement le modèle de pile recommandé. • Les batteries (bloc-piles ou piles) installées ne doivent pas être exposées à une chaleur intense, comme la lumière du soleil, le feu ou d’autres sources de chaleur semblables. • Une pile installée de manière inappropriée peut engendrer un dysfonctionnement de la soundbar. Remarque • Remplacez la pile si la portée de la télécommande est réduite ou si son fonctionnement est irrégulier. Utilisez une pilebouton « CR2025 » au lithium. • Nettoyez régulièrement avec un chiffon doux l’émetteur de la télécommande et le récepteur de la soundbar. • Exposer le capteur infrarouge de la soundbar à une lumière puissante peut altérer sa réception. Si cela se produit, modifiez l’éclairage ou l’orientation de la soundbar. • Tenez la télécommande à l’abri de l’humidité, de la chaleur, des chocs et des vibrations. 5m 5m ■■Remplacement de la pile La télécommande est alimentée par une pilebouton CR au lithium. 1 Pour extraire le support de la pile, poussez la languette de verrouillage vers le milieu de la télécommande. Dos de la télécommande Languette de verrouillage 2 Enlevez la pile usagée de son support, remplacez-la par une pile neuve et réinsérez le support dans sa position initiale. Polarité positive (+) sur le dessus Précautions d’emploi concernant la pile En cas d’arrêt d’utilisation prolongé de la soundbar, retirez la pile de la télécommande. Cela permettra d’éviter d’éventuels dégâts liés à une fuite de la pile, comme un incendie, des blessures ou la contamination du milieu environnant. • N’utilisez jamais de piles rechargeables (piles au nickel-cadmium, etc.). Fr-8 Préparation du système Montage mural de la soundbar Mise en garde : • La soundbar pèse 2,4 kg : prenez les précautions nécessaires afin d’éviter qu’elle ne tombe lors du montage mural. • Vérifiez la solidité du mur avant d’entreprendre le montage. (Ne fixez pas la soundbar sur une paroi de finition en plâtre ou en chaux, car elle pourrait tomber.) En cas de doute, faites appel à un technicien qualifié. • Les vis de fixation ne sont pas fournies. Choisissez des vis adaptées. • Vérifiez le serrage de chacune des vis de fixation. • Choisissez un bon emplacement afin d’éviter tout incident qui pourrait détériorer la soundbar. • Onkyo décline toute responsabilité pour tout incident résultant d’une mauvaise installation. 2 Faites un trou dans le mur à l’aide d’une perceuse, en suivant les marques indiquées sur le gabarit. 32 mm 8-9 mm Mur 3 Insérez une cheville dans le trou à l’aide d’un marteau, jusqu’à ce qu’elle soit à fleur du mur. 32 mm 8-9 mm Mur ■■Vis de fixation Onkyo a conçu cette soundbar pour qu’il soit possible de l’accrocher à un mur. Utilisez des vis adaptées (non fournies). Type et dimensions des vis recommandées : 3,2 mm 5 mm 4 Serrez les vis dans le mur (2 vis au total), comme indiqué ci-dessous. Vissez avec 9 mm Mur Min. 22 mm 4,5 mm - 5 mm ■■Installation de la soundbar Mur 1 Fixez au mur le gabarit de perçage, en position horizontale, comme indiqué ci-dessous. Mur un tournevis Écart du mur 5 Accrochez la soundbar sur les vis. 509 mm 548 mm 44 mm Gabarit de perçage (fourni) Remarque Consultez « Montage mural » dans la section « Prévenir toute chute » (P.11). Fr-9 Positionner la soundbar Poser la soundbar sur votre meuble TV Remarque • Avant de mettre le système en marche, enlevez le film plastique de protection recouvrant la soundbar. • La façade avant de la soundbar n’est pas amovible. • Ne modifiez pas l’orientation de l’installation alors que la soundbar est allumée. • Afin d’éviter toute blessure, ne montez pas ou ne vous asseyez pas sur la soundbar. TV VCR Lecteur DVD Utilisation des pieds fournis Utilisez les pieds fournis si le pied de votre téléviseur empêche de placer la soundbar sur votre meuble TV. Ces pieds permettent de placer la soundbar à cheval sur le pied du téléviseur. 1 Collez l’adhésif double-face sur les 2 emplacements prévus, à gauche et à droite. Dessous de la Soundbar 1. Retirez les bandes adhésives transparentes du support Coussinet 2. Collez l’adhésif 2 Vérifiez la position des adhésifs et appuyez les pieds dessus, de sorte qu’ils adhèrent au milieu de chaque pied. • Les pieds doivent être positionnés à l’arrière de la soundbar. 3 Positionnez la soundbar sur votre meuble TV. Alignez la soundbar avec le pied de votre téléviseur. Fr-10 Remarque • Assurez-vous que la soundbar est bien stable. • Afin d’éviter toute chute de la soundbar, fixez-la à votre meuble TV à l’aide de câbles de sureté (non fournis). • Avant de déplacer votre meuble TV, placez la soundbar dans un endroit sûr. Prévenir toute chute Utilisez des vis à œillet ou des câbles de sureté pour empêcher la soundbar de tomber. ■■Placement sur un meuble TV ou une table Soundbar Câbles de sureté Vis à œillet (non fournis) Meuble TV/ table Vis à œillet ■■Montage mural Vis à œillet Mur Câbles de sureté (non fournis) Soundbar Fr-11 Connexion de la soundbar à un téléviseur Débranchez tout l’équipement avant d’entreprendre le raccordement. Remarque • Pour connecter la soundbar à votre téléviseur, utilisez la prise OPTICAL IN (DIGITAL) ou AUDIO IN (ANALOG) située à l’arrière de votre soundbar. • Consultez le manuel d’utilisation du matériel à connecter. • Assurez-vous de bien enfoncer les fiches afin d’éviter les distorsions. • Dans certains cas, si vous utilisez la sortie RCA d’un téléviseur/lecteur DVD/Blu-Ray, la soundbar peut émettre un léger bruit de fond en fonction de la marque, du modèle ou de l’âge de votre appareil, et la qualité de votre soundbar n’est pas en cause. • Si le volume est à un niveau très bas de manière continue, votre soundbar s’éteint automatiquement. Connexion à un téléviseur, lecteur DVD, etc. Si votre téléviseur ou moniteur est équipé d’une sortie audio, connectez-la à la prise OPTICAL IN (DIGITAL) ou AUDIO IN (ANALOG) située à l’arrière de la soundbar. Vers la sortie audio TV ou Choisissez une connexion audio adaptée à votre téléviseur et établissez cette connexion. Vers la sortie audio Signal audio Lecteur Bluray/DVD/Tuner numérique Câble audio numérique optique Vers la prise OPTICAL IN (DIGITAL) Câble audio analogique (non fourni) Vers la prise AUDIO IN (ANALOG) Panneau arrière de la soundbar Retirer le capuchon du câble audio numérique optique avant de le connecter. Capuchon Fr-12 ■■Prise OPTICAL IN La prise OPTICAL IN (DIGITAL) est dotée d’un clapet de protection qui s’ouvre lorsqu’une prise optique est insérée et se referme lorsqu’elle est retirée. Insérez les fiches à fond. Remarque Afin de ne pas endommager le clapet de protection, tenez la fiche optique bien droite lorsque vous l’insérez ou la retirez. Utilisation avec l’adaptateur secteur Assurez-vous que tous les câbles sont correctement raccordés, puis connectez l’adaptateur secteur à la prise DC IN, et à une prise de courant. 1 Branchez le cordon d’alimentation sur l’adaptateur secteur. 2 Branchez le câble de l’adaptateur secteur dans la prise DC IN de la soundbar. 3 Reliez le cordon d’alimentation à une prise de courant. Remarque • Utilisez uniquement l’adaptateur secteur fourni. L’utilisation d’un autre adaptateur secteur peut entraîner un dysfonctionnement de la Systema-Soundbar SBT-200, et même provoquer des chocs électriques ou un incendie. L’adaptateur secteur et le cordon d’alimentation fournis sont uniquement destinés à la soundbar. Ne les utilisez jamais avec un autre appareil. • Positionnez la soundbar à proximité d’une prise de courant afin de pouvoir brancher ou débrancher facilement le cordon d’alimentation. • En mode veille, le témoin est éteint. Si on appuie sur le bouton, le témoin s’allume de la couleur correspondant à la source d’entrée sélectionnée. (OPTICAL IN: Bleu clair/Bluetooth: Bleu/ AUDIO IN : Vert) • En cas d’arrêt d’utilisation prolongé de votre soundbar, débranchez le cordon d’alimentation de la prise de courant. ■■Assurez-vous de débrancher le cordon d’alimentation avant d’entreprendre tout nouveau raccordement. Câble de l’adaptateur secteur Prise DC IN 2 Cordon d’alimentation Vers la prise de courant 3 1 Adaptateur secteur Fr-13 Fonctionnement de base Pour allumer l’appareil Pressez le bouton ou pressez la • Le touche sur la télécommande. témoin s’allume de la couleur correspondant à la source d’entrée utilisée. Remarque Si la soundbar ne s’allume pas, vérifiez que le cordon d’alimentation est correctement branché. ■■Mettre la soundbar en veille (Attente Bluetooth) bouton. Pressez à nouveau le • Le témoin s’éteint. Remarque La fonction Mise en marche automatique (P.16) est toujours activée lorsque l’appareil est en veille. Augmentation progressive automatique du volume Si la soundbar est mise en veille avec un niveau de volume élevé, lorsqu’elle est rallumée, le volume démarre à un niveau bas avant d’augmenter progressivement jusqu’au niveau initialement réglé. Si le volume est réglé sur un niveau relativement bas, l’augmentation progressive automatique du volume ne s’activera pas. Contrôle du volume Pour augmenter ou diminuer le volume, pressez le bouton VOLUME+/VOLUME- sur la soundbar ou pressez la touche VOLUME+/VOLUME- sur la télécommande. Remarque • À chaque fois que le bouton VOLUME+/VOLUME- est pressé sur la télécommande, le témoin SURROUND clignote une fois. • Le témoin SURROUND se met à clignoter si le volume est réglé au maximum ou au minimum. Mise en sourdine En pressant la touche sur la télécommande. • le volume est temporairement mis en sourdine. Pressez à nouveau le bouton pour rétablir le volume. • Lorsque le volume est mis en sourdine, le témoin SURROUND clignote. Fr-14 Surround Appuyez sur le bouton SURROUND de la soundbar ou Pressez la touche SURROUND de la télécommande. • L’effet Surround est activé. (Le témoin SURROUND s’allume en orange.) Mode Sonore Pressez la touche SOUND MODE sur la télécommande. • Le témoin SURROUND clignote une fois. CINEMA Convient au visionnage de films MUSIC Adapté à la musique NEWS Pour les émissions d’information DIRECT Aucun effet sonore Selection de la source d’entrée Pressez le bouton INPUT sur la soundbar ou Pressez la touche INPUT sur la télécommande. • Cela change la source d’entrée. Entrée Témoin INPUT Témoin PAIRING OPTICAL IN S’allume en bleu clair Éteint Bluetooth S’allume en bleu S’allume ou clignote en bleu AUDIO IN S’allume en vert Éteint Remarque En cas de panne de courant ou de débranchement du cordon d’alimentation, la fonction de sauvegarde conserve en mémoire le mode de fonctionnement pendant quelques heures. Fr-15 ■■Connexion d’une source d’entrée numérique Connectez la soundbar à une source d’entrée numérique à l’aide du câble audio numérique optique fourni puis pressez le bouton INPUT sur la soundbar ou la télécommande pour sélectionner Digital. Voici les différents types de sources d’entrée et de formats audio : Source d’entrée OPTICAL IN Audio Format Témoin AUDIO FORMAT Pas d’entrée Clignote PCM Éteint Dolby Digital S’allume en bleu Bluetooth Éteint AUDIO IN Éteint Remarque Si la sortie audio numérique de votre téléviseur ou lecteur DVD/Blu-ray est réglée sur PCM, vous ne pourrez pas obtenir l’effet de champ sonore du système Dolby Digital. Mise en veille/Mise en marche automatique Veille automatique • La soundbar se met automatiquement en veille (le détecté pendant 15 minutes. témoin s’éteint) si aucun signal audio n’est Remarque La fonction Mise en marche automatique est toujours activée lorsque l’appareil est en veille. Mise en marche automatique • Lorsque le témoin est éteint, la soundbar se met automatiquement en marche si elle détecte un signal audio en provenance d’un appareil compatible Bluetooth. Fr-16 Écouter un appareil compatible Bluetooth ■■À propos de la technologie Bluetooth La technologie Bluetooth est une technologie sans fil à courte portée permettant la communication à distance de données entre des appareils numériques. Cette technologie fonctionne dans un rayon d’environ 10 mètres. Vous n’avez pas besoin d’utiliser de câble pour la connexion, et les appareils n’ont pas besoin de se faire face, ce qui est le cas avec la technologie infrarouge. Système de communication et profil Bluetooth de la soundbar Il y a divers profils Bluetooth disponibles, décrivant les méthodes basiques de connexion et les fonctions et utilisations spécifiques qui permettent la communication entre appareils. Système de communication Spécifications Bluetooth version 2.1 Bluetooth+Enhanced Data Rate(EDR) Profil • A2DP 1.2 (Advanced Audio Distribution Profile) • AVRCP 1.0 (Audio Video Remote Control Profile) • L’A2DP permet le streaming audio depuis un appareil compatible Bluetooth A2DP (par exemple un téléphone mobile) vers la soundbar. En convertissant le signal audio stéréo sans fil en signal audio analogique, vous pouvez apprécier toute votre musique sur ce système d’enceintes. • L’AVRCP (Audio/Video Remote Control Profile) est une technologie permettant à une seule télécommande de contrôler tout appareil audiovisuel compatible Bluetooth auquel l’utilisateur a accès. Remarques concernant l’utilisation de la soundbar avec un téléphone • La soundbar ne peut pas être utilisée pour parler au téléphone, même si elle connectée par Bluetooth à un téléphone. • Consultez le manuel de votre téléphone mobile pour en savoir plus sur le fonctionnement de votre téléphone lors de la transmission de son à l’aide d’une connexion Bluetooth. Streaming audio Téléphone mobile ou autre appareil compatible Bluetooth ■■Appairage d’appareils compatibles Bluetooth. Deux appareils compatibles Bluetooth doivent d’abord être appairés avant de pouvoir échanger des données. Une fois appairés, il n’est plus nécessaire de le faire, à moins que : • plus de 8 appareils ne soient appairés. (L’appairage ne peut se faire qu’avec un appareil à la fois. La soundbar ne peut être appairée qu’avec 8 appareils au maximum. Si un nouvel appareil est appairé, l’appareil qui a été connecté le premier est supprimé et remplacé par le nouvel appareil.) • la soundbar soit réinitialisée. (toutes les informations d’appairage sont effacées si la soundbar est réinitialisée.) • les informations d’appairage sont effacées lors d’une réparation, etc. ■■Témoin PAIRING (bleu) Non connecté Clignote En cours d’appairage Clignote rapidement Connecté Reste allumé ■■Near Field Communication (NFC) La technologie Near Field Communication (NFC) est une connexion sans fil de courte portée, permettant des interactions dans les deux sens entre des appareils électroniques comme un smartphone ou un IC-TAG, en tenant simplement ces appareils à proximité ou au contact l’un de l’autre. La soundbar prend en charge l’appairage Bluetooth à l’aide de NFC. Fr-17 Appairage avec un appareil compatible Bluetooth 1 Pressez le bouton pour allumer la soundbar. 2 Pressez le bouton INPUT pour sélectionner la fonction Bluetooth. 3 Pressez le bouton PAIRING. • Le témoin PAIRING clignote. La soundbar est maintenant en mode appairage, prête à être appairée avec une autre source Bluetooth. • L’appairage peut être fait quelle que soit la source d’entrée en cours d’utilisation. 4 Suivez également la procédure d’appairage sur votre appareil source pour qu’il détecte la soundbar. • Consultez le manuel de votre appareil source pour en savoir plus. • Si sa soundbar est disponible, « Onkyo SBT-200 » apparaît dans la liste d’appareils détectés sur votre appareil source. • Pendant l’appairage, placez les appareils à appairer à environ 1 mètre l’un de l’autre. • Certains appareils ne peuvent pas afficher la liste des appareils détectés. Dans ce cas, pour appairer la soundbar avec cet appareil, consultez le manuel de l’appareil source. 5 Sélectionnez « Onkyo SBT-200 » dans la liste. Si un code* est demandé, entrez « 0000 ». • Le témoin Pairing (bleu) de la soundbar s’arrête de clignoter lorsque la soundbar est bien appairée à l’appareil source. Les données d’appairage sont alors mémorisées dans la soundbar. * Ce code peut être appelé « code PIN », « clé » ou « mot de passe ». 6 Démarrez la connexion Bluetooth depuis l’appareil source. • Certains appareils se connectent automatiquement à la soundbar. Si ce n’est pas le cas, suivez les instructions du manuel de l’appareil source pour démarrer la connexion. Remarque • Si vous éteignez la soundbar ou l’appareil source avant que la connexion Bluetooth ne soit réussie, l’appairage n’est pas réalisé et les données d’appairage ne sont pas mémorisées. Répétez l’étape 1 pour relancer l’appairage. • Pour appairer d’autres appareils, répétez les étapes 1 à 5 pour chaque appareil. • Lorsqu’un appareil est supprimé de la liste d’appairage, les données d’appairage sont également effacées. Pour écouter à nouveau le son de cet appareil, il faut l’appairer à nouveau. Répétez les étapes 1 à 5 pour cet appareil. • Le code de cet soundbar est « 0000 » et elle ne peut être appairée qu’avec les appareils Bluetooth dont le code est également « 0000 ». Appairage NFC avec un appareil compatible Bluetooth • Sur un dispositif NFC, connexion Bluetooth peut être faite que par la tenue de l’appareil sur le soundbar. • Vérifiez que la fonction NFC sur l’appareil est en marche. Fr-18 1 Mettez le soundbar et le dispositif. 2 Démarrez une application de lecture NFC de l’appareil. 3 Pressez sur le bouton PAIRING sur le soundbar. 4 Placez l’appareil sur la marque NFC sur le centre de la surface supérieure du soundbar. • Le témoin Bluetooth de la soundbar reste allumé et cesse de clignoter, indiquant que l’appairage est réussi. • Certains types d’appareils ne nécessitent pas l’étape 2. • Certains appareils, comme les smartphones, émettent une alarme lorsqu’ils reconnaissent un autre appareil compatible NFC. Si on les déplace à ce moment-là, la connexion ou la déconnexion peut ne pas se faire. Ne déplacez pas l’appareil avant qu’un message « Connexion réussie » ou « Déconnexion réussie » ne s’affiche. Écouter du son Vérifiez que : --la fonction Bluetooth de l’appareil source est activée. --L’appairage entre la soundbar et l’appareil source a réussi. 1 Pressez le bouton INPUT pour sélectionner la fonction Bluetooth. 2 Lancez la connexion Bluetooth depuis votre appareil compatible Bluetooth. 3 Lancez la lecture sur votre appareil compatible Bluetooth. • Si votre appareil source est équipé d’une fonction Super Bass ou égaliseur, désactivez-la. Le son peut être distordu si ces fonctions sont activées. Remarque • Vous devez relancer la connexion Bluetooth si : --la soundbar n’est pas allumée. --la fonction Bluetooth de la soundbar est désactivée ou en veille. Pour arrêter la lecture Vous pouvez arrêter la lecture en effectuant n’importe laquelle de ces actions. --Désactiver la connexion Bluetooth de l’appareil source. (Consulter le manuel d’utilisation de votre appareil source.) --Éteindre tous les appareils compatibles Bluetooth. --Éteindre la soundbar. Remarque • Certains appareils compatibles Bluetooth ne peuvent pas fonctionner avec la télécommande. • En fonction de l’appareil connecté, il peut arriver de ne pas pouvoir contrôler le volume de la soundbar de la manière souhaitée. Boutons de contrôle Bluetooth (télécommande seulement) Bouton Lecture/Pause. Bouton Piste suivante. Maintenez-le enfoncé pour avancer rapidement. Bouton Piste précédente. Maintenez-le enfoncé pour un retour rapide. Fr-19 Dépannage Si quelque chose ne va pas avec votre soundbar, vérifiez les points suivants avant de contacter votre revendeur Onkyo. Rétablissement des paramètres par défaut (réinitialisation) Déconnectez d’abord tous les câbles de la soundbar, puis débranchez le cordon d’alimentation. En maintenant enfoncés le bouton et le bouton PAIRING, connectez le câble d’alimentation à la prise DC IN de la soundbar. Pressez ensuite le bouton. Remarque Notez bien que réinitialiser la soundbar supprime toutes les données stockées en mémoire. Général Symptôme On n’entend aucun son. Cause possible • Le signal d’entrée (sélection) est-il correctement configuré ? Les formats DTS et AAC ne sont pas pris en charge. • Le volume est-il réglé sur « Min(0) » ? • L’appareil a-t-il été mis en sourdine ? • Tous les câbles sont-ils correctement connectés ? • La soundbar est-elle trop éloignée de l’appareil Bluetooth ? • La soundbar est-elle bien appairée avec l’appareil Bluetooth ? On entend des bruits lors • Éloignez la soundbar de totu téléphone ou ordinateur. • Le câble audio est-il correctement connecté à la prise de la lecture. d’entrée de la soundbar ? • Avec le temps, la déterioration des appareils peut créer des bruits. Vérifiez l’année de votre TV ou lecteur DVD/Blu-ray. La soundbar est affectée • Cela peut entraîner un dysfonctionnement. par du bruit en provenance Mettez la soundbar en veille puis remettez-la en ÆÆ d’une source externe marche. Si la soundbar ne fonctionne toujours pas (surcharge électrique, correctement, éteignez-la et débranchez le cordon électricité statique ou d’alimentation. Rebranchez le cordon d’alimentation et anomalie de tension en rallumez la soundbar. raison d’un orage). La soundbar ne fonctionne pas correctement. • Baissez le volume de votre TV ou de la soundbar. Le son est distordu. • Mettez la soundbar en veille puis remettez-la en marche. La soundbar ne répond pas lorsqu’on presse un • Si la soundbar ne fonctionne toujours pas, réinitialisez-la. bouton. La soundbar ne s’allume pas. Le son Bluetooth est coupé ou distordu. • Le cordon d’alimentation est-il bien branché ? • Le circuit de protection a pu être activé. Débranchez le cordon d’alimentation, attendez au moins 5 minutes, puis rebranchez-le. • La soundbar est-elle trop proche d’un appareil émettant un champ électromagnétique ? • Il y a-t-il un obstacle entre la soundbar et l’appareil Bluetooth ? Fr-20 Page P.16 P.14 P.14 P.12 P.17 P.18 P.12 P.21 P.21 Cidessus P.13 P.21 P.18 Télécommande Symptôme La télécommande ne fonctionne pas correctement. On ne peut pas allumer la soundbar avec la télécommande. Cause possible • La polarité de la pile est-elle bien respectée ? • La pile est-elle vide ? • La distance ou l’angle sont-ils adaptés ? • Il y a-t-il un obstacle devant la soundbar ? • La soundbar est-elle exposée à une puissante source lumineuse (lampe puissante ou soleil) ? • La télécommande d’un autre appareil est-elle utilisée simultanément ? • Le cordon d’alimentation est-il bien branché ? • La pile est-elle bien insérée ? Page P.8 P.13 P.8 Témoins d’erreurs et signaux d’alerte Lorsque vous effectuez une opération incorrecte, le témoin Affichage /INPUT clignote en vert. Signification Le circuit de protection est activé. Témoin /INPUT clignote en vert Si ce message apparaît même après avoir débranché/rebranché ou mis en veille/rallumé la soundbar, contactez votre revendeur Onkyo. Marques et licences Fabriqué sous licence concédée par la société Dolby Laboratories. Dolby et le symbole du double D sont des marques de la société Dolby Laboratories. La marque et le logo Bluetooth® sont des marques déposées de Bluetooth SIG, Inc., et toute utilisation de ces éléments par Onkyo est faite sous licence. Les autres marques et noms commerciaux sont ceux de leurs propriétaires respectifs. Fr-21 Caractéristiques techniques Section amplificateur Puissance de sortie nominale (IEC) 2 canaux x 20 W à 6 ohms, 1 kHz, 2 canaux driven THD+N (distorsion harmonique totale+N) 0,2% (1 kHz 1 W) Facteur d’amortissement 31 (6 Ω) Sensibilité et impédance 1000 mV/47 kΩ (AUDIO IN) d’entrée (asymétrique) Réponse de fréquence 80 Hz - 15 kHz/+3 dB, -3 dB (AUDIO IN, SOUND MODE : DIRECT) Rapport signal-bruit 103 dB (AUDIO IN IHF-A) Section Bluetooth Système de communications Bluetooth Version 2.1 +EDR Portée maximale 10 m*1 Bande de fréquence 2,4GHz ~ 2,48GHz Modulation FHSS (Freq Hopping Spread Spectrum) Profils Bluetooth compatibles A2DP 1.2 AVRCP 1.0 Codec pris en charge SBC *1 La portée effective dépend de divers facteurs comme la présence éventuelle d’obstacles entre les appareils, le champ magnétique d’un four à micro-ondes, l’électricité statique, un téléphone sans fil, la sensibilité de la réception, la qualité de l’antenne, le système d’exploitation, un logiciel, etc. Fr-22 Généralités Alimentation 100 - 240 V c.a., 50/60 Hz (Alimentation de la soundbar : 17 V c.c, 2,8 A) Consommation électrique 11 W 5 W (en mode sourdine) 0,4 W (attente réseau [Attente Bluetooth]) * La fonction Mise en marche automatique est toujours activée lorsque l’appareil est en veille. Cette fonction ne peut pas être désactivée. Dimensions 940 mm (l) x 73 mm (H) x 83 mm (P) Poids 2,4 kg Enceinte Système d’enceintes 2 voies 4 x 5,7 cm (Woofer) 2 x Tweeter à dôme équilibré de 2,5 cm ■■Entrées audio Numérique OPTICAL IN (DIGITAL) : 1 Analogique AUDIO IN (ANALOG) : 1 mini jack stéréo Ø 3,5 mm ■■Autres Entrées numériques Dolby Digital/PCM Mode sonore CINEMA, MUSIC, NEWS et DIRECT Surround Activée/Désactivée * Les spécifications techniques et les caractéristiques de cet appareil sont susceptibles d’être modifiées sans préavis. Fr-23 Mémo Fr-24 Sistema de barra de sonido SBT-200 Manual de instrucciones Índice Información sobre seguridad......................................2 Accesorios..................................................................5 Indicadores.................................................................5 Controles e indicadores..............................................6 Preparación del sistema.............................................9 Colocación de la barra de sonido.............................10 Conexiones de la barra de sonido al televisor..........12 Operaciones básicas................................................14 Escuchar dispositivos con Bluetooth........................17 Resolución de problemas.........................................20 Especificaciones.......................................................22 Gracias por comprar un producto Onkyo. Lea atentamente este manual antes de realizar las conexiones y enchufar su nuevo producto Onkyo. Si sigue las instrucciones de este manual obtendrá un rendimiento y un disfrute óptimos de su nuevo producto. Guarde este manual para futuras consultas. Información sobre seguridad ADVERTENCIA: PARA REDUCIR EL RIESGO DE INCENDIOS O DE DESCARGAS ELÉCTRICAS, NO EXPONGA ESTE APARATO A LA LLUVIA NI A LA HUMEDAD. PRECAUCIÓN: PARA REDUCIR EL RIESGO DE DESCARGAS ELÉCTRICAS, NO QUITE LA CUBIERTA (O PANEL POSTERIOR). EN SU INTERIOR NO EXISTE NINGUNA PIEZA QUE PUEDA REPARAR EL USUARIO. EN CASO DE AVERIA, SOLICITE LOS SERVICIOS DE PERSONAL DE REPARACIÓN CUALIFICADO. WARNING AVIS RISK OF ELECTRIC SHOCK DO NOT OPEN RISQUE DE CHOC ELECTRIQUE NE PAS OUVRIR El símbolo de rayo con cabeza de flecha, inscrito en un triángulo equilátero, tiene la finalidad de avisar al usuario la presencia de “tensiones peligrosas” no aisladas dentro de la caja del producto que son de magnitud suficiente como para constituir un riesgo de descargas eléctricas a personas. El signo de exclamación, inscrito en un triángulo equilátero, tiene la finalidad de avisar al usuario la presencia de instrucciones importantes de operatión y mantenimiento (reparación) en la literatura que acompaña a este producto. Instrucciones de seguridad importantes 1. 2. 3. 4. 5. 6. 7. Lea estas instrucciones. Guarde estas instrucciones. Tenga en cuenta todas las advertencias. Siga todas las instrucciones. No use este aparato cerca del agua. Límpielo únicamente con un paño seco. No bloquee los orificios de ventilación. Instálelo siguiendo las instrucciones del fabricante. 8. No lo instale cerca de radiadores, aparatos de calefacción, estufas ni ningún tipo de aparatos (incluyendo amplificadores) que generen calor. 9. Tenga en cuenta los fines de seguridad de los conectores con derivación a masa y / o polarizados. Los conectores polarizados tienen dos contactos, uno de mayor tamaño que el otro. Un conector con derivación a masa tiene dos contactos con un tercero para derivar a masa. El contacto ancho o el tercer contacto se instalan con fines de seguridad. Si el conector del equipo no encaja en la toma de corriente disponible, acuda a un técnico electricista cualificado para que le substituya la toma obsoleta. 10. Evite que el cable de alimentación pueda ser pisado o atrapado, en especial en los conectores, y en los puntos en que sale del aparato. 11. Use sólo los accesorios / conexiones especificados por el fabricante. 12. Use sólo el soporte, ADVERTENCIA PARA trípode, abrazadera CARRITOS CON RUEDAS o mesa indicados por el fabricante, o vendidos junto con el aparato. Si utiliza una S3125A mesilla con ruedas, tenga cuidado, al desplazar el conjunto de mesilla / aparato, ya que si se vuelca podría recibir lesiones. 13. Desconecte este aparato si hay tormenta o cuando no vaya a ser utilizado por largos períodos de tiempo. 14. Deje que el mantenimiento lo lleve a cabo personal cualificado. Es necesario reparar el aparato cuando ha recibido algún tipo de daño, como por ejemplo si el cable de alimentación ha sufrido daños, si se ha derramado algún líquido en el interior del aparato o si éste ha quedado expuesto a la lluvia o humedad y no funciona normalmente o si ha caído al suelo. 15. Daños que requieren reparación Desenchufe el aparato y solicite los servicios de personal cualificado cuando: A. El cable de alimentación o el enchufe esté dañado. B. En el interior del aparato hayan entrado objetos sólidos o líquidos. C. El aparato haya estado expuesto a la lluvia o al agua. D. El aparato parezca no funcionar adecuadamente aunque se sigan las instrucciones de operación. Ajuste solamente los controles indicados en el manual de instrucciones, ya que un ajuste inadecuado podría resultar en daños, y Es-2 podría requerir el trabajo laborioso de un técnico cualificado para devolver el aparato a su funcionamiento normal. E. El aparato haya caído o haya sufrido otros daños, y. F. El aparato parezca no funcionar normalmente, indicando que necesita reparación. 16. Introducción de objetos sólidos y líquidos No introduzca nunca ningún objeto a través de las aberturas del aparato, ya que podrían tocar puntos de tensión peligrosa o cortocircuitar partes, lo que resultaría en un incendio o descargas eléctricas. El equipo no se debería exponer a gotas ni a salpicaduras y nunca debería colocar objetos que contengan líquidos, como los floreros, encima de éste. No coloque velas ni otros objetos incandescentes encima de la unidad. 17. Baterías Tenga en cuenta los aspectos ambientales y siga las regulaciones locales a la hora de desechar las baterías. 18. Si instala el aparato en una instalación empotrada, como en una estantería o en una librería, asegúrese de que esté bien ventilado. Deje 20 cm de espacio libre por encima y por los lados y 10 cm en la parte posterior. El borde posterior del estante o el tablero de encima del aparato debería estar a unos 10 cm del panel posterior o de la pared, de forma que deje un espacio libre para que el aire caliente pueda circular. Precauciones Generales • Sitúe el equipo en un lugar bien ventilado • • • • desenchufe el cable de alimentación de CA de la toma de CA y enchúfelo de nuevo. En caso de tormenta eléctrica desenchufe la unidad por seguridad. Al desenchufar el cable de alimentación de CA de la toma de CA agárrelo por el cabezal y no tire del cable porque podría dañar los hilos interiores. El cable de alimentación de CA es un dispositivo de desconexión y debe estar siempre al alcance y listo para manipularse. No retire la cubierta exterior porque podría provocar una descarga eléctrica. Solicite el mantenimiento interno a su distribuidor de Onkyo. Este unidad solo debe usarse en un rango de 5°C a 35°C. Onkyo no se responsabiliza de los daños derivados de un uso incorrecto del producto. Solicite todo tipo de mantenimiento a su distribuidor de Onkyo. Advertencias: • El adaptador de CA/CC suministrado no • • 10 cm 10 cm • Para usar la unidad colóquela sobre una superficie dura, plana y sin vibraciones. • Mantenga la unidad alejada de la luz solar • • • • • y asegúrese de que haya al menos 10 cm de espacio libre en los laterales y la parte superior del equipo. 10 cm muy bajas. • Si el sistema no funciona correctamente, contiene partes que puedan ser reparadas o sustituidas por el usuario. No retire ninguna cubierta a menos que esté cualificado para ello. Contiene niveles de tensión peligrosos; desenchufe siempre el enchufe de red de la toma de corriente antes de realizar cualquier operación de mantenimiento o cuando no vaya a usarlo durante un período de tiempo prolongado. El adaptador de CA/CC suministrado con la SBT-200 no debe utilizarse con otros equipos. No utilice un adaptador de CA/CC que no sea el especificado, ya que puede provocar problemas o daños graves. La tensión aplicada debe coincidir con las especificaciones de la unidad. Utilizar este producto con una tensión superior a la especificada es peligroso y puede provocar fuegos u otros accidentes. Onkyo no se responsabiliza de los daños derivados del uso de esta unidad con una tensión distinta a la especificada. Control de volumen directa, campos magnéticos fuertes, polvo excesivo, humedad y equipos electrónicos/ eléctricos (ordenadores, fax, etc.) que generen ruido eléctrico. No ponga nada encima de la unidad. No exponga la unidad a humedad, temperaturas de más de 60°C o temperaturas El nivel de sonido en un ajuste de volumen determinado depende de la eficiencia de los altavoces, su ubicación y varios factores más. Recomendamos evitar la exposición a niveles altos de volumen, ya sea al encender la unidad con el volumen ajustado a niveles altos o escuchando sonido a volúmenes altos de forma continuada. Es-3 Para los modelos europeos Declaración de Conformidad Declaramos, bajo nuestra total responsabilidad, que este producto cumple con las normas: -- Seguridad -- Límites y métodos de ----- medición de las caracteísticas de perturbación radioeléctrica Límites de las emisiones harmónicas vigentes Limitación de los cambios de tensión, fluctuaciones de tensión y la oscilación Directiva de Restricción de ciertas Sustancias Peligrosas (RoHS por sus siglas en inglés), 2011/65/EU Por la presente, Onkyo Corporation, declara que este SBT-200 cumple con los requisitos esenciales y otras exigencias relevantes de la Directiva 1999/5/EC. WEEE http://www.onkyo.com/manual/weee/weee.pdf Es-4 Accesorios Se incluyen los siguientes accesorios. • Mando a distancia (1) • Adaptador de CA (1) • Cable de alimentación (1) • Cable de audio digital óptico (1) • Base (2) • Cinta de doble cara (1) • Papel patrón (1) El mando a distancia contiene una pila de litio (CR2025). En los catálogos y en el embalaje, la letra que aparece al final del nombre del producto indica el color. Las especificaciones y las operaciones son las mismas, independientemente del color. Recomendamos usar la barra de sonido con televisores de pantalla plana (LED, LCD o plasma). Indicadores /INPUT Bluetooth SURROUND AUDIO FORMAT [ SURROUND ] El indicador SURROUND se ilumina en naranja cuando la función SURROUND está activada. • El indicador SURROUND parpadea cuando el volumen de la barra de sonido está al máximo, al mínimo o silenciado. • El indicador SURROUND parpadea una vez cuando se selecciona SOUND MODE. [ /INPUT ] El indicador /INPUT se ilumina cuando la barra de sonido se enciende. El color cambia según la fuente de entrada. • OPTICAL IN: Azul claro • Bluetooth: Azul • AUDIO IN: Verde [ Bluetooth ] El indicador Bluetooth se ilumina en azul cuando el dispositivo con Bluetooth se conecta a la barra de sonido y se selecciona la función de Bluetooth. • El indicador Bluetooth parpadea cuando el dispositivo con Bluetooth no está conectado a la barra de sonido. • El indicador Bluetooth parpadea rápidamente cuando la barra de sonido está en el modo de emparejamiento. [ AUDIO FORMAT ] El indicador AUDIO FORMAT se ilumina según el tipo de audio cuando OPTICAL IN está seleccionado. • DolbyDigital: Azul • PCM: Apagado • Sin señal: Parpadea Es-5 Controles e indicadores Panel frontal 1 2 14 34 5 67 8 9 10 11 12 13 1. Altavoz del canal izquierdo 2. Altavoz del canal derecho 3. Indicador El indicador se ilumina cuando se enciende la barra de sonido. Indicador INPUT El color cambia según la fuente de entrada del siguiente modo: OPTICAL IN: Azul claro Bluetooth: Azul AUDIO IN: Verde 4. Botón Este botón cambia el modo de encendido a On (Encendido) o Standby (En espera). 7. Indicador Bluetooth Este indicador se ilumina o parpadea durante la conexión de Bluetooth. 8. Indicador SURROUND Este indicador se ilumina/apaga cuando la función de SURROUND se activa/desactiva. 9. Botón SURROUND Este botón activa la función de sonido surround. 10. Botón VOLUME Este botón sirve para bajar el volumen. 11. Botón VOLUME + Este botón sirve para subir el volumen. 5. Botón INPUT Este botón sirve para seleccionar la fuente de entrada entre las opciones OPTICAL IN, Bluetooth y AUDIO IN. 12. Indicador AUDIO FORMAT El color cambia según el tipo de señal digital (Dolby Digital/PCM). 6. Botón PAIRING Este botón empareja la barra de sonido con los dispositivos con Bluetooth. 14. Marca de emparejamiento NFC 13. Sensor del mando a distancia Panel trasero 2 1 3 Es-6 1. Toma DC IN Conecte el adaptador de CA suministrado a esta toma. 3. Toma AUDIO IN (ANALOG) Conecte el cable de audio analógico (no suministrado) a esta toma. 2. Toma OPTICAL IN (DIGITAL) Conecte el cable de audio digital óptico a esta toma. Mando a distancia 1 2 3 4 5 6 7 8 9 10 11 12 13 1. Botón Este botón cambia el modo de encendido de la barra de sonido a On (Encendido) o Standby (En espera). 2. Botón SURROUND Este botón activa la función de sonido surround. 3. Botón CINEMA (SOUND MODE) Este modo es adecuado para la visualización de películas. 4. Botón MUSIC (SOUND MODE) Este modo es adecuado para escuchar música. 5. Botón NEWS (SOUND MODE) Este modo es adecuado para programas de noticias. 6. Botón DIRECT (SOUND MODE) Este modo ofrece sonido sin procesamiento. 7. Botón INPUT Este botón sirve para seleccionar la fuente de entrada entre las opciones OPTICAL IN, Bluetooth y AUDIO IN. 8. Botón Este botón silencia el volumen temporalmente. Púlselo de nuevo para restablecer el volumen. 9. Botones VOLUME +/Estos botones aumentan y disminuyen el volumen. 10. Botón Bluetooth PAIRING Este botón empareja la barra de sonido con los dispositivos con Bluetooth. 11. Botón de salto adelante de Bluetooth Este botón selecciona la canción siguiente. Manténgalo pulsado para el avance rápido. 12. Botón de reproducción/pausa de Bluetooth Pulse este botón para reproducir o pausar los dispositivos con Bluetooth. 13. Botón de salto atrás de Bluetooth Este botón selecciona el inicio de la canción actual. Manténgalo pulsado para el retroceso rápido. Es-7 • Las pilas (pilas o baterías instaladas) no deben estar expuestas a un calor excesivo, como por ejemplo luz solar, fuego, etc. • La instalación incorrecta de la pila puede provocar el mal funcionamiento de la barra de sonido. ■■Uso del mando a distancia Antes de usar el mando a distancia, retire el protector de plástico del portapilas. Protector de plástico Para usar el mando a distancia, apúntelo hacia el sensor de control remoto de la barra de sonido, tal y como se muestra a continuación. 5m 5m ■■Instalación de la pila Este producto contiene una pila de botón de litio tipo CR. Notas • Sustituya la pila si la distancia de funcionamiento se reduce o si el funcionamiento se vuelve errático. Adquiera pilas de botón de litio “CR2025”. • Limpie regularmente el transmisor del mando a distancia y el sensor de la barra de sonido con un paño suave. • La exposición del sensor de la barra de sonido a fuentes de luz intensa puede afectar a su funcionamiento. Si esto sucede, cambie la iluminación o la dirección de la barra de sonido. • Mantenga el mando a distancia alejado de humedad, calor, impactos y vibraciones. 1 Presione la pestaña de bloqueo hacia el centro del mando a distancia y deslice el portapilas hacia el exterior. Parte posterior del mando a distancia Pestaña de bloqueo 2 Extraiga la pila vieja del portapilas, introduzca la pila nueva y deslice el portapilas hacia el interior del mando a distancia. Lado positivo (+) hacia arriba Precauciones para el uso de la pila Extraiga la pila si no va a utilizar la barra de sonido durante un período de tiempo prolongado. Eso evitará posibles daños provocados por fugas de la pila, como fuegos, lesiones o contaminación del entorno. • No utilice pilas recargables (pilas de níquelcadmio, etc.). • Peligro de explosión si la pila se cambia incorrectamente. • Utilice solo las pilas indicadas. Es-8 Preparación del sistema Para montar la barra de sonido en la pared Atención: • Tenga mucho cuidado de evitar que la barra de sonido (2,4 kg) se caiga al montarla en la pared. • Compruebe la solidez de la pared antes de montar la barra. (No monte la barra de sonido sobre paredes con revestimiento fino o encaladas, ya que podría caerse.) Si tiene dudas, consulte con un técnico de mantenimiento cualificado. • Los tornillos de montaje no se suministran con el producto. Utilice tornillos adecuados. • Compruebe que todos los tornillos de montaje en ángulo de la pared estén fuertemente fijados. • Elija un lugar adecuado o de lo contrario pueden provocarse accidentes o daños en la barra de sonido. • Onkyo no se responsabiliza de los accidentes provocados por una instalación inadecuada. 2 Haga los agujeros para los tornillos en la pared con un taladro siguiendo las marcas del papel patrón. 32 mm 8-9 mm Superficie de la pared 3 Introduzca un taco de pared en cada agujero con un martillo hasta que quede nivelado con la superficie de la pared. 32 mm 8-9 mm Superficie de la pared 4 Fije los tornillos a la pared como se ■■Fijación de tornillos muestra abajo. (Son 2 tornillos en total.) Onkyo ha diseñado esta barra de sonido para que pueda colgarse en la pared. Utilice tornillos adecuados (no suministrados). Las medidas y los tipos se indican a continuación. 3,2 mm 5 mm Tornillos Superficie de la pared 9 mm Mín. 22 mm Destornillador 4,5mm - 5mm Superficie de la pared ■■Instalación de la barra de sonido 1 Fije el papel patrón a la pared en posición horizontal como se indica abajo. Distancia hasta la superficie de la pared 5 Cuelgue la barra de sonido de los tornillos. 509 mm Superficie de la pared 548 mm 44 mm Papel patrón (suministrado) Nota Consulte el punto “Al montarla en la pared” del apartado “Evitar caídas” (P.11). Es-9 Colocación de la barra de sonido Colocación de la barra de sonido en el estante del televisor Televisor VCR Notas • Antes de encender el sistema retire la película protectora que cubre la barra de sonido. • El panel frontal de la barra de sonido no es desmontable. • No cambie la dirección de instalación mientras la barra de sonido esté encendida. • No se apoye ni se siente sobre la barra de sonido ya que podría lesionarse. Reproductor de DVD Uso de la base suministrada Si la base del televisor obstaculiza la instalación de la barra de sonido, utilice la base suministrada con el producto. La base suministrada permite colocar la barra de sonido a horcajadas de la base del televisor. Parte inferior de la Amortiguadores Fije las cintas adhesivas de barra de sonido 1 doble cara en 2 puntos del lado derecho e izquierdo. 2. Fije la cinta. 1. Retire la cinta transparente de la base. 2 Compruebe la posición de las cintas adhesivas y presione la base contra las cintas de modo que estas queden en el centro de cada base. • Las bases deben situarse en la parte posterior de la barra de sonido. 3 Coloque la barra de sonido en el estante del televisor. Alinee la línea frontal de la barra de sonido con la base del televisor. Es-10 Notas • Asegúrese de que la barra de sonido no bambolee. • Al fijar la barra de sonido al mueble del televisor u otro lugar utilice cables de seguridad (no suministrados) para evitar que se caiga. • Antes de desplazar el estante del televisor ponga la barra de sonido en un lugar seguro. Evitar caídas Utilice armellas o cables de seguridad para evitar que la barra de sonido se caiga. ■■Al colocarla en el estante/mesa Barra de sonido Cables de seguridad Armella (no suministrados) Estante/ mesa ■■Al montarla en la pared Armella Pared Cables de seguridad (no suministrados) Barra de sonido Es-11 Armella Conexiones de la barra de sonido al televisor Desenchufe todos los demás equipos antes de realizar cualquier conexión. Notas • Para conectar la barra de sonido a un televisor, utilice la toma OPTICAL IN (DIGITAL) o la toma AUDIO IN (ANALOG) ubicadas en la parte posterior de la barra de sonido. • Consulte el manual de instrucciones del equipo que va a conectar. • Introduzca los conectores hasta el fondo para evitar zumbidos. • Al utilizar la conexión de terminal de salida de audio RCA desde un televisor/reproductor de DVD/ Blu-ray, puede que la barra de sonido emita un pequeño ruido de fondo según la marca, el modelo o la antigüedad del equipo. No se trata de un problema de calidad de la barra de sonido. • Si el volumen se mantiene a un nivel bajo de forma continua, la barra de sonido se apagará automáticamente. Conexión de un televisor, reproductor de DVD, etc. Si el televisor/pantalla tiene una salida de audio, conéctela a la toma OPTICAL IN (DIGITAL) o a la toma AUDIO IN (ANALOG) ubicadas en la parte trasera de la barra de sonido. A terminales de salida de audio Televisor o Señal de audio reproductor de Blu-ray/DVD o sintonizador digital A terminal de salida de audio digital Cable de audio digital óptico A toma OPTICAL IN (DIGITAL) Seleccione una conexión de audio que coincida con su televisor y realice la conexión. Cable de audio analógico (no suministrado) A toma AUDIO IN (ANALOG) Panel posterior de la barra de sonido Retire el tapón del cable de audio digital óptico antes de conectarlo. Tapón Es-12 ■■Toma OPTICAL IN La toma OPTICAL IN (DIGITAL) de la barra de sonido dispone de una tapa tipo obturador que se abre cuando se inserta un conector óptico y se cierra cuando este se retira. Empuje los conectores hasta introducirlos por completo. Nota Para evitar daños al obturador, mantenga recto el conector óptico al insertarlo y al extraerlo. Uso con el adaptador de CA Tras comprobar que se han establecido todas las conexiones correctamente, conecte el adaptador de CA a la toma DC IN y luego a la toma de CA. 1 Enchufe el cable de alimentación de CA en el adaptador de CA. 2 Enchufe el cable del adaptador de CA en la toma DC IN de la barra de sonido. 3 Enchufe el cable de alimentación de CA en una toma de CA. Notas • Utilice solo el adaptador de CA suministrado. El uso de otros adaptadores puede provocar el mal funcionamiento de SBT-200, descargas eléctricas o fuegos. El adaptador de CA y el cable de alimentación de CA suministrados están diseñados para utilizarse exclusivamente con la barra de sonido. No conecte el adaptador de CA y el cable de alimentación de CA suministrados a ningún otro equipo. • Sitúe la barra de sonido cerca de una toma de CA para poder enchufar/desenchufar el cable de alimentación de CA fácilmente. • Cuando la barra está en el modo de espera de encendido, el indicador se apaga. Al pulsar el , el indicador se ilumina según la fuente de entrada. (OPTICAL IN: Azul claro/Bluetooth: botón Azul/AUDIO IN: Verde) • Desenchufe el cable de alimentación de CA de la toma de CA si no va a utilizar la barra de sonido durante un período de tiempo prolongado. ■■Asegúrese de desconectar el cable de alimentación de CA antes de realizar cualquier conexión. Cable del adaptador de CA Toma DC IN 2 Cable de alimentación de CA Toma de CA 3 1 Adaptador de CA Es-13 Operaciones básicas Encendido Pulse el botón o pulse el botón • El indicador del mando a distancia. se ilumina según la fuente de entrada. Nota Si no se enciende, compruebe si el cable de alimentación está conectado correctamente. ■■Poner la barra de sonido en el modo en espera (Modo de espera Bluetooth) . Vuelva a pulsar el botón • El indicador se apagará. Nota La función Auto power on (autoencendido) (P.16) está siempre activada en el modo en espera. Aumento gradual automático de volumen Si la barra de sonido entra en el modo en espera con el volumen a un nivel muy alto y después vuelve a encenderse, el volumen empezará a un nivel más bajo y aumentará gradualmente hasta el nivel ajustado previamente. Si el volumen está ajustado a un nivel relativamente bajo, la función de aumento gradual no se activará. Control de volumen Para aumentar y disminuir el volumen, pulse el botón VOLUME+/VOLUME- de la barra de sonido o pulse el botón VOLUME+/VOLUME- del mando a distancia. Notas • Cada vez que se pulsa el botón VOLUME+/VOLUME- del mando a distancia, el indicador SURROUND parpadea una vez. • Cuando el volumen está al máximo o al mínimo, el indicador SURROUND parpadea. Silenciamiento Pulsar el botón del mando a distancia. • El volumen se silencia temporalmente. Pulse el botón de nuevo para restablecer el volumen. • Cuando el volumen está silenciado temporalmente el indicador SURROUND parpadea. Es-14 Surround Pulse el botón SURROUND de la barra de sonido o pulse el botón SURROUND del mando a distancia. • El sonido surround se activará. (El indicador SURROUND se iluminará en naranja.) Modo de sonido Pulse el botón de SOUND MODE deseado en el mando a distancia. • El indicador SURROUND parpadeará una vez. CINEMA Adecuado para la visualización de películas MUSIC Adecuado para escuchar música NEWS Para noticias DIRECT Sin procesamientos de sonido Selección de la fuente de entrada Pulse el botón INPUT de la barra de sonido o pulse el botón INPUT del mando a distancia. • Se cambiará la fuente de entrada. Entrada Indicador INPUT Indicador PAIRING OPTICAL IN Se ilumina en azul claro Apagado Bluetooth Se ilumina en azul Se ilumina o parpadea en azul AUDIO IN Se ilumina en verde Apagado Nota La función de seguridad de memoria protege el modo de funcionamiento memorizado durante varias horas en caso de fallo eléctrico o desconexión del cable de alimentación de CA. Es-15 ■■Conexión de la fuente de entrada digital Conecte la barra de sonido a la fuente de entrada digital con el cable de audio digital óptico suministrado y pulse el botón INPUT de la barra de sonido o del mando a distancia para seleccionar la opción Digital. Los tipos de fuentes de entrada y formatos de audio disponibles son los siguientes: Fuente de entrada OPTICAL IN Formato de Audio Indicador AUDIO FORMAT Sin entrada Parpadea PCM Apagado Dolby Digital Se ilumina en azul Bluetooth Apagado AUDIO IN Apagado Nota Si la configuración de la salida de audio digital está ajustada a PCM en el televisor o el reproductor de DVD/Blu-ray, no podrá obtener el efecto de campo de sonido de Dolby Digital. Auto standby (en espera automático)/Auto power on (autoencendido) Auto standby (en espera automático) • La barra de sonido entra automáticamente en el modo en espera (el indicador detecta ninguna señal de audio en 15 minutos. se apaga) si no se Nota La función Auto power on (autoencendido) está siempre activada en el modo en espera. Auto power on (autoencendido) • Cuando el indicador está apagado, la barra de sonido se enciende automáticamente si detecta una señal de audio de un dispositivo con Bluetooth. Es-16 Escuchar dispositivos con Bluetooth ■■Acerca de la tecnología Bluetooth La tecnología Bluetooth es una tecnología inalámbrica de corto alcance que permite la comunicación de datos sin cables entre dispositivos digitales. La tecnología inalámbrica Bluetooth funciona con un alcance de unos 10 metros. No es necesario utilizar cables para la conexión ni tampoco que los dispositivos estén frente a frente como en el caso de la tecnología de infrarrojos. Sistema de comunicación y perfil de Bluetooth en la barra de sonido Hay muchos perfiles de Bluetooth disponibles que determinan los métodos básicos de comunicación, las funciones específicas y los usos para permitir la comunicación entre dispositivos. Sistema de comunicación Especificación de Bluetooth versión 2.1 Bluetooth+velocidad de transferencia de datos mejorada (EDR) Perfil • A2DP 1.2 (perfil de distribución de audio avanzada) • AVRCP 1.0 (perfil de control remoto de audio/ vídeo) • A2DP permite transmitir audio desde dispositivos con Bluetooth equipados con A2DP (p. ej., teléfonos móviles) hasta la barra de sonido. La conversión de señales inalámbricas de audio estéreo a señales de audio analógicas permite escuchar el sonido a través de este sistema de altavoz. • AVRCP (perfil de control remoto de audio/vídeo) es una tecnología que permite controlar con un único mando a distancia todos los equipos de audio/vídeo con Bluetooth a los que el usuario tiene acceso. Notas relativas al uso de la barra de sonido con teléfonos móviles • La barra de sonido no puede utilizarse para hablar por teléfono aunque se establezca una conexión de Bluetooth con un teléfono móvil. • Consulte el manual de instrucciones del teléfono móvil para obtener información sobre el uso del teléfono al transmitir sonido mediante una conexión de Bluetooth. Flujo de datos de audio Teléfonos móviles con Bluetooth u otros dispositivos con Bluetooth ■■Emparejamiento de dispositivos con Bluetooth Los dispositivos con Bluetooth deben emparejarse primero para que puedan intercambiar datos. Una vez emparejados, no es necesario volver a emparejarlos a menos que se produzca alguna de estas circunstancias: • El emparejamiento se establece entre más de 8 dispositivos. (El emparejamiento solo puede establecerse con un dispositivo a la vez. La barra de sonido puede emparejase con un máximo de 8 dispositivos. Si se emparejan más dispositivos, los dispositivos conectados se borran por orden de antigüedad y se sustituyen por los dispositivos nuevos.) • La barra de sonido se reinicia. (Al reiniciar la barra de sonido toda la información de emparejamiento se borra.) • La información de emparejamiento se borra durante operaciones como reparaciones, etc. ■■Indicador PAIRING (azul) Desconectado Parpadea Modo de Parpadea rápidamente emparejamiento Conectado Se ilumina ■■Near Field Communication (NFC) Near Field Communication (NFC) es una tecnología de conectividad inalámbrica de corto alcance que permite realizar interacciones bidireccionales entre dispositivos electrónicos como los teléfonos móviles o terminales IC (de circuito integrado) con tan solo situar el dispositivo cerca de (o en contacto con) la marca NFC o similares. La barra de sonido admite el emparejamiento de Bluetooth utilizando NFC. Es-17 Emparejamiento con dispositivos con Bluetooth 1 Pulse el botón para encender el equipo. 2 Pulse el botón INPUT para seleccionar la función de Bluetooth. 3 Pulse el botón PAIRING. • El indicador PAIRING parpadeará. La barra de sonido está en modo de emparejamiento y lista para emparejarse con otro dispositivo fuente con Bluetooth. • El emparejamiento es posible independientemente de la fuente de entrada de corriente. 4 Realice el procedimiento de emparejamiento en el dispositivo fuente para detectar la barra de sonido. • Consulte el manual de instrucciones del dispositivo fuente para obtener más información. • El nombre “Onkyo SBT-200” aparecerá en la lista de dispositivos detectados (si está disponible) del dispositivo fuente. • Al realizar el emparejamiento sitúe los dispositivos a emparejar a 1 metro o menos de distancia el uno del otro. • Algunos dispositivos fuente no pueden mostrar listas de los dispositivos detectados. Para emparejar la barra de sonido con uno de estos dispositivos, consulte la información en el manual de instrucciones del dispositivo fuente. 5 Seleccione “Onkyo SBT-200” de la lista del dispositivo fuente. Si se necesita una contraseña, introduzca “0000”. • El indicador de emparejamiento (azul) de la barra de sonido dejará de parpadear cuando la barra de sonido esté correctamente emparejada con el dispositivo fuente. La información de emparejamiento quedará memorizada en la barra de sonido. * La contraseña también puede llamarse código PIN, número PIN, clave de paso o palabra de paso. 6 Inicie la conexión de Bluetooth desde el dispositivo fuente. • Algunos dispositivos fuente de audio pueden conectarse a la barra de sonido automáticamente. En caso de no ser así, siga las indicaciones del manual de instrucciones del dispositivo fuente para iniciar la conexión. Notas • Si la barra de sonido o el dispositivo fuente se apagan antes de que se complete la conexión de Bluetooth, el emparejamiento no se completará y la información relacionada no se memorizará. Repita el paso 1 para iniciar el emparejamiento de nuevo. • Para realizar el emparejamiento con otros dispositivos, repita los pasos 1 - 5 con cada dispositivo. • Cuando un dispositivo se descarta o se borra de la lista de emparejamiento, la información de emparejamiento del dispositivo también se elimina. Para volver a escuchar el sonido desde dicho dispositivo, es necesario volver a emparejarlo con la barra de sonido. Realice los pasos 1 - 5 para volver a emparejar el dispositivo. • La contraseña de esta barra de sonido está configurada como “0000” y la barra solo puede emparejarse con dispositivos fuente de Bluetooth cuya contraseña sea también “0000”. Es-18 Emparejamiento con dispositivos con Bluetooth usando NFC • En el caso de los dispositivos con NFC, el emparejamiento por Bluetooth puede realizarse con solo situar el dispositivo por encima de la barra de sonido. • Compruebe que la función de NFC del dispositivo esté activada. 1 Encienda la barra de sonido y el dispositivo. 2 Inicie una aplicación para lectura de NFC en el dispositivo. 3 Pulse el botón PAIRING de la barra de sonido. 4 Sitúe el dispositivo por encima de la marca NFC de la parte central superior de la barra de sonido. • El indicador Bluetooth de la barra de sonido pasará de parpadear a iluminarse estáticamente, indicando que el emparejamiento se ha completado. • Algunos tipos de dispositivos no requieren el paso 2. • En algunos dispositivos como los smartphones suena una alarma al reconocer dispositivos con NFC. Si se mueve el dispositivo en ese momento puede que no logre conectarlo o desconectarlo. No mueva el dispositivo hasta que se muestre el mensaje “Conexión completada” o “Desconexión completada”. Escuchar el sonido Compruebe que: --La función de Bluetooth del dispositivo fuente está activada. --El emparejamiento entre la barra de sonido y el dispositivo fuente se ha completado. 1 Pulse el botón INPUT para seleccionar la función de Bluetooth. 2 Inicie la conexión de Bluetooth desde el dispositivo con Bluetooth. 3 Inicie la reproducción de sonido en el dispositivo con Bluetooth. • Si el dispositivo fuente tiene funciones adicionales de graves o de ecualizador, desactívelas. Si estas funciones están activadas, pueden distorsionar el sonido. Notas • Debe volver a establecer la conexión de Bluetooth en los casos siguientes: --La barra de sonido no está encendida. --El dispositivo fuente no está encendido, o la función de Bluetooth está apagada o en modo de reposo. Para dejar de escuchar Realice cualquiera de las acciones siguientes: --Interrumpa la conexión de Bluetooth del dispositivo fuente de audio. (Consulte el manual de instrucciones del dispositivo fuente.) --Apague los dispositivos con Bluetooth. --Apague la barra de sonido. Notas • Algunos dispositivos con Bluetooth no pueden controlarse con el mando a distancia. • El volumen de la barra de sonido no puede controlarse debidamente dependiendo del dispositivo conectado. Botones de control de Bluetooth (solo mando a distancia) Pulse el botón para activar la reproducción o pausarla. Pulse el botón para saltar hacia adelante. Manténgalo pulsado para el avance rápido. Pulse el botón para saltar hacia atrás. Manténgalo pulsado para el retroceso rápido. Es-19 Resolución de problemas Si detecta algún problema en este producto, compruebe los puntos siguientes antes de contactar con su distribuidor de Onkyo. Restablecimiento de los valores predeterminados (reinicio) Primero retire todos los cables conectados a la barra de sonido y luego desconecte el cable de alimentación de CA de la toma de CA. Mantenga pulsados el botón y el botón PAIRING, conecte el cable del adaptador de CA a la toma DC IN de la barra de sonido. A continuación pulse el botón . Nota Tenga en cuenta que al reiniciar la barra de sonido se borrarán todos los datos almacenados en la memoria. Problemas generales Síntoma No se oye ningún sonido. Posible causa • ¿Es correcta la configuración (selección) de la señal de entrada? No se admiten señales DTS y AAC. • ¿El nivel de volumen está ajustado al mínimo (“Min(0)”)? • ¿La función de silenciación está activada? • ¿Todas las conexiones están establecidas correctamente? • ¿La barra de sonido está demasiado lejos de los dispositivos con Bluetooth? • ¿La barra de sonido está emparejada con los dispositivos con Bluetooth? • Aleje la barra de sonido de todos los equipos informáticos Se oye ruido durante la reproducción. y teléfonos móviles. • ¿El cable de audio está conectado correctamente a la toma de entrada de la barra de sonido? • El deterioro originado por el paso del tiempo puede provocar ruidos. Compruebe el año de fabricación del modelo del televisor o del reproductor de DVD/Blu-ray. • Esto puede provocar un mal funcionamiento. La barra de sonido se Ponga la barra de sonido en el modo en espera ve afectada por ruido ÆÆ procedente de una y vuelva a encenderla. Si el problema persiste, fuente externa (impactos, apague la barra de sonido y desconecte el cable de electricidad estática alimentación de CA de la toma de CA. Enchufe el excesiva, anomalías en la cable en la toma de CA y vuelva a encender la barra tensión de alimentación de sonido. a causa de tormentas eléctricas). La barra de sonido se utiliza incorrectamente. • Reduzca el volumen del televisor o de la barra de sonido. El sonido está distorsionado. • Ponga la barra de sonido en el modo en espera y vuelva a La barra de sonido no responde al pulsar un encenderla. botón. • Si la barra de sonido sigue funcionando incorrectamente, reiníciela. Es-20 Página P.16 P.14 P.14 P.12 P.17 P.18 P.12 P.21 P.21 Arriba El equipo no se enciende. • ¿El cable de alimentación de CA de la barra de sonido está enchufado? • Es posible que se haya activado el circuito de protección. Desenchufe el cable de alimentación de CA y enchúfelo de nuevo al cabo de 5 minutos o más. El sonido de Bluetooth se interrumpe o está distorsionado. • ¿La barra de sonido está cerca de un dispositivo que genera radiación electromagnética? • ¿Hay algún obstáculo entre la barra de sonido y el dispositivo con Bluetooth? P.13 P.21 P.18 Mando a distancia Síntoma El mando a distancia no funciona correctamente. Posible causa • ¿La polaridad de la pila es correcta? • ¿La pila está gastada? • ¿La distancia y el ángulo de apunte son correctos? • ¿Hay algún obstáculo enfrente de la barra de sonido? • ¿El sensor remoto está expuesto a alguna fuente de luz intensa (lámparas fluorescentes de tipo inversor o luz solar directa)? • ¿Se está usando el mando a distancia de otro equipo simultáneamente? La barra de sonido no • ¿El cable de alimentación de CA de la barra de sonido está se enciende con el enchufado? mando a distancia. • ¿La pila está instalada? Página P.8 P.13 P.8 Indicadores de error y avisos Cuando se realiza un uso incorrecto del equipo, el indicador Pantalla /INPUT parpadea en verde. Significado El circuito de protección está activado. Indicador /INPUT (parpadea en verde) Cuando aparece el mismo mensaje incluso después de desenchufar y enchufar la barra de sonido o de cambiarla al modo en espera y volver a encenderla, contacte con el proveedor que le suministró la barra de sonido. Marcas comerciales y licencias Fabricado bajo licencia de Dolby Laboratories. Dolby y el símbolo de doble D son marcas comerciales de Dolby Laboratories. La palabra y el logo Bluetooth® son marcas comerciales registradas propiedad de Bluetooth SIG, Inc.y cualquier uso de tales marcas por parte de Onkyo se hace bajo licencia. Otras marcas registradas y nombres comerciales pertenecen a sus respectivos propietarios. Es-21 Especificaciones Sección del amplificador Potencia de salida nominal (IEC) 2 canales x 20 W a 6 ohmios, 1 kHz, 2 canales activos THD+N (Distorsión armónica total+N) 0,2% (1 kHz, 1 W) Factor de atenuación 31 (6 Ω) Sensibilidad de entrada e impedancia (desequilibrio) 1000 mV/ 47 kΩ (AUDIO IN) Respuesta de frecuencia 80 Hz - 15 kHz/ +3 dB, -3 dB (AUDIO IN, SOUND MODE: DIRECT) Relación señal/ruido 103 dB (AUDIO IN IHF-A) Sección del Bluetooth Sistema de comunicación Bluetooth versión 2.1 +EDR Alcance máximo de comunicación 10 m*1 Banda de frecuencia 2,4 GHz - 2,48 GHz Método de modulación FHSS (salto de frecuencias de espectro amplio) Perfiles de Bluetooth compatibles A2DP 1.2 AVRCP 1.0 Codec admitido SBC *1 El alcance real varía en función de factores como los obstáculos entre los dispositivos, los campos magnéticos que rodean los hornos microondas, la electricidad estática, los teléfonos inalámbricos, la sensibilidad de recepción, la capacidad de la antena, el sistema operativo, las aplicaciones de software, etc. Es-22 Generales Alimentación 100 - 240 V CA, 50/60 Hz (Entradas de alimentación de la barra de sonido: entrada de CC 17 V, 2,8 A) Consumo de energía 11 W 5 W (Sin sonido) 0,4 W (modo en espera de red [Modo de espera Bluetooth]) * La función Auto power on (autoencendido) está siempre activada en el modo en espera. Esta función no puede desactivarse. Dimensiones 940 mm (an.) x 73 mm (al.) x 83 mm (pr.) Peso 2,4 kg Altavoz Sistema de altavoces de 2 canales 5,7 cm (cono de graves) x 4 2,5 cm (cono de agudos de cúpula suave) x 2 ■■Entradas de audio Digital OPTICAL IN (DIGITAL): 1 Analógica AUDIO IN (ANALOG): 1 toma estéreo mini Ø 3,5 mm ■■Otros Entradas digitales Dolby Digital/PCM Modo de sonido CINEMA, MUSIC, NEWS y DIRECT Surround Encendido/Apagado * Las especificaciones y características están sujetas a cambios sin previo aviso. Es-23 Notas Es-24 Sistema soundbar SBT-200 Manuale di istruzioni Indice Informazioni di sicurezza............................................2 Accessori....................................................................5 Indicatori.....................................................................5 Comandi e indicatori...................................................6 Preparazione del sistema...........................................9 Posizionamento della soundbar...............................10 Collegamenti della soundbar alla TV........................12 Funzionamento di base............................................14 Ascolto dei dispositivi Bluetooth...............................17 Risoluzione dei problemi..........................................20 Caratteristiche tecniche............................................22 Grazie per aver acquistato un prodotto Onkyo. Leggere attentamente il presente manuale prima di effettuare collegamenti e connessioni del nuovo prodotto Onkyo. L'osservanza delle istruzioni contenute nel presente manuale assicurerà prestazioni ed esperienza di ascolto ottimali per il nuovo prodotto. Conservare il manuale per consultazioni future. Informazioni di sicurezza AVVERTIMENTO: PER RIDURRE IL RISCHIO DI INCENDI O SCOSSE ELETTRICHE, NON ESPORRE QUESTO APPARECCHIO ALLA PIOGGIA O ALL’UMIDITÀ. ATTENZIONE: PER RIDURRE IL RISCHIO DI SCOSSE ELETTRICHE, NON RIMUOVERE IL RIVESTIMENTO (O IL RETRO). ALL’INTERNO NON SONO PRESENTI PARTI RIPARABILI DALL’UTILIZZATORE. PER LE RIPARAZIONI RIVOLGERSI A PERSONALE DI ASSISTENZA QUALIFICATO. WARNING AVIS RISK OF ELECTRIC SHOCK DO NOT OPEN RISQUE DE CHOC ELECTRIQUE NE PAS OUVRIR Il simbolo del fulmine, racchiuso in un triangolo equilatero, serve ad avvisare l'utilizzatore della presenza di “tensioni pericolose” non isolate all’interno del rivestimento del prodotto che possono essere di intensità sufficiente da costituire un rischio di scosse elettriche alle persone. Il punto esclamativo all'interno di un triangolo equilatero serve ad avvisare l'utilizzatore della presenza di importanti istruzioni per l'impiego e la manutenzione (riparazione) nei manuali allegati al prodotto. lstruzioni importanti per la sicurezza 1. 2. 3. 4. 5. Leggere queste istruzioni. Conservare queste istruzioni. Prestare attenzione a tutti gli avvertimenti. Seguire tutte le istruzioni. Non utilizzare questo apparecchio vicino all'acqua. 6. Pulire solo con un panno asciutto. 7. Non ostruire qualsiasi apertura per la ventilazione. Installare seguendo le istruzioni del fabbricante. 8. Non installare vicino a qualsiasi fonte di calore, come ad esempio radiatori, convogliatori di calore, stufe, o altri apparati (inclusi gli amplificatori) che producono calore. 9. Non trascurare la funzione di sicurezza delle spine elettriche di tipo polarizzato o con presa di terra. Una spina polarizzata ha due lamelle, una più larga dell'altra. Una spina del tipo con presa di terra ha due lamelle più una terza punta per la messa a terra. La lamella larga o la terza punta vengono fornite per la vostra sicurezza. Se la spina fornita non corrisponde alla vostra presa di corrente, consultare un elettricista per la sostituzione della presa elettrica di vecchio tipo. 10. Proteggere il cavo di alimentazione dall'essere calpestato o schiacciato, in particolar modo le spine, le prese di corrente, e il punto dove i cavi escono dall'apparecchio. 11. Usare solo gli attacchi/accessori specificati dal fabbricante. 12. Usare solo con il AVVERTIMENTO CARRELLI carrello, supporto, PORTATILI treppiede, staffa, o tavolo specificato dal fabbricante, o venduto con l'apparecchio. Se S3125A viene utilizzato un carrello, fare attenzione quando si sposta l'insieme carrello/apparecchio, per evitare ferite a causa di rovesciamento. 13. Scollegare questo apparecchio durante i temporali o quando non viene utilizzato per lunghi periodi di tempo. 14. Per qualsiasi tipo di assistenza tecnica, riferirsi al personale tecnico di assistenza qualificato. L'assistenza tecnica si richiede quando l'apparecchio è danneggiato in qualsiasi modo, come ad esempio il cavo di alimentazione o la spina sono danneggiati, all'interno dell'apparecchio sono stati versati liquidi o sono caduti oggetti, l'apparato è stato esposto a pioggia o umidità, non funziona normalmente, oppure è caduto. 15. Danni che richiedono riparazioni Scollegare l'apparecchio dalla presa di corrente e rivolgersi per riparazioni a personale tecnico qualificato nelle seguenti condizioni: A. Quando il cavo di alimentazione o la sua spina sono danneggiati, B. Se liquidi sono stati rovesciati o oggetti sono penetrati nell'apparecchio, C. Se l'apparecchio è stato esposto alla pioggia o all'acqua, D. Se l'apparecchio non funziona normalmente quando si seguono le It-2 istruzioni per l'uso. Usare solo i comandi indicati nelle istruzioni per l'uso perché regolazioni improprie di altri comandi possono causare danni e spesso richiedono riparazioni laboriose da parte di tecnici qualificati per riportare l'apparecchio al funzionamento normale, E. Se l'apparecchio è caduto o è stato danneggiato in qualsiasi modo, e F. Quando l'apparecchio mostra un netto cambiamento nelle prestazioni: questo indica la necessità di riparazioni. 16. Penetrazione di oggetti o liquidi Non inserire oggetti di qualsiasi tipo nell'apparecchio attraverso le aperture, perché potrebbero toccare parti ad alta tensione o cortocircuitare parti, con il rischio di incendi o scosse elettriche. L'apparecchio non deve essere esposto a sgocciolii o schizzi d'acqua, e sull'apparecchio non deve essere collocato nessun oggetto riempito con liquidi, come ad esempio vasi. Non posizionare le candele o gli altri oggetti infiammabili sopra questa apparecchio. 17. Batterie Per lo smaltimento delle batterie, considerare sempre i problemi di carattere ambientale e seguire i regolamenti locali. 18. Se si installa l'apparecchio all'interno di un mobile, come ad esempio una libreria o uno scaffale, assicurarsi che ci sia un'adeguata ventilazione. Lasciare uno spazio libero di 20 cm sopra e ai lati dell’apparecchio, e 10 cm sul retro. Il lato posteriore dello scaffale o il ripiano sopra l’apparecchio devono essere regolati a 10 cm di distanza dal pannello posteriore o dal muro, creando un’apertura per la fuoriuscita dell’aria calda. Precauzioni • • • • • • Avvertenza: • L'adattatore CA/CC in dotazione non • • Avvertenze generali • Accertarsi che il dispositivo sia posizionato in una zona ben aerata e verificare che vi siano almeno 10 cm di spazio libero lateralmente e sopra l'apparecchio. 10 cm • • • • 10 cm 10 cm • Posizionare l'unità su una superficie stabile, piana e non soggetta a vibrazioni. • Tenere l'unità lontano da luce solare diretta, forti campi magnetici, eccessiva polvere, umidità e apparecchi elettronici/elettrici (computer, fax, ecc.) che generano disturbi elettrici. Non posizionare alcun oggetto sopra l'unità. Non esporre l'unità a umidità, temperature superiori a 60 °C o estremamente basse. Se il sistema presenta un funzionamento anomalo, scollegare il cavo di alimentazione CA dalla presa CA, quindi ricollegarlo. Per questioni di sicurezza, in caso di temporale scollegare l'unità. Per staccare il cavo di alimentazione CA dalla presa, afferrare saldamente la spina e tirare: se si strattona il cavo potrebbero danneggiarsi i fili interni. La spina del cavo di alimentazione CA viene utilizzata come dispositivo di scollegamento e deve sempre essere in buono stato di funzionamento. Non rimuovere la copertura esterna, poiché in caso contrario possono verificarsi scosse elettriche. In caso di necessità, ricorrere all'assistenza rivolgendosi al proprio rivenditore Onkyo. L'unità può essere utilizzata in ambienti con temperature comprese tra 5 °C e 35 °C. Onkyo non è responsabile per danni dovuti a uso improprio. Per qualsiasi intervento, rivolgersi al rivenditore Onkyo. contiene parti che richiedono un intervento dell'utilizzatore. Non rimuovere i pannelli se non si dispone delle necessarie qualifiche tecniche. All'interno dell'unità vi sono elementi in tensione; scollegare sempre la spina dalla presa di corrente prima di qualsiasi intervento di assistenza o se si lascia l'unità inutilizzata per lunghi periodi. L'adattatore CA/CC in dotazione con SBT‑200 non deve essere utilizzato con altri apparecchi. Non utilizzare adattatori CA/CC diversi da quello specificato. In caso contrario, possono verificarsi problemi o gravi rischi. La tensione utilizzata deve corrispondere a quella indicata sull'unità. L'utilizzo del prodotto con una tensione superiore a quella specificata è pericoloso e può provocare un incendio o altri tipi di incidenti alla base di potenziali danni. Onkyo non sarà ritenuta responsabile per danni conseguenti l'utilizzo dell'unità con una tensione diversa rispetto a quella specificata. Comandi del volume Il livello sonoro a una determinata impostazione di volume dipende dall'efficienza e dalla It-3 posizione del diffusore, nonché da altri fattori. Si consiglia di evitare l'esposizione a un livello di volume eccessivo, che può verificarsi all'atto di accendere l'unità mentre il comando è impostato ai valori massimi oppure dopo un ascolto prolungato ad alto volume. Per i modelli per l’Europa Dichiarazione di Conformità Dichiariamo, sotto la nostra esclusiva responsabilità, che questo prodotto è conforme agli standard: -- Sicurezza -- Limiti e metodi di ----- misurazione delle caratteristiche di interferenze radio Limiti delle emissioni di corrente armonica Limite di variazioni di tensione, di fluttuazioni di tensione e di sfarfallio Direttiva RoHS, 2011/65/UE Con la presente Onkyo Corporation dichiara che questo SBT-200 è conforme ai requisiti essenziali ed alle altre disposizioni pertinenti stabilite dalla direttiva 1999/5/CE. WEEE http://www.onkyo.com/manual/weee/weee.pdf It-4 Accessori Sono forniti in dotazione i seguenti accessori. • Telecomando (1) • Adattatore CA (1) • Cavo di alimentazione (1) • Cavo audio digitale ottico (1) • Base di supporto (2) • Nastro biadesivo (1) • Mascherina (1) Il telecomando contiene una pila al litio (CR2025). Nei cataloghi e sulle confezioni la lettera aggiunta alla fine del nome del prodotto indica il colore. Le caratteristiche tecniche e le funzioni sono identiche a prescindere dal colore. Si consiglia di utilizzare la soundbar in abbinamento a TV a schermo piatto (LED, LCD o PLASMA). Indicatori /INPUT Bluetooth [ /INPUT ] L'indicatore /INPUT si illumina quando si accende la soundbar. Il colore della spia cambia a seconda della sorgente di ingresso. • OPTICAL IN: azzurro • Bluetooth: blu • AUDIO IN: verde [Bluetooth] La spia Bluetooth si illumina in blu quando si collega un dispositivo Bluetooth alla soundbar e si seleziona la relativa funzione. • La spia Bluetooth lampeggia quando il dispositivo Bluetooth non è collegato alla soundbar. • La spia Bluetooth lampeggia in modo rapido durante la fase di l'accoppiamento dei dispositivi. SURROUND AUDIO FORMAT [SURROUND] La spia SURROUND si illumina in arancione quando la funzione SURROUND è attiva. • La spia SURROUND lampeggia quando il volume della soundbar è al massimo, al minimo o silenziato. • La spia SURROUND lampeggia una sola volta quando si seleziona SOUND MODE. [AUDIO FORMAT] La spia AUDIO FORMAT si illumina a seconda del tipo di audio in ingresso quando è selezionato OPTICAL IN. • DolbyDigital: blu • PCM: spento • Nessun segnale: lampeggiante It-5 Comandi e indicatori Pannello anteriore 1 2 14 34 5 67 8 9 10 11 12 13 1. Diffusore del canale sinistro 2. Diffusore del canale destro 3. Indicatore Questo indicatore si illumina quando si accende la soundbar. Indicatore INPUT Il colore della spia cambia a seconda della sorgente di ingresso, come descritto di seguito: OPTICAL IN: azzurro Bluetooth: blu AUDIO IN: verde 4. Tasto Questo tasto consente di accendere (“On”) o mettere in standby (“Standby”) la soundbar. 5. Tasto INPUT Questo tasto consente di cambiare la sorgente di ingresso tra OPTICAL IN, Bluetooth e AUDIO IN. 6. Tasto PAIRING Questo tasto permette di accoppiare la soundbar ai dispositivi Bluetooth. 7. Indicatore Bluetooth Questa spia si illumina o lampeggia durante la connessione Bluetooth. 8. Indicatore SURROUND Questa spia si illumina/spegne quando si attiva/disattiva la funzione SURROUND. 9. Tasto SURROUND Questo tasto consente di abilitare la funzione "surround". 10. Tasto VOLUME Questo tasto consente di ridurre il volume. 11. Tasto VOLUME + Questo tasto consente di aumentare il volume. 12. Indicatore AUDIO FORMAT Il colore della spia cambia a seconda del segnale digitale (Dolby Digital/PCM). 13. Sensore del telecomando 14. Icona dell'accoppiamento NFC Pannello posteriore 2 1 3 It-6 1. Jack DC IN Collegare l'adattatore CA a questo jack. 2. Jack OPTICAL IN (DIGITAL) Collegare il cavo audio digitale ottico in dotazione a questo jack. 3. Jack AUDIO IN (ANALOG) Collegare il cavo audio analogico (non in dotazione) a questo jack. Telecomando 1 2 3 4 5 6 7 8 9 10 11 12 13 1. Tasto Questo tasto consente di accendere (“On”) o mettere in standby (“Standby”) la soundbar. 2. Tasto SURROUND Questo tasto consente di abilitare la funzione "surround". 3. Tasto CINEMA (SOUND MODE) Questa modalità è adatta alla visione di film. 4. Tasto MUSIC (SOUND MODE) Questo modo è adatto per l'ascolto di musica. 5. Tasto NEWS (SOUND MODE) Questa modalità è adatta alla visione di notiziari. 6. Tasto DIRECT (SOUND MODE) Questa modalità offre un audio senza elaborazioni. 7. Tasto INPUT Questo tasto consente di cambiare la sorgente di ingresso tra OPTICAL IN, Bluetooth e AUDIO IN. 8. Tasto Questo tasto consente di silenziare momentaneamente il volume. Premerlo di nuovo per ripristinare il volume. 9. Tasti VOLUME +/Questi tasti permettono di aumentare e ridurre il volume. 10. Tasto Bluetooth PAIRING Questo tasto permette di accoppiare la soundbar ai dispositivi Bluetooth. 11. Tasto di scorrimento in avanti Bluetooth Questo tasto permette di selezionare il brano successivo. Tenere premuto per eseguire la ricerca rapida in avanti. 12. Tasto di riproduzione/pausa Bluetooth Premere questo tasto per riprodurre o mettere in pausa i dispositivi Bluetooth. 13. Tasto di scorrimento indietro Bluetooth Questo tasto consente di selezionare l'inizio del brano corrente. Tenere premuto per eseguire la ricerca rapida indietro. It-7 ■■Puntamento del telecomando calore eccessivo, quale raggi solari, fiamme libere o simili. • L'installazione errata delle batterie può provocare il malfunzionamento della soundbar. Prima di utilizzare il telecomando, rimuovere la protezione di plastica dal portabatteria. Protezione di plastica Nota • Sostituire le batterie se la distanza di comando si riduce o il funzionamento risulta intermittente. Acquistare pile al litio “CR2025” del tipo a bottone. • Pulire periodicamente il trasmettitore del telecomando e il sensore della soundbar utilizzando un panno morbido. • L'esposizione del sensore della soundbar a una luce forte può impedire il corretto funzionamento. Nel caso ciò si verificasse, cambiare l'illuminazione o modificare l'orientamento della soundbar. • Proteggere il telecomando dall'umidità, dal calore, dagli urti e dalle vibrazioni. Per utilizzare il telecomando, puntarlo verso il sensore della soundbar, come mostrato nella figura in basso. 5m 5m ■■Inserimento delle batterie Questo prodotto utilizza una pila al litio CR, del tipo a bottone. 1 Tenendo premuta la linguetta di chiusura in prossimità del centro del telecomando, estrarre il portabatteria. Retro del telecomando Linguetta di chiusura 2 Eliminare la batteria esaurita, inserire la nuova batteria e reinserire il supporto all'interno del telecomando. Lato positivo (+) rivolto verso l'alto Precauzioni sull'uso della batteria Estrarre la batteria se si prevede di non utilizzare la soundbar per un periodo prolungato. In questo modo si evitano possibili danni dovuti alle perdite della batteria, quali incendi, lesioni o inquinamento ambientale. • Non utilizzare batterie ricaricabili (es. pile al nichel-cadmio, ecc.). • Se la batteria non viene sostituita correttamente vi è il rischio di esplosioni. • Utilizzare solo il tipo di batterie specificato. • Le batterie (il gruppo batterie o le batterie installate) non devono essere esposte a un It-8 Preparazione del sistema Montaggio della soundbar a parete Attenzione: • Prestare attenzione a non far cadere la soundbar (2,4 kg) durante il montaggio a parete. • Prima del montaggio, verificare la solidità della parete (non fissare su pareti intonacate o semplicemente imbiancate poiché la soundbar potrebbe cadere). In caso di dubbi, richiedere il parere di un tecnico dell'assistenza. • Le viti di montaggio non sono in dotazione. Utilizzare il tipo di viti adeguate all'operazione. • Controllare che le viti a L montate a parete non siano allentate. • Scegliere una posizione adeguata; in caso contrario, potrebbero verificarsi incidenti o danni alla soundbar. • Onkyo non è responsabile per incidenti dovuti a un'installazione errata. 2 Con un trapano, praticare un foro nella parete in corrispondenza dei segni presenti sulla mascherina. 32 mm 8-9 mm Superficie della parete 3 Inserire un tassello nel foro avvalendosi di un martello, fino a che non risulti a filo con la parete. 32 mm 8-9 mm ■■Viti e tasselli Onkyo ha concepito la soundbar affinché sia montata a parete. Utilizzare solo viti adeguate. (non in dotazione.) Vedere l'immagine seguente per le dimensioni e il tipo di viti adatte. 3,2 mm 5 mm Superficie della parete 4 Fissare le viti nei tasselli come mostrato di seguito. (ogni vite è composta da due elementi.) 9 mm Utilizzo delle viti Min. 22 mm Superficie della parete ■■Installazione della soundbar 1 Fissare la mascherina alla parete in 4,5 mm - 5 mm posizione orizzontale, come mostrato di seguito. Superficie della parete Cacciavite Superficie della parete Distanza dalla superficie della parete 509 mm 548 mm 5 Appendere la soundbar sulle viti. 44 mm Mascherina (in dotazione) Nota Consultare il paragrafo “Se montata a parete” della sezione “Come evitare cadute della soundbar” (P.11). It-9 Posizionamento della soundbar Posizionamento della soundbar sul supporto della TV TV VCR Nota • Prima di accendere il sistema, rimuovere la pellicola protettiva intorno alla soundbar. • Il pannello frontale della soundbar non è rimovibile. • Non modificare la direzione di installazione mentre la soundbar è accesa. • Per evitare il rischio di lesioni, non appoggiarsi o sedersi sulla soundbar. Lettore DVD Utilizzo delle basi in dotazione Utilizzare le basi in dotazione nei casi in cui il piedistallo della TV risulti di ostacolo per il posizionamento della soundbar sul supporto della TV. Le basi in dotazione consentono di posizionare la soundbar a cavallo del piedistallo della TV. 1 Incollare gli elementi biadesivi in dotazione nei due punti a destra e sinistra. Lato inferiore della soundbar Protezione 2. Fissare il nastro 1. Rimuovere la pellicola trasparente dal supporto 2 Verificarne la posizione e premere le basi contro di essi in modo che si portino al centro delle stesse. • Le basi dovrebbero trovarsi posteriormente alla soundbar. 3 Posizionare la soundbar sul Allineare la parte anteriore della soundbar al piedistallo della TV. piedistallo della TV. It-10 Nota • Accertarsi che la soundbar non vacilli. • Fissare la soundbar al piedistallo della TV, ecc., utilizzando cavi (non in dotazione) che ne evitino la caduta. • Per spostare il piedistallo della TV, spostare prima la soundbar in un luogo sicuro. Come evitare cadute della soundbar Utilizzare occhielli a vite o cavi di sicurezza per evitare che la soundbar cada. ■■Se posizionata su piedistallo/tavolo Soundbar Cavi di sicurezza Occhiello a vite (non in dotazione) Piedistallo/ tavolo Occhiello a vite ■■Se montata a parete Occhiello a vite Parete Cavi di sicurezza (non in dotazione) Soundbar It-11 Collegamenti della soundbar alla TV Prima di effettuare i collegamenti, scollegare tutte le altre apparecchiature. Nota • Per collegare la TV, utilizzare il jack OPTICAL IN (DIGITAL) o il jack AUDIO IN (ANALOG) presenti sul retro della soundbar. • Consultare il manuale di istruzioni dell'apparecchiatura da collegare. • Per evitare rumore, inserire gli spinotti a fondo. • Quando si utilizza la connessione del terminale di uscita audio RCA di un dispositivo TV/DVD/lettore di dischi Blu-ray, in alcuni casi può udirsi un lieve rumore di sottofondo generato dalla soundbar; ciò può dipendere dalla marca, dal modello o dall'età dell'apparecchiatura ma non è un difetto della soundbar. • Se il volume resta continuamente a livello basso, la soundbar viene automaticamente spenta. Collegamento di una TV o un lettore DVD, ecc. Se la TV o lo schermo dispone di un'uscita audio, collegarla al jack OPTICAL IN (DIGITAL) oppure al jack AUDIO IN (ANALOG) nella parte posteriore della soundbar. Ai terminali di uscita audio TV o Segnale audio Lettore Blu-ray/ DVD/sintonizzatore digitale Al terminale di uscita audio digitale Cavo audio digitale ottico Al jack OPTICAL IN (DIGITAL) Scegliere un formato di collegamento audio supportato dal televisore utilizzato, quindi effettuare il collegamento. Cavo digitale analogico (non in dotazione) Al jack AUDIO IN (ANALOG) Pannello posteriore della soundbar Rimuovere il copriterminale del cavo audio digitale ottico prima di eseguire il collegamento. Copriterminale It-12 ■■Jack OPTICAL IN Il jack OPTICAL IN (DIGITAL) della soundbar è dotato di coperchio con protezione che si apre quando viene inserito uno spinotto ottico e si chiude quando lo spinotto viene rimosso. Inserire a fondo gli spinotti. Nota Per evitare di danneggiare la protezione, mantenere diritto lo spinotto ottico durante l'inserimento e la rimozione. Utilizzo dell'adattatore CA Dopo aver verificato che i collegamenti effettuati siano tutti corretti, collegare l'adattatore CA al jack DC IN, quindi alla presa CA. 1 Inserire il cavo di alimentazione CA nell'adattatore CA. 2 Inserire il cavo dell'adattatore CA nel jack DC IN della soundbar. 3 Inserire il cavo di alimentazione CA nella presa CA. Nota • Utilizzare solo l'adattatore CA in dotazione. L'utilizzo di altri tipi di adattatore CA potrebbe causare malfunzionamenti del sistema SBT-200, scosse elettrice o incendi. L'adattatore CA e il cavo di alimentazione CA in dotazione sono progettati per essere utilizzati solo con la soundbar. Non collegare l'adattatore CA e il cavo di alimentazione CA ad altre apparecchiature. • Posizionare la soundbar in prossimità di una presa CA per inserire/disinserire più facilmente il cavo di alimentazione CA. • Mentre il sistema è in standby, la spia è spenta. Se si preme il tasto , la spia si illumina a seconda di quale sia la sorgente d'ingresso. (OPTICAL IN: azzurro/Bluetooth: blu/AUDIO IN: verde) • Scollegare il cavo di alimentazione CA dalla presa CA nei casi in cui la soundbar resti inutilizzata per un periodo prolungato. ■■Accertarsi di scollegare il cavo di alimentazione CA prima di effettuare i collegamenti. Cavo dell'adattatore CA Jack DC IN 2 Cavo di alimentazione CA Presa CA 3 1 Adattatore CA It-13 Funzionamento di base Accensione del sistema Premere il tasto o premere il tasto • La spia del telecomando. si illumina a seconda della sorgente d'ingresso. Nota Se il sistema non si accende, verificare che il cavo di alimentazione sia inserito correttamente. ■■Impostazione della soundbar in modalità standby (Standby Bluetooth) . Premere di nuovo il tasto • La spia si spegne. Nota La funzione di accensione dell'autoalimentazione (P.16) è sempre attiva in modalità standby. Dissolvenza automatica del volume Se la soundbar si predispone in modalità Standby con il volume a un livello elevato e viene successivamente riaccesa, il volume inizierà a un livello più basso per poi aumentare gradualmente fino all'ultimo livello impostato. Se il volume è impostato su un livello relativamente basso, la funzione di dissolvenza automatica del volume non si attiva. Comandi del volume Per aumentare o ridurre il volume, premere il tasto VOLUME+/VOLUME- della soundbar o premere il tasto VOLUME+/VOLUME- del telecomando. Nota • Ogni volta che si preme il tasto VOLUME+/VOLUME- del telecomando, la spia SURROUND lampeggia una volta. • Quando il volume è al livello massimo o minimo, la spia SURROUND lampeggia. Silenziamento audio Pressione del tasto del telecomando. • Il volume viene silenziato provvisoriamente. Premere di nuovo il tasto per ripristinare il volume. • Quando si disattiva provvisoriamente il volume, la spia SURROUND lampeggia. It-14 Surround Premere il tasto SURROUND della soundbar o premere il tasto SURROUND del telecomando. • L'effetto surround è attivo. (la spia SURROUND si illumina in arancione.) Modalità audio Premere il tasto SOUND MODE desiderato sul telecomando. • La spia SURROUND lampeggia una volta. CINEMA Modo adatto alla visione di film MUSIC Adatto all'ascolto di musica NEWS Modo adatto alla visione di notiziari DIRECT Nessuna elaborazione sonora Scelta della sorgente d'ingresso Premere il tasto INPUT della soundbar o premere il tasto INPUT del telecomando. • La sorgente d'ingresso viene cambiata. Ingresso Indicatore INPUT Indicatore PAIRING OPTICAL IN Si illumina in azzurro Spento Bluetooth Si illumina in blu Si illumina o lampeggia in blu AUDIO IN Si illumina in verde Spento Nota La funzione di backup mantiene la modalità memorizzata per qualche ora in caso di interruzione elettrica o scollegamento del cavo di alimentazione CA. It-15 ■■Collegamento della sorgente d'ingresso digitale Collegare la soundbar alla sorgente d'ingresso digitale utilizzando il cavo audio digitale ottico in dotazione, quindi premere il tasto INPUT della soundbar o del telecomando per selezionare Digital. Sono disponibili i formati audio e le sorgenti d'ingresso seguenti: Sorgente d'ingresso OPTICAL IN Formato audio Indicatore AUDIO FORMAT Nessun ingresso Lampeggia PCM Spento Dolby Digital Si illumina in blu Bluetooth Spento AUDIO IN Spento Nota Se l'uscita audio digitale è impostata su PCM nella TV o nel lettore DVD/Blu-ray, non si ottengono gli effetti di campo sonoro del Dolby Digital. Standby automatico/Accensione dell'autoalimentazione Standby automatico • La soundbar si predispone automaticamente in modalità standby (la spia rilevando alcun segnale audio in un lasso di 15 minuti. si spegne) non Nota La funzione di accensione dell'autoalimentazione è sempre attiva in modalità standby. Accensione dell'autoalimentazione • Se la spia è spenta, la soundbar si accende automaticamente al rilevare un segnale audio da uno dei dispositivi Bluetooth. It-16 Ascolto dei dispositivi Bluetooth ■■Informazioni sulla tecnologia Bluetooth Il Bluetooth è una tecnologia wireless di corto raggio che consente la trasmissione di dati in modalità senza fili tra dispositivi digitali. La tecnologia wireless Bluetooth funziona entro un raggio di circa 10 metri. Non è necessario utilizzare un cavo per la connessione, né è necessario che i dispositivi si trovino uno di fronte all'altro, come nel caso della tecnologia a raggi infrarossi. Sistema di comunicazioni e profilo Bluetooth della soundbar Al fine di stabilire la comunicazione tra dispositivi, esistono diversi profili Bluetooth per descrivere i principali metodi di comunicazione, le funzioni specifiche e gli utilizzi. Sistema di comunicazione Versione 2.1 della specifica Bluetooth Bluetooth + Enhanced Data Rate (EDR) Profilo • A2DP 1.2 (Advanced Audio Distribution Profile) • AVRCP 1.0 (Audio Video Remote Control Profile) • Il profilo A2DP consente lo streaming audio da dispositivi Bluetooth provvisti di A2DP (es. telefoni cellulari) alla soundbar. Convertendo il segnale audio stereo wireless in segnale audio analogico, è possibile fruire dell'audio attraverso questo sistema di diffusori. • AVRCP (Audio/Video Remote Control Profile) è una tecnologia che consente a un solo comando remoto di controllare tutte le apparecchiature video/audio Bluetooth alle quali può accedere un utente. Note sull'utilizzo della soundbar con un telefono cellulare • La soundbar non può essere utilizzata per parlare al telefono anche quando è stata stabilita una connessione Bluetooth con un telefono cellulare. • Si consiglia di leggere il manuale di istruzioni del telefono cellulare per maggiori dettagli sul funzionamento del telefono durante la trasmissione di audio tramite il collegamento Bluetooth. Streaming audio Telefono cellulare Bluetooth o altri dispositivi Bluetooth ■■Accoppiamento di dispositivi Bluetooth Prima di poter scambiare dati, i dispositivi Bluetooth devono essere precedentemente accoppiati. Dopo aver eseguito l'accoppiamento, non sarà più necessario ripeterlo, salvo nei seguenti casi: • l'accoppiamento viene effettuato con più di 8 dispositivi. (L'accoppiamento può essere effettuato solo con un dispositivo alla volta. La soundbar può essere accoppiata a un massimo di 8 dispositivi. Se si accoppia un altro dispositivo, il dispositivo collegato per primo viene eliminato e sostituito con il nuovo.) • la soundbar viene reimpostata. (tutte le informazioni di accoppiamento vengono cancellate.) • le informazioni di accoppiamento sono cancellate durante un nuovo accoppiamento, ecc. ■■Spia PAIRING (blu) Non collegato Lampeggia Modalità di accoppiamento Lampeggia rapidamente Collegato Si illumina ■■Near Field Communication (NFC) Near Field Communication (NFC) è una tecnologia per la connettività wireless a corto raggio che consente l'interazione bidirezionale tra dispositivi elettronici, quali smartphone o tag IC, semplicemente tenendo in mano il dispositivo (o toccando) l'icona NFC o azione simile. La soundbar supporta l'accoppiamento Bluetooth tramite NFC. It-17 Accoppiamento con dispositivi Bluetooth 1 Premere il tasto per accendere il sistema. 2 Premere il tasto INPUT per selezionare la funzione Bluetooth. 3 Premere il tasto PAIRING. • L'indicatore PAIRING lampeggia. A questo punto la soundbar è in modalità di accoppiamento ed è pronta ad essere accoppiata con un altro dispositivo sorgente Bluetooth. • L'accoppiamento può essere eseguito indipendentemente dalla sorgente di ingresso corrente. 4 Eseguire la procedura di accoppiamento sul dispositivo sorgente per rilevare la soundbar. • Per i dettagli, consultare il manuale di istruzioni del dispositivo sorgente. • Nell'elenco dei dispositivi rilevati, se disponibile, del dispositivo sorgente compare “Onkyo SBT-200”. • Durante l'accoppiamento, posizionare i dispositivi da accoppiare entro un metro di distanza. • Su alcuni dispositivi sorgente non è disponibile l'elenco dei dispositivi rilevati. Per accoppiare la soundbar con il dispositivo sorgente, consultare il manuale di istruzioni di quest'ultimo. 5 Selezionare “Onkyo SBT-200” nell'elenco delle sorgenti. Se è necessario un codice di accesso*, immettere “0000”. • La spia PAIRING (blu) della soundbar smette di lampeggiare quando la soundbar sarà correttamente accoppiata al dispositivo sorgente. Le informazioni di accoppiamento sono state memorizzate nella soundbar. * Il codice di accesso può essere anche definito Codice PIN, Code, Passkey, Numero PIN o Password. 6 Avviare il collegamento Bluetooth dal dispositivo sorgente. • Alcuni dispositivi audio sorgente sono in grado di collegarsi alla soundbar automaticamente; se ciò non avviene, per avviare la connessione attenersi alle istruzioni fornite nel manuale del dispositivo sorgente. Nota • Se la soundbar o il dispositivo sorgente vengono spenti prima che il collegamento Bluetooth sia stato stabilito, l'accoppiamento non viene eseguito e le relative informazioni non vengono memorizzate. Ripetere il passaggio 1 per riavviare l'accoppiamento. • Per accoppiare altri dispositivi, ripetere i passaggi da 1 a 5 per ciascun dispositivo. • Se un dispositivo viene eliminato dall'elenco di quelli accoppiati, vanno perse anche le relative informazioni di accoppiamento. Per tornare ad ascoltare l'audio dal dispositivo, è necessario eseguire un nuovo accoppiamento. Eseguire i passaggi da 1 a 5 per riaccoppiare nuovamente il dispositivo. • Il codice di accesso della soundbar è “0000” e può essere accoppiata solo con un dispositivo sorgente Bluetooth avente lo stesso codice di accesso “0000”. Accoppiamento con dispositivi Bluetooth che utilizzano NFC • Su un dispositivo compatibile con la tecnologia NFC, l'accoppiamento Bluetooth può essere effettuato solo tenendo il dispositivo sopra la soundbar. • Controllare che la funzione NFC del dispositivo sia attivata. It-18 1 Accendere soundbar e dispositivo. 2 Sul dispositivo avviare l'app necessaria alla lettura NFC. 3 Premere il tasto PAIRING della soundbar. 4 Tenere il dispositivo sopra il simbolo NFC nella parte centrale superiore della soundbar. • La spia Bluetooth della soundbar cambia da lampeggiante a illuminata, per indicare che l'accoppiamento è stato eseguito correttamente. • Per alcuni tipi di dispositivi non è necessario il passaggio 2. • Alcuni dispositivi, come gli smartphone, emettono un segnale acustico al riconoscimento di dispositivi abilitati NFC. Se si muove il dispositivo in questa fase, non sarà possibile eseguire la connessione o la disconnessione. Non muovere il dispositivo fino a che non sia visualizzato un messaggio del tipo “Connessione eseguita” o “Disconnessione eseguita”. Ascolto della soundbar Verificare che: --La funzione Bluetooth del dispositivo sorgente sia attiva. --L'accoppiamento di soundbar e dispositivo sorgente è stato completato. 1 Premere il tasto INPUT per selezionare la funzione Bluetooth. 2 Avviare il collegamento Bluetooth dal dispositivo Bluetooth. 3 Iniziare la riproduzione di musica sul dispositivo Bluetooth. • Se il dispositivo sorgente dispone di un'ulteriore funzione per i bassi o un equalizzatore, disattivare tali funzioni. Infatti, se tali funzioni restano attivate, si potrebbero verificare distorsioni del suono. Nota • È necessario rieffettuare il collegamento Bluetooth nei seguenti casi: --la soundbar non è accesa. --il dispositivo sorgente non è acceso o la relativa funzione Bluetooth è disattivata o in modalità di spegnimento. Conclusione dell'ascolto Per interrompere l'ascolto, procedere in uno dei modi seguenti: --Interrompere il collegamento Bluetooth dal dispositivo audio sorgente. (per i dettagli, consultare il manuale di istruzioni del dispositivo sorgente.) --Spegnere i dispositivi Bluetooth. --Spegnere la soundbar. Nota • Alcuni dispositivi Bluetooth non possono essere controllati dal telecomando. • A seconda del dispositivo collegato, il volume della soundbar potrebbe non essere controllabile come desiderato. Tasti della funzione Bluetooth (solo telecomando) Premere il tasto per riprodurre o mettere in pausa. Premere il tasto per scorrere in avanti. Tenere premuto per eseguire la ricerca rapida in avanti. Premere il tasto per scorrere indietro. Tenere premuto per eseguire la ricerca rapida indietro. It-19 Risoluzione dei problemi Se il prodotto presenta un funzionamento anomalo, controllare le seguenti situazioni prima di rivolgersi a un rivenditore Onkyo. Ripristino delle impostazioni predefinite (Reset) Innanzitutto, staccare tutti i cavi di collegamento della soundbar, quindi scollegare il cavo di alimentazione CA dalla presa CA. Tenendo premuto il tasto e il tasto PAIRING, inserire il cavo dell'adattatore CA nel jack DC IN della soundbar. Premere il tasto . Nota Il reset della soundbar provoca la cancellazione di tutti i dati memorizzati. Situazioni generali Condizione L'audio non è udibile. Possibile causa • Il segnale di ingresso (selezione) è impostato correttamente? I segnali DTS e AAC non sono supportati. • Il livello del volume è impostato su “Min (0)”? • È disattivato il silenziamento? • I collegamenti sono stati eseguiti correttamente? • La soundbar è troppo lontana dal dispositivo Bluetooth? • La soundbar è stata precedentemente accoppiata con il dispositivo Bluetooth? Durante la riproduzione si • Allontanare la soundbar da computer o telefoni cellulari. • Il cavo audio è collegato correttamente al jack di ingresso percepisce un rumore. della soundbar? • L'usura del tempo può causare rumore. Verificare l'anno di produzione del dispositivo TV, lettore DVD/Blu-ray. • Tale condizione può provocare un malfunzionamento. Se la soundbar è Impostare la soundbar in modalità standby, quindi interessata dal rumore ÆÆ di una sorgente esterna riaccenderla. Se il malfunzionamento persiste, (urti, elettricità statica spegnere la soundbar e scollegare il cavo di eccessiva o tensione alimentazione CA dalla presa CA. Inserire il cavo nella elettrica anomala dovuta presa CA e riaccendere la soundbar. all'illuminazione). Se la soundbar viene controllata in modo errato. • Ridurre il volume della TV o della soundbar. L'audio è distorto. Quando si preme un tasto, • Impostare la soundbar in modalità standby, quindi la soundbar non risponde. riaccenderla. • Se il malfunzionamento persiste, eseguire un reset. • Il cavo di alimentazione CA della soundbar è inserito? L'alimentazione non è accesa. • Potrebbe essere attivato il circuito di protezione. Scollegare e ricollegare il cavo di alimentazione CA attendendo almeno 5 minuti. L'audio Bluetooth è interrotto o distorto. • La soundbar si trova troppo vicino a un dispositivo che genera radiazione elettromagnetica? • Vi sono ostacoli tra la soundbar e il dispositivo Bluetooth? It-20 Pagina P.16 P.14 P.14 P.12 P.17 P.18 P.12 P.21 P.21 Sopra P.13 P.21 P.18 Telecomando Condizione Il telecomando non funziona correttamente. Non è possibile accendere la soundbar usando il telecomando. Possibile causa • La polarità della pila è corretta? • La batteria è esaurita? • La distanza o l'angolazione sono corrette? • Vi sono ostacoli davanti alla soundbar? • Vi è una luce forte (come lampade fluorescenti del tipo a inverter o raggi solari diretti) che colpisce il sensore remoto? • Si utilizza contemporaneamente il telecomando di un altro apparecchio? • Il cavo di alimentazione CA della soundbar è inserito? • La batteria è inserita? Pagina P.8 P.13 P.8 Indicatori di errore e avvisi Quando non si riesce a svolgere le consuete operazioni in modo normale, la spia lampeggia in verde. Comportamento /INPUT Significato Il circuito di protezione è attivato. La spia /INPUT lampeggia in verde Se si presenta lo stesso messaggio anche quando si scollega e ricollega la soundbar oppure se la stessa viene impostata in modalità standby e riattivata, rivolgersi al rivenditore di zona presso il quale si è acquistato il prodotto. Marchi commerciali e licenze Fabbricato su licenza di Dolby Laboratories. Dolby e il simbolo della doppia D sono marchi commerciali di Dolby Laboratories. L'identificatore di parola e i loghi Bluetooth® sono marchi registrati di proprietà di Bluetooth SIG, Inc. e il loro utilizzo da parte di Onkyo è concesso in licenza. Altri marchi e nomi commerciali sono dei rispettivi proprietari. It-21 Caratteristiche tecniche Sezione amplificatori Potenza nominale in uscita (IEC) 2 canali x 20 W a 6 ohm, 1 kHz, 2 canali pilotati THD+N (distorsione armonica totale+N) 0,2% (1 kHz, 1 W) Fattore di smorzamento 31 (6 Ω) Sensibilità e impedenza d'ingresso (sbilanciamento) 1000 mV/ 47 kΩ (AUDIO IN) Risposta in frequenza 80 Hz - 15 kHz/ +3 dB, -3 dB (AUDIO IN, SOUND MODE: DIRECT) Rapporto segnalerumore 103 dB (AUDIO IN IHF-A) Sezione Bluetooth Sistema di comunicazione Versione Bluetooth 2.1 + EDR Raggio max. di comunicazione 10 m*1 Banda di frequenza 2,4 GHz - 2,48 GHz Metodo di modulazione FHSS (Freq Hopping Spread Spectrum) Profili Bluetooth compatibili A2DP 1.2 AVRCP 1.0 Codec supportato SBC *1 Il raggio effettivo può variare in base a diversi fattori: ostacoli infrapposti tra i dispositivi, campi magnetici circostanti un forno a microonde, elettricità statica, telefoni cordless, sensibilità di ricezione, prestazioni dell'antenna, sistema operativo, applicazioni software, ecc. It-22 Informazioni generali Alimentazione CA 100 - 240 V, 50/60 Hz (Ingressi di alimentazione della soundbar: ingresso CC 17 V, 2,8 A) Consumo elettrico 11 W 5 W (Nessun audio) 0,4 W (standby di rete [Standby Bluetooth]) * La funzione di accensione dell‘autoalimentazione è sempre attiva in modalità standby. Questa funzione non può essere disabilitata. Dimensioni 940 mm (L) x 73 mm (H) x 83 mm (P) Peso 2,4 kg Diffusore Sistema di diffusione bidirezionale 5,7 cm (woofer) x 4 2,5 cm (tweeter a cupola morbida) x 2 ■■Ingressi audio Digitale OPTICAL IN (DIGITAL): 1 Analogico AUDIO IN (ANALOG): 1 mini jack stereo Ø 3,5 mm ■■Varie Ingressi digitali Dolby Digital/PCM Modalità audio CINEMA, MUSIC, NEWS e DIRECT Surround Acceso/Spento * Le caratteristiche tecniche e le funzioni sono soggette a variazioni senza preavviso. It-23 Promemoria It-24 Soundbar System SBT-200 Bedienungsanleitung Inhalt Sicherheitsinformation................................................2 Zubehör......................................................................5 Anzeigen.....................................................................5 Bedienelemente und Anzeigen...................................6 Systemvorbereitung....................................................9 Platzieren des Soundbar..........................................10 Anschließen des Soundbar an einem Fernseher.....12 Grundlegende Bedienung........................................14 Wiedergabe von Bluetooth-aktivierten Geräten.......17 Fehlersuche..............................................................20 Technische Daten.....................................................22 Vielen Dank für Ihren Kauf eines Produkts von Onkyo. Bitte lesen Sie dieses Handbuch sorgfältig durch, bevor Sie Verbindungen herstellen und Ihr neues Onkyo-Produkt anschließen. Wenn Sie sich an die in dieser Anleitung aufgeführten Anweisungen halten, können Sie eine optimale Leistung erzielen und das Hörvergnügen mit Ihrem neuen Produkt auskosten. Bitte bewahren Sie dieses Handbuch für eine künftige Bezugnahme auf. Sicherheitsinformation ACHTUNG: UM FEUER UND STROMSCHLÄGE ZU VERMEIDEN, SOLLTE DAS GERÄT WEDER REGEN NOCH FEUCHTIGKEIT AUSGESETZT WERDEN. VORSICHT: UM STROMSCHLÄGE ZU VERMEIDEN, WEDER DAS GEHÄUSE (NOCH DIE RÜCKSEITE) ÖFFNEN. NICHTS IM GEHÄUSE DARF VOM BENUTZER GEWARTET WERDEN. WENDEN SIE SICH AN DEN QUALIFIZIERTEN KUNDENDIENST. WARNING AVIS RISK OF ELECTRIC SHOCK DO NOT OPEN RISQUE DE CHOC ELECTRIQUE NE PAS OUVRIR Das Blitzsymbol mit Pfeil innerhalb eines gleichseitigen Dreiecks soll den Anwender auf das Vorhandensein von “gefährlichen Spannungen” im Inneren des Gehäuses dieses Produktes aufmerksam machen. Derartige Spannungen sind hoch genug, um für Menschen gefährliche Schläge zu bewirken. Das Ausrufungszeichen innerhalb eines gleichseitigen Dreiecks soll den Anwender auf das Vorhandensein von wichtigen Betriebs- oder Wartungshinweisen (Service) in der dem Produkt beiliegenden Dokumentation hinweisen. Wichtige Sicherheitshinweise 1. 2. 3. 4. 5. Lesen Sie sich diese Hinweise durch. Bewahren Sie diese Hinweise auf. Beachten Sie alle Warnungen. Befolgen Sie alle Anweisungen. Verwenden Sie dieses Gerät niemals in der Nähe von Wasser. 6. Reinigen Sie das Gehäuse nur mit einem trockenen Tuch. 7. Versperren Sie niemals die vorhandenen Lüftungsschlitze. Stellen Sie das Gerät immer den Anweisungen des Herstellers entsprechend auf. 8. Stellen Sie das Gerät niemals in die Nähe einer Wärmequelle, z.B. eines Heizkörpers, Ofens bzw. anderen Gerätes, das viel Wärme erzeugt. 9. Versuchen Sie niemals, die Sicherheitsvorkehrung des polarisierten oder Erdungsstiftes zu umgehen. Ein polarisierter Stecker weist zwei Stifte mit unterschiedlicher Breite auf. Ein geerdeter Stecker weist zwei Stifte und einen Erdungsstift auf. Der breitere Stift bzw. der Erdungsstift dient Ihrer Sicherheit. Wenn der beiliegende Stecker nicht in Ihre Steckdose passt, müssen Sie einen Elektriker bitten, neue Steckdosen zu installieren. 10. Sorgen Sie dafür, dass niemand auf das Netzkabel treten kann und dass es nicht abgeklemmt wird. Diese Gefahr besteht insbesondere in der Nähe der Steckdose oder des Kabelaustritts am Gerät. 11. Verwenden Sie nur Halterungen/Zubehör, die/das vom Hersteller ausdrücklich empfohlen wird/werden. 12. Verwenden Sie nur VORSICH MIT SCHRÄNKEN Wagen, Ständer, Halterungen und Unterlagen, die entweder vom Hersteller S3125A empfohlen werden oder zum Lieferumfang das Gerätes gehören. Seien Sie bei Verwendung eines Wagens vorsichtig. Dieser darf beim Transport nicht umfallen, weil das zu schweren Verletzungen führen kann. 13. Lösen Sie im Falle eines Gewitters oder wenn Sie das Gerät längere Zeit nicht verwenden möchten, den Netzanschluss. 14. Überlassen Sie alle Wartungsarbeiten einer qualifizierten Kundendienststelle. Das Gerät muss zur Wartung eingereicht werden, wenn es Schäden aufweist, z.B. wenn das Netzkabel oder der Stecker beschädigt ist, wenn Wasser oder Fremdkörper in das Geräteinnere gelangt sind, wenn das Gerät Feuchtigkeit oder Regen ausgesetzt war bzw. wenn es sich nicht normal verhält oder wenn seine Funktionstüchtigkeit merklich nachgelassen hat. 15. Schäden, die eine Reparatur erfordern Lösen Sie sofort den Netzanschluss und reichen Sie das Gerät bei einer qualifizierten Kundendienststelle ein, wenn: A. Das Netzkabel bzw. dessen Stecker beschädigt ist; B. Wenn Fremdkörper oder Flüssigkeiten ins Geräteinnere gelangt sind; C. Wenn das Gerät nass geworden ist (z.B. durch Regen oder Wasser); D. Das Gerät anhand der in dieser Anleitung gegebenen Hinweise De-2 nicht erwartungsgemäß funktioniert. Prinzipiell sollten Sie nur die Bedienelemente verwenden, die ausdrücklich erwähnt werden, weil andere Handlungsabläufe zu so schweren Schäden führen können, dass nur ein qualifizierter Wartungstechniker sie wieder beheben kann; E. Das Gerät hingefallen ist bzw. das Gehäuse sichtbare Schäden aufweist; F. Wenn die Leistung des Gerätes merklich nachgelassen hat—das sollte immer als Warnung gewertet werden, dass das Gerät überprüft werden muss. 16. Flüssigkeiten und Fremdkörper Achten Sie darauf, dass weder Flüssigkeiten noch kleine Gegenstände über die Öffnungen in das Geräteinnere gelangen. Das könnte zu Stromschlägen oder sogar Brand führen. Sorgen Sie dafür, dass keine Flüssigkeit auf das Gerät tropft bzw. gespritzt wird und stellen Sie niemals Wasserbehälter (z.B. Vasen) darauf. Stellen Sie keine Kerzen oder andere brennenden Gegenstände auf dieses Gerät. 17. Batterien Beachten Sie beim Entsorgen erschöpfter Batterien immer die in Ihrer Gegend geltenden Umweltvorschriften oder -empfehlungen. 18. Achten Sie bei Aufstellung des Gerätes in einem Schrank oder Bücherbord auf eine einwandfreie Lüftung. An der Oberseite und den Seiten muss ein Freiraum von 20 cm gelassen werden. An der Rückseite müssen mindestens 10 cm frei sein. Zwischen der Rückseite des Schranks oder Bücherbords muss ein Freiraum von mindestens 10 cm gelassen werden, um die Abfuhr der Warmluft zu gewährleisten. • • • • • • • • • Warnung: • Der mitgelieferte Netzadapter enthält keine Vorsichtsmaßnahmen Allgemeines • Bitte sorgen Sie dafür, dass das Gerät an einem gut belüfteten Bereich aufgestellt wird, und stellen Sie sicher, dass etwa 10 cm an den Seiten und über dem Gerät frei bleiben. 10 cm 10 cm 10 cm Sonnenlicht, starken Magnetfeldern, übermäßiger Staubeinwirkung, Feuchtigkeit und halten Sie Abstand zu anderen elektronischen/elektrischen Geräten, die elektrische Störgeräusche erzeugen (Computer, Faxgeräte usw.). Stellen/Legen Sie keine Gegenstände auf das Gerät. Lassen Sie das Gerät nicht feucht werden, setzen Sie es keinen Temperaturen von über 60°C oder extrem tiefen Temperaturen aus. Wenn Ihr System nicht richtig funktioniert, ziehen Sie das Netzkabel aus der Netzsteckdose, und schließen es sogleich wieder an. Trennen Sie zur Sicherheit das Gerät bei Gewitter von der Stromversorgung. Ergreifen Sie beim Herausziehen aus der Steckdose das Netzkabel direkt am Stecker, da durch Ziehen am Kabel die internen Adern beschädigt werden könnten. Der Netzstecker wird zum Trennen der Stromversorgung verwendet und sollte immer zugänglich und funktionsfähig sein. Entfernen Sie nicht das Gehäuse, dadurch kann es zu einem Stromschlag kommen. Überlassen Sie Reparaturen Ihrem Onkyo Händler. Dieses Gerät sollte nur im Temperaturbereich zwischen 5°C und 35°C betrieben werden. Onkyo ist nicht verantwortlich für Schäden, die aus unsachgemäßem Gebrauch entstehen. Überlassen Sie jegliche Reparaturen Ihrem Onkyo Händler. • • • • Verwenden Sie das Gerät auf einer stabilen ebenen Fläche, die frei von Vibrationen ist. • Halten Sie das Gerät fern von direktem De-3 vom Anwender zu wartenden Teile. Entfernen Sie keine Abdeckungen, es sei denn, Sie sind hierzu autorisiert. Das Gerät enthält gefährliche Spannungen, ziehen Sie daher vor jeglichen Reparaturen oder wenn Sie das Gerät für längere Zeit nicht verwenden, den Netzstecker aus der Steckdose. Der mit dem SBT-200 gelieferte Netzadapter darf nicht für andere Geräte verwendet werden. Verwenden Sie niemals einen anderen als den angegebenen Netzadapter. Anderenfalls können Probleme oder große Gefahren entstehen. Die verwendete Netzspannung muss mit der auf das Gerät aufgedruckten Spannung übereinstimmen. Die Verwendung des Geräts mit einer höheren als der angegebenen Spannung ist gefährlich und kann einen Brand oder andere Situationen mit Schadensfolge verursachen. Onkyo kann nicht verantwortlich gemacht werden für jegliche Schäden, die aus der Verwendung dieses Geräts mit einer anderen als der angegebenen Spannung entstanden sind. Lautstärkeregelung Die tatsächliche Lautstärke bei einer bestimmten Lautstärkeeinstellung hängt vom Wirkungsgrad der Lautsprecher, dem Aufstellungsort und verschiedenen anderen Faktoren ab. Höhere Lautstärkepegel, die auftreten, wenn das Gerät bei weit aufgeregelter Lautstärke eingeschaltet wird, sowie das Hören mit großer Lautstärke für längere Zeit, sollten vermieden werden. Modelle für Europa Konformitätserklärung Wir erklären in alleiniger Verantwortung, dass dieses Produkt die Standards erfüllt: -- Sicherheit -- Grenzen und Methoden ----- der Messung von Funkstöreigenschaften Grenzen für Oberschwingungsströme Begrenzung von Spannungsveränderung, Spannungsfluktuationen und Flackern RoHS Richtlinie, 2011/65/EU Hiermit erklärt Onkyo Corporation, dass sich das Gerät SBT-200 in Übereinstimmung mit den grundlegenden Anforderungen und den übrigen einschlägigen Bestimmungen der Richtlinie 1999/5/EG befindet. WEEE http://www.onkyo.com/manual/weee/weee.pdf De-4 Zubehör Das folgende Zubehör wird mitgeliefert. • Fernbedienung (1) • Netzadapter (1) • Netzkabel (1) • Glasfaserkabel für digitale Audioverbindungen (1) • Standfuß (2) • Doppelseitige Klebepunkte (1) • Bohrschablone (1) Die Fernbedienung (der Fernbedienungsgeber) enthält eine Lithiumbatterie (CR2025). In Katalogen und auf der Verpackung gibt der Buchstabe am Ende der Produktbezeichnung die jeweilige Farbe an. Bis auf die Farbe gibt es jedoch keine Unterschiede: Spezifikationen und Bedienvorgänge sind für alle Versionen gleich. Wir empfehen, den Soundbar für Flachbildfernseher zu verwenden (LED, LCD oder PLASMA). Anzeigen /INPUT Bluetooth SURROUND /INPUT ] [ Die Anzeige /INPUT leuchtet, wenn der Soundbar eingeschaltet wird. Die Farbe wechselt je nach der Eingangssignalquelle. • OPTICAL IN: Hellblau • Bluetooth: Blau • AUDIO IN: Grün [ Bluetooth ] Die Bluetooth-Anzeige leuchtet blau, wenn ein Bluetooth-aktivierte Gerät am Soundbar angeschlossen und die Bluetooth-Funktion ausgewählt wird. • Die Bluetooth-Anzeige blinkt, wenn das Bluetooth-aktivierte Gerät nicht mit dem Soundbar verbunden ist. • Die Bluetooth-Anzeige blinkt in schneller Folge, während der Soundbar im Pairing-Modus ist. AUDIO FORMAT [ SURROUND ] Die SURROUND-Anzeige leuchtet orange, wenn die SURROUND-Funktion eingeschaltet ist. • Die SURROUND-Anzeige blinkt, wenn die Lautstärke des Soundbar auf Maximum, Minimum eingestellt oder stummgeschaltet ist. • Die SURROUND-Anzeige blinkt einmal, wenn der SOUND MODE ausgewählt wird. [ AUDIO FORMAT ] Die AUDIO FORMAT-Anzeige leuchtet je nach Audiosignaltyp, wenn OPTICAL IN ausgewählt ist. • DolbyDigital: Blau • PCM: Aus • Kein Signal: Blinkt De-5 Bedienelemente und Anzeigen Frontplatte 1 2 14 34 5 67 8 9 10 11 12 13 1. Lautsprecher für den linken Kanal 2. Lautsprecher für den rechten Kanal 3. 4. -Anzeige Diese Anzeige leuchtet, wenn der Soundbar eingeschaltet ist. INPUT-Anzeige Die Farbe wechselt je nach Eingangssignalquelle wie folgt. OPTICAL IN: Hellblau Bluetooth: Blau AUDIO IN: Grün -Taste Diese Taste schaltet das Gerät ein („On“) oder in Bereitschaft („Standby“). 7. Bluetooth-Anzeige Diese Anzeige leuchtet oder blinkt bei aktiver Bluetooth-Verbindung. 8. SURROUND-Anzeige Diese Anzeige leuchtet/erlischt, wenn die SURROUND-Funktion ein-/ausgeschaltet wird. 9. SURROUND-Taste Diese Taste aktiviert die Surround-SoundFunktion. 10. VOLUME-Taste – Diese Taste verringert die Lautstärke. 11. VOLUME-Taste + Diese Taste erhöht die Lautstärke. 5. INPUT-Taste Diese Taste schaltet um zwischen den Eingangssignalquellen OPTICAL IN, Bluetooth und AUDIO IN. 12. AUDIO FORMAT-Anzeige Die Farbe wechselt je nach Digitalsignal (Dolby Digital/PCM). 6. PAIRING-Taste Diese Taste bewirkt die Verbindung zwischen dem Soundbar und Bluetooth-aktivierten Geräten. 13. Fernbedienungssensor 14. NFC-Pairing-Symbol Rückseite 2 1 3 De-6 1. Buchse DC IN Schließen Sie den mitgelieferten Netzadapter an dieser Buchse an. 3. Buchse AUDIO IN (ANALOG) Schließen Sie ein analoges Audiokabel (nicht mitgeliefert) an dieser Buchse an. 2. Buchse OPTICAL IN (DIGITAL) Schließen Sie das beiliegende optische Digitalkabel an dieser Buchse an. Fernbedienung 1. 2. 3. 4. 5. 1 2 3 4 5 6 7 8 6. 7. 9 -Taste Diese Taste schaltet den Soundbar ein („On“) oder in Bereitschaft („Standby“). SURROUND-Taste Diese Taste aktiviert die Surround-Sound-Funktion. CINEMA-Taste (SOUND MODE) Dieser Modus ist für die Filmwiedergabe geeignet. MUSIC-Taste (SOUND MODE) Dieser Modus ist geeignet für Musik. NEWS-Taste (SOUND MODE) Dieser Modus ist für Nachrichtensendungen geeignet. DIRECT-Taste (SOUND MODE) Dieser Modus bietet den puren Sound ohne Effekte. INPUT-Taste Diese Taste schaltet um zwischen den Eingangssignalquellen OPTICAL IN, Bluetooth und AUDIO IN. 8. 10 11 12 13 -Taste Diese Taste schaltet die Lautstärke vorübergehend stumm. Drücken Sie die Taste erneut, um die Lautstärke wiederherzustellen. 9. VOLUME +/–-Tasten Diese Tasten erhöhen und verringern die Lautstärke. 10. Bluetooth-PAIRING-Taste Diese Taste bewirkt die Verbindung zwischen dem Soundbar und Bluetooth-aktivierten Geräten. 11. Bluetooth -Skip-Taste vorwärts Diese Taste wählt den nächsten Titel aus. Zum Vorspulen halten Sie diese Taste gedrückt. 12. Bluetooth -Wiedergabe/Pause-Taste Drücken Sie diese Taste, um Bluetooth-aktivierte Geräte auf Wiedergabe oder Pause zu schalten. 13. Bluetooth -Skip-Taste rückwärts Diese Taste wählt den Beginn des aktuellen Titels aus. Zum Zurückspulen halten Sie diese Taste gedrückt. De-7 • Es besteht Explosionsgefahr, wenn die Batterie nicht korrekt ausgetauscht wurde. • Verwenden Sie ausschließlich die angegebenen Batterien. • Batterien (integrierte oder eingelegte Batterien) sollten nicht großer Hitze ausgesetzt sein, wie zum Beispiel Sonnenbestrahlung, Feuer oder Ähnlichem. • Durch fehlerhaftes Einsetzen der Batterie kann der Soundbar eine Fehlfunktion zeigen. ■■Richtungswirkung der Fernbedienung Vor Gebrauch der Fernbedienung entfernen Sie bitte den Plastikschutz in der Batteriehalterung. Plastikschutz Richten Sie die Fernbedienung während der Bedienung immer auf den Sensor des Soundbar, wie unten gezeigt. Hinweis • Esetzen Sie die Batterie, wenn die Bedienreichweite abnimmt oder vermehrt Bedienfehler auftreten. Erwerben Sie eine Knopfzelle des Typs „CR2025“ (Lithiumbatterie). • Reinigen Sie regelmäßig den Sender an der Fernbedienung und den Sensor am Soundbar mit einem weichen Tuch. • Wenn der Sensor am Soundbar starkem Licht ausgesetzt wird, kann dadurch die Bedienung beeinträchtigt werden. Ändern Sie die Beleuchtung oder die Ausrichtung des Soundbar, falls dies auftritt. • Halten Sie die Fernbedienung entfernt von Feuchtigkeit, Hitze, und setzen Sie sie keinen Stößen oder Vibrationen aus. 5m 5m ■■Einlegen der Batterien Dieses Produkt enthält eine Lithium-CRKnopfbatterie. 1 Schieben Sie die Batteriehalterung heraus, während Sie die Verriegelungslasche in Richtung Mitte der Fernbedienung drücken. Rückseite der Fernbedienung Verriegelungslasche 2 Nehmen Sie die verbrauchte Batterie aus der Batteriehalterung heraus, setzen die neue Batterie ein, und schieben Sie dann die Batteriehalterung wieder in die Fernbedienung hinein. Positive (+) Seite nach oben Vorsichtsmaßnahmen für den Batteriegebrauch Nehmen Sie die Batterie heraus, wenn der Soundbar längere Zeit nicht benutzt wird. Dadurch vermeiden Sie mögliche Schäden durch auslaufende Batterien, z. B. Brände, Verletzungen oder Vergiftung der unmittelbaren Umgebung. • Verwenden Sie keine wiederaufladbare Batterie (Nickel-Kadmium-Batterie, etc.). De-8 Systemvorbereitung Montage des Soundbar an einer Wand Achtung: • Vermeiden Sie auf jeden Fall, dass der Soundbar (2,4 kg) herunterfallen kann, wenn er an einer Wand montiert wird. • Prüfen Sie vor der Montage die Tragfähigkeit der Wand. (Nicht an Furnierplatten, verputzten oder gekalkten Wänden montieren. Der Soundbar könnte herunterfallen.) Wenden Sie sich im Zweifel an einen qualifizierten Servicetechniker. • Die Schrauben für die Montage sind nicht mitgeliefert. Verwenden Sie geeignetes Befestigungsmaterial. • Prüfen Sie alle Schrauben und Montagewinkel auf festen Sitz. • Wählen Sie einen geeigneten Ort für die Montage. Anderenfalls könnten Unfälle passieren oder der Soundbar könnte beschädigt werden. • Onkyo ist nicht verantwortlich für Unfälle, die aus fehlerhafter Installation entstehen. ■■Befestigen der Schrauben Onkyo hat den Soundbar so konstruiert, dass Sie ihn an einer Wand hängend montieren können. Verwenden Sie geeignete Schrauben (nicht mitgeliefert). Siehe unten für Größe und Typ. 3,2 mm 5 mm 2 Bohren Sie jeweils an den auf der Papierschablone markierten Stellen mit einer Bohrmaschine Löcher in die Wand. 32 mm 8–9 mm Wandoberfläche 3 Treiben Sie mit einem Hammer einen Dübel in das Bohrloch hinein, bis er bündig in der Wandfläche sitzt. 32 mm 8–9 mm Wandoberfläche 4 Befestigen Sie die Schrauben in der Wand, wie unten gezeigt. (Insgesamt 2 Stück.) Festschrauben mit Wandoberfläche 9 mm Min. 22 mm 4,5 mm – 5 mm ■■Installieren des Soundbar 1 Befestigen Sie die Bohrschablone Wandoberfläche waagerecht an der Wand, wie gezeigt. Abstand zur Wandoberfläche 5 Hängen Sie den Soundbar an die Schrauben. 509 mm Wandoberfläche Schraubendreher 548 mm 44 mm Papierschablone (beiliegend) Hinweis Lesen Sie „Bei Wandmontage“ im Abschnitt „Vermeiden des Herunterfallens“ (S.11). De-9 Platzieren des Soundbar Platzierung des Soundbar auf einem TV-Möbel Hinweis • Entfernen Sie den Schutzfilm, mit dem der Soundbar abgedeckt ist, bevor Sie das System einschalten. • Die Frontplatte des Soundbar lässt sich nicht abnehmen. • Ändern Sie nicht die Installationsausrichtung, wenn der Soundbar eingeschaltet ist. • Stellen oder setzen Sie sich nicht auf den Soundbar, Sie könnten sich dabei verletzen. TV VCR DVD-Player Verwendung des mitgelieferten Standfußes Verwenden Sie den mitgelieferten Standfuß, wenn der Fernseher im Weg ist, falls der Soundbar auf dem TV-Möbel platziert werden soll. Der mitgelieferte Standfuß erlaubt eine korrekte Platzierung des Soundbar, indem der TV-Ständer überbrückt wird. 1 Befestigen Sie die doppelseitigen Klebepunkte an 2 Stellen jeweils links und rechts. Unterseite des Soundbar 2.Klebepunkt befestigen 1. Klebepunkt abziehen 2 Unterlage Prüfen Sie die Positionen der Klebestreifen, und drücken Sie den Standfuß an die Streifen, so dass der Streifen in der Mitte jedes Fußes zu liegen kommt. • Die Füße des Standfußes sollten sich an der Rückseite des Soundbar befinden. 3 Platzieren Sie den Soundbar auf dem TV-Möbel. Richten Sie die Vorderfront des Soundbar am TV-Ständer aus. De-10 Hinweis • Achten Sie darauf, dass der Soundbar nicht wackelt. • Befestigen Sie den Soundbar mit Draht (nicht mitgeliefert) am TV-Möbel o. ä., um ein Herunterfallen zu vermeiden. • Vor dem Bewegen des TV-Möbels legen Sie den Soundbar an einem sicheren Ort ab. Vermeiden des Herunterfallens Verwenden Sie Augenschrauben oder Draht zur Sicherung des Soundbar vor dem Herunterfallen. ■■Bei Platzierung auf einem Möbel/Tisch Soundbar Sicherungsdraht Augenschraube (nicht mitgeliefert) Augenschraube Möbel/Tisch ■■Bei Wandmontage Augenschraube Wand Sicherungsdraht (nicht mitgeliefert) Soundbar De-11 Anschließen des Soundbar an einem Fernseher Trennen Sie alle beteiligten Geräte vom Netz, bevor Sie Verbindungen herstellen. Hinweis • Für den Anschluss an einen Fernseher verwenden Sie die Buchse OPTICAL IN (DIGITAL) oder die Buchse AUDIO IN (ANALOG) an der Rückseite des Soundbar. • Hinweise dazu finden Sie in den Bedienungsanleitungen der beteiligten Geräte. • Stecken sie die Stecker vollständig hinein, um Kratzgeräusche zu vermeiden. • Wenn Sie die Cinch-Audiobuchsen eines Fernsehers/DVD-/Blu-ray-Disc-Players verwenden, kann in einigen Fällen ein leises Hintergrundrauschen vom Soundbar ausgesendet werden. Dies hängt von der Marke, dem Modell und dem Alter der Geräte ab und stellt keinen Qualitätsmangel des Soundbar dar. • Wenn sich die Lautstärke fortwährend auf sehr geringem Pegel bewegt, schaltet sich der Soundbar automatisch aus. Anschließen eines Fernsehers, DVD-Players usw. Wenn der Fernseher/Monitor einen Audioausgang besitzt, schließen Sie diesen an der Buchse OPTICAL IN (DIGITAL) oder der Buchse AUDIO IN (ANALOG) an der Rückseite des Soundbar an. Fernseher Zu den Audioausgängen oder Audiosignal Blu-ray-/DVD-Player/ Digitaltuner Zum digitalen Audioausgang Optisches digitales Audiokabel Zur Buchse OPTICAL IN (DIGITAL) Rückseite des Soundbar Entfernen Sie vor dem Einstecken die Kappe des digitaloptischen Audiokabels. Wählen Sie einen Audioanschluss, der dem Anschluss Ihres Fernsehers entspricht, und stellen Sie anschließend die Verbindung her. Analoges Audiokabel (nicht mitgeliefert) Zur Buchse AUDIO IN (ANALOG) Kappe De-12 ■■Buchse OPTICAL IN Die Buchse OPTICAL IN (DIGITAL) des Soundbar ist mit einer Blende versehen, die sich automatisch öffnet, sobald ein optischer Stecker angeschlossen wird. Bei Lösen der Verbindung schließt sich die Blende wieder. Schieben Sie die Stecker vollständig ein. Hinweis Halten Sie den Glasfaserstecker beim An- und Abstecken waagerecht, um die Blende nicht zu beschädigen. Nutzung mit Netzadapter Nachdem Sie geprüft haben, dass alle Verbindungen korrekt vorgenommen wurden, verbinden Sie den Netzadapter zuerst mit der Buchse DC IN, dann mit der Netzsteckdose. 1 Stecken Sie das Netzkabel in den Netzadapter. 2 Stecken Sie das Netzadapterkabel in die Buchse DC IN am Soundbar. 3 Schließen Sie das Netzkabel an einer Netzsteckdose an. Hinweis • Verwenden Sie ausschließlich den mitgelieferten Netzadapter. Die Verwendung eines anderen Netzadapters kann eine Fehlfunktion des SBT-200, einen elektrischen Schlag oder einen Brand zur Folge haben. Der mitgelieferte Netzadapter und das Netzkabel sind nur für die Verwendung mit dem Soundbar ausgelegt. Schließen Sie den mitgelieferten Netzadapter und das Netzkabel nicht an anderen Geräten an. • Platzieren Sie den Soundbar in der Nähe einer Netzsteckdose, um das Netzkabel ohne Umwege daran anschließen zu können. • Im Bereitschaftsmodus erlischt die -Anzeige. Falls die -Taste gedrückt wird, leuchtet die -Anzeige entsprechend der Eingangssignalquelle. (OPTICAL IN: Hellblau/Bluetooth: Blau/AUDIO IN: Grün) • Ziehen Sie das Netzkabel aus der Steckdose, wenn der Soundbar längere Zeit nicht benutzt wird. ■■Ziehen Sie auf jeden Fall das Netzkabel heraus, bevor Sie jegliche Verbindungen herstellen. Netzadapterkabel Buchse DC IN 2 Netzkabel Netzsteckdose 3 1 Netzadapter De-13 Grundlegende Bedienung Einschalten Drücken Sie die Taste oder drücken Sie die • Die -Taste auf der Fernbedienung. -Anzeige leuchtet je nach Eingangssignalquelle. Hinweis Lässt sich das Gerät nicht einschalten, prüfen Sie, ob das Netzkabel richtig eingesteckt wurde. ■■Soundbar in Bereitschaft schalten (Bluetooth-Bereitschaft) -Taste nochmals. Drücken Sie die • Die -Anzeige erlischt. Hinweis Die automatische Abschaltung (S.16) ist im Bereitschaftsmodus immer aktiv. Lautstärke automatisch einblenden Wenn der Soundbar bei hoher Lautstärke in Bereitschaft geschaltet wurde und dann wieder eingeschaltet wird, beginnt die Wiedergabe zunächst mit niedriger Lautstärke und wird allmählich bis hin zur zuletzt gewählten Einstellung hochgeregelt. Wenn die Lautstärke relativ niedrig eingestellt war, erfolgt kein automatisches Einblenden. Lautstärkeregler Zum Erhöhen und Verringern der Lautstärke drücken Sie die VOLUME+/VOLUME–-Taste am Soundbar oder drücken Sie die VOLUME+/VOLUME–-Taste an der Fernbedienung. Hinweis • Bei jedem Druck auf die VOLUME+/VOLUME–-Taste auf der Fernbedienung blinkt die SURROUNDAnzeige einmal. • Wenn die Lautstärke auf Maximum oder Minimum eingestellt ist, blinkt die SURROUND-Anzeige. Stummschalten Drücken der -Taste auf der Fernbedienung. • Die Lautstärke wird vorübergehend stummgeschaltet. Drücken Sie die -Taste erneut, um die Lautstärke wiederherzustellen. • Wenn die Lautstärke vorübergehend stummgeschaltet wurde, blinkt die SURROUND-Anzeige. De-14 Surround Drücken Sie die SURROUND-Taste am Soundbar oder drücken Sie die SURROUND-Taste an der Fernbedienung. • Der Surround-Sound ist eingeschaltet. (Die SURROUND-Anzeige leuchtet orange.) Sound-Modus Drücken Sie die gewünschte SOUND-MODE-Taste auf der Fernbedienung. • Die SURROUND-Anzeige blinkt einmal auf. CINEMA Geeignet für die Filmwiedergabe MUSIC Geeignet für Musik NEWS Geeignet für Nachrichtensendungen DIRECT Purer Sound ohne Effekte Auswahl der Eingangssignalquelle Drücken Sie die INPUT-Taste am Soundbar oder drücken Sie die INPUT-Taste an der Fernbedienung. • Die Eingangssignalquelle wird umgeschaltet. Eingang INPUT-Anzeige PAIRING-Anzeige OPTICAL IN Leuchtet hellblau Aus Bluetooth Leuchtet blau Leuchtet oder blinkt blau AUDIO IN Leuchtet grün Aus Hinweis Die Backup-Funktion schützt den gespeicherten Funktionsmodus einige Stunden lang bei einem Stromausfall oder herausgezogenem Netzkabel. De-15 ■■Verbinden der digitalen Eingangssignalquelle Verbinden Sie den Soundbar mit der digitalen Eingangssignalquelle mit dem mitgelieferten digitaloptischen Audiokabel, und drücken Sie die INPUT-Taste am Soundbar oder an der Fernbedienung zum Auswählen von „Digital“. Die Arten von Eingangssignalquellen und Audioformate sind wie folgt: Eingangsquelle OPTICAL IN Audioformat AUDIO FORMAT -Anzeige Kein Eingang Blinkt PCM Aus Dolby Digital Leuchtet blau Bluetooth Aus AUDIO IN Aus Hinweis Wenn die digitale Audioausgabe beim Fernseher oder DVD-/Blu-ray-Disc-Player auf PCM eingestellt ist, erhalten Sie keine Surround-Schallfeldeffekte von Dolby Digital. Automatische Bereitschaft/Automatisches Einschalten Automatische Bereitschaft (Standby) • Der Soundbar schaltet automatisch in Bereitschaft (die kein Audiosignal erkannt wird. -Anzeige erlischt), falls 15 Minuten lang Hinweis Die automatische Abschaltung ist im Bereitschaftsmodus immer aktiv. • Wenn die -Anzeige ausgeschaltet ist, schaltet sich der Soundbar automatisch ein, falls er ein Audiosignal von Bluetooth-aktivierten Geräten empfängt. De-16 Wiedergabe von Bluetooth-aktivierten Geräten ■■Über die Bluetooth-Technologie Die Bluetooth-Technologie für drahtlose Kommunikation ist für den Nahbereich gedacht und ermöglicht eine Kommunikation zwischen digitalen Geräten. Die drahtlose Übertragung über Bluetooth funktioniert in einem Entfernungsbereich bis zu 10 Metern. Sie benötigen keine Kabel für diese Verbindung, und die Geräte müssen nicht aufeinander gerichtet werden, wie es bei der Infrarot-Technologie notwendig ist. Kommunikationssystem und Bluetooth-Profil des Soundbar Es gibt viele verschiedene Bluetooth-Profile, die die grundsätzliche Kommunikationsmethode sowie spezifische Funktionen und deren Anwendung beschreiben, um eine Kommunikation zwischen Geräten zu ermöglichen. Kommunikationssystem Technische Daten Bluetooth Version 2.1 Bluetooth+Enhanced Data Rate(EDR) Profil • A2DP 1.2 (Advanced Audio Distribution Profile) • AVRCP 1.0 (Audio Video Remote Control Profile) • A2DP ermöglicht Audiostreaming von einem mit A2DP ausgestatteten Bluetooth-aktivierten Gerät (z. B. Mobiltelefon) zum Soundbar. Durch Konvertierung des drahtlosen StereoAudiosignals in ein analoges Audiosignal können Sie den Sound über dieses Lautsprechersystem hören. • AVRCP (Audio/Video Remote Control Profile) ist eine Technologie, mit der eine einzelne Fernbedienung alle Bluetooth-aktivierten Audio-/Videogeräte steuern kann, zu denen der Nutzer Zugang hat. Hinweise für die Verwendung des Soundbar mit einem Mobiltelefon • Der Soundbar lässt sich nicht verwenden, um über ds Telefon zu sprechen, auch dann nicht, wenn eine Bluetooth-Verbindung zum Mobiltelefon hergestellt wurde. • Bitte lesen Sie in der Anleitung des Mobiltelefons für Näheres zur Verwendung Ihres Mobiltelefons während der Audioübertragung über eine Bluetooth-Verbindung. Audiostream Mobiltelefon mit Bluetooth oder andere Bluetooth-aktivierte Geräte ■■Pairing von Bluetooth-aktivierten Geräten Bluetooth-aktivierte Geräte müssen anfangs „gepaart“ werden (Pairing), bevor sie untereinander Daten austauschen können. Nach erfolgreichem Pairing-Vorgang muss dieser nicht wiederholt werden, es sei denn: • Das Pairing erfolgt mit mehr als 8 Geräten. (Pairing kann nur mit einem Gerät zur Zeit erfolgen. Der Soundbar kann mit maximal 8 Geräten gepaart werden. Beim Pairing eines weiteren Geräts wird das jeweils als frühestes angeschlossene Gerät gelöscht und durch das neue ersetzt.) • Der Soundbar wird zurückgesetzt (Reset). (Alle Pairing-Informationen werden gelöscht, wenn der Soundbar zurückgesetzt wird.) • Auch bei Reparaturen o. ä. werden die PairingInformationen gelöscht. ■■PAIRING-Anzeige (blau) Nicht verbunden Blinkt Pairing-Modus Blinkt schnell Verbunden Leuchtet auf ■■Near Field Communication (NFC) Near Field Communication (NFC; Nahfeldkommunikation) ist eine drahtlose Verbindungstechnologie für sehr kleine Reichweiten, die Interaktionen zwischen elektronische Geräten wie Smartphones oder IC-Tags in zwei Richtungen ermöglicht, indem das Gerät einfach vor ein NFC-Symbol gehalten oder dieses damit berührt wird. Der Soundbar unterstützt Bluetooth-Pairing mittels NFC. De-17 Pairing mit Bluetooth-aktivierten Geräten 1 Drücken Sie die -Taste, um das Gerät einzuschalten. 2 Drücken Sie die INPUT-Taste, um die Bluetooth-Funktion einzuschalten. 3 Drücken Sie die PAIRING-Taste. • Die PAIRING-Anzeige blinkt. Der Soundbar ist jetzt im Pairing-Modus und kann mit anderen Bluetooth-Signalquellen gepaart werden. • Das Pairing kann unabhängig von der gewählten Eingangssignalquelle erfolgen. 4 Führen Sie den Pairing-Vorgang an dem als Signalquelle dienenden Gerät aus, so dass der Soundbar erkannt wird. • Lesen Sie die Bedienungsanleitung des als Signalquelle dienenden Geräts für Näheres. • In dem als Signalquelle dienenden Gerät erscheint in der Liste der erkannten Geräte (falls verfügbar) der Eintrag „Onkyo SBT-200“. • Platzieren Sie die zu paarenden Geräte beim Pairing innerhalb 1 Meter Entfernung voneinander. • Einige als Signalquelle dienenden Geräte zeigen keine Liste erkannter Geräte an. Um den Soundbar mit dem Quellgerät zu paaren, lesen Sie die Anleitung des entsprechenden Geräts. 5 Wählen Sie „Onkyo SBT-200“ aus der Liste aus. Wenn ein Passwort* verlangt wird, geben Sie „0000“ ein. • Die Pairing-Anzeige (blau) am Soundbar hört auf zu blinken, sobald der Soundbar erfolgtreich mit dem Quellgerät gepaart wurde. Die Pairing-Information ist nun im Soundbar gespeichert. * Das Passwort kann auch „Passcode“, „PIN-Code“, „Passkey“ oder „PIN-Nummer“ heißen. 6 Starten Sie die Bluetooth-Verbindung am Quellgerät. • Einige als Audiosignalquellen dienende Geräte können sich automatisch mit dem Soundbar verbinden, anderenfalls befolgen Sie die Anweisungen in der Anleitung des Quellgeräts, um die Verbindung herzustellen. Hinweis • Wenn der Soundbar oder das Quellgerät ausgeschaltet werden, bevor die Bluetooth-Verbindung fertig aufgebaut wurde, wurde das Pairing nicht abgeschlossen und die Pairing-Informationen werden nicht gespeichert. Wiederholen Sie Schritt 1, um das Pairing erneut zu starten. • Um ein Pairing mit weiteren Geräten durchzuführen, wiederholen Sie Schritte 1–5 für jedes Gerät. • Sobald ein Gerät abgelöst oder aus der Pairing-Liste gelöscht wird, werden die Pairing-Informationen für dieses Gerät ebenfalls gelöscht. Um erneut Tonsignale von diesem Gerät zu hören, muss das Pairing wiederholt werden. Führen Sie Schritte 1–5 aus, um das Pairing zu wiederholen. • Das Passwort des Soundbar ist auf „0000“ festgelegt, und es kann nur mit Bluetooth-Quellgeräten gepaart werden, die ebenfalls das Passwort „0000“ verwenden. Pairing mit Bluetooth-aktivierten Geräten via NFC • Bei einem NFC-aktivierten Gerät ist das Bluetooth-Pairing nur möglich, indem das Gerät über den Soundbar gehalten wird. • Prüfen Sie, ob die NFC-Funktion am Gerät eingeschaltet ist („ON“). De-18 1 Schalten Sie Soundbar und Gerät ein. 2 Starten Sie eine App zum Lesen von NFC am Gerät. 3 Drücken Sie die PAIRING-Taste am Soundbar. 4 Halten Sie das Gerät über das NFC-Symbol in der Mitte der Oberseite des Soundbar. • Die Bluetooth-Anzeige am Soundbar wechselt von Blinken zu Leuchten und zeigt dadurch an, dass das Pairing abgeschlossen ist. • Bei einigen Geräten ist Schritt 2 nicht erforderlich. • Bei einigen Geräten wie Smartphones ertönt ein Alarmsignal, sobald diese NFC-aktivierte Geräte erkennen. Wird das Gerät zu diesem Zeitpunkt bewegt, kann der Verbindungsauf- oder -abbau nicht abgeschlossen werden. Bewegen Sie das Gerät nicht, bis an dem betreffenden Gerät eine der Meldungen „Verbindung hergestellt“ oder „Verbindung getrennt“ angezeigt wird. Tonwiedergabe Prüfen Sie, ob: --die Bluetooth-Funktion des Quellgeräts eingeschaltet ist. --das Pairing von Soundbar und Quellgerät abgeschlossen ist. 1 Drücken Sie die INPUT-Taste, um die Bluetooth-Funktion einzuschalten. 2 Starten Sie die Bluetooth-Verbindung vom Bluetooth-aktivierten Gerät. 3 Starten Sie die Wiedergabe am Bluetooth-aktivierten Gerät. • Wenn das Quellgerät eine Extra-Bass-Funktion oder einen Equalizer besitzt, schalten Sie diese aus. Werden diese Funktionen eingeschaltet, kann der Klang verzerrt sein. Hinweis • Sie müssen die Bluetooth-Verbindung neu aufbauen, wenn: --der Soundbar nicht eingeschaltet ist. --das Quellgerät nicht eingeschaltet ist, oder dessen Bluetooth-Funktion aus- oder in Ruhezustand geschaltet ist. Wiedergabe beenden Führen Sie einen der folgenden Vorgänge aus. --Beenden Sie die Bluetooth-Verbindung am Quellgerät. (Hinweise dazu finden Sie in der Bedienungsanleitung des Quellgeräts.) --Schalten Sie die Bluetooth-aktivierten Geräte aus. --Schalten Sie den Soundbar aus. Hinweis • Einige Bluetooth-aktivierte Geräte lassen sich nicht per Fernbedienung bedienen. • Die Lautstärke des Soundbar lässt sich je nach angeschlossenem Gerät evtl. nicht wie beabsichtigt regeln. Tasten für Bluetooth-Bedienung (nur Fernbedienung) Drücken Sie diese Taste für Wiedergabe oder Pause. Drücken Sie diese Taste zum Weiterschalten durch die Titel. Zum Vorspulen halten Sie diese Taste gedrückt. Drücken Sie diese Taste zum Zurückschalten durch die Titel. Zum Zurückspulen halten Sie diese Taste gedrückt. De-19 Fehlersuche Falls etwas mit diesem Produkt nicht in Ordnung ist, prüfen Sie bitte folgende Dinge, bevor Sie sich an Ihren Onkyo-Händler wenden. Grundeinstellung wiederherstellen (Reset) Ziehen Sie zunächst alle Kabel vom Soundbar ab, und ziehen Sie dann das Netzkabel aus der Netzsteckdose heraus. Halten Sie die Tasten und PAIRING gedrückt, und stecken Sie das Kabel des Netzadapters in die Buchse DC IN am Soundbar. Drücken Sie dann die -Taste. Hinweis Beachten Sie, dass durch Zurücksetzen des Soundbar alle gespeicherten Daten gelöscht werden. Allgemeines Symptom Es ist nichts zu hören. Mögliche Ursache • Wurde die richtige Eingangssignalquelle gewählt? Die Signalformate DTS und AAC werden nicht unterstützt. • Wurde die Lautstärke auf „Min(0)“ eingestellt? • Ist die Stummschaltung aktiv? • Wurden die Anschlüsse richtig vorgenommen? • Ist der Soundbar zu weit von den Bluetooth-aktivierten Geräten entfernt? • Wurde des Soundbar mit den Bluetooth-aktivierten Geräten gepaart (Pairing)? Während der Wiedergabe • Stellen Sie den Soundbar weiter entfernt von Computern ist ein Rauschen zu hören. oder Mobiltelefonen auf. • Wurden die Audiokabel richtig an den Eingangsbuchsen des Soundbar angeschlossen? • Eine Materialverschlechterung kann im Laufe der Zeit zu erhöhtem Rauschen führen. Prüfen Sie das Herstellungsjahr von Fernseher und DVD-/Blu-ray-DiscPlayer. • Dies kann eine Funktionsstörung verursachen. Wenn der Soundbar Schalten Sie den Soundbar in Bereitschaft und durch Rauschen/ ÆÆ Geräusche von externen schalten Sie ihn dann ein. Wenn der Soundbar immer Quellen beeinträchtigt noch nicht funktioniert, schalten Sie ihn aus und wird (Schlag, starke ziehen das Netzkabel aus der Steckdose. Schließen statische Aufladung, Sie das Netzkabel wieder an und schalten Sie den oder Schwankungen der Soundbar wieder ein. Stromversorgung durch Gewitter). Wenn der Soundbar falsch betrieben/bedient wird. • Verringern Sie die Lautstärke am Fernseher oder am Der Klang ist verzerrt. Soundbar. Wenn eine Taste gedrückt • Schalten Sie den Soundbar in Bereitschaft und schalten wird, reagiert der Sie ihn dann wieder ein. Soundbar nicht. • Wenn die Fehlfunktion fortbesteht, setzen Sie den Soundbar zurück (Reset). De-20 Seite S.16 S.14 S.14 S.12 S.17 S.18 S.12 S.21 S.21 Oben • Ist das Netzkabel des Soundbar angeschlossen? • Es kann sein, dass die Schutzschaltung aktiviert wurde. Ziehen Sie das Netzkabel heraus und schließen Sie es nach mindestens 5 Minuten wieder an. Das Gerät ist nicht eingeschaltet. • Befindet sich der Soundbar in Nähe eines Geräts, das elektromagnetische Strahlung abgibt? • Befindet sich ein Hindernis zwischen Soundbar und Bluetooth-aktiviertem Gerät? Der Klang ist bei Wiedergabe über Bluetooth unterbrochen oder verzerrt. S.13 S.21 S.18 Fernbedienung Symptom Die Fernbedienung funktioniert nicht richtig. Der Soundbar lässt sich nicht mit der Fernbedienung einschalten. Mögliche Ursache • Ist die Batteriespannung korrekt? • Ist die Batterie leer? • Sind Abstand und Winkel richtig? • Befindet sich ein Hindernis zwischen Fernbedienung und Soundbar? • Strahlt eine starke Lichtquelle (Leuchtstofflampen oder direktes Sonnenlicht) auf den Fernbedienungssensor? • Wird gleichzeitig eine Fernbedienung eines anderen Geräts benutzt? • Ist das Netzkabel des Soundbar angeschlossen? • Wurde die Batterie eingelegt? Seite S.8 S.13 S.8 Fehleranzeigen und Warnungen Wenn Sie das Gerät nicht richtig bedienen, blinkt die Display /INPUT-Anzeige grün. Bedeutung Die Schutzschaltung hat angesprochen. /INPUT-Anzeige (blinkt grün) Wenn auch dann dieselbe Meldung erscheint, wenn der Soundbar vom Netz getrennt und wieder angeschlossen wurde, oder in Bereitschaft und wieder eingeschaltet wurde, weden Sie sich an den Händler, bei dem Sie den Soundbar gekauft haben. Warenzeichen und Lizensierung Hergestellt unter Lizenz der Dolby Laboratories. Dolby und das Doppel-D-Symbol sind Warenzeichen der Dolby Laboratories. Das Bluetooth®-Symbol und die entsprechenden Logos sind eingetragene Warenzeichen der Bluetooth SIG, Inc., und jegliche Verwendung dieser Symbole durch Onkyo unterliegt der Lizensierung. Andere Warenzeichen und Handelsmarken gehören den jeweiligen Eigentümern. De-21 Technische Daten Verstärkerteil Ausgabenennleistung (IEC) 2 Kan. x 20 W an 6 Ohm, 1 kHz, 2 Kan. betrieben THD+N (Gesamte harmonische Verzerrung+N) 0,2% (1 kHz, 1 W) Dämpfungsfaktor 31 (6 Ω) Eingangsempfindlichkeit 1000 mV/ 47 kΩ (AUDIO IN) und Impedanz (Unsymmetrisch) Frequenzgang 80 Hz - 15 kHz/+3 dB, –3 dB (AUDIO IN, SOUND MODE: DIRECT) Signal-/Rauschabstand 103 dB (AUDIO IN IHF-A) Bluetooth-Bereich Kommunikationssystem Bluetooth Version 2.1 +EDR Maximale 10 m*1 Kommunikationsreichweite Frequenzband 2,4 GHz - 2,48 GHz Modulationsmethode FHSS (Freq Hopping Spread Spectrum) Kompatible BluetoothProfile A2DP 1.2 AVRCP 1.0 Unterstützter Codec SBC *1 Der tatsächliche Bereich hängt von Faktoren ab wie Hindernissen zwischen Geräten, Magnetfelder von Mikrowellenöfen, statische Elektrizität, Funktelefon, Empfangsempfindlichkeit, Antennenleistung, Betriebssystem, Softwareanwendungen usw. De-22 Allgemeine Daten Stromversorgung AC 100 - 240 V, 50/60 Hz (Stromversorgungseingang des Soundbar: Gleichspannung 17 V, 2,8 A) Stromverbrauch 11 W 5 W (Ohne Ton) 0,4 W (Netzwerkbereitschaft [Bluetooth-Bereitschaft]) * Die automatische Abschaltung ist im Bereitschaftsmodus immer aktiv. Diese Funktion lässt sich nicht abschalten. Abmessungen 940 mm (B) x 73 mm (H) x 83 mm (D) Gewicht 2,4 kg Lautsprecher 2-Wege-Lautsprechersystem 5,7 cm Tieftöner x 4 2,5 cm Kalottenhochtöner x 2 ■■Audio-Eingänge Digital OPTICAL IN (DIGITAL): 1 Analog AUDIO IN (ANALOG): 1 Stereo-Miniklinkenbuchse Ø 3,5 mm ■■Sonstiges Digitaleingänge Dolby Digital/PCM Sound-Modus CINEMA, MUSIC, NEWS und DIRECT Surround Ein/Aus * Änderungen der technischen Daten und Funktionen ohne vorherige Ankündigung vorbehalten. De-23 Memo De-24 Memo De-25 Memo De-26 -- A Onkyo Corporation ezzennel kijelenti, hogy a SBT-200 típusú beren-dezés teljesíti az alapvető követelményeket és más 1999/5/EK irányelvben meghatározott vonatkozó rendelkezéseket. -- Hierbij verklaart Onkyo Corporation dat het toestel l SBT-200 in overeenstemming is met de essentiële eisen en de andere relevante bepalingen van richtlijn 1999/5/EG. -- Härmed förklarar Onkyo Corporation att denna SBT-200 följer de väsentliga kraven och andra relevanta stadgar i Direktiv 1999/5/EC. -- С настоящето, Onkyo Corporation, декларира, че SBT-200 е в съответствие със съществените изисквания и другитеприложими разпоредби на Директива 1999/5/EC. -- Onkyo Corporation tímto prohlašuje, že SBT-200 splňuje základní požadavky a všechna příslušná ustanoveni Směrnice 1999/5/ES. -- Undertegnede Onkyo Corporation erklærer herved, at følgende udstyr SBT-200 overholder de væsentlige krav og øvrige relevante krav i direktiv 1999/5/EF. -- Käesolevaga kinnitab Onkyo Corporation seadme SBT-200 vastavust direktiivi 1999/5/ EÜ põhinõuetele ja nimetatud direktiivist tulenevatele teistele asjakohastele sätetele. -- ΜΕ ΤΗΝ ΠΑΡΟΥΣΑ Ο ΚΑΤΑΣΚΕΥΑΣΤΗΣ Onkyo Corporation ΔΗΛΩΝΕΙ ΟΤΙ SBT-200 ΣΥΜΜΟΡΦΩΝΕΤΑΙ ΠΡΟΣ ΤΙΣ ΟΥΣΙΩΔΕΙΣ ΑΠΑΙΤΗΣΕΙΣ ΚΑΙ ΤΙΣ ΛΟΙΠΕΣ ΣΧΕΤΙΚΕΣ ΔΙΑΤΑΞΕΙΣ ΤΗΣ ΟΔΗΓΙΑΣ 1999/5/ΕΚ -- Por la presente, Onkyo Corporation, declara que este SBT-200 cumple con los requisitos esenciales y otras exigencias relevantes de la Directiva 1999/5/EC. -- Con la presente Onkyo Corporation dichiara che questo SBT-200 è conforme ai requisiti essenziali ed alle altre disposizioni pertinenti stabilite dalla direttiva 1999/5/CE. -- Ar šo Onkyo Corporation deklarē, ka SBT-200 atbilst Direktīvas 1999/5/EK būtiskajām prasībām un citiem ar to saistītajiem noteikumiem. -- Šiuo Onkyo Corporation deklaruoja, kad šis SBT-200 atitinka esminius reikalavimus ir kitas 1999/5/EB Direktyvos nuostatas. -- Niniejszym Onkyo Corporation deklaruje że SBT- 200 jest zgodny z zasadniczymi wymaganiami i innymi właściwymi postanowieniami Dyrektywy 1999/5/EC. -- Eu, Onkyo Corporation, declaro que o SBT- 200 cumpre os requisitos essenciais e outras provisões relevantes da Directiva 1999/5/EC. -- Prin prezenta, Onkyo Corporation, declară că aparatul SBT-200 este în conformitate cu cerinţele esenţiale şi cu alte prevederi pertinente ale Directivei 1999/5/CE. -- Onkyo Corporation týmto vyhlasuje, že SBT-200 a spĺňa základné požiadavky a všetky príslušné ustanovenia Smernice 1999/5/ES. -- Onkyo Corporation izjavlja, da je ta SBT-200 v skladu z bistvenimi zahtevami in drugimi relevantnimi določili direktive 1999/5/ES. -- Onkyo Corporation vakuuttaa täten että SBT200 tyyppinen laite on direktiivin 1999/5/ EY oleellisten vaatimusten ja sitä koskevien direktiivin muiden ehtojen mukainen. -- Hér með lýsir Onkyo Corporation því yfir að varan SBT-200 er í samræmi við grunnkröfur og aðrar kröfur sem gerðar eru í tilskipun 1999/5/EC. -- Onkyo Corporation erklærer herved at denne SBT-200 er i overensstemmelse med vesentlige krav og andre relevante bestemmelser i direktiv 1999/5/EC. -- Ovime Onkyo Corporation, potvrđuje da je SBT-200 u suglasnosti sa osnovnim zahtjevima i ostalim relevantnim odredbama Direktive 1999/5/EC. Kitahama Chuo Bldg, 2-2-22 Kitahama, Chuo-ku, OSAKA 541-0041, JAPAN http://www.onkyo.com/ The Americas 18 Park Way, Upper Saddle River, N.J. 07458, U.S.A. For Dealer, Service, Order and all other Business Inquiries: Tel: 201-785-2600 Fax: 201-785-2650 http://www.us.onkyo.com/ For Product Support Team Only: 1-800-229-1687 Europe Liegnitzerstrasse 6, 82194 Groebenzell, GERMANY Tel: +49-8142-4401-0 Fax: +49-8142-4208-213 http://www.eu.onkyo.com/ Meridien House, Ground floor, 69 - 71 Clarendon Road, Watford, Hertfordshire, WD17 1DS, United Kingdom Tel: +44 (0)8712-00-19-96 Fax: +44 (0)8712-00-19-95 China (Hong Kong) Unit 1033, 10/F, Star House, No 3, Salisbury Road, Tsim Sha Tsui Kowloon, Hong Kong. Tel: 852-2429-3118 Fax: 852-2428-9039 http://www.hk.onkyo.com/ (Mainland) 1301, 555 Tower, No.555 West NanJing Road, Jing’an District, Shanghai, China 200041, Tel: 86-21-52131366 Fax: 86-21-52130396 http://www.cn.onkyo.com/ Asia, Oceania, Middle East, Africa Please contact an Onkyo distributor referring to Onkyo SUPPORT site. http://www.intl.onkyo.com/support/ The above-mentioned information is subject to change without prior notice. Visit the Onkyo web site for the latest update. * 2 9 4 0 1 8 2 1 * SN 29401821 (C) Copyright 2014 Onkyo Corporation Japan. All rights reserved. Y1404-1