1
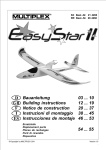
RR EasyStar II # 26 4260 Zusatzanleitung Easy Star II RR Nr. 94 4606 - Seite 1 von 2 RR 0 6 2 4 6 #2 D : Zusätzlich Empfohlene Ausrüstung MULTIPLEX Empfänger ab RX-5 light M-LINK oder RX-6-DR light M-LINK Akku: Li-BATT ECO 3/1-2000 (M6) # 5 5808 # 5 5809 # 15 7231 GB: Additional recommended equipment: MULTIPLEX receiver, min. RX-5 light M-LINK or RX-6-DR light M-LINK Battery: Li-BATT ECO 3/1-2000 (M6) # 5 5808 # 5 5809 # 15 7231 F : Equipement recommandé: Récepteur MULTIPLEX à partir de RX-5 light M-LINK Récepteur RX-6-DR light M-Link Batterie: Li-BATT ECO 3/1-2000 (M6) # 5 5808 # 5 5809 # 15 7231 I: Componenti consiglati: Ricevente MULTIPLEX a partire da RX-5 light M-LINK o RX-6-DR light M-LINK Accumulatore: Li-BATT FX 3/1-2200 (M6) E : Componentes recomendados: Receptor MULTIPLEX, a partir de RX-5 light M-LINK A partir de RX-6-DR light M-LINK El acumulador: Li-BATT FX 3/1-2200 (M6) # 5 5808 # 5 5809 # 15 7231 # 5 5808 # 5 5809 # 15 7231 D RR EasyStar II # 26 4260 GB Das Modell RR EasyStar II # 26 4260 ist nahezu flugfertig vormontiert und es entfallen für Sie zahlreiche Arbeitsschritte, die in der Bauanleitung beschrieben sind. Das Modell ist somit in kürzester Zeit betriebsbereit. Lesen Sie vor Fertigstellung und Inbetriebnahme die Anleitungen und beachten unbedingt auch die Sicherheitshinweise und Tipps. Um das Modell vollständig auszurüsten, ist noch ein Empfänger und der Antriebsakku notwendig. Unsere Empfehlungen hierzu entnehmen Sie bitte der Bauanleitung bzw. diesem Blatt und darüber hinaus (z.B. Sender, Ladegerät etc.) dem aktuellen Katalog oder der Multiplex Homepage unter: www.multiplex-rc.de The RR EasyStar II model aircraft, # 26 4260, is supplied factory-assembled and almost completely ready to fly. Many of the stages of construction described in the building instructions have already been completed for you, so the model can be ready for the air in a very short time. Please read through these instructions before you complete and fly the model, paying particular attention to the Safety Notes and Tips. To complete the model’s equipment you will need a receiver and flight battery. Please refer to our recommendations stated in the building instructions and this sheet. For details of additional equipment (e.g. transmitter, battery charger etc.) we suggest that you turn to the current Multiplex catalogue, or visit the website at: www.multiplex-rc.de Stückliste RR EasyStar II Parts List - RR EasyStar II PartNo. Description Material 1 1 EasyStar II building instructions 1.1 1 RR EasyStar II / Power Set instructions 2 2 Decal sheet Printed film 3,4*1 Fuselage, assembled* Moulded Elapor 7,8 1 Wing (L+R) Moulded Elapor 5 1 Canopy Moulded Elapor 6 1 Tailplane Moulded Elapor 50 1 Wing joiner GRP tube Lfd. 1 1.1 2 3,4* 7,8 5 6 50 # 26 4260 Stk. Bezeichnung Material Abmessungen 1 Bauanleitung Easy Star II 1 Anleitungen RR EasyStar II / Antriebssatz 2 Dekorbogen bedruckte Klebefolien Fertigteile 1 Rumpf vormontiert Elapor geschäumt Fertigteil 1 Tragflächen (L+R) Elapor geschäumt Fertigteil 1 Kabinenhaube Elapor geschäumt Fertigteil 1 Höhenleitwerk Elapor geschäumt Fertigteil 1 Holm GFK-Rohr Ø8,0x5,4x579 mm 1 Kleinteilebeutel mit den Teilen: 20(3x), 21(3x), 22(2x), 23(2x), 24(2x), 25(1x), 26(2x) ==> siehe Stückliste in der Bauanleitung * mit 2 eingebauten Servos Nano-S (UNI) incl. kompl. Ruderanlenkungen, BL-Motor PERMAX BL-O 2830-1100, Regler MULTIcont BL-20 SD-L. # 26 4260 Dimensions foam foam foam foam Ready made Ready made Ready made Ready made 8.0Øx5.4x 579mm 1 Small parts bag containing the following components: 20 (3 x), 21 (3 x), 22 (2 x), 23 (2 x), 24 (2 x), 25 (1 x), 26 (2 x) ==> see Parts List in the Building Instructions * with two factory-installed Nano-S (UNI) servos, complete with linkages, PERMAX BL-O 2830-1100 BL motor, MULTIcont BL-20 SD-L speed controller. 1. Prüfen Sie mit Hilfe der Stückliste den Inhalt auf Vollständigkeit. 2. Höhenleitwerk montieren Punkt 19., 20. in der Bauanleitung ==> Abb.20, 21 3. Rudergestänge des Höhenruders einhängen Punkt 11 ==> Abb.19 4. Empfänger und Flugakku einbauen 5. Servos und Ruder auf korrekte Neutralstellung überprüfen 6. Tragflächen anstecken Punkt 35 ==> Abb. 40, 41 7. Ruderausschläge und Schwerpunkt einstellen Punkt 38. und 40. in der Bauanleitung ==> Abb.B 8. Dekorbogen aufkleben Punkt 39. in der Bauanleitung 9. Der Erstflug - ab Punkt 42. in der Bauanleitung 1. Check that the contents are complete, referring to the Parts List 2. Fit the tailplane Points19., 20. in the building instructions ==> Figs. 20, 21 3. Connect the elevator pushrod Point 11 ==> Fig.19 4. Install the receiver and flight battery 5. Check that the servos and control surfaces are exactly at neutral (centre) 6. Plug in the wings Point 35 ==> Figs. 40, 41 7. Set the correct control surface travels and Centre of Gravity Points 38. and 40. in the building instructions ==> Fig. B 8. Apply the decals Point 39. in the building instructions 9. First flight - starting at Point 42. in the building instructions Prüfen Sie vor jedem Start die Funktionsfähigkeit von Fernsteuerung und Modell, der Ruder und Anlenkungen sowie den Antrieb und den Ladezustand des Akkus. Before every flight check that all the systems are working properly: the radio control system and model, the control surfaces and linkages, the power system and the state of charge of the battery. Optional: Querruder anlenken. Dazu sind zwei weitere Servos Nano-S erforderlich # 6 5120- Punkte 24-28 ==> Abb. 25-28 Weiterhin erforderlich: 2 Servoverlängerungskabel 30 cm Best. Nr. 8 5031 zur Verbindung der Querruderservokabel mit dem Empfänger im Rumpf. Optional: complete the aileron linkage. For this you require two additional Nano-S servos, # 6 5120 - Points 24 - 28 ==> Figs. 25 - 28 Also required: two 30 cm servo extension leads, Order No. 8 5031 to connect the aileron servo leads to the receiver in the fuselage. Als Anfänger sollten Sie unbedingt den Abschnitt „Grundlagen am Beispiel eines Flugmodells“ in der Anleitung lesen und sich ggf. von einem erfahrenen Modellpiloten unterstüzen lassen! If you are a beginner, it is essential to read the section entitled “The basics of model flying” in the instructions. We strongly advise you to ask an experienced model pilot for assistance. Höhenruderverriegelung öffnen: Drücken Sie hierzu mit zwei Fingern die HLW Klammern 44 zusammen und ziehen gleichzeitig den HLW Schieber 48 nach unten. Release of the elevator locking device: Squeeze together with 2 fingers the elevator bracket 44 and pull down simultaneous the elevator locking bolt 48. MULTIPLEX Modellsport GmbH & Co.KG • Westliche Gewerbestrasse 1 • D-75015 Bretten-Gölshausen • www.multiplex-rc.de RR EasyStar II # 26 4260 F Le modèle RR EasyStar II # 26 4260 est pré assemblé et quasiment près à voler, cela vous économise beaucoup d’étapes de constructions décrits dans la notice d’assemblage. De ce fait, votre modèle est près à l’utilisation en très peu de temps. Néanmoins, lisez attentivement la notice avant l’assemblage et l’utilisation et respectez les remarques ainsi que les conseils de sécurités. Afin d’équipez complètement votre modèle, il vous manque un récepteur et l’accu de propulsion. Vous trouverez nos suggestions dans la liste qui suit ou dans la notice d’assemblage, et si cela Si vous souhaitez équiper votre planeur en électrique, il vous faut également l’équiper d’un kit de propulsion et d’un accu de propulsion. Vous trouverez dans la notice d’assemblage des indications sur le matériel conseillé et, pour le matériel en annexe (par ex. : émetteur, chargeur, etc.), veillez vous reporter à notre catalogue général ou visiter notre site Internet sous: www.multiplex-rc.de Liste de pièces RR Easy Star II Nr. Nbr Désignation Matière 1 1 Instructions d’assemblage Easy Star II 1.1 1 Notice RR Easy Star II / Kit de propulsion 2 2 Planche de décoration Film autocollant 3,4*1 Fuselage pré-assemblé* Mousse Elapor 7,8 1 Ailes Mousse Elapor 6 1 Profondeur Mousse Elapor 50 1 Clé d’aile Tube fibre de verre # 26 4260 Dimensions pièce complète pièce complète pièce complète pièce complète Ø8,0x5,4x 579mm Zusatzanleitung Easy Star II RR Nr. 94 4606 - Seite 2 von 2 1 sachet de petit matériel contenant les pièces réf.: 20(3x), 21(3x), 22(2x), 23(2x), 24(2x), 25(1x), 26(2x) ==> voir la liste des pièces dans la notice d’assemblage * avec les deux servos Nano-S (UNI) déjà assemblés, ainsi que les commandes complètes des gouvernes, le moteur BL PERMAX BL-O 2830-1100, régulateur MULTIcont BL-20 SD-L. 1. À l’aide de la liste des pièces vérifiez que le contenu du kit soit complet. 2. Assemblez la profondeur paragraphe 19., 20. de la notice ==> Fig.20, 21 3. Mettez en place la tringle de commandes de la gouverne de profondeur paragraphe 11 ==> Fig.19 4. Mettez en place le récepteur et l’accu de propulsion 5. Vérifiez que les servos et les gouvernes soient dans une position correcte de neutre 6. Mettez en place les ailes paragraphe 35 ==> Fig. 40, 41 7. Réglez les débattements et le centre de gravité paragraphes 38. et 40. de la notice ==> Fig.B 8. Collez les décalcomanies paragraphe 39. de la notice 9. Le premier vol - à partir du paragraphe 42. de la notice Avant chaque décollage, vérifiez le bon fonctionnement de l’émetteur et du modèle, des différentes gouvernes et des tringles de commandes ainsi que de la propulsion et surtout vérifiez l’état de charge de votre accu. Option: commande d’aileron. Pour cela vous avez besoin de deux servos Nano-S # 6 5120 supplémentaires – paragraphe 24-28 ==> Fig. 25-28 Egalement nécessaire: 2 rallonges de câbles de commandes pour servo de 30 cm réf. Nr. 8 5031 pour le raccordement des câbles des servos d’ailerons avec le récepteur dans le fuselage. Il est vivement conseillé pour les débutants de lire attentivement le paragraphe „Bases du pilotage avec un modèle réduit avion comme exemple“ de la notice d’assemblage et, si nécessaire, de demander consel à un pilote expérimenté! Ouvrir le verrouillage gouvernail de profondeur: Serrez les clips d‘empennage horizontal 44 avec les deux doigts et tirez en même temps le piston d‘empennage horizontal 48 vers le bas. RR EasyStar II # 26 4260 I RR EasyStar II # 26 4260 E Il modello RR EasyStar II # 26 4260 è quasi pronto al volo e molti dei lavori di assemblaggio, descritti nelle istruzioni di montaggio, sono già stati effettuati – l’assemblaggio è quindi particolarmente veloce. Prima di terminare e di mettere in funzione il modello, leggere assolutamente le istruzioni di montaggio, le avvertenze ed i consigli. Per equipaggiare il modello sono ulteriormente necessari una ricevente ed il pacco batteria. Per i componenti consigliati, consultare le istruzioni di montaggio o le presenti istruzioni supplementari, come pure il nostro catalogo e sito Multiplex: www.multiplex-rc.de (p.es. per radio, caricabatterie, ecc.). El modelo RR EasyStar II # 26 4260 viene casi listo para volar, con un alto grado de finalización y con muchos de los pasos de montaje descritos en el manual, ya realizados. De esta manera, el modelo estará totalmente listo en muy poco tiempo. Lea los apartados de finalización del montaje y puesta en marcha, en el manual de instrucciones, y respete todas las recomendaciones y consejos de seguridad, además de consultar los trucos. Para completar el modelo y poder volar, solo necesita un receptor y una batería para el motor. Para ello, consulte las recomendaciones que le damos en el manual, o en esta página, y hojee el catálogo actual o visite la página web de Multiplex (por ejemplo para ver emisoras, cargadores, etc.) en: www.multiplex-rc.de Lista materiale RR EasyStar II Pos. Pz. Descrizione MaterialeDimensioni 1 1 Istruzioni di montaggio Easy Star II 1.1 1 Istruzioni RR Easy Star II / set motorizzazione 2 2 Decals foglio adesivo stampato 3,4*1 Fusoliera preassemblata espanso Elapor 7,8 1 a l a espanso Elapor 6 1 Impennaggio elevatore espanso Elapor 5 0 1 Baionetta Tubo in vetroresina Lista de partes RR EasyStar II # 26 4260 finito finito finito finito Ø8,0x5,4x 579mm Num. 1 1 1.1 1 2 2 3,4*1 7,8 1 6 1 50 1 # 26 4260 Uds. Descripción Material Dimensiones Instrucciones Easy Star II Instr. RR Easy Star II / Kit de propulsión Lámina decorativa Lámina adhesiva prefabricada impresa Fuselaje pre-montado Elapor Pieza prefabricada ala Elapor Pieza prefabricada Estabilizador horizontal Elapor Pieza prefabricada Larguero Larguero de Ø8,0 x 5,4 fibra de vidrio x579 mm. 1 sacchetto minuteria con i componenti: 20(3x), 21(3x), 22(2x), 23(2x), 24(2x), 25(1x), 26(2x) ==> vedasi distinta base nelle istruzioni per il montaggio 1 Bolsa de accesorios con las piezas: 20(3x), 21(3x), 22(2x), 23(2x), 24(2x), 25(1x), 26(2x) ==> consulte la lista de piezas en el manual de instrucciones * con 2 servi incorporati Nano-S (UNI) inclusi i rinvii completi del timone, il motore BL PERMAX BL-O 2830-1100, il regolatore MULTIcont BL-20 SD-L. * con 2 servos Nano-S (UNI) montados, incluye transmisiones completas, motor sin escobillas PERMAX BL-O 2830-1100, regulador MULTIcont BL20 SD-L. 1. Controllare con l’ausilio della distinta base se il contenuto è completo. 2. Montare l’impennaggio elevatore punto 19., 20. nelle istruzioni per il montaggio ==> Figg.20, 21 3. Appendere i rinvii del timone del timone di quota punto 11 ==> Fig.19 4. Montare l’accumulatore di volo e la ricevente 5. Controllare se i servi e il timone sono sulla corretta posizione neutra 6. Inserire le superfici alari punto 35 ==> Figg. 40, 41 7. Regolare le escursioni del timone e il baricentro punto 38. e 40. delle istruzioni per il montaggio ==> Fig.B 8. Incollare i decals punto 39. nelle istruzioni per il montaggio 9. Primo volo - a partire da punto 42 delle istruzioni per il montaggio 1. Consulte la lista de piezas para comprobar la exactitud el contenido del kit. 2. Montar el estabilizador horizonal Puntos 19,20 de las instrucciones ==> Img. 20, 21 3. Enganchar la varilla de transmisión del timón de profundidad Punto 11 ==> Img. 19 4. Instalar la batería principal y el receptor 5. Comprobar la correcta posición en neutro de los servos y timones 6. Conectar las alas Punto 35 ==> Img. 40,41 7. Ajustar los recorridos y el centro de gravedad Puntos 38 y 40 de las instrucciones ==> Img. B 8. Pegar la decoración Punto 39 de las instrucciones 9. El primer vuelo – a partir del punto 42 de las instrucciones Prima di ogni avvio controllare che il radiocomando e il modello, il timone e i rinvii siano in grado di funzionare, inoltre controllare la motorizzazione e i pacchi batteria. Antes de cada despegue debe comprobar el funcionamiento de su emisora y modelo, de los timones, de las transmisiones y del motor y el nivel de carga de las baterías. Opzionale: Usare gli alettoni. A tal scopo sono necessari due ulteriori servi Nano-S erforderlich # 6 5120- punti 24-28 ==> Figg. 25-28 Inoltre sono necessari: 2 cavi di prolunga del servo di cm n.d’ordine 8 5031 per collegare il cavo del servo degli alettoni con la ricevente nella fusoliera. Opcional: Transmisiones de alerones Para ello se necesitan otros dos servos Nano-S # 6 5120- Puntos 24-28 ==> Img. 25-28 También necesitará: 2 cables prolongadores de servos de 20 cm. Referencia 8 5031 para unir el cable de los servos de alerones con el receptor en el fuselaje. Come principiante dovete assolutamente leggere il paragrafo „Nozioni basilari in riguardo ad un aeromodello“ nelle istruzioni e, se necessario, farvi aiutare da un pilota modellista esperto! ¡Como principiante, debería leer sin falta la sección “conceptos básicos de un aeromodelo” en las instrucciones y, si fuese necesario, dejarse ayudar por un piloto experimentado! Aprire il bloccaggio del timone di quota: Premere con due dita contemporaneamente il clip del timone di quota 44 e tirare in sotto il perno del timone di quota 48. Abrir cierre del timon de profundidad: para ello aprete con dos dedos las pinzas 44 del timon de profundidad y tire a la vez de la tranca del timon de profundidad MULTIPLEX Modellsport GmbH & Co.KG • Westliche Gewerbestrasse 1 • D-75015 Bretten-Gölshausen • www.multiplex-rc.de