1
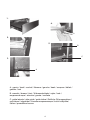
USER'S MANUAL FOR BUILT-IN OVEN
cod. 9606801
Food-warmer module, cod. 7138 000
Foster spa
via M.S. Ottone, 18/20
42041 Brescello (RE) - Italy
tel. +39.0522.687425 - tel. Servizio Assistenza +39.0522.684450
fax +39.0522.686019 - fax Servizio Ricambi +39.0522.962166
e-mail: [email protected]
www.fosterspa.com
3
1.
4.
A
2.
5.
B
C
3.
A
!"#$%
&'(&)*+,-.)/"00/"1
4"""5678"
"9/$:,,&.+;<&.=.#
9
$
>
#
/
4
GENERAL WARNINGS
DISPOSAL INFORMATION
ELECTRICAL CONNECTION
TECHNICAL DATA
INSTALLATION
BEFORE THE FIRST USE
USING THE DRAWER
CARE AND CLEANING
REMOVING THE DRAWER
WHAT TO DO IN CASE OF FAULT
19
IMPORTANT INSTALLATION INFORMATION
Please read this instruction manual carefully. This will allow you to use your appliance in complete safety.
Always keep the instruction manual handy.
This appliance is exclusively for home use for heating dishes.
The manufacturer shall not be held liable for damage to persons or property due to incorrect installation, or
improper, wrong or ludicrous use of the appliance.
Be sure to check the appliance once it has been unpacked. If it has been damaged, do not use it. Contact customer technical
service.
PROPER USE OF THE APPLIANCE
This appliance is compliant with current safety regulations.
Improper use may nonetheless cause damage to persons and/or property.
The inside of the appliance may reach a temperature of up to 85°C when the thermostat is set to the maximum position.
When taking out hot dishes, use appropriate kitchen mitts as necessary.
Remember that children have very delicate skin which is more sensitive to heat.
Therefore, do not allow children to play with the appliance.
If the on button is pressed, the drawer will start heating and there is the danger of burns.
SAFETY INSTRUCTIONS AND WARNINGS
Appliance not suitable for children.
Do not use the appliance to keep warm, re-heat or cook foods and beverages.
Humidity from foods or beverages may cause problems for the appliance.
Do not lean or sit on the open drawer. The telescopic carriage may be damaged.
The maximum load of the drawer is 25 kg.
Make sure that the appliance is firmly secured to the cabinet.
Do not keep plastic or flammable objects in the appliance.
When the appliance it turned on, these kinds of objects may melt or catch fire.
Fire hazard.
Do not use the appliance to heat the room.
Never use steam cleaners. They may cause short circuits and damage the appliance.
Never under any circumstances insert objects (e.g. screwdrivers, pointed objects, paper, etc.) through the slots in the
protection grille of the heating element and fan.
21
DISPOSAL OF PACKAGING
The packaging materials protect the appliance during transport.
Recycling of the packaging makes it possible to save raw materials and reduce waste volumes. If you dispose of the
packaging yourself, ask local authorities for the location of the nearest collection centre.
DISPOSAL OF ELECTRICAL AND ELECTRONIC APPLIANCES
This appliance is marked in compliance with European Directive 2002/96/EC, Waste Electrical and Electronic Equipment
(WEEE).
By making sure that this product is properly disposed of, the user contributes to preventing potential environmental and
health damage.
on the product, or on the documentation that goes with it, indicates that this product must not be
The symbol
considered as domestic waste. It must instead be turned over to suitable collection centres for the recycling of electrical and
electronic equipment.
Dispose of it in accordance with local standards for waste disposal.
For further information on the treatment, salvage and recycling of this product, contact the proper local authority, the home
waste collection service or the retailer where the product was purchased.
22
ELECTRICAL CONNECTION
Contact a qualified technician for the electrical connection of this product.
Before connecting the appliance to the electrical mains, ensure that the technical data (voltage: V and frequency: Hz)
indicated on the plate concur with those of the electrical mains.
If in doubt, contact a qualified technician.
If the plug is disconnected from the electrical power cord, a qualified technician will be required to insert and connect the
appliance. Contact a qualified technician who is knowledgeable of local standards and of any additional regulations issued by
the local electric company, and who ensures that work is carried out in compliance with these standards.
Important: check that the appliance is correctly connected to an approved earth wire to ensure electrical safety. If
necessary, have the system checked by a qualified technician.
The manufacturer shall not be held liable for damage to individuals or property due to lack or interruption of the earth wire.
Attention: earth connection is required by law.
Warning: Connect the wires in accordance with the following colours/codes:
BLUE
- NEUTRAL (N)
BROWN
- LIVE (L)
YELLOW-GREEN
- EARTH ( Ũ )
If the appliance is connected to the mains with an extension cord, make sure that the extension cord and the connection are
insulated against humidity.
The appliance is manufactured for use only after being properly inserted.
Never open the covering of the appliance If you come into contact with wires that carry voltage or if you modify the electrical
and mechanical structure of the appliance, it is possible that the appliance will malfunction during operation.
If installation, maintenance and repair work is not carried out correctly, there may be hazards for the user. The manufacturer
declines all liability for this type of personal injury or property damage.
During the warranty period, repairs may be carried out only by authorised technical service staff. Otherwise, guarantee
coverage will be void.
Installation, repair and cleaning work are to be carried out only with the machine disconnected from the electrical mains. The
appliance is disconnected from the electrical mains in the following cases:
the main switch of the electrical system is off.
The safety switch is off.
The appliance is unplugged.
When unplugging the appliance, do not pull on the cord. Take hold of the plug.
It is advisable to connect the appliance to the mains with an electrical plug.
This will make technical assistance easier should it become necessary.
Make sure the plug can be reached after the appliance has been inserted.
If connection is not made by means of an electrical plug, contact an electrician who is knowledgeable of local standards and
of any additional regulations issued by the local electric company, and who ensures that work is carried out in compliance
with these standards.
If the electrical outlet is no longer accessible after insertion, or if a fixed connection is to be made, the installer must provide a
separation device for each pole.
Valid separation devices include switches with a contact opening of at least 3mm.
Data required for connection can be found on the data plate. This information must match the data of the electrical mains.
The manufacturer shall not be held liable for damage to persons or property due to incorrect installation, or
improper, wrong or ludicrous use of the appliance. The manufacturer shall also not be held liable for accidents (e.g.
electrical shock) caused by lack or interruption of the earth wire.
After assembly, all parts of the appliance must be insulated so that no mishaps may occur during operation.
23
TECHNICAL DATA
Total power:
360 - 440 W
Connection:
AC 220-240 V / 50-60 Hz
Replacement of power cord:
If the power cord needs to be replaced, choose type H 05 VV-F (insulated in PVC) 3X1.
INSTALLATION
Safety instructions for installation
Before connecting the appliance to the electrical mains, compare the connection data (voltage and frequency) indicated on
the data plate with the data of the electrical mains.
The data must match, otherwise the appliance may be damaged.
If in doubt, contact a qualified technician.
Make sure that the electrical outlet is easily accessible even after the appliance has been inserted.
The dish warmer can only be inserted with other appliances with a maximum weight of 50 Kg that are provided with adequate
cooling ventilation.
For installation of the combination appliance, follow the instructions in the relative use and installation book.
Insertion and installation of this appliance may only be performed by qualified staff who ensure safe operating conditions.
Insertion space measurements
The dimensions of the niche are obtained from the size of the dish warmer plus the measurements of the appliance
combined with it. All measurements are indicated in millimetres. Please see the drawing on the very first page.
24
USEFUL INFORMATION
The appliance is designed exclusively for the heating of dishes which are suited for this purpose.
The appliance is equipped with a hot air system. A fan creates excellent distribution of warmth from the drawer heating
element. Air circulation heats the dishes evenly and quickly.
A protection grille prevents contact with the heating element and the fan.
The base of the drawer is covered with anti-slip material to keep dishes from moving when it is opened or closed.
BEFORE THE FIRST USE
When using the appliance for the first time, clean it as follows:
clean the surface with a soft cloth and then dry it.
Pre-heat the empty drawer for at least two hours. Turn the temperature knob to the maximum setting, in order to eliminate
any residual grease, oil, or manufacturing resins which may cause unpleasant odours during heating. Air out the room.
Upon completion of this operation, the appliance is ready to be used for the first time.
25
APPLIANCE CONTROLS
The control elements are the temperature knob and the luminous ON-OFF switch.
With the switch pressed (position 1) the drawer is on, whereas when the switch is released (position 0) the drawer is off.
These parts can be seen only when the drawer is open.
When the drawer is closed, a control light located on the front of the appliance lets you see whether the drawer is on.
OPERATION
-
Place the dishes in the drawer
Select a temperature
Turn on the appliance; the switch will light up
Close the drawer gently
Turn off the appliance before removing the heated dishes.
26
TEMPERATURE SELECTION
The temperature knob lets you select a temperature between approximately 30°C and 85°C.
Turn the temperature knob clockwise only, until the stop that indicates the maximum setting, and then counter-clockwise.
Do not force it beyond the stop, otherwise the thermostat will be damaged.
The temperature scale does not show absolute temperatures in °C, but rather symbols that represent the best temperature
for respective groups of dishes:
-(cup) approx. 40°C
for cups or glasses.
When contained in glasses which are previously heated to this temperature, hot beverages do not cool so rapidly and the
container can nonetheless be touched without any problem.
-(plates) approx. 60°C
for dishes.
Foods placed in these dishes will stay warm longer.
Depending on personal sensitivity, the containers can be touched without any danger. Use mitts or pot holders as necessary.
-MAX approx. 85°C
for dishes.
The thermostat is set to the maximum temperature.
The containers can be touched with appropriate mitts or pot holders.
HEATING TIMES
The time required to heat dishes, glasses and so on depends on several factors:
x
x
x
x
Material and thickness of the dishes
Amount of load
Arrangement of load
Temperature setting
For this reason it is not possible to provide absolute information.
It is advisable to determine the best settings for your needs based on practical experience.
27
LOAD CAPACITY
Load capacity depends on the height of the appliance and the size of the dishes.
The following examples are approximate.
Also remember that the drawer can sustain a maximum weight of 25 kg.
Dishes for 6 people:
6 plates
6 soup bowls
1 bowl
1 bowl
1 bowl
2 meat platters
Ø 28cm
Ø 10cm
Ø 22cm
Ø 19cm
Ø 17cm
Ø 36cm
or a choice of:
20 plates
Ø 26cm
36 soup dishes
Ø 22cm
30 soup bowls
Ø 10cm
10 plates
Ø 28cm
10 soup dishes
Ø 22cm
10 pizza plates
Ø 36cm
80 espresso cups
40 cappuccino cups
30 glasses (grog)
18 soup dishes
Ø 22cm
2 soup bowls 21cm X 18cm
28
CARE AND CLEANING
Cleaning operations are to be undertaken only when the machine is disconnected from the electrical mains. The appliance is
disconnected from the electrical mains in the following cases:
the main switch of the electrical system is off.
The safety switch is off.
The appliance is unplugged.
When unplugging the appliance, do not pull on the cord. Take hold of the plug.
Clean all surface with a soft sponge, a bit of detergent and lukewarm water.
Then dry all surfaces with a soft cloth.
Important: the area of the grille for the protection of internal components and the area of the switch and thermostat must not
be cleaned with water.
Any penetration of liquids or other substances into electrically live parts may cause failures or short circuits, creating
hazards for the user.
Appliances with aluminium front
Aluminium surfaces and control elements may undergo colour changes and fading if they are left soiled for long periods of
times. Therefore, remove dirt as soon as possible.
Do not use:
detergents that contain soda, acids or chloride, abrasive detergents (powder or cream) abrasive sponges (e.g. steel wool
pads) special products for stainless steel, detergents that dissolve lime, dishwasher detergent, or oven cleaning sprays.
Appliances with stainless steel front
The steel surfaces should be cleaned with a special non-abrasive product for steel.
Do not use:
detergents that contain soda, acids or chloride, abrasive detergents (powder or cream) abrasive sponges (e.g. steel wool
pads) or sponges that contain residual abrasive detergent.
Anti-slip bottom of drawer
The anti-slip bottom of the drawer can be cleaned for thorough cleaning of the drawer
The bottom can be hand-washed with warm water and a gentle detergent. Dry thoroughly afterwards.
Put the anti-slip bottom back in the drawer only when it is completely dry.
29
REMOVING THE DRAWER
The drawer can be removed if the appliance requires cleaning on the inside.
Open the drawer completely (see pic. 1).
Undo the 4 front screws (2 on both sides) – (pic. 2).
Lift the 2 hooks (1 on both sides) – (pics. 3-4).
Take hold of the front of the drawer on both sides, because the rear section of the guide rails has been lubricated.
Carefully remove the drawer in an upward direction (pic. 5) and set it down.
The appliance can now be cleaned on the inside with water and detergent.
Do not immerse the drawer in water once it has been removed.
How to refit the drawer:
Proceed in the reverse order of removal to refit the warming drawer.
To do this, position the drawer on the rails.
Please bear the following in mind:
There is a tensioning hook under the warming drawer, one for each side.
The drawer can only be opened if the tensioning hook is in the correct position.
30
WHAT TO DO IN CASE OF FAULT
Repair of electrical appliances is to be carried only by qualified, authorised technical staff.
Improperly or incorrectly performed repairs may create grave hazards for the safety of the user.
If the dishes are not warm enough, check whether:
x
x
x
x
the appliance is on
the right temperature has been set
the heat outlets have been covered by large plates or bowls
the dishes have been heated for a sufficient period of time.
Various factors affect heating time, such as:
material and thickness of dishes, size of load, arrangement of load, temperature setting.
Optimal heating times for dishes are subjective. Therefore, it is advisable to determine them on a trial and error basis
according to your own preferences.
If the dishes do not get warm, check whether:
x
there is fan noise: the fan is working, but the heating element might be defective
x
if the fan is not working, it may be defective
x
the main switch of the electrical system is off.
x
the electrical power cord is unplugged or damaged
If the dishes overheat:
x
the temperature setting device may be defective
The on/off switch does not light up when the appliance is switched on:
x
the control light of the switch is defective.
31