1
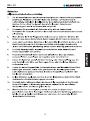
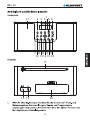
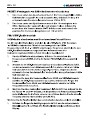
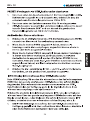
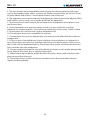
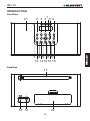
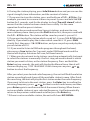
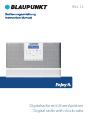
RX+ 12 Digitalradio mit Uhrenfunktion Digital radio with clock radio RX+ 12 2 RX+ 12 3 RX+ 12 4 RX+ 12 5 RX+ 12 6 RX+ 12 7 RX+ 12 8 RX+ 12 9 RX+ 12 10 RX+ 12 11 RX+ 12 12 RX+ 12 13 RX+ 12 21 1 2 3 4 5 6 7 8 9 10 11 12 13 14 15 16 17 18 19 20 14 RX+ 12 15 RX+ 12 16 RX+ 12 17 RX+ 12 18 RX+ 12 19 RX+ 12 20 RX+ 12 21 RX+ 12 22 RX+ 12 23 RX+ 12 24 RX+ 12 25 RX+ 12 26 RX+ 12 27 RX+ 12 28 RX+ 12 29 RX+ 12 30 RX+ 12 IMPORTANT SAFETY INSTRUCTIONS Important Safety Instructions Caution: To reduce the risk of electric shock, do not dismantle the product and do not expose the apparatus to rain or moisture. No user-serviceable parts inside. Refer servicing to qualified personnel only. Explanation of Graphical Symbols: The lightning flash within an equilateral triangle is intended to alert you to the presence of uninsulated dangerous voltage within the product's enclosure that may be of sufficient magnitude to constitute an electric shock to a person or persons. The exclamation point within an equilateral triangle is intended to alert you to the presence of important operating and maintenance (servicing) instructions in the literature accompanying the product. To achieve the utmost in enjoyment and performance, and in order to become familiar with its features, please read this manual carefully before attempting to operate this product. This will assure you years of trouble free performance and listening pleasure. Important Notes This safety and operating instruction should be retained for future reference. The apparatus should not be exposed to dripping or splashing or placed in a humid atmosphere such as a bathroom. Do not install the product in the following areas: Places exposed to direct sunlight or close to radiators. On top of other stereo equipment that radiate too much heat. Blocking ventilation or in a dusty area. Areas where there is constant vibration. Humid or moist places. Do not place near candles or other naked flames. Operate the product only as instructed in this manual. Before turning on the power for the first time, make sure the power adaptor is properly connected. For safety reasons, do not remove any covers or attempt to gain access to the inside of the product. Refer any servicing to qualified personnel. Do not attempt to remove any screws, or open the casing of the unit; there are no user serviceable parts inside. Refer all servicing to qualified service personnel. 31 RX+ 12 Conformity Model number: RX+ 12 Description: Digital radio with clock radio Brand name: Blaupunkt Responsible party: M3 Electronic GmbH Gutenbergstrasse 5, D-65830 Kriftel. Germany Hereby, Blaupunkt Competence Center Audio M3 Electronic GmbH, declares that this Class 1 equipment is in compliance with the essential requirement and other relevant provisions of Directive 1999/5/EC. Letter of conformity can be obtained from [email protected]. SAFETY INSTRUCTIONS 1. Read Instructions - All the safety and operating instructions must be read before the product is operated. 2. Retain Instructions - The safety and operating instructions should be kept with the product for future reference. 3. Heed warnings - All warnings on the product and in the operating instructions should be adhered to. 4. Follow instructions - All operating and users’ instructions should be followed. 5. Installation - Install in accordance with the manufacturer's instructions. 6. Power sources - This product should be operated only from the type of power source indicated by the marking adjacent to the power cord entry. If you are not sure of the type of power supply to your home, consult your product dealer or local power company. 7. Grounding or polarization - the product is not required to be grounded. Ensure that the plug is fully inserted into the wall outlet or extension cord receptacle to prevent blade or pin exposure. Some versions of the product are equipped with a power cord fitted with a polarized alternating line plug (a plug having one blade wider than the other). This plug will fit onto the power outlet only one way. This is a safety feature. If you are unable to insert the plug fully into the outlet, try reversing the plug. If the plug should still fail to fit, contact your electrician to replace your obsolete outlet. Do not defeat the safety purpose of the polarized plug. When using an extension power-supply cord or a power-supply cord other than that supplied with the appliance, it should be fitted with the appropriate molded plugs and carry safety approval appropriate to the country of use. 8. Power cord protection - Power-supply cords should be routed so that they are not likely to be walked on, kinked or pinched by items placed on or against them, paying particular attention to cords from plugs, receptacles and the point where they exit from the product. 9. Overloading - Do not overload wall outlets, extension cords, or multiple sockets, as this can result in a risk of fire or electric shock. 32 RX+ 12 10. Ventilation - The product must be properly ventilated. Do not place the product on a bed, sofa, or other similar surface. Do not cover the product with any items such as tablecloths, newspapers, etc. 11. Heat - The product should be situated away from heat sources such as radiators, heat registers, stoves, or other products, including amplifiers that produce heat. No naked flame sources, such as lighted candles, should be placed on the apparatus. 12. Water and moisture - To reduce the risk of fire or electric shock, do not expose the product to train, dripping, splashing or excessive moisture such as in a sauna or bathroom. Do not use this product near water, for example, near a bathtub, washbowl, kitchen sink, laundry tub, in a wet basement or near a swimming pool (or similar). 13. Object and Liquid Entry - Never push objects of any kind into this product through openings, as they may touch dangerous voltage points or short-circuit parts that could result in a fire or electric shock. Never spill liquid of any kind on the product. Do not place any object containing liquid on top of the product. 14. Cleaning - Unplug the product from the wall outlet before cleaning. Dust in the woofer may be cleaned with a dry cloth. If you wish to use an aerosol cleaning spray, do not spray directly on the cabinet; spray onto the cloth. Be careful not to damage the drive units. 15. Attachments - Do not use attachments not recommended by the product manufacturer, as they may cause hazards. 16. Accessories - Do not place this product on an unstable cart, stand, tripod, bracket or table. The product may fall, causing serious injury to a child or adult, and serious damage to the product. Use only with a cart, stand, tripod, bracket or table recommended by the manufacturer or sold with the product. Any mounting of the product should follow the manufacturer’s instructions and should use a mounting accessory recommended by the manufacturer. 17. Moving the product - A product and cart combination should be moved with care. Quick stops, excessive force and uneven surfaces may cause the product and cart combination to overturn. 18. Unused periods - The power cord of the appliance should be unplugged from the outlet during lightning storms or when the apparatus is left unused for a long period of time. 19. Servicing - Do not attempt to service this product yourself, as opening or removing covers may expose you to dangerous voltage or other hazards. Refer all servicing to qualified service personnel. 20. Please remove the power plug form the main power source or wall power source when not in use. When plugged in to a power source, the system is in standby mode, so the power is not entirely cut off. 21. Replacement parts - When replacement parts are required, ensure that the service technician has used replacement parts specified by the manufacturer or have the same characteristics as the original part. Unauthorized substitutions may result in fire, electric shock or other hazards. 33 RX+ 12 22. Mains fuses - For continued protection against fire hazard, use fuses only of the correct type and rating. The correct fuse specification for each voltage range is marked on the product. 23. Do not turn up the volume while listening to a section with very low level inputs or no audio signals. If you do, the speaker may be damaged when a peak level section is suddenly played. 24. The only means of completely disconnecting the product from the power supply is by removing the power cord from the wall outlet or the product. The wall outlet or the power cord entry to the product must remain freely accessible at all times while the product is in use. 25. Try to install the product near a wall socket or extension cord and shall be easily accessible. 26. The highest environmental temperature suitable for this product is 35°C. 27. ESD hints - The normal function of the product may be disturbed by strong Electro-Magnetic Interference. If so, simply reset the product to resume normal operation by following the instruction manual. In case the function could not resume, please use the product in other location. 28. Battery 1). The batteries must not be exposed to excessive heat such as sunshine, fire or the like. 2). The batteries should be drawn to the environmental aspects of battery disposal. 3). Battery usage CAUTION-to prevent battery leakage which may result in body injuries, property damage, or damage to the apparatus: - Install all batteries correctly, + and – as marked on the apparatus. - Do not mix batteries (old and new or carbon and alkaline, etc.) - Remove batteries when the unit is not used for a long time. WARNING This appliance is not intended for use by persons (including children) with reduced physical sensory or mental capabilities, or lack of experience and knowledge, unless they have been given supervision or instruction concerning use of the appliance by a person responsible for their safety. Children should be supervised to ensure that they do not play with the appliance. 1. Never use the device unsupervised! Switch off the device whenever you are not using it, even if this only for a short while. 2. The appliance is not intended to be operated by means of an external timer or separate remote control system. 3. If the supply cord is damaged, it must be replaced by the manufacturer, its service agent or similarly qualified persons in order to avoid a hazard. 4. Before operating this system, check the voltage of this system to see if it is identical to the voltage of your local power supply. 34 RX+ 12 5. The unit should not be impeded by covering the ventilation opening with items such as newspaper, table-cloths, curtains etc. Make sure that there are at least 20 cm of space above and at least 5 cm of space on each side of the unit. 6. The apparatus must not be exposed to dripping or splashing and that objects filled with liquids, such as vases, must not be placed on the apparatus. 7. To prevent fire or shock hazard, do not expose this equipment to hot places, rain, moisture or dust. 8. Do not locate this unit near any water sources e.g. taps, bathtubs, washing machines or swimming pools. Ensure that you place the unit on a dry, stable surface. 9. Do not place this unit close to a strong magnetic field. 10. Do not place the unit on a amplifier or receiver. 11. Do not place this unit in a damp area as the moisture will affect the life of electric components. 12. If the system is brought directly from a cold to a warm location, or is placed in a very damp room, moisture may condense on the lens inside the player. If this occurs, the system will not operate properly. Please leave the system turned on for about an hour until the moisture evaporates. 13. Do not attempt to clean the unit with chemical solvents as this might damage the finish. Wipe with a clean, dry or slightly damp cloth. 14. When removing the power plug from the wall outlet, always pull directly on the plug, never pull on the cord. 15. The mains plug is used as the disconnect device, the disconnect device must remain readily operable. 35 RX+ 12 INTRODUCTION Front View 21 1 2 3 4 5 6 7 8 9 10 11 12 13 14 15 16 Back View 17 18 19 20 36 RX+ 12 Button function introduction 1. Display 2. --- short press to switch the radio between standby ON and OFF. In standby ON mode: press and hold to check the software version, and short press to system reset operation. 3. Band ---DAB/FM switching. 4. Scan --- radio scan button. 5. Info/Alarm --- short press to switch the radio information display. Press and hold two seconds for alarm setting. 6. Shift --- combine with 1/6 - 5/10 key to save station. 7. --- next (station selection). 8. --- previous (station selection). 9. Enter --- Enter key. 10. Vol---- volume down. 11. Vol + --- volume up. 12. 1/6—5/10 station Preset keys. 17. Telescopic antenna. 18. DC IN jack. 19. Headphone jack. 20. Battery compartment. GENERAL OPERATION 1. Power on: the unit will enter into working status directly once you connect the DC power. Short press the button can switch the unit between standby on and off. 2. Volume adjustment: you can press VOL+/- button to increase or decrease the volume. 3. Time and Alarm The radio can update time automatically once it gets the DAB signal successfully. And the time can be saved and ran by radio itself even without the DAB signal, when it is provided with continuous power. After connect with DC or battery power, press and hold the Info/Alarm button two seconds to enter to alarm setting mode. Press or button to select alarm ON or OFF. The previous alarm setting will be cancelled if you select OFF. You can select ON and press Enter button to start the alarm time set up. Press or button to adjust the alarm hour and minute 37 RX+ 12 setting; then press Enter button shift to alarm source (beeper/DAB/FM)/ alarm volume / alarm mode (Daily/Weekday/Weekend/once) selection; press or button to select between these options. Then press Enter button again to complete the alarm setting. And the unit will resume to previous play mode. Note: a. The alarm setting will implement and quit the alarm interface automatically if there is no further operation last 10 seconds. b. You can press the button to cancel the alarm sound when the alarm is ringing. c. You can press other button (except button) to enter 9 minutes snooze time when the alarm is activated. d. The alarm sound will ring up 1 hour if there is no further operation. e. If the alarm source is same as current working mode, the unit turns to “Beeper” alarm source automatically, and resumes to previous working mode when you turn off the alarm or enter to snooze mode. f. The display backlight will flare once the alarm is activated. g. There is no time manual setting operation given on this unit, but it can be automatically updated via DAB signal. DAB OPERATION 1. Connect the DC adaptor to the 5V DC-IN jack, and plug on the adaptor to power source. Fully pull and extent the telescopic antenna, the unit will enter into work status after display shows ”Welcome to digital Radio” information. 2. In the first time that you use this unit, you will enter to DAB band. The unit will quick scan automatically, and it will show: Autotune quick scan. Now it’s scanning DAB radio 3. During scanning, it shows the station name, the total number of stations will be displayed in the upper right corner of the display. 4. The unit will play the first scanned station after the scan is completed. Now pressing or button to select your favorite station. After the display showing the your favorite station name, then press Enter to confirm or wait three seconds, the unit will automatically play your favorite station. 5. When playing the radio, adjust the volume by keys VOL- or VOL+ to a suitable volume. 38 RX+ 12 6. During the station playing, press Info/Alarm button and you can see the signal strength, time information, and the content of station. 7. If you want to store the station, press and hold one of 1/5 – 6/10 key. For example, you want to save one stations in preset 3, press and hold the 3/8 button for 2 seconds, wait for the display to show “Preset 3 stored”, which means that the station has been stored successfully. It is the same operation for other preset stations. 8. When you have saved more than 5 preset stations, and want to save more stations please short press the Shift button first, then press and hold the 1/5 – 6/10 button. The station will be saved as preset 6 –preset 10. 9. If you want to play the station which saved to 1-5, press 1/6–5/10 button directly. If you want to play the station which saved at 6-10, press Shift shortly first, then press 1/6–5/10 button, and you can pick up and play the preset station of 6-10. 10. If you want to listen to DAB radio programs throughout the band, please press Scan button for 2 seconds under DAB band mode and the device will display: Autotune full scan, full-band search. 11. When you do not want to do stations searching automatically, but want to select the stations in manually: the first step you need to know is which station you want to listen, or the station frequency. Press and hold the Enter key two seconds, the unit will display the Manual tune, then it will show on display, eg. 11B 218.64.MHZ. At this time you can press or button to select the frequency. After you select your desired radio frequency, the unit will find the relative station accordingly and shows all the available station’s name. After finish the searching, the unit will play the first station under the radio frequency. If you want to listen to the next station, press the Enter key to confirm the receiving frequency, press or button to switch radio name, and then press Enter again to confirm and finish the manual tuning. When there is not an available station at your selected frequency, it will automatically return to the previous radio broadcast after press the Enter key. * If there is not an available station, the unit will show: NO SIGNAL. 39 RX+ 12 FM OPERATION 1. In DAB band, if you want to listen FM radio, please press Band to switch to FM band. 2. In FM mode, press Scan button to auto tune station. Short press the Scan button and the unit will search for radio frequency automatically. When it finds a station with strong signal, the unit will stop searching and will play this station. Short press the Scan button for high frequency auto tuning, long press the Scan button for lower frequency auto tuning. 3. If you want to manual tune the frequency, press or button to adjust it. The frequency will up or down 0.05MHz each. 4. In FM mode, when the station includes RDS message the unit can synchronize this information. At this point press the Info button to view the signal strength and radio stations RDS content. 5. In FM mode, press the Enter button to switch the audio stereo and mono output (stereo only can be listen by using headphones, because the speaker is mono output). 6. The station preset operation is the same as in DAB mode. 7. Auto tune sensitivity settings: long press the Enter key to enter setup interface, it will show sensitivity scale, press or button to adjust the FM auto tune sensitivity, turn to left side will auto tune strong signal station only; and turn to right side will auto tune include weak signal station as well. After adjustment, please press the Enter button to confirm. The radio will resume to previous station and play. 8. When playing the radio, you can press VOL- (volume down) or VOL+ (volume up) button to adjust a suitable volume. SYSTEM OPERATION 1. In POWER ON mode, you can view the software version by long press . 2. System reset operation, in power on mode, long press the key, there will show the contents of the software version; short press the key again, the display will show “System reset” , short press the Enter key, the display will show “Press Enter Key to Reset”. Press the Enter button again to start the system reset operation. The display will show “ok” once the system reset is completed. The device will enter in the DAB band radio scan directly. 3. Earphone output: plug in the stereo 3.5mm earphone connector into the earphone jack in the bottom left corner of rear panel, meanwhile, the speaker will stop to play music, and you can listen the music via earphone. 40 RX+ 12 4. Open up the battery door on the rear side, install and put 4 pcs 1.5V AAA into the compartment. Please pay attention to direct the voltage +/polarity according to the symbol inside. When you are using battery power supply, the whole functionality operation is the same as with DC power. When the battery has low power, the display will show low battery bar. When the battery is exhausted, the display show “Change Battery”, and then switches Power OFF after two seconds. Important note: Please pick up the battery out of the unit if you are not going to use it for long time in order to avoid battery liquid leakage issue and damage the unit. SPECIFICATION Radio frequency: DAB (BAND III 5A-13F), FM (87.5MHz-108MHz) Radio preset: 10 stations for DAB and FM each (max.). Display: 2x16 blue background with white text, negative display. Power: DC IN 5V/500Ma, or 4 x 1.5V AAA battery (not included) Speaker RMS Output: 1.2 Watt Power consumption (on mode): 3 Watt Power consumption (standby mode): < 1 Watt TROUBLE SHOOTING We cannot receive some stations, and the radio output is coming with noise and sound intermittently. - Please fully extent the FM telescopic antenna and adjust the antenna for better reception. - Please move the radio to another position (for example: next to a window) for better reception. - Please reset the radio and scan the stations again. 41 RX+ 12 This symbol on the product or in the instructions means that your electrical and electronic equipment should be disposed at the end of its life separately from your household waste. There are separate collection systems for recycling in the EU. For more information, please contact the local authority or your retailer where you purchased the product. All rights reserved by Blaupunkt Competence Center Audio M3 Electronic GmbH. This material may be reproduced, copied or distributed for personal use only. 42