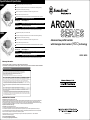
1
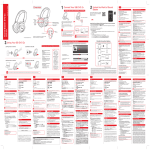
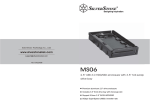
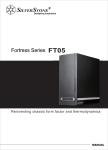
Special Features & Specification
Designed for low profile system at only 37mm tall
AR05
Two Ø6mm heat-pipes and aluminum fins for excellent heat conducting efficiency
Heat-pipe direct contact (HDC) technology
Includes compact 92mm PWM fan for excellent cooling and low noise
For use with CPUs up to 65W or more*
Intel Socket LGA1155/1156/1150 and AMD Socket AM2/AM3/FM1/FM2 compatible
Material
Copper heat pipes with aluminum fins
Heat Pipe Type
Ø6mm heat-pipe x 2
Application
Intel Socket LGA1155/1156/1150 / AMD Socket AM2/AM3/FM1/FM2
Cooling System
92mm x 92mm x 15mm fan
104mm (W) x 92mm (D) x 36.7mm (H) (with fan)
Dimension
*To use on CPUs with TDP greater than 65W, a case with efficient airflow is required.
Designed for low profile system at 58mm tall
AR06
Four Ø6mm heat-pipes and aluminum fins for excellent heat conducting efficiency
Heat-pipe direct contact (HDC) technology
Includes compact 92mm PWM fan for excellent cooling and low noise
For use with CPUs up to 95W or more*
Intel Socket LGA1155/1156/1150 and AMD Socket AM2/AM3/FM1/FM2 compatible
Material
Copper heat pipes with aluminum fins
Heat Pipe Type
Ø6mm heat-pipe x 4
Application
Intel Socket LGA1155/1156/1150 / AMD Socket AM2/AM3/FM1/FM2
Cooling System
92mm x 92mm x 15mm fan
ARGON
SERIES
Advanced low-profile heatsink
with Heat-pipe direct contact (HDC) technology
AR05 / AR06
105mm (W) x 92mm (D) x 58mm (H) (with fan)
Dimension
*To use on CPUs with TDP greater than 95W, a case with efficient airflow is required.
Warranty Information
This product has a limited 1 year warranty in North America and Australia.
For information on warranty periods in other regions, please contact your reseller or SilverStone authorized distributor.
Warranty terms & conditions
1. Product component defects or damages resulted from defective production is covered under warranty.
Defects or damages with the following conditions will be fixed or replaced under SilverStone Technology’s jurisdiction.
a) Usage in accordance with instructions provided in this manual, with no misuse, overuse, or other inappropriate actions.
b) Damage not caused by natural disaster (thunder, fire, earthquake, flood, salt, wind, insect, animals, etc…)
c) Product is not disassembled, modified, or fixed. Components not disassembled or replaced.
d) Warranty mark/stickers are not removed or broken.
Loss or damages resulted from conditions other than ones listed above are not covered under warranty.
2. Under warranty, SilverStone Technology’s maximum liability is limited to the current market value for the product (depreciated value, excluding
shipping, handling, and other fees). SilverStone Technology is not responsible for other damages or loss associated with the use of product.
3. Under warranty, SilverStone Technology is obligated to repair or replace its defective products. Under no circumstances will SilverStone
Technology be liable for damages in connection with the sale, purchase, or use including but not limited to loss of data, loss of business, loss of
profits, loss of use of the product or incidental or consequential damage whether or not foreseeable and whether or not based on breach of warranty,
contract or negligence, even if SilverStone Technology has been advised of the possibility of such damages.
4. Warranty covers only the original purchaser through authorized SilverStone distributors and resellers and is not transferable to a second hand
purchaser.
5. You must provide sales receipt or invoice with clear indication of purchase date to determine warranty eligibility.
6. If a problem develops during the warranty period, please contact your retailer/reseller/SilverStone authorized distributors or SilverStone
http://www.silverstonetek.com.
Please note that: (i) You must provide proof of original purchase of the product by a dated itemized receipt; (ii) You shall bear the cost of shipping
(or otherwise transporting) the product to SilverStone authorized distributors. SilverStone authorized distributors will bear the cost of shipping
(or otherwise transporting) the product back to you after completing the warranty service; (iii) Before you send the product, you must be issued a
Return Merchandise Authorization (“RMA”) number from SilverStone. Updated warranty information will be posted on SilverStone’s official website.
Please visit http://www.silverstonetek.com for the latest updates.
Additional info & contacts
For North America ([email protected])
SilverStone Technology in North America may repair or replace defective product with refurbished product that is not new but has been functionally tested.
Replacement product will be warranted for remainder of the warranty period or thirty days, whichever is longer. All products should be sent
back to the place of purchase if it is within 30 days of purchase, after 30 days, customers need to initiate RMA procedure with SilverStone Technology
in USA by first downloading the “USA RMA form for end-users” form from the below link and follow its instructions.
http://silverstonetek.com/contactus.php
For Australia only ([email protected])
Our goods come with guarantees that cannot be excluded under the Australian Consumer Law.
You are entitled to a replacement or refund for a major failure and for compensation for any other reasonably foreseeable loss or damage.
You are also entitled to have the goods repaired or replaced if the goods fail to be of acceptable quality and the failure does not amount to a major failure.
Please refer to above “Warranty terms & conditions” for further warranty details.
SilverStone Technology Co., Ltd. 12F No. 168 Jiankang Rd., Zhonghe Dist., New Taipei City 235 Taiwan R.O.C. + 886-2-8228-1238
(standard international call charges apply)
For Europe ([email protected])
For all other regions ([email protected])
2014
NO.G11221560
1
4
Install hex screws and corresponding nuts Закрепите кронштейны винтами с
шестигранной головкой и
onto the mounting brackets
соответствующими гайками
Sechskantschrauben und entsprechende
Muttern an den Montagehalterungen
installieren
INTEL
LGA 1366
將扣具鎖上六角螺絲與螺帽,
螺絲孔位需對應主機板類型
LGA 115X
Apply included thermal grease onto the
cooler base evenly
Ровным слоем нанесите термопасту
на основание теплоотвода
Mitgeliefertes Wärmeleitfett gleichmäßig
auf die Kühlerbasis auftragen
將導熱膏均勻塗抹在散熱器底部
Appliquez la pâte thermique fournie
uniformément sur la base du
refroidisseur
将导热膏均匀涂抹在散热器底部
LGA 775
Installez les vis hexagonales et les
écrous correspondants sur les supports
de montage
将扣具锁上六角螺丝与螺帽,
螺丝孔位需对应主板类型
Instale tornillos hexagonales y las tuercas
correspondientes en los brackets de
montaje
六角ネジおよび対応するナットをマウ
ントブラケットに取り付けます。
Aplique la pasta térmica de forma
uniforme en la base de refrigeración
クーラーベースにサーマルグリスを
均等に塗ります。
Installare le viti esagonali ed i relativi
dadi sulle staffe di montaggio
장착 브래킷 위에 육각 나사와 해당
너트를 설치합니다.
Applicare in modo uniforme il grasso
termico incluso sulla base del dissipatore
di calore
제공된 서멀 그리스를 쿨러 베이스에 고르게
바릅니다.
AMD
2
5
Remove protective film from the cooler
base
Снимите защитную пленку с
основания теплоотвода
Secure cooler onto the motherboard
with spacer between the backside of
motherboard and hex nuts
Закрепите теплоотвод на системной плате
с использованием шайбы между задней
стороной системной платы и шестигранными
гайками
Schutzfolie von der Kühlerbasis
entfernen
將散熱器底部保護貼撕離
Kühler mit Abstandhalter zwischen
Rückseite des Motherboards und
Sechskantmuttern am Motherboard
befestigen
疊上主機板,用六角螺帽與墊片鎖緊
Retirez le film protecteur de la base
du refroidisseur
将散热器底部保护贴撕离
Fixez le refroidisseur sur la carte mère
avec une espaceur entre l'arrière de la
carte mère et les écrous hexagonaux
迭上主板,用六角螺帽与垫片锁紧
Retire la película protectora de la base
de refrigeración
クーラーベースの保護フィルムを剥がします。
Asegure el refrigerador en la placa base
con un espaciador entre la parte trasera
de la placa base y las tuercas
hexagonales
マザーボード裏側とナットの間にスペ
ーサーを挟んで、クーラーをマザーボ
ードに固定します。
Rimuovere la pellicola protettiva dalla
base del dissipatore di calore
쿨러 베이스에서 보호 필름을 제거합니다.
Fissare il dissipatore di calore sulla
scheda madre con un distanziatore tra la
parte posteriore della scheda madre e i
dadi esagonali
메인보드의 뒷면과 육각 너트 사이에
스페이서를 끼운 채 쿨러를 메인보드에
고정합니다.
3
6
Secure the assembled brackets from step
1 onto the cooler base with screws
Закрепите винтами собранные на
шаге 1 кронштейны в основании
теплоотвода
Installation complete
Установка завершена
Montierte Halterungen aus Schritt
1 mit Schrauben an der Kühlerbasis
befestigen
將步驟1組好的扣具用螺絲鎖在散熱器底部
Installation abgeschlossen
安裝完成
Fixez les supports assemblés lors de
l'étape 1 sur la base du refroidisseur
avec des vis
将步骤1组好的扣具用螺丝锁在散热器底部
Installation terminée
安装完成
Asegure los brackets montados del paso
1 en la base de refrigeración usando los
tornillos
ステップ1で組まれたブラケットをク
ーラーベースにネジで固定します。
Instalación completa
インストール完了
Fissare con viti le staffe assemblate
al punto 1 sulla base del dissipatore
di calore
나사를 사용하여 단계 1에서 조립된
브래킷을 쿨러 베이스에 고정합니다.
L'installazione è completata
설치가 완료되었습니다.