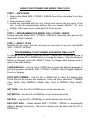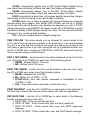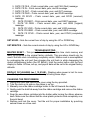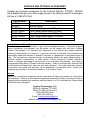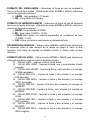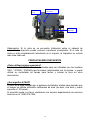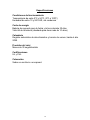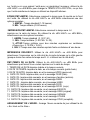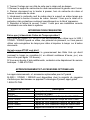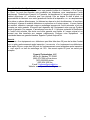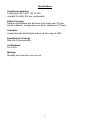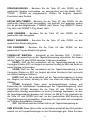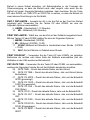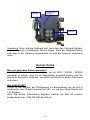
1
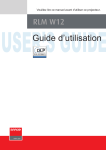
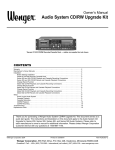
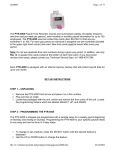
MODEL 3500 / 3700HD / 3000HD
ELECTRONIC PAYROLL TIME RECORDER INSTALLATION
AND OPERATION INSTRUCTIONS
IMPORTANT!
READ THESE INSTRUCTIONS BEFORE INSTALLING AND USING
THIS PRODUCT.
Keep these instructions for future reference
1
USING YOUR PYRAMID 3000 SERIES TIME CLOCK
STEP 1 – UNPACKING
1. Remove the Model 3500 / 3700HD / 3000HD from its box and place it on a firm
surface.
2. Plug unit into an outlet.
3. Locate key packaged with the unit. Unlock and remove the top cover of the
unit. Locate the programming buttons that are labeled SELECT, UP, and
DOWN. Place your key in a safe place for future access.
4.
STEP 2 – PROGRAMMING THE MODEL 3500 / 3700HD / 3000HD
Programming the Model 3500 / 3700HD / 3000HD is extremely easy and can be
done in less than 5 minutes.
STEP 3 – READY TO GO
Reinstall the top cover, lock the unit and you are ready to use your new Model
3500 / 3700HD / 3000HD.
PROGRAMMING YOUR PYRAMID 3000 SERIES TIME CLOCK
To change or set a feature, press the SELECT button until the desired feature is
displayed. Use the UP or DOWN button to change the feature. After the displayed
feature is changed, press the SELECT button to change other features and to
return to the main display.
LANG=ENGLISH – Use the UP or DOWN key to select the desired language to
print and program the Model 3500 / 3700HD / 3000HD. Select English, Spanish,
French or German.
DATE FMT=YYMMDD – Use the UP or DOWN key to select the desired date
format that will be printed and displayed. There are three selections: YYMMDD
(Year, Month, Day), MMDDYY (Month, Day, Year) or DDMMYY (Day, Month,
Year).
SET YEAR – Use the UP or DOWN key to set the desired year.
SET MONTH – Use the UP or DOWN key to set the desired month.
SET DAY – Use the UP or DOWN key to set the desired day of month.
DAYLIGHT SAV= – Allows Models 3500 / 3700HD / 3000HD to automatically
adjust to daylight saving time. There are 5 options you can select with the UP or
DOWN key:
2
USA07+ Automatically adjusts time to 2007 United States daylight saving
time (starts Second Sunday of March and ends First Sunday of November).
USA06- Automatically adjusts time to Pre-2007 United States daylight
saving time (starts First Sunday of April and ends Last Sunday of October).
EURO Automatically adjusts time to European daylight saving time. (Begins
last Sunday in March and ends on the last Sunday in October).
OTHER Allows you to select a custom start and end Sunday for automatic
daylight saving time changes. After SELECTING OTHER, use the UP or DOWN
key to select the desired Sunday (only Sundays are allowed) you wish to START
daylight saving time, press SELECT and again use the UP or DOWN key to select
the desired Sunday to END daylight saving time. Note: The time will automatically
change at 2 a.m. on the selected Sundays.
OFF- Unit will not adjust time for daylight saving time.
TIME STD=LINE. This option should only be changed for areas outside of the
U.S.A where there is frequency variation in the power lines. If you are operating
this unit in an area that has problems with power line frequency resulting in the
unit losing or gaining time or you are running the unit off a generator/inverter, use
the UP or DOWN key to change the TIME STD to CRYSTAL which will cause the
unit to keep time using an internal device.
DSPLY FMT=AM/PM – Selects how the time will be displayed on the front of the
unit. Using the UP or DOWN keys, select one of the following options:
1. AM/PM - Standard time (1-12 hours).
2. MIL - Military time (0-24 hours).
PRINT FMT=AM/PM – Selects how time will be printed on the time card. Using
the UP or DOWN keys, select one of the following options:
1. AM/PM - Standard time (3:30PM)
2. MIL- Military time (3:30PM = 15:30)
3. ATAAP-Military time with minutes expressed in hundredths of hour
(3:30PM = 15.50)
4. 24H.1-Time with minutes expressed in tenths of an hour.
PRINT DIR=RIGHT – Use the UP or DOWN key to select print on the right side of
the time card or the left side (almost all time cards in the USA are right-sided).
FMT=DATE TIME – Use the UP or DOWN key to select which of the following
formats you want printed on time card:
1. DATE TIME – Prints current date and time.
2. DATE YR TIME – Prints current date, year, and time (small font).
3. DATE YR APPD – Prints current date, year, and APPD (approved)
message.
4. DATE YR FAXD – Prints current date, year, and FAXD (faxed) message.
3
5.
6.
7.
8.
9.
DATE YR FILE – Prints current date, year, and FILE (filed) message.
DATE YR IN – Prints current date, year, and IN message.
DATE YR OUT – Prints current date, year, and OUT message.
DATE YR PAID – Prints current date, year, and PAID message.
DATE YR RCVD – Prints current date, year, and RCVD (received)
message.
10. DATE YR SENT – Prints current date, year, and SENT message.
11. DATE YR ORIG – Prints current date, year, and ORIG (original)
message.
12. DATE YR VOID – Prints current date, year, and VOID message.
13. DATE YR USED – Prints current date, year, and USED message.
14. DATE YR CPLD – Prints current date, year, and CPLD (completed)
message.
SET HOUR – Sets the current hour of day by using the UP or DOWN key.
SET MINUTES – Sets the current minute of day by using the UP or DOWN key.
TROUBLESHOOTING
MASTER RESET – This procedure will clear the entire time clock memory and
reset the program to the original factory defaults. This procedure should only be
used if the time clock is behaving completely erratic. Master reset is accomplished
by unplugging the unit and then plugging the unit back in while depressing the
center programming button (the UP button). Hold the center button until the front
display is visible. All time, set-up, and payroll data will be set to the original factory
defaults.
DISPLAY IS FLASHING Jan 1 12:01AM – Displays when power is lost for more
than 30 days. To correct, reset the time by following these steps.
CHANGING THE PRINT RIBBON
1. Unplug the clock and remove the cover using the key provided.
2. Turn the clock on its side so the ribbon is on top.
3. Manually move the ribbon cartridge holder to the left towards the display.
4. Gently push the hold tab away from the ribbon cartridge and remove the ribbon
cartridge.
5. Snap the new ribbon cartridge into the holder while turning the ribbon advance
knob. Make sure the ribbon and the clear plastic protector slide completely over
the print head.
6. Replace and lock the cover. Test the unit for proper installation by punching
several times on a time card.
4
Ribbon Advance
Knob
Hold Down
Tab
Print Head
Note: If the ribbon is not completely over the print head, the resulting print will
show incomplete characters. If the ribbon cartridge is not completely snapped in
the holder, the resulting print will be increasingly lighter.
FREQUENTLY ASKED QUESTIONS
Do I have to use special cards?
PTI 35100-10 cards were designed for use with the 3500 / 3700HD / 3000HD
when it is used for payroll purposes, or you may use your time recorder to date
and time stamp other documents.
What does ATAAP mean?
ATAAP is the acronym used by the U.S. government that describes how time is
accounted for using hundredths of hour. i.e. (one and a quarter hours equal 1.25
hours).
If further assistance is required, please contact our technical services department
at 1-888-479-7264.
5
SUPPLIES AND OPTIONAL ACCESSORIES
Supplies and optional accessories for the Pyramid M-3500 / 3700HD / 3000HD
are available through most office supply stores or by calling Pyramid Technologies
toll free at 1-888-479-7264.
Part Number
4000R2
4000R6
35100-10D
35100-10DDS
35100-10M
35100-10MDS
400-3
Description
Ribbon 2-pack
Ribbon 6-pack
Time Cards Single-sided 500 pack
Time Cards Double-sided 500 pack
Time Cards Single-sided 1000 pack
Time Cards Double-sided 1000 pack
25 Pocket Time Card Rack
Limited Hardware Warranty
Your Pyramid time clock comes with a 1-year Limited Hardware warranty. If Customer Support
cannot troubleshoot your problem over the phone, we will replace your unit free of charge
Pyramid Technologies, LLC warrants this equipment to the original user against defective
material or workmanship for a period of 1 year from the date of purchase. The manufacturer's
responsibility under this warranty is limited to the repair or replacement of the defective part or
parts. The manufacturer reserves the right to determine whether the parts failed because of
defective material, workmanship, or other causes. Failure caused by accident, alteration,
misuse, or improper packaging of returned unit is not covered by this warranty. Any repair to
the equipment other than by Pyramid voids the warranty. Users in countries other than the USA
should contact the Dealer from whom the unit was purchased. The rights under this warranty
are limited to the original user and may not be transferred to subsequent users. Protect your
equipment by investing in an extended warranty. Call Pyramid Today.
Returns
Returns on non-defective equipment can be made within 30-days of purchase for a full refund
after inspection. Returns on non-defective equipment made after 30-days, but within 60 days of
shipping will be accepted after inspection and are subject to a 15% restocking fee. Returns after
60 days will not be accepted.
Pyramid Technologies, LLC
48 Elm St. Meriden, CT 06450
(888) 479-7264 toll free phone
(203) 238-0550 phone
(203) 634-1696 fax
E-mail: [email protected]
Website: www.PyramidTechnologies.com
6
Specifications
Operating Conditions
Temperature 0C to 50C, (3F to 122F)
Humidity 10 to 95% RH, non condensing
Power Failure
Battery back-up of data and time for 30 days
Battery life (designed to last more than 10 years)
Calendar
Automatic Leap Year and Daylight Saving Time, Year up to 2099
Clock Accuracy
Less than 30 seconds/year
Certifications
UL and CUL
Mounting
Desktop Or Wall Mountable.
7
PYRAMID
MODELO 3500 / 3700HD / 3000HD
INSTRUCCIONES DE INSTALACION
Y USO
IMPORTANTE!
LEA ATENTAMENTE LAS INSTRUCCIONES ANTES
DE LA INSTALACION Y USO DE ESTE PRODUCTO.
Conserve las instrucciones para futuras consultas
CÓMO UTILIZAR SU CONTROLADOR DE TIEMPO PYRAMID 3000 SERIES
PRIMER PASO – DESEMBALAJE
5. Retire el Modelo 3500 / 3700HD / 3000HD de su caja y colóquelo sobre una
superficie firme.
6. Enchufe la unidad en una toma de corriente.
7. Busque la llave provista con la unidad. Destrabe y quite el cobertor superior de
la unidad. Busque las teclas de programación que fueron rotuladas como
SELECCIONAR, ARRIBA, y ABAJO. Coloque su llave en un lugar seguro para
poder acceder a ella en el futuro.
SEGUNDO PASO 2 – PROGRAMACIÓN DEL MODELO 3500 / 3700HD /
3000HD
La programación del Modelo 3500 / 3700HD / 3000HD es muy fácil y puede
realizarse en menos de 5 minutos.
TERCER PASO – LISTO PARA FUNCIONAR
Reinstale el cobertor superior, cierre con llave la unidad y estará listo para utilizar
su nuevo Modelo 3500 / 3700HD / 3000HD.
PROGRAMACIÓN DE SU CONTROLADOR DE TIEMPO PYRAMID SERIE 3000
Para cambiar o programar una función, presione la tecla SELECCIONAR hasta
que se visualice la función deseada. Utilice la tecla ARRIBA o ABAJO para
cambiar la función. Después de cambiar la función visualizada, presione la tecla
SELECCIONAR para cambiar otras funciones y para regresar al visor principal.
IDIOMA=INGLÉS – Utilice la tecla ARRIBA o ABAJO para seleccionar el idioma
deseado para la impresión y programar el Modelo 3500 / 3700HD / 3000HD.
Seleccione inglés, español, francés o alemán.
8
FORMATO DE FECHA=AÑO-MES-DÍA – Utilice la tecla ARRIBA o ABAJO para
seleccionar el formato de fecha deseado para la impresión y visualización. Hay
tres posibilidades de selección: AA-MM-DD (Año, Mes, Día), MMDDYY (Mes, Día,
Año) o DDMMYY (Día, Mes, Año).
PROGRAMAR EL AÑO – Utilice la tecla ARRIBA o ABAJO para programar el
año deseado.
PROGRAMAR EL MES – Utilice la tecla ARRIBA o ABAJO para programar el
mes deseado.
PROGRAMAR EL DÍA – Utilice la tecla ARRIBA o ABAJO para programar el día
deseado.
HORARIO DE VERANO= – Permite que los Modelos 3500 / 3700HD / 3000HD se
adapten automáticamente para el horario de verano. Hay 5 opciones que puede
seleccionar con la tecla ARRIBA o ABAJO:
USA07+ Ajusta automáticamente la hora al horario de verano de Estados
Unidos 2007 (comenzando el segundo domingo de marzo y culminando el primer
domingo de noviembre).
USA06- Ajusta automáticamente la hora al horario de verano de Estados
Unidos anterior a 2007 (comenzando el primer domingo de abril y culminando el
último domingo de octubre).
EURO Ajusta automáticamente la hora al horario de verano europeo
(comenzando el último domingo de marzo y culminando el último domingo de
octubre).
OTHER Le permite seleccionar un domingo convencional de comienzo y fin
para los cambios automáticos de hora según el horario de verano. Después de
SELECCIONAR OTRO, utilice la tecla ARRIBA o ABAJO para seleccionar el
domingo (sólo se permite seleccionar domingos) en el que usted desea
COMENZAR el horario de verano, presione SELECCIONAR y otra vez utilice la
tecla ARRIBA o ABAJO para seleccionar el domingo deseado para FINALIZAR el
horario de verano. Observación: La hora cambiará automáticamente a las 2 de la
mañana de los domingos seleccionados.
DESACTIVADO- La unidad no adaptará la hora al horario de verano.
EST TEMP=LÍNEA. Esta opción sólo se debe cambiar para las zonas externas a
Estados Unidos donde hay variación de frecuencia de la energía eléctrica. Si
usted opera esta unidad en una zona que tiene problemas con la frecuencia de
energía eléctrica que puede provocar un retraso o adelanto de tiempo o si usted
administra la unidad desde un generador/inversor, utilice la tecla ARRIBA o
ABAJO para cambiar el EST TEMP a CRISTAL que permitirá que la unidad
mantenga el registro del tiempo utilizando un dispositivo interno.
9
FORMATO DEL VISOR=AM/PM – Seleccione la forma en que se mostrará la
hora en el frente de la unidad. Utilizando las teclas ARRIBA o ABAJO, seleccione
una de las siguientes opciones:
5. AM/PM - Hora estándar (1-12 horas).
6. MIL - Hora militar (0-24 horas).
FORMATO DE IMPRESIÓN=AM/PM – Seleccione la forma en que se imprimirá
la hora en la tarjeta de tiempo. Utilizando las teclas ARRIBA o ABAJO, seleccione
una de las siguientes opciones:
1. AM/PM - Hora estándar (3:30PM)
2. MIL- Hora militar (3:30PM = 15:30)
7. ATAAP-Hora militar con minutos expresados en centésimos de hora
(3:30PM = 15.50)
8. 24H.1-Hora con minutos expresados en décimas de hora.
DIR IMPRESIÓN=DERECHA – Utilice la tecla ARRIBA o ABAJO para seleccionar
la impresión sobre el lado derecho de la tarjeta de tiempo o sobre el lado
izquierdo (casi todas las tarjetas en Estados Unidos lo tienen sobre el lado
derecho).
FORMATO=FECHA HORA – Utilice la tecla ARRIBA o ABAJO para seleccionar
el formato que desea imprimir sobre la tarjeta de tiempo:
15. FECHA HORA – Imprime la fecha y hora actual.
16. FECHA AÑO HORA – Imprime la fecha, año y hora actuales (fuente
pequeña).
17. FECHA AÑO APROB – Imprime la fecha y año actuales y el mensaje
APROB (aprobado).
18. FECHA AÑO FAX – Imprime la fecha y año actuales y el mensaje
FAX (faxeado).
19. FECHA AÑO ARCH – Imprime la fecha y año actuales y el mensaje
ARCH (archivado).
20. FECHA AÑO ING – Imprime la fecha y año actuales y el mensaje de
INGRESO.
21. FECHA AÑO EGR – Imprime la fecha y año actuales y el mensaje de
EGRESO.
22. FECHA AÑO PAGO – Imprime la fecha y año actuales y el mensaje
PAGO.
23. FECHA AÑO REC – Imprime la fecha y año actuales y el mensaje
REC (recibido).
24. FECHA AÑO ENV - Imprime la fecha y año actuales y el mensaje
ENVIADO.
25. FECHA AÑO ORIG – Imprime la fecha y año actuales y el mensaje
ORIG (original).
10
26. FECHA AÑO NULO – Imprime la fecha y año actuales y el mensaje
NULO.
27. FECHA AÑO UTIL – Imprime la fecha y año actuales y el mensaje
UTILIZADO.
28. FECHA AÑO COMP – Imprime la fecha y año actual y el mensaje
COMP (completo).
PROG HORA – Programa la hora actual del día utilizando la tecla ARRIBA o
ABAJO.
PROG MINUTOS – Programa el minuto actual del día utilizando la tecla ARRIBA
o ABAJO.
SOLUCIÓN DE PROBLEMAS
REPROGRAMACIÓN TOTAL – Este procedimiento borrará toda la memoria del
reloj y reiniciará el programa según el diseño original de fábrica. Este
procedimiento sólo debe utilizarse si el reloj se comporta en forma completamente
errática. La reprogramación total se realiza desenchufando la unidad y volviendo
a enchufarla mientras presiona el botón central de programación (el botón UP).
Sostenga el botón central hasta que se visualice el display frontal. Toda la
información sobre tiempo, programación y nómina se programará según el diseño
original de fábrica.
DISPLAY ENCENDIDO Ene 1 12:01AM – Anuncia cuando estuvo sin energía
durante más de 30 días. Para corregirlo, reprograme la hora siguiendo estos
pasos.
CAMBIO DE LA CINTA DE IMPRESIÓN
7. Desenchufe el controlador y quite el cobertor utilizando la llave provista con la
unidad.
8. Gire el controlador sobre un lado para que la cinta quede hacia arriba.
9. Manualmente mueva el soporte del rollo de cinta hacia la derecha en dirección
al visor.
10. Suavemente presione la pestaña que lo sostiene y aléjela del rollo de cinta y
quite el rollo.
11. Introduzca el nuevo rollo de cinta en el soporte mientras gira la perilla de
avance de la cinta. Asegúrese de que la cinta y el protector plástico claro se
deslicen por completo sobre el cabezal de impresión.
12. Reemplace y cierre el cobertor. Pruebe que la unidad haya quedado
debidamente instalada imprimiendo varias veces sobre una tarjeta de tiempo.
11
Perilla de avance
de la cinta
Pestaña de
cierre
Cabezal de
impresión
Observación: Si la cinta no se encuentra totalmente sobre el cabezal de
impresión, la impresión puede contener caracteres incompletos. Si el rollo de
cinta no está completamente introducido en el soporte, la impresión se volverá
más clara cada vez.
PREGUNTAS MÁS FRECUENTES
¿Debo utilizar tarjetas especiales?
Las tarjetas PTI 35100-10 están diseñadas para ser utilizadas con los modelos
3500 / 3700HD / 3000HD para funciones relacionadas con la nómina, o puede
utilizar su controlador de tiempo para fechar y colocar la hora en otros
documentos.
¿Qué significa ATAAP?
ATAAP es la sigla utilizada por el gobierno de Estados Unidos para describir que
el tiempo se calcula utilizando centésimos de hora (es decir, una hora y cuarto
equivale a 1,25 horas).
Si necesita ayuda, por favor contáctese con nuestro departamento de servicios
técnicos en el 1-888-479-7264.
12
PROVISIONES Y ACCESORIOS OPCIONALES
Las provisiones y accesorios opcionales para el Pyramid M-3500 / 3700HD /
3000HD están disponibles en la mayoría de los locales de provisiones, o llame a
Pyramid directamente en forma gratuita al 1-888-479-7264.
Número del
Repuesto
4000R2
4000R6
35100-10D
35100-10DDS
35100-10M
35100-10MDS
400-3
Descripción
Cinta pack x 2
Cinta pack x 6
Tarjetas de tiempo de una cara, pack x 500
Tarjetas de tiempo de doble cara, pack x 500
Tarjetas de tiempo de una cara, pack x 1000
Tarjetas de tiempo de doble cara, pack x 1000
25 Protectores ajustables de tarjetas de tiempo
de bolsillo
Garantía limitada sobre el Hardware
El controlador de tiempo Pyramid tiene un año de garantía limitada sobre el Hardware. Si
Soporte al Cliente no puede solucionar su problema por teléfono, reemplazaremos su unidad
sin cargo. Pyramid Technologies, LLC garantiza este equipo al usuario original contra material o
mano de obra defectuosos por el período de 1 año a partir de la fecha de compra. La
responsabilidad del fabricante según esta garantía se limita a la reparación o reemplazo de la
parte o partes defectuosas. El fabricante se reserva el derecho de determinar si las partes
fallaron por material o mano de obra defectuosos o por otras causas. Las fallas provocadas por
accidente, alteración, mal uso o embalaje inapropiado de la unidad devuelta no son cubiertas
por esta garantía. Cualquier reparación al equipo que no fuera realizada por Pyramid deja sin
efecto la garantía. Los usuarios en países que no sean Estados Unidos deben contactar al
Distribuidor a quien compraron la unidad. Los derechos establecidos en esta garantía están
limitados al usuario original y no pueden ser transferidos a usuarios posteriores. Proteja su
equipo invirtiendo en una garantía extendida. Llame a Pyramid hoy.
Devoluciones
Las devoluciones de equipos que no presenten fallas pueden realizarse dentro de los 30 días a
partir de la fecha de compra y se reembolsará el monto por completo después de realizar una
inspección. Las devoluciones de equipos que no presenten fallas después de los 30 días, pero
dentro de los 60 días de embarque serán aceptados para su inspección y quedan sujetos a un
15% del arancel de reposición en inventarios. No se aceptan devoluciones después de los 60
días.
Pyramid Technologies, LLC
48 Elm St. Meriden, CT 06450
Línea gratuita: (888) 479-7264
Teléfono: (203) 238-0550
Fax: (203) 634-1696
E-mail: [email protected]
Website: www.PyramidTechnologies.com
13
Especificaciones
Condiciones de funcionamiento
Temperaturas de entre 0ºC y 50ºC, (3ºF a 122ºF)
Humedad de entre 10 y 95% HR, sin condensar
Corte de energía
Batería de repuesto para la fecha y la hora durante 30 días
Vida útil de la batería (diseñada para durar más de 10 años)
Calendario
Registro automático de años bisiestos y horario de verano, hasta el año
2099
Precisión del reloj
Menos de 30 segundos/año
Certificaciones
UL y CUL
Colocación
Sobre un escritorio o una pared.
14
PYRAMID
MODELE 3500 / 3700HD / 3000HD
INSTRUCTIONS D’INSTALLATION ET
MODE D’EMPLOI
IMPORTANT!
LISEZ ATTENTIVEMENT CES INSTRUCTIONS AVANT
D’INSTALLER ET D’UTILISER CE PRODUIT.
Gardez ces instructions pour pouvoir les consulter ultérieurement
UTILISATION DE VOTRE HORLOGE DE SERIES DE TEMPS PYRAMID 3000
PAS 1- DÉBALLAGE
1. Enlevez le Modèle 3500 / 3700HD / 3000HD de sa boîte et placez-le sur une
surface firme.
2. Connectez l´unité à une terminale.
3. Localisez la clé enveloppée avec l´unité, ouvrez-la et enlevez le couvert de
l`unité. Localisez les boutons de programmation, qui sont étiquetés
«SÉLECTIONNER», «EN HAUT» et «EN BAS».Placer votre clé dans un lieu sûr
pour une utilisation plus tard.
PAS 2- PROGRAMMATION DU MODELE 3500 / 3700HD / 3000HD
La programmation du modèle 3500 / 3700HD / 3000HD est très facile et on la
peut faire en moins de 5 minutes.
PAS 3 - PRÊT À COMMENCER
Réinstallez le couvert frontal et fermez l´unité et Vous êtes prêt pour utiliser votre
3000 / 3700HD / 3000HD.
PROGRAMMATION DE L`HORLOGE DE TEMPS DE SERIES PYRAMID 3000
Pour changer ou fixer une caractéristique, pressez le bouton «Sélectionner»
jusqu´à qu´elle apparaisse. Utilisez les boutons «EN HAUT» et « EN BAS» pour
changer la caractéristique .Après le changement de la caractéristique, pressez le
bouton «SELECTIONNER» pour changer des autres caractéristiques et pour
retourner à l´indicateur principal.
15
LANG=ANGLAIS - Utilisez la clé «EN HAUT» ou «EN BAS» pour sélectionner la
langue désirée pour imprimer et programmer le Modèle HD 3500/ 3700HD/ 3000.
Sélectionner l`anglais, espagnol, français ou allemand.
DATE FMT=AAMMJJ- Utilisez la clé «EN HAUT» ou «EN BAS» pour
Sélectionner le format de date désiré à imprimer et montrer. Il y a trois
sélections : AAMMJJ (An, Mois Jour), MMJJAN/ Mois, Jour, An) ou JJMMAA
(Jour, Mois, An).
MONTAGE DE L´AN - Utilisez la clé «EN HAUT» ou «EN BAS» pour arranger
l´an désiré.
MONTAGE DU MOIS - Utilisez la clé «EN HAUT» ou «EN BAS» pour arranger le
mois désiré.
MONTAGE DU JOUR - Utilisez la clé «EN HAUT» ou «EN BAS» pour arranger le
jour du mois désiré.
HEURE D´ÉTÉ= - Cela permet aux Modèles 3500 / 3700HD / 3000HD d´ajuster
automatiquement la différence de l´heure d´été. Il y a 5 options à sélectionner
avec la clé «EN HAUT» ou «EN BAS» :
ETATS-UNIS07+ Ajuste le temps automatiquement à la différence de
l´heure d´été de 2007 aux États-Unis (cela commence le second dimanche de
mars et finit le premier dimanche de novembre).
Etats-Unis06- Ajuste le temps automatiquement à l´heure d´été Pre2007
(cela commence le premier dimanche d´avril et finit le dernier dimanche
d´octobre).
EURO Ajuste le temps automatiquement à l´heure d´été européenne. (Cela
commence le dernier dimanche de mars et finit le dernier dimanche d´octobre).
AUTRE Vous permet de sélectionner un commencement et final habituels
des dimanches pour les changements de l´heure d´été. Après SÉLECTIONNER
AUTRE, utilisez la clé «EN HAUT» ou «EN BAS» pour sélectionner le dimanche
désiré (on permet uniquement les dimanches) quand Vous voulez COMMENCER
l´heure d´été, pressez SÉLECTIONNER et utilisez une autre fois la clé «EN
HAUT» ou «EN BAS» pour sélectionner le dimanche désiré pour Finir l´heure
d´été. Note : Le temps changera automatiquement à 2 a.m. sur les dimanches
choisis.
ARRÊT- L´unité n´ajustera pas le temps pour l´heure d´été.
TEMPS STD = LIGNE. Cette option devrait uniquement être changée pour des
régions hors des E.U. où il y a une variation de fréquence sur les lignes
d´énergie. Si Vous opérez cette unité dans une région qui a des problèmes avec
la fréquence des lignes d´énergie, ce qui provoque la perte ou l´avance du temps
16
sur l´unité ou si vous opérez l´unité avec un générateur/ inverseur, utilisez la clé
«EN HAUT» ou «EN BAS» pour changer le TEMPS STD à CRYSTAL, ce qui fera
que l´unité maintienne le temps en utilisant un dispositif intérieur.
ECRAN FMT=AM/PM - Sélectionne comment le temps sera-t-il montré sur le front
de l´unité. En utilisant la clé «EN HAUT» ou «EN BAS» sélectionnez une des
options suivantes :
1. AM/PM – Temps standard (1-12 heures).
2. MIL- Temps militaire (0-24 heures).
IMPRESSION FMT=AM/PM –Sélectionne comment le temps sera -t-il
imprimé sur la carte de temps. En utilisant la clé «EN HAUT» ou «EN BAS»,
sélectionnez une des options suivantes :
1. AM/PM- Temps standard (3 :30 P .M.).
2. MIL- Temps militaire (3 :30 PM= 15 :30).
3. ATTAP-Temps militaire avec des minutes exprimées en centièmes
d´heure (p.e. 3 :30 PM = 15.50)
4. 24H.1- Temps avec des minutes exprimé fonte en dixièmes d`une heure.
IMPRESSION DIR=DROIT- Utilisez la clé «EN HAUT» ou «EN BAS» pour
sélectionner l`impression sur le côté droit de la carte de temps ou le côté gauche
(presque toutes les cartes de temps aux E .U. s´utilisent sur le côté droit).
FMT=TEMPS DE LA DATE- Utilisez la clé «EN HAUT» ou «EN BAS» pour
sélectionner quel format Vous voulez imprimer sur la carte de temps.
1. TEMPS DE LA DATE-Imprime la date et le temps courants.
2. DATE YR TEMPS--Imprime la date, an et le temps courants (petite fonte).
3. DATE YR APPD- Imprime date, an et le message APPD (approuvé).
4. DATE YR FAXD- Imprime date, an et le message FAXD (faxé).
5. DATE YR- Imprime date courante, an et message d`archive (archivé)
6. DATE YR- Imprime date courante, an et message DANS
7. DATE YR - Imprime date courante, an et message HORS
8. DATE YR- Imprime date courante, an et message PAYE
9. DATE YR- Imprime date courante, an et message RCVD (reçu)
10. DATE YR- Imprime date courante, an et message ENVOYE
11. DATE YR- Imprime date courante, an et message ORIG (original)
12. DATE YR- Imprime date courante, an et message ANNULE
13. DATE YR- Imprime date courante, an et message UTILISE
14. DATE YR- Imprime date courante, an et message CPLD (complété)
ARRANGEMENT DE L`HEURE - Arrange l`heure courante du jour utilisant la clé
« En- Haut ou En- Bas »
17
ARRANGEMENT DES MINUTES - Arrange l`heure courante de la
utilisant la clé « En- Haut ou En- Bas »
minute
COMMENT RÉSOUDRE DES PROBLÈMES
REMONTAGE PRINCIPAL - Ce procédé annulera la mémoire entière du temps
de l´horloge et réarrangera le programme au défaut original de fabrication. Ce
procédé devrait être utilisé uniquement si l´horloge se comporte tout à fait de
façon erratique. On fait le montage principal en déconnectant l´unité et ensuite en
la reconnectant tandis que l´on presse sur le bouton de programmation central (le
bouton UP). Pressez le bouton central jusqu´à ce que l´indicateur du front soit
visible. Tous les temps, le montage et les dates de la liste de paiement se
placeront d´accord avec les défauts originaux de fabrique.
Bouton
d´avance du
Bouton à
Presser
Tête pour
l`impressio
Note : Si le ruban n´est pas complètement placé sur la tête d´impression,
l´impression résultante montrera des caractères incomplets. Si le cartouche du
ruban ne s´encastre pas complètement dans le support, l´impression résultante
sera chaque fois plus faible.
L`ECRAN MONTRE Jan 1 12 :01 AM - Ceci se montre quand l`énergie a été
perdue pour plus que 30 jours. Pour corriger, réarranger le temps suivant ces
étapes.
CHANGEMENT DU RUBAN D´IMPRESSION
1. Déconnectez l`horloge et enlevez le couvert en utilisant la clé qui accompagne
l´unité.
18
2. Tourner l`horloge sur son côté de sorte que le ruban soit au-dessus.
3. Remuer le support du cartouche du ruban manuellement à gauche vers l`écran.
4. Pressez doucement sur le bouton à presser, hors du cartouche du ruban et
enlevez le cartouche du ruban.
5. Introduisez le cartouche neuf du ruban dans le support en même temps que
Vous tournez le bouton d´avance du ruban. Assurez –Vous que le ruban et le
protecteur clair en plastique coulissent complètement sur la tête d´impression.
6. Remettez et fermez le couvert. Testez l´unité pour une installation correcte
introduisant une carte dans le système.
INTERROGATIONS FREQUENTES
Est-ce que j´ai besoin de Cartes de Temps spéciales?
Les Cartes de Temps PTI 35100-10 ont été conçues pour utiliser avec le 3500 /
3700HD / 3000HD quand on utilise, des périodes de paiement, ou Vous pouvez
utiliser votre enregistreur de temps pour dater et imprimer le temps sur d`autres
documents.
Qu´est-ce que ATTAP veut dire?
ATTAP est l´acronyme utilisé par le gouvernement des Etats Unis qui décrit
comment le temps se considère-t-il, en utilisant centièmes d´heure, p.e.( une
heure et le quart égale 1.25 heures).
Si Vous avez besoin d`aide additionnelle, contactez notre département du service
technique : 1-888-479-7264.
APPROVISIONNEMENT ET ACCESSOIRES OPTIONNELLES
Les approvisionnements et accessoires optionnelles pour le Pyramid
M-3500 / 3700HD / 3000HD sont disponibles chez la majorité de magasins
d`articles pour des bureaux ou appelant Technologies Pyramid, appel gratuit
1-888-479-7264.
Numéro de la Pièce
4000R2
4000R6
35100-10D
35100-10DDS
35100-10M
35100-10MDS
400-3
Description
2 paquets de ruban
6 paquets de ruban
Paquet de 500 Cartes de Temps d`un Seul Côté
Paquet de 500 Cartes de Temps de Deux Côtés
Paquet de 1000 Cartes de Temps d`un Seul Côté
Paquet de 1000 Cartes de Temps de Deux Côtés
Support de Poche de 25 Cartes de Temps
19
Garantie Limitée de « Hardware «
Votre Horloge de temps Pyramid vient avec une garantie Limitée de « Hardware ». Si le Service
au Client ne peut pas résoudre votre problème par téléphone, nous remplacerons l`unité
gratuitement. Technologies Pyramid, LLC garantie cet équipement à l`usager original contre le
matériel défectueux ou exécution pour une période d`un an depuis la date d`achat. La
responsabilité du fabricant sous cette garantie est limitée à la réparation ou au remplacement
de la pièce ou pièces défectueuses .Le fabricant se réserve le droit de déterminer si les pièces
ont manqué à cause du matériel défectueux ou exécution ou d`autres causes. L´erreur causée
par accident, altération, mauvais usage ou emballage impropre de l´unité retournée, n´est pas
couverte par cette garantie. N`importe quel réparation de l`équipement autre que par Pyramid
annule la garantie. Les usagers d`autres pays hors des E. U .devrions contacter le Distributeur
où l`unité a été achetée. Les droits sous cette garantie sont limités à l`usager original et ne
peuvent pas être transferts aux usagers subséquents. Protégez votre équipement en
investissant dans une garantie étendue. Appelez Pyramid Aujourd`hui.
Renvois
Les renvois d`un équipement non- défectueux peut être faite dans 30 jours de la date d`achat
pour un plein remboursement après inspection. Les renvois d`un équipement non-défectueux
faites après 30 jours, mais dans 60 jours de l`embarquement seront acceptées après inspection
et sont sujet à un tarif de restockage de 15%. Les renvois après 60 jours ne seront pas
acceptés.
Pyramid Technologies, LLC
48 Elm St. Meriden, CT 06450
(888) 479-7264 toll free phone
(203) 238-0550 phone
(203) 634-1696 fax
E-mail: [email protected]
Website: www.PyramidTechnologies.com
20
Spécifications
Conditions opératives
Température OC a 50C, (3F a 122F)
Humidité10 a 95% RH, non condensable
Défaut d´énergie
Réserve de la batterie des données et du temps pour 30 jours
Vie de la batterie (conçue pour une durée supérieure à 10 ans).
Calendrier
Année bissextile automatique et heure d´été. Jusqu´à 2099
Exactitude de l´horloge
Moins de 30 secondes/an
Certifications
UL et CUL
Montage
Montage sur le bureau ou sur un mur.
21
PYRAMID
MODELL 3500 / 3700HD / 3000HD
INSTRUCTIONS
INSTALLATIONS- UND G INSTALLATIONSUND GEBRAUCHSANWEISUNG
EBRAUCHSANWEISUNG
WICHTIG!
LESEN SIE DIESE ANLEITUNG BEVOR SIE DIESES GERÄT
INSTALLIEREN UND IN BETRIEB NEHMEN.
Bewahren sie diese Gebrauchsanweisung für spätere Fragen auf.
Grundeinstellungen
GEBRAUCH IHRER KONTROLLUHR PYRAMID SERIE 3000
SCHRITT 1 – AUSPACKEN
8. Nehmen Sie das Modell 3500 / 3700HD / 3000HD aus seiner Schachtel und
stellen Sie es auf eine feste Oberfläche.
9. Stecken Sie die Einheit in eine Steckdose.
10. Suchen Sie den mit der Einheit verpackten Schlüssel. Schließen Sie den
oberen Deckel der Einheit auf und nehmen Sie ihn ab. Suchen Sie die
Programmierknöpfe, die mit SELECT, UP, und DOWN beschildert sind.
Bewahren Sie den Schlüssel an einem sicheren Ort, um künftig zu öffnen.
SCHRITT 2 – DAS MODELL 3500 / 3700HD / 3000HD PROGRAMMIEREN
Es ist äußerst einfach das Modell 3500 / 3700HD / 3000HD zu programmieren
und es erfordert weniger als 5 Minuten.
SCHRITT 3 – STARTBEREIT
Setzen Sie den oberen Deckel wieder auf, verschließen Sie die Einheit und Sie
sind fertig, um Ihr neues Modell 3500 / 3700HD / 3000HD zu benutzen.
PROGRAMMIEREN DER KONTROLLUHR PYRAMID SERIE 3000
Um eine Eintragung zu ändern oder zu bestimmen, drücken Sie auf den Knopf
SELECT bis die gewünschte Eintragung angezeigt wird. Benutzen Sie den Knopf
UP oder DOWN , um die Eintragung zu ändern. Nachdem Sie die angezeigte
Eintragung geändert haben, drücken Sie auf den Knopf SELECT, um andere
Eintragungen zu ändern und um zur Hauptanzeige zurückzukehren.
22
SPRACHE=ENGLISH – Benutzen Sie die Taste UP oder DOWN, um die
gewünschte Sprache auszuwählen, um auszudrucken und das Modell 3500 /
3700HD / 3000HD zu programmieren. Wählen Sie Englisch, Spanisch,
Französisch oder Deutsch.
DATUM FMT=YYMMDD – Benutzen Sie die Taste UP oder DOWN, um das
gewünschte Datum-Format auszuwählen, das gedruckt und angezeigt werden
soll. Es gibt drei Möglichkeiten: YYMMDD (Jahr, Monat, Tag), MMDDYY (Monat,
Tag, Jahr) oder DDMMYY (Tag, Monat, Jahr).
JAHR EINGEBEN – Benutzen Sie die Taste UP oder DOWN, um das
gewünschte Jahr einzugeben.
MONAT EINGEBBEN – Benutzen Sie die Taste UP oder DOWN, um den
gewünschten Monat einzugeben.
TAG EINGEBEN – Benutzen Sie die Taste UP oder DOWN, um den
gewünschten Tag des Monats einzugeben.
TAGESLICHT EINSPAR= – Ermöglicht es den Modellen 3500 / 3700HD /
3000HD, sich automatisch auf die Tageslichteinsparung einzustellen. Sie können
mit den Tasten UP oder DOWN zwischen 5 Optionen auswählen:
USA07+ Stellt die Zeit automatisch auf die Tageslichteinsparung in den
Vereinigten Staaten 2007 ein (beginnt am zweiten Sonntag im März und endet am
ersten Sonntag im November).
USA06- Stellt die Zeit automatisch auf die Tageslichteinsparung in den
Vereinigten Staaten vor 2007 ein (beginnt am ersten Sonntag im April und endet
am letzten Sonntag im Oktober).
EURO Stellt die Zeit automatisch auf die Tageslichteinsparung in Europa
ein. (Beginnt am letzten Sonntag im März und endet am letzten Sonntag im
Oktober).
OTHER Ermöglicht Ihnen einen kundenspezifischen Anfang- und
Endsonntag für automatische Veränderungen der Tageslichteinsparung. Nach
SELECTING OTHER, benutzen Sie die Taste UP oder DOWN, um den
gewünschten Sonntag auszuwählen (es sind nur Sonntage zugelassen), an dem
die Tageslichteinsparung beginnen soll, drücken sie SELECT und verwenden Sie
die Taste UP oder DOWN noch mal, um den gewünschten END-Sonntag der
Tageslichteinsparung auszuwählen. Anmerkung: Die Zeit ändert sich automatisch
um 2 AM des ausgewählten Sonntags.
OFF- Die Einheit passt die Uhrzeit nicht an die Tageslichteinsparung an.
TIME STD=LINE. Diese Option sollte nur für Gebiete außerhalb der USA geändert
werden, wo es Frequenzänderungen in den Stromleitungen gibt. Wenn Sie diese
23
Einheit in einem Gebiet einsetzen, mit Schwierigkeiten in der Frequenz der
Stromversorgung, so dass die Einheit nach- oder vorgeht, oder wenn Sie die
Einheit mit einem Generator/Umkehrer betreiben, dann benutzen Sie die Taste
UP oder DOWN, um TIME STD auf CRYSTAL zu setzen, so dass die Einheit mit
einer internen Einrichtung in der Zeit bleibt.
DSPLY FMT=AM/PM – Auswahl der Art in der die Zeit an der Front der Einheit
angezeigt wird. Verwenden Sie die Tasten UP oder DOWN, um eine der
folgenden Optionen auszuwählen:
9. AM/PM – Standardzeit (1-12 Stunden).
10. MIL - Militärzeit (0-24 Stunden).
PRINT FMT=AM/PM – Wählt aus, wie die Zeit auf der Zeitkarte ausgedruckt wird.
Mit den Tasten UP oder DOWN, wählen Sie eine der folgenden Optionen:
1. AM/PM - Standardzeit (3:30PM)
2. MIL- Militärzeit (3:30PM = 15:30)
11. ATAAP-Militärzeit mit Minuten in Hundertsteln einer Stunde (3:30PM
= 15.50)
12. 24H.1-Zeit mit Minuten in Zehnteln einer Stunde.
PRINT DIR=RIGHT – Verwenden Sie die Taste UP oder DOWN, um zwischen
Bedrucken der rechten oder linken Seite der Zeitkarte auszuwählen (fast alle
Zeitkarten in den USA werden rechts bedruckt).
FMT=DATE TIME – Verwenden Sie die Taste UP oder DOWN, um auszuwählen,
welches der folgenden Formate Sie auf der Zeitkarte ausdrucken möchten:
29. DATE TIME – Druckt das aktuelle Datum und die Uhrzeit.
30. DATE YR TIME – Druckt das aktuelle Datum, Jahr und Uhrzeit (kleine
Buchstaben).
31. DATE YR APPD – Druckt das aktuelle Datum, Jahr und die Botschaft
APPD (genehmigt).
32. DATE YR FAXD – Druckt das aktuelle Datum, Jahr und die Botschaft
FAXD (Fax gesendet).
33. DATE YR FILE – Druckt das aktuelle Datum, Jahr und die Botschaft
FILE (Datei).
34. DATE YR IN – Druckt das aktuelle Datum, Jahr und die Botschaft IN.
35. DATE YR OUT – Druckt das aktuelle Datum, Jahr und die Botschaft
OUT.
36. DATE YR PAID – Druckt das aktuelle Datum, Jahr und die Botschaft
PAID.
37. DATE YR RCVD – Druckt das aktuelle Datum, Jahr und die Botschaft
RCVD (Eingegangen).
38. DATE YR SENT – Druckt das aktuelle Datum, Jahr und die Botschaft
SENT.
24
39. DATE YR ORIG – Druckt das aktuelle Datum, Jahr und
ORIG (Original).
40. DATE YR VOID – Druckt das aktuelle Datum, Jahr und
VOID (frei).
41. DATE YR USED – Druckt das aktuelle Datum, Jahr und
USED.
42. DATE YR CPLD – Druckt das aktuelle Datum, Jahr und
CPLD (ausgefüllt).
die Botschaft
die Botschaft
die Botschaft
die Botschaft
SET HOUR – Gibt die aktuelle Tageszeit durch Verwendung der Tasten UP oder
DOWN ein.
SET MINUTES – Gibt die aktuellen Minuten des Tages durch Verwendung der
Tasten UP oder DOWN ein.
PROBLEMLÖSUNG
MASTER RESET – Dieses Verfahren löscht den gesamten Speicher der
Kontrolluhr und stellt das Programm auf die ursprünglich im Werk festgesetzten
Werte. Dieses Verfahren solle nur eingesetzt werden, wenn sich die Kontrolluhr
völlig unkontrolliert benimmt. Die Gesamteinstellung erreicht man durch
Ausstecken der Einheit und Wiedereinstecken, während auf den mittleren
Programmierknopf (den UP-Knopf) gedrückt wird. Drücken Sie den mittleren
Knopf nieder, bis die Frontanzeige sichtbar wird. All Daten über Zeiten,
Einstellung und Lohnliste werden auf die ursprünglich im Werk festgesetzten
Werte eingestellt.
ANZEIGE BLINKT Jan 1 12:01AM – Wird bei einer Stromunterbrechung von über
30 Tagen angezeigt. Zum Beheben, stellen Sie die Zeit nach diesen Schritten neu
ein.
FARBBAND AUSWECHSELN
13. Stecken Sie die Uhr aus und nehmen Sie den Deckel mit dem mitgelieferten
Schlüssel ab.
14. Drehen Sie die Uhr auf die Seite, damit das Band oben ist.
15. Schieben Sie mit der Hand den Farbband-Patronenhalter nach links in
Richtung zum Display.
16. Drücken Sie leicht die Halterung von der Patrone weg und entnehmen Sie
die Farbband- Patrone.
17. Schnappen Sie die neue Farbband-Patrone in die Halterung, während Sie
den Vorschubknopf für das Farbband drehen. Vergewissern Sie sich, dass das
Band und der Klarsichtschutz ganz über dem Druckknopf sitzen.
18. Setzen Sie den Deckel wieder auf und verschließen Sie ihn. Prüfen Sie die
Einheit auf richtiges Funktionieren durch mehrmaliges Stempel auf eine
Zeitkarte.
25
Drehknopf für
Farbband
Halterung
Druckkopf
Anmerkung: Wenn sich das Farbband nicht ganz über dem Druckkopf befindet,
wird der Ausdruck unvollständige Zeichen zeigen. Wenn die Farbband-Patrone
nicht ganz in der Halterung eingeschnappt ist, wird der Ausdruck zunehmend
heller.
HÄUFIGE FRAGEN
Muss ich besondere Karten verwenden?
Die PTI 35100-10 Karten sind entworfen, um mit 3500 / 3700HD / 3000HD
verwendet zu werden, wenn sie als Zahlungsliste eingesetzt werden, oder Sie
können die Kontrolluhr verwenden, um Datum und Uhrzeit auf andere Dokumente
zu drucken.
Was heißt ATAAP?
ATAAP ist das Akronym der US-Regierung zur Beschreibung, wie die Zeit in
Hundertsteln einer Stunde berechnet wird (d.h. ein und eine Viertel Stunde sind
1,25 Stunden).
Wenn Sie weitere Unterstützung brauchen, nehmen Sie bitte mit unserem
Kundendienst unter 1-888-479-7264 Kontakt auf.
26
Verbrauchsartikel und Zubehör
Verbrauchsartikel und Zubehör für die Pyramid M 3500 / 3700HD / 3000HD sind
in den meisten Büroartikelgeschäften verfügbar, oder wenden Sie sich direkt und
kostenlos an Pyramid unter der Telefonnummer 1-888-479-7264.
Artikel Nr.
4000 R2
4000 R6
35100-10D
35100-10DDS
35100-10M
35100-10MDS
400-3
Beschreibung
Farbband, 2 Einheiten
Farbband, 6 Einheiten
Zeitkarten, einseitig, 500 Paket
Zeitkarten, doppelseitig, 500 Paket
Zeitkarten, einseitig, 1000 Paket
Zeitkarten, doppelseitig, 1000 Paket
25 Zeitkarten-Halter für die Tasche
Begrenzte Haftung für Hardware
Ihre Pyramid-Kontrolluhr verfügt über eine auf ein Jahr begrenzte Hardwaregarantie. Wenn der
Kundendienst Ihr Problem nicht am Telefon lösen kann, ersetzen wir Ihre Einheit kostenlos.
Pyramid Technologies, LLC garantiert dem Originalkäufer diese Einrichtung im Fall von
Werkstoff- oder Herstellungsmängeln für ein Jahr vom Kaufdatum an. Die Verantwortung des
Herstellers im Rahmen dieser Garantie ist auf die Reparatur oder den Ersatz des oder der
schadhaften Teils oder Teile begrenzt. Der Hersteller behält sich das Recht vor zu entscheiden,
ob die Teile auf Grund fehlerhafter Werkstoffe, Verarbeitung oder anderer Gründe versagt
haben. Das Versagen auf Grund von Unfällen, Änderungen, Missbrauch oder unsachgemäßer
Verpackung der zurückgeschickten Einheit wird nicht von dieser Garantie abgedeckt. Jegliche
Reparatur der Einrichtung durch Dritte verstößt gegen die Garantie. Benutzer außerhalb der
USA sollten Kontakt mit dem Verkäufer aufnehmen, bei dem die Einheit erworben wurde. Die
Rechte im Rahmen dieser Garantie beschränken sich auf den Originalbenutzer und sind nicht
auf Folgeeigentümer übertragbar. Schützen Sie Ihre Einrichtung und Erwerben Sie eine
ausgedehnte Garantie. Rufen Sie noch heute bei Pyramid an.
Rückgaben
Rückgaben nicht mangelhafter Einrichtungen können binnen 30 Tagen nach dem Kaufdatum
gegen volle Erstattung nach Inspektion erfolgen. Die Rückgaben nicht mangelhafter
Einrichtungen nach 30 Tagen, aber innerhalb von 60 Tagen nach Verschiffung, werden nach
Inspektion zugelassen und unterliegen einem Skonto von 15 %. Rückgaben nach 60 Tagen
werden nicht angenommen.
Pyramid Technologies, LLC
48 Elm St. Meriden, CT 06450
(888) 479-7264 toll free phone
(203) 238-0550 phone
(203) 634-1696 fax
E-mail: [email protected]
Website: www.PyramidTechnologies.com
27
Spezifikationen
Betriebsbedingungen
Temperatur 0 oC bis 50 oC, (3 oF bis 122 oF)
Feuchtigkeit 10 bis 95% rel.F., kondensatfrei
Stromausfall
Batterieunterstützung für Daten und Zeit über 30 Tage
Batteriehaltbarkeit (für über 10 Jahre Haltbarkeit entworfen)
Kalender
Automatik für Schaltjahre und Tageslicht-Einsparung, bis zum Jahr 2099
Uhrwerk-Präzision
Weniger als 30 Sekunde/Jahr
Zertifizierungen
UL und CUL
Montage
Auf dem Schreibtisch oder an der Wand.
28
48 Elm Street, Meriden, CT 06450
www.PyramidTechnologies.com
29
I2080 Rev C