1
Operating Manual
IP222
IP232
Release 9.00, hotfix 17, 1. edition November 2012
Brand names are used with no guarantee that they may be freely employed.
Almost all hardware and software designations in this manual are registered
trademarks or should be treated as such.
All rights reserved. No part of this manual may be reproduced in any way (print,
photocopy, microfilm or by any other means) or processed, duplicated or
distributed using electronic systems without explicit approval.
Texts and illustrations have been compiled and software created with the utmost
care, however errors cannot be completely ruled out. This documentation is
therefore supplied under exclusion of any liability or warranty of suitability for
specific purposes. innovaphone reserves the right to improve or modify this
documentation without prior notice.
Copyright © 2012 innovaphone ® AG
Böblinger Str. 76, 71065 Sindelfingen
Tel: +49 7031 73009 – 0 Fax: +49 7031 73009 – 99
http://www.innovaphone.com
P
P
Table of contents
1.
2.
3.
4.
5.
6.
7.
8.
9.
About this manual .......................................................................................................................... 2
1.1.
Overview of the chapters ...................................................................................................... 2
1.2.
Operating instructions ........................................................................................................... 3
1.3.
Display .................................................................................................................................. 4
1.4.
Navigation and saving settings in the menu ......................................................................... 7
Call functions ................................................................................................................................. 7
2.1.
Setting up two connections ................................................................................................... 7
2.1.1
Administering a waiting call...................................................................................... 7
2.1.2
Dialling a new number ............................................................................................. 8
2.2.
Three-party conference ......................................................................................................... 8
2.3.
Switching between calls ........................................................................................................ 9
2.4.
Call back ............................................................................................................................... 9
2.4.1
Call back on busy ..................................................................................................... 9
2.4.2
Call back on no reply ............................................................................................... 9
2.4.3
Automatic redialling ................................................................................................ 10
2.5.
Announcement function ...................................................................................................... 10
2.6.
Partner function ................................................................................................................... 11
2.7.
Pickup list function .............................................................................................................. 11
2.8.
Park ..................................................................................................................................... 12
2.9.
Operating two or more calls ................................................................................................ 12
2.10. Function keys ...................................................................................................................... 12
2.11. Secure connections ............................................................................................................ 13
Messages .................................................................................................................................... 13
3.1.
Sending messages ............................................................................................................. 13
3.1.1
Sending a message using the menu ..................................................................... 13
3.1.2
Send message using Indirect dialling .................................................................... 13
3.2.
Receiving messages ........................................................................................................... 13
3.3.
Leaving a message ............................................................................................................. 15
Telephone directory ..................................................................................................................... 15
User Setup Menu ......................................................................................................................... 15
5.1.
Call diversion....................................................................................................................... 15
5.1.1
Diversion options ................................................................................................... 16
5.1.2
Setting up a call diversion ...................................................................................... 16
5.2.
Presence ............................................................................................................................. 16
5.3.
Do not disturb ...................................................................................................................... 17
5.4.
Call waiting .......................................................................................................................... 18
5.5.
Calling line identification presentation (CLIP) ..................................................................... 18
Phone Setup menu ...................................................................................................................... 18
6.1.
Headset ............................................................................................................................... 18
6.2.
Direct dialling....................................................................................................................... 19
6.3.
Lock ..................................................................................................................................... 20
6.4.
Change PIN......................................................................................................................... 20
6.5.
LCD contrast ....................................................................................................................... 20
User lists / multiple registration .................................................................................................... 20
7.1.
Registering co-users ........................................................................................................... 21
7.2.
Unregister or delete co-user ............................................................................................... 21
7.3.
Switch user.......................................................................................................................... 21
7.4.
Change language ................................................................................................................ 21
7.5.
Setting up the ring melody .................................................................................................. 22
Indirect dialling (special menu) .................................................................................................... 22
Administration .............................................................................................................................. 23
9.1.
Information .......................................................................................................................... 23
9.2.
IP settings ........................................................................................................................... 23
9.3.
Registration ......................................................................................................................... 23
9.4.
Reset Configuration ............................................................................................................ 24
Bedienungsanleitung
IP-Telefon IP222 / IP232
-1-
-1-
Declaration of conformity
innovaphone AG declares that the telephones IP222 and IP232 meet all basic
requirements of the 1999/5/EC European guideline.
The original declaration of conformity is delivered with the telephone. It is also available
on the innovaphone website under http://www.innovaphone.com.
1. About this manual
This manual describes how to operate the innovaphone IP telephone IP222 or
innovaphone IP232. Handling of both telephones is mostly identical. Specific telephone
features are indicated separately.
Please refer to the innovaphone Wiki at http://wiki.innovaphone.com if you require
information on configuration and connection.
Please check for new versions of this manual in the download area on our website at
http://www.innovaphone.com.
Always comply with the safety instructions in the document included with this delivery
and at the end of this manual.
1.1. Overview of the chapters
This manual provides comprehensive information on the IP telephones IP222 and
IP232. Besides the general basic principles of the telephone, it also provides the entire
operating instructions, including instructions for the administrator.
The easiest way to configure the telephones, particularly the function keys, is via the
telephone’s web interface. To do this please contact the telephone system
administrator.
The following operating instructions for the keypad, screen and instructions on
navigating through the menu are necessary to understand the subsequent chapters.
Bedienungsanleitung
IP-Telefon IP222 / IP232
-2-
-2-
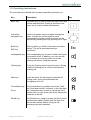
1.2. Operating instructions
The overview below details the key names and their particular use.
Key
Description
Menu key
The Menu key is used to open the main menu and
confirm selected lines. During a connection the
menu key is used to initiate conferences.
4-direction
navigation key
Use the navigation key to navigate through the
menu, but also for quick access to some
functionalities. During a call the volume can be
adjusted by pressing the keys pointing left or right.
Back key
This key takes you back in the menu and saves
entries. The call is terminated during a
connection.
ESC key
Key
Loudspeaker key The Loudspeaker key is used to switch the handsfree system on/off. In addition, you can use this
key to accept an incoming call or to end an
existing call without using the handset.
Clearing key
Press the Clearing key to leave the menu. During
a call the Clearing key is used to terminate the
existing call.
Mute key
In the idle state, the call signal is switched off.
During a call, a long press switches the
microphone off or on.
Consultation key
The Consultation key enables use of the "Hold"
and "Hold and retrieve" functions. In the idle state,
the Consultation key is used to call up the list of
missed calls. In entry mode, the R key deletes the
character to the left.
R key
Redial key
Bedienungsanleitung
The Redial key is used to access the list of phone
numbers last dialled. Double click the key to redial the last number dialled. During a call,
incoming calls are forwarded.
IP-Telefon IP222 / IP232
-3-
-3-
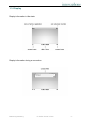
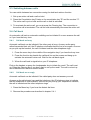
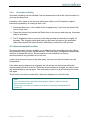
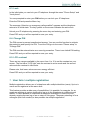
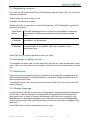
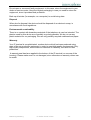
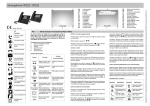
1.3. Display
Display information in idle state:
Display information during a connection:
Bedienungsanleitung
IP-Telefon IP222 / IP232
-4-
-4-
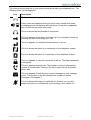
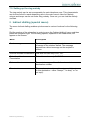
The icons on the bottom line of your screen show which state your telephone is in. The
following icons can be displayed:
Icon
Description
The handset icon is displayed during an active call using the handset.
These icons are displayed during an active call in hands-free mode.
Loudspeaker and microphone are both active. Press the loudspeaker
key to switch on the hands-free mode.
This icon shows that the headset is connected.
This icon appears if the active lock is set up for your keypad. Unlock by
pressing any key and entering your PIN.
This icon appears if a conditional call diversion is set up.
This icon shows that there is no connection to the telephone system.
This icon shows that there is a connection to the telephone system.
This icon appears if a secure connection is set up. The data transmitted
is encrypted.
This icon displays missed calls. The number on the left indicates the
number of missed calls. Press the (R) key to open the list of possible
return calls.
This icon appears if there are any unread messages in your message
in-box. The number on the left indicates the number of unread
messages. See chapter 3.
This icon shows that ringing is switched off. Whether you can still
answer the phone or not depends on the settings. See chapter 5.3.
Bedienungsanleitung
IP-Telefon IP222 / IP232
-5-
-5-
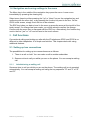
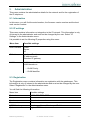
In addition to the icons on the bottom line, icons are also displayed in the contact field.
The contact field is displayed when a call is being set up and during a call.
Icon
Description
Connected, conference, wait queue
Call pending, call waiting
Call initiated, ringing
This icon shows that the call has been forwarded manually. Press the
arrow to the right to go to a menu with further information on the call.
This icon shows that the call has been forwarded automatically. Press
the arrow to the right to go to a menu with further information on the
call.
Presence icon: Vacation
Presence icon: Lunch
Presence icon: Meeting
Presence icon: Away
Presence icon: Busy
Bedienungsanleitung
IP-Telefon IP222 / IP232
-6-
-6-
1.4. Navigation and saving settings in the menu
The Menu key in the middle of the navigation key opens the menu. Leave menu
immediately by pressing the clearing key.
Select menu items by either pressing the "up" or "down" key on the navigation key and
confirming with the menu key, or by pressing the function key next to the line. On the
IP232 touch screen, simply touch the line to be selected.
The ESC key takes you back a level in the menu or press the arrow at the top left of the
touch screen. If a change has been made, you will be asked to confirm the change.
Confirm with the menu key or disregard with the ESC key. Alternatively, the function key
next to the line "yes" or "no" can be used or the touch screen.
2. Call functions
Conventional calling and picking up calls with the IP telephones IP222 and IP232 is no
different to other telephones. It is simple and intuitive. This chapter deals with using
additional features.
2.1. Setting up two connections
The possibilities for setting up two connections are as follows:
1. There is a call on hold. You can make a call to another subscriber.
2. Someone tries to call you whilst you are on the phone. You can accept a waiting
call.
2.1.1
Administering a waiting call
Someone tries to call you whilst you are on the phone. The waiting call is not accepted
automatically. You can accept a waiting call using the key sequence "R" and "2" or “R”
and “R”.
Bedienungsanleitung
IP-Telefon IP222 / IP232
-7-
-7-
2.1.2
Dialling a new number
Whilst connected with an active call, you can set up a new connection by calling another
subscriber. You have the possibility of transferring an active call or initiating a
conference.
Key
Effect
1. Press the consultation key during a call. The active call is put on hold
and you can hear a dial tone.
2. A connection is set up to the number dialled. If the subscriber answers,
you can make a consultation before the transfer.
3. Replace the handset or, if you are in hands-free mode, press the
Loudspeaker key. The caller will be connected.
4. If, after the consultation, you no longer want to transfer the call there,
you can end this active connection by pressing the Clearing key. You
are then connected with the call that was previously on hold.
During an active call, press the redial key to initiate a second call. The call
is automatically transferred as soon as the phone rings or there is a callwaiting indication at the selected destination. You are not able to set up a
conference.
2.2. Three-party conference
You can set up a conference between yourself and two other connections. Set up two
connections as described in the previous chapter. Once two connections have been set
up, a conference can be initiated.
Press the Menu key in the middle of the navigation key. To terminate the conference
press the Menu key again. The call put on hold before initiating the conference is now
on hold again.
To terminate the active connection, you must press the Clearing key. The connection to
the active call is terminated. The call on hold now becomes the active call.
Bedienungsanleitung
IP-Telefon IP222 / IP232
-8-
-8-
2.3. Switching between calls
You can switch between two connections using the hold and retrieve function.
1. Set up an active call and a call on hold.
2. Press the Consultation key R twice or the consultation key "R" and the number "2".
The active call is put on hold and the call on hold is activated.
3. To terminate the active call, you must press the Clearing key. The connection to
the active call is terminated. The call on hold automatically becomes the active call.
2.4. Call back
An automatic call back or automatic redialling can be initiated if no-one answers the call
or if you hear the busy tone.
2.4.1
Call back on busy
Automatic call back can be initiated if the other party is busy. As soon as the party
called has ended their call, the IP telephone indicates that the line is free again. As soon
as you pick up the handset, the call is initiated and the other telephone rings.
1. Press the menu key in the middle of the navigation key if you hear the busy tone.
2. Press the function key beside the call back line on the screen and hang up to
activate the automatic return call. Wait for the call back signal.
3. When the call back is signalled on your IP telephone:
Pick up the handset or press the Loudspeaker key to initiate the recall. The call is set
up. Press the Clearing key if you don't want to set up the recall. The call is not set up
and is deleted from the list of active recalls.
2.4.2
Call back on no reply
Automatic call back can be initiated if the called party does not answer your call.
As soon as the called party has used the telephone, the IP telephone rings to indicate
that the subscriber is now available. As soon as you pick up your telephone’s handset,
the call is initiated and the other telephone rings.
1. Press the Menu key if you hear the distant dial tone.
2. Resume the procedure as described in chapter 2.4.1.
Bedienungsanleitung
IP-Telefon IP222 / IP232
-9-
-9-
2.4.3
Automatic redialling
Automatic redialling can be initiated if no-one answers the call at the other terminal or if
you hear the busy tone.
If another call is made at the terminal which was called, your IP telephone rings to
indicate the possibility of making a return call.
1. Press the Menu key in the middle of the navigation key if you hear the distant dial
tone or busy tone.
2. Press the function key beside the Redial line on the screen and hang up. Automatic
redial is activated.
3. The IP telephone tries to connect to the other terminal at intervals of roughly 30
seconds. The outgoing call signal tone can be heard as soon as the automatic
redial has reached the other terminal. Redialling is restricted to 20 minutes.
2.5. Announcement function
The Announcement function enables you to address other subscribers directly without
the subscriber having to pick up the handset. The other party’s telephone automatically
switches to hands-free mode. The microphone is not activated, so that an
announcement is only possible at on one end.
A short tone announces you to the other party, and you can then be heard over the
loudspeaker.
If the other party’s telephone is engaged, the call will go into hold mode whilst the
Announcement function is active. Once the announcement is finished, the call on hold
will automatically be set up again. The other party’s call on hold will become the active
call again.
This function can only be used after it has been assigned to a function key.
Note:
You must have been granted administrator rights in order to use the
Announcement function.
The person you wish to contact must also be using an innovaphone IP
telephone.
Bedienungsanleitung
IP-Telefon IP222 / IP232
- 10 -
- 10 -
2.6. Partner function
The Partner function offers three possibilities:
Partner
status "Busy"
If your partner is connected, you can take a look at their connections.
Partner
status
"Ringing"
A call to the configured partner’s telephone is signalled on your
telephone. The bell symbol and the caller’s telephone number
appear next to the name of the partner.
The call can be picked up by pressing the adjacent function key.
Partner
status "free"
The key can be used like a direct dialling key if the partner’s line is
free. The partner is called by pressing the key.
This function can only be used after it has been assigned to a function key.
2.7. Pickup list function
The Pickup List function is used to display all group telephones that are currently ringing
and the number of the first caller. This function allows a call from a partner telephone to
be picked via a diversion.
1. If there is only one call that needs answering, it can be picked up by pressing the
function key beside the Pickup List entry.
2. If several calls need answering, all of these calls can be displayed in a menu by
pressing the Pickup List key. To select a call from the list for answering, proceed as
follows:
Open the Pickup List menu by pressing the function key next to the Pickup List entry.
Select the desired entry in the list with the arrow keys "up" or "down" on the navigation
key. Press the arrow key to the right on the navigation key or the function key beside
the entry and the selected call is picked up.
Bedienungsanleitung
IP-Telefon IP222 / IP232
- 11 -
- 11 -
2.8. Park
You can use this function to park and unpark calls. The parked calls are linked to an
existing object in the same group. The object can for example be a telephone, the
exchange line or the queue.
You can park a call onto your own IP telephone or take an external call that has been
parked on your telephone. Furthermore, you can park a call onto an external object (not
your own telephone) or pick up the parked call from an external object.
This function can only be used after it has been assigned to a function key.
2.9. Operating two or more calls
Your IP telephones IP222 and IP232 are able to hold more than two calls at the same
time.
Key combination
Description
+
Switch between active call and call on hold
+0
Reject the displayed call waiting
+1
Disconnect active call, call on hold becomes active call
+2
Switch between active call and call on hold
+ 3 / Menü
Three-party conference mode
+4
Connect active call and call on hold
Overview of the key combinations
2.10. Function keys
Functions simplify the usage of the telephone for recurring processes. The function and
the current status are shown on the screen next to the key. On the IP232's touch screen
the function keys are all displayed on the screen.
Long press the relevant function key (approx. 3 seconds) to set-up and configure the
function keys. Setting-up function keys is even easier using the telephone's web
interface. More detailed information may be found in the innovaphone Wiki at:
http://wiki.innovaphone.com.
Bedienungsanleitung
IP-Telefon IP222 / IP232
- 12 -
- 12 -
2.11. Secure connections
It is possible to make encrypted phone calls with the IP222 and IP232. This hinders
interception by third-parties. An encrypted call is indicated by the "encrypted call" icon in
the status line on your screen.
3. Messages
The Messaging function enables you to send text messages from your IP telephone to
other subscribers and to receive messages from other subscribers.
The function can only be used if all subscribers are using innovaphone IP
telephones. All telephones must be registered to an innovaphone PBX.
3.1. Sending messages
The message content appears as a direct message on the recipient’s screen.
3.1.1
Sending a message using the menu
In the menu go to "Messages" and "new message".
Enter the recipient's number or name in the top line. After pressing the 4 way navigation
key's down key enter the message text.
The message is sent as soon as you press the menu key. "OK" will appear on the
screen once the message has been sent successfully.
3.1.2
Send message using Indirect dialling
It is faster to send messages using indirect dialling than by using the menu. Proceed as
follows in the idle state:
First enter the name or number of the message recipient. Press the menu key to reach
the special menu "Indirect dialling". Select the menu item "Send message". Enter your
text message; the recipient’s number has already been selected.
Send the message by pressing the menu key.
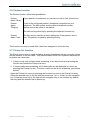
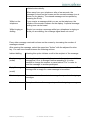
3.2. Receiving messages
It is also possible to receive messages with the IP222 and IP232. It depends what mode
your telephone is in, as to how you receive a message from another subscriber. The
following chart explains which modes allow you to receive messages and how they are
displayed.
In idle state
Bedienungsanleitung
The message is shown directly on the screen in this mode. A
special message tone is heard. Press any key to stop this tone.
Press the speaker key or just pick up the handset to immediately
place a return call to the sender of the message. The call is
IP-Telefon IP222 / IP232
- 13 -
- 13 -
initiated automatically.
When away from your telephone: after a few seconds, the
message is closed on the screen and the unread message icon is
shown on the display. The missed message can be opened by
pressing the R key.
Whilst on the
telephone
If you receive a message whilst you are on the telephone, the
number of the sender is shown on the display. A special message
waiting tone can be heard.
Whilst ringing or
dialling
Should you receive a message whilst your telephone is ringing or
whilst you are dialling, the message signal does not sound.
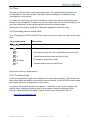
Every other message received is shown on the screen by increasing the number of
messages missed.
After opening the message, select the menu item "Action" with the adjacent function
key. You can now choose between the following actions:
Indirect dialling
Selecting this option initiates a call to the recipient of the message.
Send message
(redial)
Selecting this option opens the form in order for you to resend this
message as it is or to change it before resending it. It is also
possible to change the number or name behind "For" in order to
send the message to another participant.
Reply Message
The message editor is opened and the recall number is pre-set. The
message text is empty for a new message to be written.
(recall)
Delete entry
This option deletes the selected message from your list of outgoing
messages.
Delete list
This option deletes all messages in your list of outgoing messages
Bedienungsanleitung
IP-Telefon IP222 / IP232
- 14 -
- 14 -
3.3. Leaving a message
There are various options available using the menu key if you cannot reach the person:
•
Recall
•
Automatic redial
•
Send message
Should you decide to send a message, then the number dialled will be assumed to be
the recipient of the message.
4. Telephone directory
The telephone directory is your personal phone book in which the names and telephone
numbers of your call partners are managed.
Depending on the configuration, it may be possible to access the directory of the
telephone system (exchange) or of an external LDAP server. Entries in the local
telephone directory consist of the name (= search term), the telephone number and, if
desired, further settings and notes. The number of possible entries depends on the
amount of notes additionally entered etc. Notes can be addresses or birthdays, for
example. Without notes, about 2,000 entries can be managed. All entries are sorted
alphabetically.
The entire telephone directory can be backed up on a computer and reloaded for further
use and as an additional data backup. You can also import external address books from
the computer. To do so, please consult your administrator.
5. User Setup Menu
5.1. Call diversion
The Call Diversion menu allows you to be available even whilst absent.
Bedienungsanleitung
IP-Telefon IP222 / IP232
- 15 -
- 15 -
5.1.1
Diversion options
The IP telephone supports three different types of call diversion:
Unconditional
diversion
In this case, calls are always diverted to another subscriber. This
diversion setting cancels the other diversion types. This setting
diverts calls immediately. The party being called is therefore unable
to answer the calls.
Diversion if
busy
Calls are diverted if there is already an active call.
Diversion if
no reply
Calls are diverted if they are not answered within a certain time limit.
Unlike permanent call diversion, the latter two types allow you to
accept calls within a pre-defined time period before they are
diverted.
In the IP telephone’s initial state, an active call diversion is indicated by the appropriate
icon in the status line. In the case of a permanent diversion, the diversion destination is
also displayed.
5.1.2
Setting up a call diversion
Proceed as follows to activate call diversion:
1. In the initial state, select "User Setup" in the Menu and "Call Diversion".
2. Select the desired setting: “Unconditional”, “Busy” and/or “No reply” either with the
navigation key or with the adjacent function key to "on" or "off". Use the navigation key
to go to the empty line below and enter the desired diversion destination.
3. Save the entry by pressing ESC and confirming you want to save it.
5.2. Presence
The Presence menu provides various possibilities: You can:
1. Show your status to your calling partner or
2. show a status message to other subscribers.
Bedienungsanleitung
IP-Telefon IP222 / IP232
- 16 -
- 16 -
Select "Presence" in the "User Setup" menu. The following settings are possible:
Activity
This menu item allows you to select a pre-set activity with the navigation
key as a status setting. If a subscriber has assigned your number to a
partner key, your partner directly sees the status message on the screen
next to your name.
Note
Under this menu item it is possible to write your own status message.
When you receive an incoming call, the caller sees the note on the
screen under the name of the person called.
Press ESC to go back one level in the menu, you will be requested to save your entries.
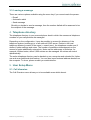
5.3. Do not disturb
This function allows you to respond in a particular way to incoming calls.
Incoming calls are categorised as: (For) Internal calls, External calls and Any call
For defined incoming calls, you can choose between four possible responses (Action):
Ringing off
Your telephone will not ring for incoming calls. The setting is indicated
on the screen by the
icon.
The call is still shown on the screen, however, and you can take the
call at any time.
Silence
In the “Silence” state, the ringing of your IP telephone is suspended
for incoming calls. The setting is indicated on the screen by the
icon.
Unlike with the "Ringing off" function, it is not possible to take the call.
A dial tone is nonetheless forwarded to the caller. You will see the
missed call on the screen.
Busy
The call is blocked with this option. The caller receives a busy signal.
Out-of-office The presence icon "away" is shown to the caller. An out-of-office
message can also be specified.
Press ESC to go back one level in the menu, you will be requested to save your entries.
Bedienungsanleitung
IP-Telefon IP222 / IP232
- 17 -
- 17 -
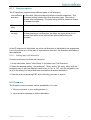
5.4. Call waiting
1. This function allows you to control call waiting while engaged in a telephone call.
2. In the initial state, press the following keys: Menu key in the middle of the
navigation key and the function key next to User Setup.
3. Use the function key next to Call Waiting, to confirm your choice between the
following call waiting states:
Off
The call waiting function is switched off. The caller receives a busy
signal and the called party receives no call-waiting signal.
On (once)
A call-waiting tone sounds once.
On (mute)
No call-waiting tone; you only receive a visual notification of a new call
on the screen.
On (default)
Call waiting duration and signal are in accordance with the countryspecific standard.
Press ESC and you will be required to save your entry.
5.5. Calling line identification presentation (CLIP)
This function is used to switch the calling line identification presentation feature for
outgoing calls on or off. The setting applies for all subsequent calls, in so far as settings
are not made for individual calls.
1. In the initial state, press the following keys: Menu key in the middle of the
navigation key and the function key next to User Setup.
2. Use the function key next to Number Presentation to switch this feature on or off.
3. Press ESC and you will be required to save your entry.
6. Phone Setup menu
The Phone Setup menu relates to the IP telephone hardware, irrespective of the user.
6.1. Headset
Before installing the headset please check whether the innovaphone telephone
supports it. The current list of compatible headsets can be found in the innovaphone
Wiki under: http://wiki.innovaphone.com
Hardware
Plug your headset's USB connector into a free USB slot on the IP telephone. It is not
necessary to install the computer software. The computer software only needs to be
Bedienungsanleitung
IP-Telefon IP222 / IP232
- 18 -
- 18 -
installed for headsets that need a direct connection to the telephone via DHSG (with
DHSG-USB adapter) and a second connection to the computer via USB.
Configuration
The headset is automatically recognised and configured by the telephone. A headset
icon appears in the status bar when the configuration is successful.
Accepting incoming calls
The telephone rings when there is an incoming call. If the headset supports the feature,
a signal is also heard on the headset and calling information is shown on the display.
The call can be answered by pressing the pick up call key on the headset. End the call
by pressing the same key on the headset.
Outgoing calls
A call is always prepared by dialling the number or selecting a number from one of the
phone lists. A call can be made from the headset by either pressing the redial key or the
respective key on the headset. Despite an installed headset it is still possible to set-up a
call by picking up the handset, or by pressing the speaker key in hands-free mode.
Volume control
If the headset has volume control it can be used. Volume control on the telephone
extends the settings range on the headset.
Muting
Muting can be used on both a suitable headset and on the telephone by pressing the
microphone key. Muting on the headset is not shown on the telephone display.
6.2. Direct dialling
If direct dialling is switched on, a direct dialling number is dialled after picking up the
handset or pressing the speaker key.
You can reach direct dialling in the menu over "Phone setup". Switch Direct dial on and
enter the number to be dialled.
If you have set a delay, the number or name is dialled after a pre-defined time interval
(in seconds).
Press ESC and you will be required to save your entry.
Bedienungsanleitung
IP-Telefon IP222 / IP232
- 19 -
- 19 -
6.3. Lock
In the initial state you can lock your IP telephone through the menu "Phone Setup" and
"Lock phone".
You are prompted to enter your PIN before you can lock your IP telephone.
Enter the PIN and press the Menu key.
The message “Attention no emergency calls possible!” appears and the telephone
returns to its initial state. The key symbol on the screen indicates the active lock.
Unlock your IP telephone by pressing the menu key and entering your PIN.
Press ESC and you will be required to save your entry.
6.4. Change PIN
The PIN serves to prevent unauthorised access. You can use this function to activate
the protection and specify the PIN. To set the PIN go via the menu "Phone setup" to
"Change PIN".
The PIN must be entered twice as a security precaution. There is no default PIN setting.
Press ESC and you will be required to save your entry.
6.5. LCD contrast
There are two ranges available in the menu from 1 to 15 to set the contrast on your
screen. The first value "LCD light" sets the contrast in active mode and the second
value sets the contrast in idle mode.
Please note, that lower values are more energy efficient.
Press ESC and you will be required to save your entry.
7. User lists / multiple registration
Multiple registration allows use of a telephone with multiple identities (users). Up to six
users can be registered at the same time.
This feature provides a wide array of possibilities. It is possible, for example, for an
employee working at various locations to log on to the telephone at a different work
station. It is also possible to implement a telephone exchange or hotline function,
whereby employees can log on as co-users of this group. Temporary standing in for a
colleague (their call number) is also possible via multiple registration.
Bedienungsanleitung
IP-Telefon IP222 / IP232
- 20 -
- 20 -
7.1. Registering co-users
A co-user can be registered with your IP telephone using the menu "User list". Enter the
following information:
"Name" enter the name of the co-user,
"Number" the extension number,
"Password" if the co-user has one, and in the sub-item "VOIP Gatekeeper" specify the
following information:
Gatekeeper
Name
If several gatekeepers are to be active at one address, a particular
gatekeeper is identified amongst them using the name entered
here.
Gatekeeper
IP Address
Here, you specify the IP address at which the first responsible
gatekeeper can be reached.
Gatekeeper
IP Address
There should be a further gatekeeper in the network in case the
first gatekeeper is unavailable. Enter the IP address of this
gatekeeper here.
Press ESC and you will be required to save your entry.
7.2. Unregister or delete co-user
To unregister the active user or even delete him from the list, select the desired co-user
in the "User List" and confirm the Unregister or Delete function with the relevant function
key.
7.3. Switch user
If several users are registered with your telephone, incoming calls are signalled for all
users with specification of the called identity on the screen. Outgoing calls are set up
with the active user's data.
To switch the active user, select the desired co-user under "User List" and confirm the
option "Activate".
7.4. Change language
User guidance is available in more than 14 languages. Language settings are assigned
to each user. Personal settings for ringing tones and programmed function keys are
also stored there. In order to change user settings, select the user concerned in the
User list menu. Language setting and time format can be found under Preferences,
various ringing tones under tone Ring melody and function keys can be changed in the
third item.
Press ESC and you will be required to save your entry.
Bedienungsanleitung
IP-Telefon IP222 / IP232
- 21 -
- 21 -
7.5. Setting up the ring melody
The ring melody can be set up separately for each telephone user. This characteristic
can thus be found for each respective user in the main menu’s User list. Melody,
volume and tempo can be set under Ring melody. Once set, you can test the melody
via Start.
8. Indirect dialling (special menu)
The menu Indirect dialling enables quick access to various functions for the following
call.
Dial the number of the subscriber in order to open the "Indirect dialling" menu and then
press the navigation right. The following options, explained in the chart below, will
appear on the screen:
Menu
Description
Send message
By choosing this option you are able to send a text
message to the number dialled. The message
appears as a direct message on the recipient's
screen.
Dial with Number Presentation
Dial with one-time only CLIP "On".
Dial without Number
Presentation
Dial with one-time only CLIP "Off".
Dial - no diversion
To override any possible call diversion set at
destination number.
Diversion to...
The number entered is used to setup a call diversion
to this destination - either "always", "on busy" or "on
no reply".
Bedienungsanleitung
IP-Telefon IP222 / IP232
- 22 -
- 22 -
9.
Administration
This menu contains the administrative details for the network and for the registration of
the IP telephone.
9.1. Information
In this menu, you will find the serial number, the firmware version number and the boot
code version number.
9.2. IP settings
This menu contains information on integration in the IP network. This information is only
of interest to the administrator and must not be changed by the user. Select "IP
Settings" in the Administration menu.
It is possible to set the following IP properties using this menu:
Menu item
Possible settings
DHCP Modus
Client
Server
off
IP Addresses
Interface IP address
IP address mask
Standard IP gateway
VLAN
VLAN header off
VLAN header on
•
VLAN Priority
•
VLAN Identifier
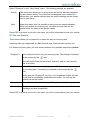
9.3. Registration
The Registration menu contains information on registration with the gatekeeper. This
information is only of interest to the administrator and must not be changed by the user.
Select "Registration" in the Administration menu.
You will find the following information:
Menu item
Protocol
Name
Number
Password
VOIP Gatekeeper
Options
Bedienungsanleitung
Possible settings
H323, SIP, TSIP, SIPS
User name
His extension number
If set
Gatekeeper Name, Gatekeeper IP Address
regional PBX tones
IP-Telefon IP222 / IP232
- 23 -
- 23 -
9.4. Reset Configuration
It is possible to reset the device to factory default configuration. All settings made on the
device are then lost. Select "Registration" in the Administration menu.
You are requested to confirm whether the device should be returned to factory default
settings. You can return the device to factory settings ("yes") whereby all changes will
be lost. Alternatively, you can leave the menu ("no").
Once you have restored the device to its factory default configuration, restart is
performed and all data and settings will be lost.
Bedienungsanleitung
IP-Telefon IP222 / IP232
- 24 -
- 24 -
Safety instructions
The manufacturer assumes no responsibility for any personal injury, damage to property
or subsequent damage that can be attributed to improper use of the device.
innovaphone AG declares that the device meets all basic requirements of the
1999/5/EC European guideline.
The innovaphone Wiki at wiki.innovaphone.com should also be observed for
configuration of the IP telephones. All instructions specified there should be followed
carefully and the devices should only be used in accordance with these instructions.
Power supply
Power can be supplied using the power supply or the network cable (power over LAN).
The external power supply is designed for operation with a 100-240 V, 50 Hz AC mains
network. Never try to connect the equipment to other mains systems!
The equipment cannot be operated during a mains failure. The equipment settings
however are retained.
The power socket must be near to the equipment and easy to access. The power
supply to the device can be interrupted by pulling the mains adapters out of the power
socket or, if the power is supplied via a network cable (Power over LAN), by removing
the network cable.
Installation and connection
Lay the connection cables carefully so that no one can trip over them. Connected
cables must not be bent excessively, pulled or subjected to mechanical strain.
The equipment is intended for use in dry rooms only.
The equipment must not be installed and operated under the following conditions:
•
In damp, dusty rooms or in rooms where an explosion may occur
•
At temperatures over 40°C or under 0°C
•
Where it is subject to impact stress or vibrations
•
In places subject to direct sunlight
Some types of furniture varnish or cleaning products can damage the plastic feet of the
telephone and leave marks. In these cases, make sure you put the equipment on a
stable, non-slip surface.
Cleaning
Use a soft, slightly damp cloth to clean the surface of the equipment housing.
Do not use any chemicals or abrasives. The equipment does not require any
maintenance.
Malfunctions
There is no need to open the device if it is operated and serviced as intended.
Bedienungsanleitung
IP-Telefon IP222 / IP232
- 25 -
- 25 -
Do not open or reconnect faulty equipment. In this case, return the equipment to your
dealer or service centre. Keep the original packaging in case you need to return the
equipment, since it provides ideal protection.
Back up all entries (for example, on a computer) to avoid losing data.
Disposal
When due for disposal, the device should be disposed of as electronic scrap, in
accordance with local regulations.
Environmental sustainability
There is no contact with hazardous materials if the telephone is used as intended. The
plastics used for this device are of partially recycled granulate. We do not use any
plastic material for our packaging. We use only partially recycled cardboard and paper.
Warranty
Your IP terminal is a sophisticated, modern device which has been produced using
state-of-the-art production equipment in order to meet high quality requirements. Only
high quality components, which ensure a maximum of reliability, are used for their
production.
A warranty seal has been applied to the bottom of the IP terminal (on a screw of the
housing). Please make sure it is not damaged, since otherwise no warranty claims can
be made.
Bedienungsanleitung
IP-Telefon IP222 / IP232
- 26 -
- 26 -