Transcript
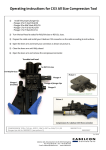
MOUNTING INSTRUCTIONS FOR TYPE -13
STEP 1
A
Use a Stanley-knife (or similar) for the stripping
operation.
B
STEP 1
A. Cut and remove the jacket, outer conductor
and dielectric from the inner conductor in one
operation to obtain dimension “B” (exposed
inner conductor).
B. If necessary, clean the inner conductor using
a conductor cleaner (item no 98500900), or
another other proper tools.
C. Cut and remove the jacket to obtain
dimension “A”. Please make sure, not to
damage the outer conductor during this
operation.
After completed operation, the outer conductor must
be smooth and the prepared cable dimensions should
be as follows:
STEP 2
A = 10.0 mm.
B = 12.0 mm.
STEP 2
STEP 3
Place the back nut over the cable and push it
backward to reach mechanical stop.
STEP 3
Push the connector front part and the cable (with the
back-nut) together by hand. During this operation the
inner conductor of the cable slips into the centre
seizing mechanism of the front part.
STEP 4
STEP 4
HL-001
FINISHED OPERATION
Tighten the back-nut by hand as far as possible. Then
tighten the back-nut to positive stop by use of two
spanners. Keep the body in place during the
operation.
Size of open-ended spanners: 20 mm (for main-nut
and body).
ISO 9001 certified
Distributor:
O:\SPLICE\TYPE-3\-13.doc
Corning Cabelcon ApS, Industriparken 10, DK 4760 Vordingborg
Tel: +45 55 98 55 99 · Fax: + 45 55 98 55 04
E-mail: [email protected] · www.cabelcon.dk