1
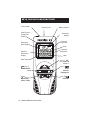
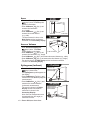
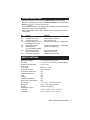
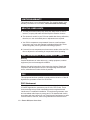
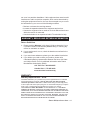
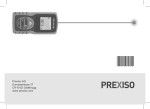
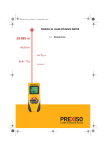
Quick Start Guide
Model 3350
KEYS, DISPLAYS AND FUNCTIONS
Laser emitter
Area/Volume/
Pythagoras
display
Measuring
plane display
Receiver lens
Battery symbol
Secondary
Display
Fractions/
Exponents
Units
Addition/
Subtraction
display
Fractions/
Exponents
Units
Main Display
(Key 1)
On / Measure
distance
(Key 5)
Add/Subtract
(Key 2)
(Key 4)
Measuring
Plane / Units
(Key 3)
Clear/Off
2 — PREXISO X2 QUICK START GUIDE
Area/
Volume/
Pythagoras
GENERAL SAFETY RULES
DANGER!
Do not aim light at persons or animals. Do not stare into the laser light
source. Laser light can damage your eyes.
Read the instructions carefully before using the device.
Safe Practices for Using the Prexiso X2
•
•
•
•
•
•
•
•
Do not use as a pointing device.
Make sure that the safety settings are not disabled.
Make sure that warning labels and caution labels are not removed.
Do not open the device with tools (screwdriver, etc.).
Make sure that the device is not modified.
Avoid using accessories that are not recommended by the manufacturer.
Do not aim the laser beam at shiny, reflective surfaces.
Avoid aiming directly at the sun.
Correct usage
The Prexiso X2 is designed for measuring distances, lengths, and
heights and for calculating areas and volumes.
INITIAL OPERATION
Insert the batteries
• To ensure reliability, use alkaline batteries only.
• Remove battery compartment cover.
• Insert two (2) AAA alkaline batteries, observing the polarity.
• Close the battery compartment cover.
-
-
-
Changing the batteries
• Change the batteries when the battery symbol is blinking continuously.
PREXISO X2 QUICK START GUIDE — 3
HOW TO USE
Measuring conditions
The quality of the measurement depends on the surfaces to which you are
measuring. Strongly reflecting targets deflect the laser beam and cause measuring errors. Non-reflecting, dark surfaces increase the measuring time.
Always begin by making a control measurement.
Measurement errors
Measuring errors are possible in case of:
• Colorless fluids (e.g., water)
• Clean, translucent glass
• Styrofoam or similar semi-translucent surfaces
• Strongly reflecting targets that deflect the laser beam
• Measurements aimed at moving objects
For consistently accurate measurements
• Perform control measurements periodically.
• Perform control measurements before and after important measurements.
Switching on/off
(Key 1) /
(Key 3)
• Switch on the device by pressing Clear/Off
(Key 1). The device shows the
Battery and Measuring Plane symbols until another key is pressed.
• Switch off the device by pressing Clear/Off
(Key 3) for 2 seconds. If no
key is pressed for 3 minutes, the device switches off automatically.
Clear key
(Key 3)
• Undo the most recent action by pressing Clear/Off
briefly.
(key 3)
Adjusting the measuring plane
Rear measuring plane is the
standard setting.
• For measurement from front edge,
press Measuring Plane/Units
(key 4) briefly.
• For measurement from rear edge,
press Measuring Plane/Units
(key 4) briefly again.
MEASURES FROM:
or
The Rear Edge
4 — PREXISO X2 QUICK START GUIDE
The Front Edge
Adjusting measuring units
Metric system is the standard setting.
• To change the unit, hold Measuring Plane/Units
seconds.
(key 4) for several
Possible units:
• meters
• feet-inch-fractions
─ main display up to 1/16 inch
─ secondary display up to 1/8 inch
• inch-fractions
─ main display up to 1/16 inch
─ secondary display up to 1/8 inch
Measuring
(Key 1)
• Press and release On/Measure
• Aim active laser at target area.
• Press and release On/Measure
(Key 1) to light the laser.
(Key 1) again to measure.
The device measures the distance and immediately displays the result in the Main Display.
Continuous measuring
This function enables specific, desired distances to be determined.
• Hold On/Measure
(Key 1) for several seconds. Continuous measuring starts,
and display shows “trc”
• Press On/Measure
(Key 1) briefly. Continuous measuring stops.
The value last measured appears in the Main Display.
FUNCTIONS
Add/Subtract
(Key 5)
Add:
• Measure the first distance by pressing On/Measure
• Press Add/Subtract
(key 5) once.
• Measure the second distance.
(Key 1).
The device adds the second measurement to the first measurement. Result shows in the
Main Display and the previous value in the Secondary Display.
Subtract:
• Measure the first distance by pressing On/Measure
• Press Add/Subtract
(key 5) twice.
• Measure the second distance.
(Key 1).
The device subtracts the second measurement from the first measurement.
Repeat if required. The device displays the result in the Main Display and the previous value
in the Secondary Display.
PREXISO X2 QUICK START GUIDE — 5
Area
• Press Area/Volume/Pythagoras
(key 2) once. The Area symbol
appears on the display.
• Press On/Measure
(Key 1) and
measure the first distance
(e.g., length).
• Press On/Measure
(Key 1) and
measure the second distance
(e.g., width).
The Area measured is shown in the
Main Display and the last distance
measured is in the Secondary Display.
L
W
L x W = Area
W
Area or Volume
L
H
• Press Area/Volume/Pythagoras
(key 2) twice. The Volume
symbol appears on the display.
L x W x H = Volume
• Press On/Measure
(Key 1) and
measure the first distance (e.g., length).
• Press On/Measure
(Key 1) and measure the second distance (e.g., width).
• Press On/Measure
(Key 1) and measure the third distance (e.g., height).
The result is shown in the Main Display and the last distance measured
is shown in the Secondary Display.
Pythagoras (Indirect)
• Press Area/Volume/Pythagoras
(key 2) three times.
The Pythagoras symbol appears on
the display.
• Press On/Measure
(Key 1) and
measure the first distance (diagonal
measurement).
• Press On/Measure
(Key 1) and
measure the second distance
(horizontal measurement).
The result is shown in the Main
Display and the last distance
measured is shown in the
Secondary Display.
Note: Second measurement must
be perpendicular (90º angle) to
measured surface.
6 — PREXISO X2 QUICK START GUIDE
(Indirect Measurement)
Measure to Top
Measure to Bottom
Solves for Height
Height
1
90˚
Top
2
90˚
Bottom
(Indirect Measurement)
Measure Far Point
Measure Near Point
Solves for Width
90˚
Near
Point
Width
2
90˚
1
Far Point
TROUBLESHOOTING
• If the laser remains lit, or the value in the Main Display keeps changing,
flashing, or showing “trc” you are in Continuous Measure mode. Press On/
Measure
(Key 1) once to exit this mode.
• If the message Error does not disappear after switching on and off the device
repeatedly, contact Calculated Industries.
• If the message InFo appears with a number, follow the instructions in the following table.
No.
204
252
253
255
256
257
258
260
Cause
Calculation error
Temperature too high
Temperature too low
Reception signal too weak,
measuring time too long
Input signal too high
Measuring error,
too much background light
Measurement outside
of the measuring range
Laser beam interrupted
Remedy
Measure again.
Let the device cool down.
Warm the device up.
Change target surface (e.g., white paper).
Change target surface (e.g., white paper)
Shadow the target area.
Target is beyond range.
Move closer to target.
Repeat the measurement.
SPECIFICATIONS
Measuring Range
Accuracy
Smallest unit displayed
Laser class
Laser type
Automatic shut-off
Continuous measuring
Addition/Subtraction
Area
Volume
Pythagoras (Indirect)
Metric and Imperial Units
Dimensions
Battery life
Weight
Temperature range:
- Storage
- Operation
4” (10 cm) to 100’ (30.5 m)
+/- 1/8” (3 mm) or better over entire range
1/16 (1 mm)
2
635 nm, < 1 mW
After 3 minutes
Yes
Yes
Yes
Yes
Yes
Yes
4.75 x 2 x 1” (118 x 50 x 26 mm)
Up to 3,000 measurements
3.22 ounces (100g)
-13°F to +158°F (-25°C to +70°C)
32°F to +104°F (0°C to +40°C)
PREXISO X2 QUICK START GUIDE — 7
LIMITED WARRANTY
This product has a 2-year Limited Warranty. For complete details, view
warranty information on our website, www.calculated.com/warranty.
HELPFUL USER HINTS
a. To clean your Prexiso PX2 (PX2) use a soft, damp cloth. Do not immerse in, or spray with water. Avoid all liquid or abrasive cleaners.
b. The electronic module in your PX2 was sealed after factory calibration;
therefore, no user serviceable parts or adjustments are required.
c. Your PX2 is temperature compensated. However, small variations
in accuracy may occur with changes in altitude and humidity. These
variations typically can be ignored for estimating purposes.
d. If moved from one temperature environment to another, allow the PX2
time to adjust to the surrounding air temperature before operating.
ELECTROMAGNETIC COMPATIBILITY (EMC)
Warning
Possible disturbance of other devices (e.g. safety equipment, medical
equipment) due to electromagnetic radiation.
Observe the safety instructions of the respective devices. Despite the
compliance with all requirements of the corresponding directives and
norms, a disturbance of other devices is possible.
FCC
This equipment has been certified to comply with the limits for a Class B
digital device, pursuant to Part 15 of FCC rules.
FCC Statement
This equipment has been tested and found to comply with the limits for
a Class B digital device, pursuant to part 15 of the FCC Rules. These
limits are designed to provide reasonable protection against harmful
interference in a residential installation. This equipment generates, uses
and can radiate radio frequency energy and, if not installed and used in
accordance with the instructions, may cause harmful interference to radio
communications. However, there is no guarantee that interference will
8 — PREXISO X2 QUICK START GUIDE
not occur in a particular installation. If this equipment does cause harmful
interference to radio or television reception, which can be determined by
turning the equipment off and on, the user is encouraged to try to correct
the interference by one or more of the following measures:
• Reorient or relocate the receiving antenna.
• Increase the separation between the equipment and receiver.
• Connect the equipment into an outlet on a circuit different from that to
which the receiver is connected.
• Consult the dealer or an experienced radio/ TV technician for help.
WARRANTY, REPAIR AND RETURN INFORMATION
Return Guidelines
1. Please read the Warranty in this User’s Guide to determine if your
CI product remains under warranty before calling or returning any
device for evaluation or repairs.
2. If your product won’t turn on, check the batteries as outlined in the
User’s Guide.
3. If you need more assistance, please go to the website listed below.
4. If you believe you need to return your product, please call a
Calculated Industries representative between the hours of 8:00am
and 4:00pm Pacific Time for additional information and a Return
Merchandise Authorization (RMA).
Call Toll Free: 1-800-854-8075
Outside USA: 1-775-885-4900
www.calculated.com/warranty
WARRANTY
Warranty Repair Service – U.S.A.
Calculated Industries (“CI”) warrants this product against defects in materials
and workmanship for a period of two (2) years from the date of original
consumer purchase in the U.S. If a defect exists during the warranty period,
CI at its option will either repair (using new or remanufactured parts) or replace
(with a new or remanufactured calculator) the product at no charge.
THE WARRANTY WILL NOT APPLY TO THE PRODUCT IF IT HAS BEEN
DAMAGED BY MISUSE, ALTERATION, ACCIDENT, IMPROPER HANDLING OR
OPERATION, OR IF UNAUTHORIZED REPAIRS ARE ATTEMPTED OR MADE.
SOME EXAMPLES OF DAMAGES NOT COVERED BY WARRANTY INCLUDE,
BUT ARE NOT LIMITED TO, BATTERY LEAKAGE, BENDING, A BLACK “INK
SPOT” OR VISIBLE CRACKING OF THE LCD, WHICH ARE PRESUMED TO
BE DAMAGES RESULTING FROM MISUSE OR ABUSE.
PREXISO X2 QUICK START GUIDE — 9
To obtain warranty service in the U.S., please go to the website.
A repaired or replacement product assumes the remaining warranty of the
original product or 90 days, whichever is longer.
Non-Warranty Repair Service – U.S.A.
Non-warranty repair covers service beyond the warranty period, or service
requested due to damage resulting from misuse or abuse.
Contact Calculated Industries at the number listed above to obtain current
product repair information and charges. Repairs are guaranteed for 90 days.
Repair Service – Outside the U.S.A.
To obtain warranty or non-warranty repair service for goods purchased outside
the U.S., contact the dealer through which you initially purchased the product. If
you cannot reasonably have the product repaired in your area, you may contact
CI to obtain current product repair information and charges, including freight
and duties.
Disclaimer
CI MAKES NO WARRANTY OR REPRESENTATION, EITHER EXPRESS OR
IMPLIED, WITH RESPECT TO THE PRODUCT’S QUALITY, PERFORMANCE,
MERCHANTABILITY, OR FITNESS FOR A PARTICULAR PURPOSE. AS A
RESULT, THIS PRODUCT, INCLUDING BUT NOT LIMITED TO, KEYSTROKE
PROCEDURES, MATHEMATICAL ACCURACY AND PREPROGRAMMED
MATERIAL, IS SOLD “AS IS,” AND YOU THE PURCHASER ASSUME THE
ENTIRE RISK AS TO ITS QUALITY AND PERFORMANCE.
IN NO EVENT WILL CI BE LIABLE FOR DIRECT, INDIRECT, SPECIAL,
INCIDENTAL, OR CONSEQUENTIAL DAMAGES RESULTING FROM ANY
DEFECT IN THE PRODUCT OR ITS DOCUMENTATION.
The warranty, disclaimer, and remedies set forth above are exclusive and
replace all others, oral or written, expressed or implied. No CI dealer, agent, or
employee is authorized to make any modification, extension, or addition to this
warranty.
Some states do not allow the exclusion or limitation of implied warranties or
liability for incidental or consequential damages, so the above limitation or
exclusion may not apply to you. This warranty gives you specific rights, and you
may also have other rights, which vary from state to state.
10 — PREXISO X2 QUICK START GUIDE
KEYS, DISPLAYS AND FUNCTIONS
Laser emitter
Area/Volume/
Pythagoras
display
Measuring
plane display
Receiver lens
Battery symbol
Secondary
Display
Fractions/
Exponents
Units
Addition/
Subtraction
display
Fractions/
Exponents
Units
Main Display
(Key 1)
On / Measure
distance
(Key 5)
Add/Subtract
(Key 2)
(Key 4)
Measuring
Plane / Units
(Key 3)
Clear/Off
Area/
Volume/
Pythagoras
PREXISO X2 QUICK START GUIDE — 11
Printed in U.S.A.
1/12
QSG3350E-C
12 — PREXISO X2 QUICK START GUIDE