1
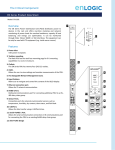
Mounting
Place barcode here.
EN Series PDU: Quick Start Installation Guide
English
For more information about Enlogic products and complete installation
information, go to www.enlogic.com.
Refer to the EN Series User Guide for specific information on installation and
operation of the PDU or visit www.enlogic.com.
Warranty information can be found at www.enlogic.com/warranty.
Unpacking the Enlogic PDU
Unpackage the Enlogic PDU and ensure that nothing is missing or damaged. If
something appears to be missing or damaged, contact Enlogic at info@enlogic.
com. The following is included:
• EN Series PDU
• Quick Start Guide
• Safety Information Sheet
• Warranty card
Before You Begin
1.
2.
Prepare the installation site: make sure it is not exposed to extreme
temperature or humidity. Allow space around the Enlogic PDU for cabling
and outlet connections. Refer to the EN Series User Manual for full
installation and operation information and safety instructions.
Register your product online at www.enlogic.com/warranty
The Critical Component
LT-00012-D5
Mounting the PDU in the Server Cabinet without Mounting Brackets
The EN Series PDU comes with tool-less, adjustable mounting pegs for ease and convenience.
1. Determine where the EN Series PDU will be mounted inside the server cabinet.
2. Measure the distance between mounting holes in the server cabinet and adjust the
PDU mounting pegs accordingly. Note: The adjustable mounting pegs can be adjusted
between 1472mm and 1584mm in length (or 554mm and 676mm on EN1101, EN2101,
EN5101, and EN6101 series PDUs.
3. With the mounting pegs at the correct position, insert the pegs into the mounting holes
of the server cabinet.
4. Pull the power cord through the cabinet and proceed with connecting to a power source.
Note: For specific mounting instructions for various rack manufacturers refer to www.
enlogic.com.
Mounting the PDU in the Server Cabinet with Mounting Brackets
1. Determine where the EN Series PDU will be mounted inside the server cabinet. Hang the
mounting brackets in the server cabinet using the mounting bracket hooks.
2. Attach the enclosed mounting brackets to the server cabinet using the screws provided.
3. Measure the distance between mounting holes in the server cabinet and adjust the PDU
mounting pegs accordingly. Note: The adjustable mounting pegs can be adjusted between
1472mm and 1584mm in length (or 554mm and 676mm on EN1101, EN2101, EN5101,
and EN6101 series PDUs.
4. With the mounting pegs at the correct position, insert the pegs into the mounting
brackets.
5. Pull the power cord through the cabinet and proceed with connecting to a power source.
Note: For specific mounting instructions for various rack manufacturers refer to www.
enlogic.com.
Connecting to a Power Source
When connecting the Enlogic PDU to a Power Source, make sure that you have enough length in
the PDU power cord to reach the PDU power source.
1. Turn the feed circuit breaker off. Make sure that all circuit breakers on the Enlogic PDU
are set to ON.
2. Connect each Enlogic PDU device to an appropriately rated branch circuit.
Note: Refer to the label on the PDU for acceptable input ratings.
Daisy-Chain Network Communications
Warranty Information
To connect up to 4 PDUs of the same SKU through a single IP address:
1. Configure the PDU that will be first in line on the Rs485 daisy-chain.
2. When the initial PDU is configured, connect an Ethernet cord from the “Rs485-2” port on the
configured PDU to the “Serial+Rs485-1” port on the next PDU in the daisy-chain line.
3. Repeat step 2, connecting PDUs from the “Rs485-2” port to the “Serial+Rs485-1” port for up
to 4 PDUs.
Note: The total length of the Ethernet cords connecting the PDUs must be less than 6m (20
feet).
Enlogic warranties that the equipment provided shall be free from manufacturing defects for a period
of two (2) years from the invoice date to the original purchaser. Enlogic will automatically extend the
standard warranty period for an additional (1) year if the product registration is completed within thirty
(30) days from the invoice date to the original purchaser. Product registration may be completed online
at www.Enlogic.com.
Enlogic’s warranty obligations hereunder are contingent upon the following conditions: (1) Enlogic
is promptly notified of the defect; (2) Purchaser establishes to Enlogic’s reasonable satisfaction that
any goods have been properly installed, maintained and operated; and (3) Purchaser returns the
defective goods or any part thereof to Enlogic. Upon a determination by Enlogic that a product is not
as warranted, Enlogic shall, at its exclusive option, replace or repair said defective product or parts
thereof. This warranty is void in the case of abuse, misuse, abnormal usage, faulty installation or repair
by unauthorized persons, or if for any other reason Enlogic determines that said product is not operating
properly as a result of causes other than defective manufacture.
3.
Turn the feed circuit breaker on. The OLED screen will display a loading status screen
when the PDU is loading. When complete, the Main Menu will display on the OLED. Note:
If the PDU is a switched PDU, the lights corresponding to each outlet will consecutively
turn on to indicate power before displaying a steady color.
Connecting to a Network
The EN series PDU is DHCP compatible.
1. Connect a standard Ethernet patch cable to the Ethernet port on the EN Series PDU.
2. Connect the other end of the Ethernet cable to your LAN.
3. Make sure the Ethernet port on the PDU shows a solid green light on the left
and a flashing yellow light on the right to indicate successful connectivity to the
network.
4.
5.
Look up the IP address on the OLED Display, using the menu buttons to go to:
Setup>Menu>IPv4 or IPv6, as applicable.
In a standard web browser, enter the PDU IP address and proceed to configure the PDU.
Note: The default username is admin. The default password is 12345678.
Accessing an Enlogic PDU Using a Static IP Address
1.
Connect a standard Ethernet cable to the Ethernet port on the EN Series PDU and the
other end of the Ethernet cable directly to your laptop/PC. Note: A cross over cable is not
required.
When the PDU completes a live connection, the Ethernet port on the PDU shows a solid
green light on the left and a flashing yellow light on the right to indicate successful connectivity.
When connected, and with no DHCP service found, the PDU will revert to a static IP address of 192.168.0.1
Assign your laptop/PC’s Ethernet port an IP address in the 192.168.0.2-254 range.
Note: Do NOT assign 192.168.0.1 to your laptop/PC.
In a standard web browser, enter the URL ‘http://192.168.0.1’ and configure the PDU, or
access the CLI using SSH at 192.168.0.1:22
Note: The default username is admin. The default password is 12345678.
Configuring the PDU with a static IP address overrides the default IP address.
2.
3.
4.
5.
This warranty is governed by and construed in accordance with the laws of the State of Missouri,
without regard to conflict of law principles. The parties to this warranty agree that the United Nations
Convention on Contracts for the International Sale of Goods is hereby excluded in its entirety from
application to this warranty. All disagreements and disputes arising out of or in connection with this
warranty shall be finally settled by arbitration. Unless otherwise prohibited by law, the arbitration shall
be: (i) held in St. Louis, Missouri; (ii) conducted in accordance with Missouri law; (iii) conducted in the
English language; (iv) settled under the Rules of Arbitration of the American Arbitration Association
(“Rules”); and (v) heard by one arbitrator appointed in accordance with the Rules. The decision of
the arbitrator shall be final and binding upon the parties. If part of this warranty is held to be invalid
or unenforceable, such invalidity or unenforceability shall not invalidate or render unenforceable the
entire warranty, but rather the warranty shall be construed as if not containing the particular invalid or
unenforceable provision.” If this warranty is translated into a language other than English, the English
version will prevail to the extent that there is any conflict or discrepancy in meaning between the English
version and any translation thereof.
This warranty shall apply exclusively to products sold to Purchaser by Enlogic or any company controlled
by or in common control with Enlogic or an Enlogic subsidiary (collectively, “Enlogic”). Enlogic shall not
have any liability or obligation to Purchaser, under this warranty or otherwise, with respect to any defect
or failure of performance in products which are not sold or manufactured by Enlogic, including any such
products which are commingled with or incorporated into any Enlogic products, or any products into
which Enlogic products are incorporated as a system component or otherwise.
THIS WARRANTY IS EXPRESSLY MADE IN LIEU OF ANY OTHER WARRANTIES, EXPRESSED OR IMPLIED, IT
BEING UNDERSTOOD THAT ALL SUCH OTHER WARRANTIES, EXPRESSED OR IMPLIED, INCLUDING THE
WARRANTIES OF MERCHANTABILITY AND FITNESS FOR PARTICULAR PURPOSE ARE HEREBY EXPRESSLY
EXCLUDED. IN NO EVENT SHALL ENLOGIC BE LIABLE TO PURCHASER FOR ANY DIRECT, COLLATERAL,
INCIDENTAL OR CONSEQUENTIAL DAMAGES IN CONNECTION WITH PURCHASER’S USE OF ANY OF THE
PRODUCTS LISTED HEREIN, OR FOR ANY OTHER CAUSE WHATSOEVER RELATING TO THE SAID PRODUCTS.
NEITHER ENLOGIC NOR ITS REPRESENTATIVES SHALL BE LIABLE TO THE PURCHASER OR ANYONE
ELSE FOR ANY LIABILITY, CLAIM, LOSS, DAMAGE OR EXPENSE OF ANY KIND, OR DIRECT COLLATERAL,
INCIDENTAL OR CONSEQUENTIAL DAMAGES RELATIVE TO OR ARISING FROM OR CAUSED DIRECTLY OR
INDIRECTLY BY SAID PRODUCTS OR THE USE THEREOF OR ANY DEFICIENCY, DEFECT OR INADEQUACY OF
THE SAID PRODUCTS. IT IS EXPRESSLY AGREED THAT PURCHASER’S EXCLUSIVE REMEDY FOR ANY CAUSE
OF ACTION RELATING TO THE PURCHASE AND/OR USE OF ANY OF THE PRODUCTS LISTED HEREIN FROM
ENLOGIC SHALL BE FOR DAMAGES, AND ENLOGIC’S LIABILITY FOR ANY AND ALL LOSSES OR DAMAGES
RESULTING FROM ANY CAUSE WHATSOEVER, INCLUDING WHETHER SUCH DAMAGES ARE CLAIMED,
ASSERTED OR BROUGHT IN AN ACTION OR CLAIM IN TORT OR CONTRACT, OR ON THE WARRANTY
ITSELF, OR UNDER ANY OTHER LAW OR FORM OF ACTION, SHALL IN NO EVENT EXCEED THE PURCHASE
PRICE OF THE PRODUCT IN RESPECT TO WHICH THE CLAIM IS MADE, OR AT THE ELECTION OF ENLOGIC,
THE RESTORATION OR REPLACEMENT OR REPAIR OF SUCH PRODUCT.
Guía de inicio rápido: PDU Serie EN
Español
Recursos adicionales
Consulte la Guía del Usuario de la PDU Serie EN para obtener información
específica sobre la instalación y funcionamiento de la unidad o visite www.
enlogic.com.
Warranty information can be found at www.enlogic.com/warranty
Desembalaje de la PDU Enlogic
Al recibir la unidad de distribución de energía (PDU), desembale todas las piezas
y asegúrese de que no falte ninguna y de que no estén dañadas. Si alguna pieza
falta o está dañada, póngase en contacto con Enlogic por medio de esta dirección
de correo electrónico: [email protected]. Se incluyen los siguientes elementos:
• PDU Serie EN
• Guía de instalación rápida
• Hoja de información de seguridad
• Certificado de garantía
2.
Conexión a una fuente de alimentación
Montaje de la PDU en el armario del servidor sin soportes de montaje
Notas: al conectar la PDU Enlogic a una fuente de alimentación, asegúrese de que el cable de
alimentación de la PDU sea lo suficientemente extenso como para llegar hasta la fuente. Para
conectar la PDU a una fuente de alimentación:
1. Desconecte el disyuntor de alimentación. Asegúrese de que todos los disyuntores de la
PDU Enlogic se encuentren en su posición ON (encendidos).
2. Conecte cada PDU Enlogic a un circuito en derivación apropiado.
Nota: consulte la etiqueta de la PDU para conocer los valores aceptables de consumo
nominal.
3. Conecte el disyuntor de alimentación. En la pantalla OLED, aparecerá una barra de estado
mientras la PDU se está cargando. Al completarse la carga, la pantalla OLED mostrará el
menú principal.
Nota: si la PDU es una unidad conmutada, las luces correspondientes a cada salida se
encenderán de manera consecutiva, para indicarla presencia de alimentación, antes de
ponerse en un color fijo.
La PDU Serie EN viene con pasadores de montaje ajustables, sin herramientas, para una
instalación fácil y práctica.
1. Determine el lugar donde se montará la PDU Serie EN dentro del armario del servidor.
2. Mida la distancia entre los orificios de montaje en el armario del servidor y ajuste los
pasadores de montaje de la PDU de acuerdo con dicha distancia. Nota: la longitud de los
pasadores de montaje ajustables puede regularse entre 1472mm y 1584mm (o 554mm y
676mm en EN1101, EN2101, EN5101, o EN6101 series PDUs.
3. Cuando los pasadores de montaje se encuentren en la posición correcta, insértelos en los
orificios de montaje correspondientes del armario del servidor.
4. Tire del cable de alimentación a través del armario y luego conéctelo a una fuente de
alimentación.
Nota: para obtener instrucciones específicas sobre los diversos fabricantes de bastidores,
consulte www.enlogic.com.
Montaje de la PDU en el armario del servidor con soportes de montaje
1.
2.
3.
Antes de comenzar
1.
Montaje
Prepare el sitio de instalación: asegúrese de que no esté expuesto a
temperaturas o humedad extremas. Deje espacio alrededor de la PDU
Enlogic para los cables y las tomas de corriente. Consulte el Manual
del Usuario de la Serie EN para obtener información detallada sobre la
instalación y funcionamiento de la unidad, así como las instrucciones de
seguridad.
Visite www.enlogic.com para registrar el producto en línea.
4.
5.
Determine el lugar donde se montará la PDU Serie EN dentro del armario del servidor.
Utilice los ganchos para soportes de montaje para colgar dichos soportes en el armario
del servidor.
Utilice los tornillos provistos para fijar los soportes de montaje suministrados al armario
del servidor.
Mida la distancia entre los orificios de montaje en el armario del servidor y ajuste los
pasadores de montaje de la PDU de acuerdo con dicha distancia. Nota: la longitud de los
pasadores de montaje ajustables puede regularse entre 1472mm y 1584mm (o 554mm y
676mm en EN1101, EN2101, EN5101, o EN6101 series PDUs.
Cuando los pasadores de montaje se encuentren en la posición correcta, insértelos en los
soportes correspondientes.
Tire del cable de alimentación a través del armario y luego conéctelo a una fuente de
alimentación.
Nota: para obtener instrucciones específicas sobre los diversos fabricantes de bastidores,
consulte www.enlogic.com.
Conexión a una red
La PDU Serie EN es compatible con el protocolo de configuración dinámica de host (DHCP).
1. Conecte un extremo de un cable de conexión Ethernet estándar al puerto Ethernet de la
PDU Serie EN.
2. Conecte el otro extremo del cable Ethernet a la red LAN.
3. Asegúrese de que el puerto Ethernet en la PDU muestre una luz de color verde.
4. Busque la dirección IP en la pantalla de OLED; para eso, acceda a
Configuración>Menú>IPv4 or IPv6.
5. En un navegador Web estándar, introduzca la dirección IP de la PDU y, a continuación,
configure la unidad.
Nota : Nombre de usuario por defecto es admin. Contraseña por defecto es 12345678.
The Critical Component
Acceder a un PDU Enlogic con una dirección IP estática
1.
Conecte un cable Ethernet estándar entre el puerto Ethernet del PDU y su ordenador.
Nota: un cable cruzado no es necesario.
Cuando el PDU está conectado, el puerto Ethernet del PDU tiene un indicador luminoso
verde en la izquierda y un intermitente amarillo en la derecha para indicar la conexión.
Cuando conectado, y sin servicio DHCP encontrado, el PDU revertira a la dirección IP
192.168.0.1
Atribuya al puerto Ethernet de su ordenador una dirección IP en la gama 192.168.0.2254. Nota: NO atribuya la dirección IP 192.168.0.1.
En un navegador web estándar, ponga la URL ‘http://192.168.0.1’ y configure el PDU, o
conecte a la CLI a través de SSH en 192.168.0.1 :22
Nota : Nombre de usuario por defecto es admin. Contraseña por defecto es 12345678.
La configuración del PDU con una dirección IP estática anula la dirección IP por defecto.
2.
3.
4.
5.
Comunicaciones de red a través de una conexión en serie
Para conectar en serie un máximo de cuatro PDU por medio de una sola dirección IP:
1. Configure la PDU que esté primera en la línea de conexión en serie Rs485.
2. Cuando la PDU inicial esté configurada, conecte un cable Ethernet entre el puerto
“Rs485-2” de la PDU configurada y el puerto “Serial+Rs485-1” de la siguiente PDU de la
línea conectada en serie.
3. Repita el paso 2; es decir, conecte las PDU entre sus puertos “Rs485-2” y “Serial+Rs485-1”
hasta un máximo de cuatro PDU.
Nota: la longitud total de los cables Ethernet empleados para conectar en serie las PDU
debe ser inferior a los 6 m (20 pies).
Información de garantía
Enlogic garantiza que los equipos proporcionados no presentarán defectos de fabricación durante
un período de dos (2) años a partir de la fecha de la factura emitida al comprador original. Enlogic
prorrogará automáticamente el período de garantía estándar un (1) año adicional si el registro del
producto se completa dentro de un plazo de treinta (30) días a partir de la fecha de la factura emitida
al comprador original. El registro del producto puede realizarse en línea, a través de la dirección http://
www.enlogic.com/http://www.enlogic.com/www.enlogic.com.
Las obligaciones de garantía de Enlogic establecidas en el presente documento están supeditadas a las
siguientes condiciones: (1) se notifica el defecto a Enlogic de inmediato; (2) el comprador demuestra
de forma razonablemente satisfactoria, a juicio de Enlogic, que el producto se instaló, mantuvo y operó
de manera correcta; y (3) el comprador devuelve a Enlogic el producto defectuoso, o cualquiera de sus
piezas . Una vez Enlogic haya concluido que el producto no se encuentra tal como se garantizó, Enlogic,
a su elección exclusiva, reemplazará o reparará dicho producto o piezas defectuosas. Esta garantía
quedará anulada en caso de maltrato, uso indebido, uso anormal, instalación incorrecta, reparación por
parte de personas no autorizadas o, si por cualquier otro motivo, Enlogic determina que dicho producto
no funciona correctamente como resultado de causas que no tienen que ver con una fabricación
defectuosa.
Esta garantía se aplica exclusivamente a los productos que el comprador adquiera a Enlogic, cualquier
otra compañía controlada por Enlogic o que se encuentre bajo el control conjunto de esta última, o una
filial de Enlogic (en conjunto, “Enlogic”). Enlogic no se responsabiliza ni se obliga ante el Comprador,
ni en virtud de esta garantía ni de cualquier otro modo, con respecto a cualquier defecto o fallo en el
rendimiento de productos que no hayan sido vendidos ni fabricados por Enlogic, incluido cualquier
producto que se combine con los productos de Enlogic o se incorpore en ellos, y todos aquellos
productos en los que se incorporen productos de Enlogic como un componente del sistema o de otro
tipo.
ESTA GARANTÍA SUSTITUYE CUALQUIER OTRA GARANTÍA, EXPRESA O TÁCITA; DE ELLO SE DESPRENDE
QUE CUALQUIER OTRA GARANTÍA, EXPRESA O TÁCITA, INCLUIDAS AQUELLAS DE COMERCIABILIDAD
Y APTITUD PARA FINES ESPECÍFICOS, SE EXCLUYE POR LA PRESENTE EN FORMA EXPRESA. ENLOGIC
EN NINGÚN CASO SERÁ RESPONSABLE ANTE EL COMPRADOR DE DAÑOS Y PERJUICIOS DIRECTOS,
COLATERALES, DERIVADOS O INDIRECTOS EN RELACIÓN CON EL USO POR PARTE DE ÉSTE DE
CUALQUIERA DE LOS PRODUCTOS QUE SE INDICAN EN EL PRESENTE DOCUMENTO NI POR NINGUNA
OTRA CAUSA RELACIONADA CON ELLOS. NI ENLOGIC NI SUS REPRESENTANTES RESPONDERÁN ANTE
EL COMPRADOR NI ANTE NINGUNA OTRA PERSONA POR RESPONSABILIDADES, RECLAMACIONES,
PÉRDIDAS, DAÑOS O GASTOS DE NINGÚN TIPO; POR DAÑOS Y PERJUICIOS DIRECTOS, COLATERALES,
DERIVADOS O INDIRECTOS QUE SE RELACIONEN CON DICHOS PRODUCTOS O EL USO DE ÉSTOS, QUE
SURJAN DE DICHOS PRODUCTOS O EL USO DE ÉSTOS, O QUE TALES PRODUCTOS CAUSEN DIRECTA
O INDIRECTAMENTE; NI POR CUALQUIER DEFECTO O DEFICIENCIA DE TALES PRODUCTOS. QUEDA
EXPRESAMENTE ACORDADO QUE EL RECURSO EXCLUSIVO DEL COMPRADOR PARA INICIAR CUALQUIER
ACCIÓN RELACIONADA CON LA COMPRA O EL USO DE CUALQUIERA DE LOS PRODUCTOS DE ENLOGIC
QUE SE INDICAN EN EL PRESENTE DOCUMENTO SERÁ EL DE DAÑOS Y PERJUICIOS. ASIMISMO, ENLOGIC
ACUERDA QUE TODA RESPONSABILIDAD QUE DEBA ASUMIR POR DAÑOS Y PERJUICIOS DERIVADOS
DE CUALQUIER CAUSA, INCLUSO SI TALES DAÑOS Y PERJUICIOS SE RECLAMAN, ALEGAN O PRESENTAN
EN UNA ACCIÓN LEGAL O DEMANDA CONTRACTUAL O AJENA A UN CONTRATO, O EN LA GARANTÍA
MISMA, O BAJO CUALQUIER OTRA LEY O ACCIÓN LEGAL, NO EXCEDERÁ EN NINGÚN CASO EL PRECIO
DE COMPRA DEL PRODUCTO RESPECTO DEL CUAL SE EFECTÚA LA RECLAMACIÓN, O A ELECCIÓN DE
ENLOGIC, LA COMPAÑÍA PODRÁ RESTAURAR, REEMPLAZAR O REPARAR EL PRODUCTO EN CUESTIÓN.
Esta garantía se rige e interpreta de conformidad con las leyes del estado de Misuri, con independencia
de los principios de conflicto entre leyes. Las partes de esta garantía acuerdan que la aplicabilidad de la
Convención de las Naciones Unidas sobre los Contratos de Compraventa Internacional de Mercaderías
queda absolutamente excluida de esta garantía. Todo desacuerdo o controversia que surja de esta
garantía o se relacione con ella se resolverá mediante arbitraje. Salvo que la ley lo prohíba, el arbitraje:
(i) tendrá lugar en St. Louis, Misuri; (ii) se conducirá de acuerdo con las leyes del estado de Misuri; (iii)
se llevará a cabo en idioma inglés; (iv) se resolverá en virtud de las normas de arbitraje de la Asociación
Estadounidense de Arbitraje (American Arbitration Association) (“Normas”); y (v) será presidido por
un árbitro que será designado de conformidad con las Normas. La decisión del árbitro será decisiva y
vinculante para las partes. Si parte de esta garantía se declara nula o inaplicable, ello no anulará ni dejará
sin efecto la garantía total; en cambio, deberá interpretarse como si la disposición nula o inaplicable de
que se trate no estuviera contenida en la garantía. Si esta garantía se traduce a otro idioma distinto del
inglés, la versión en inglés prevalecerá en la medida en que surja cualquier conflicto o discrepancia de
significado entre la versión en inglés y la traducción de ésta.
Avant de commencer
1.
Guide de mise en marche rapide : unité d’alimentation de la série EN
Français
2.
Préparez le site d’installation : vérifiez que l’appareil n’est pas exposé à des températures
ou une humidité extrêmes. Laissez de la place autour de l’unité d’alimentation Enlogic
pour le raccordement des câbles et de la prise. Pour les consignes d’installation et
d’utilisation ainsi que les consignes de sécurité exhaustives, veuillez vous reporter au
Manuel d’utilisation de la série EN.
Enregistrez votre produit en ligne à www.enlogic.com.
Montage
4.
Branchement sur une source d’alimentation
Montage de l’unité d’alimentation dans l’armoire du serveur sans supports de montage
Ressources supplémentaires
Pour des renseignements particuliers sur l’installation et l’utilisation de l’unité
d’alimentation, veuillez vous reporter au guide d’utilisation de la série EN ou
visiter www.enlogic.com.
Des informations sur la garantie sont disponibles sur le site internet www.
enlogic.com/warranty
Déballage de l’unité d’alimentation Enlogic
Lors de la réception de l’unité d’alimentation Enlogic, déballez toutes les
pièces et vérifiez qu’elles sont toutes présentes et en bon état. S’il manque
des pièces ou si des pièces sont endommagées, veuillez contacter Enlogic à
[email protected]. Vous trouverez les éléments suivants dans le colis :
•
•
•
•
Unité d’alimentation de la série EN
Guide d’installation rapide
Fiche d’information de sécurité
Carte de garantie
L’unité d’alimentation (PDU) de la série EN est fournie avec des chevilles de montage réglables
sans outils qui sont faciles et pratiques à installer.
1. Déterminez l’emplacement de montage de l’unité d’alimentation de série EN à l’intérieur
de l’armoire du serveur.
2. Mesurez la distance entre les trous de montage dans l’armoire du serveur et ajustez les
chevilles de montage de l’unité d’alimentation en conséquence. Nota : L’écart entre les
chevilles de montage réglables peuvent être ajustées de 1472mm et 1584mm (ou 554mm
et 676mm en EN1101, EN2101, EN5101, ou EN6101 series PDUs.
3. Une fois que les chevilles de montage sont sur la bonne position, insérez-les dans les
trous de montage de l’armoire du serveur.
4. Faites passer le cordon d’alimentation au travers de l’armoire et branchez-le sur une
source d’alimentation.
Nota : Pour obtenir des consignes de montage particulières à divers fabricants de bâtis,
veuillez aller sur le site : www.enlogic.com.
Montage de l’unité d’alimentation dans l’armoire du serveur avec supports de montage
1.
2.
3.
The Critical Component
Accéder à un PDU Enlogic avec une adresse IP statique
1.
Reliez un câble Ethernet standard entre le port Ethernet du PDU et votre ordinateur.
Remarque: Un câble croisé n’est pas nécessaire.
Lorsque le PDU effectue une connexion, la prise Ethernet du PDU affiche un voyant vert
continu sur la gauche et un voyant jaune clignotant à droite pour indiquer une connexion
réussie.
Une fois connecté, et sans service DHCP trouvé, le PDU reviendra à une adresse IP
statique de 192.168.0.1
Attribuez au port Ethernet de votre ordinateur une adresse IP dans la plage 192.168.0.2254. Note: N’utilisez pas l’adresse 192.168.0.1.
Dans un navigateur Web standard, entrez l’URL «http://192.168.0.1» et configurez le PDU
en utilisant l’interface graphique, ou accédez à la CLI via SSH à 192.168.0.1:22
Remarque: Par défaut, le nom d’utilisateur est admin et le mot de passe est 12345678.
Configurer le PDU avec une adresse IP statique remplace l’adresse IP par défaut.
2.
3.
4.
5.
Communications de réseau en chaîne bouclée
Pour connecter jusqu’à 4 unités d’alimentation en chaîne bouclée au moyen d’une seule adresse
IP :
1. Configurez l’unité d’alimentation qui sera la première en ligne sur la connexion Rs485.
2. Lorsque l’unité d’alimentation initiale est configurée, branchez un câble Ethernet du port
« Rs485-2 » de cette unité sur le port « série+Rs485-1 » de l’unité d’alimentation suivant.
3. Répétez l’étape 2, en connectant les unités d’alimentation du port « Rs485-2 » au port «
série+Rs485-1 » pour un maximum de 4 unités d’alimentation.
Nota : La longueur totale des câbles Ethernet raccordant les unités d’alimentation
connectes en chaine doit être inférieure à 6 mètres.
Déterminez l’emplacement de montage de l’unité d’alimentation de série EN à l’intérieur
de l’armoire du serveur. Accrochez les supports de montage dans l’armoire du serveur en
utilisant les crochets des supports de montage.
Attachez les supports de montage fournis sur l’armoire du serveur avec les vis fournies.
Mesurez la distance entre les trous de montage dans l’armoire du serveur et ajustez
les chevilles de montage de l’unité d’alimentation en conséquence. Nota : L’écart entre
les chevilles de montage réglables peuvent être ajustées de 1472mm et 1584mm (ou
554mm et 676mm en EN1101, EN2101, EN5101, ou EN6101 séries PDUs.Une fois que les
Garantie
Enlogic garantit que les équipements fournis seront exempts de vices de fabrication pendant une
période de deux (2) ans à compter de la date de facturation à l’acheteur original. Enlogic prolongera
automatiquement la période de garantie standard d’une (1) année supplémentaire si le produit est
enregistré dans un délai de trente (30) jours à compter de la date de facturation à l’acheteur original. Le
produit peut être enregistré en ligne à www.enlogic.com.
Les obligations de garantie d’Enlogic en vertu de la présente sont subordonnées aux conditions suivantes
: (1) Enlogic est promptement avertie du défaut ; (2) l’acheteur apporte la preuve à la satisfaction
raisonnable d’Enlogic que les produits ont été convenablement installés, entretenus et utilisés ; et (3)
l’acheteur renvoie les produits défectueux ou toute pièce de ceux-ci à Enlogic. Une fois qu’Enlogic aura
déterminé qu’un produit n’est pas tel qu’il est garanti, Enlogic soit remplacera soit réparera le produit
défectueux ou des pièces dudit produit, selon son choix exclusif. La présente garantie devient nulle et
non avenue en cas de mauvais traitement, d’utilisation incorrecte, de mauvais emploi, d’installation
ou de réparation défectueuse par des personnes non autorisées ou, si pour tout autre motif, Enlogic
détermine que le dit produit ne fonctionne pas convenablement du fait de causes autres que des vices
de fabrication.
La présente garantie s’appliquera exclusivement aux produits vendus à l’acheteur par Enlogic ou toute
société contrôlée par ou sous le contrôle conjoint d’Enlogic ou d’une filiale d’Enlogic (collectivement,
« Enlogic »). Enlogic n’acceptera aucune responsabilité ou obligation envers l’acheteur, en vertu de la
présente garantie ou d’une autre manière, eu égard à tout défaut ou défaillance de performance de
produits qui ne sont pas vendus ou fabriqués par Enlogic, y compris les produits qui sont mélangés avec
ou intégrés dans des produits Enlogic, ou tous produits dans lesquels les produits Enlogic sont intégrés
en tant que composants d’un système ou d’une autre manière.
Weitere Ressourcen
Spezifische Installations- und Betriebsinformationen finden Sie im Handbuch der ENSerie und auf der Website www.enlogic.com.
Informationen zur Garantie finden Sie unter
www.enlogic.com/warranty
Enlogic-Stromverteiler auspacken
Nach Empfang des Enlogic-Stromverteilers packen Sie alle Teile aus und überprüfen,
dass nichts fehlt oder beschädigt ist. Wenn etwas fehlt oder beschädigt ist, wenden
Sie sich an Enlogic unter [email protected]. Folgendes ist mitgeliefert:
• Stromverteilereinheit EN-Serie
• Schnelleinrichtungsanleitung
• Sicherheitsinformationsblatt
• Garantiekarte
Der Stromverteiler der EN-Serie wird für den leichten Einbau mit werkzeuglosen einstellbaren
Montageklammern geliefert.
1. Bestimmen Sie, wo im Serverschrank der Stromverteiler der EN-Serie montiert werden
soll.
2. Messen Sie den Abstand zwischen den Montagelöchern im Serverschrank und stellen
Sie die Montageklammern des Stromverteilers dementsprechend ein. Anmerkung: Die
Montageklammern lassen sich längenmäßig zwischen 472mm und 1584mm einstellen.
(oder 554mm und 676mm für EN1101, EN2101, EN5101, oder EN6101 series PDUs).
3. Wenn die Montageklammern in der richtigen Stellung stehen, stecken Sie die Stöpsel in
die Montagelöcher des Serverschranks.
4. Ziehen Sie das Stromkabel durch den Schrank und stecken Sie den Stecker in eine
Steckdose.
Anmerkung: Die spezifischen Montageanleitungen für unterschiedliche Gestellhersteller
finden Sie bei www.enlogic.com.
Montage des Stromverteilers im Serverschrank mit Montagestützen
1.
2.
3.
Bevor Sie beginnen
2.
2.
3.
Raccordement à un réseau
L’unité d’alimentation de série EN est compatible avec le protocole DHCP.
1. Branchez un câble de raccordement Ethernet standard sur le port Ethernet de l’unité
d’alimentation de série EN.
2. Branchez l’autre extrémité du câble Ethernet sur votre LAN.
3. Vérifiez que le voyant du port Ethernet de l’unité d’alimentation est vert.
4. Cherchez l’adresse IP sur l’écran OLED, en allant à : Configuration>Menu>IPv4 or IPv6.
5. Dans un navigateur web standard, saisissez l’adresse IP de l’unité d’alimentation et
effectuez la configuration de l’unité d’alimentation.
Note: Nom d’utilisateur par défaut est admin. Mot de passe par défaut est 12345678.
L’ACHETEUR EU ÉGARD À TOUTE CAUSE D’ACTION EN RELATION AVEC L’ACHAT ET/OU L’UTILISATION
DE L’UN QUELCONQUE DES PRODUITS MENTIONNÉS DANS LA PRÉSENTE DE LA PART D’ENLOGIC SE
RAPPORTERA AUX DOMMAGES, ET QUE LA RESPONSABILITÉ D’ENLOGIC EU ÉGARD À TOUS PERTES OU
DOMMAGES RÉSULTANT DE TOUTE CAUSE QUELLE QU’ELLE SOIT, Y COMPRIS SI CES DOMMAGES SONT
RÉCLAMÉS, REVENDIQUÉS OU FONT L’OBJET D’UNE ACTION OU D’UNE RÉCLAMATION POUR DÉLIT OU
DE NATURE CONTRACTUELLE, OU À PROPOS DE LA GARANTIE ELLE-MÊME, OU EN VERTU DE TOUTE
AUTRE LOI OU FORME D’ACTION, NE DÉPASSERA EN AUCUN CAS LE PRIX D’ACHAT DU PRODUIT FAISANT
L’OBJET DE LA RÉCLAMATION, OU AU CHOIX D’ENLOGIC, LA RÉNOVATION OU LE REMPLACEMENT OU LA
RÉPARATION DU PRODUIT CONCERNÉ.
La présente garantie est régie par et interprétée conformément aux lois de l’état du Missouri, sans
égard aux principes de conflit des lois. Les parties à la présente garantie conviennent que la Convention
des Nations Unies sur les Contrats de vente internationale de produits est exclue dans son ensemble
de l’application de la présente garantie. Tous les différends et litiges résultant de ou en rapport avec la
présente garantie seront définitivement réglés par arbitrage. Sauf autrement interdit par la loi, l’arbitrage
sera : (i) effectué à St Louis, Missouri ; (ii) mené conformément aux lois du Missouri ; (iii) effectué en
langue anglaise ; (iv) conclu en vertu des Règles d’Arbitrage de l’American Arbitration Association («
Règles ») ; et (v) entendu par un arbitre désigné conformément aux Règles. La décision de l’arbitre sera
exécutoire et obligatoire pour les parties. Si une partie de la présente garantie est jugée être nulle ou
non exécutoire, cette nullité ou ce défaut de la rendre exécutoire n’invalidera pas ou ne rendra pas
l’ensemble de la garantie non exécutoire, mais la garantie sera interprétée comme si elle ne contenait
pas la disposition nulle ou non exécutoire. Si la présente garantie est traduite dans une langue autre que
l’anglais, la version anglaise fera foi dans la mesure où il y a un conflit ou une différence de sens entre la
version anglaise et toute traduction de celle-ci.
Anschluss an einer Steckdose
Montage des Stromverteilers im Serverschrank ohne Montagestützen
Deutsch
1.
1.
Installationsvorbereitung: Stellen Sie sicher, dass die Produkte nicht extremer
Temperaturen und Luftfeuchtigkeit ausgesetzt werden. Sorgen Sie für
ausreichend Platz für die Verkabelung und die Anschlüsse der Enlogic –
Stromverteiler. Umfassende Installations- und Betriebsinformationen und
Sicherheitsanleitungen entnehmen Sie dem EN-Serie-Benutzerhandbuch.
Registrieren Sie Ihr Produkt online bei www.enlogic.com.
Nota : Lors du branchement de l’unité d’alimentation Enlogic sur une source
d’alimentation électrique, vérifiez que le cordon d’alimentation de l’unité d’alimentation
est assez long pour atteindre la source d’alimentation électrique. Pour brancher une unité
d’alimentation sur une source d’alimentation électrique :
Mettez le disjoncteur d’alimentation en position d’arrêt. Vérifiez que tous les disjoncteurs
de l’unité d’alimentation Enlogic sont réglés sur ON (EN MARCHE).
Branchez chaque unité d’alimentation Enlogic sur un circuit divisionnaire d’une puissance
appropriée.
Nota : Vous trouverez les puissances d’entrée acceptables sur l’étiquette de l’unité
d’alimentation.
Mettez le disjoncteur d’alimentation en position de marche. L’écran OLED affichera une
barre d’état lorsque l’unité d’alimentation sera en cours de téléchargement. Une fois
cette opération terminée, le menu principal s’affichera à l’écran OLED.
Nota : Si l’unité d’alimentation est une unité commutée, les voyants correspondant à
chaque sortie s’allumeront tour à tour pour indiquer qu’elles sont alimentées avant
d’afficher une couleur fixe.
LA PRÉSENTE GARANTIE EST OFFERTE EXPRESSÉMENT AU LIEU ET PLACE D’AUTRES GARANTIES,
EXPRESSES OU IMPLICITES, ÉTANT ENTENDU QUE TOUTES AUTRES GARANTIES DE CETTE NATURE,
EXPRESSES OU IMPLICITES, Y COMPRIS LES GARANTIES DE QUALITÉ MARCHANDE ET D’ADAPTATION À
UN USAGE PARTICULIER SONT EXPRESSÉMENT EXCLUES PAR LA PRÉSENTE. ENLOGIC NE SERA EN AUCUN
CAS RESPONSABLE ENVERS L’ACHETEUR DE TOUS DOMMAGES DIRECTS, COLLATÉRAUX, ACCESSOIRES
OU INDIRECTS EN RELATION AVEC L’UTILISATION PAR L’ACHETEUR DE L’UN OU L’AUTRE DES PRODUITS
MENTIONNÉS DANS LA PRÉSENTE, OU POUR TOUTE AUTRE CAUSE QUELLE QU’ELLE SOIT EN RELATION
AVEC LESDITS PRODUITS. NI ENLOGIC NI SES REPRÉSENTANTS NE SERONT RESPONSABLES ENVERS
L’ACHETEUR OU TOUTE AUTRE PERSONNE DE TOUS OBLIGATION, RÉCLAMATION, PERTE, DOMMAGE OU
FRAIS DE QUELQUE NATURE QUE CE SOIT, OU DE DOMMAGES DIRECTS, COLLATÉRAUX, ACCESSOIRES OU
INDIRECTS EN RELATION AVEC OU RÉSULTANT DE OU PROVOQUÉS DIRECTEMENT OU INDIRECTEMENT
PAR LESDITS PRODUITS OU PAR LEUR UTILISATION OU TOUS INSUFFISANCE, DÉFAUT OU IMPERFECTION
DESDITS PRODUITS. IL EST EXPRESSÉMENT CONVENU QUE LE DÉDOMMAGEMENT EXCLUSIF DE
Montage
Schnelleinstieg: Stromverteilereinheit EN-Serie
chevilles de montage sont sur la bonne position, insérez-les dans les trous de montage de
l’armoire du serveur.
Faites passer le cordon d’alimentation au travers de l’armoire et branchez-le sur une
source d’alimentation électrique.
Nota : Pour obtenir des consignes de montage particulières à divers fabricants de bâtis,
veuillez aller sur le site :www.enlogic.com.
4.
5.
Bestimmen Sie, wo im Serverschrank der Stromverteiler der EN-Serie montiert werden
soll. Hängen Sie die Montagestützen im Serverschrank mit den Montagehaken.
Befestigen Sie die beiliegenden Montagestützen mit den mitgelieferten Schrauben im
Serverschrank.
Messen Sie den Abstand zwischen den Montagelöchern im Serverschrank und stellen
Sie die Montageklammern des Stromverteilers dementsprechend ein. Anmerkung: Die
Montageklammern lassen sich längenmäßig zwischen 1472mm and 1584mm einstellen.
(oder 554mm and 676mm on EN1101, EN2101, EN5101, oder EN6101 series PDUs).
Wenn die Montageklammern in der richtigen Stellung stehen, stecken Sie die Stöpsel in
die Montagestützen.
Ziehen Sie das Stromkabel durch den Schrank. Dann stecken Sie den Stecker in eine
Steckdose.
Anmerkung: Die spezifischen Montageanleitungen für unterschiedliche Gestellhersteller
finden Sie bei www.enlogic.com.
1.
2.
3.
Anmerkungen: Wenn Sie den Enlogic-Stromverteiler an einer Stromzufuhr anschließen,
stellen Sie sicher, dass das Stromkabel lang genug ist, um die Stromzufuhr für den
Stromverteiler zu erreichen. So schließen Sie den Stromverteiler an einer Stromzufuhr an:
Schalten Sie den Stromkreisunterbrecher für die Stromzufuhr ab. Stellen Sie sicher, dass
alle Stromkreisunterbrecher am Enlogic-Stromverteiler EINGESCHALTET sind.
Schließen Sie jedes Enlogic-Stromverteiler-Gerät an einem geeigneten Endstromkreis an.
Anmerkung: Prüfen Sie die richtige Eingangsleistung am Schild des Stromverteilers.
Schalten Sie den Stromkreisunterbrecher für die Stromzufuhr an. Im OLED-Display
erscheint eine Status-Leiste, wenn sich der Stromverteiler auflädt. Zum Schluss erscheint
das Hauptmenü im OLED.
Anmerkung: Wenn der Stromverteiler mit Schalter ausgestattet ist, leuchten die Lampen
für jeden Ausgang nacheinander auf, um Strom anzuzeigen, sie bleiben dann ständig an.
Anschluss am Stromnetz
Der Stromverteiler EN Serie ist mit DHCP kompatibel.
1. Schließen Sie ein standard Ethernetpatch-Kabel am Ethernetport des EN-SerieStromverteilers an.
2. Schließen Sie das andere Ende des Ethernetkabels an Ihrem LAN an.
3. Stellen Sie sicher, dass der Ethernetport am Stromverteiler grün aufleuchtet.
4. Hier finden Sie die IP-Adresse auf dem OLED-Display: Einrichten>Menü>IPv4 or IPv6.
5. In einem standard Webbrowser geben Sie die PDU-IP-Adresse ein und konfigurieren den
Stromverteiler (PDU).
Anmerkung: Voreingestellter Username ist admin. Voreingestelltes Passwort ist
12345678.
The Critical Component
Zugriff auf eine Enlogic iPDU mit einer statischen IP-Adresse
1.
2.
3.
4.
5.
Verbinden Sie ein Standard Ethernet Kabel (kein gekreuztes Kabel) mit dem Ethernet-Port
auf der Powerleiste der iPDU und das andere Ende des Kabels direkt mit Ihrem Laptop/
PC.
Wenn die iPDU eine live Verbindung herstellt, der Ethernet-Port auf der Leiste leuchtet
grün auf der linken Seite, zeigt ein blinkendes gelbes Licht auf der rechten Seite die erfolgreiche Datenverbindung an.
Wenn eine Verbindung besteht und kein DHCP-Service gefunden wird, greift die PDU auf
die statische IP-Adresse 192.168.0.1 zurück.
Geben Sie dem Ethernet-Port Ihres Laptops/PC eine IP-Adresse im Bereich 192.168.0.2254. Die Adresse 192.168.0.1 darf NICHT verwendet werden.
In einem Standard Webbrowser geben Sie bitte die URL ‘http://192.168.0.1’ ein und konfigurieren Sie die iPDU, oder Sie greifen für das CLI mit SSH auf 192.168.0.1:22 zu.
Bemerkung: Der voreingestellte Username ist admin. Voreingestelltes Passwort ist
12345678.
Die Konfiguration der PDU mit einer statischen IP-Adresse schaltet die voreingestellte IPAdresse aus.
Reihenschaltungs-Netz-Kommunikation
So verbindet man mit Reihenschaltung bis zu 4 PDU über eine einzelne IP-Adresse:
1. Konfigurieren Sie den PDU, der zuerst in der Rs485-Reihenschaltung sein soll.
2. Wenn der erste PDU konfiguriert ist, verbinden Sie ein Ethernetkabel vom “Rs485-2”Port am konfigurierten PDU mit dem “Serial+Rs485-1”-Port am nächsten PDU in der
Reihenschaltung.
3. Wiederholen Sie Schritt 2 und verbinden die PDU vom “Rs485-2”-Port zum “Serial+Rs4851”-Port für bis zu 4 PDU.
Anmerkung: Die Gesamtlänge der Ethernetkabel, die die reihengeschalteten PDU
miteinander verbinden, darf nicht größer als 6 m sein.
Garantieinformationen
Enlogic garantiert für zwei Jahre ab Rechnungsdatum an den ersten Käufer, dass die gelieferte Anlage
frei von Fertigungsfehlern ist. Enlogic verlängert die Standardgarantiezeit automatisch um ein weiteres
Jahr, wenn die Produktregistrierung innerhalb von dreißig Tagen nach Rechnungsdatum an den ersten
Käufer vollzogen ist. Die Produktregistrierung kann online hier vorgenommen werden:www.enlogic.
com.
Enlogics Garantieverpflichtungen gelten vorbehaltlich folgenden Bedingungen: (1) Enlogic wird prompt
über den Defekt informiert, (2) der Käufer erbringt den Nachweis zu Enlogics Zufriedenheit, dass die
Waren richtig installiert, gewartet und betrieben wurden und (3) der Käufer retourniert die defekten
Waren oder Teile davon an Enlogic. Wenn Enlogic bestimmt hat, dass ein Produkt nicht der Garantie
entspricht, wird Enlogic das defekte Produkt oder Teil davon nach Gutdünken ersetzen oder reparieren.
Diese Garantie erlischt im Falle von Missbrauch, falscher Anwendung, Zweckentfremdung, falscher
Installation oder Reparatur durch Unbefugte, oder wenn Enlogic aus irgendeinem anderen Grunde
bestimmt, dass das Produkt aufgrund anderer Ursachen als Fertigungsfehlern nicht richtig funktioniert.
Diese Garantie gilt nur für Produkte, die von Enlogic oder einer unter ihrer Kontrolle stehenden Firma
oder einer Tochtergesellschaft von Enlogic (insgesamt "Enlogic") an den Käufer verkauft wurden. Enlogic
haftet oder verpflichtet sich nicht gegenüber dem Käufer unter dieser Garantie oder sonst wie in Bezug
auf Fehler oder Versagen oder mangelnder Leistung von Produkten, die nicht von Enlogic hergestellt
oder verkauft wurden, einschließlich Produkten, die mit Enlogic-Produkten vermischt oder in solche
eingebaut wurden, oder Produkte, in welche Enlogic-Produkte als Systemkomponente oder sonst wie
eingebaut wurden.
DIESE GARANTIE GILT AUSDRÜCKLICH ANSTELLE JEGLICHER ANDEREN AUSDRÜCKLICHEN ODER
IMPLIZIERTEN GARANTIE. ES VERSTEHT SICH, DASS SOLCHE ANDEREN AUSDRÜCKLICHEN ODER
IMPLIZIERTEN GARANTIEN EINSCHLIESSLICH DER GARANTIE DER MARKTGÄNGIGKEIT UND EINER
SPEZIFISCHEN GEBRAUCHSTAUGLICHKEIT HIERMIT AUSDRÜCKLICH AUSGESCHLOSSEN SIND. UNTER
KEINEN UMSTÄNDEN HAFTET ENLOGIC DEM KÄUFER GEGENÜBER FÜR DIREKTE, KOLLATERALE,
ANFALLENDE ODER MITTELBARE SCHÄDEN IM ZUSAMMENHANG MIT DER VERWENDUNG DES
KÄUFERS DER HIER AUFGEFÜHRTEN PRODUKTEN ODER FÜR IRGENDWELCHE ANDEREN URSACHEN
BEZÜGLICH DIESER PRODUKTE. WEDER ENLOGIC NOCH IHRE REPRÄSENTANTEN HAFTEN DEM KÄUFER
ODER IRGEND JEMAND ANDEREM GEGENÜBER FÜR HAFTUNG, SCHADENERSATZ, SCHADENSVERLUST
ODER KOSTEN IRGENDWELCHER ART ODER DIREKTE, KOLLATERALE, ANFALLENDE ODER MITTELBARE
SCHÄDEN IN BEZUG AUF ODER AUFGRUND VON ODER DIREKT ODER INDIREKT VON DEN GENANNTEN
PRODUKTEN VERURSACHTEN SCHÄDEN ODER SOLCHEN SCHÄDEN, DIE DURCH DEN GEBRAUCH ODER
FEHLER ODER DEFEKT ODER MANGEL DER GENANNTEN PRODUKTE ENTSTANDEN SIND. ES WIRD
AUSDRÜCKLICH VEREINBART, DASS DIE EXKLUSIVE ABHILFEMASSNAHME DES KÄUFERS FÜR JEGLICHE
HANDLUNGSURSACHE BEZÜGLICH DEM KAUF UND/ODER DEM GEBRAUCH DER HIER GENANNTEN
PRODUKTE VON ENLOGIC FÜR SCHADEN SEIN WIRD, UND ENLOGICS HAFTUNG FÜR JEGLICHEN UND
ALLE VERLUSTE ODER SCHÄDEN, DIE AUF GLEICH WELCHEN URSACHEN BERUHEN, GLEICHWOHL OB
SOLCHE SCHÄDEN REKLAMIERT; GELTEND GEMACHT ODER EINGEKLAGT WERDEN ODER OB KLAGE
WEGEN UNERLAUBTER HANDLUNG ODER VERTRAGLICH ERHOBEN WIRD ODER AUFGRUND DER
GARANTIE SELBST ODER AUFGRUND IRGENDEINES ANDEREN GESETZES ODER KLAGEFORM, IN KEINEM
FALL DEN WERT DES KAUFPREISES DES PRODUKTS, FÜR WELCHES REKLAMIERT WIRD, ÜBERSTEIGT. ES
LIEGT IM GUTDÜNKEN ENLOGICS, SOLCHE PRODUKTE ZU REPARIEREN ODER ZU ERSETZEN.
Diese Garantie unterliegt den Gesetzen des Staats Missouri, abgesehen von sich widersprechenden
Rechtsgrundsätzen. Die Parteien dieser Garantie vereinbaren, dass das UN-Kaufrecht hiermit insgesamt
ausgeschlossen wird und auf diese Garantie keine Anwendung findet. Alle Meinungsverschiedenheiten
und Streitigkeiten aus dieser Garantie werden durch ein Schiedsspruchverfahren beglichen. Wenn nicht
gesetzlich verboten, findet das Schiedsspruchverfahren wie folgt statt: (i) in St. Louis, Missouri; (ii) gemäß
den Gesetzen von Missouri; (iii) auf Englisch; (iv) entschieden gemäß den Schiedsverfahrensregeln der
amerikanischen American Arbitration Association (“Regeln”); and (v) vor einem Schiedsrichter, der
gemäß den Regeln bestellt wurde. Die Entscheidung des Schiedsrichter ist endgültig und für beide
Parteien verbindlich. Wenn eine Bestimmung dieser Garantie ungültig oder unvollstreckbar ist, wird
dadurch nicht die gesamte Garantie ungültig oder unvollstreckbar, sondern gilt die Garantie so, als
ob sie die ungültige oder unvollstreckbare Bestimmung nicht enthielte.” Wenn diese Garantie in eine
andere Sprache übersetzt wird, gilt die englische Version, wenn ein Konflikt oder eine Diskrepanz in der
Bedeutung zwischen der englischen und ihrer übersetzten Version besteht.