1
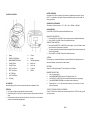
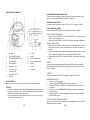
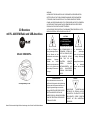
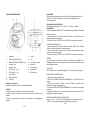
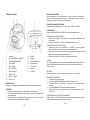
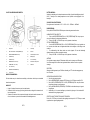
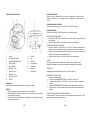
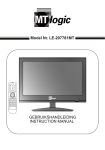
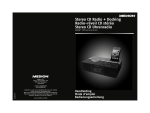
WARNING CD Boombox with PLL AM/FM Radio and USB Port TO PREVENT ELECTRIC SHOCK; DO NOT USE THIS PLUG WITH AN EXTENSION CORD RECEPTACLE OR OTHER OUTLET UNLESS THE BLADES CAN BE FULLY INSERTED TO PREVENT BLADES EXPLOSURE. TO PREVENT FIRE OR SHOCK HAZARD; DO NOT EXPOSE THIS APPLIANCE TO RAIN OR MOISTURE. DO NOT INSTALL THIS EQUIPMENT IN A CONFINED SPACE SUCH AS A BOOK CASE OR SIMILAR UNIT. CAUTION RISK OF ELECTRONICS SHOCK DO NOT OPEN Model: CSU384PLL The lighting flash with arrowhead symbol, with an equilateral triangle is intended to alert the user to the presence of uninsulated dangerous voltage within the products enclosure that may be of sufficient magnitude to constitute a risk of electric shock to persons. CAUTION: TO REDUCE THE RISK OF ELECTRIC SHOCK, DO NOT REMOVE COVER (OR BACK). NO USER SERVICEABLE PARTS INSIDE REFER SERVICING TO QUALIFIED SERVICE PERSONNEL. LASER SAFETY www.mpmaneurope.com Note: Please read and follow these instructions before using your unit. This unit uses a laser. Only a qualified service person should remove the cover or attempt to service this device to avoid possible eye injure. Caution: USE OF CONTROLS OR ADJUSTMENT OF PERFORMANCE OF PROCEDURE OTHER THAN SPECIFIED HEREIN MAY RESULT IN HAZARDOUS RADIATION EXPOSURE. The exclamation point within an equilateral triangle is intended to alert the user to the presence of important operating and maintenance (servicing) instruction in the literature accompanying the appliance. DANGER: INVISIBLE LASER RADIATION WHEN OPEN AND INTERLOCK FAILED OR DEFEATED. AVOID DIRECT EXPOSURE TO LASER BEAM. BATTERY OPERATION Disconnect the AC Cord Set completely. Open the Battery Compartment Door and insert 6 pieces UM-2 "C" size batteries into the battery compartment with battery polarity as shown inside the battery compartment. LOCATION OF CONTROLS SEQUENCE OF FUNTION MODE The sequence of the function mode is : “CD → USB → AUX → FM Radio → AM Radio” RADIO OPERATION Press POWER / SOURCE button and select the desired radio mode. MANUAL STATION SELECTION 1. Press the SKIP/TUN > or SKIP/TUN < button step by step to tune to the desired radio stations 2. Press VOLUME + or VOLUME – Button for the desired volume level; SEARCH STATION OPERATION 1. 2. 3. 1. Speaker 11. CD door 2. POWER / SOURCE Button 12. Handle 3. MODE/MEMORY/PROG Button 13. FM Telescope Antenna 4. VOLUME – Button 14. Battery Door 5. VOLUME + Button 15. Aux-in Jack 6. SKIP / TUN < Button 16. AC Socket 7. SKIP / TUN > Button 17 USB Slot 8. M+ / STOP Button 9. PLAY / PAUSE Button 10. LCD display AC OPERATION Connect the plug to the AC socket of the unit and the other end to a standard AC outlet. ATTENTION 1. Do not plug or unplug the power cable while you have wet hands; 2. When planning not to use this unit for a long time, disconnect the power cable from the wall outlet; 3. When disconnecting the power cord from the wall outlet, do not pull on the cord in order to avoid shock risks caused by damaged cable. Press and hold the SKIP/TUN > or SKIP/TUN < button for approx. 1 second, it will start to search the next radio station in the direction of the search. The search operation simply finds stations with strong signals. Stations with weak reception can only be tuned in manually. Press VOLUME + or VOLUME – Button for the desired volume level; ANTENNA For best reception, fully extend the FM Antenna to receive FM stations. For AM reception, the unit has a built-in antenna, turn the whole unit for best reception. FM STEREO When turn to a FM Stereo Broadcast, “ST” will be shown on the LCD display. MEMORIZE RADIO STATIONS 1. Tune to the desired station. 2. Press MODE/MEMORY/PROG button, the LCD display will show ‘ P01. 3. Press SKIP/TUN > or SKIP/TUN < button and select the desired number of your program 4. Press MODE/MEMORY/PROGRAM to store the radio station in the memory. 5. Repeat steps from 1 to 3 to store more tracks in memory. You can store up to 20 radio stations in the memory. TO SELECT THE RADIO STATION IN THE MEMORY Press M+ / STOP button for the radio station memory and press the M+ / STOP button skip up to the next memory station. ENG 1 ENG 2 CD/MP3 PLAYBACK FUNCTION To play a CD/MP3 disc, please follow the steps underneath: 1. Press POWER / SOURCE button and select the CD mode. 2. Open the CD door, Insert the disc with the printed side facing up and close the CD door; 3. Disc information (total number of tracks) will appear on the LCD display and play automatically. 4. For MP3 disc, press and hold the FOLDER button and LCD display will show “FOLDER”. Use SKIP/TUN > or SKIP/TUN < button to select the folder you want to listen. 5. Press VOLUME + or VOLUME – Button for the desired volume level; 6. Press STOP button to stop playing the disc. Programming the CD/MP3 disc The programming of the CD/MP3 disc should be done during STOP mode. 1. Press MODE/MEM/FOLDER button, LCD display will show ‘ PXX ‘ (XX indicates the preset number of track to be programmed). 2. Press the SKIP/TUN > or SKIP/TUN < buttons to select the desired track. Press the MODE/MEM/FOLDER button again to store this track in memory. 3. Repeat steps from 2 to 3 to store more tracks in memory. You can store up to 20 tracks in the memory for CD disc and 99 tracks in the memory for MP3 disc. 4. Press the PLAY/PAUSE button to play the disc in the programmed order. 5. To stop playing, press the STOP/M+ button. 6. To cancel the programming list, press the STOP/M+ button and open the CD door or press SOURCE button. Different Play Mode Press the Mode Button to select different kinds of play mode with the following sequence. For Audio CDs : Repeat One Repeat All Normal For MP3 Files : Repeat One Repeat Folder Repeat All Normal Repeat One– repeat the track being played. Repeat All – repeat all the tracks in the storage media. Repeat Folder – repeat all the tracks in the entire album/folder. Normal – play the tracks in sequence AUX IN CONNECTION 1. Press POWER / SOURCE button and select the Aux-in mode. The display will show “AUX”. 2. Insert one side of the audio cable (requires 3.5mm stereo plug, not supplied) into the line-out jack or phones jack on your audio device and the other side to the aux-in jack on the unit. 3. Turn on your audio device and follow the playback instruction. 4. To stop this function, press SOURCE button to turn off your audio device. Note: Because of none-standardized format definition/production of MP3 CD, playback quality & performance are not guaranteed. Manufacturer is not responsible for the playability of MP3 in any case due to recording conditions such as PC performance, writing software, media ability and etc. Playing MP3 files with USB 1. Press the POWER / SOURCE Button to select the USB mode. 2. Plug your USB device into the USB port on the unit, the unit will start reading the files in the USB device, it will show the total number of tracks of the device after reading and play from track 001 automatically. 3. Press and hold the MODE/MEM/FOLDER button and LCD display will show “FOLDER”. Use SKIP + or SKIP - button to select the folder you want to listen. 4. During playing, press the PLAY/PAUSE Button to temporarily pause playing. To resume, press the Play/Pause Button again. Skip Mode 1. During play or pause mode, press the SKIP + Button to go to the next track. 2. During play or pause mode, press the SKIP - Button to go back to the previous track. ENG 3 ENG 4 CARE AND MAINTENANCE Always turn off the unit after use. Keep the unit away from magnetic objects, water or heat sources. Use a clean soft cloth moistened with lukewarm water to clean the cabinet. Never use chemical cleaners that could damage the finish of the unit. Never touch the CD pickup and lens. If fingerprints get on the pickup lens, clean it gently with a commercial lens cleaner. Disconnect the unit from any power sources before cleaning. To remove a disc from its storage case, press down on the centre of the case and lift the disc out, holding it carefully by the edges. Fingerprints and dust should be carefully wiped off the disc’s recorded surface with a soft cloth. Unlike conventional records, compact discs have no grooves to collect dust and microscopic debris so gently wiping with a soft cloth should remove most particles. Wipe in a straight line from the inside to the outside of the disc. Small dust particles and light stains will have absolutely no effect on reproduction quality. Never use chemicals such as record sprays, anti-static sprays, benzene or thinners to clean compact discs. These chemicals can irreparably damage the disc’s surface. Discs should be returned to their cases after use. This avoids serious scratches that could cause the Laser pickup to skip. Do not expose discs to direct sunlight, high humidity, or high temperatures for extended periods. Long exposure to high temperatures can warp the disc. Do not stick paper or write anything with a ballpoint pen on the label side of the disc. Important Note Automatic standby switching To comply with the ERP2 directive, the unit automatically switches to standby after approximately 10 minutes without a signal. To switch the unit on again, press the “POWER / SOURCE” button on the unit. ENG 5 Specifications Frequency Range: Power Supply: AM 522-1620 KHz FM 87.5 - 108 MHz AC 230V ~ 50Hz (UM-2 x 6) DC 9V Specifications are subject to change without further notice. This is to certify that CSU384PLL is in conformity with: Council directive 89/336/EEC(EMC direction): Applicable Standards: EN55013:2001+A1:2003+A2:2006 EN61000-3-2:2006+A1:2009+A2:2009 EN61000-3-3:2008 EN55020:2007 Made in PRC For more information please visit our website www.mpmaneurope.com ENG 6 MISE EN GARDE Radiocassette CD Avec radio PLL AM/FM et port USB AFIN D’ÉVITER LES RISQUES D’ÉLECTROCUTION, N’UTILISEZ JAMAIS CETTE PRISE AVEC UNE RALLONGE NI AUCUNE AUTRE SORTIE ÉLECTRIQUE, SAUF SI LES LAMES SONT ENTIÈREMENT INSÉRÉES, AFIN D’ÉVITER LEUR REJET. AFIN D’ÉVITER LES RISQUES D’INCENDIE, N’EXPOSEZ JAMAIS CET APPAREIL A LA PLUIE OU A L’HUMIDITÉ. N’INSTALLEZ PAS CET ÉQUIPEMENT DANS UN LIEU CONFINE TEL QU’UNE BIBLIOTHÈQUE OU UN AUTRE LIEU DE CE TYPE. ATTENTION RISQUE D’ÉLECTROCUTION! NE PS OUVRIR Modèle: CSU384PLL Le voyant lumineux en forme de flèche enfermée dans un permet d’avertir triangle l’utilisateur d’une tension dangereuse, susceptible de générer une magnitude capable de résulter en électrocution. ATTENTION: AFIN E RÉDUIRE LES RISQUES D’ÉLECTROCUTION, NE RETIREZ PAS LE CACHE (OU ARRIÈRE DU SYSTÈME). CET APPAREIL CONTIENT ES ÉLÉMENTS DE PETITE TAILLE NON RÉPARABLES PAR LES INDIVIDUS NON QUALIFIES. SÉCURITÉ LASER www.mpmaneurope.com Remarque: Veuille lire attentivement les consignes suivantes avant d’utiliser l’appareil. Cette unité utilise un laser. Seul un technicien qualifié est autorisé à intervenir sur cet appareil, afin de ne pas risquer de s’abîmer les yeux. Attention: L’UTILISATION DE COMMANDES OU LE RÉGLAGE DU SYSTÈME PAR D’AUTRES BIAIS QUE CEUX MENTIONNES DANS CE MANUEL PEUVENT VOUS EXPOSER A DES RAYONNEMENTS DANGEREUX. Le point d’exclamation enfermé dans un triangle équilatéral permet d’attirer l’attention de l’utilisateur sur les consignes d’entretien et d’utilisation importances relatives à ce produit. DANGER: RAYONNEMENT LASER DANGEREUX EN CAS D4ERREUR D4OUVERTURE< ÉVITER TOUT CONTACT DES YEUX CONTACT AVEC LE FAISCEAU LASER. EMPLACEMENT DES COMMANDES FONCTIONNEMENT DU COMPARTIMENT A PILES Débranchez le cordon CA entièrement. Ouvrez le compartiment à piles et insérez 6 piles de type UM-2 "C", en respectant la polarité indiquée à l’intérieur du compartiment. SÉQUENCE DU MODE FONCTION La séquence du mode Fonction est la suivante: “CD → USB → AUX → FM Radio → AM Radio” FONCTIONNEMENT DE LA RADIO Maintenez le bouton POWER / SOURCE enfoncé et sélectionnez le mode radio souhaité. SÉLECTION MANUELLE DES CHAINES 1. Appuyez sur le bouton SKIP/TUN > ou sur le bouton SKIP/TUN < par touches successives jusqu’à trouver la station de votre choix. 2. Appuyez sur la touche VOLUME + ou VOLUME – pour régler le volume selon vos préférences; RECHERCHE DES STATIONS 1. 2. 1. Haut-parleur 11. Porte CD 2. Touche POWER / SOURCE 12. Poignée 3. Touche MODE/MEMORY/PROG 13. Antenne FM télescopique 4. Touche VOLUME – 14. Cache compartiment à piles 5. Touche VOLUME + 15. Prise aux. 6. Touche SKIP / TUN < 16. Prise CA 7. Touche SKIP / TUN > 17 Fente USB 8. Touche M+ / STOP 9. Touche PLAY / PAUSE 10. Écran LCD 3. Maintenez le bouton SKIP/TUN > ou le bouton SKIP/TUN < enfoncé pendant environ 1 seconde. La recherche automatique se lance automatiquement et la première radio détectée est proposée. La recherche automatique permet de détecter les radios dont les fréquences radio sont les plus fortes. Les stations mal reçues par le système peuvent être détectées manuellement. Appuyez sur le bouton VOLUME + ou sur le bouton VOLUME – jusqu’à obtenir le niveau sonore désiré. ANTENNE Pour une meilleure réception, déployez entièrement l’antenne FM afin de recevoir els station FM. Pour la réception AM, l’unité est doté d’une antenne intégrée. Pour améliorer la réception, tournez directement l’appareil. STÉRÉO FM Lorsque vous basculez sur la fréquence FM, le symbole “ST” apparaît sur l’écran LCD. FONCTIONNEMENT CA Branchez la prise à la fiche CA de l’unité et l’autre extrémité à une prise murale standard. ATTENTION 1. Ne branchez et ne débranchez pas le câble d’alimentation si vous avez les mains mouillées; 2. Lorsque vous envisagez de ne pas utiliser cet appareil pendant une longue période, débranchez le câble d’alimentation de la prise murale; 3. Lorsque vous débranchez le cordon d’alimentation de la prise murale, ne tirez pas sur le cordon, afin d’éviter de l’endommager. FRE 1 MÉMORISER DES STATIONS 1. Rendez-vous à la station souhaitée. 2. Enfoncez la touche MODE/MEMORY/PROG , l’écran LCD indique ‘ P01. 3. Appuyez sur SKIP/TUN > ou sur SKIP/TUN < et sélectionnez le nombre de votre choix pour le programme. 4. Appuyez sur le bouton MODE/MEMORY/PROGRAM pour enregistrer la station dans la mémoire du système. 5. Répétez les étapes de 1 à 3 afin d’enregistrer d’autres stations. Vous pouvez enregistrer jusqu’à 20 stations de radio. TO SELECT THE RADIO STATION IN THE MEMORY Appuyez sur le bouton M+ / STOP pour accéder aux stations enregistrées et sur M+ / STOP pour passer à la radio suivante en mémoire. FRE 2 FONCTIONNEMENT LECTEUR CD/MP3 Pour lire un disque CD/MP3, suivez les étapes suivantes: 1. Appuyez sur la touche POWER / SOURCE et sélectionnez le mode CD. 2. Ouvrez la porte CD, placez le disque face imprimée vers vous puis refermez la porte. 3. Les informations relatives au CD (nombre total de pistes) s’afficheront sur l’écran LCD et la lecture débutera automatiquement. 4. Pour les disques MP3, maintenez ka touche FOLDER enfoncée et l’écran LCD affichera le message “FOLDER”. Utilisez la touche SKIP/TUN > ou la touche SKIP/TUN < pour sélectionner le morceau à lire. 5. Appuyez sur la touche VOLUME + ou sur la touche VOLUME – pour ajuster le volume selon vos préférence. 6. Appuyez sur STOP pour arrêter la lecture. Programmation du disque CD/MP3 La programmation du disque CD/MP3 doit être effectué en mode STOP . 1. Appuyez sur la touche MODE/MEM/FOLDER , l’écran LCD affiche le message ‘ PXX ‘ (XX indique le nombre de piste prédéfini à programmer). 2. Appuyez sur la touche SKIP/TUN > ou sur la touche SKIP/TUN < pour sélectionner la piste souhaitée. Appuyez sur la touche MODE/MEM/FOLDER une nouvelle fois pour enregistrer cette piste en mémoire. 3. Répétez les étapes 2 à 3 pour enregistrer plus de pistes en mémoire. Vous pouvez stocker jusqu’à 20 pistes dans la mémoire pour les disques CD et jusqu’à 99 pistes pour les fichiers MP3. 4. Appuyez sur la touche PLAY/PAUSE pour lire le disque dans l’ordre programmé. 5. Pour arrêter la lecture, appuyez sur la touche STOP/M+ . 6. Pour annuler la liste de programmation, appuyez sur la touche STOP/M+ et ouvrez la porte du lecteur CD ou appuyez sur la touche SOURCE. Mode Lecture Aléatoire Appuyez sur le bouton Mode pour sélectionner différents types de lectures en mode aléatoire. Pur les CD audio : Repeat One Repeat All Normal Pour les fichiers MP3 : Repeat One Repeat Folder Repeat All Normal Repeat One– rejoue le morceau en cours de lecture. Repeat All – rejoue l’ensemble des musiques continues sur le support. Repeat Folder – rejoue l’ensemble dees pistes du CD/fichier. Normal – lit les pistes selon l’ordre définit CONNEXION AUXILIAIRE 1. Appuyez sur la touche POWER / SOURCE et sélectionnez le mode Auxiliaire. L’écran LCD affiche le message “AUX”. 2. Insérez l’une des extrémités du câble audio (prise stéréo 3,5mm non fournie) dans la prise jack de votre dispositif et l’autre extrémité à la prise auxiliaire de l’unité. 3. Allumez votre dispositif audio et suive les consignes de lecture. 4. Pour arrêter cette fonction, appuyez sur la touche SOURCE pour éteindre votre dispositif audio. Remarque: Dans le cas de supports MP3/CD non conformes aux normes en vigueur, la qualité de lecture peut être mauvaise. Le fabricant ne saurait être tenu responsable de la qualité de lecture des fichiers MP3 ou des CD, ni de la performance du PC utilisé, du média de lecture, etc. Lecture de fichiers MP3 via un port USB 1. Appuyez sur la touche POWER / SOURCE pour sélectionner le mode USB. 2. Branchez votre dispositif USB sur au port USB de l’appareil. L’unité commence la lecture des fichiers du dispositif USB. Le nombre total de pistes apparaît et l’affichage commence automatiquement par 001. 3. Maintenez la touche MODE/MEM/FOLDER enfoncée et l’écran LCD affichera “FOLDER”. Utilisez les touches SKIP + ou SKIP – pour sélectionner le dossier a écouter. 4. Pendant la lecture, appuyez sur la touche PLAY/PAUSE afin de mettre temporairement la lecture en pause. Pour la reprendre, appuyez de nouveau sur Play/Pause. Mode Skip 1. Pendant la lecture ou en pause, appuyez sur la touche SKIP + pour passer au morceau suivant. 2. Pendant la lecture ou en pause, appuyez sur la touche SKIP - pour passer au morceau suivant. FRE 3 FRE 4 ENTRETIEN ET MAINTENANCE Éteignez toujours l’appareil après l’avoir utilisé. Maintenez l’appareil à distance des objets magnétiques, de l’eau et des sources de chaleur. Utilisez un chiffon souple et doux légèrement humidifié à l’eau tiède pour nettoyer l’appareil. N’utilisez jamais de produits détergents, qui pourraient endommager l’unité. Ne touchez jamais les objectifs ni le centre des CDs. Si des empreintes se déposent sur ces parties, supprimez-les au moyen d’un nettoyant doux vendu dans le commerce. Débranchez l’ unité de la prise murale avant de le nettoyer. Pour retirer un disque de son boîtier, appuyez sur le centre du boîtier et soulevez le disque, en le tenant délicatement sur les rebords. Les empreintes digitales et la poussière doivent être nettoyées délicatement de la surface des disques, au moyen d’un chiffon doux. A la différence des autres supports, les disques compacts engendrent la poussière et les résidus ; c’est pourquoi il convient de les éliminer au moyen d’un tissu souple. Nettoyez le disque de l’intérieur vers l’extérieur. Les petits résidus de poussière et les petites tâches ne gênent pas la copie. N’utilisez jamais de substances chimiques tels que des sprays, des diluants ou du benzène pour nettoyer vos CD. Ces substances peuvent endommager la surface du disque. Après chaque utilisation, rangez les CD dans leur boîtier d’origine. Cela évitera de les endommager et de les faire sauter lors de la lecture. N’exposez pas les CD aux rayons directs du soleil, à l’humidité ou aux températures extrêmes pendant une longue période. Une exposition longue à des températures élevées peut gravement endommager le disque. Ne collez aucun papier ni aucun autre support sur la partie imprimée du disque. Remarque importante Mise en veille automatique Par soucis de conformité avec la norme ERP2, l’unité bascule directement en mode veille après 10 minutes sans signal. Pour revenir au mode de fonctionnement normal, appuyez sur la touche “POWER / SOURCE” de l’unité. FRE 5 Caractéristiques Échelle de fréquence: Alimentation électrique: AM 522-1620 KHz FM 87.5 - 108 MHz CA 230V ~ 50Hz (UM-2 x 6) CC 9V Les caractéristiques de l’unité sont susceptibles d’être modifiées sans préavis. Ce document atteste que le produit CSU384PLL est conforme aux Directives d’État 89/336/CEE (Directive EMC): Normes applicables: EN55013:2001+A1:2003+A2:2006 EN61000-3-2:2006+A1:2009+A2:2009 EN61000-3-3:2008 EN55020:2007 Fabriqué en Chine Pour plus d’informations, consultez notre site Internet www.mpmaneurope.com FRE 6 CD Boombox mit PLL AM/UKW-Radio und USB-Anschluss WARNUNG UM EINEN ELEKTRISCHEN KURZSCHLUSS ZU VERHINDERN, VERWENDEN SIE DEN NETZSTECKER NICHT MIT EINEM VERLÄNGERUNGSKABEL ODER EINER ANDEREN STECKDOSE, WENN DIE KONTAKTE NICHT VOLLSTÄNDIG EINGEFÜHRT WERDEN KÖNNEN, UM GEFÄHRDUNGEN DURCH TEILS FREILIEGENDE KONTAKTE ZU VERMEIDEN. UM FEUER UND STROMSCHLAGGEFAHR ZU VERMEIDEN DARF DAS GERÄT WEDER REGEN NOCH FEUCHTIGKEIT AUSGESETZT WERDEN. INSTALLIEREN SIE DIESES GERÄT NICHT IN EINEM ABGETRENNTEN BEREICH, WIE Z.B. EINEM BÜCHERREGAL ODER AN EINEM ÄHNLICHEN ORT. ACHTUNG ELEKTRISCHE STROMSCHLAGGEFAHR NICHT ÖFFNEN Modell: CSU384PLL Der Blitz mit Pfeilspitze in einem gleichseitigen Dreieck, soll den Benutzer auf das Vorhandensein nicht isolierter gefährlicher Spannung innerhalb des Geräts hinweisen, welche ausreichen kann, um die Gefahr eines Stromschlags für Personen zu erzeugen. ACHTUNG: UM DIE GEFAHR VON STROMSCHLÄGEN ZU VERRINGERN, ÖFFNEN SIE NICHT DAS GEHÄUSE (ODER DIE RÜCKSEITE). ENTHÄLT KEINE TEILE, DIE VON BENUTZERN GEWARTET WERDEN KÖNNTEN. WARTUNGSARBEITEN NUR DURCH QUALIFIZIERTES PERSONAL DURCHFÜHREN LASSEN. LASERSICHERHEIT www.mpmaneurope.com Hinweis: Bitte lesen und befolgen Sie diese Anweisungen, bevor Sie das Gerät in Betrieb nehmen. Dieses Gerät arbeitet mit einem Laser. Nur qualifiziertes Fachpersonal sollte die Abdeckung entfernen und eine Reparatur durchführen, um mögliche Augenverletzungen zu vermeiden. Achtung: BENUTZUNG DER REGLER ODER EINSTELLUNGEN DER LEISTUNG AUF ANDERE WEISE ALS HIERIN BESCHRIEBEN KANN ZUR FREISETZUNG GEFÄHRLICHER STRAHLUNG FÜHREN. Das Ausrufezeichen in einem gleichseitigen Dreieck soll den Benutzer auf wichtige Bedienungsund Wartungs(Service)-Anweisu ngen im Handbuch hinweisen, das dem Gerät beiliegt. GEFAHR: UNSICHTBARE LASERSTRAHLUNG ENTWEICHT BEI ÖFFNUNG UND BEI GLEICHZEITIG FEHLERHAFTER ODER BESCHÄDIGTER SPERRE. DIREKTEN KONTAKT MIT DEM LASERSTRAHL VERMEIDEN. AKKUBETRIEB Entfernen Sie das Netzkabel komplett vom Gerät. Öffnen Sie das Batteriefach und legen Sie 6 Stück UM-2 "C"-Batterien in das Batteriefach ein, gemäß der Polaritätsangaben wie im Batteriefach dargestellt. POSITION DER BEDIENELEMENTE ABFOLGE-MODUS DER FUNKTIONEN Die Reihenfolge der Funktionen ist : "CD → USB → AUX → FM-Radio → AM-Radio" RADIOBETRIEB Drücken Sie die EIN/AUS / MUSIKQUELLE-Taste und wählen Sie den gewünschten Radio-Modus. Manuelle Sendersuche 1. Drücken Sie die Taste SKIP / TUNING > oder SKIP / TUNING <, um Schritt für Schritt zu den gewünschten Radiosender zu gelangen. 2. Drücken Sie die Taste LAUTSTÄRKE + oder LAUTSTÄRKE - für die gewünschte Lautstärke FUNKTION DER STATIONSSUCHE 1. Drücken und halten Sie die Taste SKIP / TUNING > oder SKIP / TUNING < für ca. 1 Sekunde und es wird die nächste Radiostation in Suchrichtung gesucht. 2. Der Suchvorgang findet nur Sender mit starkem Signal. Sender mit schwachem Empfang können nur manuell eingestellt werden. 3. Drücken Sie die Taste LAUTSTÄRKE + oder LAUTSTÄRKE - für die gewünschte Lautstärke. 1. Lautsprecher 11. CD-Fach 2. EIN/AUS / MUSIKQUELLE-Taste 12. Griff 3. MODUS/SPEICHER/PROGRAMMIER-Taste 13. UKW Teleskop- Antenne 4. Lautstärke – Taste 14. Batteriefach 5. Lautstärke + Taste 15. Aux-in-Anschluss 6. SKIP / TUNING < Taste 16. Stromanschluss 7. SKIP / TUNING > Taste 17 USB-Anschluss 8. M+ / STOP-Taste 9. PLAY / PAUSE-Taste 10. LCD-Display Anschluss an das Stromnetz Verbinden Sie den Stecker des Geräts mit einer Standard-Steckdose. ACHTUNG 1. Hantieren Sie nicht mit nassen Händen am Stecker und der Steckdose 2. Falls Sie das Gerät für längere Zeit nicht benutzen, ziehen Sie das Netzkabel aus der Steckdose 3. Ziehen Sie das Netzkabel nicht am Kabel aus der Steckdose, um Stromschlaggefahr zu vermeiden. DE 1 ANTENNE Für besten Empfang von UKW-Sendern, fahren Sie die UKW-Antenne vollständig aus. Für AM-Empfang besitzt das Gerät eine eingebaute Antenne. Drehen Sie das gesamte Gerät, um den besten Empfang einzustellen. UKW-STEREO Bei Verbindung mit einer Stereo UKW-Übertragung, wird "ST" auf dem LCD-Display angezeigt. ABSPEICHERN VON RADIOSTATIONEN 1. Wählen Sie den gewünschten Sender aus. 2. Drücken Sie die MODUS/SPEICHER/PROGRAMMIER-Taste, das LCD-Display wird P01 anzeigen. 3. Drücken Sie die Taste SKIP / TUNING > oder SKIP / TUNING < und wählen Sie den gewünschte Speicherplatz ihres Programms aus 4. Drücken Sie die MODUS/SPEICHER/PROGRAMMIER-Taste, um den Sender in den Speicher einzutragen. 5. Wiederholen Sie die Schritte 1 bis 3, um weitere Stationen einzuspeichern. Sie können bis zu 20 Radiostationen in den Speicher eingeben. UM DEN RADIOSENDER IM SPEICHER AUSZUWÄHLEN Drücken Sie die M + / STOP-Taste für den Radiosenderspeicher und drücken Sie die M + / STOP-Taste, um zum nächsten Speicherplatz eines Radiosenders zu gelangen. DE 2 CD/MP3 Wiedergabe-Funktion Um eine CD oder MP3-CD abzuspielen, folgen Sie bitte den folgenden Schritten: 1. Drücken Sie die EIN/AUS / MUSIKQUELLE-Taste und wählen Sie den CD-Modus aus. 2. Öffnen Sie das CD-Fach, legen Sie die CD mit der bedruckten Seite nach oben ein und schließen Sie das CD-Fach 3. CD-Informationen (Anzahl der Titel) werden auf dem LCD-Display angezeigt und automatisch abgespielt. 4. Bei MP3-CD‘s, drücken und halten Sie die Taste ORDNER und das LCD-Display wird "ORDNER" anzeigen. Verwenden Sie die Taste SKIP / TUNING > oder SKIP / TUNING <, um den Ordner auszuwählen, den Sie hören möchten. 5. Drücken Sie die Taste LAUTSTÄRKE + oder LAUTSTÄRKE - für die gewünschte Lautstärke. 6. Drücken Sie die STOP-Taste zum Stoppen der Wiedergabe der CD. Programmierung der CD und MP3-CD Die Programmierung der CD und MP3-CD sollte während des STOP-Modus durchgeführt werden. 1. Drücken Sie die MODUS/SPEICHER/PROGRAMMIER-Taste, es wird 'PXX' (XX zeigt die voreingestellte Anzahl an programmierten Titeln an) auf dem LCD-Display angezeigt. 2. Drücken Sie die Taste SKIP / TUNING > oder SKIP / TUNING < ,um den gewünschten Titel auszuwählen. Drücken Sie die MODUS/SPEICHER/PROGRAMMIER-Taste erneut, um diesen Track zu speichern. 3. Wiederholen Sie die Schritte 2-3, um weitere Titel einzuspeichern. Sie können bis zu 20 Titel in den CD-Speicher und 99 Tracks in den MP3-CD-Speicher ablegen. 4. Drücken Sie die PLAY / PAUSE-Taste, um die CD in der programmierten Reihenfolge wiederzugeben. 5. Um die Wiedergabe anzuhalten, drücken Sie die Taste STOP / M +. 6. Um die Programmierung der Liste abzubrechen, drücken Sie die Taste STOP / M + und öffnen Sie das CD-Fach oder drücken Sie die Taste MUSIKQUELLE. Wiedergabe von MP3-Dateien mit USB 1. Drücken Sie die EIN/AUS / MUSIKQUELLE-Taste, um den USB-Modus auszuwählen. 2. Stecken Sie das USB-Gerät an den USB-Anschluss des Geräts an, das Gerät beginnt mit dem Auslesen der Dateien auf dem USB-Gerät. Es zeigt die Gesamtzahl der Titel des Gerätes an und beginnt automatisch nach dem Auslesen mit dem Abspielen von Musikspur 001. 3. Drücken und halten Sie die MODUS/SPEICHER/PROGRAMMIER-Taste und das LCD-Display wird "ORDNER" anzeigen. Verwenden die Taste SKIP + oder SKIP -, um den Ordner auszuwählen, den Sie hören möchten. 4. Während der Wiedergabe, drücken Sie die PLAY/PAUSE-Taste, um die Wiedergabe vorübergehend zu pausieren. Um die Wiedergabe fortzusetzen, drücken Sie die Play/Pause-Taste erneut. Verschiedene Wiedergabe-Modi Drücken Sie die Modus -Taste, um verschiedene Arten von Abspiel-Modi mit der folgenden Reihenfolge zu wählen. Für Audio-CD’s: Titel Wiederholen Alles Wiederholen Normale Wiedergabe Bei MP3-Dateien: Titel Wiederholen Ordner Wiederholen Alles Wiederholen Normale Wiedergabe • • • • Titel Wiederholen - Titel wiederholen der gespielt wird. Alle wiederholen - wiederholt alle Titel auf dem Speichermedium. Ordner Wiederholen - wiederholt alle Titel des gesamten Albums / Ordners. Normal – gibt die Titel in normaler Reihenfolge wieder. AUX-IN-ANSCHLUSS 1. Drücken Sie die EIN/AUS / MUSIKQUELLE-Taste und wählen Sie den Aux-in-Anschluss. Im Display erscheint "AUX" . 2. Schließen Sie das eine Ende des Audiokabels (3,5mm Stereostecker benötigt, nicht im Lieferumfang enthalten) an den Line-Out-Anschluss ihres Audio-Geräts oder dem Handy an und das andere Ende an den AUX-IN-Anschluss an diesem Gerät an. 3. Schalten Sie ihr Audiogerät ein und folgen Sie der Anleitung zur Wiedergabe. 4. Um diese Funktion zu stoppen, drücken Sie MUSIKQUELLE-Taste und schalten Sie das Audio-Gerät aus. Hinweis: Wegen dem nicht-standardisierten Format (Definition und Herstellung) von MP3-CD’s ist die Wiedergabe-Qualität und Leistung nicht garantiert. Der Hersteller ist in keinem Fall verantwortlich für die Abspielbarkeit von MP3‘s aufgrund der Aufnahmebedingungen die von Faktoren wie PC-Leistung, der Schreibsoftware, Medieneignung usw. Abhängen Skip-Modus 1. Während der Wiedergabe oder dem Pause-Modus, drücken Sie die SKIP + Taste, um zum nächsten Titel zu springen. 2. Während der Wiedergabe oder im Pause-Modus, drücken Sie die SKIP-Taste, um zurück zum vorherigen Titel zu gelangen. DE 4 DE 3 . REINIGUNG UND PFLEGE • • • • • • • • • • • Schalten Sie das Gerät nach dem Gebrauch immer aus. Halten Sie das Gerät von magnetischen Gegenständen, Wasser oder Wärmequellen fern. Verwenden Sie ein sauberes, weiches Tuch mit lauwarmem Wasser, um das Gehäuse zu reinigen. Verwenden Sie niemals chemische Reinigungsmittel, die die Oberfläche des Gerätes beschädigen könnten. Berühren Sie niemals die CD-Aufnahme und die Linse. Wenn Fingerabdrücke auf dem Abtaster sind, säubern Sie diesen vorsichtig mit einer handelsüblichen Reinigungsflüssigkeit für Optikgeräte. Trennen Sie das Gerät vor der Reinigung von allen Stromquellen. Um eine CD aus der Hülle zu nehmen, drücken Sie auf die Mitte des Gehäuses, um die CD vorsichtig an den Rändern herauszheben. Fingerabdrücke und Staub sollten mit einem weichen Tuch vorsichtig von der bespielten Oberfläche der CD abgewischt werden. Im Gegensatz zu herkömmlichen Schallplatten, haben Compact Discs keine Rillen. Die meisten Staubpartikel und mikroskopische Verschmutzungen sollten durch vorsichtiges Abwischen mit einem weichen Tuch entfernt werden können. Wischen Sie in einer geraden Linie von der Innenseite zur Außenseite der Scheibe. Kleine Staubpartikel und leichte Flecken haben keinen Einfluss auf die Wiedergabequalität. Verwenden Sie niemals Chemikalien wie Schallplattensprays, antistatische Sprays, Benzin oder Verdünner, um die CD zu reinigen. Diese Chemikalien können die Oberfläche der CD irreparabel beschädigen. CD’s sollten nach Gebrauch in die CD-Hülle zurückgelegt werden. Dies schützt vor ernsthaften Kratzern, die bewirken könnten, dass der Laser Einheiten überspringt. Setzen Sie CD’s keiner direkten Sonneneinstrahlung, hoher Luftfeuchtigkeit oder hohen Temperaturen über einen längeren Zeitraum aus. Lange Exposition gegenüber hohen Temperaturen können die CD verformen. Kleben Sie kein Papier oder schreiben Sie mit einem Kugelschreiber auf die Label-Seite der CD. Technische Angaben Frequenzbereich: Stromversorgung: AM 522-1620 KHz UKW 87,5 - 108 MHz 230V ~ 50Hz (UM-2 x 6) DC 9V Die Spezifikationen können ohne vorherige Ankündigung geändert werden. Hiermit wird bescheinigt, dass CSU384PLL in Übereinstimmung steht mit den: Richtlinie des Rates 89/336/EWG (EMV-Richtung): Geltenden Normen: EN55013: 2001 + A1: 2003 + A2: 2006 EN61000-3-2: 2006 + A1: 2009 + A2: 2009 EN61000-3-3: 2008 EN55020: 2007 Made in China Für weitere Informationen besuchen Sie bitte unsere Webseite unter: www.mpmaneurope.com Wichtiger Hinweis Automatische Standby-Schaltung Um der ERP2-Richtlinie zu entsprechen, schaltet das Gerät automatisch in den Standby-Modus, wenn nach ca. 10 Minuten kein Signal eingeht. Um das Gerät wieder einzuschalten, drücken Sie die "EIN/AUS / MUSIKQUELLE"-Taste am Gerät. DE 5 DE 6 AVVERTENZA CD Boombox con Radio PLL AM/FM e Porta USB PER EVITARE SCOSSE ELETTRICHE: NON UTILIZZARE QUESTA SPINA CON UN CAVO DI PROLUNGA O ALTRE PRESE MULTIPLE A MENO CHE LE LAME NON SIANO COMPLETAMENTE INSERITE, PER EVITARE IL PERICOLO DI CONTATTO CON LAME ESPOSTE. PER EVITARE INCENDI E CORTOCIRCUITI: NON ESPORRE QUESTO APPARECCHIO A PIOGGIA O UMIDITÀ. NON INSTALLARE QUESTO APPARECCHIO IN LUOGHI LIMITATI COME VANI LIBRERIA O SIMILI. ATTENZIONE! RISCHIO DI SCOSSE ELETTRICHE NON APRIRE Modello: CSU384PLL Il simbolo del fulmine con la punta a freccia dentro un triangolo equilatero ha lo scopo di avvertire l’utente della presenza di voltaggio non isolato pericoloso all’interno dell’apparecchio che potrebbe risulatare di Potenza sufficiente a costituire un rischio di scosse elettriche alle persone. www.mpmaneurope.com Nota: Si prega di leggere e seguire queste istruzioni prima di utilizzare l’apparecchio. ATTENZIONE: PER RIDURRE IL RISCHIO DI SCOSSE ELETTRICHE, NON RIMUOVERE IL COPERCHIO (O IL RETRO). NON CI SONO PARTE UTILI ALL’UTENTE ALL’INTERNO. PER LA MANUTENZIONE SI PREGA DI RIVOLGERSI A PERSONALE QUALIFICATO SICUREZZA LASER Questo apparecchio utilizza un laser. Solo personale qualificato è autorizzato a rimuovere il coperchio o tentare di riparare l’apparecchio per evitare possibili lesioni. Attenzione: OPERAZIONI DI UTILIZZO O REGOLAZIONE DELL’ESECUZIONE DELLE PROCEDURE IN MODO DIVERSO DA COME QUI ILLUSTRATO PUÒ CAUSARE ESPOSIZIONE A PERICOLOSE RADIAZIONI. The exclamation point within an equilateral triangle is intended to alert the user to the presence of important operating and maintenance (servicing) instruction in the literature accompanying the appliance. PERICOLO: INVISIBILI RADIAZIONI LASER QUANDO APERTO O CON LO SPORTELLO ROTTO. EVITARE L’ESPOSIZIONE DIRETTA AL RAGGIO LASER. GESTIONE DELLE BATTERIE Staccare completamente il cavo di alimentazione CA. Aprire lo sportello del compartimento batterie e inserire 6 pezzi di batterie UM-2 formato "C" nello scomparto batterie con la polarità delle batterie come indicato all’interno dello scomparto batterie. POSIZIONE DEI COMANDI SEQUENZA DELLA MODALITÀ FUNZIONE La sequenza della modalità funzione è : “CD → USB → AUX → FM Radio → AM Radio” FUNZIONE RADIO Premere il tasto ALIMENTAZIONE / SORGENTE e selezionare la modalità desiderata. SELEZIONE MANUALE DELLA STAZIONE 1. Premere il tasto SALTA/SINT > o SALTA/SINT < passo dopo passo per sintonizzare le stazioni radio desiderate 2. Premere il tasto VOLUME + o VOLUME – per il desiderato livello di volume; GESTIONE DELLA RICERCA DELLE STAZIONI 1. 2. 1. Altoparlante 11. Porta CD 2. Tasto ALIMENTAZIONE / SORGENTE 12. Maniglia 3. Tasto MODO/MEMORIA/PROG 13. Antenna FM Telescopica 4. Tasto VOLUME – 14. Sportello Batteria 5. Tasto VOLUME + 15. Spinotto Aux-in 6. Tasto SALTA /SINT < 16. Spina CA 7. Tasto SALTA / SINT > 17 Porta USB 8. Tasto M+ / STOP 9. Tasto PLAY / PAUSA 10. display LCD ALIMENTAZIONE CA Collegare uno spinotto alla presa CA dell’apparecchio e l’altro alla presa di alimentazione CA. ATTENZIONE 1. Non inserire o estrarre la spina del cavo d’alimentazione con le mani bagnate; 2. Se si pensa di non utilizzare l’apparecchio per lungo tempo, staccare il cavo di alimentazione dalla presa generale; 3. Nello staccare il cavo di alimentazione dalla presa a parete, non tirare il cavo per evitare rischi di scariche elettriche causati dal cavo danneggiato . 3. Premere e tener premuto il tasto SALTA/SINT > o SALTA/SINT < per circa un secondo, e comincerà a cercare la successive stazione radio nella direzione di ricerca. L’operazione di ricerca trova semplicemente le stazioni con segnale forte. Stazioni con ricezione debole possono essere sintonizzate solo manualmente. Premere il tasto VOLUME + o VOLUME – per il desiderato livello di volume. ANTENNA Per una ricezione migliore, estendre completametne l’ Antenna FM per ricevere stazioni FM. Per la ricezione AM, l’apparecchio ha un’antenna incorporata, orientare l’intero apparecchio per una ricezione ottimale. FM STEREO Quando ci si sintonizza su di una trasmissione FM Stereo, apparirà “ST” sul display LCD. MEMORIZZARE STAZIONI RADIO 1. Sintonizzarsi sulla stazione desiderata. 2. Premere il tasto MODO/MEMORIA/PROG, e il display LCD mostrerà ‘ P01. 3. Premere SALTA/SINT > o SALTA/SINT < e selezionare il numero del programma desiderato. 4. Premere MODO/MEMORIA/PROG per memorizzare la stazione radio. 5. Ripetere i passi da 1 a 3 per memorizzare più tracce. Si possono memorizzare fino a 20 stazioni radio. PER SELEZIONARE LA STAZIONE RADIO MEMORIZZATA Premere il tasto M+ / STOP per la selezionare stazione radio in memoria e premere il tasto M+ / STOP per passare alla successiva stazione radio in memoria. ITA 2 ITA 1 FUNZIONE RIPRODUZIONE CD/MP3 Per riprodurre un disco CD/MP3, si prega di seguire I passi elencati di seguito: 1. Premere il tasto ALIMENTAZIONE/ SORGENTE e selezionare la modalità CD. 2. Aprire lo sportello CD, inserire il disco con il lato stampato verso l’alto e chiudere lo sportello CD; 3. Informazioni sul disco (numero totale delle tracce) appariranno sul display LCD e verranno riprodotte automaticamente. 4. Per il disco MP3 disc, premere e tenere premuto il tasto CARTELLA e sul display LCD apparirà “CARTELLA”. Usare il tasto SALTA/SINT > o SALTA/SINT < per selezionare la cartella che si desidera ascoltare. 5. Premere il tasto VOLUME + o VOLUME – per il livello di volume desiderato; 6. Premere il tasto STOP per smettere di riprodurre il disco. Programmare il disco CD/MP3 La programmazione del disco CD/MP3 dovrebbe essere fatta in modalità STOP. 1. Premere il tasto MODO/MEM/CARTELLA, e il display LCD mostrerà ‘ PXX ‘ (XX indica il numero preselezionato della traccia da programmare). 2. Premere i tasti SALTA/SINT > o SALTA/SINT < per selezionare la traccia desiderata. Premere il tasto MODO/MEM/CARTELLA di nuovo per memorizzare la traccia. 3. Ripetere i passi da 2 a 3 per memorizzare più trace in memoria. Si possono memorizzare fino a 20 tracce di un disco CD e 99 tracce di un disco MP3. 4. Premere il tasto PLAY/PAUSA per riprodurre il disco nell’ordine programmato. 5. Per interrompere la riproduzione, premere il tasto STOP/M+. 6. Per cancellare la lista programmata, premere il tasto STOP/M+ e aprire lo sportello CD o premere il tasto SORGENTE. Riprodurre file MP3 con USB 1. Premere il tasto ALIMENTAZIONE / SORGENTE per selezionare la modalità USB. 2. Inserire il dispositivo USB nella porta USB dell’apparecchio, che inizierà a leggere i file sul dispositivo USB, sul display apparirà il numero delle tracce e l’apparecchio comincerà a riprodurre automaticamente dalla traccia 001. 3. Premere e tenere premuto il tasto MODO/MEM/CARTELLA e sul display LCD apparirà “CARTELLA”. Utilizzare il tasto SALTA + o SALTA – per selezionare la cartella che si desidera ascoltare. 4. Durante la riproduzione, premere il tasto PLAY/PAUSA per mettere temporaneamente in pausa la riproduzione. Per riprendere, premere il tasto Play/Pause di nuovo. Diferenti modalità di riproduzione Premere il tasto Modo per selezionare differenti tipi di riproduzione con la seguente sequenza. Per Audio CD : Ripeti Uno Ripeti Tutti Normale Per file MP3 : Ripeti Uno Ripeti Cartella Ripeti Tutti Normale Ripeti Uno– Ripete la traccia che viene riprodotta. Ripeti Tutti – Ripete tutte le tracce immagazzinate nel dispositivo. Ripeti Cartella – Ripete tutte le tracce dell’intero album/cartella. Normale – Riproduce le tracce in sequenza. CONNESSIONE AUX IN 1. Premere il tasto ALIMENTAZIONE / SORGENTE e selezionare la modalità Aux-in. Sul display apparirà “AUX”. 2. Inserire un’estremità del cavo audio (richiede cavo stereo 3.5mm, non fornito) nello spinotto di uscita o nello spinotto auricolari del dispositivo audio e l’altra estremità nello spinotto di entrata aux-in dell’unità. 3. Accendere il vostro dispositivo audio e seguire le istruzioni di riproduzione. 4. Per interrompere la funzione, premere il tasto SORGENTE per spegnere il vostro dispositivo audio. Nota: A causa di formati non standardizzati di definizione/produzione di MP3 e CD, la qualità di riproduzione e esecuzione non è garantita. Il costruttore non è responsabile per la riproducibilità di MP3 in qualsiasi caso dovuta alle condizioni di registrazione come prestazioni del PC, scrittura del software, capacità del media, ecc. Modalità Salta 1. Durante la modalità play o pausa, premere il tasto SKIP + per passare alla traccia successiva. 2. Durante la modalità play o pausa, premere il tasto SKIP – per tornare alla traccia precedente track. ITA 4 ITA 3 CURA E MANUTENZIONE Spegnere sempre l’apparecchio dopo l’uso. Tener l’apparecchio lontano da oggetti magnetici, acqua o fonti di calore. Utilizzare un panno pulito inumidito con acqua tiepida per pulire le superfici esterne. Non utilizzare mai detergent chimici che potrebbero danneggiare le guarnizioni dell’apparecchio. Non toccare mai il pickup e la lente del CD. Se impronte digitali finiscono sulla lente del pickup, pulire con deicatezza con un detergente per lenti in commercio. Staccar l’apparecchio da tutte le sorgenti di alimentazione prima di pulirlo. Per togliere un disco dallo scomparto, premere sul centro del coperchio e sollevare il disco facendo attenzione a tenerlo con cura lungo il bordo. Impronte digitali e polvere dovrebbero essere rimosse con cura dalla superficie registrata del disco con un panno morbido. A differenza delle registrazioni convenzionali, i CD non hanno solchi in cui si raccolgano polvere e miscroscopiche particelle, pertanto spolverare con delicatezza con un panno morbido dovrebbe rimuovere la maggior parte delle particelle. Spolverare in linea retta dall’interno all’esterno del disco. Piccolo particelle di polvere e leggeri graffi non hanno assolutamente alcuna conseguenza sulla qualità di riproduzione. Non usare mai detergenti chimici quali sostanze spray antistatiche, benzene o diluenti per pulire i CD. Tali sostanze chimiche possono danneggiare in modo irreparabile la superficie del disco. I dischi dovrebbero essere riposte nelle loro custodie dopo l’uso. Ciò evita serie scalfiture che potrebbero far saltare il lettore laser. Non esporre I dischi alla diretta luce del sole, elevate umidità o alte temperature per lunghi periodi. Una prolungata esposizione ad alte temperature può incurvare il disco. Non incollare pezzi di carta e non scrivere nulla con penna a sfera sul lato con l’etichetta del disco. Specifiche Gamma di frequenza: Alimentazione: AM 522-1620 KHz FM 87.5 - 108 MHz CA 230V ~ 50Hz (UM-2 x 6) CC 9V Le specifiche sono soggette a modifica senza ulteriore preavviso. Questo marchio sta a certificare che l’apparecchio CSU384PLL:risulta conforme alle direttive Comunitarie 89/336/EEC(direttive EMC): Standards applicabili: EN55013:2001+A1:2003+A2:2006 EN61000-3-2:2006+A1:2009+A2:2009 EN61000-3-3:2008 EN55020:2007 Prodotto nella RPC Per ulteriori informazioni consultare il sito web: www.mpmaneurope.com Avvertenza importante Commutazione in sospensione automatica In osservanza della direttiva ERP2, l’apparecchio passa automaticamente in modalità standby dopo circa 10 minuti senza segnale. Per riattivare l’apparecchio, premere il tasto “ALIMENTAZIONE / SORGENTE”. ITA 5 ITA 6 CD Boombox met PLL AM/ FM-Radio en USB-poort WAARSCHUWING GEBRUIK DEZE STEKKER NOOIT MET EEN VERLENGSNOER RECIPIËNT OF ANDERE STROOMVOORZIENING OM ELEKTRISCHE SCHOKKEN TE VOORKOMEN TENZIJ DE PINNEN VOLLEDIG KUNNEN WORDEN INGEVOEGD IN HET STOPCONTACT OM TE VOORKOMEN DAT DEZE ONTBLOOT WORDEN AAN REGEN OF VOCHT. TER VOORKOMING VAN BRANDGEVAAR OF ELEKTRISCHE SCHOKKEN; STEL DIT TOESTEL NIET BLOOT AAN REGEN OF VOCHT. INSTALLEER DIT APPARAAT NIET IN EEN AFGESLOTEN RUIMTE ZOALS EEN BOEKENKAST OF EEN GELIJKAARDIG OMGEVING. LET OP RISICO VAN ELEKTRONICA SCHOK NIET OPENEN LET OP: OM HET RISICO VAN EEN ELEKTRISCHE een ACHTERKANT (OF RUGPLAAT) NIET. gelijkzijdige gebruiker www.mpmaneurope.com Opmerking: Lees en volg deze instructies voordat u uw toestel gebruikt. TE VERMIJDEN, driehoek is bedoeld om de aandacht van de Model: CSU384PLL SCHOK De bliksemflits met pijlymbool, in te vestigen op de ER VERWIJDER BEVINDEN ZICH GEBRUIKSONDERDELEN GEEN AAN aanwezigheid van niet geïsoleerde BINNENKANT DIE gevaarlijke ONDERHOUDEN WORDEN. spanning in de DE DE MOETEN LAAT Het uitroepteken in een gelijkzijdige driehoek is bedoeld om de aandacht van de gebruiker te vestigen op de aanwezigheid van behuizing van de producten die ONDERHOUD mogelijk een risico vormt op een GEKWALIFICEERD onderhoudsinstructies elektrische schok voor personen. SERVICEPERSONEEL. literatuur, bijgevoegd bij het toestel. OVER LASERVEILIGHEID Dit apparaat maakt gebruik van een laser. Alleen een gekwalificeerde servicepersoon mag de behuizing verwijderen of onderhoud uitvoeren voor dit apparaat om te voorkomen dat mogelijke oogverwondingen optreden. Let op: Gebruik van BESTURINGSELEMENTEN of het afstellen van prestaties van andere dan de hierin aangegeven PROCEDURE kan leiden tot blootstelling aan gevaarlijke straling. AAN belangrijke bedieningsin en de GEVAAR: ONZICHTBARE LASERSTRALING WANNEER OPEN EN BIJ FOUTIEVE VERGRENDELING. VERMIJD DIRECTE BLOOTSTELLING AAN LASERSTRAAL. BATTERIJWERKING Verbreek de verbinding met het wisselstroomnetsnoer volledig. Open het batterijklepje en plaats 6 UM-2 "C" batterijen in het batterijcompartiment met een polariteit zoals aangegeven in het batterijvak. LOCATIE VAN BEDIENINGSELEMENTEN VOLGORDE VAN FUNCTIEMODUS De volgorde van de functiemodus is: "CD → USB → AUX → FM-Radio → AM-Radio" RADIOBEDIENING Druk op AAN-UITSCHAKELEN / BRON knop en selecteer de gewenste radio-modus. 1. Luidspreker 11. CD-deurtje 2. AAN- UITSCHAKEL / SOURCE (BRON) knop 12. Handvat 3. MODUS/GEHEUGEN/PROG Knop 13. FM telescopische antenne 4. VOLUME-Knop 14. Batterijklepje 5. VOLUME + Knop 15. Aux-in Aansluiting 6. VERDERGAAN / TUN < Knop 16. Wisselstroom Stopcontact 7. OVERSLAAN / TUN > Knop 17 USB-sleuf 8. M + / STOP Knop 9. AFSPELEN / PAUZEREN Knop 10. 1.LCD-scherm HANDMATIGE STATION SELECTIE 1. Druk op de SKIP(VERDERGAAN)/TUN > of SKIP (VERDERGAAN)/TUN < knop stap voor stap om af te stemmen op de gewenste radiostations 2. Druk op VOLUME + of VOLUME- knop voor het gewenste volumeniveau; STATION ZOEKBEWERKING 1. Houd de SKIP(VERDERGAAN)/TUN > of SKIP (VERDERGAAN)/TUN < knop ingedrukt voor ca. 1 seconde, het zoeken naar de volgende radiozender zal dan beginnen in de richting van de zoekactie. 2. De zoekbewerking vindt alleen stations met sterke signalen. Er kan enkel handmatig afgestemd worden op stations met zwakke ontvangst. 3. Druk op VOLUME + of VOLUME- knop voor het gewenste volumeniveau; ANTENNE Voor optimale ontvangst verleng de FM-antenne volledig voor het ontvangen van FM-zenders. Voor AM-ontvangst heeft het toestel een ingebouwde antenne, draai het toestel voor optimale ontvangst. FM-STEREO Wanneer u heeft afgestemd op een FM Stereo uitzending, zal "ST" zal worden weergegeven op het LCD-scherm. WISSELSTROOMWERKING Sluit de stekker aan op de wisselstroom aansluiting en het andere uiteinde op een standaard wisselstroomstopcontact. AANDACHT 1. 2. 3. Koppel of ontkoppel het netsnoer nooit met natte handen; Wanneer dit toestel voor lange tijd niet zal gebruikt worden, ontkoppel het netsnoer dan uit het muurstopcontact; Wanneer u het netsnoer uit het stopcontact loskoppelt, trek dan niet aan het netsnoer om het risico te voorkomen op een schok veroorzaakt door beschadigd netsnoer. DUT 1 ONTHOUDEN VAN RADIOSTATIONS 1. Stem af op de gewenste zender. 2. Druk op MODUS/MEMORY (geheugen) /PROG knop, op het LCD-scherm verschijnt ' P01. 3. Druk op SKIP (VERDERGAAN )/TUN > of SKIP (VERDERGAAN)/TUN < knop en selecteer het gewenste nummer van uw programma 4. Druk op MODUS/MEMORY (GEHEUGEN) / PROGRAM om het radiostation op te slagen in het geheugen. 5. Herhaal stap 1 tot 3 om meer instellingen op te slaan in het geheugen. U kunt maximaal 20 radiozenders in het geheugen opslaan. SELECTIE VAN HET RADIOSTATION IN HET GEHEUGEN Druk op M + / STOP knop voor het radio station geheugen en druk op de M + / STOP knop om verder te gaan naar het volgende geheugenstation. DUT 2 CD/MP3 AFSPEELFUNCTIE Voor het afspelen van een CD/MP3-CD, volg de stappen onder: 1. Druk op de POWER (AAN- UITSCHAKEL) SOURCE (KNOP) en selecteer de CD-modus. 2. Open het CD-deurtje, plaats de disc met de bedrukte zijde naar boven en sluit het CD deurtje; 3. Status of disc-informatie (totale aantal liedjes) zal verschijnen op het LCD-scherm en wordt automatisch afgespeeld. 4. Voor MP3-discs, druk in en houdt ingedrukt de FOLDER-knop ingedrukt en het LCD-scherm zal "FOLDER" weergeven. Gebruik SKIP(VERDERGAAN)/TUN > of SKIP (VERDERGAAN) /TUN < knop voor het selecteren van de folder waar u wil naar luisteren. 5. Druk op VOLUME + of VOLUME- knop voor het gewenste volumeniveau; 6. Druk op STOP om te stoppen met afspelen van de disc. De CD/MP3-disc programmeren De programmering van de CD/MP3-disc moet worden gedaan tijdens de STOP-modus. 1. Druk op MODUS/MEM/FOLDER knop, het LCD scherm zal 'PXX' weergeven (XX geeft het vooraf ingestelde nummer weer van het liedje dat moet geprogrammeerd worden) 2. Druk op de SKIP (VERDERGAAN) /TUN > of SKIP (VERDERGAAN) /TUN < knoppen om het gewenste liedje te selecteren. Druk opnieuw op de knop MODUS/MEM/FOLDER voor het opslaan van dit nummer in het geheugen. 3. Herhaal stap 2 naar 3 om meer liedjes op te slaan in het geheugen. U kunt tot 20 liedjes opslaan in het geheugen voor de CD-disc en 99 liedjes in het geheugen voor MP3-discs. 4. Druk op de knop PLAY/PAUSE (AFSPELEN/PAUZEREN) voor het afspelen van de disc in de geprogrammeerde volgorde. 5. Om te stoppen met afspelen, drukt u op de knop STOP / M +. 6. Om de programmeringslijst te annuleren, drukt op de STOP / M + knop en open het CD-deurtje of druk op de SOURCE-knop (BRON). Afspelen van MP3-bestanden met USB 1. Druk op de POWER / SOURCE (AAN-UITSCHAKEL KNOP / BRON) knop om de USB modus te selecteren. 2. Sluit uw USB-toestel aan op de USB-poort van het apparaat, het apparaat zal beginnen met het lezen van de bestanden in het USB-toestel, het totaal aantal liedjes van het toestel zal worden getoond na het aflezen en het afspelen vanaf nr. 001 zal dan automatisch starten. 3. Houd de knop MODUS/MEM/FOLDER ingedrukt en op het LCD-scherm verschijnt "FOLDER". Gebruik SKIP + (VERDERGAAN) of de SKIP - (OVERSLAAN) knop om de folder te selecteren van de folder die u wilt beluisteren. 4. Tijdens het spelen, druk op de knop PLAY/PAUSE (AFSPELEN/PAUZEREN) om het afspelen te onderbreken. Als u de werking wilt hervatten, drukt u op de knop Play/Pause (afspelen/pauzeren). DUT 3 Skip (Verdergaan) Modus 1 Tijdens het afspelen of de pauzeringsmodus, druk op de SKIP + (Verdergaan) knop om naar het volgende liedje te gaan. 2 Tijdens het afspelen of de pauzeringsmodus, druk op de SKIP - knop om terug te gaan naar het vorige liedje. Verschillende Afspeel-Modus Druk op de Modus-toets om de verschillende soorten afspeelmodus te selecteren met de volgende volgorde. Voor Audio-CD's: Herhalen Eén Herhaal Allemaal Normaal Voor MP3-bestanden: Herhaal Eén Herhaal Folder Herhaal Allemaal Normaal Repeat One (Herhaal één) -Herhaal het liedje dat wordt gespeeld. Repeat All (Herhaal Allemaal) – Herhaal alle liedjes in het opslagmedium. Repeat Folder (Folder Herhalen) – Herhaal alle tracks in het hele album/folder. Normal (Normaal) - de liedjes in volgorde afspelen AUX IN VERBINDING 1. Druk op POWER / SOURCE (AAN- UITSCHAKEL / BRON knop en selecteer de Aux-in modus. Het display-scherm toont 'AUX'. 2. Voer de ene kant van de audiokabel in (vereist 3.5mm stereo stekker, niet meegeleverd) op de line-out aansluiting of hoofdtelefoon op uw audio-apparaat en de andere kant aan op de aux-in-aansluiting op het toestel. 3. Schakel uw audio-toestel aan en volg de afspeel instructies. 4. Om te stoppen met deze functie, druk op de SOURCE (BRON) om uw audio-toestel uit te schakelen. Opmerking: Vanwege een niet -gestandaardiseerd formaat definitie/productie van MP3 CD, zijn afspeelkwaliteit & prestaties niet gegarandeerd. In geen geval is de fabrikant verantwoordelijk voor de afspeelbaarheid van MP3’s omdat dit toe te schrijven is aan de opname omstandigheden zoals de prestaties van de PC, het schrijven door de software, media vermogen en enz. DUT 4 VERZORGING EN ONDERHOUD Schakel het toestel steeds uit na gebruik. Houd het toestel altijd uit de buurt van magnetische voorwerpen, water of warmtebronnen. Gebruik een schone zachte doek bevochtigd met lauw water voor het reinigen van de behuizing. Gebruik nooit chemische reinigingsmiddelen die schade kunnen toebrengen aan de lak van het toestel. Raak nooit de CD-houder en lens aan. Als er zich vingerafdrukken op de houder en lens bevinden, maak dan zachtjes schoon met een commerciële lensreiniger. Koppel het toestel los van de stroomvoorziening voordat u de reiniging uitvoert. Om een cd te verwijder uit het opslagetui drukt u het midden van het etui naar beneden en tilt u de cd op, houdt het schijfje zorgvuldig vast bij de randen. Vingerafdrukken en stof moeten van zorgvuldig afgeveegd worden van het opgenomen oppervlak van de schijf met een zachte doek. In tegenstelling tot conventionele LP’s hebben cd's geen groeven voor het verzamelen van stof en microscopisch afval. Het voorzichtig afvegen met een zachte doek moet de meeste deeltjes verwijderen. Veeg in een rechte lijn vanaf de binnenkant naar de buitenkant van de schijf. Kleine stofdeeltjes en lichte vlekken zullen absoluut geen effect hebben op de reproductiekwaliteit. Maak nooit gebruik van chemicaliën zoals LP-sprays, antistatische sprays, benzeen of verdunners om compact discs schoon te maken. Deze chemicaliën kunnen het oppervlak van de schijf onherstelbaar beschadigen. Schijven moeten opnieuw in het etui gebracht worden na gebruik. Dit vermijdt ernstige krassen die er toe kunnen leiden het overslaan van liedjes door de Laserhouder. Stel CD’s nooit bloot aan direct zonlicht, hoge vochtigheid of hoge temperaturen voor langere periodes. Lange blootstelling aan hoge temperaturen kan het schijfje vervormen. Bevestig geen papier of schrijf niets op de labelkant met een balpen. Specificaties Frequentiebereik: Voeding: BEN 522-1620 KHz FM 87,5-108 MHz AC 230 v ~ 50Hz DC 9V (UM-2 x 6) Specificaties zijn onderhevig aan verandering zonder nadere aankondiging. Dit is om te certificeren dat CSU384PLL in overeenstemming is met: Richtlijn van de Raad 89/336/EEC(EMC direction): Toepasselijke normen: EN55013:2001 + A1:2003 + A2:2006 EN61000-3-2:2006 + A1:2009 + A2:2009 EN61000-3-3:2008 EN55020:2007 Gemaakt in China Voor meer informatie bezoek onze website www.mpmaneurope.com Belangrijke opmerking Automatische naar stand-by overschakelen Om te voldoen aan de ERP2-richtlijn, schakelt het toestel automatisch over naar stand-by na ongeveer 10 minuten zonder een signaal. Om het toestel weer in te schakelen, druk op de "POWER / SOURCE" (AAN- UITSCHAKEL / BRON ) knop op het toestel. DUT5 DUT6 AVISO Leitor de CD Com Rádio PLL AM/FM e Porta USB DE MODO A PREVENIR CHOQUE ELÉCTRICO, NÃO UTILIZE ESTA FICHA COM UM RECEPTÁCULO DE EXTENSÃO OU OUTRAS TOMADAS A NÃO SER QUE AS LÂMINAS POSSAM SER COMPLETAMENTE INSERIDOS, DE MODO A PREVENIR EXPOSIÇÃO DAS LÂMINAS. DE MODO A PREVENIR INCÊNDIO OU CHOQUE ELÉCTRICO, NÃO EXPONHA ESTE APARELHO À CHUVA OU HUMIDADE. NÃO INSTALE ESTE EQUIPAMENTO NUM ESPAÇO FECHADO COMO ESTANTE DE LIVRO OU UNIDADE SEMELHANTES. CUIDADO RISCO DE CHOQUE ELÉCTRICO NÃO ABRIR Modelo: CSU384PLL Este símbolo de seta dentro de um triângulo equilateral alerta o utilizador para a presença de voltagem não isolada perigosa dentro do produto que poderá ser de magnitude suficiente para constituir risco de choque eléctrico às pessoas. www.mpmaneurope.com CUIDADO: DE MODO A REDUZIR O RISCO DE CHOQUE ELÉCTRICO, NÃO RETIRE A COBERTURA (OU TAMPA). NÃO EXISTEM PARTES PARA O USO DO UTILIZADOR. REFIRA A ASSISTÊNCIA A PESSOAL DE ASSISTÊNCIA QUALIFICADO. SEGURANÇA DE LASER Esta unidade utiliza um laser. Só pessoas de assistência qualificadas podem retirar a tampa ou tentar assistir este dispositivo, de modo a evitar ferimentos aos olhos. Cuidado: A UTILIZAÇÃO DE CONTROLOS OU AJUSTES DA EXECUÇÃO PARA ALÉM DOS AQUI ESPECIFICADOS PODERÁ RESULTAR EM EXPOSIÇÃO A RADIAÇÃO. Nota: Leia e siga estas instruções antes de utilizar a sua unidade. O ponto de exclamação dentro de um triângulo equilateral alerta os utilizadores para a presence de instruções de operação e manutenção (assistência) no manual que acompanha o aparelho. PERIGO: RADIAÇÃO DE LASER INVISÍVEL QUANDO ABERTO E LIGAÇÕES EM FALHA OU COM DEFEITO. EVITE EXPOSIÇÃO DIRECTA DO FEIXE LASER. OPERAÇÃO DA BATERIA Desligue o cabo AC completamente. Abra a Tampa do Compartimento da Bateria e insira 6 baterias de tamanho UM-2 "C" no compartimento com a polaridade como mostrado dentro do mesmo. LOCALIZAÇÃO DOS CONTROLOS SEQUÊNCIA DO MODO DE FUNÇÃO A sequência do modo de função é: “CD → USB → AUX → Rádio FM →Rádio AM” OPERAÇÃO DO RÁDIO Pressione o botão POWER / SOURCE e seleccione o modo de rádio desejado. SELECÇÃO DE ESTAÇÕES MANUAL 1. Pressione o botão SKIP/TUN > ou SKIP/TUN < passo a passo para sintonizar nas estações de rádio desejadas. 2. Pressione o botão VOLUME + ou VOLUME – para o nível de volume desejado; OPERAÇÃO DE PESQUISA DE ESTAÇÕES 1. 2. 1. Coluna 11. Porta CD 2. Botão POWER / SOURCE 12. Alça 3. Botão MODE/MEMORY/PROG 13. Antena FM 4. Botão VOLUME – 14. Tampa de Bateria 5. Botão VOLUME + 15. Entrada Aux-in 6. Botão SKIP / TUN < 16. Entrada AC 7. Botão SKIP / TUN > 17 Ranhura USB 8. Botão M+ / STOP 9. Botão PLAY / PAUSE 10. Ecrã LCD OPERAÇÃO AC Ligue a ficha à tomada AC da unidade e a outra ponta à entrada AC padrão. ATENÇÃO 1. Não ligue nem desligue o cabo de alimentação com as mãos molhadas; 2. Quando planear não utilizar esta unidade durante um longo período de tempo, desligue o cabo de alimentação da tomada; 3. Quando desligar o cabo de alimentação da tomada, não puxe pelo cabo para evitar risco de choque causado pelo mesmo. POR 1 3. Pressione e mantenha o botão SKIP/TUN > ou SKIP/TUN < durante aproximadamente 1 segundo e começará a pesquisar a estação de rádio seguinte segundo a direcção de procura. A operação de pesquisa simplesmente encontra estações com sinais fortes. As estações com recepção fraca só podem ser sintonizadas manualmente. Pressione o botão VOLUME + ou VOLUME – para o nível de volume desejado; ANTENA Para melhor recepção, extenda ao máximo a Antena FM para receber estações FM. Para recepção AM, a unidade tem uma antena incorporada; gire a unidade para melhor recepção.. ESTÉREO FM Quando ligar para uma Transmissão Estérea FM, o ecã LCD irá mostrar “ST”. MEMORIZAR ESTAÇÕES DE RÁDIO 1. Sintonize na estação desejada. 2. Pressione o botão MODE/MEMORY/PROG, e o ecrã LCD irá mostrar ‘ P01. 3. Pressione o botão SKIP/TUN > ou SKIP/TUN < e seleccione o número do seu programa desejado 4. Pressione MODE/MEMORY/PROGRAM para armazenar a estação de rádio na memória. 5. Repita os passos 1 a 3 para armazenar mais estações na memória. Pode armazenar até 20 estações. PARA SELECCIONE A ESTAÇÃO DE RÁDIO DA MEMÓRIA Pressione o botão M+ / STOP para a estação de rádio memorizada e pressione o botão M+ / STOP para passar para a estação de memória seguinte. POR 2 FUNÇÃO DE REPRODUÇÃO CD/MP3 Para reproduzir um disco CD/MP3, siga os passos abaixo: 1. Pressione o botão POWER / SOURCE e seleccione o modo CD. 2. Abra a porta de CD, insira o disco com o lado impresso para cima e feche a porta; 3. A informação do disco (total de número de faixas) aparecerá no ecrã LCD e irá reproduzir automaticamente. 4. Para o disco MP3, pressione e mantenha o botão FOLDER e o ecrã LCD irá exibir “FOLDER”. Utilize o botão SKIP/TUN > ou SKIP/TUN < para seleccionar a pasta que deseja ouvir. 5. Pressione o botão VOLUME + ou VOLUME – para o nível de volume desejado; 6. Pressione o botão STOP para parar de reproduzir o disco. Programação do disco CD/MP3 A programação do disco CD/MP3 deve ser realizada durante o modo STOP. 1. Pressione o botão MODE/MEM/FOLDER, o ecrã LCD irá mostrar ‘ PXX ‘ (XX indica o número pré-definido da faixa a ser programada). 2. Pressione os botões the SKIP/TUN > ou SKIP/TUN < para seleccionar a faixa desejada. Pressione o botão MODE/MEM/FOLDER novamente para armazenar esta faixa na memória. 3. Repita os passos 2 a 3 para armazenar mais faixas na memória. Pode armazenar até 20 faixas na memória para o disco CD e 99 faixas na memória para o disco MP3. 4. Pressione o botão PLAY/PAUSE para reproduzir o disco na ordem programada. 5. Para parar a reprodução, pressione o botão STOP/M+. 6. Para cancelar a lista de programação, pressione o botão STOP/M+ e abra a porta de CD ou pressione o botão SOURCE.. Reprodução de ficheiros MP3 com USB 1. Pressione o botão POWER / SOURCE para seleccionar o modo USB. 2. Insira o seu dispositivo USB na unidade. A unidade irá começar a ler os ficheiros no dispositivo USB e irá mostrar o número de faixas após terminar. Irá começar a reprodução na faixa 001 automaticamente. 3. Pressione mantenha o botão MODE/MEM/FOLDER e o ecrã LCD irá mostrar “FOLDER”. Utilize o botão SKIP + ou SKIP – para seleccionar a pasta que deseja ouvir. 4. Durante a reprodução, pressione o botão PLAY/PAUSE para pausar a reprodução. Para retomar, pressione o botão Play/Pause novamente. Modo de Reprodução Diferente Pressione o botão Mode para seleccionar diferentes tipos de modo de reprodução com a seguinte sequência. Para CDs de áudio: Repetir Um Repetir Todos Normal Para CDs MP3: Repetir Um Repetir Pasta Repetir Todos Normal Repetir Um – Repete a faixa a ser reproduzida. Repetir Todos – Repete todas as faixas no armazenamento de média. Repetir Pasta – Repete todas as faixas do álbum/pasta completo. Normal – Reproduz as faixas em sequência. CONEXÃO AUX IN 1. Pressione o botão POWER / SOURCE e seleccione o modo Aux-in. O ecrã irá mostrar “AUX”. 2. Insira um lado do cabo de áudio (entrada de 3.5mm estérea, não fornecida) na entrada line-out ou entrada de fones do seu dispositivo de áudio e a outra ponta na entrada aux-in da unidade. 3. Ligue o seu dispositivo de áudio e siga as instruções de reprodução. 4. Para parar esta função, pressione o botão SOURCE para desligar o seu dispositivo de áudio. Nota: Devido à definição/produção do formato não padronizado do CD MP3, a qualidade e execução da reprodução não são garantidas. O fabricante não é responsável pela reprodução de MP3 em qualquer caso devido a condições de gravação como performance de PC, software de escrita, habilidade média, etc. Modo de Skip 1. Durante o modo de reprodução ou pausa, pressione o botão SKIP + para ir para a faixa seguinte. 2. Durante o modo de reprodução ou pausa, pressione o botão SKIP - para ir para a faixa anterior. POR 3 POR 4 CUIDADOD E MANUTENÇÃO Desligue sempre a unidade após a utilização. Mantenha a unidade longe de objectos magnéticos, água ou fontes de calor. Utilize um pano limpo e suave humedecido com água morna para limpar o revestimento. Nunca utilize líquidos químicos que possam danificar o acabamento da unidade. Nunca toque na pega do CD nem na lente. Se a lente tiver impressões digitais, limpe cuidadosamente com um limpador de lentes comercial. Desligue a unidade de quaisquer fontes de energia antes de limpar. Para retirar o disco da caixa de armazenamento, pressione o centro da caixa e levante o disco, segurando pelas beiras. As impressões digitais e o pó devem ser cuidadosamente limpas da superfície de gravação do disco com um pano suave. Ao contrário de gravações convencionais, os discos compactos não têm entradas para recolher pó e detritos microscópicos, por isso limpar com um pano suave deve retirar a maioria das partículas. Limpa em linha recta de dentro para fora do disco. As partículas de pó e pequenas manchas não terão efeito nenhum na qualidade de reprodução. Nunca utilize químicos como sprays de gravação, sprays anti-estáticos, benzeno ou solventes para limpar os discos compactos. Estes químicos podem danificar permanentemente a superfície do disco. Os discos devem ser voltados a colocar na caixa de armazenamento após a utilização. Isto evita arranhões sério que podem causar o laser passar à frente. Não exponha os discos à luz directa do sol, alta humidade, ou altas temperaturas durante longos períodos de tempo. A longa exposição a altas temperaturas pode deformar o disco. Não cole papel nem escreva nada com esferográficas no lado da etiqueta do disco. Especificações Alcance de frequência: Fonte de alimentação: AM 522-1620 KHz FM 87.5 - 108 MHz AC 230V ~ 50Hz (UM-2 x 6) DC 9V As especificações estão sujeitas a alterações sem aviso prévio. Isto serve para certificar que CSU384PLL cumpra com: Directiva de concelho 89/336/EEC(direcção EMC): Padrões Aplicáveis: EN55013:2001+A1:2003+A2:2006 EN61000-3-2:2006+A1:2009+A2:2009 EN61000-3-3:2008 EN55020:2007 Fabricado na RPC Para mais informação, visite o nosso website www.mpmaneurope.com Nota Importante Iniciação de suspensão automática Para cumprir com a directiva ERP2, a unidade troca automaticamente para suspensão após aproximadamente 10 minutos sem sinal. Para ligar a unidade novamente, pressione o botão “POWER / SOURCE” na unidade. POR 5 POR 6