1
MANUALE D’ISTRUZIONE
user’s manual
notice d’utilisation
Bedienungsanleitung
manual de instrucciones
gebruikshandleiding
ÓÖÍÑÅÑÇÔÕÅÑÒÑàÍÔÒÎÖÃÕÃÙËË
návod k použití
manual de instruções
instrukcja obslugi
1
The symbol on the product or on its packaging indicates that this product may not be treated as household waste. Instead it shall be handed
over to the applicable collection point for the recycling of electrical and electronic equipment. By ensuring this product is disposed of correctly, you will
help prevent potential negative consequences for the environment and human health, which could otherwise be caused by inappropriate waste
handling of this product. For more detailed information about recycling of this product, please contact your local city office, your household waste
disposal service or the shop where you purchased the product.
Dieses Produkt darf am Ende seiner Lebensdauer nicht über den normalen Haushaltsabfall entsorgt werden, sondern muss an einem
Sammelpunkt für das Recycling von elektrischen und elektronischen Geräten abgegeben werden. Das Symbol auf dem Produkt, der
Gebrauchsanleitung oder der Verpackung weist darauf hin. Die Werkstoffe sind gemäß ihrer Kennzeichnung wiederverwertbar. Mit der
Wiederverwendung, der stofflichen Verwertung oder anderen Formen der Verwertung von Altgeräten leisten Sie einen wichtigen Beitrag zum Schutze
unserer Umwelt. Bitte erfragen Sie bei der Gemeindeverwaltung die zuständige Entsorgungsstelle.
Il simbolo sul prodotto o sulla confezione indica che il prodotto non deve essere considerato come un normale rifiuto domestico, ma deve
essere portato nel punto di raccolta appropriato per il riciclaggio di apparecchiature elettriche ed elettroniche. Provvedendo a smaltire questo prodotto
in modo appropriato, si contribuisce a evitare potenziali conseguenze negative per l’ambiente e per la salute, che potrebbero derivare da uno
smaltimento inadeguato del prodotto. Per informazioni più dettagliate sul riciclaggio di questo prodotto, contattare l’ufficio comunale, il servizio locale di
smaltimento rifiuti o il negozio in cui è stato acquistato il prodotto.
Ce symbole figure sur le produit ou sur son emballage en application de la directive européenne 2002/96/CE sur les Déchets d’Équipement
Électrique et Électronique (DEEE). Cette directive sert de règlement cadre à la reprise, au recyclage et à la valorisation des appareils usagés dans
toute l’Europe. Ce produit doit donc faire l’objet d’une collecte sélective. Lorsque vous ne l’utiliserez plus, remettez-le à un service de ramassage
spécialisé ou à une déchèterie qui traite les DEEE ; vous contribuerez ainsi à éviter des conséquences néfastes pour la santé et l'environnement. Pour
tout renseignement sur la mise au rebut et le recyclage de ce produit, veuillez contacter la mairie ou le service de la propreté de votre commune, ou
encore le magasin dans lequel vous l'avez acheté.
Este aparato lleva el marcado CE en conformidad con la Directiva 2002/96/EC del Parlamento Europeo y del Consejo sobre residuos de
aparatos eléctricos y electrónicos (RAEE). La correcta eliminación de este producto evita consecuencias negativas para el medioambiente y la salud.
El símbolo en el producto o en los documentos que se incluyen con el producto, indica que no se puede tratar como residuo doméstico. Es necesario
entregarlo en un puntode recogida para reciclar aparatos eléctricos y electrónicos. Deséchelo con arreglo a las normas medioambientales para
eliminación de residuos. Para obtener información más detallada sobre el tratamiento, recuperación y reciclaje de este producto, póngase en contacto
con el ayuntamiento, con el servicio de eliminación de residuos urbanos o la tienda donde adquirió el producto.
O símbolo no produto ou na embalagem indica que este produto não pode ser tratado como lixo doméstico. Em vez disso, deve ser entregue
ao centro de recolha selectiva para a reciclagem de equipamento eléctrico e electrónico. Ao garantir uma eliminação adequada deste produto, irá
ajudar a evitar eventuais consequências negativas para o meio ambiente e para a saúde pública, que, de outra forma, poderiam ser provocadas por
um tratamento incorrecto do produto. Para obter informações mais pormenorizadas sobre a reciclagem deste produto, contacte os serviços
municipalizados locais, o centro de recolha selectiva da sua área de residência ou o estabelecimento onde adquiriu o produto.
Het symbool op het product of op de verpakking wijst erop dat dit product niet als huishoudafval mag worden behandeld. Het moet echter
naar een plaats worden gebracht waar elektrische en elektronische apparatuur wordt gerecycled. Als u ervoor zorgt dat dit product op de correcte
manier wordt verwijderd, voorkomt u mogelijk voor mens en milieu negatieve gevolgen die zich zouden kunnen voordoen in geval van verkeerde
afvalbehandeling. Voor meer details in verband met het recyclen van dit product, neemt u het best contact op met de gemeentelijke instanties, het
bedrijf of de dienst belast met de verwijdering van huishoudafval of de winkel waar u het product hebt gekocht.
Simbolul de pe produs sau de pe ambalaj indica faptul ca produsul nu trebuie aruncat împreuna cu gunoiul menajer. Trebuie predat la
punctul de colectare corespunzator pentru reciclarea echipamentelor electrice si electronice. Asigurându-va ca ati eliminat în mod corect produsul,
ajutati la evitarea potentialelor consecinte negative pentru mediul înconjurator si pentru sanatatea persoanelor, consecinte care ar putea deriva din
aruncarea necorespunzatoare a acestui produs. Pentru mai multe informatii detaliate despre reciclarea acestui produs, va rugam sa contactati biroul
local, serviciul pentru eliminarea deseurilor sau magazinul de la care l-ati achizitionat.
Simbol na izdelku ali njegovi embalaži oznacuje, da z izdelkom ni dovoljeno ravnati kot z obicajnimi gospodinjskimi odpadki. Izdelek odpeljite
na ustrezno zbirno mesto za predelavo elektricne in elektronske opreme. S pravilnim nacinom odstranjevanja izdelka boste pomagali prepreciti
morebitne negativne posledice in vplive na okolje in zdravje ljudi, ki bi se lahko pojavile v primeru nepravilnega odstranjevanja izdelka. Za podrobnejše
informacije o odstranjevanju in predelavi izdelka se obrnite na pristojen mestni organ za odstranjevanje odpadkov, komunalno službo ali na trgovino, v
kateri ste izdelek kupili.
Symbol na produkcie lub na opakowaniu oznacza, ze tego produktu nie wolno traktowac tak, jak innych odpadów domowych. Nalezy oddac
go do wlasciwego punktu skupu surowców wtórnych zajmujacego sie zlomowanym sprzetem elektrycznym i elektronicznym. Wlasciwa utylizacja i
zlomowanie pomaga w eliminacji niekorzystnego wplywu zlomowanych produktów na srodowisko naturalne oraz zdrowie. Aby uzyskac szczególowe
dane dotyczace mozliwosci recyklingu niniejszego urzadzenia, nalezy skontaktowac sie z lokalnym urzedem miasta, sluzbami oczyszczania miasta lub
sklepem, w którym produkt zostal zakupiony.
Symbol na výrobku alebo na jeho obale znamená, že s výrobkom sa nesmie zaobchádzat ako s domovým odpadom. Namiesto toho ho treba
odovzdat v zbernom stredisku na recykláciu elektrických alebo elektronických zariadení. Zabezpecte, že tento výrobok bude zlikvidovaný správnym
postupom, aby ste predišli negatívnym vplyvom na životné prostredie a ludské zdravie, co by bolo spôsobené nesprávnym postupom pri jeho likvidácii.
Podrobnejšie informácie o recyklácii tohto výrobku získate, ak zavoláte miestny úrad vo Vašom bydlisku, zberné suroviny alebo obchod, v ktorom ste
výrobok kúpili.
Symbol na výrobku nebo jeho balení udává, že tento výrobek nepatrí do domácího odpadu. Je nutné odvézt ho do sberného místa pro
recyklaci elektrického a elektronického zarízení. Zajištením správné likvidace tohoto výrobku pomužete zabránit negativním dusledkum pro životní
prostredí a lidské zdraví, které by jinak byly zpusobeny nevhodnou likvidací tohoto výrobku. Podrobnejší informace o recyklaci tohoto výrobku zjistíte u
príslušného místního úradu, služby pro likvidaci domovního odpadu nebo v obchode, kde jste výrobek zakoupili.
Symbolen på produkten eller emballaget anger att produkten inte får hanteras som hushållsavfall. Den skall i stället lämnas in på
uppsamlingsplats för återvinning av el- och elektronikkomponenter. Genom att säkerställa att produkten hanteras på rätt sätt bidrar du till att förebygga
eventuellt negativa miljö- och hälsoeffekter som kan uppstå om produkten kasseras som vanligt avfall. För ytterligare upplysningar om återvinning bör
du kontakta lokala myndigheter eller sophämtningstjänst eller affären där du köpte varan
Symbolet på produktet eller på emballasjen viser at dette produktet ikke må behandles som husholdningsavfall. Det skal derimot bringes til et
mottak for resirkulering av elektrisk og elektronisk utstyr. Ved å sørge for korrekt avhending av apparatet, vil du bidra til å forebygge de negative
konsekvenser for miljø og helse som gal håndtering kan medføre. For nærmere informasjon om resirkulering av dette produktet, vennligst kontakt
kommunen, renovasjonsselskapet eller forretningen der du anskaffet det.
2
]]
]
]
!!
]
"#!
]]
]$]%
!&]'# "
]
]$]
]
]]((
])
!&*+(
]
5
]]]
)
,]
% ] -] ]
%
]( ](]
% ]
]]..]
.
((]
)
/]
$(]-%]]]])
!"#$
0
- ] 1]. %]%2 % $ 3( ] ( 1( ]2)4
-]]]
()
] ](( $% 1
( (2 ] (
(
%
.%]
$].
-5
(-(.]%
$]
]
]
$%
$]]%)
!(($(]]]]%(]%]]
)
*] ( - ( ] (. % ( . $
%])]$.(]]
]((-
(%)
%%"#&'("!$
(' #"" " " " ' ! (& % %%!
!(%%"") !(%%)#&"$
]]]]-%
]](
]
]]
$
%]]%(
]
)
]
%]%(
].]]]].
%]]
(](](]
)
& -. % ] ]
]. ] $ ( % $% 3(
)
,-
(].(]
(6]
])
33
,
]($7$.-]]]
]
]]
])
,]
$(.(]]8](
]
]]
]
)
]$(]$(
()
9-]
(]
]
($%](]%
(]
]
])
,]
($((.]]$
($%]]
]
(](]
]3(]])
:
](.-]$(](]
)
]5]%](](]].]]
$](.]
(%%]
]]);]
]$(]$
%]%-
)
]
]<]$]]
(]].
%.()+]((%%
]
)
-.]](]
-
]$
5]%])
/](]()
=]]]]]5]$1]](
52)+
]]]]
])
;(]].$
]]]
]](
](
]7)
%]]
(
()
=
]
]]]
6])
]]
]]])
,](]]3(]
]8](
%7])
]]](((]]-
)
> ]
. . ]] ( ] ]$
](]
]6]1.]
)2)
?]( ] -]$
(]
6].$%].(](-7)
34
*+,
@ 6( ] ]< % $ ]
]( ] ] ]
]]
].(]]](6
%(
](]]
$
]
)
( "!'%# "
#)@]]$($%
((](]
.
(]]
1]2)
),] ] %
$.
]
]
$(] ]
]
]?<=<(]]]
](]
(
]]
:1=2.:1?2.A1]2)
)B]]
]
$]]]
$()
")!]]$(
)
&%#%%"! "(
>(
]
]]].]
%](
]]]]
](
](.](]
$]
]
]]]
]
(
]
]
]%,,,(]]])
B$]((]
]%(
](]]$)
,](
]
]]]
]
]%%.]
%]]
]
$] ]
(] $]]
]
]((](
](
]%(
]
]%
(]1]]
]]]]](
$2)
%
$]$](
%]]](]5
(]
]]$% '!]%])
] $ ]% -< ] ]
]% ] (
(
]]%])
35
-'.&*%(%%"!)(.
<]
-](
](
]]8
<]
-] $ ]]]( ]C5 ]%(
]( ]
]$1$28
<%]]]](]
]
]]
$
1$28
<]
-]
]$]]
)
<,]]]
.
]
-]])]5]
(
]
-])
<@
]
](.]
]
$(]
]
-]]
$%]
)
<
$]]$$]
()
<
$]$(
%
-((%
($%]3(]
)
<!%(
$]%]]
]]((])
/"&%#%%"!'!
<"DE *3
%"('%# "
,]
$(]$
(.
$]]%%
<* &&<>.
<* DD<>12.
<* DD<>.
]$]]
]%(]])<%(
$]
$]]]]
(
]$%5]%
36
(% ! 0() () $ ( 1 # 2
'("!$
] ] ] $]< . ] ] ] ] ]$
]]
<](7
]]]]$
]
](]]]]8
< ] ( ( ] ]. ] ] $ ] ]] ]
]]]#'!8
:]]]]].]
%]$]
F(<
]
G1
((]
-2)
F(<
]
G]$]]
(]]]]
(1
](2)
]$
](]((.]]
]$-].](
]
])
;]]]
]($](6]]]$%
]]](])
(]]]]$%FBG
](]]
)
9- ] ] ] ] $% ]( ] ]8]. ( ] 5
](])
$]
](]]]
].-
(("< ]]]
)
37
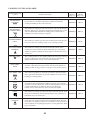
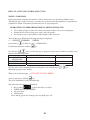
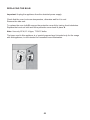
DESCRIPTION OF THE CONTROL PANEL
2
1
9
8
3
4
6
5
7
Description of the keys
1. Keys for setting the cooking chamber temperature and display area for the temperature
indication ( + to increase, - to decrease, min 50°C – max 250°C)
2. and 9. Menu options scrolling keys
3. Keys for programming timed events and display area for timing indication
4. Keys for programming the alarm or setting the clock and display area for clock / alarm
indication
5. Cooking chamber light on / off key
6. Oven on / off key
7. Cooking function selection keys
8. Selection confirmation key
9. and 2. Menu options scrolling keys
38
FIRST START-UP
When the oven is connected to the mains power supply for the first time, a wait message ( WAIT )
and some product identification information appear on the display.
Do not touch the keypad during this brief period.
N.B. It is normal that the tangential fan turns on and then shuts off after a few moments.
When the following message appears: LANGUAGE
select the desired language by pressing one of the keys
Confirm the selection with key
ENGLISH
(4)
(8)
Then set the clock using the keys
to reach the current time.
Confirm the setting by pressing key
(4) individually
(8)
HOW TO TURN THE OVEN ON
Press the key
(6) for at least 1 sec.
The writing <<ON>> appears on the display, the oven light turns on and then the following
message appears:
moSELECT COOKING
MENU
N.B. Deactivate the keypad lock if it is active.
See section HOW TO DEACTIVATE THE KEYPAD LOCK
the oven will turn off automatically, after 5 minutes, if no selection is made.
HOW TO TURN THE OVEN OFF
(6).
Press the key
The writing <<OFF>> appears on the display.
The oven will go into stand-by mode, see section oven off mode
39
COOKING CYCLES AVAILABLE
Function name and
symbol
Function description
TRADITIONAL
COOKING
This method of cooking provides traditional cooking with heat from
the top and lower elements. Particularly suitable for traditional
roasting and baking on the centre shelf only.
TRADITIONAL
COOKING WITH
FAN
LOWER ELEMENT
ONLY
FAN AND LOWER
ELEMENT
CENTRE GRILL
FULL GRILL
FULL GRILL AND
FAN
FAN
PIZZA
DEFROST
Min-Max
chamber
temp. (°C)
Default
chamber
temp. (°C)
50-250°C
190 °C
This method of cooking provides heat from the outer top and the lower
elements, plus the use of the fan to circulate the heat and ensure a fast
50-250°C
and even distribution. Suitable for baking pastries and biscuits on
multiple levels when browning is required.
This method of cooking uses the lower element to direct heat upward
to the food. For slow-cooking recipes or for warming up meals.
200 °C
50-250°C
50 °C
50-250°C
165°C
50-250°C
250 °C
50-250°C
165 °C
50-250°C
250 °C
This method of cooking uses the circular element located around the
fan while the heat is distributed, resulting in a faster, more efficient
operation. Cooking with the fan on allows different kinds of food to be 50-250°C
cooked simultaneously on different shelves, preventing the
transmission of smells and tastes from one dish onto another.
165 °C
This method of cooking uses the lower and circular fan element while
the heat is distributed by the fan reproducing the same conditions as
traditional clay wood fired ovens.
165 °C
This method of cooking uses the bottom element with the fan to
circulate the heat. For delicate dishes and heating pre-cooked food.
Suitable for pattisere ,baking foods that require concentration of heat
on the base.
This cooking method is static grilling utilising the inner part of the top
element, which directs heat downward onto the food. Suitable for
grilling small portions of meat or for toasted sandwiches.
This cooking method is normal static grilling utilising the top
elements, which directs heat downwards onto the food. Suitable for
grilling medium to large portions of sausages, bacon, steaks and fish.
This method of grilling uses the full top element in junction with the
fan, to grill meat without the need to turn. Suitable for steaks such as
hamburgers and large fillets.
The fan runs without heat to reduce the defrosting time of frozen
foods. The time required to defrost the food will depend on the room
temperature, the quantity and type of food: Remove frozen portions of
meat completely from packaging and place over the grill rack to allow
proper circulation.
40
50-250 °C
HOW TO SELECT A COOKING FUNCTION
(7) to select the desired cooking cycle.
Press one of the two direction keys:
See function explanation in the table above (cooking cycles available).
N.B. If no selection is made within 5 minutes, the oven will turn off automatically.
See section oven off mode .
HOW TO CHANGE THE COOKING CHAMBER TEMPERATURE
(1) to change, with steps of +/-5°C, the preset temperature.
Press one of the two keys
The cooking chamber temperature is always displayed on the left side of the letter t.
N.B. The degree symbol “°” flashes during the oven preheating period until the set temperature is
achieved. Otherwise, it is always on in all the other cases, such as for example: temperature control, when
the oven is maintaining the temperature already achieved, and cooling, when the oven must reach a set
temperature lower than the starting value.
HOW TO START THE COOKING
The activation of the selected cooking function, with the settings shown on the display, occurs when
(8).
the selection is confirmed with key
The following message appears on the display: ACTIVATE CYCLE MENU
N.B. The oven turns off automatically after 5 minutes if the start of the cooking process is not
confirmed.
The phrase “COOKING IN PROGRESS MENU” will appear on the display when the cooking
is activated.
(9) accesses a menu which allows the user to perform semiautomatic cooking
Pressing the key
settings or store the data of the cooking in progress. See section
41
HOW TO USE THE ALARM FUNCTION
(4) to activate the function.
Press one of the two keys
The symbol
begins to flash and the display shows the message:
ALARM and the digits 00.00 appear.
(4) individually to set the desired time.
Use the keys
The maximum time that can be set is 23 hours and 59 minutes.
After a few moments (5 sec.), the timer begins, the oven returns to displaying the current time and
the symbol remains constantly lit.
At the end of the set time period, a buzzer sounds and the following message is displayed:
ALARM
00.00 and the symbol
(the last two flashing).
Press any key to stop the buzzer.
Note: The buzzer is automatically deactivated after 5 minutes.
CAUTION:
The alarm function does NOT interact with the operation of the oven, and it is always available
regardless of the oven state.
HOW TO DISPLAY OR CHANGE THE ALARM STATUS
(4) and the display immediately shows the information
Press one of the two keys
regarding the time status of the alarm.
begins to flash.
The symbol
Press one of the two keys
(4) to set a new time for the alarm.
How to reset the alarm function
Press the keys
function.
The symbol
(4) simultaneously to reset the time previously programmed for this
will turn off.
HOW TO PROGRAM THE OVEN
HOW TO SET OR CHANGE THE COOKING TIME
Turn the oven on and select a cooking function.
Use the keys
(3) to set the cooking time.
The initial display of the time is set in mm.ss, then hh.mm.
(h=hours, m= minutes, s=seconds)
The maximum time that can be set is 10 hours.
Then activate the cooking, see section how to start the cooking
The time displayed begins to decrease, and when it reaches zero the oven will go into cooking
finished mode.
42
HOW TO CANCEL A COOKING TIME
(3) simultaneously to cancel the time previously programmed for this
Press the keys
function.
The cooking time is set to zero.
HOW TO PROGRAM THE START AND STOP OF THE OVEN
Turn on the oven, select a cooking function and set the desired cooking temperature.
Use the keys
(3) to set the cooking time.
The maximum time that can be set is 10 hours.
(9), select the item END OF COOKING with key
Then press the key:
(8).
(3) to
When the message SET TIME appears, use the keys
set the END OF COOKING time, within the next 23 hours 59 minutes.
Confirm the setting with the key
(8).
The oven will go into delayed start mode. It will be automatically activated later for a set duration
and will stop at the programmed end of cooking time.
A clear message: “OVEN TO BE TURNED ON IN
.. ..”
at 15 sec. intervals will be displayed to show the time remaining before the oven is turned on.
It is possible, however, to recall the information on the display at any time by pressing one of the
two keys
(3)
HOW TO CANCEL AN OVEN START/STOP PROGRAM
(3) simultaneously to cancel the oven start/stop program.
Press the keys
The oven will automatically activate and display the message: COOKING IN PROGRESS
MENU
COOKING FINISHED MODE
The oven turns off all the heating elements.
The display shows the message: “COOKING FINISHED” accompanied by a buzzer signal.
The buzzer signal can be turned off by pressing any key.
Press the key
cooking cycle.
to turn off the oven or press one of the two keys
43
(7) to select a new
SAVING A COOKING CYCLE
The oven electronics offers the possibility to store your cooking settings in appropriate memory
areas. This information may be retrieved at a later time in order to cook with the same previous
settings, obtaining consistent and unfailing results.
The following can be stored in the memory:
x cooking cycle
x cooking chamber temperature
x cooking time
It is not possible to store:
x Start cooking time
x End of cooking time
HOW TO SAVE A COOKING CYCLE
After turning on the oven and carrying out all the necessary cooking settings, press key
(9) repeatedly until the following text appears: SAVE COOKING CYCLE
Press key:
(8) to confirm that you would like to save the data.
Select one of the 10 available records using the scrolling keys:
(9) or
Confirm the saving of the data in COOKING CYCLE NO. with key
When the data has been saved, the system responds with “DONE”
(8)
Notes:
x It is advisable to write down the number of the cooking cycle along with the name of the
dish for which it is used in a notebook. This will help in the future when you would like to
call up the cooking cycle to be used for this particular dish.
x If the system does not display the writing "DONE", this means that all the available memory
records have been used. To save another cooking cycle, you must delete one or more
records. See section how to delete your own recipe
Menu functions
x Recipes
x Pyrolysis
x Settings
x Exit
Recipes:. The system has a stored list of dishes (meat, bread/pizza, desserts, timbales, your own
recipes) that allows a quick setting of the oven (recommended parameters) based on the item
selected in order to obtain the correct cooking.
The following pages provide the tables and parameters of the food stored in the memory.
Pyrolysis: self-cleaning system based on the heat action. By setting this function, the oven cleans
itself thanks to the high temperature achieved. The remains of fats and spatters on the inside
surfaces of the oven and the door get totally burned.
Then you just need to remove the residual ashes with a damp cloth, without needing any cleaning
product.
Settings: In this menu it is possible to carry out a series of settings that allow to personalize the
oven based on your own needs.
44
HOW TO MOVE AROUND INSIDE THE MENU
Turn on the oven. When the following message is displayed:
moSELECT COOKING
MENU
press the key:
(9) to display the first item in the list: “RECIPES”
To view the menu structure:
press the key:
(9) to scroll down the list
press the key:
(9) to scroll up the list
Press the key:
(8) to select the item shown
EXIT allows to return at any time to the initial item displayed when the oven was turned on.
Pressing the keys
simultaneously allows to go back to the previous item one step at a
time. (go back function <<< )
45
BREAD / PIZZA recipe list
Cooking
chamber
temperature
°C
Dish
BREAD
160
SAVOURY FOCACCIA
TORTA SALATA
PIZZA
220
200
190
Cooking
cycle
LOWER
ELEMENT
FAN
FAN
PIZZA
Cooking time
00.50
00.20
00.30
00.25
MEAT recipe list
Dish
Cooking
chamber
temperature
°C
Cooking cycle
LOWER
ELEMENT
LOWER
ELEMENT
LOWER
ELEMENT
LOWER
ELEMENT
LOWER
ELEMENT
LOWER
ELEMENT
Cooking time
ROAST BEEF
200
ROAST VEAL
225
ROAST PORK
170
BEEF FILET
220
ROAST CHICKEN
200
ROAST TURKEY
170
SPIT MEAT
250
FULL GRILL
0030
ROAST BEEF
220
FAN
01.00
MEATLOAF
180
FAN
01.10
46
01.00
01.10
00.50
01.00
01.30
02.20
FISH recipe list
Dish
Cooking
chamber
temperature
°C
Cooking cycle
TRADITIONAL
Cooking time
SALMON
190°
00.30
TUNA FISH
190
TRADITIONAL
00.35
FLAT FISH
180
FULL GRILL
00.25
TROUTS
180°
FULL GRILL
00.25
DESSERTS recipe list
Dish
Cooking
chamber
temperature
°C
MERINGUES
50°
APPLE PIE
170°
MUFFINS
190°
PLUM CAKE
170°
SOUFFLÈS
200°
YOGURT BISCUITS
170°
FRUIT CAKE
SPONGE CAKE
170
170°
Cooking cycle
Cooking time
LOWER
ELEMENT
LOWER
ELEMENT
LOWER
ELEMENT
LOWER
ELEMENT
LOWER
ELEMENT
LOWER
ELEMENT
FAN
FAN
00.20
00.30
Cooking cycle
Cooking time
00.50
00.45
00.15
01.00
00.35
00.15
TIMBALES recipe list
Dish
Cooking
chamber
temperature
°C
LASAGNE
160
CANNELLONI
180
LOWER
ELEMENT
FAN
00.50
00.45
NOTE:
The settings listed in the tables (temperature, cooking time) may be changed to create personalized
cooking better suited to your needs. New data can be entered to overwrite the data stored in the
memory by following the instructions provided below.
47
HOW TO PERSONALIZE THE RECIPE LIST
Select an item from the list and set the data according to your own needs. Remember that it is
possible to cook by time (cooking time) or with the food probe.
(9) repeatedly until the following text appears: SAVE
Activate the cooking, then press the key
COOKING CYCLE
(8) to confirm and store the new settings.
Press key:
The system displays DONE when the saving is finished.
HOW TO LOAD YOUR OWN RECIPE
Select menu and select the recipes item, with key
Scroll the items with key
(9) or key
Confirm the selection with key
(8).
(9) until the text YOUR OWN RECIPES is displayed.
(8)
When the following message appears: LOAD COOKING CYCLE press key
The system displays the recipes that have been stored.
Use the key
(9) or
(8)
(9) to select the desired cooking cycle.
Confirm the selection by pressing key
(8).
N.B. If the memory area is empty because no personalized recipes have been stored, the system
responds with EXIT.
HOW TO DELETE YOUR OWN RECIPE
Select menu and select the recipes item, with key
Scroll the items with key
(9) or key
Confirm the selection with key
Use one of the two keys
DELETE COOKING CYCLE.
(8).
(9) until the text YOUR OWN RECIPES is displayed.
(8)
(9) to scroll the items until the following text is displayed:
(8) to enter the submenu.
Press key
Select the cooking cycle that you would like to delete, scrolling the items with one of the two keys
(9), and confirm the deletion with the key
(8).
When the cooking cycle has been deleted, the system responds with DONE
48
PRACTICAL COOKING SUGGESTIONS
x
All cooking must be carried out with the door closed.
x
x
x
x
Always use completely dry oven gloves or pot holders to remove the hot dishes from the
oven.
Use containers able to withstand maximum temperatures of 300°C or higher.
During or at the end of the cooking phase, be careful of the hot air that escapes from the oven
when the door is opened.
Never rest the dishes directly in contact with the bottom of the oven. Use the appropriate
accessories.
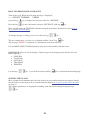
ACCESSORIES
The accessories supplied with the oven increase
the number of cooking modes and possibilities.
The drip pan and grill accessories can be placed
on various levels of the slide guide located
inside the oven. This allows the user to set the
most suitable height (levels) depending on the
cooking to be carried out.
Level 4
Level 3
Level 2
Level 1
Drip pan
Tray with raised edges used as a support surface for any single-level cooking container.
Container for collecting juices or drippings of fat during the cooking process, used together with the
main grill.
When cooking fatty dishes, it is recommended to place a bit of water in the drip pan to prevent the
fat from burning and producing unpleasant odours or smoke.
Support surface for the food (biscuits, etc.)
Grill
Used mainly as a support surface.
Recommended position: level 2 / 3 / 4
49
HOW TO ACTIVATE A PYROLYSIS CYCLE
NOTES / WARNINGS
During automatic cleaning, the surfaces of the oven become very hot. Keep children away.
Through the glass of the oven door, you may note some particles that light: this is spontaneous
combustion, which is absolutely normal and is in no way dangerous.
OPERATIONS TO PERFORM BEFORE STARTING PYROLYSIS
x Use a damp sponge to remove the most consistent residues. Do not use detergents.
x Extract the accessories, drip pans, racks, and side guides.
x Do not leave rags or pot holders on the handle of the oven door.
Turn on the oven. When the following message is displayed:
moSELECT COOKING
MENU
press the key:
(9) until you see: “ PYROLYSIS “.
Confirm the selection with key
(8)
(2-9) to select the type of pyrolysis that is most suitable according to the
Use the keys
times in the following table:
Menu items
PRE-SET TIME (in hours)
TYPE OF SOILING
MEDIUM
1, 30
NORMAL
PYROLYSIS
SHORT PYROLYSIS
1
little
LONG PYROLYSIS
2
much
N.B. the time can be modified before starting the cycle with the keys
Minimum pyrolysis time 30min.
When you see the message: ACTIVATE CYCLE MENU
(8).
Activate pyrolysis with key
The door immediately locks automatically.
The following information is displayed:
x
x
Key symbol
to show that door is locked.
PYROLYSIS IN PROGRESS
x Pyrolysis time
x Current time
Note: During pyrolysis cleaning, the oven light stays off.
50
(3) .
HOW TO DELAY THE START OF PYROLYSIS
After selecting the most suitable mode of pyrolysis, upon appearance of the message: CYCLE
ACTIVE MENU
Press key
(9) to postpone the start-up of pyrolysis with respect to the current time.
select the item: END COOKING with key
(8).
Upon appearance of the message TIME SETTING, use the keys
of cooking within the next 23 hours and 59 minutes.
Confirm the setting with the key
(3) to set the time of end
(8).
.
The oven immediately locks the door and shows the symbol
It will be automatically activated later for a set duration and will stop at the programmed end of
cooking time.
A clear message: “OVEN TO BE TURNED ON IN
.. ..”
at 15 sec. intervals will be displayed to show the time remaining before the oven is turned on.
It is possible, however, to recall the information on the display at any time by pressing one of the
two keys
(3)
A delayed pyrolysis programme can be deleted by simultaneously pressing the keys:
(3)
The oven will immediately start the pyrolysis cycle.
END OF PYROLYTIC CYCLE
When the pyrolysis time is up, the door of the oven will remain closed until the cooking
temperature has dropped to an acceptable value.
When the symbol
goes off, it means that oven functions have been reset.
Notes:
When you open the door, you could see some white ashes on the bottom and on the walls of the
oven. Remove them with a damp sponge when the oven is cold.
51
HOW TO PERSONALIZE YOUR OVEN
Turn on the oven. When the following message is displayed:
moSELECT COOKING
MENU
press the key:
(9) to display the first item in the list: “RECIPES”.
Press the key
(9) and confirm the selection “SETTINGS” with key
(8)
Move around inside the SETTINGS submenu using the procedures described in section how to
move around inside the menu .
To change the type of setting, press one of the two keys
(4).
(8).
The new setting must, of course, be confirmed with the “enter” key
The message “DONE” is displayed as confirmation of the new selection.
Use the MENU STRUCTURE diagram to help you become familiar with the items.
LANGUAGE: allows to set the display of the messages in the language best suited to the user.
Menu languages:
x ENGLISH
x ITALIANO
x DEUTSCH
x FRANÇAIS
x ESPAÑOL
Use the keys
(4). to scroll the list items and key
(8) to confirm the desired language.
SETTING THE CLOCK
Move around in this submenu and select the item to be personalized using the procedures already
described. See section how to move around inside the menu how to move around inside the menu
on page 15.
The variable parameters are displayed in flashing mode and can be changed using the keys
(4).
52
x
SET TIME
Allows to set the current time.
Keep one of the two keys mentioned previously pressed down to scroll faster.
x
CLOCK DISPLAYED
If NO is selected, the current time is not displayed when the oven is off.
x NIGHT MODE
Default setting = NO
If the setting is changed to YES, when the oven is off, during the time between 22.00 and 06.59.59
the clock digits are displayed with a low light intensity. During the remaining daytime hours, the
maximum intensity returns to ensure proper display in case of reflection.
SETTING KEYPAD LOCK:
This option allows to select the mode in which the keypad lock is set: manual or automatic. It is
recommended to select the automatic mode (YES), especially if there are children present.
AUTOMATIC KEYPAD LOCK YES
The keys are locked automatically when the keypad remains inactive for 1 minute.
AUTOMATIC KEYPAD LOCK
NO
The keypad lock is activated by simultaneously pressing the key on the far left
and the key on
the far right
In both cases, when the keypad lock is activated the display shows the message: KEYPAD LOCK
ACTIVATED followed, if the oven is off, by the key symbol
function is activated.
to remind the user that the
If the keypad lock is activated manually or automatically during a cooking process, the display,
after the message: “KEYPAD LOCK ACTIVATED”, returns to displaying the cooking
information. If someone attempts to perform new settings, the system responds to pressure on any
key with a message that reminds the user to deactivate the protection first.
See the next section.
HOW TO DEACTIVATE THE KEYPAD LOCK
If the key symbol
UNLOCK KEYS
is shown on the display, or the following message appears:
The two arrows on the sides pointing downwards remind the user of the key combination)
Press simultaneously the key on the far left
and the key on the far right
The message : KEYPAD LOCK DEACTIVATED confirms that the appliance's normal control
functions have been restored.
53
KEYPAD LOCK DETAILS
The key
The key
allows to turn on / off the light in the cooking chamber regardless of the oven state.
allows to turn the oven off.
BUZZER
Allows to select one of the 3 levels (low, medium, high) for the intensity of the buzzer that sounds
during a warning. Default setting: MEDIUM
LIGHTING
Allows to select the criteria for turning off the light once it has been turned on.
Select NO for the item: LIGHT OFF AUTOMATICALLY to use the manual mode. Once the light
has been turned on, it must always be turned off by pressing the appropriate key
again.
The automatic function (YES) allows the electronics to turn the light off automatically 5 minutes
after it was turned on.
RESET SETTINGS
This function is used to reset the system in case of problems.
Caution: All the system variables are returned to the original values and your own recipes are
deleted.
Select the item : “ RESET SETTINGS” with key
the display.
(8) and follow the instructions provided on
OVEN OFF MODE
All the heating elements are deactivated, including the fan inside the cooking chamber and the light.
The cooling fan and the fan located inside the cooking chamber deactivate a few minutes after the
oven is turned off in order to allow rapid cooling of the oven. (Maximum cooling time: 20 min.)
The keypad is deactivated except for the on/off key
and the ALARM function keys.
COOKING FINISHED MODE
The control unit sounds a buzzer and deactivates all the heating elements, including the fan inside
the cooking chamber and the light.
The display shows the message: COOKING FINISHED
x
x
x
Press any key to stop the buzzer, cancel the message and return the system to the ON
conditions.
Or press the On/Off key to turn the oven off. (see oven off mode)
Otherwise the oven will turn off automatically after 5 minutes.
54
WHAT TO DO IN CASE OF AN ANOMALY
PROBLEM
SOLUTION
The oven does not work.
Check whether the omnipolar switch or any
residual-current circuit breaker (cut-out) of the
electrical system is off. In case of problems with the
electrical system, consult a qualified electrician. If
the oven still does not work after resetting the
omnipolar switch and/or residual-current circuit
breaker, contact an Authorized Service Centre.
See the instructions on how to change the oven light
bulb.
This combination indicates a failure.
See the error codes table.
Probable electricity failure (Black-out).
Set the current time.
Check whether the door is closed.
The light inside the cooking chamber does
not turn on.
The display shows Err and a number.
The system requires the time to be set.
The oven does not heat.
WHAT TO DO IN CASE OF A BLACK-OUT
x
In the case of a black-out, when the electricity is restored it may be necessary to reset the
current time.
x
The stored settings or recipes are not lost.
x
If the black-out occurs during a cooking process, the process cannot continue.
55
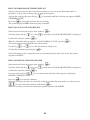
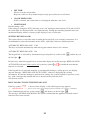
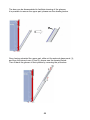
REPLACING THE BULB
Important: Unplug the appliance from the electrical power supply.
Check that the oven is at room temperature, otherwise wait for it to cool.
Remove the side rack.
To replace the oven bulb B, remove the protective cover A by turning it anti-clockwise.
Replace the burnt-out bulb and fit the protective cover back in place A.
Note: Use only 25 W, E-14 type, T 500°C bulbs.
The lamp used in this appliance is a ‘special purpose lamp’ intended only for the usage
with this appliance; is not intended for household room illumination.
A
B
56
/
+/
(
( -
]]].$](
$
%(1(2)-]
].](
$
(]
B((]]$$]:)
;$]:(.](])*(].](
]$]((((.(]](]](8
](](]]])
]](.]%(]]]])
:
](.$]]]]]$$]:(]-]]
).#$
A
B
A
57
B
!
"
#
58
(% $
% ]]
].]]% $(
]%(
](]]
]
%]]
]
)
;] ] ] ( $ ( ] % ])
]$.$
])
=
]
]]]
6])
] $ ] $]
. ] %
(]
;](]$%(
]](]((
]8
((%]
%)
;
]]].%((]%]]
].$]]]I]%].](
]]$]
])
>5]]
.]
](%].((%
%)
;]
(]-.
)
5&$
(]%]$.]$]
(]
]6]1.]
)2)
59