1
INSTRUCTION MANUAL
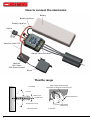
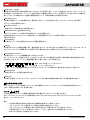
How to connect the electronics
Battery
Battery positive +
Battery negative Switch
Receiver cable (TH)
Sensor cable connector
Receiver
CH1: Servo
CH2: Speed Control
Servo
Throttle range
Full throttle
Rock Crawler: Backward Zone
Normal EP Car: Brake and backward zone
Forward
Neutral zone
Full brake/reverse
Neutral point
Brake/reverse zone
Full brake/reverse
2
Forward Neutral point
Neutral zone
Full throttle
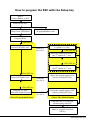
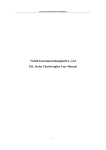
How to program the ESC with the Setup key
Step A
Connect Battery to ESC
Switch on the ESC
Hold SET key for 1s
Then Green LED blinks
Hold SET key for 5s to reset
all programmable items
Release SET key to enter
Program Mode
Click SET key
Enter the 1st item
Green LED blinks once
Hold SET
key for 3s
Red LED blinks once means the
1st option of 1st item
Click SET key
Red LED blinks twice means
the 2nd option of 1st item
…
Click SET key
Red LED blinks N times means
the Nth option of 1st item
Click SET key
Enter the 2nd item
Green LED blinks twice
Hold SET
key for 3s
Choose the wanted option of 2nd
item by clicking SET key
…
Click SET key
Enter the Mth item
Green LED blinks M times
Choose Programmable Item
Hold SET
key for 3s
Choose the wanted option of Mth
item by clicking SET key
Choose The Wanted Option
Hold SET key 3s to save the
selected option into ESC
Turn off ESC to quit Program
Mode or set other item from
STEP A
www.teamorion.com
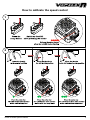
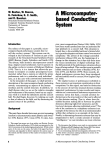
How to calibrate the speed control
1
2
Vortex R-Series Speed Controls
3
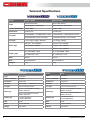
Technical Specifications
Model
65103 / 65108
Type
Model
Type
65104 / 65107
65103 Sensorless
65104 Sensorless
Model
65109
65108 Sensor / Sensorless
65107 Sensor / Sensorless
Const. / peak Amp
100A / 520A
130A / 760A
Resistance
0.0007 ohm
Const. / peak Amp
Function
Resistance
65103 / 65108
Type65104 / 65107
65103 Sensorless
Const.
/ peak
Amp
90A / 420A
65104
Sensorless
65108 Sensor / Sensorless
Resistance
0.00055 ohm
65107 Sensor / Sensorless
Sensor / Sensorless
0.0004 ohm
forward/brake – forward/brake reverse
100A / 520A
130A / 760A
Function
0.0007 ohmforward/reverse (for rock crawler)
0.0004 ohm
forward/brake
– forward/brake reverse
forward/brake – forward/brake reverse
forward/reverse
forward/reverse(for
(forrock
rockcrawler)
crawler)
Car type
1/10
Truggy / Buggy
/ Monster
Truggy
/ Buggy
1/12
on-road,
1/10 on-road and
forward/brake
– forward/brake
reverse
forward/brake – 1/8
forward/brake
reverse
Car type
Function
off-road, Short Course, Rock Crawler
forward/reverse
(for –
rock
forward/reverse 2S
(forLipo
rock crawler)
2S Lipo
upcrawler)
to 6000KV
up to 6000KV
2S up to 5.5T
Car typeMotor type 1/10 Truggy3S
/ Buggy
/ Monster
1/8 Truggy / Buggy
Lipo up
to 4000KV
3S Lipo up to 4000KV
Motor type
3S up to 10.5T
2S Lipo – up to 6000KV
2S Lipo up to 6000KV
4S Up
Lipo
up to 3000KV
to 6000KV
Motor type
3S Lipo up to 4000KV
3S Lipo up to 4000KV
6-9 cells NiMH - NiCd
6-12
cells
5-9
cellsNiMH
NiMH -- NiCd
NiCd
Battery type
4S Lipo
Battery
type up to 3000KV
2-3 cells LiPo - LiFe
2-42-3
cells
LiPo
- LiFe
cells
LiPo
- LiFe
6-9 cells NiMH - NiCd
6-12 cells NiMH - NiCd
Battery BEC
type
BEC
5.75V@3A, Linear mode
6V/3A
6V/3A
2-3 cells LiPo - LiFe
2-4 cells LiPo - LiFe
Size
41.5x30.5x20.2mm w/o fan
Size
53.5x36x36mm
53.5x36x36mm
BEC
6V/3A
6V/3A
Weight
43g
Weight
74g
Size
53.5x36x36mm
53.5x36x36mm 79g
Weight
74g
Model
65106/65110
65106/65110
Model
65111
Sensorless
Type
Sensorless
Const. / peak Amp
45A/290A
Const. / peak Amp
60A/290A
Resistance
0.0012 ohm
Resistance
0.0012 ohm
Function
forward/brake – forward/brake reverse
Car typeCar type
1/10
1/10 on-road
andon-road
off-road and off-road
Motor type
Motor type
2StoLipo
– upOn-Road
to 6000KV
On-Road /
2S Lipo – up
6000KV
/
4000KV Off-Road
4000KV Off-Road
Motor type
3S Lipo up 3S
to 4000KV
/ On-Road /
Lipo upOn-Road
to 4000KV
2500KV Off-Road
2500KV Off-Road
2S Lipo – up to 6000KV On-Road /
4000KV Off-Road
2-3 cells LiPo/LiFe or
Battery type
2-3 cells LiPo/LiFe or
4-9 cells NiMH/NiCd
6V/3A
Model
Type
Type
45A/290A
Resistance
0.0012 ohm
Size
Weight
forward/brake – forward/brake reverse
Function
2-3 cells LiPo/LiFe or
Battery type 4-9 cells NiMH/NiCd
4-9 cells NiMH/NiCd
Battery type
BEC
Sensorless
Const. / peak Amp
Function
BEC
Size
Weight
4
79g
Car type
forward/brake – forward/brake reverse
1/10 on-road and off-road
3S Lipo up to 4000KV On-Road /
2500KV Off-Road
BEC
6V/3A
31.5x27.5x33mm
Size
31.5x27.5x33mm
74g w/wires
Weight
74g w/wires
6V/3A
31.5x27.5x33mm
74g w/wires
www.teamorion.com
Motor type
6S LiPo up to 2400KV
Battery type
2-6 cells LiPo/LiFe or 6-18 cells NiMH/
NiCd
BEC
5.75V/3A
Size
56x46.5x35mm
Weight
105g w/o wires
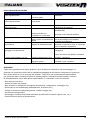
Technical Specifications
Model
65101
65102
Type
Sensor / Sensorless
Sensor / Sensorless
Const. / peak Amp
120A / 760A
160A / 760A
Resistance
0.0003 ohm
0.0003 ohm
forward/brake – forward/brake reverse
forward/brake – forward/brake
reverse
forward/reverse (for rock crawler)
forward/reverse (for rock crawler)
1/12 on-road, 1/10 on-road and
off-road, Rock Crawler
1/12 on-road, 1/10 on-road and
off-road, Rock Crawler
1S up to 3.5T
2S up to 2.5T
2S up to 4.5T
3S up to 5.5T
Up to 12000KV
Up to 16000KV
4-6 cells NiMH - NiCd
5-9 cells NiMH - NiCd
1-2 cells LiPo - LiFe
2-3 cells LiPo - LiFe
BEC
6V/2A, DC/DC Booster
5.75V/3A, Linear mode
Size
41.5x30.5x16.5mm w/o fan
41.5x30.5x20.2 mm w/o fan
Weight
40g
44g
Function
Car type
Motor type
Battery type
Model
65109
Model
65105
Type
Sensor / Sensorless
Type
Sensor / Sensorless
Const. / peak Amp
90A / 420A
Const. / peak Amp
180A/950A
Resistance
0.00055 ohm
Resistance
0.0002 ohm
Function
Car type
forward/brake – forward/brake reverse
forward/reverse (for rock crawler)
1/12 on-road, 1/10 on-road and
off-road, Short Course, Rock Crawler
2S up to 5.5T
Motor type
3S up to 10.5T
Up to 6000KV
Battery type
5-9 cells NiMH - NiCd
2-3 cells LiPo - LiFe
BEC
5.75V@3A, Linear mode
Size
41.5x30.5x20.2mm w/o fan
Weight
43g
Function
Car type
Motor type
forward/brake – forward/brake reverse
forward/reverse (for rock crawler)
1/8 off-road buggy, truggy and monster trucks, 1/8 on-road
4S LiPo up to 3000KV
6S LiPo up to 2400KV
Battery type
2-6 cells LiPo/LiFe or 6-18 cells NiMH/
NiCd
BEC
5.75V/3A
Size
56x46.5x35mm
Weight
105g w/o wires
Model
Vortex R-Series Speed Controls
65101
Type
Sensor / Sensorless
Const. / peak Amp
120A / 760A
5
Senso
160A /
8. Neutral Range
9. Timing
(Only for
sensorless motors)
(Narrow)
(Normal)
(Wide)
0.00 °
3.75 °
7.50 °
11.25 °
15.00 °
18.75 °
22.50°
26.25°
10. Reserved Item
11. Reserved Item
12. Motor Rotation
Counter
Clockwise
13. Lipo Cells
Auto
Calculate
Programmable
Items
Clockwise
2 Cells
3 Cells
4 Cells
5 Cells
6 Cells
ORI65106-ORI65110-ORI65111
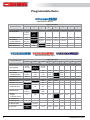
Programmable Items
Programmable Value
1
2
3
4
5
6
7
8
30%
40%
Basic Items
1. Running Mode
Forward
with Brake
Forward/
Reverse
with
Brake
2. Drag Brake Force
0%
5%
10%
15%
20%
25%
3. Low Voltage
Cut-Off Threshold
NonProtection
2.6V/Cell
2.8V/Cell
3.0V/Cell
3.2V/Cell
3.4V/Cell
4. Start Mode(Punch)
Level1
Level2
Level3
Level4
25%
50%
75%
100%
5. Max Brake Force
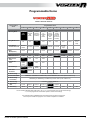
ORI65103-65104-65105-65107-65108
Programmable Value
Programmable Items
1
2
3
4
5
6
7
8
80%
100%
9
Basic Items
1. Running Mode
Forward
with Brake
Forward/
Reverse
with Brake
Forward/
Reverse
2. Drag Brake Force
0%
5%
10%
20%
40%
60%
3. Low Voltage
Cut-Off Threshold
NonProtection
2.6V
/Cell
2.8V
/Cell
3.0V
/Cell
3.2V
/Cell
3.4V
/Cell
4. Start Mode(Punch)
Level 1
Level 2
Level 3
Level 4
Level 5
Level 6
Level 7
Level 8
22.50°
26.25°
Level 9
Advanced Items
5. Max Brake Force
25%
50%
75%
100%
6. Max Reverse Force
25%
50%
75%
100%
7. Initial Brake Force
= Drag
Brake
Force
0%
20%
40%
6%
(Narrow)
9%
(Normal)
12%
(Wide)
0.00 °
3.75 °
7.50 °
11.25 °
15.00 °
18.75 °
12. Motor Rotation
Counter
Clockwise
Clockwise
13. Lipo Cells
Auto
Calculate
2 Cells
3 Cells
4 Cells
5 Cells
6 Cells
8. Neutral Range
9. Timing
(Only for
sensorless motors)
Disable
10. Reserved Item
11. Reserved Item
ORI65106-ORI65110-ORI65111
6
Programmable Items
Programmable Value
1
2
3
4
5
6
www.teamorion.com
7
8
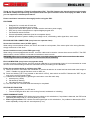
Programmable Items
ORI65101-ORI65102-ORI65109*
Programmable
Items
Programmable Value
1
2
3
4
5
6
7
8
9
100%
User set
in 1%
steps
Level 9
Basic Items
1. Running Mode
2. Drag Brake Force
3. Low Voltage
Cut-Off Threshold
4. Start
Mode(Punch)
Forward
with
Brake
Forward/
Reverse
with
Brake
Foward/
Reverse
(For Rock
Crawler)
Zero Timing
Forward
with
Brake
Zero
Timing
Forward/
Reverse
with
Brake
Zero
Timing
Forward/
Reverse
(For Rock
Crawler)
0%
5%
10%
15%
20%
25%
30%
Non-Protection
2.6V/Cell
2.8V/Cell
3.0V/Cell
3.2V/Cell
3.4V/Cell
User set
in 0.1V
steps
Level 1
Level 2
Level 3
Level 4
Level 5
Level 6
Level 7
Level 8
62.50%
75%
87.50%
100%
Advanced Items
5. Max Brake Force
6. Max Reverse
Force
7. Initial Brake
Force
8. Neutral Range
9. Over-heat
Protection
12.50%
25%
37.50%
50%
25%
50%
75%
100%
40%
=Drag
Brake
Force
0%
20%
6%
(Narrow)
9%
(Normal)
12%
(Wide)
Enable
Disable
10. Boost Timing
0° to 16° in 1° steps, default 0°
11. Boost Start RPM
1000RPM to 15000RPM in 1000RPM steps, default 5000PRM, Stock class specific software only
12. Boost Timing
Acceleration
50RPM/deg to 750RPM/deg in 50RPM steps, Stock class specific software only
13. Turbo Timing
0° to 20° in 1° steps, default 10°
14. Turbo Slope
Rate
3°/0.1s
6°/0.1s
12°/0.1s
18°/0.1s
24°/0.1s
Fastest
15. Turbo Delay
0s/off
0.1s
0.2s
0.3s
0.4s
0.5s
0.6s
0.7s
0.8s
1-9 are manually adjustable with on/off switch | 10, 13, 14, 15 need program box to access these settings |
11, 12 need program box and firmware update to access these settings
*The Vortex R10 Race (ORI65109) has been developed for the fIxed 0-Timing class.
For this speed controller the programs 10-15 cannot be adjusted nor activated.
Vortex R-Series Speed Controls
7
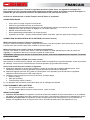
ENGLISH
Thank you for purchasing a Team Orion Brushless ESC. This ESC features the latest brushless technologies.
Our World Championship winning development team has spent countless hours developing this ESC so that
you can experience ultimate performance.
Please read these instructions thoroughly before using the ESC.
FEATURES
•
•
•
•
•
•
•
Designed for on-road and off-road use
High precision speed and power control
High power built-in BEC system for stable receiver and servo power supply
Easy set-up via the setup button or optional digital program box
Forward and reverse function
Several adjustable parameters (see list on separate sheet)
Multiple protection systems: battery low voltage cut-off, overheating, radio signal loss, stuck motor
ESC AND MOTOR CONNECTION (see picture on separate sheet)
Sensorless brushless motor (all ESC types)
When using a motor without sensors, the A-B-C wire order is not important, if the motor spins in the wrong direction,
simply reverse two of the wires.
Sensor brushless motor (select ESC types only)
When using a motor equipped with sensors, a sensor cable must be used to connect the motor to the ESC. The ESC
detects when a sensor cable is connected and switches to sensor mode.
WARNING! When using sensor equipped motors, you must respect the A-B-C wire connection order when
connecting the motor to the ESC, you can’t connect the wires randomly.
ESC CALIBRATION (see pictures on separate sheet)
In order to ensure proper function, the ESC must be calibrated to your transmitter inputs. It is recommended to center
the trims and reset all settings inside the transmitter before proceeding to the calibration.
Follow the procedure below to calibrate your ESC
A) Switch off the ESC and switch the transmitter on, set the throttle trim to neutral and set the throttle travel range to
100%”. Disable any special functions such as ABS, etc.
B) Press and hold the “SET” key (located on the switch or ESC), then switch on the ESC. Release the “SET” key as
soon as the red LED starts to flash.
C) Calibrate the throttle points by pressing the set button once after each step.
1. neutral point (1 flash)
2. full throttle (2 flashes)
3. full brakes/reverse (3 flashes)
D) The motor will run 3 seconds after the last step is completed.
STATUS LED FUNCTION
• In the neutral position, no LED are lit
• The red LED lights when the car is moving forward, backwards or is braking.
AUDIO WARNING TONES
1. Input voltage problem: ESC checks the input voltage as it is switched on, if a problem is detected, the ESC emits
repeatedly two beeps with a 1 second pause (xx-xx-xx).
2. Radio signal problem: ESC checks the radio signal input as it is switched on, if a problem is detected, the ESC
emits repeatedly a beep with a 2 second pause (x-x-x).
8
www.teamorion.com
ENGLISH
ESC ADVANCED SETUP
You can adjust several parameters by using the setup button located on the switch or ESC or by using the optional
digital program box (ORI65150).
Please note that depending on the ESC type you have purchased, the number of adjustable parameters may vary
(check the separate sheet for more information).
To adjust the parameters using the setup button, follow the procedure below (see picture on separate sheet).
A) Switch on the ESC.
B) Press and hold the setup button for one second until the green led starts flashing and then release the setup
button (holding the setup button for 5 seconds will restore the ESC to factory defaults).
C) Press the setup button once more.
D) The green LED blinks once repeatedly indicating that parameter nr.1 is currently selected.
E) By pressing on the setup button once more, you move to parameter nr.2 and so on until you have gone
through all the parameters. The process goes in a loop.
F) To change a parameter value, press and hold the setup button for 3 seconds while the green LED is flashing
the number of times corresponding to the parameter you wish to modify.
G) The red LED will flash indicating the actual setting. One flash means setting nr.1 is actually selected, two
flashes means setting nr.2 and so on.
H) Press the setup button to select the setting you wish to use for the current parameter. The process goes in a
loop.
I)
Once you have selected the setting you wish to use, press and hold the setup button for 3 seconds to save the
change.
J) Switch the ESC off and back on to make the parameter change effective.
Please note : you can only change one setting at a time, after each modification you need to switch the ESC
off and back on both to make the parameter change effective and be able to modify another parameter.
PARAMETERS
Running Mode
1)“Forward Only with Brake” this mode is meant for competition use. In this mode the car can go forward and brake,
there is no reverse.
2)“Forward/Reverse with Brake” this is the basic all-around mode. In this mode the car can go forward and reverse
and can also brake. When you move the throttle to the reverse position while the car is moving forward, brakes are
applied until the car is fully stopped, reverse cannot engage while the car is moving. To engage reverse, once the car
has stopped, release the brakes and move the throttle to the reverse position again.
While braking or in reverse, if the throttle is moved to the forward position, the car will immediately accelerate forward.
3)“Forward/Reverse” this mode is meant for Rock Crawler use. In this mode there is no brake, the car can go from
forward to reverse immediately without any pause. Do not use this mode with other car types as it can overload and/or
damage the ESC.
Drag Brake Force
Sets the amount of brake automatically applied when the throttle is returned to the neutral position. This simulates the
engine breaking effect of a real car, it can help improve turn-in and the general feeling of the car.
Low Voltage Cut-off
This function helps to prevent battery over-discharge. The ESC continuously monitors the battery’s voltage. If the
voltage becomes lower than the threshold for 2 seconds, the output power is shut off and the red LED flashes twice
repeatedly.
The cutoff threshold calculation is based on LiPo individual cell voltage. For NiMH batteries, if the voltage battery pack
is higher than 9.0V, it will be considered as a 3 cell LiPo battery pack; If it is lower than 9.0V, it will be considered as a
2 cell LiPo battery pack. Example: for a 8.0V NiMH battery pack used with a 2.6V/cell threshold, it will be considered
as a 2 cell LiPo battery pack and the low-voltage cut-off threshold will be 5.2V (2.6x2=5.2).
Using the optional Digital Program box (ORI65150) you can adjust custom values for the cutoff threshold. Unlike the
preset values, custom cutoff values are for the total battery voltage not individual cell voltage.
Vortex R-Series Speed Controls
9
ENGLISH
Start
Startmode
mode“punch”
“punch”
This
Thisparameter
parametersets
setsthe
theinitial
initialthrottle
throttlepunch
punchwhen
whenthe
thecar
caraccelerates.
accelerates.Level1
Level1gives
givesa avery
verysoft
softinitial
initialacceleration
accelerationand
and
level
level9 9gives
givesa avery
verystrong
stronginitial
initialacceleration.
acceleration.When
Whenusing
usinglevels
levels7,7,8 8oror9,9,you
youmust
mustuse
usehigh
highpower
powerbatteries.
batteries.With
With
low
lowpower
powerbatteries,
batteries,the
thebattery
batterymight
mightoverload
overloadand
andcause
causepoor
poorperformance
performanceororunexpected
unexpectedresults.
results.
Max
MaxBrake
BrakeForce
Force
This
Thisparameter
parameteradjusts
adjuststhe
themaximum
maximumbreaking
breakingforce.
force.AAhigher
highervalue
valueprovides
providesstronger
strongerbraking,
braking,but
butit itcan
canalso
alsocause
cause
the
thewheels
wheelstotolock
lockcausing
causingloss
lossofofcontrol
controlofofthe
thecar.
car.
Max
MaxReverse
ReverseForce
Force
This
Thisparameter
parameteradjusts
adjuststhe
themaximum
maximumpower
powerwhen
whentravelling
travellingininreverse.
reverse.
Initial
InitialBrake
BrakeForce
Force(minimum
(minimumbrake)
brake)
This
Thisparameter
parameteradjusts
adjuststhe
theminimum
minimumamount
amountofofbraking
brakingpower
powerwhen
whenthe
thebrakes
brakesengage.
engage.The
Thedefault
defaultvalue
valueisisequal
equaltoto
the
thedrag
dragbrake
brakevalue.
value.AAhigh
highvalue
valuecan
cancause
causethe
thewheels
wheelstotolock
lockimmediately
immediatelywhen
whenthe
thebrake
brakeisisused.
used.
Neutral
NeutralRange
Range
This
Thisparameter
parameteradjusts
adjuststhe
thethrottle
throttlesensitivity
sensitivityaround
aroundthe
theneutral
neutralpoint.
point.AAhigher
highervalue
valuemeans
meansthat
thatthe
thethrottle
throttlewill
willhave
have
totobebemoved
movedfurther
furtherfor
forthe
thecar
cartotomove
moveforward,
forward,backward
backwardororbrake.
brake.
Timing
Timing
This
Thisparameter
parameteradjusts
adjuststhe
themotor
motordrive
drivecurrent
currenttiming.
timing.More
Moretiming
timinggives
givesmore
moreperformance
performancebut
butcan
canlower
lowerefficiency
efficiency
and
andcause
causedamage
damagetotothe
themotor
motorand/or
and/orESC
ESCbybyoverload
overloadororoverheating.
overheating.Use
Usewith
withcaution.
caution.
Overheating
OverheatingProtection
Protection
This
Thisparameter
parameteractivates
activatesorordeactivates
deactivatesthe
theoverheating
overheatingprotection.
protection.Output
Outputpower
powerwill
willbebecut-off
cut-offif ifthe
thetemperature
temperatureofof
the
theESC
ESCororthe
theinternal
internaltemperature
temperatureofofthe
themotor
motorgoes
goes(sensored
(sensoredonly)
only)over
overa afactory
factorypreset
presetvalue
valuefor
for5 5seconds.
seconds.
When
Whenthe
theprotection
protectionisisactivated,
activated,the
thegreen
greenLED
LEDflashes.
flashes.
ESC
ESCoverheating:
overheating: green
greenLED
LEDflashes
flashesx-x-x
x-x-x(single
(singleflash).
flash).
Motor
Motoroverheating:
overheating: green
greenLED
LEDflashes
flashesasasxx-xx-xx
xx-xx-xx(double
(doubleflash).
flash).
Please
Pleasenote
notethat
thatthe
themotor
motoroverheating
overheatingprotection
protectiondoes
doesnot
notwork
workwith
withallallbrushless
brushlessmotor
motorbrands.
brands.
Motor
MotorRotation
Rotation
This
Thisparameter
parameterallows
allowsyou
youtotochange
changethe
themotor
motorrotation
rotationdirection.
direction.
LiPo
LiPocells
cells
This
Thisparameter
parameterallows
allowsyou
youtotomanually
manuallyselect
selectthe
theamount
amountofofcells
cellsinside
insidethe
theLiPo
LiPobattery
batterywhich
whichisisbeing
beingused,
used,
overriding
overridingthe
theautomatic
automaticdetection.
detection.
Restore
RestoreDefault
DefaultSettings
Settings
With
Withthe
thethrottle
throttleininthe
theneutral
neutralposition,
position,press
pressand
andhold
holdthe
the“SET”
“SET”key
keyfor
for5 5seconds,
seconds,the
thered
redand
andgreen
greenLED
LEDwill
willflash
flash
simultaneously
simultaneouslyindicating
indicatingthat
thatthe
theparameters
parametershave
havebeen
beenreset
resettotothe
thefactory
factorydefault
defaultvalues.
values.
SOFTWARE
SOFTWAREUPDATE
UPDATE
If Ifavailable,
available,updated
updatedsoftware
softwareand
andrecommended
recommendedsettings
settingswill
willbebeposted
postedononour
ourwebsite
websitewww.teamorion.com.
www.teamorion.com.
To
Tobebeable
abletotoupdate
updatethe
theESC’s
ESC’ssoftware
softwareyou
youmust
mustpurchase
purchasethe
theoptional
optionaldigital
digitalprogramming
programmingbox
box(ORI65150).
(ORI65150).
WARNINGS
WARNINGS
-
10
-
Do
Donot
notletletchildren
childrenuse
usethis
thisproduct
productwithout
withoutthe
thesupervision
supervisionofofananadult.
adult.
Never
Neverleave
leavethe
theESC
ESCunsupervised
unsupervisedwhile
whileit itisispowered
poweredon.
on.
The
TheESC
ESCmight
mightget
gethot
hotduring
duringuse,
use,bebecareful
carefulwhen
whenhandling
handlingit.it.
Always
Alwaysdisconnect
disconnectthe
thebattery
batteryafter
afteruse,
use,dodonot
notstore
storewith
withthe
thebattery
batteryconnected.
connected.
Do
Donot
notuse
usenear
nearflammable
flammablematerials.
materials.
Do
Donot
notexpose
exposetotowater
waterororhumidity.
humidity.
If Ifthe
theESC
ESChas
hassuspicious
suspiciousreactions,
reactions,immediately
immediatelydisconnect
disconnectthe
thebattery
batteryand
anddiscontinue
discontinueuse.
use.
www.teamorion.com
ENGLISH
TROUBLESHOOTING
Symptom
ESC switched ON, no motor function,
no audio tone.
ESC switched ON, no motor function,
two beeps tones with one second
pause.
ESC switched ON, no motor function,
red LED lit.
Motor runs in the wrong direction
Possible cause
Battery or connection problem.
Damaged switch
Input voltage to high or too low
Throttle radio signal problem
Motor wiring error
Possible solution
Check battery and power connections, check
switch
Check battery voltage
Check transmitter and receiver, check ESC
connection to receiver
Swap 2 of the 3 motor wires to reverse motor
rotation direction (SENSORLESS ONLY)
System not compatible with the
car
Use a different system to power your car.
Motor suddenly stops running
Low voltage protection or
overheating protection system
activated
If the red LED flashes, replace/recharge battery
Motor cuts or stutters during
acceleration
Low power battery
Wrong gearing
With throttle at neutral, red and green
LED flash simultaneously
Issue with sensor signal
The motor stutters and does not spin
If the green LED flashes, let ESC/motor cool
down, change setup to avoid overheating
Use high power battery
Use shorter gearing, use slower motor or
change ESC setup
Check sensor cable connection between motor
and ESC
Motor wiring error
Sensors inside the motor are damaged, repair
or replace
Check motor wiring and order
Damaged ESC
Contact support
WARRANTY
Team Orion guarantees this product to be free from manufacturing and workmanship defects. The
warranty does not cover incorrect installation, components worn by use, or any other problem resulting
from incorrect use or handling of the product. No liability will be accepted for any damage resulting
from the use of this product. By the act of connecting and operating this product, the user accepts
all resulting liability. Is considered incorrect use:
•
•
•
•
•
•
•
•
Failure to follow instructions.
Improper use of the product (abusive use, out of spec, etc.).
Failure to adapt settings for proper function (improper connections, wrong gearing, installation, setup, etc.).
Overload, overheating (desoldering, melting, etc.).
Running in inadequate conditions (damage or rust from rain, humidity, etc.).
Improper maintenance (presence of dirt, etc.).
Disassembly, modification by the user (modifying original connectors, wires, components, etc.).
Mechanical damage due to external causes.
Vortex R-Series Speed Controls
11
FRANCAIS
Nous vous félicitons pour l’achat d’un régulateur brushless Team Orion. Ce régulateur est équipé des
technologies les plus récentes. Notre team champion du monde a passé de longues heures à développer ce
produit afin que vous puissiez bénéficier des performances les plus élevées qui soit.
Veuillez lire attentivement ce mode d’emploi avant d’utiliser le régulateur.
CARACTERISTIQUES
•
•
•
•
•
•
•
Conçu pour un usage sur piste ou tout-terrain
Gestion de la puissance précise et performante
Système BEC haute-puissance intégré pour une alimentation efficace du récepteur et des servos
Réglage facile grâce au bouton de réglage ou a au boitier optionnel
Marche avant et marche arrière
Divers paramétrages disponibles (voir feuille annexe)
Systèmes de sécurité : coupure tension batterie faible, surchauffe, perte de signal radio, blocage moteur
CONNECTION DU REGULATEUR ET DU MOTEUR (voir feuille annexe)
Moteur brushless sensorless (tous les régulateurs)
Lorsqu’un moteur sensorless est utilisé, l’ordre des fils moteur n’est pas important. Si le moteur tourne à l’envers,
inversez deux des trois fils moteur pour modifier le sens de rotation.
Moteur brushless avec sensor (certains régulateurs uniquement)
Lorsque vous utiliser un moteur avec sensor, vous devez utiliser un câble spécifique pour relier le moteur au
régulateur. Le régulateur détecte la connexion et passe en mode sensor.
ATTENTION ! Lorsque vous utilisez un moteur avec sensor, vous devez impérativement respecter l’ordre des
fils du moteur ABC.
CALIBRAGE DU REGULATEUR (voir feuille annexe)
Afin d’assurer un fonctionnement optimal, vous devez calibrer le régulateur au signal de l’émetteur. Avant de procéder
au calibrage, centrez le trim et désactivez les fonctions spéciales qui pourraient être actives.
Suivez cette procédure pour calibrer le régulateur
A) Eteignez le régulateur et enclenchez l’émetteur, centrez le trim des gaz et réglez le débattement à 100%.
Désactivez toutes les fonctions spéciales qui pourraient être actives dans le régulateur.
B) Maintenez appuyé le bouton SET (situé sur l’interrupteur ou le régulateur) puis enclenchez le régulateur.
Relâchez le bouton dès que la LED rouge clignote.
C) Calibrez les gaz en appuyant une fois sur le bouton à chaque étape.
1. Neutre (1 flash)
2. Plein gaz (2 flashs)
3. Freins/marche arrière (3 flashs)
D) Le régulateur est fonctionnel 3 secondes après que le calibrage soit effectué
FONCTIONNEMENT DES LED D’ETAT
• Au neutre aucune LED ne s’allume
• La LED rouge s’allume lorsque la voiture avance, recule ou freine.
SIGNAUX SONORES
1. Problème d’alimentation: le régulateur contrôle la tension de la batterie lorsqu’il est enclenché. Si un problème
est détecté, les régulateur émet deux signaux sonores avec 2 secondes de pause entre les répétitions(xx-xx-xx).
2. Problème de signal radio: le régulateur contrôle le signal radio lorsqu’il est enclenché. Si un problème est
détecté, les régulateur émet un signal sonore avec 2 secondes de pause entre les répétitions (x-x-x).
12
www.teamorion.com
FRANCAIS
PARAMETRAGE AVANCE DU REGULATEUR
Divers paramètres du régulateur peuvent être modifiés en utilisant le bouton de réglage située sur l’interrupteur ou le
régulateur ou en utilisant le boîtier de programmation digital optionnel (ORI65150).
Veuillez noter que selon le modèle de régulateur, le nombre de paramètres modifiables peut varier (voir feuille
annexe). Pour modifier les paramètres en utilisant le bouton de réglage, suivez la procédure ci-dessous (voir feuille
annexe).
A) Enclenchez le régulateur.
B) Appuyez sur le bouton pendant une seconde jusqu’à ce que la LED verte clignote puis relâchez-le (si vous le
maintenez pressé pendant 5 secondes, les paramètres sont remis en configuration d’usine).
C) Appuyez encore une fois sur le bouton.
D) La LED verte clignote une fois à répétition indiquant que le paramètre nr.1 est sélectionné.
E) En appuyant sur le bouton, vous passez au paramètre nr.2 et ainsi de suite, en boucle.
F) Pour modifier un paramètre, appuyez sur le bouton pendant 3 secondes, alors que la LED verte clignote le
nombre de fois indiquant le paramètre que vous désirez modifier.
G) La LED rouge clignote un certain nombre de fois, indiquant le réglage actuel. Un clignotement veut dire
réglage nr.1, deux clignotements veux dire réglage nr.2 et ainsi de suite.
H) Appuyez sur le bouton pour modifier le réglage d’un cran (en boucle).
I)
Une fois le réglage effectué, appuyez sur le bouton pendant 3 secondes pour sauvegarder la modification.
J) Eteignez puis rallumez le régulateur pour valider la modification.
NB : Vous ne pouvez modifier qu’un paramètre à la fois. Pour sauvegarder une modification et pouvoir
modifier un autre paramètre, il faut éteindre et rallumer le régulateur.
PARAMETRES
Mode de fonctionnement (running mode)
1)“Marche avant avec frein” ce mode est destiné à la compétition. Dans ce mode il n’y a pas de marche arrière.
2)“Marche avant/arrière avec frein” ce mode est le mode basique passe partout. Dans ce mode, la voiture peut
avancer, reculer et freiner. Lorsque vous tirez/poussez le manche des gaz en position marche arrière pendant que la
voiture avance, le régulateur freine la voiture jusqu’à ce qu’elle soit totalement arrêtée. Une fois la voiture à l’arrêt,
relâchez le manche des gaz puis tirez/poussez le en position marche arrière à nouveau pour enclencher la marche
arrière. Lorsque la voiture recule ou pendant que vous freinez, si vous tirez/poussez le manche des gaz en position
marche avant, la voiture repart en avant instantanément.
3)“Marche avant/arrière” ceci est le mode de fonctionnement idéal pour les Rock Crawler. Dans ce mode le régulateur
passe de la marche avant à la marche arrière et inversement, sans délai. Attention n’utilisez pas ce mode avec des
voitures standard car cela peut surcharger le régulateur et l’endommager.
Frein Moteur (drag brake)
Ce paramètre règle la quantité de frein appliqué lorsque les gaz sont au neutre. Ceci permet d’améliorer le feeling
général ainsi que l’entrée en courbe.
Coupure en cas de tension de batterie faible (low voltage Cut-off)
Avec cette système, le régulateur contrôle constamment la tension de la batterie. Si la tension de la batterie passe
en-dessous du seuil prédéfini pendant 2 secondes, le régulateur coupe l’alimentation et la LED rouge clignote deux
fois de façon répétée. Le seuil de coupure est calculé sur la base d’une batterie LiPo. Avec une batterie NiMH, si sa
tension est supérieure à 9V alors la coupure sera basée sur celle d’un LiPo 3 éléments, en-dessous de 9V la coupure
sera basée sur celle d’un LiPo 2 éléments. Par exemple pour une batterie NiMH avec une tension de 8V et un réglage
de 2.6V/él., le seuil sera basé sur un LiPo 2 éléments, donc il sera de 5.2V (2.6x2=5.2V).
En utilisant le boîtier optionnel (ORI68150) vous pouvez définir une valeur personnalisée, dans ce cas la valeur se
réfère à la tension de toute la batterie plutôt qu’à un seul élément.
Force d’accélération (start mode “punch”)
Ce paramètre défini la puissance de l’accélération. Le niveau 1 donne une accélération peu puissante et le niveau 9
donne l’accélération la plus puissante. Si vous utilisez les niveaux 7, 8 ou 9, il faut impérativement utiliser une batterie
puissante. Une batterie peu puissante pourrait ne pas être capable de fournir le courant nécessaire et provoquer des
disfonctionnements.
Vortex R-Series Speed Controls
13
FRANCAIS
Puissance de freinage (max brake force)
Ce paramètre défini la puissance du freinage. Une valeur plus élevée donne un freinage plus puissant mais peut
causer des blocages de roues et des pertes de maîtrise.
Puissance de la marche arrière (max reverse force)
Ce paramètre défini la puissance/vitesse maximale en marche arrière.
Puissance de freinage minimale (initial brake force)
Ce paramètre défini la puissance de freinage initiale lorsque le frein est actionné. Une valeur élevée peut causer un
blocage immédiat des roues lors de l’actionnement du frein. La valeur minimale est égale à la valeur du frein moteur.
Débattement neutre (neutral range)
Ce paramètre défini la sensibilité des gaz autour du neutre. Une value plus élevée fait qu’il faut faudra déplacer plus le
manche des gaz pour que la voiture avance, recule ou freine.
Avance (timing)
Ce paramètre défini l’avance appliquée au courant d’alimentation du moteur. Plus d’avance augmente les
performances mais peut diminuer le rendement et provoquer des surcharges du régulateur ou du moteur. A utiliser
avec précaution.
Protection contre les surchauffes (overheating protection)
Ce paramètre active ou désactive le système de protection contre les surchauffes. Le régulateur coupe la puissance
si la température du moteur ou celle du moteur (sensor seul.) dépasse une valeur prédéfinie pendant 5 secondes.
Lorsque la protection est active, la LED verte clignote.
Surchauffe régulateur: la LED clignote une fois ( x-x-x)
Surchauffe moteur: la LED clignote deux fois (xx-xx-xx)
NB : la protection thermique du moteur ne fonctionne pas avec tous les types de moteur sensor.
Sens de rotation du moteur (motor rotation)
Ce paramètre permet de modifier le sens de rotation du moteur.
Nombre d’éléments batterie LiPo (LiPo cells)
Ce paramètre permet de définir manuellement le nombre d’éléments de la batterie LiPo qui est utilisée.
Remise à zero, configuration d’usine (restore default settings)
Pour remettre le régulateur en configuration d’usine, avec les gaz au neutre, appuyez sur le bouton de réglage
pendant 5 secondes. Les LED verte et rouge clignotent, indiquant la remise à zéro.
MISE A JOUR DU LOGICIEL
Si disponibles, des mises à jour et des réglages seront mis en ligne sur notre site www.teamorion.com
Pour mettre à jour le logiciel, il faut utiliser le boîtier de programmation optionnel (ORI65150).
MISES EN GARDE
-
14
Ne laissez pas les enfants utiliser ce produit sans la supervision d’un adulte.
Ne laissez pas un régulateur enclenché sans surveillance.
Le régulateur peut chauffer pendant l’utilisation, faites attention lorsque vous le manipulez.
Débranchez toujours la batterie après l’emploi. Ne stockez pas le régulateur avec la batterie branchée.
N’utilisez pas le régulateur à proximité de matières inflammables.
N’exposez pas le régulateur à l’eau et l’humidité.
Si le régulateur réagit de façon suspecte, débranchez-le et arrêtez immédiatement son utilisation.
www.teamorion.com
FRANCAIS
DEPANNAGE
Symptome
Cause possible
Régulateur enclenché, pas de fonction, Problème de batterie ou
pas de signal sonore
connexion
Interrupteur endommagé
Régulateur enclenché, pas de fonction Tension batterie trop élevée ou
moteur, deux signaux sonores en
trop faible
boucle
Régulateur enclenché, pas de fonction Problème avec le signal radio
moteur, LED rouge allumée
Le moteur tourne à l'envers
Erreur de branchement moteur
Le moteur s'arrête de façon soudaine
Le moteur fait des accoups pendant
l'accélération
Au neutre les LED rouge et verte
clignotent simultanément
Solution possible
Vérifiez la batterie, les connexions et
l'interrupteur
Vérifiez la tension de la batterie
Vérifiez l'émetteur, le récepteur et le
branchement du régulateur
Inversez deux des trois fils du moteur (SEUL
SENSORLESS)
Système brushless non
compatible avec la voiture
Utilisez un autre système brushless
Système de protection tension
batterie faible ou surchauffe
activée
Batterie peu puissante
Rapport de transmission inadapté
LED rouge clignote, remplacer batterie
LED verte clignote, laissez refroidir, modifier
réglages pour éviter la surchauffe
Utilisez une batterie plus puissante
Utilisez un rapport plus court, modifiez les
réglages, utilisez un moteur moins puissant
Vérifiez le câble sensor et son branchement
Problème de signal sensor
Le moteur fait des accoups et ne tourne Problème de cablâge moteur
pas
Régulateur défectueux
Les sensors du moteur sont endommagés,
remplacez-le
Vérifiez le cablâge du moteur
Contactez votre revendeur
GARANTIE
Team Orion garanti que ce produit ne comporte pas de défauts de fabrication. Cette garantie n’est pas
valable lors d’une mauvaise utilisation, d’usure due à l’utilisation ou tout autre problème résultant d’une
utilisation ou d’une manipulation inappropriée du produit. Aucune responsabilité ne sera assumée
pour un quelconque dommage résultant de l’utilisation du produit. Du fait de connecter et d’utiliser
ce produit, l’utilisateur accepte toutes les responsabilités découlant de son utilisation.
Sont considérés comme mauvaise utilisation:
• Ne pas suivre les instructions.
• Utilisation inadaptée (abus, utilisation extrême, etc.) :
• Réglages inadaptés (mauvaises connexions, rapport inadapté, mauvaise installation, etc.).
• Surcharge, surchauffe (éléments dessoudés, brûlés, etc.).
• Conditions d’utilisation inappropriées (humidité, pluie, etc.).
• Mauvais entretien (présence de saleté, etc.).
• Démontage, modifications par l’utilisateur (modification des connecteurs, câbles, composants, etc.).
• Dommage dus aux chocs
Vortex R-Series Speed Controls
15
ITALIANO
La ringraziamo per avere scelto un regolatore brushless Team Orion. Questo regolatore e provvisto delle
ultime tecnologie. Il nostro team campione del mondo a sviluppato questo regolatore affinché possiate avere
le migliori prestazioni possibili.
Vi preghiamo di leggere attentamente queste istruzioni per sfruttare al meglio il vostro regolatore.
CARATTERISTICHE
•
•
•
•
•
•
•
Per uso su pista o fuori strada
Gestione della potenza efficiente e progressiva
Sistema BEC ad alta potenza integrato per un’alimentazione stabile dei servi e ricevente
Impostazione semplice tramite pulsante o programmatore opzionale
Marcia avanti e retromarcia
Vari parametraggi possibili (vedi foglio annesso)
Sistemi di sicurezza : tensione batteria bassa , surriscaldamento, perdita segnale radio, bloccaggio motore
COLEGAMENTO DEL MOTORE E DEL REGOLATORE (vedi foglio annesso)
Motore brushless sensorless (tutti i regolatori)
Con i motori sensorless, l’ordine dei fili non e importante. Se il motore gira nel senso sbagliato, basta invertire due fili
per cambiare il senso di rotazione del motore.
Motore brushless con sensor (solo certi regolatori)
Con i motori a sensor, dovete adoperare un cavo specifico per collegare i sensor del motore all’regolatore. Una volta il
cavo collegato, il regolatore rileva la presenza di sensor e passa in modo sensor.
ATTENZIONE ! Con i motori a sensor, dovete imperativamente collegare i fili del motore nel ordine corretto
A-B-C.
CALIBRAZIONE DEL REGOLATORE (vedi foglio annesso)
Per garantire un funzionamento ottimale del regolatore, dovete calibrare il regolatore in relazione ai segnali del
trasmettitore. Prima di procedere, centrate il trim del gas e disattivate tutte le funzioni speciali del trasmettitore.
Seguite queste istruzioni per calibrare il regolatore
A) Col regolatore spento, accendete il trasmettitore, centrate il trim del gas e impostate il fine corsa a 100%.
Disattivate tutte le funzioni speciali che potrebbero essere attivi nel trasmettitore.
B) Premete sul pulsante SET (situato sul regolatore o l’interruttore) e accendete il regolatore. Rilasciate il pulsante
quando la LED si accende.
C) Calibrate il gas premendo sul tasto dopo ogni tappa.
1. Neutro (1 flash)
2. Gas max (2 flash)
3. Freno/retromarcia max (3 flash)
D) Il regolatore funziona 3 secondi dopo la fine della calibrazione.
FUNZIONAMENTO DEI LED DI CONTROLLO
• Al neutro nessuna LED si accende.
• La LED rossa si accende quando la macchina va avanti, in retromarcia o frena.
SEGNALI ACUSTICI
1. Problema alimentazione: quand’e acceso, il regolatore verifica la tensione di alimentazione. Se un problema
avviene il regolatore emette due segnali acustici con 2 secondi di pausa entro le ripetizioni (xx-xx-xx).
2. Problema segnale radio: quand’e acceso, il regolatore verifica il segnale radio. Se un problema avviene il
regolatore emette un segnale acustico con 2 secondi di pausa entro le ripetizioni (x-x-x).
16
www.teamorion.com
ITALIANO
PARAMETRAGGIO DEL REGOLATORE
Vari parametri del regolatore possono essere impostati tramite il pulsante localizzato sul regolatore o l’interruttore o
adoperando il programmatore digitale opzionale (ORI65150).
A secondo del tipo di regolatore, i parametri disponibili possono variare (vedi foglio annesso).
Per modificare i parametri tramite il pulsante seguite queste istruzioni (vedi foglio annesso).
A) Accendete il regolatore.
B) Premete sul pulsante finche la LED verde lampeggia e rilasciate il pulsante (se lo mantenete premuto per 5
secondi le impostazioni vengono ripristinate in modalità di fabbrica).
C) Premete ancora una volta sul pulsante.
D) La LED verde lampeggia una volta, indicando che il parametro nr.1 e selezionato.
E) Premendo sul pulsante, passate al parametro nr.2 è cosi via.
F) Per modificare un parametro, premete sul pulsante per 3 secondi mentre la LED verde sta lampeggiando il
numero di volte che si riferisce al parametro che desiderate modificare.
G) La LED rossa lampeggia un certo numero di volte, indicando l’impostazione attuale. 1 lampeggiamento indica
valore 1, due lampeggiamenti valore 2, è cosi via.
H) Premete sul pulsante per aumentare il valore di una tacca, è cosi via.
I)
Una volta l’impostazione eseguita, premente il pulsante durante 3 secondi per salvaguardare la modifica.
J) Spegnete e riaccendete il regolatore per validare la modifica.
NB : Potete modificare un solo parametro alla volta. Per modificare un altro parametro e validare una
modifica, dovete spegnere e riaccendere il regolatore.
PARAMETRI
Modo di funzionamento (running mode)
1)“Marcia avanti con freno” modo destinato alla competizione. In questo modo non c’e retromarcia.
2)“Marcia avanti/retromarcia con freno” modo di base multiuso. In questo modo potete andare avanti, indietro e
frenare. Quando tirate/spingete il stick del gas mentre la macchina va avanti, il freno viene azionato finche la
macchina si fermi. Una volta la macchina ferma, rilasciate il stick del gas e poi tirate/spingete per azionare la
retromarcia. Mentre la macchina va in retromarcia o frena, potete a qualunque momento ripartire in marcia avanti.
3)“ Marcia avanti/retromarcia”modo ideale per il Rock Crawler. In questo modo, il regolatore passa dalla marcia avanti
alla retromarcia senza pausa. Non adoperate questo modo di funzionamento con auto standard perche potrebbe
danneggiare il regolatore.
Freno motore (drag brake)
Questo parametro imposta la forza del freno che viene applicato quando il regolatore e al neutro. Questo permette di
migliorare il feeling generale e l’entrata in curva.
Cut-off tensione batteria bassa (low voltage cut-off)
Con questo sistema, il regolatore controlla continuamente la tensione della batteria. Se la tensione della batteria
passa sotto una soglia predefinita per 2 secondi, il regolatore ferma l’alimentazione e la LED rossa lampeggia due
volte in modo continuo . La soglia e calcolata in rapporto a una batteria LiPo. Con una batteria NiMH, se la tensione
originale e di più di 9V, la soglia sarà calcolata come per una batteria LiPo 3 celle, sotto 9V sarà calcolata come per
una LiPo 2 celle. Per esempio con una batteria NiMH con una tensione di 8V e un impostazione di 2.6V/cella, la soglia
sarà basata su quella per una LiPo 2 celle, sarà dunque di 5.2V (2.6x2=5.2V).
Utilizzando il programmatore opzionale (ORI68150), si possono definire valori personalizzati. In questo caso, il valore
impostato si riferisce alla tensione totale della batteria.
Accelerazione (start mode “punch”)
Questo parametro imposta la potenza del’accelerazione. Il livello 1 da un’accelerazione dolce e il livello 9 da
l’accelerazione la più potente. Se impostate il livello 7, 8 o 9, dovete adoperare una batteria potente. Se adoperate
una batteria di scarsa qualità, questo potrebbe provocare malfunzionamenti.
Vortex R-Series Speed Controls
17
ITALIANO
Potenza frenaggio (max brake force)
Questo parametro definisce la potenza del frenaggio. Un valore più alto da un frenaggio più forte ma può provocare
bloccaggi delle ruote e perdite di controllo.
Potenza retromarcia (max reverse force)
Questo parametro definisce la potenza/velocità della retromarcia.
Potenza minimale freno (initial brake force)
Questo parametro definisce la potenza minima del freno quando viene azionato. Un valore elevato può provocare il
bloccagio delle ruote appena viene azionato il freno. Il valore minimo e almeno uguale al valore del freno motore.
Sensibilita neutro (neutral range)
Questo parametro definisce la sensibilità del gas intorno al neutro. Con un valore più elevato, si dovrà spostare di più
il stick del gas per far andare la macchine in marcia avanti, in retromarcia o frenarla.
Anticipi (timing)
Questo parametro definisce l’anticipo applicato alla corrente d’alimentazione del motore. Più anticipo può aumentare
le prestazioni ma diminuisce l’efficienza e può provocare sovraccariche. Utilizzare con cautela.
Protezione surriscaldamento (overheating protection)
Questo parametro innesca o disinnesca il sistema di protezione contro i surriscaldamenti. L’alimentazione viene
interrotta se la temperatura del regolatore o del motore (solo sensor) va oltre una soglia predefinita in fabbrica per 5
secondi. Quando la protezione viene attivata, la LED verde lampeggia.
Surriscaldamento regolatore : la LED lampeggia una volta ( x-x-x)
Surriscaldamento motore : la LED lampeggia due volte (xx-xx-xx)
NB : la protezione termale non funziona con tutti i tipi di motore brushless con sensor.
Senso di rotazione (motor rotation)
Questo parametro permette di definire il senso di rotazione del motore.
Numero di celle batterie LiPo (LiPo cells)
Questo parametro permette di definire manualmente il numero di celle della batteria LiPo adoperata.
Ripristinamento in configurazione di fabbrica (restore default settings)
Per ripristinare il regolatore con le impostazioni di fabbrica, con i gas al neutro, premette sul pulsante per 5 secondi.
Le LED verdi e rosse lampeggiano, indicando la rimessa a zero.
AGGIORNAMENTO SOFTWARE
Se disponibili, aggiornamenti e impostazioni per il regolatore saranno messi in linea su www.teamorion.com
Per aggiornare il software e necessario il programmatore (ORI65150).
MISES EN GARDE
-
18
Non lasciate bambini ad utilizzare questo prodotto senza la sorveglianza di un adulto.
Non lasciate il regolate senza sorveglianza quand’e acceso.
Il regolatore può diventare caldo quand’e utilizzate, siate attenti quando lo toccate.
Scollegate sempre la batteria dopo l’uso. Non conservate il regolatore con la batteria collegata.
Non utilizzate il regolatore vicino a materiali infiammabili.
Non esponete il regolatore al’acqua e l’umidità.
Se il regolatore a reazioni sospette, scollegate la batteria immediatamente e smettete di utilizzarlo.
www.teamorion.com
ITALIANO
RISOLUZIONE DEI PROBLEMI
Sintomo
Regolatore acceso, senza funzione e
senza segnale acustico
Regolatore acceso, senza funzione e
doppio segnale acustico
Regolatore acceso, senza funzione,
LED rossa accesa
Il motore gira a l'incontrario
Il motore si ferma in modo imprevisto
Il motore fa dei sobbalzi durante
l'accelerazione
Al neutro, le LED verdi e rosse
lampeggiano simultaneamente
Causa eventuale
Soluzione eventuale
Problèma batteria o collegamento Verificate la batteria, i collegamenti e
l'interruttore
Interrutore guasto
Tensione batteria troppo alta o
Verificate la tensione della batteria
troppo bassa
Problema col segnale radio
Collegamento errato
Verificare il trasmettitore, la ricevente e il
collegamento del regolatore
Invertite 2 dei 3 fili del motore (SOLO
SENSORLESS)
Sistema brushless non
compatibile con la macchina
Adoperate un altro sistema brushless
Sistema di protezione tensione
bassa o contro I surriscaldamenti
attivato
Batteria poco potente
Rapporto di trasmissione errato
LED rossa lampeggia, sostituire la batteria
LED verde lampeggia, fare raffredare,
modificare les impostazioni
Adoperate una batteria piu potente
Adoperate un rapporto piu corto, un motore piu
lente o modificate le impostazioni
Verificate il cavo del sensor e il suo
collegamento
Problema segnale sensor
I sensor del motore sono diffettosi, sostituiteli
Il motore fa dei sobbalzi e non gira
Problema collegamento motore
Verificate I collegamenti
Regolatore guasto
Contattate il vostro rivenditore
GARANZIA
Team Orion garantisce che questo prodotto è privo di difetti nel materiale e nell’assemblaggio. La
garanzia non copre danni dovuti ad un’installazione sbagliata ed all’utilizzo di componenti o qualunque
altro danno dovuto a un uso scorretto del prodotto. Team Orion non accetta alcuna responsabilità
per qualunque danno inerente all’utilizzo di questo prodotto. Utilizzando questo prodotto, l’utente si
fa automaticamente carico della piena responsabilità. E’ considerato come uso scorretto:
• Non seguire le istruzioni
• Utilizzo scorretto del prodotto
• Non utilizzare le impostazioni consigliate (impostazioni, collegamento, montaggio, etc.)
• Sovraccarica, surriscaldamento (dissaldamento, bruciatura, etc.)
• Utilizzo in condizioni inadeguate (polvere, umidità, pioggia, etc.)
• insufficiente manutenzione
• Smontaggio, modifica del prodotto dall’utente (modifica dei connettori originali, cavi, etc.)
• Guasti meccanici dovuti a cause esterne.
Vortex R-Series Speed Controls
19
DEUTSCH
Vielen Dank für den Kauf eines Team Orion Brushless Fahrtenreglers. Dieser Fahrtenregler ist mit der
aktuellsten Technologie ausgerüstet. Unser Team, das mit zahlreichen Weltmeistertiteln ausgezeichnet
worden ist, hat unzählige Teststunden in den Regler investiert, um die höchstmögliche Leistung zu erzielen.
Bitte lesen Sie diese Anleitung vor dem Gebrauch des Reglers ausführlich durch.
EIGENSCHAFTEN
•
•
•
•
•
•
•
Entwickelt für On-Road und Off-Road Einsatz
Hoch präzises Regelverhalten
Integriertes Hochleistungs-BEC System für konstante Stromversorgung von Servo und Empfänger
Einfachstes Setup mit Setup-Taste oder optionaler Programmierbox
Vorwärts- und Rückwärts-Funktion
Diverse einstellbare Parameter (siehe Zusatzblatt)
Multi-Schutz-System: Akku-Abschaltspannung, Überhitzen, Signalverlust, blockierter Motor
ANSCHLUSS VON REGLER UND MOTOR (siehe Darstellung auf Zusatzblatt)
Sensorless Brushless Motoren (alle Regler-Typen)
Wenn Sie einen Motor ohne Sensor verwenden, ist die Reihenfolge der A-B-C Kabel nicht wichtig. Wenn der Motor in
der falschen Drehrichtung läuft, ändern Sie die Steckverbindung zweier beliebiger Kabel.
Sensor Brushless Motor (nur bestimmte Regler)
Wenn Sie einen Motor mit Sensoren verwenden, müssen Sie den Regler und Motor mit einem Sensorkabel verbinden.
Der Regler stellt automatisch fest, dass ein Sensorkabel angeschlossen ist und stellt auf Sensor-Modus.
WARNUNG! Wenn Sie einen Motor mit Sensor verwenden, müssen Sie auf die korrekte Reihenfolge der
A-B-C Kabel achten.
REGLER-KALIBRIERUNG (siehe Bilder auf Zusatzblatt)
Um die korrekte Funktion des Reglers zu gewährleisten, muss er auf Ihre Fernsteuerung abgestimmt werden.
Zentrieren Sie hierzu alle Trimmer und setzen Sie alle Einstellungen am Sender zurück, bevor Sie mit der Kalibrierung
des Reglers beginnen.
Befolgen Sie diese Schritte, um den Regler zu kalibrieren
A) Schalten Sie den Regler aus und die Fernsteuerung ein. Stellen Sie die Gas-Trimmung auf neutral und den
Ausschlag auf 100%. Deaktivieren Sie Spezialfunktionen wie ABS etc.
B) Drücken und halten Sie die “SET”-Taste (auf dem Regler oder Ein-/Aus-Schalter) und schalten Sie den Regler ein.
Lassen Sie die “SET”-Taste los, sobald die LED rot blinkt.
C) Stellen Sie die folgenden Positionen am Sender ein und bestätigen Sie jeweils mit der “SET”-Taste:
1. Neutralpunkt (LED blinkt 1 mal)
2. Vollgas (LED blinkt 2 mal)
3. Vollbremse/rückwärts (LED blinkt 3 mal)
D) Der Motor dreht nach dem letzten Schritt während 3 Sekunden. Danach ist der Vorgang abgeschlossen.
FUNKTION DER STATUS LED
• In Neutralposition leuchtet keine LED
• Die rote LED leuchtet, wenn das Fahrzeug vorwärts oder rückwärts fährt oder bremst
WARNTÖNE
1. Problem mit Eingangsspannung: Der Regler prüft die Eingangsspannung, sobald er eingeschaltet ist. Wenn ein
Problem erkannt wird, ertönen wiederholt zwei Signaltöne im Abstand von 1 Sekunde (xx-xx-xx).
2. Problem mit dem Empfangssignal: Der Regler prüft das Empfangssignal, sobald er eingeschaltet ist. Falls ein
Problem besteht, ertönt wiederholt ein Signalton im Abstand von 2 Sekunden (x-x-x).
20
www.teamorion.com
DEUTSCH
ERWEITERTE EINSTELLUNGEN
Sie können mit der Setup-Taste (auf dem Ein-/Aus-Schalter oder dem Regler) oder mit der zusätzlichen Digitalen
Programmierbox (ORI65150) diverse erweiterte Einstellungen vornehmen. Bitte beachten Sie, dass die
Einstellungsmöglichkeiten je nach Regler-Modell variieren kann (beachten Sie das Zusatzblatt). Um eine Einstellung
mit der Setup -Taste zu verändern, befolgen Sie die folgende Anleitung (siehe auch Bild auf Zusatzblatt)
A) Schalten Sie den Regler ein
B) Drücken und halten Sie die Setup-Taste für eine Sekunde, bis die grüne LED zu blinken beginnt. Danach
lassen Sie die Taste los (bei Halten der “SET” -Taste während 5 Sekunden wird der Regler auf die
Standardeinstellungen zurückgesetzt)
C) Drücken Sie die Setup-Taste noch einmal.
D) Die grüne LED blinkt wiederholt 1 mal. Dies zeigt an, dass die Einstellung 1 gewählt ist.
E) Drücken Sie die Setup -Taste 1 mal kurz, gelangen Sie zu Einstellung 2 usw. bis Sie durch alle Einstellungen
geblättert haben, danach kommt erneut Einstellung 1.
F) Um eine Einstellung zu ändern, drücken und halten Sie (bei der gewünschten Einstellung) die Setup -Taste
während 3 Sekunden.
G) Die rote LED wird nun den Wert der Einstellung anzeigen: blinkt sie 1 mal, so beträgt der Wert 1, blinkt sie 2
mal, beträgt der Wert 2 usw.
H) Drücken Sie die Setup -Taste, um den Wert zu verändern.
I)
Wenn Sie den gewünschten Wert eingestellt haben, drücken und halten Sie die Setup -Taste während 3
Sekunden, um die Änderung zu speichern.
J) Schalten Sie den Regler aus und wieder ein, um die neue Einstellung zu aktivieren.
Bitte beachten: Sie können jeweils nur eine Einstellung verändern. Nach jeder Veränderung muss der Regler
ein- und ausgeschaltet werden.
EINSTELLUNGSMÖGLICHKEITEN
Betriebsmodus
1) “Vorwärts/Bremse” ist für den Wettbewerbseinsatz geeignet. In diesem Modus können Sie nur vorwärts fahren und
bremsen. Die Rückwärtsfahrt ist nicht möglich.
2) “Vorwärts/Rückwärts mit Bremse” ist der Modus für den Allround-Einsatz. Ihr Fahrzeug kann damit vorwärts und
rückwärts fahren. Wenn Sie den Gashebel während der Vorwärtsfahrt auf Rückwärtsposition stellen, bremst das
Fahrzeug bis zum Stillstand. Es ist nicht möglich, den Motor rückwärts drehen zu lassen, bevor das Fahrzeug zum
Stillstand gekommen ist. Wenn Sie rückwärts fahren wollen, müssen Sie den Gashebel nach der Vollbremsung
wieder auf die Neutralposition bewegen, bevor Sie ihn zur Rückwärtsfahrt wieder auf Rückwärtsposition bringen.
Wenn Sie bremsen oder rückwärts fahren und danach in eine Vorwärtsposition übergehen, fährt das Fahrzeug
umgehend vorwärts.
3) “Vorwärts/Rückwärts” ist für Rock Crawler geeignet. Dieser Modus hat keine Bremse. Das Fahrzeug kann zudem
direkt von Vorwärts- zu Rückwärtsfahrt wechseln. Verwenden Sie diesen Modus nicht mit anderen Autos, da der
Fahrtenregler sonst beschädigt werden kann.
Automatik-Bremse
Bremst das Fahrzeug automatisch ab, wenn der Gashebel in die Neutralposition geführt wird. Dies simuliert die
Motorbremse eines echten Fahrzeugs. Dies kann zu besserem Einlenkverhalten und besseren Fahrgefühl führen.
Akku-Abschaltspannung
Diese Funktion dient dazu, eine Tiefentladung des Akkus zu verhindern. Der Regler prüft die Akku-Spannung
fortlaufend. Wenn sie für 2 Sekunden oder mehr unter das eingestellte Limit fällt, wird die Ausgangsleistung gestoppt
und die rote LED leuchtet wiederholt 2 mal. Das eingestellte Limit ist abhängig von der individuellen Zellspannung von
LiPo-Akkus. NiMH Akkus, die mehr Spannung als 9.0V aufweisen, werden wie 3-zellige LiPo-Akkus behandelt. Liegt
die Spannung von NiMH Akkus unter 9.0 Volt, wird er wie ein 2-Zellen LiPo-Akku behandelt. Beispiel: Ein 8.0V NiMH,
der mit einer Abschaltspannung von 2.6V pro Zelle gefahren wird, wird vom Regler als 2 Zellen Akku behandelt und
stellt bei 5.2V ab (2.6x2=5.2). Mit der Digitalen Programmierbox ORI65150 können Sie beliebige Werte als
Abschaltspannung eingeben. Im Gegensatz zu den Standardwerten, die im Regler gespeichert sind, betreffen die
Werte in der Programmierbox die Spannung des Akkus und nicht der einzelnen Zellen.
Vortex R-Series Speed Controls
21
DEUTSCH
Startmodus “Punch”
Diese Einstellung ermöglicht es, die Beschleunigungscharakteristik des Fahrzeugs zu verändern. Level 1 ergibt eine
sehr feine Beschleunigung und Level 9 beschleunigt sehr stark aus dem Stand. Bei den Levels 7, 8 und 9 müssen Sie
Hochleistungsakkus verwenden, um eine Überlastung des Akkus, schlechte Leistung oder unvorhergesehene
Komplikationen zu vermeiden,
Maximale Bremskraft
Diese Einstellung betrifft die maximale Bremskraft des Reglers. Ein höherer Wert führt zu stärkerer Bremskraft. Zu
starke Bremskraft kann zum Blockieren der Räder und Kontrollverlust über das Fahrzeug führen.
Maximale Rückwärts-Leistung
Diese Einstellung stellt die maximale Leistung für die Rückwärtsfahrt ein.
Minimalbremskraft
Mit dieser Einstellung können Sie die minimale Bremskraft beim Betätigen der Bremse verändern. Der Minimalwert
dieser Einstellung ist mit dem Wert der Automatik-Bremse identisch. Ein hoher Wert kann dazu führen, dass die
Räder sofort blockieren, sobald die Bremse betätigt wird.
Neutral-Bereich
Diese Einstellung betrifft die Empfindlichkeit des Regelverhaltens um den Neutralpunkt. Ein höherer Wert bedeutet,
dass der Gashebel mehr bewegt werden muss, um das Fahrzeug vorwärts oder rückwärts zu bewegen oder
abzubremsen.
Timing
Diese Einstellung verändert das Timing des Motors. Mehr Timing ergibt mehr Leistung, doch kann die Effizienz
verringern und den Motor und/oder Regler beschädigen (Überlastung oder Überhitzen). Mit Vorsicht zu gebrauchen.
Überhitzugsschutz
Diese Einstellung aktiviert oder deaktiviert den Überhitzungsschutz. Die Ausgangsleistung wird gestoppt, sobald
Regler- oder Motoren-Temperatur (nur Sensor-Motoren) ein Limit während 5 Sekunden überschreitet. Wenn der
Schutz eingeschaltet ist, blinkt die grüne LED.
Regler überhitzt: grüne LED blinkt x-x-x
Motor überhitzt: grüne LED blinkt xx-xx-xx
Bitte beachten Sie, dass der Überhitzungsschutz nicht mit allen Motorenherstellern funktioniert.
Motor Drehrichtung
Diese Einstellung erlaubt es, die Drehrichtung des Motors zu ändern.
LiPo Zellen
Stellen Sie mit diesem Wert die Anzahl Zellen Ihres LiPo-Akkus ein. Mit dieser Einstellung überschreiben Sie den
Wert der Automatik-Erkennung.
Auf Werkseinstellungen zurücksetzen
Drücken und halten Sie die “SET”-Taste während 5 Sekunden (Gashebel in Neutralposition): die rote und grüne LED
werden gleichzeitig blinken, sobald alle Werte auf die Werkseinstellung zurückgesetzt worden sind.
SOFTWARE UPDATE
Aktualisierte Software und empfohlene Einstellungen können auf der Website www.teamorion.com heruntergeladen
werden. Um die Software des Reglers aktualisieren zu können, müssen Sie im Besitz einer Programmierbox
(ORI65150) sein.
WARNUNGEN
-
22
Lassen Sie Kinder beim Gebrauch dieses Produkts nie unbeaufsichtigt.
Lassen Sie den Regler nie unbeaufsichtigt, während er eingeschaltet ist.
Der Regler kann während des Gebrauchs warm werden. Seien Sie vorsichtig!
Stecken Sie den Akku nach dem Gebrauch IMMER aus!
Verwenden Sie den Regler nicht im Bereich von brennbaren Materialien.
Wenn der Regler auffällige Reaktionen zeigt, ziehen Sie den Akku sofort aus und suchen im Fachhandel Hilfe.
www.teamorion.com
DEUTSCH
TROUBLESHOOTING
Symptom
Regler eingeschaltet, jedoch keine
Funktion des Motors und keine
Signaltöne
Regler eingeschaltet, keine
Motorfunktion, zwei Signaltöne mit
Pause von einer Sekunde
Regler eingeschaltet, keine
Motorfunktion, rote LED leuchtet
Motor dreht in die falsche Richtung
Possible cause
Problem mit Akku-Anschluss
Ein-/Aus-Schalter defekt
Eingangsspanung zu hoch oder
zu tief
Prüfen Sie die Akku-Spannung
Problem mit dem Empfangssignal Prüfen Sie Fernsteuerung und Empfänger,
sowie den Anschluss des Reglers an den
Empfänger
Motor falsch angeschlossen
Tauschen Sie den Anschluss von zwei der drei
Motoranschlusskabeln (nur für SensoressMotoren)
Motor stoppt plötzlich
System nicht mit Ihrem Fahrzeug
kompatibel
Schutzsystem "AkkuAbschaltspannung" oder
Überhitzungsschutz aktiv
Motor unterbricht Funktion oder stottert
bei der Beschleunigung
Akku-Leistung zu gering
Falsche Untersetzung
Bei Neutralstellung des Gashebels
blinken die rote und grüne LED
gleichzeitig
Problem mit dem Sensorsignal
Der Motor stottert und dreht nicht
Possible solution
Prüfen Sie den Akku-Anschluss und den Ein/Aus-Schalter
Problem mit dem MotorAnschluss
Regler defekt
Verwenden Sie ein anderes System für Ihr
Fahrzeug
Wenn die rote LED blinkt, ersetzen oder laden
Sie den Akku
Wenn die grüne LED blinkt, lassen Sie das
System abkühlen und prüfen die Einstellungen
an Fahrzeug und Regler/Motor, um ein
weiteres Überhitzen zu verhindern
Verwenden Sie einen Hochleistungsakku
Verwenden Sie eine kürzere Untersetzung,
wechseln zu einem langsameren Motor oder
ändern Sie das Regler-Setup
Prüfen Sie das Sensor-Anschlusskabel
zwischen Motor und Regler
Sensoren im Motor sind beschädigt.
Reparieren oder ersetzen Sie den Motor.
Prüfen Sie den Motor-Anschluss
Kontaktieren Sie den Support
GARANTIE
Team Orion garantiert, dass dieses Produkt frei ist von Herstellungs- und Bearbeitungsfehlern. Die Garantie deckt
nicht inkorrekte Installation, Gebrauchsabnützung oder jegliche andere Probleme, die durch inkorrekte Anwendung
des Produkts entstanden sind. Jegliche Haftung für Schäden, die durch den Gebrauch dieses Produkts entstehen,
wird abgelehnt. Mit dem Gebrauch dieses Produkts übernimmt der Anwender jegliche Haftung. Nicht korrekte
Anwendung ist:
•
•
•
•
•
•
•
•
Nicht befolgen der Anleitung.
Nicht korrekter Gebrauch des Produkts (Missbrauch, Überlastung etc)
Falsche Einstellungen für korrekte Funktion (falscher Anschluss, falsche Übersetzung, Installation etc.)
Überlastung, Überhitzung (schmelzen, ablöten etc)
Anwendung bei nicht adäquaten Bedingungen (Beschädigung oder Rost durch Schmutz, Feuchtigkeit etc.)
Falsche Pflege (Anwesenheit von Schmutz etc.)
Demontage/Modifikation des Produkts durch den Anwender (Ändern der Originalstecker, Kabel,
Komponenten etc.)
Mechanische Beschädigung von aussen
Vortex R-Series Speed Controls
23
JAPANESE
ƋươŹƩŹƮ ƛƨƃƫƅƅƙưƐſƮƏƬưƨưűŁąľňīńĽŭŃřĿŊŌľŤŏĸïFŞ
ŝƛƨƃƫƅƃƅƍơű¼ōŗŁŭŤŏĸ¾wŘ"3ōœƋươŹƩŹƮĠÁƋươŞʼnŝƛƨƃƫƅ
ƅƙưƐſƮƏƬưƨưŝĠÁŜRŅŝġűĆũōŤōœĸʼnŝ"ůœråűŊİŋľĸƛƨƃƫƅƅ
ƙưƐſƮƏƬưƨư űŊ ¼ ŝ . Ŝʼnŝ ; z ý űūŅŁþ ť ŋľĸ
¶o
•
•
•
•
•
•
•
ŹƮƬưƐ:ŠŹƚƬưƐźưŜaq
ıÕiŝƅƙưƐ:ŠƖƭưſƮƏƬưƪ-n
<řƁưƞŜ[\ōœƖƭưűÜŏŮı'/ BEC ƃƅƍơű%ë
ø\ƞƉƮũŹƜƃƧƮŝƎƄƉƪƜƬŽƨơƞƌżƅŜūŮÔ6ø\
.ĕŜ0ŀƕƌżŜŨaq
ðŝƇƌƍŴƮŽĬÄƳ+×ŝòîű8²ƴ
RŅŝĂƃƅƍơƹĩJźƌƏŹƚķŹưƕưƗưƏķ<łŬŝ>ęķƣưƉư ƅƙư ƐſƮƏƬư ƨưřƣư Ɖư ŝ ~ Þ ij Ƴ+ × ŝ ½ ! 8 ² ƴ
ƇƮƁ ư ƫƅ ij ƛƨƃƫƅƣư Ɖư
ƇƮƁưƫƅƣưƉưű¼ŏŮM@ŞķA-B-C ĜàŝĭhŞĝñŘŞĽŭŤőŲĸƣưƉưŝHČBŃĐHČŏŮM@
ŞķľŖůł 2 ŝĜàű#ůŀŗŋľĸ
ƇƮƁ ư ńƛƨƃƫƅƣư Ɖư
ƇƮƁưńƣưƉưű¼ŏŮM@ķƣưƉưřƅƙưƐſƮƏƬưƨưűƇƮƁưžưƛƪŘ~ÞōŗŅŔŋľĸ
ā D Ʊ ƇƮƁ ư ńƣưƉưű ¼ ŏŮM @ Ş ķƣưƉưű ƅƙư ƐſƮƏƬư ƨưŜ ~ Þ ŏ ŮĦ Ŝ ķĜ à ŝ A-B-C
űĭ h đ ŭŜ~ Þ ōśŇů ş śŭŤő ŲĸĜ à ű Ę ) Ŝ~ Þ ōŗŞ ľŇŤő Ųĸ
ƅƙư ƐſƮƏƬư ƨưŝ ÿ
Ƴ+ × ŝ ½ ! 8 ² ƴ
¡gś2űŋőŮ°ŜƅƙưƐſƮƏƬưƨưű¼ŏŮď¼Ŝÿ
ōśŇůşśŭŤőŲĸÿ
.ŜƏƩơűƇƮƉư
Ŝÿ
ōďŝƇƌƍŴƮŽűƩƇƌƏŏŮ
űŁ4ŧōŤŏĸ
÷ ŝ y ĭ ŜōœŃ ŕŗ ESC ŝ ÿ
űōŗ ŋľĸ
A) ƅƙưƐſƮƏƬưƨưŝƅŵƌƋű)ŕŗďŝƅŵƌƋű#ůķďŝƅƬƌƏƪƏƩơűƒƥưƏƨƪŜō
ƅƬƌƏƪŝű 100ƲŜÿ
ĸABS Ñŝ¶+śåޱ1ŜŏŮĸ
B) ĵSETĵŻưű|ōśŃŬƅƙưƐſƮƏƬưƨưŝƅŵƌƋű#ůķĈľ LED Ń¯ōXŧœŬŏņŜĴSETĵŻưűħŏĸ
C) ďŝƒƥưƏƨƪķƔŵƟŵƮƏķƚƪƛƫưŻƵƕƌżƟŵƮƏűø\ƞƉƮŘÿ
ōŤŏĸ
1. ƒƥưƏƨƪƟŵƮƏƳ1 H¯ƴ
2. ƔŵƟŵƮƏij Ƴ2 H¯ƴ
3. ƚƪƛƫưŻƵƕƌżij Ƴ3 H¯ƴ
D) ÿ
ÚlķÖ 3 ÏŘĉí=åŜśŭŤŏĸ
LED å ŝ · u
• ƒƥưƏƨƪŝM@Ŝ LED ަ®·uĸ
• .ĕķƕƌż9ŞƛƫưŻŝM@Ş LED ŃĈŅ¯®ŏŮĸ
āDĪ
1. # / ĩ J ŝ Əƨƛƪ ƹ ƅƙưƐſƮƏƬưƨưŝƅŵƌƋŃ#ŕœĦŜ#/ĩJűÉüōŤŏĸGĮŃ'ŋůœM@
ŞƅƙưƐſƮƏƬưƨưłŬ 2 HĔÞōœƘưƜĪŃ 2 ÏġĥŘIJŭŤŏĸ(XX-XX-XX)
2. < ł Ŭŝ > ŝ G Į ƹ ƅƙưƐſƮƏƬưƨưŝƅŵƌƋŃ#ŕœĦŜ#/>űÉüōŤŏĸGĮŃ'ŋů
œM@ŞƅƙưƐſƮƏƬưƨưłŬƘưƜĪŃ 2 ÏġĥŘIJŭŤŏĸ(X-X-X)
24
www.teamorion.com
JAPANESE
ƅƙư ƐſƮƏƬư ƨưŝ ı i śø \
ƅƙưƐſƮƏƬưƨưũƅŵƌƋŜĽŮø\ƞƉƮ9ŞŹƜƃƧƮŝƎƄƉƪƜƬŽƨơƞƌżƅƳNo.ORI65150)űŕŗ
¼źƍƀƩưũƁưŻƌƏŜaqŋőœƇƌƍŴƮŽPŃ=åŘŏĸŊć#ŋůœƅƙưƐſƮƏƬưƨưŝÐŜūŕŗŞ
ƇƌƍŴƮŽ=åśĬÄŃėľŤŏĸƳûÙŞ+×űÉüƴ *R10 Proには専用の接続ケーブルが付属。
ø\ƞƉƮű¼ōŗ?ĬÄŝƇƌƍŴƮŽűíĿM@Ş÷ŝĭhŜmŕŗŋľĸƳ+×ŝ½!ű8²ƴ
A) ƅƙưƐſƮƏƬưƨưŝƅŵƌƋű#ůŮĸ
B) ßŝ LED Ń¯ŏŮŤŘø\ƞƉƮűƶÏġ|ōķ¯ōœŬø\ƞƉƮűħōŤŏĸƳø\ƞƉƮű 5 Ïġ|ōÞŇ
ŮřƅƙưƐſƮƏƬưƨưŝø\ŃdM'ê·uŜxŭŤŏĸƴ
C) ø\ƞƉƮűŨĿi|ŏĸ
D) ßŝ LED Ń¯űáŭĎŏřƇƌƍŴƮŽĬÄ 1 űĚ{ōœ
űîōŗľŤŏĸ
E) ŨĿiø\ƞƉƮű|ŏřƇƌƍŴƮŽĬÄ 2 ŜĕťŤŏĸø\ƞƉƮű|ŏřĭ¿ŜŝƇƌƍŴƮŽĬÄŜĕť
ŤŏĸlŝƇƌƍŴƮŽĬÄŤŘĕŦřƇƌƍŴƮŽĬÄƶŜxŭŤŏĸ
F) ƇƌƍŴƮŽĬÄŝ%`űPŏŮŜŞPōœľƇƌƍŴƮŽĬÄŝ¿>ŝŤŘßŝ LED Ń¯ŏŮūĿŜø
\ƞƉƮű|ōŗĕŧŤŏĸPōœľƇƌƍŴƮŽĬÄűĚ{ōœŬø\ƞƉƮűƷÏġ|ōÞŇŤŏĸ
G) Ĉľ LED Ń¹Kŝø\%`ƳProgrammable ValueƴűÊōŤŏĸ¯ 1 HŞ No.1 ŝø\ķ¯ 2 HŞ No.2 ŝø
\ŃĚ{ŋůŗľŮsEűîōŗľŤŏĸ
H) ø\ƞƉƮű|ōŗfŏŮø\űĚ{űŏŮĸlŤŘĕŦř*ŜxŭŤŏĸ
I)
Ě{ŃÚōœŬø\ƞƉƮű 3 Ïġ|ōŗPōœø\űZűōŤŏĸ
J)
ƅƙưƐſƮƏƬưƨưŝƅŵƌƋű)ŕŗķ&i ON ŜŏŮřƇƌƍŴƮŽŝPŃ1ŜśŭŤŏĸ
Ŋ¥sƹPŞiŜĬÄŤŘōł'ŤőŲĸ?ĬÄŝPlŞƅƙưƐſƮƏƬưƨưŝƅŵƌƋű
) ŭP ű÷ v ŋő ķ ŝ ƇƌƍŴƮŽ Ĭ Ä ŝ P űí Ŀœŧ Ŝ * ł Ŭ ø \ űX ŧ Ťŏ ĸ
Ƈ ƌƍŴƮŽ Ĭ Ä ŝ ý ij ĶƅƙưƐſƮƏƬưƨưŝÐįŜūŕŗŞø\'śľĬÄŨCŤůŗŁŭŤŏĸ
ƯRunning Mode
1)ĺForward with BrakeĻʼnŝƣưƐŞƫưƅŜĘōŗľŤŏĸ.ĕřƛƫưŻŝťŘƕƌżŞĽŭŤőŲĸ
2)ĺForwardƵReverse with BrakeĻʼnůŞ«ƣưƐŘŏĸʼnŝƣưƐŘŞ.ĕřƕƌżŒōŗƛƫưŻŨŀŤŏĸċŃ.ĕ
ōŗľŮŜƅƬƌƏƪűƕƌżŜ2łŏřƛƫưŻŃłłŭŤŏĸƕƌżűíĿŜŞƛƫưŻű}Ňŗċű ŋőķƛƫ
ưŻűħō&ŠƅƬƌƏƪűƕƌżŝâŜ2łōŤŏĸƛƫưŻ9ŞƕƌżűōŗľŮŜƅƬƌƏƪű.ĕŝâŜ2łŏ
řċŞŏņŜ.ĕōŤŏĸ
3)ĺForwardƵReverseĻŝƣưƐŞ ƬƌżżƬưƨưŜ¼ōŤŏĸʼnŝƣưƐŘŞƛƫưŻŞĽŭŤőŲĸċŃ ŤŬŐŜŏ
ņŜ.ĕłŬƕƌżŜ2ńŤŏĸʼnŝƣưƐŞƅƙưƐſƮƏƬưƨưŃōœŭĖăêŃ}łŮŝŘżƬưƨQŜ޼
ōśľŘŋľĸ
ƯDrag Brake Force
ƅƬƌƏƪűƒƥưƏƨƪâŜxōœŜ}łŮƛƫưŻŝjŋűø\ōŤŏĸʼnůŞ]ċŝŸƮƄƮƛƫưŻŝūĿś1
ŘķċŝſƮƏƬưƪƚŴưƪŃèŅśŭŤŏĸ
ƯLow Voltage Cut-off
ʼnŝåŞƕƌƍƩưŝĖĩűĢņ ńűōŤŏĸƅƙưƐſƮƏƬưƨưŃgŜƕƌƍƩưĩJű'ōŤŏĸƕƌƍƩư
ĩJŃ 2 Ïġķø\ūŭŅśŮř'/űęōĈľ LED ŃHĔÞōœ¯űáŭĎōŤŏĸ
źƌƏŹƚŝĩJŞ LiPo ŝĹŝƇƪĩJŜūŕŗöÒŋůŤŏĸ
ƒƌžƪ£ØƕƌƍƩưŝM@ķĩJŃ 9.0V ūŭľř 2 Ƈƪ LiPo ƕƌƍƩưƖƌżřťśŋůĩJŃ 9.0V ūŭıľř 3 Ƈ
ƪ LiPo ƕƌƍƩưƖƌżřťśŋůŤŏĸ
ŀşķ8.0V ŝƒƌžƪ£ØƕƌƍƩưŞ?ƇƪkŭŝźƌƏŹƚĩJű 2.6V Ŝø\ŏŮřŏŮřķ2 Ƈƪ LiPo Ŝťśŋů
ĩJŝźƌƏŹƚĩJŞ 5.2VƳ2.6Vx2=5.2VƴŜśŭŤŏĸ
ŹƜƃƧƮŝƎƄƉƪƜƬŽƨơƞƌżƅ(No.ORI65150)ű¼ŏŮřźƌƏŹƚĩJűsŜÿ
'ŤŏĸʼnŝM@ŞƜƩ
ƇƌƏřėľø\ōœźƌƏŹƚĩJŞĹŝƇƪĩJŘŞ±ŅƕƌƍƩư$ŝĩJřťśŋůŤŏĸ
Vortex R-Series Speed Controls
25
JAPANESE
ƯStart
ƯStart modeij
modeij ”punch”
”punch”
ʼnŝĬÄŞċŃ0ĒŏŮĦŝ*ŝƅƬƌƏƪŝƖƮƋ/űø\ōŤŏĸ”Level
ʼnŝĬÄŞċŃ0ĒŏŮĦŝ*ŝƅƬƌƏƪŝƖƮƋ/űø\ōŤŏĸ”Level 1”Ş0ĒŃřŗŨƅơưƆŘķ”Level
1”Ş0ĒŃřŗŨƅơưƆŘķ”Level 9”Ř
9”Ř
Ş0ĒŃřŗŨèŅśŭŤŏĸ”Level
Ş0ĒŃřŗŨèŅśŭŤŏĸ”Level 7ƺ9”űĚšM@ŜŞĩ/ŃıľƕƌƍƩưű¼ōśŇůşśŭŤőŲĸĩ/Ń
7ƺ9”űĚšM@ŜŞĩ/ŃıľƕƌƍƩưű¼ōśŇůşśŭŤőŲĸĩ/Ń
ľƕƌƍƩưŘŞăêŃłłŭråŃÁ'śłŕœŭķ¨ŝÛŜśŮM@ŃĽŭŤŏĸ
ľƕƌƍƩưŘŞăêŃłłŭråŃÁ'śłŕœŭķ¨ŝÛŜśŮM@ŃĽŭŤŏĸ
ƯMax
ƯMax Brake
Brake Force
Force
ʼnŝĬÄŞSƛƫưŻ/űÿ
ōŤŏĸŃıľţŚƛƫưŻ/ŞjŅśŭŤŏĸōłōƝŵưƪŃƬƌżŋůċŝ
ʼnŝĬÄŞSƛƫưŻ/űÿ
ōŤŏĸŃıľţŚƛƫưŻ/ŞjŅśŭŤŏĸōłōƝŵưƪŃƬƌżŋůċŝ
ſƮƏƬưƪűTĿ
ŃĽŭŤŏĸ
ſƮƏƬưƪűTĿ
ŃĽŭŤŏĸ
ƯMax
ƯMax Reverse
Reverse Force
Force
ʼnŝĬÄŞƕƌżŝS'/űÿ
ōŤŏĸ
ʼnŝĬÄŞƕƌżŝS'/űÿ
ōŤŏĸ
ƯInitial
brakeƴ
ƯInitial Brake
Brake ForceƳminimum
ForceƳminimum brakeƴ
ʼnŝƖƨƢưƉŞƛƫưŻŃ}łŮŝbƛƫưŻ/űÿ
ōŤŏĸ
ʼnŝƖƨƢưƉŞƛƫưŻŃ}łŮŝbƛƫưŻ/űÿ
ōŤŏĸ
'êŝø\Ş”Drag
'êŝø\Ş”Drag Brake
Brake Force”ŝřAŎŘŏĸø\ŃıľřƛƫưŻŃ}łŮĦŜƝŵưƪŃŏņŜƬƌżōŗōŤ
Force”ŝřAŎŘŏĸø\ŃıľřƛƫưŻŃ}łŮĦŜƝŵưƪŃŏņŜƬƌżōŗōŤ
ĿM@ŃĽŭŤŏĸ
ĿM@ŃĽŭŤŏĸ
ƯNeutral
ƯNeutral Range
Range
ʼnŝĬÄŞƒƥưƏƨƪâčŝƅƬƌƏƪtiűÿ
ōŤŏĸ
ʼnŝĬÄŞƒƥưƏƨƪâčŝƅƬƌƏƪtiűÿ
ōŤŏĸ
ƯTiming
ƯTiming
ʼnŝĬÄŞƣưƉưŝĕóűÿ
ōŤŏĸĕóűOũŏřƖƭưŞŃŭŤŏŃķĖăêũŹưƕưƗưƏŜūŭƣưƉưũ
ʼnŝĬÄŞƣưƉưŝĕóűÿ
ōŤŏĸĕóűOũŏřƖƭưŞŃŭŤŏŃķĖăêũŹưƕưƗưƏŜūŭƣưƉưũ
ƅƙưƐſƮƏƬưƨưŜűŀœŭ1¸ŃŃŮM@ŨĽŭŤŏĸ¼ŏŮŜŞ5(ś¥sŃpñŘŏĸ
ƅƙưƐſƮƏƬưƨưŜűŀœŭ1¸ŃŃŮM@ŨĽŭŤŏĸ¼ŏŮŜŞ5(ś¥sŃpñŘŏĸ
ƯOverheating
ƯOverheating Protection
Protection
ʼnŝĬÄŞŹưƕưƗưƏĂåűŹƮ9ŞŹƚŜōŤŏĸ
ʼnŝĬÄŞŹưƕưƗưƏĂåűŹƮ9ŞŹƚŜōŤŏĸ
ƅƙưƐſƮƏƬưƨưŝ§iłƇƮƁưńƛƨƃƫƅƣưƉưŝ%ě§iŃƸÏġķdM'êŝø\űĊŀœŜ
ƅƙưƐſƮƏƬưƨưŝ§iłƇƮƁưńƛƨƃƫƅƣưƉưŝ%ě§iŃƸÏġķdM'êŝø\űĊŀœŜ
'/űźƌƏōŤŏĸŹưƕưƗưƏĂåŃ
'/űźƌƏōŤŏĸŹưƕưƗưƏĂåŃ ľœM@ķßŝ
ľœM@ķßŝ LED
LED Ń¯ōŤŏĸ
Ń¯ōŤŏĸ
ƅƙư
ƐſƮƏƬưƨưŝ
ƨưŝŹưƕ
Źư ƕưƗưƏƹßŝ
ư Ɨư Əƹßŝ LED
LED Ń¯
Ń¯ x-x-xƳ1
x-x-xƳ1 Hƚƨƌƃƥƴ
Hƚƨƌƃƥƴ
ƅ ƙưƐſƮƏƬư
Ɖưŝ
ŝŹư
Źưƕ
ƕư
ưƗư
ƗưƏƹßŝ
Əƹßŝ LED
LED Ń¯
Ń¯ xx-xx-xxƳ2
xx-xx-xxƳ2 Hƚƨƌƃƥƴ
Hƚƨƌƃƥƴ
ƣư
ƣưƉư
Ƴ¥ƴŹưƕưƗưƏĂåŞËƛƨƮƐŝƛƨƃƫƅƣưƉưŘŞ2ōśľM@ŃĽŭŤŏŝŘŊ¥sŋľĸ
Ƴ¥ƴŹưƕưƗưƏĂåŞËƛƨƮƐŝƛƨƃƫƅƣưƉưŘŞ2ōśľM@ŃĽŭŤŏŝŘŊ¥sŋľĸ
ƯMotor
ƯMotor Roation
Roation
ʼnŝĬÄŞƣưƉưŝHČBűPŀŤŏĸ
ʼnŝĬÄŞƣưƉưŝHČBűPŀŤŏĸ
ƯLiPo cells
cells
ƯLiPo
ʼnŝĬÄŞ¼ōŗľŮ
ʼnŝĬÄŞ¼ōŗľŮ LiPo
LiPo ƕƌƍƩưŝŜ#ŕŗľŮƇƪŝæ2'ű;ŭ¦ōŗƇƪűĚ{ŘńŤŏĸ
ƕƌƍƩưŝŜ#ŕŗľŮƇƪŝæ2'ű;ŭ¦ōŗƇƪűĚ{ŘńŤŏĸ
d
dM
M'
'ê
ê
ŝ
ŝø
ø\
\Ŝx
Ŝxŏ
ŏ
ƅƬƌƏƪűƒƥưƏƨƪŝâŜō“SET”ŻưűƸÏġ|ŏřķƅƙưƐſƮƏƬưƨưŃdM'êŝø\ŜƩƇƌ
ƅƬƌƏƪűƒƥưƏƨƪŝâŜō“SET”ŻưűƸÏġ|ŏřķƅƙưƐſƮƏƬưƨưŃdM'êŝø\ŜƩƇƌ
ƏŋůķAŜĈřßŝ
ƏŋůķAŜĈřßŝ LED
LED Ń¯ōŤŏĸ
Ń¯ōŤŏĸ
ŷųưŝ
ŝ
ƈƚƏŶ
ƈƚƏŶŷųư
Ŋ,¼=åśƈƚƏŶŷųưŝũVø\ŃĽŮM@ŞŶŷƛƁŵƏŜŗŊòŜśůŤŏĸ
Ŋ,¼=åśƈƚƏŶŷųưŝũVø\ŃĽŮM@ŞŶŷƛƁŵƏŜŗŊòŜśůŤŏĸ
ƅƙưƐſƮƏƬưƨưŝƈƚƏŶŷųŝ°ŜŞŹƜƃƧƮŝƎƄƉƪƜƬŽƨƠƮŽƞƌżƅƳNo.ORI65150)Ńp
ƅƙưƐſƮƏƬưƨưŝƈƚƏŶŷųŝ°ŜŞŹƜƃƧƮŝƎƄƉƪƜƬŽƨƠƮŽƞƌżƅƳNo.ORI65150)Ńp
ñŘŏĸ
ñŘŏĸ www.teamorion.com.
www.teamorion.com.
āD
āD
------
26
ŁYŃïFű¼ŏŮM@ŞpŐĂãŝÃÈŜŗ¼ōŗŋľĸ
ŁYŃïFű¼ŏŮM@ŞpŐĂãŝÃÈŜŗ¼ōŗŋľĸ
ƅƙưƐſƮƏƬưƨưŜĩªŃ#ŕœ·uŘŞÝaŜâōśľŘŋľĸ
ƅƙưƐſƮƏƬưƨưŜĩªŃ#ŕœ·uŘŞÝaŜâōśľŘŋľĸ
ƅƙưƐſƮƏƬưƨư޼Ŝ³ŅśŮ
ŃĽŭŤŏĸŁ;ŭzľŞ5(Ŝ¢űŇŋľĸ
ƅƙưƐſƮƏƬưƨư޼Ŝ³ŅśŮ
ŃĽŭŤŏĸŁ;ŭzľŞ5(Ŝ¢űŇŋľĸ
Ŋ¼lŞpŐƕƌƍƩưű;ŭQōŗŋľĸƕƌƍƩưű;ŭŇœŤŤÓōśľŘŋľĸ
Ŋ¼lŞpŐƕƌƍƩưű;ŭQōŗŋľĸƕƌƍƩưű;ŭŇœŤŤÓōśľŘŋľĸ
´ŀũŏľµŝčŅŘŞ¼ōśľŘŋľĸ
´ŀũŏľµŝčŅŘŞ¼ōśľŘŋľĸ
www.teamorion.com
JAPANESE
-
£(ũ©¢ŜõůśľūĿŊ¥sŋľĸ
ŨōƅƙưƐſƮƏƬưƨưŃÀgś2űōœM@ķŏņŜƕƌƍƩưűQōŗ¼ű ōŗŋľĸ
Əƨƛƪ ƃƥư ƍŴƮŽ
@<
H3+4
X5~qz¢¢edta^Ye ¢w'Du[e`}^ ¢£X5¤v'Ds
l}_
ta_
X5~qz¢¢edta_1A Xe\lg}dlg}_
TVr2v¢Ye]}_
¢vX
l}_
X5~qz¢¢edmKaLE v?"_
De87l}_
N0s0
kq¢¡ ¢
¢s0v'D
l}_
¢¢eO+uMl}_
¢¢vM+c}9^SFv¦/vb
ov¥/~.c}_£¡¢:kvy¤
Le!%l}uc}_
¢¢vSFeTRpqa}_
eLu!%kqata_
¢¢eB;dtht}_
XJ¢d¢¢¢ KaLEDe86v^¢v(dX
J¢e
aqa}_
l}_EvLEDe86v^¢¡ ¢¢s¢¢{k¢¢¢UiI
u-l}_
Pu¢¢e1xpn|^fe& ¢v)Xea
ht}_
w2eTRpqa}_
)Xe\a¢>l}_
e¢v,uKsEvL ¡¢vu[e`}_
EDe,u86l}_
¢¢s¢¡ ¢¢v¡¢¢
v'D
l}_
2j}^kvv¢¢bw
¢¡ ¢¢vI -l}_
¢¢v¡¢e*Wkqa}_(w
=e$G_
¢¢vfe&hMkta_
¢¢vSFeTRpqa}_
¢¡ ¢¢v*W_
¢¢vSFsZ#
l}_
¢uQCl}_
ù
ƋươŹƩŹƮŞïFŜïēŝĤŃśľ
űùōŤŏĸʼnŝùŞĘ)ś;ŭŇķ¼ŜĿäķ9ŞĘ
)ś¼¤ũ;ŭzľŘÁ»ōœGĮŜľŗŞĘ¼ŋůŤőŲĸʼnŝïFŝ¼ŜūŭÁ»ŏŮĽŬŪŮTŜaŏŮ
ĄŞăľŤőŲĸʼnŝïFŝ~Þ9޼ĠXŜūŭƦưƂưŃŏŢŗŝĄűăĿ
ű<Ň#ůœŨŝřōŤŏĸ÷
ŝM@ŞĘ)ś¼řťśŋůŤŏĸ
• ;zýŜmŰśľM@
• Ę)ś¼ƳyéŜzĿķQŝ¼¤Ñƴ
• Ę)ś2űWňŮø\ƳĘ)ś~Þ¤ķ;ŭŇķø\śŚƴ
• ĖăêķŹưƕưƗưƏƳƔƮƊķěFŝ¬ìśŚƴ
• Ę)śºNŘŝ¼ƳĨķ©¢śŚŜūŮĽŮľŞğśŚƴ
• ƢƮƍƑƮƅŝèƳLśŚƴ
• Ł^ŜūŮ(ôķēƳſƓżƉưķĜàķěFŝēśŚƴ
• QÂñIŜūŮÂś
ƋươŹƩŹƮƄƤƖƮij www.team-orion.co.jp
ļ243-0034 ÍUcÇ7eçY 153
ƯƦưƂưÆĀ_Åđĩú 046-229-4115
ŁGľ@ŰőŞƹƺĞƳÌÎűģŅƴ 13ƹ00ƺ19ƹ00
ĶïFèŝœŧķDśŅűPŏŮM@ŃĽŭŤŏĸ
Vortex R-Series Speed Controls
27
COPYRIGHT 2011 © TEAM ORION