1
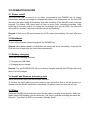
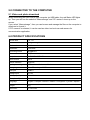
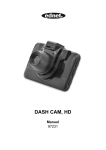
DASH CAM, HD
Manual
87231
In order to make better use of all the function of the car DVR, please read the manual
carefully before using.
Caution
1. Please insert the memory card to the Car DVR and format it. Please insert the card
according to the correct direction to avoid damaging the TF card or Car DVR.
2. It is suggested to regularly backup the recorded files from the card every week.
3. Please charge the Car DVR for the first time use.
4. Please note that this Car DVR is not waterproof.
5. Please do not use it in dusty environment to avoid damaging the Lens
6. Please do not use it in the high-intensity of magnetic field environment.
1.0 STRUCTURE
1. 12 V power
2. Bracket slot
3.USB outlet
4. Audio output
5.heat dissipation hole
6. Lens
7. TF card slot
8. Reset key
9. Power key
10. Menu Key
11. Mode key
12. Charging LED 13. Status LED
14. Up key
15. OK key
16. Down key
17. Microphone
18. IR LED
2.0 FEATURES
1. Supports 720P and VGA resolution with avi video format.
2. Built-in microphone/speaker
3. Support up to 32GB MicroSD card (TF)
4. Supports loop recording for seamless video
5. Supports motion detecting
3.0 OPERATION GUIDE
3.1 Power on/off
The Car DVR can be turned on by either long-pressing the POWER key or simply
connected it with the car charger to automatically power it on. After power on, the Car DVR
will enter the video mode automatically and start recording if the MicroSD card is already
inserted. The Status LED would start to flash in green color indicating recording. After
switching off the car’s engine (or unplug the car charger from the car DVR), the Car DVR
will record for another 5 seconds and then turn off automatically.
Remark: If there is no SD card inserted, the LCD screen would display "No card" after turn
on.
3.2 Shutdown
To turn off the camera, please long press the POWER key.
Remark: when battery power is insufficient, the screen will show “low battery”, then the Car
DVR will turn off and save the video files automatically.
3.3 Battery charging
There are two charging methods:
1)Charging by USB cable.
2 ) Charging by car charger
Remark: The red POWER LED will be on during charging and the red LED light will be off
when it is fully charged.
3.4 Install and Remove a memory card
Insert the MicroSD card into the MicroSD card slot.
To remove the card, simply push the memory card inside first then it will be ejected out.
Please note that the SD card itself is directional. So please insert it in the correct way.
3.5 Video
Press the POWER key to start and enter into the video recording mode directly. While the
green Status LED flashes, you can press the “OK” key to stop the recording and save the
video file. Then this Car DVR is now under “Standby mode”.
3.6 Photo
Under Standby mode, press the “MODE” button once to enter the Snapshot mode. Then
press the “OK” button to take pictures. You can hear the clicking sound indicating photo
taken.
3.7 Playback and Delete files.
Under Standby, short press the “MODE” button twice, it will enter into “PLAYBACK” Mode.
Press UP or DOWN to select the files you want to preview. Then press “OK” button to play
or stop.
If you want to delete the files, please press MENU to select DELETE and press “OK” key to
enter into the option of “delete all” or “delete current one”.
Press “OK” button to confirm and return. Press MENU key to go back to PLAYBACK
MODE.
Please note that for protected files, it is not allowed to delete them using this way. Please
un-lock the protection first then it can be deleted afterwards.
4.0 OPTIONS AND SYSTEM SETTINGS
Press MENU to go to the setup menu under standby mode. press the UP/DOWM button to
select item, confirm it by pressing OK button.
The specific menu options are described as below:
Mode
Image
setting
Menu
Resolution
Cycling
record
Time Stamp
Video
Motion
defection
Video Time
Voice Record
Resolution
Snapshot
Time Stamp
Delete
Playback Lock/Unlock
Volume
Language
Setting
Auto off
Setup
Light Freq
Screen
saving
USB
Description
720P/VGA
Off / 3 minute / 5 minutes / 10 minutes
Off / On
Off / On
Off / 1 minute / 3 minutes / 5 minutes
Off / On
3MP / 2MP / 1.3MP / VGA
Off / On
Delete One / Delete All
Lock One / Lock All / Unlock one / Unlock All
0/1/2/3/4/5/6
English / Français / Deutsch / Italiano / Portuguese /
Русский / Espaiol
Off / 1minute / 3 minutes / 5 minutes
50Hz/60Hz
Off / 1 minute / 3 minutes / 5 minutes
PC cam / Mass storage
5.0 CONNECTED TO THE COMPUTER
5.1 Video and photo download
When connecting the Car DVR to your computer via USB cable, the red Status LED lights
up. Then you will see the selection “Mass storage” and “PC camera” show up on the
screen.
If you select “Mass storage”, then you can browse and manage the files on the computer to
download or format it.
If “PC camera” is selected, it can be used as video tool such as web camera for
communication application.
6.0 PRODUCT SPECIFICATIONS
Screen size
2.4” TFT
Lens
70degree angle lens
Minimum Lux
1LUX
Resolution
720P/VGA
Recording format
AVI@MJPG
Frame rate
30fps
Snapshot resolution
3MP/2MP/1.3MP/VGA
Photo format
JPEG
Motion detection
Supports
Cycling recording
Off / 1 minute / 3 minutes / 5 minutes
Storage type
MicroSD card up to 32GB
USB port
USB2.0
Voltage input
DC12V
Battery capacity
260mAHr
Microphone/Speaker
Built-in
Language
English / Français / Deutsch / Italiano / Portuguese / Русский / Espaiol
Weight
55g
Dimension
77*36*52mm